Personalization Template
Introduction
The ECC Personalization Template is a seeded OA page shipped as part of the ECC Developer responsibility; that is, as a seeded FND function where customers can easily add and remove tabs within this seeded OA page. This feature allows a user to access and manage multiple dashboards from a single responsibility so that they can have a full view of all business operations. This capability is different from using menus, that is, creating a menu hierarchy to personalize existing dashboards, which needs additional development in terms of creating OA pages. The ECC Personalization Template approach is a much easier approach in personalizing and extending not just a single dashboard but across multiple dashboards. No developer is needed to develop an OA page.
With these features users can:
-
Structure cross departmental dashboards access
-
Create new command centers
-
Create single menu entry
-
Add new dashboards to existing dashboards
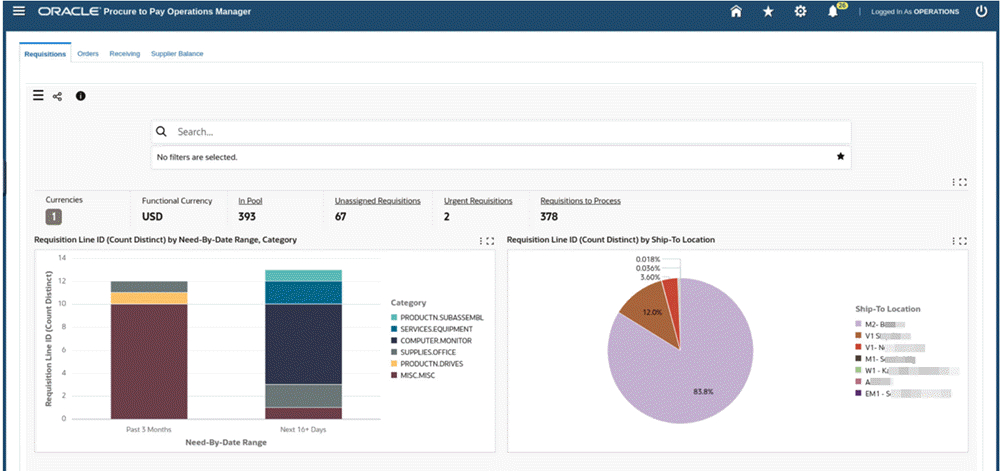
For example, an Operations Manager might want to monitor and measure the performance and efficiency of the entire procure-to-pay process so that they can identify opportunities for improvement, cost savings, compliance, and risk mitigation.
Example of the Procure to Pay Operations Manager Dashboard
Personalization Steps
The ECC Personalization Template setup consists of two major steps:
-
RBAC setup
-
OA Personalization
Personalization Steps
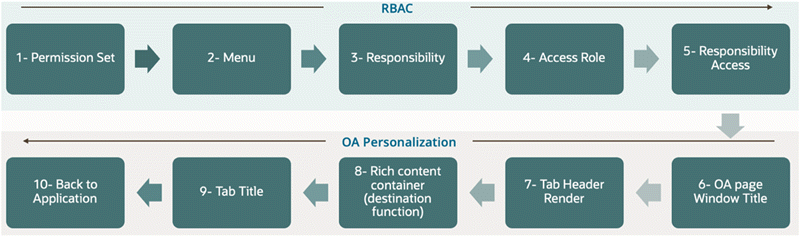
The Role Based Access Control (RBAC) steps to use the Personalization Template are:
-
Create a new permission set.
-
Create a new menu.
-
Create a new responsibility.
-
Create a new access role.
-
Create a new grant.
For more information on performing these steps, refer to the Oracle E-Business Suite Security Guide.
The Oracle Application Framework Personalization steps are:
-
Update the personalization template OAF page window title.
-
Set the "rendered" property to 'true' in Tab Header sections.
-
Add the ECC Page FND function to the respective rich container (destination function).
-
Add the tab title.
-
Return to the application.
As prerequisites, there must be EBS form functions for the required ECC dashboards which are to be displayed in the ECC Personalization Template.
| Dashboard | FND Function | Permission Set |
|---|---|---|
| Requisitions dashboard | PO_PCC_ECC_REQUISITIONS | PO_PCC_ECC_PS |
| Orders dashboard | PO_PCC_ECC_ORDERS | PO_PCC_ECC_PS |
| Receiving dashboard | INV_ECC_RCV | INV_ECC_RCV_ACCESS_PS |
| Supplier Balance dashboard | AP_ECC_SUPP_BALANCE | AP_ECC_ACCESS_PS |
To begin, log in to Oracle E-Business Suite with Functional Administrator credentials.
Create a New Permission Set
-
Navigate to the Functional Administrator responsibility, then choose Security, then Permission Sets.
-
Select Create Permission Set.
-
Provide these details in the Create Permission Set page:
-
Name: P2P Permission Set
-
Code: P2P_PS
-
In the Permission Builder section, click on the (+) icon to add the permission sets below:
-
PO PCC Permission Set
-
Receiving ECC Dashboard Access Permission Set
-
Payables Command Center Access Permission Set
-
-
-
Click the Apply button to create the permission set.
Create a New Menu
-
Navigate to the Functional Administrator responsibility, then choose Core Services, then Menus.
-
Select Create Navigation Menu.
-
Provide these details in the Create Navigation Menu page:
-
Name: P2P Menu
-
Code: P2P_MENU
-
In the Menu Builder section, click on the (+) icon to add the menu entry details below:
-
Prompt: P2P Operations
-
Function: ECC Personalization Template
-
-
-
Click the Apply button to create the menu.
Create a New Responsibility
-
Navigate to the Functional Administrator responsibility, then choose Core Services, then Responsibility.
-
Select Create Responsibility.
-
Provide these details in the Create Responsibility page:
-
Responsibility Name: Procure to Pay Operations Manager
-
Menu: P2P_MENU
-
Responsibility Key: P2P_ECC_OP_MGR
-
Application: Purchasing
-
Under the Groups section, provide the details below:
-
Data Group Name: Standard
-
Application: Purchasing
-
-
-
Click the Create button to create the responsibility.
Create a New Access Role and Grant
-
Navigate to the User Management responsibility, then choose Roles and Role Inheritance.
-
Select Create Role.
-
Provide these details in the Create Role page:
-
Application: Purchasing
-
Role Code: UMX|P2P_ECC_ACCESS_ROLE
-
Display Name: P2P Access Role
-
Description: P2P Access Role
-
-
Click the Create Grant button.
-
Click Save and Proceed in the confirmation window to create the grant.
-
The Create Grant page appears.
-
Provide the following details:
-
Name: P2P Grant
-
In the security context section, Responsibility: Procure to Pay Operations Manager
-
Click on the Next button.
-
Specify "P2P Permission Set" as the permission set.
-
Click on the Next button and then the Finish button to create the grant.
-
-
Click OK in the confirmation window. The Update Access Role page appears.
-
Click Apply.
Run Workflow Background Process
-
Navigate to the System Administration responsibility, then Schedule Requests.
-
For the Program Name, specify "Workflow Background Process".
-
Under Parameters section, provide these details:
-
Process Deferred: Yes
-
Process Timeout: No
-
-
Click the Continue button and then the Submit button.
-
Once the "Workflow Background Process" request has completed successfully, proceed to the next step to clear the application cache.
Clear the Application Cache
-
Navigate to the Functional Administrator responsibility, then Core Services, then Caching Framework, and choose Global Configuration.
-
Click the Clear All Cache button.
Assign the Access Role to a Responsibility
-
Navigate to the User Management responsibility, then Roles and Role Inheritance.
-
Search for the "Procure to Pay Operations Manager" responsibility.
-
Select the icon under "View In Hierarchy".
-
Click on the (+) icon under "Add node".
-
Search for "P2P Access Role" and click the Go button.
-
Add the access role to the responsibility.
Assign the Responsibility to a User
-
Navigate to the User Management responsibility and select Users.
-
For the User Name, specify "OPERATIONS" and click the Go button.
-
Click on the update icon in the results for the OPERATIONS user.
-
Click the Assign Roles button and add "Procure to Pay Operations Manager".
-
Provide a justification such as "New Responsibility".
-
Click Apply.
-
Run the Workflow Background Process request and clear the application cache as done earlier.
Run Workflow Background Process
-
Navigate to the System Administration responsibility, then Schedule Requests.
-
For the Program Name, specify "Workflow Background Process".
-
Under Parameters section, provide these details:
-
Process Deferred: Yes
-
Process Timeout: No
-
-
Click the Continue button and then the Submit button.
-
Once the "Workflow Background Process" request has completed successfully, proceed to the next step to clear the application cache.
Clear the Application Cache
-
Navigate to the Functional Administrator responsibility, then Core Services, then Caching Framework, and choose Global Configuration.
-
Click the Clear All Cache button.
Personalize ECC Personalization Template to add ECC Procure to Pay Dashboards
You must log in to Oracle E-Business Suite to access the ECC Personalization Template under the "Procure to Pay Operations Manager" responsibility.
-
Navigate to Procure to Pay Operations Manager, then P2P Operations.
-
Click the Oracle E-Business Suite Settings icon.
-
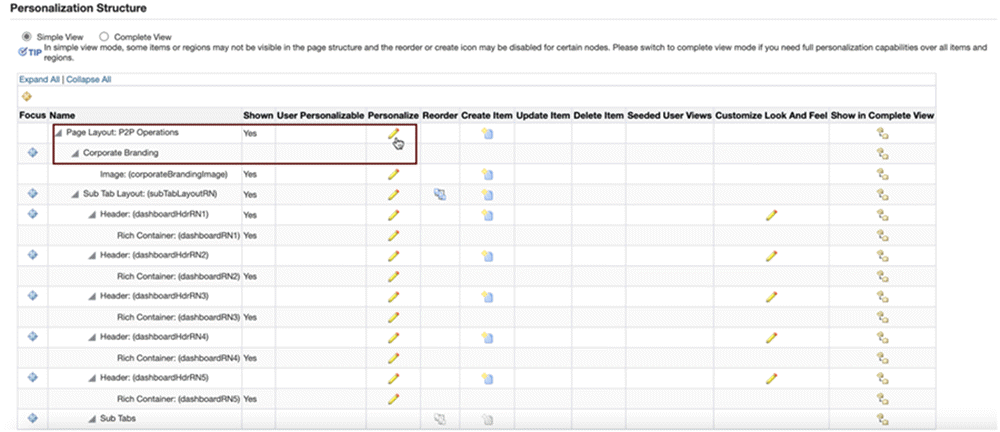
Click the "Personalize Page" option.
-
In the Personalization structure table, click on the "Personalize" icon in the Page Layout section to update the window title.
Personalize Icon for Page Layout Section
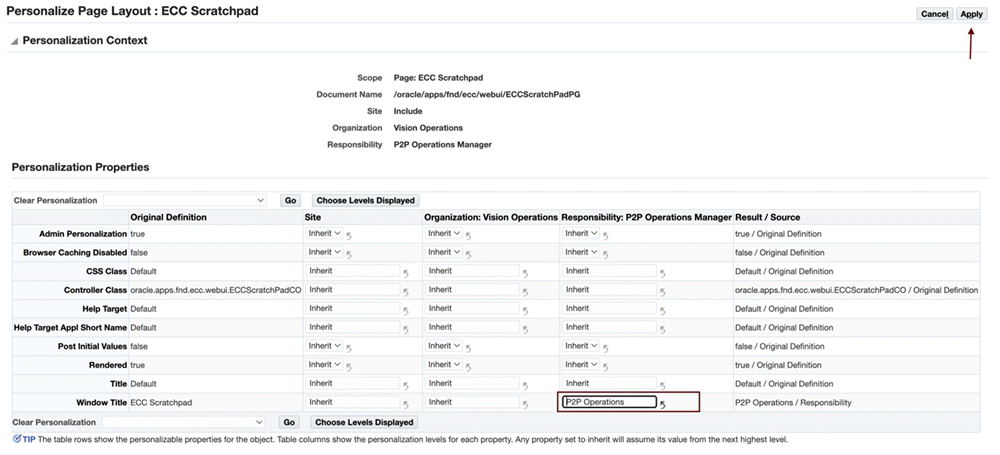
-
Set the window title to "P2P Operations" and click the Apply button.
Setting the Window Title
-
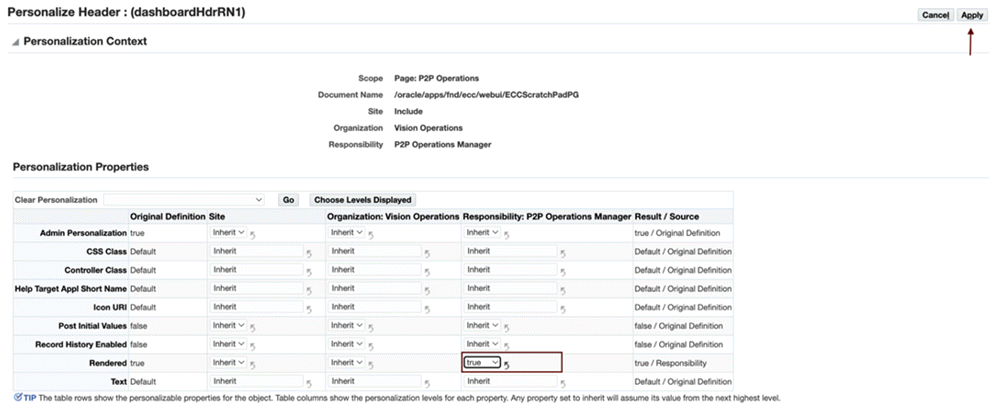
Set the "rendered" property to
truein the respective Tab Header sections.Personalize Icon for a Header
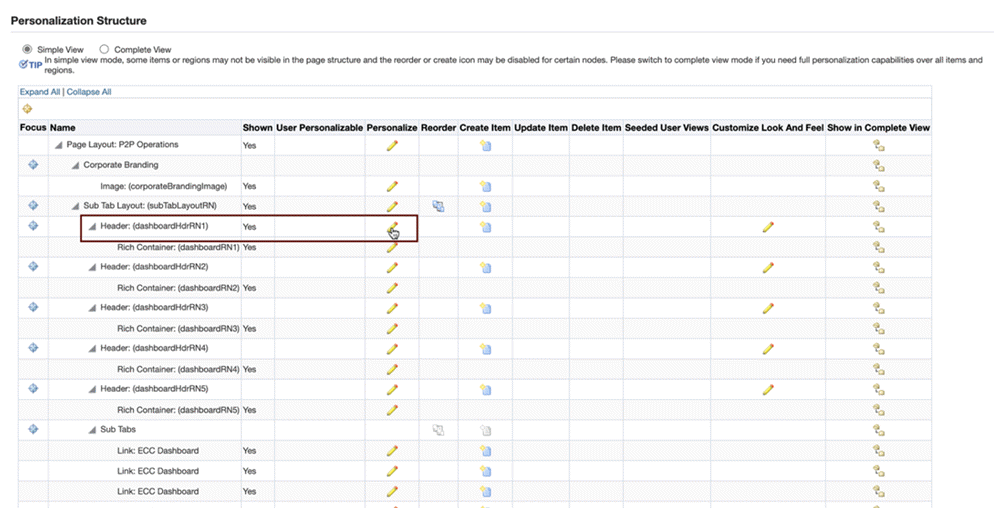
Updating a Tab Header Property
-
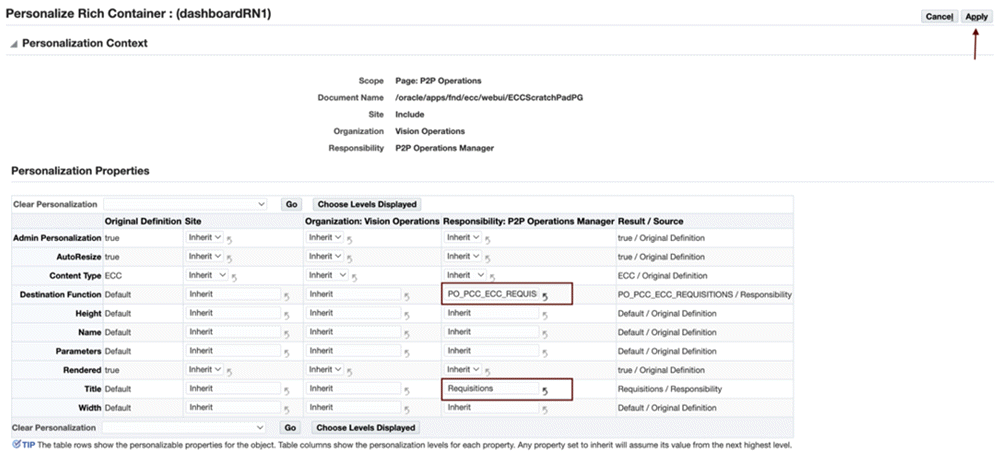
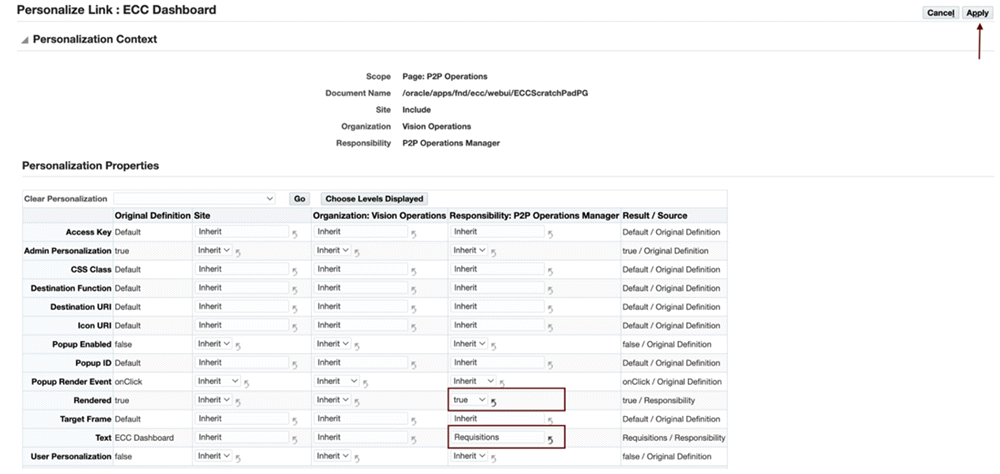
Add the ECC Page FND function to the respective Rich Container sections.
-
Destination Function: PO_PCC_ECC_REQUISITIONS
-
Title: Requisitions
-
Rendered: true
Personalize Icon for the Rich Container
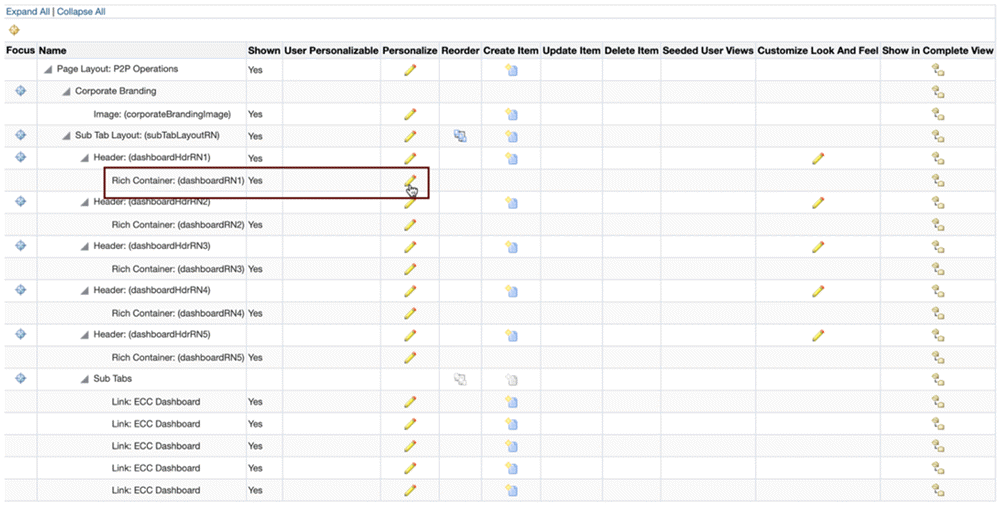
Updating a Rich Container Properties
-
-
Set the subtab title by clicking the Personalize icon for the respective "Subtab link".
-
Text: Requisitions
-
Rendered: true
Personalize Icon for a Subtab Link
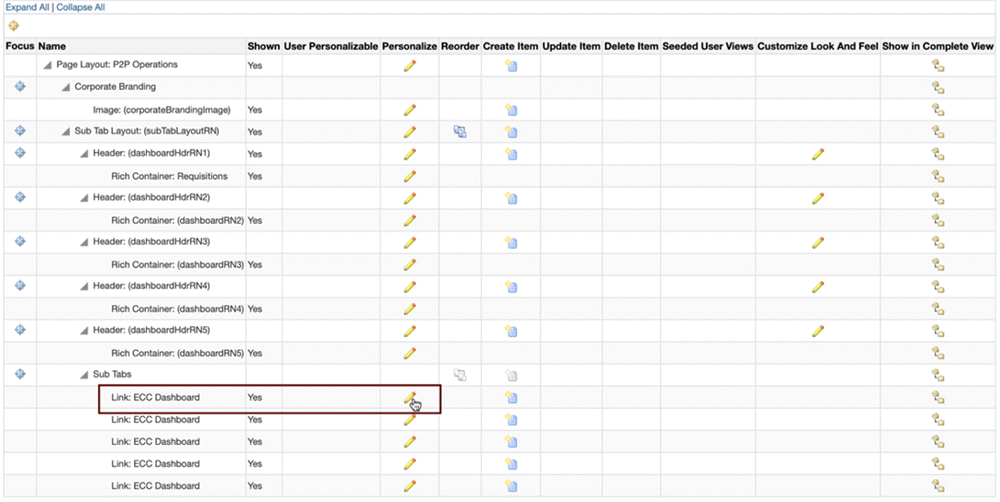
Updating the Properties for a Subtab Link
-
-
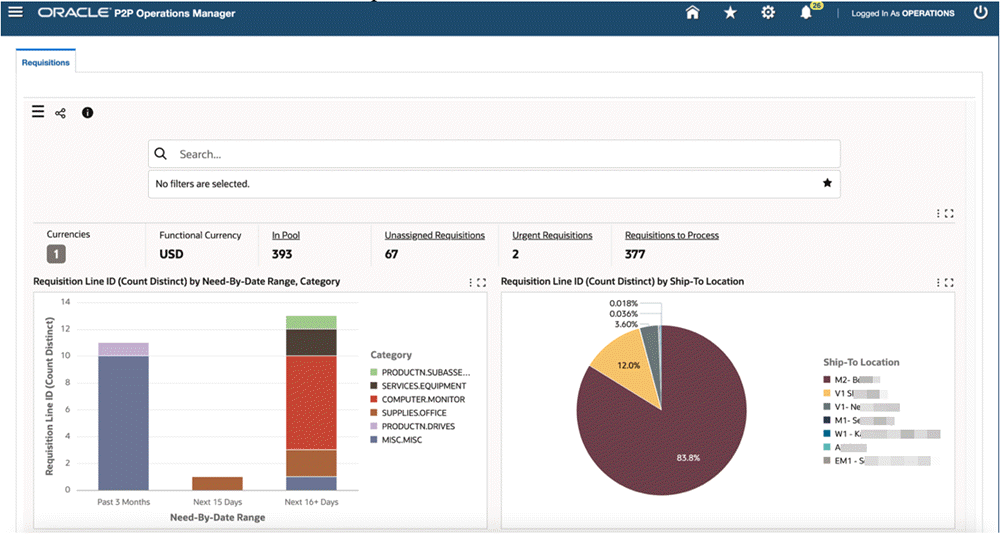
Click on "Return to Application" to access the dashboard.
-
Now a user can view the Requisitions dashboard.
Example of the Requisitions Dashboard
-
Similarly, the user can add the below-mentioned remaining dashboards by following the same steps as described above (Steps 6, 7, and 8).
-
Subtab 2:
-
Title: Orders
-
Destination Function: PO_PCC_ECC_ORDERS
-
-
Subtab 3:
-
Title: Receiving
-
Destination Function: INV_ECC_RCV
-
-
Subtab 4:
-
Title: Supplier Balance
-
Destination Function: AP_ECC_SUPP_BALANCE
-
-
-
Click "Return to Application" to access the dashboards.
Example of the Procure to Pay Operations Manager Dashboard