| Skip Navigation Links | |
| Exit Print View | |

|
Using Virtual Networks in Oracle Solaris 11.1 Oracle Solaris 11.1 Information Library |
| Skip Navigation Links | |
| Exit Print View | |

|
Using Virtual Networks in Oracle Solaris 11.1 Oracle Solaris 11.1 Information Library |
1. Network Virtualization and Resource Management in Oracle Solaris
2. Creating and Administering Virtual Networks in Oracle Solaris
3. Managing Network Resources in Oracle Solaris
Working With Clients, Transmit Rings, and Receive Rings
MAC Clients and Ring Allocation
Datalink Properties for Ring Allocation
Commands for Working With Receive and Transmit Rings
Obtaining and Interpreting Ring Information
Displaying Ring Allocation Capabilities of a Datalink
Displaying Ring Use and Ring Assignments on a Datalink
How to Configure Clients and Allocate Rings
4. Monitoring Network Traffic and Resource Usage in Oracle Solaris
The pool link property enables you to bind network processing to a pool of CPUs. With this property, you can better integrate network resource management with CPU binding and administration in zones. In Oracle Solaris, zone administration includes the binding of non-networking processes to a pool of CPU resources by using the zonecfg or poolcfg command. To dedicate that same pool of resources to also manage network processes, you use the dladm set-linkprop command to configure a link's pool property. Then you assign that link to the zone.
By setting the pool property for a link and assigning the link as the zone's network interface, that link becomes bound to a zone's pool as well. If that zone is set to become an exclusive zone, then CPU resources in the pool can no longer be used by other datalinks that are not assigned to that zone.
Note - A separate property, cpu, can be set to assign specific CPUs to a datalink. The two properties, cpu and pool, are mutually exclusive. You cannot set both properties for a given datalink. To assign CPU resources to a datalink by using the cpu property, see How to Allocate CPUs to a Link.
For more information about pools within a zone, see Chapter 13, Creating and Administering Resource Pools (Tasks), in Oracle Solaris 11.1 Administration: Oracle Solaris Zones, Oracle Solaris 10 Zones, and Resource Management. For more information about creating pools and assigning CPU sets to the pools, refer to the poolcfg(1M) man page.
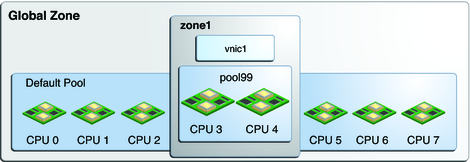
The following figure show how pools work when the pool property is assigned to a datalink.
Figure 3-1 pool Property of a VNIC Assigned to a Zone

In the figure, the system has eight CPUs. When no pools are configured on the system, all the CPUs belong to the default pool and are used by the global zone. However, in this example, the pool99 pool has been created and consists of CPU 3 and CPU 4. This pool is associated with zone1, which is an exclusive zone. If pool99 is set as a property of vnic1, then pool99 becomes dedicated to also manage vnic1's networking processes. After vnic1 is assigned to be zone1's network interface , the CPUs in pool99 become reserved to manage both networking and non-networking processes of zone1.
The pool property is dynamic in nature. Zone pools can be configured with a range of CPUs, and the kernel determines which CPUs are assigned to the pool's CPU set. Changes to the pool are automatically implemented for the datalink, which simplifies pool administration for that link. In contrast, assigning specific CPUs to the link by using the cpu property requires you to specify the CPU to be assigned. You have to set the cpu property every time you want to change the CPU components of the pool.
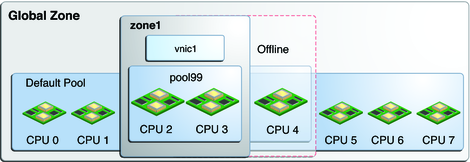
For example, suppose that the system CPU 4 in Figure 3-1 is taken offline. Because the pool property is dynamic, the software automatically associates an additional CPU with the pool. Thus, the pool's original configuration of two CPUs is preserved. For vnic1, the change is transparent. The adjusted configuration is shown in the following figure.
Figure 3-2 Automatic Reconfiguration of the pool Property

Additional pool-related properties display information about a datalink's use of CPUs or a pool of CPUs. These properties are read-only and cannot be set by the administrator.
pool-effective displays the pool that is being used for network processes.
cpus-effective displays the list of CPUs that are being used for network processes.
To manage CPU resources of a zone, setting a datalink's pool property is not normally performed as an initial step. More frequently, commands such as zonecfg and poolcfg are used to configure a zone to use a pool of resources. The cpu and pool link properties themselves are not set. In such cases, the pool-effective and the cpus-effective properties of these datalinks are set automatically according to the zone configurations when the zone is booted. The default pool is displayed under pool-effective, and the value of cpus-effective is selected by the system. Thus, if you use the dladm show-linkprop command, the pool and cpu properties will be empty, but the pool-effective and cpus-effective properties will contain values.
Directly setting the pool and cpu properties of a datalink is an alternative step that you can use to bind a zone's CPU pool for networking processes. After you configure these properties, their values are reflected in the pool-effective and cpus-effective properties as well. Note, however, that this alternative step is used less often to manage a zone's network resources.
As with other link properties, the pool property can be set for a datalink either at the moment when the link is created or later when the link requires further configuration.
To set the pool property while you create the VNIC, you use the following syntax:
# dladm create-vnic -p pool=pool-name -l link vnic
To set the pool property of an existing VNIC, you use the following syntax:
# dladm setlinkprop -p pool=pool-name vnic
The following procedure explains how to configure a CPU pool for a VNIC.
Before You Begin
You must have completed the following:
Created a processor set with its assigned number of CPUs
Created a pool with which the processor set will be associated
Associated the pool with the processor set
Note - For the instructions to complete these prerequisites, see How to Modify a Configuration in Oracle Solaris 11.1 Administration: Oracle Solaris Zones, Oracle Solaris 10 Zones, and Resource Management.
If the VNIC has not yet been created, use the following syntax:
# dladm create-vnic -l link -p pool=pool vnic
where pool refers to the name of the pool that was created for the zone.
If the VNIC exists, use the following syntax:
# dladm setlinkprop -p pool=pool vnic
zonecfg>zoneid:net> set physical=vnic
Note - For the instructions that explain how to assign a networking interface to a zone, refer to the Configuring, Verifying, and Committing a Zone in Oracle Solaris Administration: Oracle Solaris Zones, Oracle Solaris 10 Zones, and Resource Management
Example 3-6 Assigning a Link's CPU Pool to a Zone With an Exclusive IP-Type
This example shows how a pool is assigned to a zone's datalink. The scenario is based on the configuration in Figure 3-1. The example assumes that a pool of CPUs named pool99 has already been configured for the zone. The pool is then assigned to a VNIC. Finally, the non-global zone zone1 is set to use the VNIC as the network interface.
# dladm create-vnic -l net1 -p pool99 vnic1

# zonecfg -c zone1
zonecfg:zone1> set ip-type=exclusive
zonecfg:zone1> add net
zonecfg:zone1>net> set physical=vnic1
zonecfg:zone1>net> end
zonecfg:zone1> exit
The following procedure explains how to assign specific CPUs to process traffic traversing a datalink by configuring the cpu property.
# dladm show-linkprop -p cpus link
By default, no CPUs are assigned to any specific interface. Thus, the parameter VALUE in the command output will not contain any entry.
# echo ::interrupts | mdb -k
The output lists parameters for each link on the system, including the CPU number.
The CPUs can include those with which the link's interrupts are associated.
# dladm set-linkprop -p cpus=cpu1,cpu2,... link
where cpu1 is the CPU number to be assigned to the link. You can dedicate multiple CPUs to the link.
# echo ::interrupts | mdb -k
# dladm show-linkprop -p cpus link
Example 3-7 Allocating CPUs to a Link
This example shows how to dedicate specific CPUs to the datalink net0.
Note the following information in the output that is generated by the different commands. For clarity, the significant information is emphasized in the output.
By default net0 has no dedicated CPU. Thus, VALUE is --.
After CPUs are allocated, net0 displays a new CPU list under VALUE.
# dladm show-linkprop -p cpus net0
LINK          PROPERTY     PERM     VALUE     DEFAULT     POSSIBLE
net0     cpus         rw       --        --          --

# echo ::interrupts | mdb -k
Device  Shared   Type   MSG #   State   INO    Mondo   Pil   CPU
net#0   no       MSI    2       enbl    0x1a   0x1a    6     18

# dladm set-linkprop -p cpus=14,18,19,20 net0

# dladm show-linkprop -p cpus net0
LINK   PROPERTY   PERM   VALUE        DEFAULT   POSSIBLE
net0   cpus       rw     14,18,19,20  --        --
All the supporting threads, including the interrupt, are now confined to the newly assigned set of CPUs.
See Also
For an example that shows how to use flows and how to allocate system resources, including CPUs and CPU pools, to process network traffic in a virtual network, see Example 3-8.