| Skip Navigation Links | |
| Exit Print View | |

|
Oracle Solaris 10 1/13 Installation Guide: Flash Archives (Creation and Installation) Oracle Solaris 10 1/13 Information Library |
| Skip Navigation Links | |
| Exit Print View | |

|
Oracle Solaris 10 1/13 Installation Guide: Flash Archives (Creation and Installation) Oracle Solaris 10 1/13 Information Library |
What's New in the Oracle Solaris 10 08/11 Release
Auto Registration and Flash Archives
How Does Auto Registration Affect Flash Archives?
Flash Archives and ZFS Root Pools
Installing Clone Systems With an Initial Installation
3. Creating Flash Archives (Tasks)
4. Installing and Administering Flash Archives (Tasks)
If you have a clone system and want to update that system, you can create a differential archive that contains only the differences between two images, the unchanged master image and an updated master image. When you update a clone system with a differential archive, only the files that are in the differential archive are changed. You can choose to install a Flash Archive differential archive with the JumpStart installation method or Live Upgrade. An update is a five-part process.
Prepare the master system with changes.
Before changes are made, the master system should be running a duplicate of the original archive.
Note - If the master system is not running a duplicate of the original archive, the differences between the two system images might result in a large differential archive. Consequently, installing the differential archive could be time consuming. Use an initial installation with a full archive in this case.
(Optional) Prepare customization scripts to reconfigure or customize the clone system before or after installation.
Mount the directory of a copy of the saved-unchanged master image.
This second image is to be used to compare the two system images. Access the image by one of the following methods:
Mounted from a Live Upgrade boot environment
Mounted from a clone system over NFS
Restored from backup by using the ufsrestore command
Create the differential archive with the -A option of the flarcreate command.
Install the differential archive on clone systems with JumpStart or use Live Upgrade to install the differential archive on an inactive boot environment.
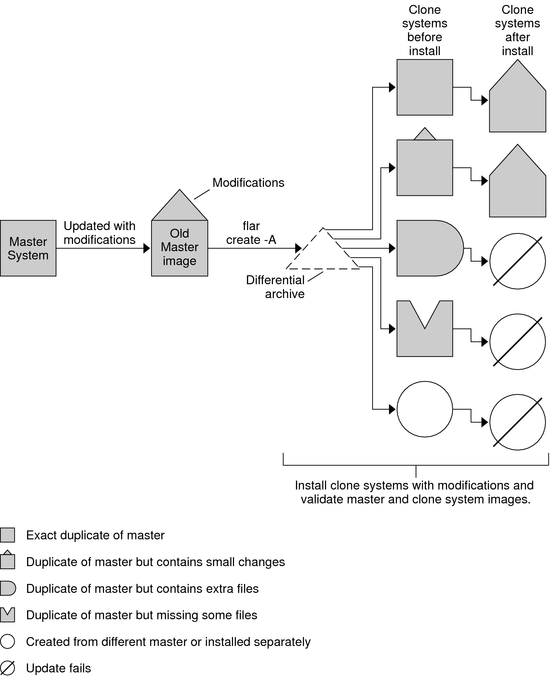
The following figure shows the creation and installation of a differential archive. A master image is updated with some modifications. These modifications could be as simple as the addition, reconfiguration, or deletion of a few files, or as complex as propagating patches. The updated master image is compared to the unchanged master image. The differences between the two images become the differential archive. The archive can be used to update other clone systems that are currently using the unchanged master image. If the clone system has already been modified or is not running the unchanged master image, the update fails. If you have many changes to make on the clone systems, you can do an initial installation at any time.
Figure 1-2 Solaris Flash Update
