4 Creating and Configuring the Nodes
This chapter contains information on the requirements for creating and configuring the Oracle Communications Offline Mediation Controller Nortel DMS Operational Metrics (OM) nodes.
This chapter explains how to create and configure the OM Collector CC and OM Distributor DC.
There are two notes that apply to both the OM CC and OM DC:
-
You must deploy the nodes on the same server. These nodes cannot be distributed like other nodes.
-
In the Node Performance window, there are no counts associated with the nodes.
OM Collector CC
The OM collection cartridge (CC) collects OM files from DMS-100 switches. The CC uses FTP to periodically connect and pull OM/DIRP encoded files from each switch. A single OM CC is capable of polling and pulling files from multiple switches. The polling period is a single value used for all switches that are assigned to the CC. On a single switch, OM files can be found on multiple volumes, so the OM CC polls multiple directories on each switch.
The OM CC retrieves files from one or more DMS switches, re-names the files and transfers them ta local NM directory. The CC re-names the files in the following way:
-
DMS file name: R040625145027OM
-
OM CC file name: AAA_R040625145027OM.done
The CC adds a three letter prefix, underscore and appends .done to the incoming file name. The three letters range in the following way: [A-Z][A-Z][A-Za-z]. The prefix differentiates input files from different IP addresses, port numbers and disk volume combinations. Note that the prefix can change if the device configuration is modified.
The CC does not parse or process the individual OM records. Therefore, the CC does not produce a NAR file and Offline Mediation Controller is unaware of the contents of the OM records.
In the event that the OM CC cannot communicate with a DMS-100, it attempts to re-establish a connection after a configurable delay. You can also configure the number of times the CC attempts to re-establish the connection before raising a critical alarm. The CC raises the alarm in both the GUI and via SNMP and logs the incident to the cartridges log file. At this point, the CC considers the poll to have failed and does not attempt to re-establish a connection with the switch until the next scheduled poll.
You can provision a backup OM CC as a means to recover from a polling failure rather than wait for the next scheduled poll. For example, if the log file of the primary OM CC indicates a polling failure, you can manually configure the backup OM CC to have a short polling interval, such as 5 minutes, for a specific switch. The backup OM CC will collect the files the primary OM CC failed to capture. After the files have been transferred successfully, you can stop the backup CC. This backup method can be used to manually initiate polls to switches instead of waiting a longer period for the primary OM CC to attempt to re-establish the connection.
To create and configure the OM Collector CC:
-
Log on to Offline Mediation Controller Administration Client.
The Node Hosts & Nodes (logical view) screen appears.
-
In the Mediation Hosts table, select a host.
-
In the Nodes on Mediation Host section, click New.
The Create a Node dialog box appears.
-
Select Voice of IP (VoIP) and click Next.
-
Select Collection Cartridge (CC) and click Next.
-
Select OM Collector and click Finish.
-
In the node configuration window, type a name for the node in the Name field.
-
In the Rule File drop-down list, accept the default rule file, OM Collector.
-
On the General tab, accept the default field settings, as shown in the sample below.
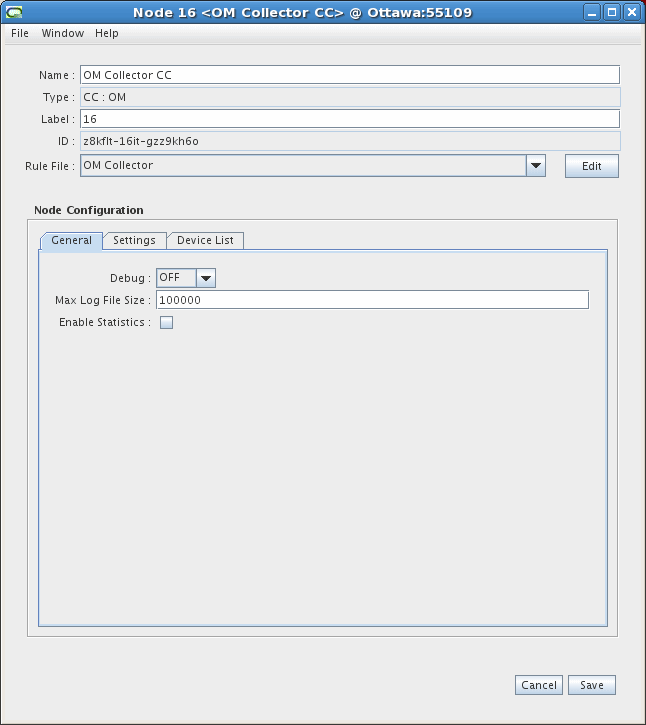
Description of the illustration nortel_om_CC_1.gif
-
On the Settings tab, configure the field values as necessary. The field definitions are as follows:
-
Directory for Unprocessed Files: files transferred by FTP are stored here for processing by the OM DC
-
Unprocessed File Prefix: file prefix of unprocessed data files on the remote device
-
Rename Unprocessed to Processed: Select this checkbox if you want the CC to rename the files on the remote device after successful transfer via FTP.
-
Processed File Prefix: File prefix of processed files on the remote device
-
Retries per poll: Number of additional FTP attempts for each polling interval
-
Polling interval: Time interval between FTP polls
-
Process daily at fixed time: Select this checkbox if you want the CC to align its polling schedule ta specific time of day. Set the time of day using the drop-down lists.
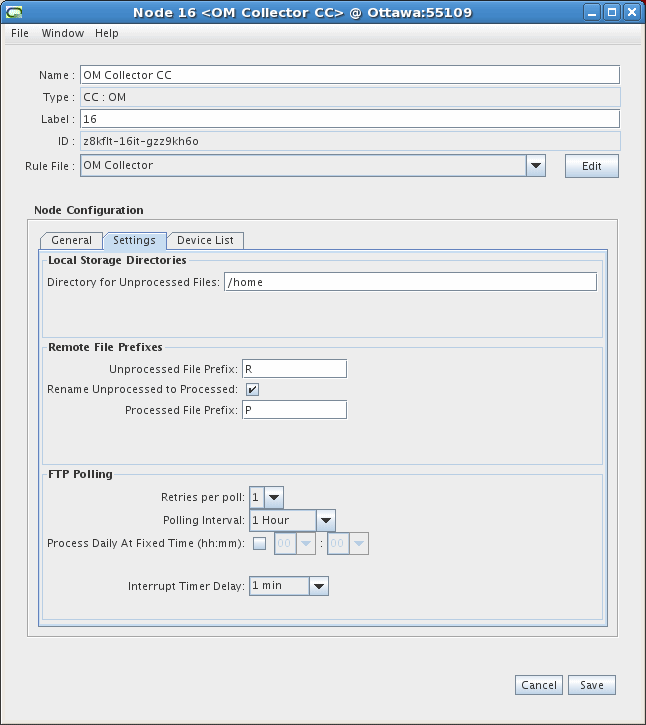
Description of the illustration nortel_om_CC_2.gif
-
-
On the Device List tab, click Add.
The Add Device window appears. (If you are editing a device entry, the Edit Device window will appear, as shown below).
-
Configure the fields as required. The field definitions are as follows:
-
Name: Enter a name for the device, if desired.
-
IP Address: Enter the IP address of the device.
-
Port: Enter the port you will connect to on the device.
-
FTP User ID: Enter the user or account ID for the remote device.
-
Password: Enter your password for the remote device.
-
Confirm Password: Re-enter your password for the remote device.
-
Disk Volumes: Enter the disk volume name and click Add to add it to the list. The disk volumes are non-delimited location names for files. Multiple disk volumes can be added per device.
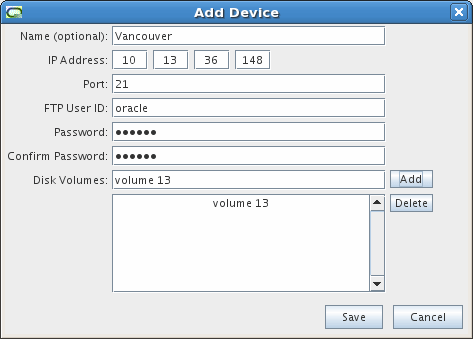
Description of the illustration nortel_om_CC_add_device.gif
-
-
Click the Save button.
The device appears in the list on the Device List tab.
Repeat steps 11 to 13 to add more devices to the list. You can also edit device profiles by clicking the Edit button or delete device profiles by clicking the Delete button.
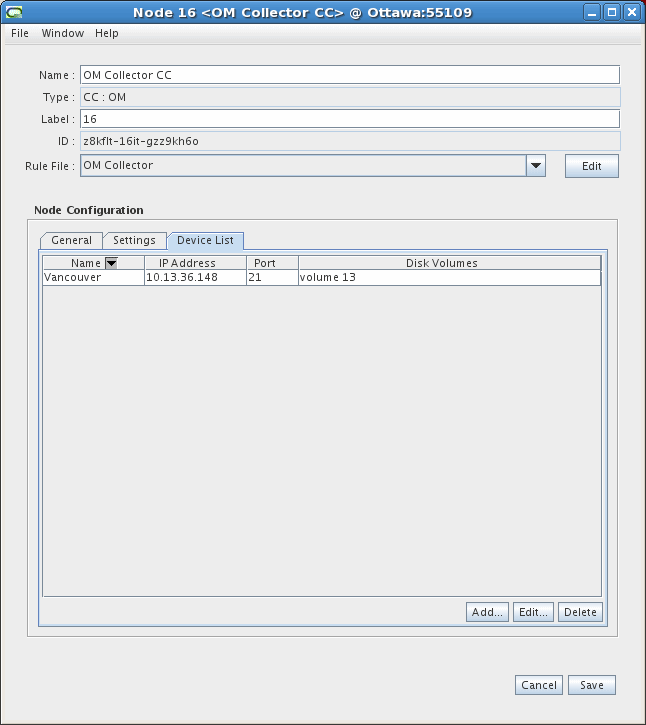
Description of the illustration nortel_om_CC_3.gif
-
Click Save.
OM Distributor DC
The OM distribution cartridge (DC) receives DIRP encoded OM files from the CC and transfers these files to downstream applications using FTP Push or Pull. You can configure the DC to transfer files periodically. You can configure the FTP capability in the DC node configuration window.
To create and configure the OM Distributor DC:
-
In the Administration GUI, click New.
-
Select Voice of IP (VoIP) and click Next.
-
Select Distribution Cartridge (DC) and click Next.
-
Select OM Distributor and click Finish.
-
In the node configuration window, type a name for the node in the Name field.
-
In the Rule File drop-down list, accept the default, OM Distributor.
-
On the General tab, accept the default values, as shown in the sample below.
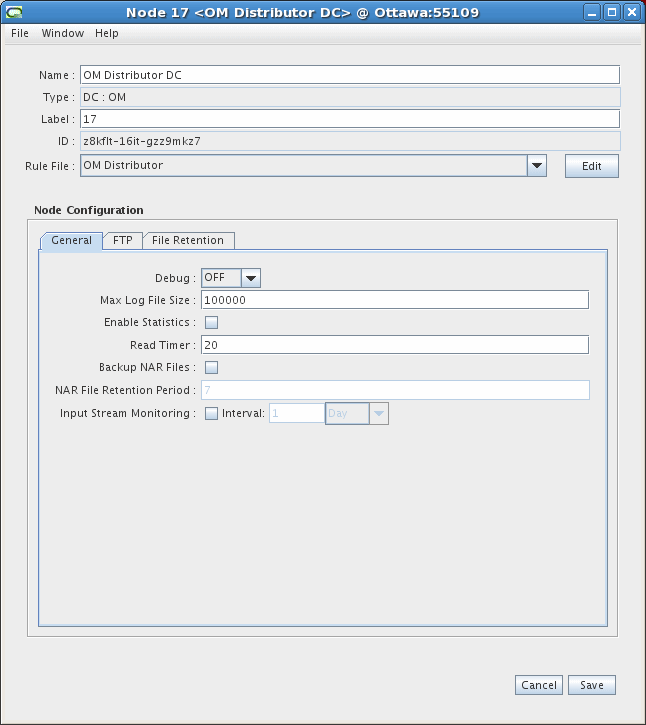
Description of the illustration nortel_om_DC_1.gif
-
On the FTP tab, configure the settings as necessary to point to the remote location where the files will be stored. The Outbound File Directory field refers to the output directory of the CC. This value must match the OM CC output directory value. The directory string must terminate with a directory separator - '/' for UNIX or '\' for Windows.
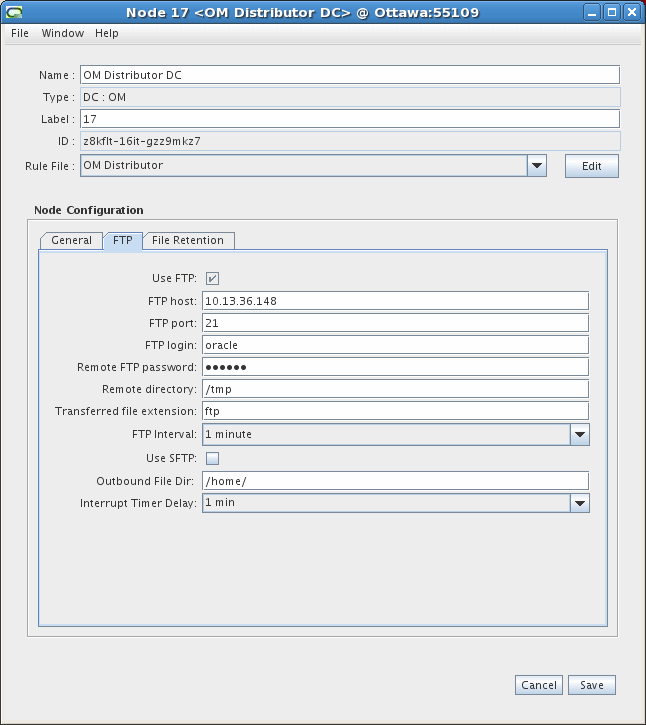
Description of the illustration nortel_om_DC_2.gif
-
Click Save.