| Oracle® Fusion Middleware Portal Development Guide for Oracle WebLogic Portal 10g Release 3 (10.3.4) Part Number E14243-06 |
|
|
View PDF |
| Oracle® Fusion Middleware Portal Development Guide for Oracle WebLogic Portal 10g Release 3 (10.3.4) Part Number E14243-06 |
|
|
View PDF |
This chapter explains how to add WebLogic Portal functionality into an existing Oracle Enterprise Pack for Eclipse web application.
This chapter contains the following sections:
Note:
If you want to add an existing web application to WebLogic Portal, see Chapter 5, "Integrating Existing Web Applications into WebLogic Portal."
You can transform an existing web application implemented with Oracle Enterprise Pack for Eclipse into a Portal web project by installing the necessary WebLogic Portal–specific facets into it. Then you can give the web application a portal user interface, add personalization and campaign functionality, and take advantage of WebLogic Portal's content and user management services.
Note:
These instructions assume that you have an existing web application that conforms to the requirements of the Oracle Enterprise Pack for Eclipse environment, and includes an EAR Project and a Oracle Enterprise Pack for Eclipse Web Project.
Integrating a web application into a WebLogic Portal environment involves the following steps:
Adding WebLogic Portal project facets into the EAR project.
Adding WebLogic Portal project facets into the web application project.
Adding a Datasync project (if you want to use the general service portal services data such as user profiles, user segments, request properties, session properties, and so on).
Associating your EAR project with a WebLogic Portal-enabled server.
To integrate an existing web application into Oracle Enterprise Pack for Eclipse and add WebLogic Portal functionality, follow these steps:
In the Package Explorer view, right-click the EAR Project and choose Properties.
Select Project Facets in the tree that is displayed in the left pane of the dialog.
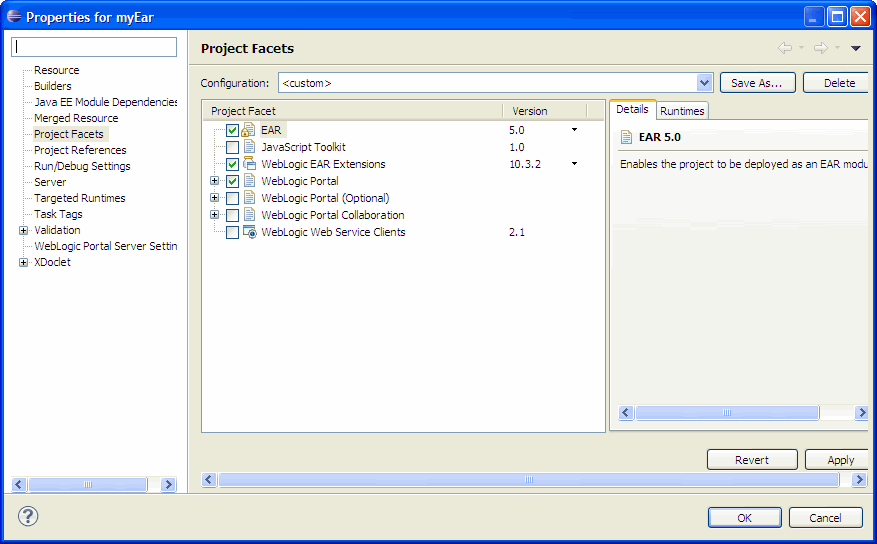
The project facets associated with this EAR project display in the table, as shown in Figure 6-1.
Figure 6-1 Project Facets Associated with Non-Portal EAR Project

Select the WebLogic Portal check box.
All the features for the WebLogic Portal facet are selected by default.
Click Finish.
The Project Facets table in the properties dialog displays the facets that you just added.
Click OK.
The Package Explorer view includes the new portal-related content.
Repeat steps 1 through 5 to add WebLogic Portal facets to the Web Project.
When you are finished, the display in the Properties view includes the WebLogic Portal facets, and the tree in the Package Explorer view shows the added portal-specific shared J2EE libraries.
Associate your portal-enabled project with a WebLogic server that is customized for use with WebLogic Portal. If you need to create a new server that is enabled for use with WebLogic Portal, refer to Section 4.2, "Portal Perspective."
You can now use WebLogic Portal features to create portlets and to assemble and manage the portal environment.