| Oracle® Fusion Middleware Portlet Development Guide for Oracle WebLogic Portal 10g Release 3 (10.3.4) Part Number E14244-05 |
|
|
View PDF |
| Oracle® Fusion Middleware Portlet Development Guide for Oracle WebLogic Portal 10g Release 3 (10.3.4) Part Number E14244-05 |
|
|
View PDF |
A clipper portlet is a portlet that renders content from another web site. A clipper portlet can include all or a subset of another web site's content using a process called "web clipping." This chapter explains how to create and configure clipper portlets.
This chapter includes these topics:
Section 7.4, "Modifying the Appearance of a Clipper Portlet"
Section 7.11, "Updating Portlet Preferences While the Server is Running"
Clipping is an easy technique for including content in your portal. You can clip all or part of another web site. Users can effectively view and interact with content from another web site without leaving the portal.
Note that another WLP feature, the browser portlet, also lets you include remote web page contents in a portal. For information on browser portlets, see Section 5.4.4, "Building Browser Portlets." A clipper portlet differs from a browser portlet in the following ways:
A browser portlet uses an IFrame, while a clipper portlet includes the content of the clipped web page into the same page as the rest of the portal. An advantage of using an IFrame is that it isolates the remote content, preventing it from overlapping other parts of the portal. Disadvantages are that the portal cannot access the IFrame's content and portal and IFrame sessions are maintained separately.
A browser portlet returns the entire remote page, while a clipper portlet lets you subset or modify the contents of a remote web page.
You create a clipper portlet using the Portlet Wizard. The steps are similar to those of creating other types of portlets.
Note:
No post-processing is performed on the text of a clipped web page, unless a clipCustomClass preference is specified as described in Section 7.4, "Modifying the Appearance of a Clipper Portlet." Clipped text is written verbatim to the response. If the original web page contains syntax errors, the errors may also appear in the consumer browser when the clipper portlet is rendered.If it is not currently open, open the Portal Perspective.
Select File > New > Portlet.
In the New Portlet dialog, enter a name for the portlet, and click Finish. The Portlet Wizard opens.
In the Portlet Wizard, select Web Clipper Portlet, as shown in Figure 7-1 and click Next.
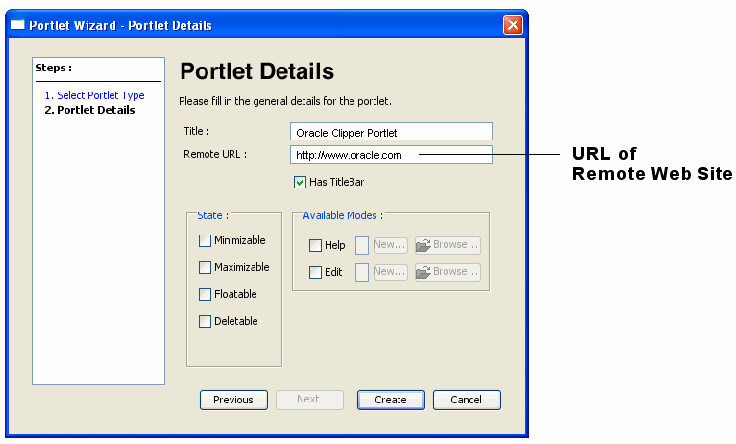
In the Portlet Details dialog, enter a title for the portlet and enter the URL of the web site you want to clip in the Remote URL field, as shown in Figure 7-2.
Figure 7-2 Specifying the URL of a Remote Web Site
Click Create to create the new clipper portlet.
Modify the clipper portlet, if you want, by adding and editing preferences, as explained in Section 7.3, "Modifying Clipper Portlet Properties."
Note:
By default, the entire web site is included in the clipper portlet's contents, including the <HEAD> element of the remote site.By setting certain portlet properties, you can change the appearance of a clipper portlet, subset the content of a web page that appears in a clipper portlet, and provide authentication. There are two primary ways to modify a clipper portlet's properties: through the Properties editor and manually.
This section includes these topics:
You can use the Properties editor to edit the common set of portlet properties, such as the title bar and presentation properties. Clipper portlets share most of these properties with other types of portlets, and the procedure for changing them is the same. See Section 9.1, "Portlet Properties" for detailed information on editing portlet properties through the Properties editor.
Clipper portlets also include a set of properties that do not appear in the Properties editor and which must be set manually. The easiest way to modify clipper portlet properties manually is to add and set them as portlet preferences.
Tip:
WLP provides preferences for controlling the extent of a clipped page and for authentication. See Section 7.4, "Modifying the Appearance of a Clipper Portlet" and Section 7.5, "Authenticating a Clipper Portlet" for specific information on those tasks.To set portlet preferences, do the following:
Open the Portlet editor for the clipper portlet. To do this, right click the portlet name in the Project Explorer and select Open With > Portlet Editor.
Right click the Portlet Preferences bar in the portlet editor and select Add Preference. The Portlet Preferences bar is shown in Figure 7-3.
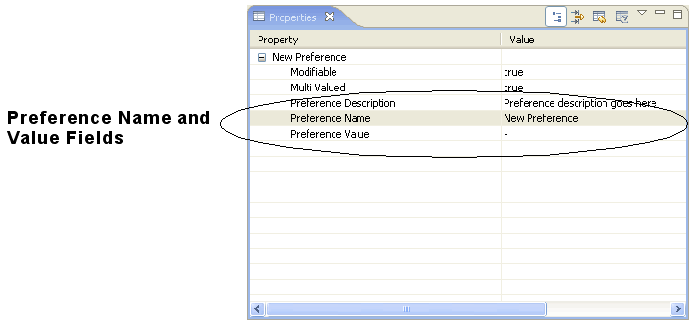
In the Properties editor, enter the Preference Name and Preference Value in the appropriate fields, as shown in Figure 7-4.
Figure 7-4 Preference Name and Value Fields
For more information on setting portlet preferences, see Section 9.2, "Portlet Preferences."
You can set portlet preferences to specify which portion of a web page to clip. You can also modify the text that is clipped by implementing a Java class and specifying it as a portlet preference. Table 7-1 lists and describes the set of clipper portlet preferences that you may set manually to accomplish these tasks. For details on how to set preferences, see Section 7.3, "Modifying Clipper Portlet Properties."
Note:
The preferences clipXPath, clipStartText/clipEndText, and clipCustomClass (listed in Table 7-1) are exclusive. The system looks for clipCustomClass first. If that class is not present, the system looks for clipXPath. If clipXPath is not present, the system looks for clipStartText/clipEndText.Table 7-1 Preferences for Determining the Text to Clip
| Property Name | Property Value |
|---|---|
|
clipXPath |
(Optional) An XPath that is applied to the remote page. The remote page is required to be well-formed XML. If you set this option, the system will apply the XPath to the remote page and put the text of the first node found in the clipper portlet output. This option provides a convenient way to clip a specific chunk of text. For example, suppose this preference value is html/body[1], which is an XPath expression that selects the <body> element of the web page's text. You can also use this option to specify div elements to clip. For example, //div[@id="barracuda"] clips out a <div id="barracuda"> element. |
|
clipStartText, clipEndText |
(Optional) Specifying regular expressions that are used to locate the beginning and the end of the web page text to clip. For example, if the page you want to clip looks like: Some web site text... <abc> text to clip </abc> Some more web site text... and you want to clip the text between <abc> and </abc> inclusive, enter the following properties and values: clipStartText = <abc> clipEndText = </abc> The left angle bracket needs to be escaped if you enter the values directly in the XML .portlet file. For example: <netuix:preference name="clipStartText" value="<abc>" modifiable="false"/> <netuix:preference name="clipEndText" value="<abc>" modifiable="false"/> |
|
clipCustomClass |
(Optional) This preference specifies the name of a class that implements com.bea.netuix.clipper.IClipStrategy. This interface lets you define your own clipping logic. The interface has one method to implement: String clip(String markup); Your implementation must have a no-argument constructor. The clipCustomClass preference registers your implementation with the portlet. An IClipStrategy class can be used to selectively rewrite a web page; for example, you can substitute text in the page, or suppress certain elements. |
This section explains how to configure authentication for a clipper portlet. Once configured, clipper portlet authentication is automatic. WebLogic Portal supports two kinds of clipper portlet authentication:
Form-based authentication
Basic HTTP authentication
Both of these methods are described in this section.
Form-based authentication is performed through a server-side form request on the remote site. You configure this type of authentication by setting preferences on the portlet. The procedure for setting preferences is described in Section 7.3, "Modifying Clipper Portlet Properties."
Note:
There are current security limitations associated with form-based authentication. See Section 7.12, "Clipper Portlet Limitations."To set up form-based authentication:
Set the preference: authenticationType = Form. This preference enables form-based authentication.
Tell the server how to build up the HTTP request that performs the authentication by setting the preferences listed in Table 7-2.
Provide the authentication credentials by setting the preferences listed in Table 7-2.
Table 7-2 HTTP Request Preferences
| Preference Name | Preference Value |
|---|---|
|
loginFormUrl |
(Required) The ACTION attribute in the HTML <FORM> element. This is the URL to which the authentication request is made. |
|
loginFormMethod |
(Required) The METHOD attribute in the HTML <FORM> element. The value must be either GET or POST. |
|
loginFormUserParam |
(Required) The name of the request parameter that holds the login name. |
|
loginFormPasswordParam |
(Required) The name of the request parameter that holds the login password. |
|
loginFormExtraParams |
(Optional) A string to append to the request query. Use this string to specify custom parameters that might need to be set. For example, if the form also has COLOR and SHAPE parameters, you can set them with: loginFormExtraParams= COLOR=PURPLE&SHAPE=DIAMOND |
The following preferences are used to provide the authentication credentials.
Table 7-3 Authentication Credential Preferences
| Preference Name | Preference Value |
|---|---|
|
groupUsername |
Specifies shared user name. |
|
groupPassword |
Specifies the password for the shared user name. |
|
personalUsername |
Specifies a user name on a per-user basis. Ignored if groupUsername is set. |
|
personalPassword |
Specifies the password on a per-user basis. Ignored if groupUsername is set. |
Example 7-1 shows example preferences for form-based authentication.
Example 7-1 Example Form-Based Authentication Preferences
<netuix:preference name="remoteUrl" value="http://some.site.com" modifiable="false"/>
<netuix:preference name="loginFormUrl" value="http://some.site.com/login.action" modifiable="false"/>
<netuix:preference name="authenticationType" value="Form" modifiable="false"/>
<netuix:preference name="loginFormMethod" value="POST" modifiable="false"/>
<netuix:preference name="loginFormUserParam" value="os_username" modifiable="false"/>
<netuix:preference name="loginFormPasswordParam" value="os_password" modifiable="false"/>
<netuix:preference name="loginFormExtraParams" value="os_destination=abc" modifiable="false"/>
<netuix:preference name="groupUsername" value="your_username" modifiable="false"/>
<netuix:preference name="groupPassword" value="your_password" modifiable="false"/>
To set up basic HTTP authentication:
Set the preference: authenticationType = BasicHTTP. This preference enables form-based authentication.
Provide the authentication credentials by setting the preferences listed in Table 7-4.
Table 7-4 Authentication Credential Preferences
| Preference Name | Preference Value |
|---|---|
|
groupUsername |
Specifies shared user name. |
|
groupPassword |
Specifies the password for the shared user name. |
|
personalUsername |
Specifies a user name on a per-user basis. Ignored if groupUsername is set. |
|
personalPassword |
Specifies the password on a per-user basis. Ignored if groupUsername is set. |
Example 7-2 shows example basic HTTP authentication preferences.
Example 7-2 Example Basic HTTP Authentication Preferences
<netuix:preference name="authenticationType" value="BasicHTTP" modifiable="false"/>
<netuix:preference name="groupUsername" value="your_username" modifiable="false"/>
<netuix:preference name="groupPassword" value="your_password" modifiable="false"/>
This section explains how to configure the way clipper portlets rewrite navigable links and resource URLs.
This section includes these topics:
Navigable links, such as anchor links, can be configured as follows:
Rewrite the link so that the resulting page displays in the portlet. This is the default.
Do not rewrite the link. In this case, if you click the link, the linked page opens in another browser window, not in the portlet.
Block the link. Because a clipper portlet embeds the URL that defines a page to clip in the portal request, it is possible to manually change the URL so the portlet clips an arbitrary web page. This presents a security risk, because a user could browse web pages from the WLP server, which may be behind a firewall and thus allow access to pages that aren't authorized for the given user. Clipper portlets can be configured to block this security risk.
See Section 7.6.3, "URL Rewriting Configuration Techniques" for more information.
Resource URLs point to images, stylesheets, scripts, and so on. You can configure a clipper portlet so that it either does or does not rewrite resource links so that they are proxied through the WLP server.
By default, resources are proxied, because cookies for clipped pages are stored on the WLP server. For example, if you clip a page behind a firewall, your browser will not have access to resources on the remote page. In this case, it is necessary to route resource requests through the WLP server. However, this proxying can affect WLP server performance; therefore, you have the option to turn proxying off if you don't need it.
See Section 7.6.3, "URL Rewriting Configuration Techniques" for more information.
You can configure the way URLs are rewritten by implementing a Java class called IClipperUrlFilter or by setting portlet preferences.
The SPI interface com.bea.netuix.clipper.IClipperUrlFilter is available for you to define your link rewriting rules. This interface has three methods, listed in Example 7-3. Your implementation must have a no-argument constructor. Register your implementation with the portlet using the urlFilter portlet preference. For example:
<netuix:preference name="urlFilter" value="my.package.MyUrlFilterImpl" modifiable="false"/>
For more information on setting portlet preferences, see Section 7.3.2, "Setting Clipper Properties Manually as Preferences" and see "Portlet Preferences" in the Oracle Fusion Middleware Portlet Development Guide for Oracle WebLogic Portal.
Example 7-3 IClipperUrlFilter Methods
/** Should the url be reachable from the clipper portlet?
   * If this method returns false, rewritten links containing this url will have
   * empty values (for example, a link <a href="forbidden.site.com">
   * would be rewritten to <a href="">, and a request to clip this url would
   * receive a 404 response.
   */
  boolean allowUrl(String url);

  /**
   * Should the url be rewritten to stay within portal context? If this methods
   * returns false, clicking on a link
   * to this url will take the user straight to the target url, which will render
   * the new page in the full browser, and not inside the clipper portlet.
   *
   * This method applies to navigable urls only: links in anchors, form actions,
   * etc.
   */
  boolean rewriteClickableUrl(String url);

  /**
   * For resource urls only, e.g. image, script, and style tags.
   *
   * Should the resource be proxied through the wlp server, or should the resource
   * link point
   * directly to the original resource in the remote page?
   */
  boolean rewriteResourceUrl(String url);
If you don't want to define your own class to control link rewriting, you can use these portlet preferences. For more information on setting portlet preferences, see Section 7.3.2, "Setting Clipper Properties Manually as Preferences" and see "Portlet Preferences" in the Oracle Fusion Middleware Portlet Development Guide for Oracle WebLogic Portal.
allowedUrlRegex – Set the value of this portlet preference to a regular expression. WLP tries to match URLs against this expression, and if the match fails, the link will be blocked. For example:
<netuix:preference name="allowedUrlRegex" value=".*allowedlink.*" modifiable="false"/>
proxyResourceUrls – If this portlet preference is set to false, resource URLs will not be rewritten to run through the WLP server. The default value is true. The following example turns off rewriting for resource links:
<netuix:preference name="proxyResourceUrls" value="false*" modifiable="false"/>
Suppose the clipped page has an image tag <img src="abc.com/myImage.gif"/>. If the proxyResourceUrls preference value is false, then the clipper page will have the exact same image link:
<img src="abc.com/myImage.gif"/>
But if the value is set to true, the link will look like this:
<img src="myportal.com?[BEA internal link representation]" />
This section discusses how to handle clipper portlets with HTTPS URLs.
When an HTTPS link is clipped, the link shows up as an HTTPS link in the portal page.
If you click on a clipped link that causes a redirect on the remote site from an HTTP URL to an HTTPS URL, the portal request is redirected from an HTTP URL to an HTTPS URL, as expected. However, note the following exception to this case: the initial request to the portal for a given browser session is never redirected to HTTPS. The following cases illustrate this exception:
The page www.xyz.com has a link to xyz.com/mail. This link points to http://mail.google.com/mail, and clicking that link redirects you to https://www.google.com/accounts/ServiceLogin.
If you clip http://www.xyz.com into your portal at http://myportal.com, start your browser, and click the mail link in your clipped portal, the portal request will be redirected to https://myportal.com. The clipped page will be redirected to, for example, https://www.xyz.com/accounts/ServiceLogin, and you will see that page.
If you clip http://mail.xyz.com/mail, and you start your browser and open the portal, then you will not be redirected to HTTPS. The clipped page will still follow the redirect to, for example, https://www.zyz.com/accounts/ServiceLogin, so the page contents will look fine, but the route from the browser to the WLP server will not use HTTPS. Note that the "Sign In" form on that page has an HTTPS action URL, so the action for the clipped form will point to https://myportal.com.
Likewise, if you clip https://www.xyz.com/accounts/ServiceLogin, and you start your browser and go to http://myportal.com, then you will not be redirected to HTTPS on that initial request.
For WLS to make an HTTPS request to a site, it must have a certificate for that site in its keystore. If the certificate is not available, you will see exceptions such as:
[Security:090477]Certificate chain received from aaa.bbb.com - 10.123.45.67 was not trusted causing SSL handshake failure.
For detailed information on configuring SSL in WLS, see "Configuring Identity and Trust" in Oracle Fusion Middleware Securing Oracle WebLogic Server. The basic steps to configure a clipper portlet to use HTTPS correctly are:
Obtain a security certificate for the site you are trying to clip.
Tip:
One way to obtain the certificate is to use the Firefox plug-in called "Cert Viewer Plus." This plug-in lets you view and save the security certificate.Open a command shell and navigate to the root directory of your domain.
Locate the trust keystore; for example, DemoTrust.jks.
Obtain the password for the keystore.
Use the Java keytool program to import the key. For example:
keytool -import -file my_certificate_file -keystore DemoTrust.jks -alias some_unique_alias
The alias value is an alias unique to that .jks file. You can view the aliases with the command:
keytool -list -keystore DemoTrust.jks
By default, if a user clicks a link inside a clipper portlet, then visits another page within the portal, and then returns to the page with the clipper portlet, the clipper portlet "remembers" and displays the last URL rendered within the clipper portlet. It is possible, however, to change this default behavior.
The refresh feature discussed in this section allows you to configure a clipper portlet to return to its original state in response to an onActivation portal event instead of rendering the portlet with the currently cached URL for the clipper portlet. This type of event is fired by a page change or when the portlet is minimized/restored.
Tip:
The refresh feature automatically returns to the URL specified by theremoteURL portlet preference for the clipper portlet. This preference specifies the initial URL for the clipper portlet. You specify this URL when you create the clipper portlet. You can change it by clicking the Portlet Preferences bar in the clipper portlet editor.
Note that another remoteURL property is cached with the clipper portlet's state in the session. This cached property keeps track of the last URL accessed by the user in the clipper portlet. This cached property is not necessarily the same as the remote URL specified by the portlet preference.
The following steps illustrate how to configure a clipper portlet to return to its original state in response to an onActivation portal event.
In the portlet editor, click the Event Handlers link. If no handlers have been created previously, the link is called No Event Handlers, as shown in Figure 7-5.
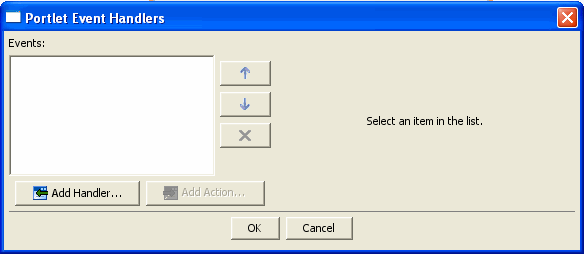
In the Portlet Event Handlers dialog click Add Handler, as shown in Figure 7-6.
Figure 7-6 Portlet Event Handlers Dialog Box
From the drop down list, select Handle Portal Event.
The Portlet Event Handlers dialog box expands to allow entry of more details.
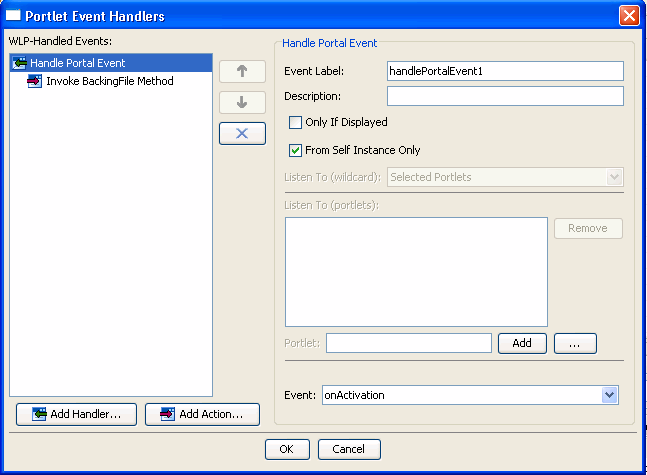
Uncheck the Only If Displayed checkbox.
Check the From Self Instance Only checkbox.
From the Event dropdown menu, select onActivation. See Figure 7-7.
Figure 7-7 Event Handler Dialog Box Expanded
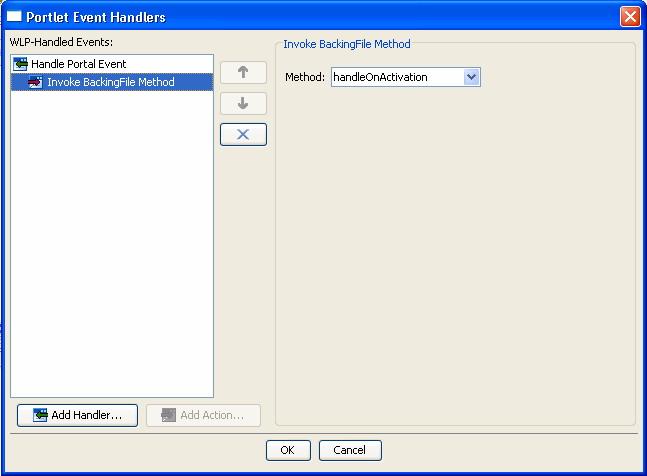
Click Add Action and select Invoke Backing File.
Set the backing file method to handleOnActivation, as shown in Figure 7-8.
Note:
All clipper portlets reference the backing filecom.bea.netuix.clipper.ClipperBacking. You can see this backing file referenced in the clipper portlet properties editor and in the .portlet file. This backing file class has the method called handleOnActivation(), which is called in response to the onActivation event. This method handles the details of restoring the clipper portlet to its original state. See also Section 7.10, "Using Backing Files with Clipper Portlets."Figure 7-8 Specifying the Backing File Method
Click OK.
The event handler is added, and now the clipper portlet will be restored to its original state whenever an onActivation event is fired.
Example 7-4 shows a properly-configured sample .portlet file that reflects the result of the above configuration steps.
Example 7-4 Configured .portlet File Sample
<netuix:portlet backingFile="com.bea.netuix.clipper.ClipperBacking" definitionLabel="myClipper" title="Myclipper">
    <netuix:handlePortalEvent event="onActivation"
         eventLabel="handlePortalEvent1"
         fromSelfInstanceOnly="true" onlyIfDisplayed="false">
         <netuix:invokeBackingFileMethod method="handleOnActivation"/>
    </netuix:handlePortalEvent>
    <netuix:titlebar>
        <netuix:minimize/>
    </netuix:titlebar>
    <netuix:content>
        <netuix:jspContent contentUri="/clipper/clipper.jsp"/>
    </netuix:content>
    <netuix:preference modifiable="false" name="remoteUrl"  value="http://www.oracle.com"/>
</netuix:portlet>
The clipper portlet comes with its own backing file. For detailed information on backing files, see "Backing Files" in the Oracle Fusion Middleware Portlet Development Guide for Oracle WebLogic Portal.
To add your own backing file to a clipper portlet, do the following:
Create your own backing class that extends com.bea.netuix.clipper.ClipperBacking.
For any of the backing file methods you override, call the super class on that method.
Set the backingFile attribute in your .portlet file to your backing class.
If you change the preferences for a clipper portlet in the .portlet file, the changes are not picked up at runtime unless you set the following attribute in the WEB-INF/netuix-config.xml file:
<propagate-preferences-on-deploy propagate-to-instances='true' master='file'/>
Preference changes that are made in the Administration Console are picked up automatically.
The following are known limitations on the clipper portlet feature. These limitations may or may not apply to future releases.
Authentication preferences are not encrypted.
JavaScript in remote pages is not fully supported. Sites with that use JavaScript may work, but it is not guaranteed.
Persistent cookies are not supported. Remote cookies only last as long as the main portal session.
The current remote URL for a clipper portlet is stored in the session. This means that to reset your clipper window, you need to close and restart your browser.