13 Performing Postupgrade Tasks After Upgrading to Enterprise Manager Cloud Control 12c Release 5 (12.1.0.5)
This chapter describes the postinstallation tasks you must perform. In particular, this part covers the following:
-
Discovering the Database Where the Management Repository Was Upgraded
-
Viewing Inactive Targets in the Upgraded Enterprise Manager System
-
Signing Off the Migration Processes and Exiting the Upgrade Mode
-
(Optional) Monitoring Targets That Were Monitored by the Deleted Central Agent
-
Migrating the SYSMAN Schema to a Database Configured with CDB and PDB
13.1 Verifying the Host on Which Enterprise Manager Is Installed
Note:
Follow these instructions only if you are upgrading using the 2-System upgrade approach.For 2-system upgrade approach, Oracle recommends that you use a clean, fresh host for installing Enterprise Manager Cloud Control 12c Release 5 (12.1.0.5). Verify that you have installed on a fresh host.
To do so, on the Management Services and Repository page, click the information icon adjacent to the page title. In the Target Information region that appears, as shown in Figure 13-1, validate the host name and make sure it reflects the host on which you have installed the new 12c OMS. Also verify that the same host name appears on the top-right corner of the page, right below the Search Target Name text box, as shown in Figure 13-1.
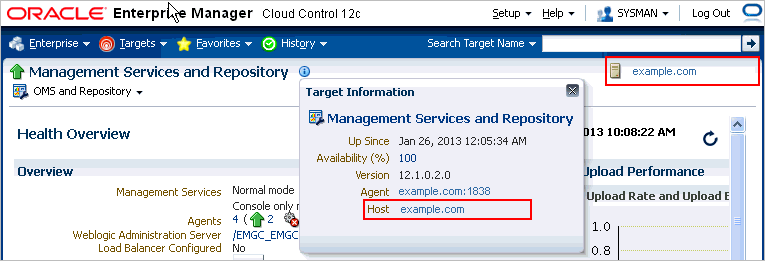
If the host names match and if they reflect the host on which you have installed the new 12c OMS, then it is a confirmation that you have installed on a fresh host.
If one of them reflects a different host name, then it is a confirmation that you have installed on a host that already has a Management Agent. Under such circumstances, follow these steps:
-
Deinstall the Management Agent that already exists. Clean up or remove information related to this Management Agent and the targets monitored by it, from the Management Repository. For instructions, see Oracle Enterprise Manager Cloud Control Advanced Installation and Configuration Guide.
-
Add the host as a target to the new Management Agent, which was installed with the new 12c OMS as part of the 2-system upgrade.
To do so, run the following command from the new Management Agent home:
$<AGENT_HOME>/bin/emctl config agent addInternaltargets -
Verify that the host is added as a target in Enterprise Manager Cloud Control Console. To do so, on the Management Agent home page, in the Monitoring section, in the Monitored Targets tab, verify that the host is listed.
-
Relocate the Management Services and Repository target, which is monitored by the Management Agent installed with the old OMS host, to the new Management Agent, which was installed with the new 12c OMS as part of the 2-system upgrade.
To do so, log in as SYSMAN and run the following command from any host where EM CLI is installed:
emcli relocate_targets -src_agent="<agent_installed_with_old_OMS>" -dest_agent="<new_agent_installed_with_new_12c_OMS>" -target_name="Management Services and Repository" -target_type=oracle_emrep -copy_from_src -
Set the connect descriptor and credentials of the new, upgraded Management Repository as the monitoring configuration settings of the Management Services and Repository target.
To do so, on the Management Services and Repository Home page, from the OMS and Repository menu, select Target Setup, then select Monitoring Configuration. On the Monitoring Configuration page, enter the connect descriptor and the credentials of the new, upgraded Management Repository. Click OK.
13.2 Creating a Link to the Upgraded Management Repository
Note:
Follow these instructions only if you are upgrading using the 2-System upgrade approach. Perform these steps in the Enterprise Manager Grid Control console of the earlier release.As a prerequisite for upgrading your Enterprise Manager system using the 2-System upgrade approach, you are required to clone (or back up) your existing database first, and then upgrade the Oracle Management Repository (Management Repository) that is configured in it. This is to ensure that the upgraded Management Repository coexists with the earlier release of the Management Repository.
However, after you upgrade the Management Repository in the backed up database, link it to your earlier release of the Management Repository so that the two repositories are linked with each other, and any operations on the upgraded repository can be directly done from the old repository.
WARNING:
Verify the value set to the GLOBAL_NAMES parameter on both the databases:
-
If the GLOBAL_NAMES parameter is set to FALSE on both the databases, then ensure that you do not change this value until the upgrade is complete, and all the Management Agents are switched over.
-
If the GLOBAL_NAMES parameter is set to TRUE on even one of the databases, and if both the databases have the same value for the GLOBAL_NAME parameter, then change the value of the GLOBAL_NAME parameter set on the new, cloned database to a value that is different from the one set on the old database.
To link the earlier release of the repository to the upgraded repository, follow these steps:
-
In Grid Control, click Deployments.
-
On the Deployments page, in the Upgrade section, click Enterprise Manager 12c Upgrade Console.
-
On the Upgrade Console page, in the Select Upgrade Type section, select 2-System. For information about these upgrade approaches, see Chapter 2.
Enterprise Manager Grid Control refreshes the page and displays a table with a list of tasks you need to perform for the upgrade approach you selected.
-
In the OMS Upgrade Steps section, from the table, click Create Link to Upgraded Repository.
-
On the Create Upgraded Oracle Management Repository Link page, in the Repository Link Details section, do the following:
-
Enter the connect string to connect to the upgraded Management Repository that will be used by Enterprise Manager Cloud Control.
Note:
You will find the connect string set as a value to theEM_REPOS_CONNECTDESCRIPTORparameter of theemgc.propertiesfile. This file is present in the OMS Instance Base directory (gc_inst). When you enter this value as the connect string, remove all backslashes (\) and white spaces if any.For example, the value in the
emgc.propertiesfile might be:(DESCRIPTION\=(ADDRESS_LIST\=(ADDRESS\=(PROTOCOL\=TCP)(HOST\=example.com)(PORT\=1521)))(CONNECT_DATA\=(SID\=emrep)))When you enter this value as the connect string, it must look like this:
(DESCRIPTION=(ADDRESS_LIST=(ADDRESS=(PROTOCOL=TCP)(HOST=example.com)(PORT=1521)))(CONNECT_DATA=(SID=emrep)))If you connect using service name instead of SID, then replace
SIDin the syntax withSERVICE_NAME. -
Enter the SYSMAN password of the upgraded Management Repository that will be used by Enterprise Manager Cloud Control.
-
Enter the SYS password of the old Management Repository.
-
-
Click Create DB Link.
Note:
If you had already provided these details and linked the two repositories, and if you are updating the connect descriptor or the SYSMAN password, then click Re-create DB Link.13.3 Discovering the Database Where the Management Repository Was Upgraded
Note:
Follow these instructions only if you are upgrading using the 2-System upgrade approach.After completing the 2-System upgrade, manually discover the database where you upgraded the Management Repository so that the database can be monitored in the Enterprise Manager Cloud Control Console.
For instructions, see Oracle Enterprise Manager Cloud Control Administrator's Guide.
13.4 Reconfiguring the Software Library
Note:
Follow these instructions only if you are upgrading using the 2-System upgrade approach.To reconfigure an upgraded Software Library in a two-system upgrade, perform these steps:
Note:
-
In a one-system upgrade, where the upgraded Enterprise Manager 12c comes up on the same host, reconfiguration is not required as the upgraded Software Library becomes functional when the system starts.
For a one system upgrade, where the upgraded Enterprise Manager 12c comes up on a different host, all the location(s) configured in the earlier, existing Enterprise Manager system for Software Library should be accessible from the new host.
-
In a two-system upgrade, and sometimes in a one-system upgrade on a different host, if the location configured in the earlier, existing Enterprise Manager system is a local file system path, then follow the instructions outlined in Section 9.1 for more information.
-
In Cloud Control, from Setup menu, select Provisioning and Patching and then, click Software Library.
-
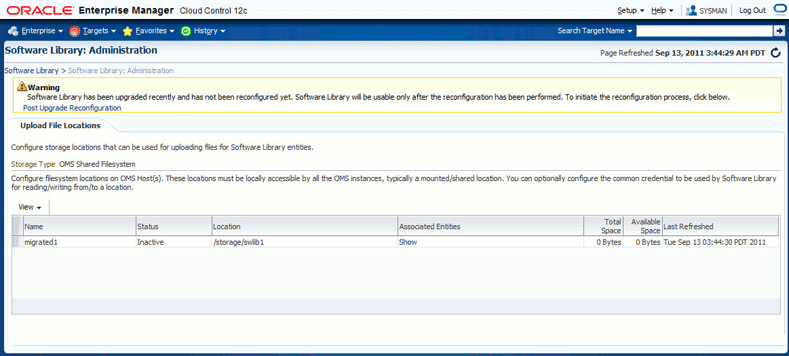
If the Software Library has been upgraded, then on the Software Library home page, the following notification will appear:
Software Library has been upgraded recently and has not been reconfigured yet. Software Library will be usable only after the reconfiguration has been performed. To initiate the reconfiguration process, click Post Upgrade Reconfiguration.Click Post Upgrade Reconfiguration, to reconfigure the Software Library.
-
On the Software Library Reconfigure Locations page, enter the new file system location that is to be configured, corresponding to the location configured in the earlier, existing Enterprise Manager system.
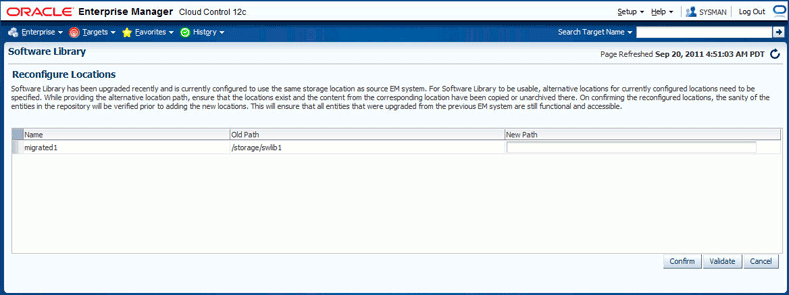
The archive of the location which was configured for the old Enterprise Manager system must be unzipped in the corresponding location on the new file system. Also, ensure that the new location, and all its unarchived files and directories have read/write permissions for the 12c OMS process owner.
For example:
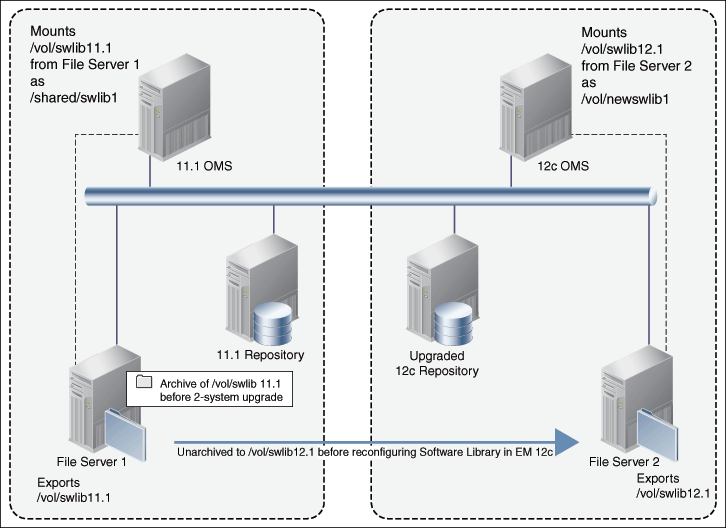
In the earlier, existing Enterprise Manager system, lets assume that the Software Library was configured to use the following file system locations:
/shared/swlib1
/shared/swlib2
After an upgrade, on the Reconfigure Locations page, you will see:
migrated1, /shared/swlib1
migrated2, /shared/swlib2
where,
migrated1andmigrated2are names automatically assigned to the upgraded locations.Note:
Since the new locations are only reconfiguring the OMS Shared File System storage locations, you must ensure that these new locations are either NFS-mounted shared locations or OCFS2 shared locations.You should then provide an alternate file system path for each of the existing locations. For example, as follows:
migrated1, /shared/swlib1, /vol/newswlib1
migrated2, /shared/swlib2, /vol/newswlib2
Before confirming this configuration, you must ensure that the new locations have the corresponding back ups of the configured Software Library directories unarchived, which means,
/vol/newswlib1should have the same content as/shared/swlib1,/vol/newswlib2should have the same content as/shared/swlib2had when the backup was taken.-
Click Validate to submit a validation job that performs exhaustive validation checks on the entities being migrated. Ensure that you track this job to completion. If there are any validation errors, then it will appear on the job step. Some of the common validation errors are:
- The new location specified for reconfiguration does not exist.
- The new location specified for reconfiguration does not have read/write permissions for the OMS process owner.
- The content of the location(s) configured in the old Enterprise Manager Software Library is not restored in the corresponding new location specified for reconfiguration.
-
After a successful validation, click Confirm to reconfigure the Software Library. A job starting with
SwlibUpgradeLocationsis submitted, which must be tracked to successful completion, following which you should initiate any patching or provisioning tasks.
-
13.5 Checking the Agent Upgrade Status
Note:
Perform these steps in the Enterprise Manager Grid Control console of the earlier release.To check the status of the agent upgrade operations, follow these steps:
-
In Grid Control, click Deployments.
-
On the Deployments page, in the Upgrade section, click Enterprise Manager 12c Upgrade Console.
-
On the Upgrade Console page, do the following:
-
For macro-level details, in the Agent Upgrade Status section, view the count displayed against the following:
-
Successful, to identify the Management Agents that have been successfully upgraded.
-
Failed, to identify the Management Agents that failed to get upgraded.
-
In Progress, to identify the Management Agents that are currently being upgraded.
-
Not Started, to identify the Management Agents that are yet to be upgraded.
-
Not Supported, to identify the Management Agents that are not supported in the upgraded Enterprise Manager system because Oracle Management Agent 12c is not released for a particular platform.
To drill down and view more information, click the count value. Enterprise Manager Grid Control displays the Agent Upgrade Status page that provides information.
-
-
For micro-level details, in the Other Links section, click Agent Upgrade Status.
On the Agent Upgrade Status page, do the following:
-
To filter the list according to your needs and view only the upgrade operations that interest you, use the search functionality.
For example, to view only the deployment operations that have failed, select Deployment from the Operation Type list, and select Failed from the Operation Status list, and click Search.
Note:
An Operation Type refers to a job submitted for a particular agent upgrade step such as Deployment, Configuration, Health Check, Upgrade, or Switch Over. An operation name refers to the operation name you specified while submitting any of these jobs. And each of these operations can have a status such as Not Started, In Progress, Success, Not Supported, Failed, or Pending Report Verification. -
To deploy the agent software, select one or more Management Agent from the table, and click Deploy and Configure Agent.
Note:
You cannot deploy and configure Oracle Management Agent 12c for problematic Management Agents. To identify problematic Management Agents, see Section 10.6.5.Also, you can deploy and configure Oracle Management Agent 12c only on existing Management Agents that are either completely upgradable or upgradable with missing plug-ins. To identify the upgradability status of the Management Agents, see Section 10.6.3.
-
To check the health and readiness of the deployed Management Agent, select one or more Management Agents, and click Check Agent Readiness.
-
To view the readiness check details, select one or more Management Agents, and click View and Verify Health Check Reports.
On the Agent Readiness Check Details page, review the reports one by one. If you want to confirm that you have verified the report, then select the Management Agent and click Verify and Sign Off Report. If you want to view more details about the readiness check, then select the Management Agent and click View Detailed Report.
-
To switch over the agents, select one or more Management Agents, which have successfully been deployed, configured, and health-checked, and click Switch Agent.
-
-
13.6 Performing General Postupgrade Tasks
This section describes the postupgrade steps you must follow after upgrading to Enterprise Manager Cloud Control. In particular, this section describes the following postupgrade steps:
-
Restarting the Central Agent When Additional OMS Is Upgraded
-
Reconfiguring Oracle WebLogic Server with Custom Certificates
-
Restarting the Management Agent After Upgrading an Additional OMS
-
Enabling the Compliance Standards That Were Disabled in the Previous Release
-
Enabling Upgrade of Job Types That Were Skipped Before the Upgrade of the Enterprise Manager System
13.6.1 Performing General Postupgrade Steps After Upgrading to Enterprise Manager Cloud Control 12c Release 5 (12.1.0.5)
Perform the following general postupgrade tasks:
-
Follow the postupgrade steps outlined in the chapter that describes how to install a new Enterprise Manager system, in the Oracle Enterprise Manager Cloud Control Basic Installation Guide.
-
As a sanity check, ensure that all the database parameters are reset to their original values that existed before you started the upgrade operation, particularly for the
job_queue_processesparameter. -
(Only for 1-System Upgrade Approach) Start the Management Agent that monitors the Management Services and Repository target. Before starting the 2-system upgrade, you would have shut it down to prevent it from connecting to the Management Repository for metric collections. After upgrade, make sure you start it.
13.6.2 Patching Oracle WebLogic Server
While upgrading the Enterprise Manager system, in the installer if you had provided a middleware home location that already contained an Oracle WebLogic Server of the supported version, which you had installed yourself before invoking the installer, then make sure you apply the patches 14482558, 13349651, and 16080294 on that Oracle WebLogic Server. Without these patches, the additional OMS installation will fail.
These patches are required only if you are using an Oracle WebLogic Server that you installed yourself. They are not required if you provided an empty middleware home location and let the installer install the Oracle WebLogic Server while performing the upgrade.
In addition, apply the WebLogic Server PSU 10.3.6.8, as it contains several performance and security fixes.
13.6.3 Upgrading Oracle Exalogic System Targets
Note:
This section is NOT applicable for upgrade from 10g Release 5 (10.2.0.5).Ensure that you upgrade your Oracle Exalogic System targets.
-
To do so, from the Enterprise menu, select Job, then select Library.
-
On the Job Library page, select the job name UPGRADE EXALOGIC SYSTEMS TO FUSION MIDDLEWARE 12.1.0.3.0 MODEL, and click Submit.
For the job to run successfully and upgrade the Oracle Exalogic System targets, you should have already upgraded the Management Agents, which are monitoring these targets, to the following supported release so that they contain 12.1.0.3 or later versions of the Oracle Fusion Middleware Plug-in.
-
If you upgraded from Enterprise Manager Cloud Control 12c Release 4 (12.1.0.4), and if you had not performed this step when you upgraded to 12c Release 4 (12.1.0.4), then perform this step now in 12c Release 5 (12.1.0.5). Ensure that the Management Agent in this case is either 12c Release 5 (12.1.0.5), 12c Release 4 (12.1.0.4), 12c Release 3 (12.1.0.3), or 12c Release 2 (12.1.0.2).
-
If you upgraded from Enterprise Manager Cloud Control 12c Release 3 (12.1.0.3), and if you had not performed this step when you upgraded to 12c Release 3 (12.1.0.3), then perform this step now in 12c Release 5 (12.1.0.5). Ensure that the Management Agent in this case is either 12c Release 5 (12.1.0.5), 12c Release 3 (12.1.0.3), or 12c Release 2 (12.1.0.2).
-
If you upgraded from Enterprise Manager Cloud Control 12c Release 2 (12.1.0.2), and if you had not performed this step when you upgraded to 12c Release 2 (12.1.0.2), then perform this step now in 12c Release 5 (12.1.0.5). Ensure that the Management Agent in this case is either 12c Release 5 (12.1.0.5) or 12c Release 2 (12.1.0.2).
-
If you upgraded from 11g Release 1 (11.1.0.1) to 12c Release 5 (12.1.0.5), then the Management Agent must be 12c Release 5 (12.1.0.5).
If one or more such Management Agents are not upgraded yet to any of these supported releases, then the job fails and does not upgrade the Oracle Exalogic System targets. Under such circumstances, to resolve the issue, first upgrade those Management Agents, and then try submitting this job to upgrade the Oracle Exalogic System targets.
13.6.4 Restarting the Central Agent When Additional OMS Is Upgraded
After you upgrade an additional OMS of 10g Release 5 (10.2.0.5) to 12c Release 5 (12.1.0.5) using 1-system upgrade approach, the targets that begin with /EMGC_GCDomain/GCDomain might appear as if they are down.
/EMGC_GCDomain/GCDomain/EMGC_OMS2
/EMGC_GCDomain/GCDomain/EMGC_OMS2/emgc
/EMGC_GCDomain/GCDomain/EMGC_OMS2/empbs
/EMGC_GCDomain/GCDomain/EMGC_OMS2/OCMRepeater
/EMGC_GCDomain/GCDomain/EMGC_OMS2/oracle.security.apm(11.1.1.3.0)
To resolve this issue, first check if the Management Agent on the additional OMS host is up, then refresh the Weblogic domain in the Enterprise Manager Cloud Control Console, and then restart the Management Agent on the additional OMS host.
13.6.5 Stopping the OCM Scheduler
If OCM was installed in the Enterprise Manager system that you upgraded, then follow these steps:
-
If you upgraded from Enterprise Manager 10g Grid Control Release 5 (10.2.0.5), then follow these steps:
-
Set the environment variable
ORACLE_HOMEto the upgraded OMS home.-
In bash terminal, run the following command:
export ORACLE_HOME=<absolute_path_to_oms_home> -
In other terminals, run the following command:
setenv ORACLE_HOME <absolute_path_to_oms_home>
-
-
Stop the OCM scheduler:
$ORACLE_HOME/ccr/bin/emCCR stop
Note:
If you have the OCM scheduler installed on Oracle Management Agent, then repeat these steps on the Management Agent home as well. In this case, set the environment variableORACLE_HOMEto the Management Agent home as described in Step (1), and perform Step (2) from its home. -
-
If you upgraded from Enterprise Manager 11g Grid Control Release 1 (11.1.0.1), then
-
Set the environment variable
ORACLE_CONFIG_HOMEto the OMS instance home:-
In bash terminal, run the following command:
export ORACLE_CONFIG_HOME=<absolute_path_to_gc_inst> -
In other terminals, run the following command:
setenv ORACLE_CONFIG_HOME <absolute_path_to_gc_inst>
-
-
Set the environment variable
ORACLE_HOMEto the OMS home:setenv ORACLE_HOME <absolute_path_to_oms_home> -
Stop the OCM scheduler:
$ORACLE_HOME/ccr/bin/emCCR stop
Note:
If you have the OCM scheduler installed on Oracle Management Agent, then repeat these steps on the Management Agent home as well. In this case, skip Step (1), set the environment variableORACLE_HOMEto the Management Agent home as described in Step (2), and perform Step (3) from its home. -
13.6.6 Deleting Obsolete Targets
Targets that were created to monitor the earlier release of Enterprise Manager are not deleted automatically. This is because you might have created notification rules, metric threshold settings, compliance standard settings, jobs, and so on for these targets, and you might want to copy them to the new Oracle WebLogic Server targets of Enterprise Manager Cloud Control. After copying them, manually delete these targets.
This section describes how you can delete these obsolete targets. In particular, this section covers the following:
13.6.6.1 Deleting the Obsolete Targets After 1-System Upgrade
-
After upgrading from Enterprise Manager Cloud Control 12c Release 4 (12.1.0.4), 12c Release 3 (12.1.0.3), or 12c Release 2 (12.1.0.2), you will not have any obsolete targets to delete. In this case, you can ignore this section.
-
After upgrading from Enterprise Manager 10g Grid Control Release 5 (10.2.0.5), the following targets are not deleted automatically. You must delete them manually.
-
EM Website
-
EM Website System
-
Microsoft Operations Manager Connector Target (generic_mom_managed_host)
-
The following targets of each old OMS. You can delete these by deleting the top-level Oracle Application Server target of each old OMS.
-
Oracle Application Server
-
OC4J
-
Oracle HTTP Server
-
Web Cache
-
-
-
After upgrading from Enterprise Manager 11g Grid Control Release 1 (11.1.0.1), the following targets are not deleted automatically. You must delete them manually.
-
EM Website
-
EM Website System
-
Microsoft Operations Manager Connector Target (generic_mom_managed_host)
-
The following targets of each old OMS. You can manually delete these by deleting the top-level farm target
secFarm_GCDomain.-
Oracle Fusion Middleware Farm
-
Oracle Weblogic Domain
-
Application Deployment
-
Metadata Repository
-
Note:
After you upgrade your Enterprise Manager using the 1-System upgrade approach, these targets might appear as if they are up and running. This status is false. In any case, do not investigate to resolve the status issue. Manually delete the targets as they are no longer needed in the Enterprise Manager Cloud Control. -
13.6.6.2 Deleting the Obsolete Targets After 2-System Upgrade
-
Manually delete these targets:
-
EM Website
-
EM Website System
-
Microsoft Operations Manager Connector Target (generic_mom_managed_host)
-
-
As part of 2-system upgrade, the central agent and the targets monitored by it are automatically deleted, and therefore, you need not manually delete the old central agent.
If you want to continue to monitor some of the targets that were automatically deleted, then install Oracle Management Agent 12c on that host. For instructions, see Oracle Enterprise Manager Cloud Control Basic Installation Guide.
13.6.7 Cleaning Up Stale Compliance Standards of Deleted Targets
From the Enterprise Manager Cloud Control Console (or from EM CLI), when you delete a target that is associated with a user-defined compliance standard, the target is deleted from the Enterprise Manager system but its user-defined compliance standard is not removed completely. This causes an issue when attempting to edit this compliance standard later on. To circumvent this issue, after upgrading the Enterprise Manager system, manually delete all stale compliance-related data for the deleted targets.
To verify if you have any stale, compliance-related data for the deleted targets, run the following SQL query manually as SYSMAN user on the Management Repository. If the result of the query is greater than zero, then manually delete the stale data.
select count(*) from em_cs_tgt_assoc_txf_req where root_target_guid not in (select target_guid from mgmt_targets);
To manually delete all stale compliance-related data for the deleted targets, follow these steps:
-
Log in to the database, which houses the Management Repository, as SYSMAN user.
-
Run the cleanup script uploaded to My Oracle Support note 1643222.1:
SQL>@cleanup_stale_data.sql -
Run the following SQL query manually, and make sure the output is zero:
SQL> select count(*) from sysman.em_cs_tgt_assoc_txf_req where root_target_guid not in (select target_guid from mgmt_targets);
13.6.8 Updating Incident Rules
During upgrade, all Notification Rules created in the earlier release of Enterprise Manager are automatically migrated to corresponding Incident Rulesets that act on the targets originally defined in the Notification Rule. For more information about Incident Rulesets, see Appendix B.
However, for situations where the target type modeling has changed in Enterprise Manager Cloud Control, you must manually adjust the rules. This section describes how you can manually adjust the rulesets.
In particular, this section covers the following:
13.6.8.1 About Updating the Incident Rules
In the earlier releases of Enterprise Manager, OMS and Repository was a common target type defined for all the OMS instances in your environment. And the metrics collected for the different OMS instances were shown within this common target type.
However, in Enterprise Manager Cloud Control, in addition to the target type OMS and Repository, a new target type Oracle Management Service has been introduced to represent each of the OMS instances in your environment. Therefore, if you have five OMS instances in your environment, you will see one target type OMS and Repository and five instances of the target type Oracle Management Service - one for each OMS.
While the target type OMS and Repository captures metrics that are common to all the OMS instances in your environment, the target type Oracle Management Service captures metrics specific to an OMS.
Table 13-1 lists the metrics and describes the changes done to them due to the introduction of a new target type Oracle Management Service, and the actions you must take for each change.
Table 13-1 Changes to Metrics and Updates to Be Done
| Change Type | Change Description | Affected Metrics | Action to Be Taken by You |
|---|---|---|---|
|
Some metrics have been retained for the same target type —OMS and Repository. |
The following metrics have been retained:
|
No changes required. |
|
|
Some metrics have been moved to the individual target type—Oracle Management Service. |
The following metrics have been moved:
|
Set up new incident rules to respond to the metrics that have been moved to different target types. See Section 13.6.8.2 |
|
|
Some metrics have been renamed for easy undersanding. |
The following metrics have beenhave been renamed:
|
Update the incident rules set to the metrics that have been renamed. See Section 13.6.8.3 |
|
|
Some metrics have been decommissioned due to lack of support in Enterprise Manager Cloud Control. |
The following metrics have been decommissioned:
|
Remove decommissioned metrics from the incident rules. See Section 13.6.8.4 |
13.6.8.2 Updating the Incident Rules for Moved Metrics
To update the incident rules set to the metrics that have been moved to the individual target type Oracle Management Service in Enterprise Manager Cloud Control, follow these steps:
-
In Cloud Control, from the Setup menu, select Incidents, and then, click Incident Rules.
-
On the Incident Rules page, from the table, select an incident rule created for Oracle Management Service (OMS), click Edit.
-
On the Edit Rule Set page, in the Rules tab, select the event rule that operates on the moved metrics, and click Edit.
Enterprise Manager displays the Edit Rule Wizard where you can edit the incident rule for the selected incident rule set.
-
In the Edit Rule Wizard, do the following:
-
On the Select Events page, select the metrics listed in the second row of Table 13-1, and click Remove.
-
Click Next.
-
On the Add Actions page and the Specify Name and Description page, click Next without making any change.
-
On the Review page, click Continue.
-
-
Click Save.
Enterprise Manager displays the Incident Rules page.
-
On the Incident Rules page, click Create Rule Set.
-
On the Create Rule Set page, enter a unique name for the rule set.
-
In the Targets tab, select All targets of types, and select Oracle Management Service.
-
In the Rules tab, click Create.
-
In the Select Type of Rule to Create dialog, select Event Rule, and click Continue.
Enterprise Manger displays the Create New Rule Wizard where you can create a new incident rule set.
-
In the Create New Rule Wizard, do the following:
-
On the Select Events page, from the Event Type list, select Metric Alert.
Note:
For the metric Management Service Status, select Target Availability from the Event Type list. -
Select Specific metric alerts, and click Add.
-
In the Select Specific Metric Alert dialog, do the following:
-
In the Search region, from the Target Type list, select Oracle Management Service, and then, click Search.
-
From the table, select the moved metrics listed in the second row of Table 13-1.
-
In the Severity and Corrective Action Status region, from the Severity list, select an appropriate severity level.
-
Click OK.
-
-
Click Next.
-
On the Add Actions page and the Specify Name and Description page, click Next without making any change.
-
On the Review page, click Continue.
-
-
Click Save.
Enterprise Manager displays the Incident Rules page.
Note:
Repeat the procedure for all other incident rules created for the OMS.13.6.8.3 Updating the Incident Rules for Renamed Metrics
To update the incident rules set to the metrics that have been renamed in Enterprise Manager Cloud Control, follow these steps:
-
In Cloud Control, from the Setup menu, select Incidents, and then, click Incident Rules.
-
On the Incident Rules page, from the table, select an incident rule created for Oracle Management Service (OMS), click Edit.
-
On the Edit Rule Set page, in the Rules tab, select the event rule that operates on the renamed metrics, and click Edit.
Enterprise Manager displays the Edit Rule Wizard where you can edit the incident rule for the selected incident rule set.
-
In the Edit Rule Wizard, do the following:
-
On the Select Events page, select the metrics listed in the third row of Table 13-1, and click Remove.
-
Click Add.
-
In the Select Specific Metric Alert dialog, do the following:
-
In the Search region, from the Target Type list, select OMS and Repository, and then, click Search.
-
From the table, select the renamed metrics listed in the third row of Table 13-1.
-
In the Severity and Corrective Action Status region, from the Severity list, select an appropriate severity level.
-
Click OK.
-
-
Click Next.
-
On the Add Actions page and the Specify Name and Description page, click Next without making any change.
-
On the Review page, click Continue.
-
Note:
Repeat the procedure for all other incident rules created for the OMS.13.6.8.4 Deleting Incident Rules
To remove the decommissioned metrics from the the incident rules, follow these steps:
-
In Cloud Control, from the Setup menu, select Incidents, and then, click Incident Rules.
-
On the Incident Rules page, from the table, select an incident rule created for Oracle Management Service (OMS), click Edit.
-
On the Edit Rule Set page, in the Rules tab, select the rule Metric Alerts Event Rule, and click Edit.
Enterprise Manager displays the Edit Rule Wizard where you can edit the incident rule for the selected incident rule set.
-
In the Edit Rule Wizard, do the following:
-
On the Select Events page, select the metrics listed in the last row of Table 13-1, and click Remove.
-
Click Next.
-
On the Add Actions page and the Specify Name and Description page, click Next without making any change.
-
On the Review page, click Continue.
-
Note:
Repeat the procedure for all other incident rules created for the OMS.13.6.9 Disabling Incident Rule Sets
If you upgraded using the 2-System upgrade approach, then disable the default incident rule sets. If you do not disable them, the incidents are automatically created for all critical metric alerts.
To disable the default incident rule sets, follow the steps:
-
In Cloud Control, from the Setup menu, select Incidents, and then select Incident Rules.
-
On the Incident Rules - All Enterprise Rules page, scroll down the table, and expand Incident management Ruleset for all targets.
-
Select the row for the rule set you want to disable.
-
From the Actions menu, click Disable.
-
On the pop-up window, click OK.
-
Repeat Step (3) to Step (5) for every rule set you want to disable.
-
Once all the rule sets are disabled, ensure that the Enabled column of the table shows No with a warning icon next to it.
13.6.10 Resolving Metric Collection Errors for SOA Target
If you were monitoring a SOA target in your earlier release of Enterprise Manager, then in the health report you generated as described in Section 11.2, you might have seen metric collection errors for the metrics Top SOA SQL Queries and Dehydration Store Tables.
To resolve that issue, access the Monitoring Configuration page of the SOA target, and provide the database credentials.
13.6.11 Enabling Linux Patching After Upgrading Enterprise Manager
Note:
This section is applicable only when you upgrade from Enterprise Manager 10g Grid Control Release 5 (10.2.0.5) or Enterprise Manager 11g Grid Control Release 1 (11.1.0.1) to Enterprise Manager Cloud Control 12c.If you had scheduled any jobs of the types DownloadLatestPkgs or UpdateHostPackages in the previous release, then after upgrading to 12c Release 5 (12.1.0.5), those jobs will fail due to missing credentials. Therefore, to resolve this issue, you can do one of the following:
13.6.11.1 Resubmitting All Active Linux Patching Jobs After Stopping the Jobs and Resetting their Credentials
After the upgrade, you must stop all active Linux patching jobs that were submitted prior to the upgrade, reset their credentials, and then resubmit the jobs on the same targets. To do so, follow the instructions outlined in the following sections:
-
Resubmitting DownloadLatestPackages Jobs After Stopping them and Resetting their Credentials
-
Resubmitting UpdateHostPackages Jobs After Stopping Them and Resetting their Credentials
Note:
If you do not want to stop the active Linux patching jobs, then see Section 13.6.11.2.13.6.11.1.1 Resubmitting DownloadLatestPackages Jobs After Stopping them and Resetting their Credentials
To stop and resubmit all DownloadLatestPackages jobs, follow these steps:
-
Stop active jobs which were scheduled prior to upgrade as follows:
-
From the Enterprise menu, select Job and then Activity. The Job Activity page is displayed.
-
In the Job Activity page, click the Advanced Search link.
-
In the Advanced Search options, select Job Type as DownloadLatestPkgs, Target Type as Host, Status as Active, Scheduled Start as All, and then click Go.
-
In the Advanced Search result, select each job listed in the table and click Stop.
-
-
For each host target on which an active DownloadLatestPkgs job was stopped, resubmit a new DownloadLatestPkgs job on it as follows:
-
From the Setup menu, select Provisioning and Patching and then Linux Patching. The Patching Setup page is displayed.
-
In the Patching Setup page, click Setup RPM Repository.
-
In the Setup RPM Repository page, select the Host target and set Normal Host Credentials and Privileged Host Credentials for this host target.
-
Click Apply to submit the new job.
-
13.6.11.1.2 Resubmitting UpdateHostPackages Jobs After Stopping Them and Resetting their Credentials
To stop and resubmit all UpdateHostPackages jobs, follow these steps:
-
Stop active jobs which were scheduled prior to upgrade as follows:
-
From the Enterprise menu, select Job and then Activity. The Job Activity page is displayed.
-
In the Job Activity page, click the Advanced Search link.
-
In the Advanced Search options, select Job Type as UpdateHostPackages, Target Type as All Target Types against which jobs were submitted, Status as Active, Scheduled Start as All, and then click Go.
-
In the Advanced Search result, select each job listed in the table and click Stop.
-
-
For each group target on which an active UpdateHostPackages job was stopped, resubmit a new UpdateHostPackages job on it as follows:
-
From the Setup menu, select Provisioning and Patching and then Linux Patching.
-
In the Patching Setup page, click Setup Groups. The Setup Groups page is displayed.
-
In the Setup Groups page, select the group on which you stopped an active UpdateHostPackages job and click Edit. The Edit Group wizard is displayed.
-
In the Edit Group: Properties page, click Next.
-
In the Edit Group: Package Repositories page, click Next.
-
In the Edit Group: Credentials page, either use Host Preferred Credentials or Override Preferred Credentials and specify Normal Host Credentials and Privileged Host Credentials. Click Next.
Note:
Before editing this step, ensure that the host Preferred credentials are set already or the appropriate Named Credentials have been created already. If not, from the Setup menu, select Security and then Named Credentials to create Named Credentials or Preferred Credentials to set the Preferred Credentials for the host targets contained in the Linux Patching group. -
In the Edit Group: Review page, click Finish to submit the new job.
-
13.6.11.2 Resubmitting All Active Linux Patching Jobs After Resetting the Credentials, but without Stopping the Jobs
After upgrade, you must reset the credentials of all active Linux patching jobs that were submitted prior to the upgrade, and then resubmit the jobs. To do so, follow these steps:
-
From the Enterprise menu, select Job, then select Activity.
-
On the Job Activity page, click Advanced Search.
-
In the Advanced Search region, in the Name field, enter the job name
PACKAGES UPDATE%,and from the Job Type list, select UpdateHostPackages. Click Go. -
In the search results table, select the job and click Edit.
-
On the Edit 'UpdateHostPackages' Job page, click the Credentials tab.
-
In the Credentials tab, set the necessary credentials.
-
Click Submit.
-
Repeat Step (3) to Step (7) for the job name
DOWNLOADLATESTPKGS%of the job type DownloadLatestPkgs.
13.6.12 Updating the Console URL
If you have a multi-OMS environment with a Server Load Balancer (SLB) configured for the upgraded OMS instances, then make sure you update the console URL on the Management Services and Repository page. The console URL you enter here is used to compose links pointing back to the Enterprise Manager Cloud Control Console in the e-mails sent by Enterprise Manager.
To update the Console URL, follow these steps:
-
From the Setup menu, select Manage Cloud Control, then select Health Overview.
-
On the Management Services and Repository page, in the Overview section, click Edit against the Console URL label, and modify the URL to the SLB URL.
For example,
http://www.example.com, https://www.example.com:4443.Note:
Do NOT end the Console URL with/em. -
Verify if the updated console URL appears correctly in the e-mails sent by Enterprise Manager.
13.6.13 Redoing the Custom Configurations
Upgrade to 12c Release 5 (12.1.0.5) is an out-of-place upgrade, and therefore, any custom configuration done on the earlier release of the Enterprise Manager system and any customization done on the WebLogic Server, which is configured with the earlier release of the Enterprise Manager system, are not carried over by the upgrade process. You will have to redo the customization on the upgraded system. For example, any LDAP configuration in the emd.properties file is not going to be carried over, so you will have to reconfigure it on the emd.properties file after the upgrade.
13.6.14 Reconfiguring Oracle WebLogic Server with Custom Certificates
Note:
-
This section is applicable only if you are upgrading from 12c Release 4 (12.1.0.4), 12c Release 3 (12.1.0.3), or 12c Release 2 (12.1.0.2) to 12c Release 5 (12.1.0.5).
-
This section is applicable only for Oracle WebLogic Server custom certificates, and not applicable for Enterprise Manager Console certificates. The Enterprise Manager Console certificates are automatically copied over during upgrade.
If custom certificates were configured for Oracle WebLogic Servers (admin server as well as managed servers) in 12c Release 4 (12.1.0.4), 12c Release 3 (12.1.0.3), or 12c Release 2 (12.1.0.2), then after upgrading to 12c Release 5 (12.1.0.5), the custom certificates are not carried over. Instead, the Oracle WebLogic Servers are configured with Demo Certificates. Therefore, after upgrading, make sure you reconfigure the Oracle WebLogic Servers with custom certificates. To do so, follow these steps:
-
Run the following command on all the OMS instances. For information on the command and the options you can pass, see the Oracle Enterprise Manager Cloud Control Security Guide.
$<OMS_Home>/bin/emctl secure wls <options> -
Stop all the OMS instances:
$<OMS_Home>/bin/emctl stop oms -all -
Start all the OMS instances:
$<OMS_Home>/bin/emctl start oms
13.6.15 Restarting the Management Agent After Upgrading an Additional OMS
After upgrading the first OMS of 12c Release X (12.1.0.X) to 12c Release 5 (12.1.0.5), Oracle strongly recommends that you immediately upgrade the central agent on that host as described in Chapter 4.
However, if you did not upgrade the central agent on that host, and instead proceeded with the upgrade of an additional OMS from 12c Release X (12.1.0.X) to 12c Release 5 (12.1.0.5), then verify the version of that upgraded additional OMS on the Managed Services page. To do so, from the Setup menu, select Manage Cloud Control, then select Management Services. Verify the OMS version.
If it still shows the older version and not the upgraded version, then restart the Management Agent on the additional OMS host.
13.6.16 Enabling the Compliance Standards That Were Disabled in the Previous Release
After you upgrade to 12c Release 5 (12.1.0.5), the compliance standards that were disabled in the previous release are automatically enabled in 12c Release 5 (12.1.0.5). If you want to continue to have these compliance standards disabled, then manually disable them for each target in 12c Release 5 (12.1.0.5) after you upgrade. To do so, follow these steps:
-
From the Enterprise menu, select Compliance, then Library.
-
On the Compliance Library page, click the Compliance Standards tab.
-
In the Compliance Standards tab, select a compliance standard and click Associate Targets.
-
On the Compliance Standard Target Association page, select a target and click Edit.
-
On the Target Settings for Compliance Standard page, in the left tree view, select the rule node, and in the right panel, from the Compliance Standard Rule Evaluation Status list, select Disabled. Click OK.
-
On the Compliance Standard Target Association page, click OK.
13.6.17 Resetting the Java Heap Memory Arguments
After upgrading to 12c Release 5 (12.1.0.5), the Java heap memory arguments are automatically set to the default values, and therefore, any customization done to the arguments in the previous release of Enterprise Manager Cloud Control are not persisted to the upgraded OMS. You must manually reset the Java memory arguments to the custom values.
For example, if you had customized the heap size in the WebLogic Server configuration file earlier to 8 GB, then after upgrading to 12c Release 5 (12.1.0.5), the heap size is reset to a default value of 4 GB. Therefore, as a postupgrade step, you must manually reset the heap size to the custom value of 8 GB.
In 12c Release 3 (12.1.0.3) and 12c Release 2 (12.1.0.2), the JAVA_EM_MEM_ARGS argument was supported, which not only changed the memory settings of the OMS but also the memory settings of the other components integrated with Enterprise Manager Cloud Control, such as Oracle BI Publisher. This argument is no longer supported in 12c Release 4 (12.1.0.4) or higher.
In 12c Release 4 (12.1.0.4) or higher, the following Java heap memory arguments are supported.
-
OMS_HEAP_MIN -
OMS_HEAP_MAX -
OMS_PERMGEN_MIN -
OMS_PERMGEN_MAX
To reset the aforementioned Java heap memory arguments after upgrading to 12c Release 5 (12.1.0.5), follow these steps:
-
Check the current value set for the argument on the OMS:
emctl get property -name <argument_name>For example,
emctl get property -name OMS_HEAP_MAX -
Reset the value:
emctl set property -name <argument_name> -value <value_followed_by_G_or_M>For example,
emctl set property -name OMS_HEAP_MAX -value 8192M -
Stop the OMS:
emctl stop oms -all -
Start the OMS:
emctl start oms -
Verify the changes in one of the following steps:
-
Access the
emgc.propertiesfile in the OMS base instance home directory(gc_inst),and check the value of the argument you reset. -
Run the following command and check the value of the argument you reset.
ps -aef | grep weblogic.Server | grep EMGC_OMS1
-
13.6.18 Enabling Upgrade of Job Types That Were Skipped Before the Upgrade of the Enterprise Manager System
If you had selectively skipped or postponed the upgrade of certain job types as described in Step 2 (j) of Table 4-1, then after upgrading the Enterprise Manager system, make sure you clear the values you inserted into the MGMT_PARAMETERS table.
To do so, as a SYSMAN user, log in to the database that houses the Oracle Management Repository, and run the following query:
DELETE FROM MGMT_PARAMETERS WHERE parameter_name LIKE 'mgmt_job_skip_job_type_upg%');
COMMIT;
In addition, as the SYSMAN user, create a SQLPlus session against the Oracle Management Repository and run the following:
WARNING:
Do not include the job types PropagateTarget and ExecLoaderCallbacks to the list.
BEGIN
FOR c IN (SELECT job_type_id
FROM MGMT_JOB_TYPE_MAX_VERSIONS
WHERE job_type IN ('<job type 1>', '<job type 2>', ...))
LOOP
MGMT_JOB_ENGINE.reschedule_on_new_jobtype_ver(c.job_type_id);
COMMIT;
END LOOP;
END;
13.7 Tracking the Status of Deferred Data Migration Jobs
This section describes the following:
13.7.1 About Deferred Data Migration Jobs
Deferred Data Migration is a post-upgrade activity to migrate the format of the data stored in an earlier release of Enterprise Manager to the format compatible with the upgraded Enterprise Manager system. The migration activity is essentially a job in Enterprise Manager that is submitted when the Oracle Management Repository gets upgraded and is scheduled to run in the background when the upgraded Enterprise Manager system starts functioning.
The format of the data stored in Enterprise Manager Cloud Control is different from the format in which the data was stored in any earlier release of Enterprise Manager.
When you upgrade from an earlier release of Enterprise Manager to Enterprise Manager Cloud Control, the data format gets automatically converted or migrated to the format that is compatible with Enterprise Manager Cloud Control.
However, the time taken to migrate the data format depends on the volume of data available in your earlier release of Enterprise Manager. Therefore, if you have a large amount of data, then it takes longer to migrate, and as a result, the upgrade process takes more time to complete. Unfortunately, until the upgrade process completes, your existing Enterprise Manager system might be unavailable, particularly when you use a 1-System upgrade approach (either on the local host or on a different, remote host).
Considering this, Oracle has fine-tuned its upgrade process to migrate the data format in two distinct phases.
In the first phase, when the Enterprise Manager system is shut down and upgraded, the most critical data relevant to the functioning of Enterprise Manager Cloud Control is migrated within a short time so that the new system can start functioning without much downtime. At this point, only some historical data is unavailable, but you can start monitoring the targets in the upgraded Enterprise Manager system, and see new alerts generated by the upgraded Oracle Management Agent.
In the second phase, after the upgraded Enterprise Manager system starts functioning, the remaining data is migrated.
The data whose format is migrated in the second phase, after Enterprise Manager Cloud Control starts functioning, is called the Deferred Data, and this process of migrating from old to new format is called the Deferred Data Migration.
Note:
-
If you want to prevent the DDMP jobs from running immediately by default, then see Section 10.3 and Section 10.2 (Step 6).
-
Canceling or stopping of a running DDMP job is not recommended.
WARNING:
Do not shut down or restart the OMS or the Management Repository while DDMP jobs are running.
13.7.2 Tracking the Status of Deferred Data Migration Jobs
After upgrade, check the status of the deferred data migration jobs. Ensure that the FLAT Association build task in particular is completed successfully.
To track the status of deferred data migration jobs, follow these steps:
-
In Cloud Control, from the Setup menu, select Manage Cloud Control and then, click Post Upgrade Tasks.
-
On the Post Upgrade Tasks page, click the Deferred Data Migration tab.
The tab provides a list of data migration jobs with their status, start date and time, and end date and time.
-
In this tab, you can do the following:
-
To start a data migration job for a component, select that component and click Start. By default, the job starts immediately. You cannot change this behavior.
-
To rerun a failed job, click the status icon to reach the Job Run page. On the Job Run page, click Edit. On the Edit <JobName> Job page, click Submit to rerun the job.
-
To hide or unhide the table columns, from the View list, select an appropriate option.
-
To detach the table from the screen, click Detach.
-
13.8 Tracking the Status of Accrued Data Migration Jobs
Note:
This section is applicable only for 2-system upgrade of 10g Release 5 (10.2.0.5) and 11g Release 1 (11.1.0.1) of Enterprise Manager system.This section describes the following:
13.8.1 About Accrued Data Migration Jobs
Accrued Data Migration is a post-upgrade activity to migrate the accrued data stored in an earlier release of Oracle Management Repository (Management Repository) to the upgraded Management Repository. The accrued data relates to functional areas such as blackouts, alerts, events, metrics, and so on.
Note:
The Accrued Data Migration process does not migrate any of the following changes if they were done after the Management Repository was backed up. If you want these changes in the upgraded Enterprise Manager system, you must manually redo these changes after upgrade.-
Security data (new users created, passwords changed)
-
Jobs created, deleted, or submitted
-
Customized deployment procedures
-
Patches
-
Targets added or deleted
-
Reports created, modified, or deleted
-
Software Library configuration changes
-
Templates created, modified, or deleted
-
User-defined metrics
Check the Diff Report as described in Section 13.9 to know what all changes are not migrated via the ADMP process and what needs to be migrated manually.
The migration activity is essentially a job in Enterprise Manager that runs in the background immediately after the earlier releases of Oracle Management Agents (Management Agents) are switched over to Oracle Management Agent 12c, particularly in the case of 2-System upgrade approach.
As part of the upgrade process, when you switch over the earlier releases of Oracle Management Agents to Oracle Management Agent 12c, the new Management Agents start communicating with Enterprise Manager Cloud Control, and start uploading data to the upgraded Oracle Management Repository (Management Repository).
In the 1-System upgrade approach, the entire Enterprise Manager system is upgraded, and therefore, all the Management Agents are switched over at a given time. In this approach, earlier releases of Management Agents cannot coexist with the upgraded ones, and once they are switched over, the upgraded Management Agents upload data only to one Management Repository at any given point, which is the upgraded repository. Therefore, there is no scope for accrued data.
However, in the 2-System upgrade approach, you can choose to switch over your Management Agents in phases. When one set of Management Agents are switched over, they start uploading data about their hosts and targets to the upgraded Management Repository, whereas the ones that are not switched over yet, continue to upload data about their hosts and targets to the old Management Repository. Therefore, the earlier releases of Management Agents coexist with the upgraded ones when only some of them are switched over, and under such circumstances, the data is uploaded to the old Management Repository as well as the new one at a given point. However, note that only one Management Agent represents a host at any given time, so the coexistence does not indicate two Management Agents on the same host. It only indicates an earlier release of Management Agent monitoring a host that coexists with an upgraded Management Agent monitoring another host.
When you swtich over the next set of Management Agents in the next phase, although they start uploading data to the upgraded Management Repository, the data uploaded to the old Management Repository before being switched over continues to exist in the old Management Repository. This data is called the Accrued Data, and the process of migrating this accrued data from the old Management Repository to the new one is called the Accrued Data Migration Process.
Note:
The accrued data migration jobs migrate ECM history data with the following exceptions:-
If the ECM history data is associated with a target that is no longer part of the Enterprise Manager system, then the ECM history data for that target is not migrated to Enterprise Manager Cloud Control.
-
For Oracle WebLogic Server targets, the WebLogic configuration data is not migrated. This configuration data has changed significantly in Enterprise Manager Cloud Control.
-
As part of the data migration process, summary counts are now calculated and displayed in the ECM Summary region. For migrated data, the summary counts are only calculated for the last seven days.
If you do not see key values that you saw in the past, or if you see new values as key values, then note that this is an expected behavior. Some snapshots have had metadata changes in the last release and key values have changed. If metadata keys were removed from the metadata, those values will no longer be displayed in the Enterprise Manager Cloud Control as key columns, though the data is still present in the migrated database. If existing columns are now flagged as key columns, those columns will start appearing as key columns for newly collected data only. For new columns that are added either as key columns or non key columns, data will start appearing for newly collected data only.
Note:
-
If you want to prevent the ADMP jobs from running immediately by default, then see Section 10.2 (Step 6).
-
Do NOT change any database link-related settings during ADMP process. If you do, the ADMP process will fail to use the database link.
-
ADMP uses DBMS_SCHEDULER, so make sure all scheduler-related settings are turned on (on the server) to submit any jobs using DBMS_SCHEDULER.
To verify this, run the following query:
select value from dba_scheduler_global_attribute where attribute_name='SCHEDULER_DISABLED'If the query returns TRUE, then run the following query:
exec dbms_scheduler.set_scheduler_attribute('SCHEDULER_DISABLED','FALSE');
13.8.2 Tracking the Status of Accrued Data Migration Jobs
Note:
This section is applicable only for 2-system upgrade of 10g Release 5 (10.2.0.5) and 11g Release 1 (11.1.0.1) of Enterprise Manager system.To track the status of accrued data migration jobs, follow these steps:
-
In Cloud Control, from the Setup menu, select Manage Cloud Control and then, click Post Upgrade Tasks.
-
On the Post Upgrade Tasks page, click the Accrued Data Migration tab.
The Accrued Data Migration page displays information about the accrued data migration jobs related to all the targets available in your Enterprise Manager system. By default, for every target, the accrued data migration job migrates the ECM history details as well as the metric details.
-
In this tab, you can do the following:
-
To control the data being migrated for all the targets, from the Run accrued data migration for list, select one of the following options:
-
ECM HISTORY MIGRATION, to migrate only the ECM history details.
-
METRIC DATA MIGRATION, to migrate only the metric details.
-
All Components, to migrate the ECM history details as well as the metric details.
-
-
To view different types of data, from the View Targets list, select one of the following options:
-
All, to view all the accrued data migration jobs for all the targets in your Enterprise Manager system.
-
Active, to view the accrued data migration jobs that either failed or are currently running.
-
History, to view the accrued data migration jobs that succeeded.
-
Not Started, to view the accrued data migration jobs that have not started yet.
-
-
To retry a failed job, select the target for which the job failed and click Retry.
-
To stop a running job, select the target for which you want to stop the job and click Stop.
-
13.9 Generating and Viewing Diff Reports
Note:
This section is applicable only for 2-system upgrade of 10g Release 5 (10.2.0.5) and 11g Release 1 (11.1.0.1) of Enterprise Manager system.This section describes the following:
13.9.1 About Diff Reports
Diff Reports provide information about the configuration or setup-related changes that were manually made to the earlier release of Enterprise Manager while it was being upgraded to Enterprise Manager Cloud Control using the 2-System upgrade approach.
In the 2-System upgrade approach, the earlier release of Enterprise Manager coexists with Enterprise Manager Cloud Control until the upgrade operation ends. In some production environments, the upgrade operation might take a long time to complete due to a large volume of data, and during this period, you might make some changes to the functional areas in the earlier release.
For example, you might add additional Software Library entity, new jobs, new deployment procedures, and so on.
Such changes must be carried over to Enterprise Manager Cloud Control so that the upgraded system is identical to the earlier release. The Diff Reports show a summary of such changes so that you can manually redo those changes in Enterprise Manager Cloud Control.
13.9.2 Generating and Viewing Diff Reports
Note:
This section is applicable only for 2-system upgrade of 10g Release 5 (10.2.0.5) and 11g Release 1 (11.1.0.1) of Enterprise Manager system.Note:
All the changes shown in the diff report are not migrated by the upgrade process from old to new Enterprise Manager system, so you must migrate them manually. Ensure that the database link-related settings are intact while you use the diff report.To generate and view diff reports, follow these steps:
-
In Cloud Control, from the Setup menu, select Manage Cloud Control and then, click Post Upgrade Tasks.
-
On the Post Upgrade Tasks page, click the Diff Report tab.
The Diff Report page lists the reports that were generated in the past for various components. However, when you visit this page the first time, you will not see any reports.
-
On this page, you can do the following:
-
To generate the reports for various components, click Regenerate Report.
Note:
On clicking Regenerate Report, the status in the Status column changes to In Progress. Keep refreshing the page manually until the status changes to Completed. -
To view a report of a particular component, select a component (row) from the table, and click Show Report.
-
To refresh a report and view the latest changes related to a component, select a component (row) from the table, and click Regenerate Report.
-
To hide or unhide the table columns, or to reorder the table columns, from the View list, select an appropriate option.
-
To detach the table from the screen, click Detach.
-
13.10 Viewing Inactive Targets in the Upgraded Enterprise Manager System
Note:
This section is applicable only for 2-system upgrade of 10g Release 5 (10.2.0.5) and 11g Release 1 (11.1.0.1) of Enterprise Manager system.Targets available in the existing Enterprise Manager system are active (monitored) in the upgraded Enterprise Manager system only when the Oracle Management Agents that were monitoring those targets are switched over to the upgraded Enterprise Manager system using Oracle Management Agent 12c.
To view a list of targets that are currently inactive in the upgraded Enterprise Manager system, follow these steps:
-
In Cloud Control, from the Setup menu, select Manage Cloud Control and then, click Post Upgrade Tasks.
-
On the Post Upgrade Tasks page, click the Targets with Pending Activation tab.
-
In this tab, you can view a list of inactive targets.
To search for targets of your choice, enter a keyword or a part of the target name (or target type) in the search text box placed right above the Target Name column (or Target Type column).
Alternatively, you can click the links in the Refine Search pane to filter the table and list the targets of your choice.
Note:
To convert these inactive targets to active targets, switch over the Management Agents that are monitoring these targets in the existing Enterprise Manager system to the upgraded Enterprise Manager system. For information about switching over the Management Agents, see Section 11.4.13.11 Signing Off the Accrued Data Migration Process
Note:
This section is applicable only for 1-system upgrade, 2-system upgrade, and 1-system upgrade on a different host for 10g Release 5 (10.2.0.5) and 11g Release 1 (11.1.0.1) of Enterprise Manager system.After you switch over the Oracle Management Agents (Management Agent) to the new Enterprise Manager system, you can deinstall the earlier release of Management Agents. Instead of manually deinstalling the Management Agents, you can formally sign off the Accrued Data Migration Process (ADMP) for each of the Management Agents and have the Post Upgrade Console automatically deinstall them for you.
Caution:
The sign-off process requires you to have all the credentials set to run file system-related operations on the Management Agent, so make sure you have set all the required credentials.To sign off the ADMP process for each of the Management Agents, follow these steps:
-
In Cloud Control, from the Setup menu, select Manage Cloud Control and then, click Post Upgrade Tasks.
-
On the Post Upgrade Tasks page, click the Sign Off tab.
By default, the page lists all the Management Agents regardless of their sign-off status.
-
On this page, search Management Agents for which you have signed off the ADMP process or for which you are yet to sign off.
(i) From the Search Criteria list, select an appropriate option.
(ii) In the Agent field, enter the name of the Management Agent. You can leave this blank if you want to search all Management Agents with a particular sign-off status. Alternatively, you can enter a part of the name and use wildcards to search for Management Agents with a similar name.
(iii) Click Search.
-
Select Management Agents you want to formally sign off. To select all the Management Agents in one attempt, enable Select All.
Note:
If you are selecting a Master Agent to sign off, then make sure you sign it off only after all its Shared Agents have been signed off. If they have not already been signed off, then select those Shared Agents to be signed off along with the Master Agent. -
Click Sign off Agents.
-
Provide credentials to access the hosts on which the selected Management Agents were running.
-
Click Submit.
Note:
Once you sign off, the selected Management Agents will automatically be deinstalled and removed, and they cannot be recovered in any way. Therefore, before you sign off, ensure that your Management Agents have switched over successfully and they are fully functional, and their targets are successfully being monitored in the new Enterprise Manager system.
13.12 Signing Off the Migration Processes and Exiting the Upgrade Mode
Note:
This section is applicable only for 1-system upgrade, 2-system upgrade, and 1-system upgrade on a different host for 10g Release 5 (10.2.0.5) and 11g Release 1 (11.1.0.1) of Enterprise Manager system.After the Deferred Data Migration Process (DDMP), the Management Agent switchover, the Accrued Data Migration Process (ADMP), the manual data migration as calculated by the diff report, you can formally sign off the migration process, and exit upgrade mode.
WARNING:
Sign-off must be the last step of the upgrade process. Once this is done, all upgrade-related processes and resources are cleaned up, and you must not run any ADMP or DDMP jobs, or generate any diff reports.
To sign off the migration processes and formally exit the upgrade mode, follow these steps:
-
In Cloud Control, from the Setup menu, select Manage Cloud Control and then, click Post Upgrade Tasks.
-
On the Post Upgrade Tasks page, click the Sign Off tab.
-
On this page, select Sign off Migration, and click Go. This option is placed at the bottom-left corner below the table.
-
(Applicable Only for 2-System Upgrade Approach and 1-System Upgrade Approach on a Different Host) After exiting the upgrade mode, delete the old central agents as described in Section 13.13.
After deleting the central agents, if you want to continue monitoring the targets that were monitored by them, then follow the instructions outlined in Section 13.14.
13.13 Deleting Old Central Agents and the Associated Targets
This section describes the following procedures for deleting the old central agents and their associated targets.
-
Deleting Unwanted Central Agents After Upgrading from 10.2.0.5/11.1.0.1 to 12.1.0.5
-
Deleting Unwanted Central Agents After Upgrading from 12.1.0.2/12.1.0.3/12.1.0.4 to 12.1.0.5
13.13.1 Deleting Unwanted Central Agents After Upgrading from 10.2.0.5/11.1.0.1 to 12.1.0.5
Note:
This section is applicable only for 2-system upgrade and 1-system upgrade on a different host for 10g Release 5 (10.2.0.5) and 11g Release 1 (11.1.0.1).If you upgraded 10g Release 5 (10.2.0.5) or 11g Release 1 (11.1.0.1) using the 2-system upgrade approach or the 1-system upgrade approach on a different host, then delete the old central agent that was not switched over. You do not require this central agent.
Note:
In the Preupgrade Console, the central agents are listed for selection, but when you select and try to submit a deployment and configuration job, the selected central agents are validated and reported as problematic agents. Therefore, they cannot be deployed and configured, and as a result, cannot be switched over. Since these central agents are no longer required, you must delete them.To delete the old central agent and the associated targets, follow these steps:
-
As a prerequisite, verify the host where you installed Enterprise Manager Cloud Control as described in Section 13.1.
-
Identify the central agents by running the following query as SYSMAN user in the upgraded Management Repository (12.1.0.5 repository). The query reports central agents and the targets monitored by them, but make note of only the central agent names. Deleting the central agents anyway deletes the targets monitored by them.
SELECT ag.target_name agent_name, t.target_name target_name, t.target_type target_type FROM sysman.mgmt_targets ag, sysman.em_current_availability eca, sysman.PRE_UPGC_AGT_STAT_MGMT puasm, sysman.mgmt_targets t WHERE ag.target_guid = eca.target_guid AND eca.current_status = 4 AND eca.current_sub_status = 1 AND ag.target_type='oracle_emd' AND puasm.target_guid = ag.target_guid AND puasm.UPGRADE_STATUS !='IGNORE_UPGRADE' AND ag.emd_url IN (SELECT emd_url FROM mgmt_targets WHERE target_type = 'host' AND target_name IN (SELECT value FROM mgmt_oms_parameters WHERE name = 'HOST_NAME')) AND ag.emd_url NOT IN (SELECT emd_url FROM sysman.mgmt_targets WHERE target_type='oracle_emrep') AND t.emd_url = ag.emd_url ORDER BY ag.target_name, t.target_type, t.target_name -
Delete the identified, old central agent:
-
On the remote host where you installed the new Enterprise Manager Cloud Control, from the OMS home, log in to the EM CLI client. EM CLI Client is available by default with every OMS installation, so you need not install the client separately.
$<OMS_HOME>/bin/emcli login -username=SYSMAN -password=<sysman-passwd> -
Synchronize EM CLI:
$<OMS_HOME>/bin/emcli sync -
Delete the central agent. Here,
agentNameis the name of the central agent you want to delete.$<OMS_HOME>/bin/emcli delete_target -name=<agentName> -type=oracle_emd -delete_monitored_targetsFor example,
$/u01/software/oracle/middleware/oms/bin/emcli delete_target -name=example.com:4567 -type=oracle_emd -delete_monitored_targets
-
-
(Optional) After deleting the central agent, if you want to continue monitoring the targets that were monitored by it, then follow the instructions outlined in Section 13.14.
13.13.2 Deleting Unwanted Central Agents After Upgrading from 12.1.0.2/12.1.0.3/12.1.0.4 to 12.1.0.5
Note:
This section is applicable only for 1-system upgrade from 12c Release 4 (12.1.0.4), 12c Release 3 (12.1.0.3), 12c Release 2 (12.1.0.2).After upgrading from 10g Release 5 (10.2.0.5) or 11g Release 1 (11.1.0.1) to 12c Release 2 (12.1.0.2), 12c Release 3 (12.1.0.3), or 12c Release 4 (12.1.0.4), you should ideally delete the old central agent, which was not switched over, as described in Section 13.13.1. However, if you did not delete the unwanted central agent for some reason, and if you upgraded from 12c Release 2 (12.1.0.2), 12c Release 3 (12.1.0.3), or 12c Release 4 (12.1.0.4) to 12c Release 5 (12.1.0.5), then you might continue to see the old, unwanted 10g or 11g central agent in Activation Pending state in the 12.1.0.5 Enterprise Manager Cloud Control Console.
If you do see such unwanted central agents in Activation Pending state, then delete by following these steps:
-
As a prerequisite, verify the host where you installed/upgraded Enterprise Manager Cloud Control as described in Section 13.1.
-
Identify the unwanted central agents to be deleted by running the following query as SYSMAN user in the upgraded Management Repository (12.1.0.5 repository). The query reports central agents and the targets monitored by them, but make note of only the central agent names. Deleting the central agents anyway deletes the targets monitored by them.
SELECT ag.target_name agent_name, t.target_name target_name, t.target_type target_type FROM sysman.mgmt_targets ag, sysman.em_current_availability eca, sysman.PRE_UPGC_AGT_STAT_MGMT puasm, sysman.mgmt_targets t WHERE ag.target_guid = eca.target_guid AND eca.current_status = 4 AND eca.current_sub_status = 1 AND ag.target_type='oracle_emd' AND puasm.target_guid = ag.target_guid AND puasm.UPGRADE_STATUS !='IGNORE_UPGRADE' AND ag.emd_url NOT IN (SELECT emd_url FROM sysman.mgmt_targets WHERE target_type='oracle_emrep') AND t.emd_url = ag.emd_url ORDER BY ag.target_name, t.target_type, t.target_name -
Delete the unwanted central agents:
-
On the upgraded OMS host, from the OMS home, log in to the EM CLI client. EM CLI Client is available by default with every OMS installation, so you need not install the client separately.
$<OMS_HOME>/bin/emcli login -username=SYSMAN -password=<sysman-passwd> -
Synchronize EM CLI:
$<OMS_HOME>/bin/emcli sync -
Delete the unwanted central agents. Here,
agentNameis the name of the central agent you want to delete.$<OMS_HOME>/bin/emcli delete_target -name=<agentName> -type=oracle_emd -delete_monitored_targetsFor example,
$/u01/software/oracle/middleware/oms/bin/emcli delete_target -name=example.com:4567 -type=oracle_emd -delete_monitored_targets
-
13.14 (Optional) Monitoring Targets That Were Monitored by the Deleted Central Agent
Note:
This section is applicable only for 2-system upgrade and 1-system upgrade on a different host for 10g Release 5 (10.2.0.5) and 11g Release 1 (11.1.0.1) of Enterprise Manager system.If you upgraded 10g Release 5 (10.2.0.5) or 11g Release 1 (11.1.0.1) using the 2-system upgrade approach or the 1-system upgrade approach on a different host, then you are required to delete the unwanted old central agent as described in Section 13.13. After deleting this central agent, if you want to continue monitoring the targets that were monitored by the deleted central agent, then follow these steps:
-
Install a fresh Oracle Management Agent 12c using the Add Host Targets Wizard from the new OMS, on the old central agent host.
-
Discover all the targets running on that host so that they can be monitored in the new OMS.
13.15 (Optional) Deleting the Old OMS Home
After upgrading your Enterprise Manager system completely, if you want to delete your old OMS home, follow these steps:
-
If you upgraded from 12c Release 4 (12.1.0.4), 12c Release 3 (12.1.0.3), or 12c Release 2 (12.1.0.2) to 12c Release 5 (12.1.0.5), either full release or an additional OMS, then follow the instructions outlined in Appendix K.
-
If you upgraded from 11g Release 1 (11.1.0.1) to 12c Release 4 (12.1.0.4), either full release or an additional OMS, then follow the instructions outlined in the Oracle Enterprise Manager Grid Control Advanced Installation and Configuration Guide.
-
If you upgraded from 10g Release 5 (10.2.0.5) to 12c Release 4 (12.1.0.4), either full release or an additional OMS, then follow the instructions outlined in the Oracle Enterprise Manager Grid Control Installation and Configuration Guide.
13.16 Migrating the SYSMAN Schema to a Database Configured with CDB and PDB
If you plan to migrate the SYSMAN schema to a database configured with CDB and PDB, then ensure that you meet the following requirements:
-
Upgrade the database to a non-CDB-based database. During the database upgrade process, ensure that the character set of the non-CDB-based database is the same as the CDB. Then, migrate the SYSMAN schema from the upgraded non-CDB-based database to a new PDB in the CDB.
-
Correct the connect descriptor with updated database details. To do so, follow these steps on each OMS instance:
-
Stop all the OMS instances.
emctl stop oms -all -
Start the administration server on the first OMS.
emctl start oms -admin-only -
On each OMS instance, modify the connect descriptor for the Management Repository:
emctl config oms -store_repos_details -repos_conndesc "(DESCRIPTION=(ADDRESS=(PROTOCOL=TCP)(HOST=<host_name>)(PORT=<port>))(CONNECT_DATA=(SERVER=DEDICATED)(SERVICE_NAME=<service_name>)))"For example,
emctl config oms -store_repos_details -repos_conndesc "(DESCRIPTION=(ADDRESS=(PROTOCOL=TCP)(HOST=dbhost.example.com)(PORT=1522))(CONNECT_DATA=(SERVER=DEDICATED)(SERVICE_NAME=pdb2.example.com)))" -
Stop and start all the OMS instances.
emctl stop oms -allemctl start oms -
Modify the monitoring configuration of the OMS and the Management Repository target.
emctl config emrep -conn_desc
-
13.17 Enabling the Create External Role Option
To enable the Create External Role option and use it while creating new roles, set the External Authentication-related properties on the OMS. To do so, run the following commands. If Enterprise Manager is authenticated with any Single Sign-On (SSO), then set the value SSO instead of LDAP for the oracle.sysman.emSDK.sec.DirectoryAuthenticationType property.
OMS_HOME/bin>emctl set property -name "oracle.sysman.core.security.auth.is_external_authentication_enabled" -value "true"
OMS_HOME/bin>emctl set property -name "oracle.sysman.emSDK.sec.DirectoryAuthenticationType" -value "LDAP"
For more details, see My Oracle Support note 1902075.1.