| Oracle® Big Data Appliance Software User's Guide Release 1 (1.0) Part Number E25961-04 |
|
|
PDF · Mobi · ePub |
| Oracle® Big Data Appliance Software User's Guide Release 1 (1.0) Part Number E25961-04 |
|
|
PDF · Mobi · ePub |
This chapter provides information about the software and services installed on Oracle Big Data Appliance. It contains these topics:
Cloudera Manager is installed on Oracle Big Data Appliance to help you with Cloudera's Distribution including Apache Hadoop (CDH) operations. Cloudera Manager provides a single administrative interface to all Oracle Big Data Appliance servers configured as part of the Hadoop cluster.
Cloudera Manager simplifies the performance of these administrative tasks:
Monitor jobs and services
Start and stop services
Manage security and Kerberos credentials
Monitor user activity
Monitor the health of the system
Monitor performance metrics
Track hardware use (disk, CPU, and RAM)
Cloudera Manager runs on node02 and is available on port 7180.
To use Cloudera Manager:
Open a browser and enter a URL like the following:
http://bda1node02.example.com:7180
In this example, bda1 is the name of the appliance, node02 is the name of the server, example.com is the domain, and 7180 is the default port number for Cloudera Manager.
Log in with a user name and password for Cloudera Manager. Only a user with administrative privileges can change the settings. Other Cloudera Manager users can view the status of Oracle Big Data Appliance.
See Also:
Cloudera Manager User Guide athttp://oracle.cloudera.com/ or click Help on the Cloudera Manager Help menu.In Cloudera Manager, you can choose the page from the Navigation Bar across the top of the display:
Services: Monitors the status and health of services running on Oracle Big Data Appliance. Click the name of a service to drill down to additional information.
Hosts: Monitors the health, disk usage, load, physical memory, swap space, and so forth of all servers.
Activities: Monitors all MapReduce jobs running in the selected time period.
Logs: Collects historical information about the systems and services. You can search for a particular phrase for a selected server, service, and time period. You can also select the minimum severity level of the logged messages included in the search: TRACE, DEBUG, INFO, WARN, ERROR, or FATAL.
Events: Records a change in state and other noteworthy occurrences. You can search for one or more keywords for a selected server, service, and time period. You can also select the event types: Audit Event, Activity Event, Health Check, or Log Message.
Reports: Generates reports on demand for disk and MapReduce use.
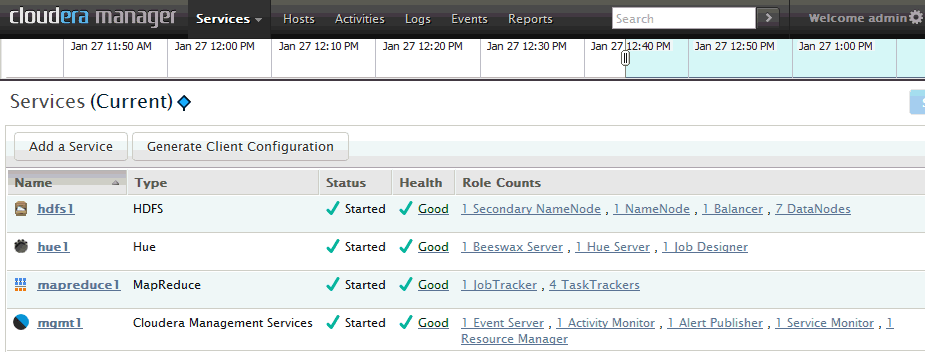
Figure 2-1 shows the opening display of Cloudera Manager, which is the Services page.
Figure 2-1 Cloudera Manager Services Page
As a Cloudera Manager administrator, you can change various properties for monitoring the health and use of Oracle Big Data Appliance, add users, and set up Kerberos security.
To access Cloudera Manager Administration:
Log in to Cloudera Manager with administrative privileges.
Click Welcome admin at the top right of the page.
If you need help from Oracle Support to troubleshoot CDH issues, then you should first collect diagnostic information using Cloudera Manager.
To collect diagnostic information about CDH:
Log in to Cloudera Manager with administrative privileges.
From the Help menu, click Send Diagnostic Data.
Verify that Send Diagnostic Data to Cloudera Automatically is not selected. Keep the other default settings.
Click Collect Host Statistics Globally.
Wait while all statistics are collected on all nodes.
Click Download Result Data and save the ZIP file with the default name. It identifies your CDH license.
Go to My Oracle Support at http://support.oracle.com.
Open a Service Request (SR) if you have not already done so.
Upload the ZIP file into the SR. If the file is too large, then upload it to ftp.oracle.com, as described in the next procedure.
To upload the diagnostics to ftp.oracle.com:
Open an FTP client and connect to ftp.oracle.com.
You can use an FTP client such as WinSCP4 to upload the ZIP file. See Example 2-1 if you are using a command-line FTP client.
Log in as user anonymous and leave the password blank.
In the bda/incoming directory, create a directory using the SR number for the name, in the format SRnumber. The resulting directory structure looks like this:
bda
   incoming
      SRnumber
Set the binary option to prevent corruption of binary data.
Upload the diagnostics ZIP file to the bin directory.
Update the SR with the full path and file name.
Example 2-1 shows the commands to upload the diagnostics using the Windows FTP command interface.
Example 2-1 Uploading Diagnostics Using Windows FTP
ftp> open ftp.oracle.com
Connected to bigip-ftp.oracle.com.
220-***********************************************************************
220-Oracle FTP Server
         .
         .
         .
220-****************************************************************************

220
User (bigip-ftp.oracle.com:(none)): anonymous
331 Please specify the password.
Password:
230 Login successful.
ftp> cd bda/incoming
250 Directory successfully changed.
ftp> mkdir SR12345
257 "/bda/incoming/SR12345" created
ftp> cd SR12345
250 Directory successfully changed.
ftp> bin
200 Switching to Binary mode.
ftp> put D:\Downloads\3609df...c1.default.20122505-15-27.host-statistics.zip
200 PORT command successful. Consider using PASV.
150 Ok to send data.
226 File receive OK.
ftp: 706755 bytes sent in 1.97Seconds 358.58Kbytes/sec.
Users can monitor MapReduce jobs without providing a Cloudera Manager user name and password.
Hadoop Map/Reduce Administration monitors the JobTracker, which runs on port 50030 of node03 on Oracle Big Data Appliance.
To monitor the JobTracker:
Open a browser and enter a URL like the following:
http://bda1node03.example.com:50030
In this example, bda1 is the name of the appliance, node03 is the name of the server, and 50030 is the default port number for Hadoop Map/Reduce Administration.
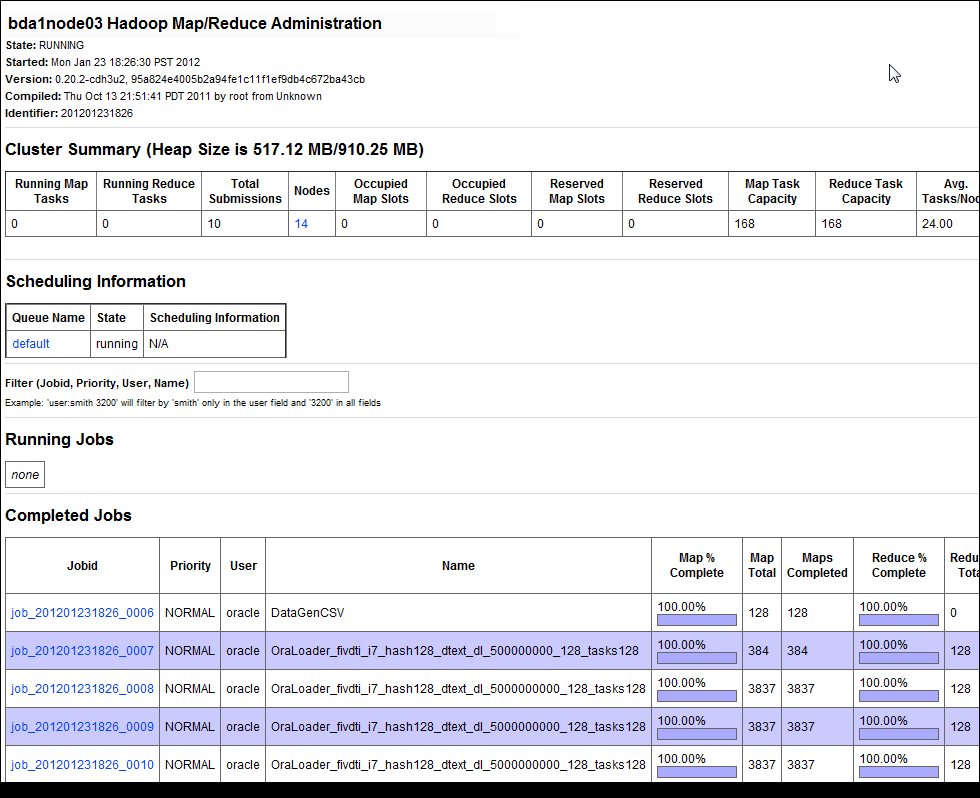
Figure 2-2 shows part of a Hadoop Map/Reduce Administration display.
Figure 2-2 Hadoop Map/Reduce Administration
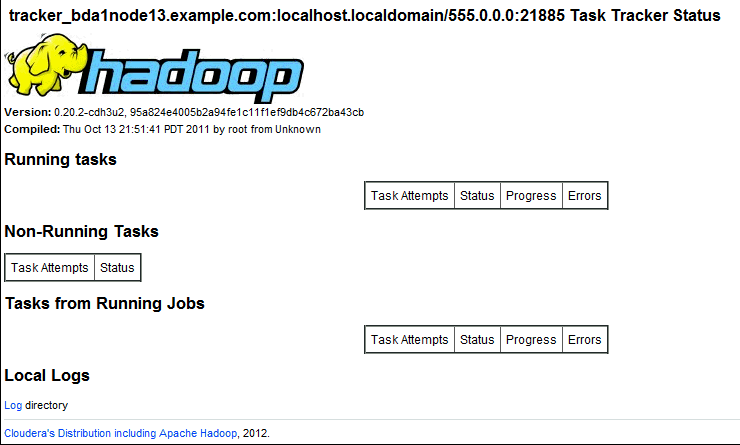
The Task Tracker Status interface is available on port 50060 of node04 -node18 on Oracle Big Data Appliance.
To monitor the TaskTracker:
Open a browser and enter a URL like the following:
http://bda1node13.example.com:50060
In this example, bda1 is the name of the rack, node13 is the name of the server, and 50060 is the default port number for Task Tracker Status.
Figure 2-3 shows the TaskTracker.
Oracle Big Data Appliance supports full local access to all commands and utilities in Cloudera's Distribution including Apache Hadoop (CDH).
You can use a browser on any computer on the same network as Oracle Big Data Appliance to access Cloudera Manager, Hadoop Map/Reduce Administration, Hadoop Task Tracker UI, and other browser-based Hadoop tools.
To issue Hadoop commands remotely, however, you must connect from a system configured as a CDH client. This chapter explains how to set up a computer so you can access HDFS and submit MapReduce jobs on Oracle Big Data Appliance.
To follow these procedures, you must have these access privileges:
Root access to the client system.
Read access to the /opt/hadoop/client directory on an Oracle Big Data Appliance server.
Login access to Cloudera Manager.
If you do not have these access privileges, then contact your system administrator for help.
The system that you use to access Oracle Big Data Appliance must run Oracle Linux 5 or a compatible Linux distribution, that is, one that permits installation of Oracle Linux 5 RPMs. You must install the same version of CDH that Oracle Big Data Appliance runs, or CDH3u4 or later.
To install the CDH client software:
Log in to the Linux system as root and change to the /tmp directory.
cd /tmp
Perform a secure copy of the Hadoop client RPM to the /tmp directory:
scp username@bda_node_name:/opt/hadoop/client/*.rpm .
Or, to use sftp instead of scp:
Open a secure connection to any server in Oracle Big Data Appliance:
sftp username@bda_node_name
Copy the RPM file:
get /opt/hadoop/client/*.rpm
Close the SFTP connection:
quit
Ensure that no Hadoop client currently exists on your system:
rpm -qa | grep hadoop
If you see just the prompt, then no Hadoop client is installed, and you can continue with the next step.
If the command returns a value, then remove that version:
rpm -e hadoop-version
Install the new CDH client:
rpm -ihv hadoop-version
Example 2-2 illustrates the previous steps. It uses scp to copy hadoop-0.20-0.20.2+923.202-1.noarch.rpm from bda1node09, removes an older version of Hadoop, and installs the new version.
Example 2-2 Installing the CDH Client Software
[root@client]$ cd /tmp
[root@client]$ scp username@bda1node09.example.com:/opt/hadoop/client/*rpm .
username@bda1node09.example.com's password:
hadoop-0.20-0.20.2+923.202-1.noarch.rpm 100% 30MB 10.0MB/s 00:03
[root@client]$ rpm -qa | grep hadoop
hadoop-0.20-0.20.2+923.194-1
[root@client]$ rpm -e hadoop-0.20-0.20.2+923.194-1
[root@client]$ rpm -ihv hadoop-0.20-0.20.2+923.202-1.noarch.rpm
warning: hadoop-0.20-0.20.2+923.202-1.noarch.rpm: Header V4 DSA signature: NOKEY, key ID e8f86acd
Preparing...                ########################################### [100%]
   1:hadoop-0.20            ########################################### [100%]
After installing CDH, you must configure it for use with Oracle Big Data Appliance.
To configure the Hadoop client:
Open a browser on your client system and connect to Cloudera Manager. It runs on node02 and listens on port 7180, as shown in this example:
http://bda1node02.example.com:7180
Log in as admin.
Cloudera Manager opens on the Services tab. Click the Generate Client Configuration button.
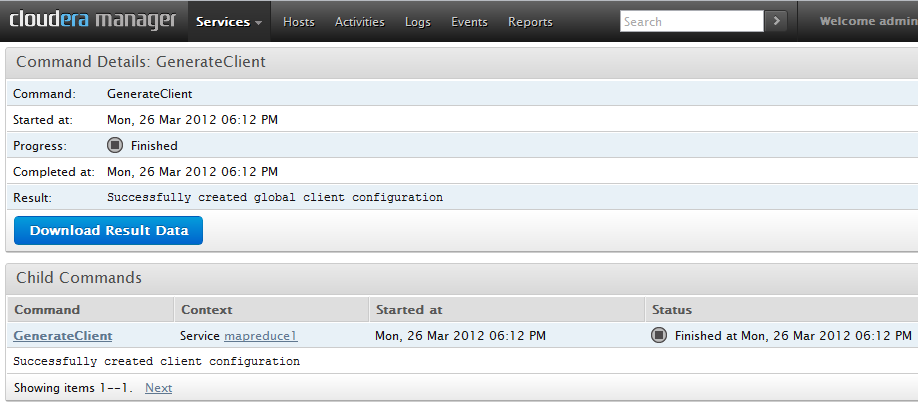
On the Command Details page (shown in Figure 2-4), click Download Result Data to download global-clientconfig.zip.
Unzip global-clientconfig.zip into the /tmp directory on the client system. It creates a hadoop-conf directory containing these files:
core-site.xml
hadoop-env.sh
hdfs-site.xml
log4j.properties
mapred-site.xml
README.txt
ssl-client.xml.example
Open hadoop-env.sh in a text editor and change JAVA_HOME to the correct location on your system:
export JAVA_HOME=full_directory_path
Delete the hash mark (#) to uncomment the line, then save the file.
Copy the configuration files to the Hadoop conf directory:
cd /tmp/hadoop-conf
cp * /usr/lib/hadoop/conf/
Validate the installation by changing to the mapred user and submitting a MapReduce job, such as the one shown here:
su mapred
hadoop jar /usr/lib/hadoop/hadoop-examples.jar pi 10 1000000
Figure 2-4 shows the download page for the client configuration.
Figure 2-4 Cloudera Manager Command Details: GenerateClient Page
Every open source package installed on Oracle Big Data Appliance creates one or more users and groups. Most of these users do not have login privileges, shells, or home directories. They are used by daemons and are not intended as an interface for individual users. For example, Hadoop operates as the hdfs user, MapReduce operates as mapred, and Hive operates as hive. Table 2-1 identifies the operating system users and groups that are created automatically during installation of Oracle Big Data Appliance Software for use by CDH components and other software packages.
You can use the oracle identity to run Hadoop and Hive jobs immediately after the Oracle Big Data Appliance software is installed. This user account has login privileges, a shell, and a home directory. Oracle NoSQL Database and Oracle Data Integrator run as the oracle user. Its primary group is oinstall.
Note:
Do not delete or modify the users created during installation, because they are required for the software to operate.When creating additional user accounts, define them as follows:
To run MapReduce jobs, users must be in the hadoop group.
To create and modify tables in Hive, users must be in the hive group.
Table 2-1 Operating System Users and Groups
| User Name | Group | Used By | Login Rights |
|---|---|---|---|
|
|
|
Flume parent and nodes |
No |
|
|
|
HBase processes |
No |
|
|
|
NameNode, DataNode |
No |
|
|
|
Hive metastore and server processes |
No |
|
|
|
Hue processes |
No |
|
|
|
JobTracker, TaskTracker, Hive Thrift daemon |
Yes |
|
|
|
MySQL Server |
Yes |
|
|
|
Oozie server |
No |
|
|
|
Oracle NoSQL Database, Oracle DBA, Oracle Loader for Hadoop, Oracle Data Integrator |
Yes |
|
|
|
Puppet parent (puppet nodes run as |
No |
|
|
|
Sqoop metastore |
No |
|
|
-- |
Auto Service Request |
No |
|
|
|
Zookeeper processes |
No |
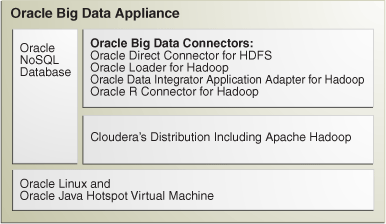
The following sections identify the software installed on Oracle Big Data Appliance and where it runs in the rack. Some components operate with Oracle Database 11.2.0.2 and later releases.
These software components are installed on all 18 servers in Oracle Big Data Appliance Rack. Oracle Linux, required drivers, firmware, and hardware verification utilities are factory installed. All other software is installed on site using the Mammoth Utility.
Note:
You do not need to install software on Oracle Big Data Appliance. Doing so may result in a loss of warranty and support. See the Oracle Big Data Appliance Owner's Guide.Installed software:
Cloudera's Distribution including Apache Hadoop Release 3 Update 3 (CDH)
Oracle Direct Connector for Hadoop Distributed File System 1.0
See Also:
Oracle Big Data Appliance Owner's Guide for information about the Mammoth Utility.Figure 2-5 shows the relationships among the major components.
Figure 2-5 Major Software Components of Oracle Big Data Appliance
Each server has 12 disks. The critical information is stored on disks 1 and 2.
Table 2-2 describes how the disks are partitioned.
This section identifies the services, where they run, and their default status. Services that are always on are required for normal operation. Services that you can switch on and off are optional.
You can use Cloudera Manager view the services.
To view the services:
In Cloudera Manager, click the Services tab at the top of the page to display the Services page.
Click the name of a service to see its detail pages. The service opens on the Status page.
Click the link to the page you want to view: Status, Instances, Commands, Configuration, or Audits.
Table 2-3 describes the parent services and those that run without child services.
Table 2-4 describes the child services.
| Service | Role | Description | Default Status |
|---|---|---|---|
|
HBase Region Server |
-- |
Hosts data and processes requests for HBase |
OFF |
|
hdfs1 |
Stores data in HDFS |
Always ON |
|
|
mapreduce1 |
Always ON |
||
|
NoSQL DB Storage Node |
-- |
ON |
|
|
nosqldb |
-- |
Supports a web console or command-line interface for administering Oracle NoSQL Database |
ON |
All services are installed on all servers, but individual services run only on designated servers.
Table 2-5 identifies the nodes where the services run. Services cannot be run on different nodes in this release, so do not attempt to change this configuration.
Table 2-5 Software Service Locations
| Service | Node |
|---|---|
|
Node01 |
|
|
Node03 |
|
|
All nodes |
|
|
Node02 |
|
|
Datanode |
All nodes |
|
Node03 |
|
|
Node03 |
|
|
Node03 |
|
|
Node02 |
|
|
Node03 |
|
|
Node01 |
|
|
Oracle Data Integrator AgentFoot 1 |
Node03 |
|
Oracle NoSQL Database AdministrationFootref 1 |
Node02 |
|
Oracle NoSQL Database Server ProcessesFootref 1 |
All nodes |
|
All nodes |
|
|
Node01 |
|
|
Node02 |
|
|
Node04 to Node18 |
Footnote 1 Started only if requested in the Oracle Big Data Appliance Configuration Worksheets
The NameNode is the most critical process because it keeps track of the location of all data. Without a healthy NameNode, the entire cluster fails. This vulnerability is intrinsic to Apache Hadoop (v0.20.2 and earlier).
Oracle protects against catastrophic failure by maintaining four copies of the NameNode logs:
Node01: Working copy of the NameNode snapshot and update logs is stored in /opt/hadoop/dfs/ and is automatically mirrored in a local Linux partition.
Node02: Backup copy of the logs is stored in /opt/shareddir/ and is also automatically mirrored in a local Linux partition.
A fifth backup outside of Oracle Big Data Appliance can be configured during the software installation.
The effects of a server failure vary depending on the server's function within the CDH cluster. Sun Fire servers are more robust than commodity hardware, so you should experience fewer hardware failures. This section highlights the most important services that run on the various servers. For a full list, see "Service Locations".
Node01 is critically important because it is where the NameNode runs. If this server fails, the effect is downtime for the entire cluster, because the NameNode keeps track of the data locations. However, there are always four copies of the NameNode metadata on Oracle Big Data Appliance, plus an optional NFS backup.
The current state and update logs are written to these locations:
Node01: /opt/hadoop/dfs/ on Disk 1 is the working copy with a local, operating system, mirrored partition on Disk 2 providing a second copy.
Node04: /opt/shareddir/ on Disk 1 is the third copy, which is also duplicated on a mirrored partition on Disk 2.
The cluster continues to function after a loss of node2 or node03, but with a loss of some services that might be critical to your operation. The disruptions are in these areas:
Node02:
Cloudera Manager: This tool provides central management for the entire CDH cluster. Without this tool, you can still monitor activities using the utilities described in "Using Hadoop Monitoring Utilities".
Oracle NoSQL Database: This database is an optional component of Oracle Big Data Appliance, so the extent of the disruption depends on whether you are using it and how critical it is to your applications.
Node03:
Oracle Data Integrator: This service supports Oracle Data Integrator Application Adapter for Hadoop. You cannot use this connector when node03 is down.
MySQL Master Database: Cloudera Manager, Oracle Data Integrator, Hive, and Oozie use MySQL Database. The data is replicated automatically, but you cannot access it when the master database server, which runs on node03, is down.
JobTracker: Assigns MapReduce tasks to specific nodes in the CDH cluster.
Node04 to node18 are optional in that Oracle Big Data Appliance continues to operate with no loss of service if a failure occurs. The NameNode automatically replicates the lost data to maintain three copies at all times. MapReduce jobs execute on copies of the data stored elsewhere in the cluster. The only loss is in computational power, because there are fewer servers on which to distribute the work.
Node04 stores two duplicate copies of the critical NameNode data, but a loss of this backup does not affect operation of the NameNode.
This section identifies security vulnerabilities and discusses the precautions you can take to prevent unauthorized use of the software and data on Oracle Big Data Appliance. It consists of these subsections:
Apache Hadoop is not an inherently secure system. It is protected only by network security. After a connection is established, a client has full access to the system.
Cloudera's Distribution including Apache Hadoop (CDH) supports Kerberos network authentication protocol to prevent malicious impersonation. You must install and configure Kerberos and set up a Kerberos Key Distribution Center and realm. Then you configure various components of CDH to use Kerberos.
CDH provides these securities when configured to use Kerberos:
The CDH master nodes, NameNode, and JobTracker resolve the group name so that users cannot manipulate their group memberships.
Map tasks run under the identity of the user who submitted the job.
Authorization mechanisms in HDFS and MapReduce help control user access to data.
See Also:
http://oracle.cloudera.com for these manuals:
CDH3 Security Guide
Configuring Hadoop Security with Cloudera Manager
Configuring TLS Security for Cloudera Manager
Table 2-6 identifies the port numbers that may be used in addition to those used by CDH. For the full list of CDH port numbers, go to the Cloudera website at
http://ccp.cloudera.com/display/CDHDOC/Configuring+Ports+for+CDH3
To view the ports used on a particular server:
In Cloudera Manager, click the Hosts tab at the top of the page to display the Hosts page.
In the Name column, click a server link to see its detail page.
Scroll down to the Ports section.
See Also:
The Cloudera website for CDH port numbers:Hadoop Default Ports Quick Reference
http://www.cloudera.com/blog/2009/08/hadoop-default-ports-quick-reference/
Configuring Ports for CDH3 at
https://ccp.cloudera.com/display/CDHDOC/Configuring+Ports+for+CDH3
Following are configuration details about the software components and any special security precautions they require.
The puppet node service (puppetd) runs continuously as root on all servers. It listens on port 8139 for "kick" requests, which trigger it to request updates from the puppet master. It does not receive updates on this port.
The puppet master service (puppetmasterd) runs continuously as the puppet user on the first server of the primary Oracle Big Data Appliance rack. It listens on port 8140 for requests to push updates to puppet nodes.
The puppet nodes generate and send certificates to the puppet master to register initially during installation of the software. For updates to the software, the puppet master signals ("kicks") the puppet nodes, which then request all configuration changes from the puppet master node that they are registered with.
The puppet master sends updates only to puppet nodes that have known, valid certificates. Puppet nodes only accept updates from the puppet master host name they initially registered with. Because Oracle Big Data Appliance uses an internal network for communication within the rack, the puppet master host name resolves using /etc/hosts to an internal, private IP address.
|
Copyright © 2012, Oracle and/or its affiliates. All rights reserved. Legal Notices |
|