2 Infrastructure
The Oracle Enterprise Manager Ops Center infrastructure is the software and connections used by the product. You can manage that infrastructure through the user interface and from the command line.
The following features and topics are covered in this chapter:
-
Viewing and Changing the Enterprise Controller and Proxy Controller Status
-
Configuring Proxy Controllers to Use a Strong Cipher Suite Configuration
2.1 Introduction to Infrastructure
This chapter explains how to set up and manage the Oracle Enterprise Manager Ops Center infrastructure.
The Enterprise Controller, Knowledge Base, Proxy Controllers, and Agent Controllers make up the Oracle Enterprise Manager Ops Center infrastructure. The Enterprise Controller generates the UI, routes jobs, communicates with the Knowledge Base, and stores Oracle Enterprise Manager Ops Center data in the Enterprise Controller Database. The Proxy Controllers directly manage specific assets and carry out jobs. Agent Controllers enable the full range of operating system update and monitoring capabilities on managed operating systems.
You can view and maintain the infrastructure, make changes to its configuration, and configure the connection mode.
Some of the procedures described in this section use the ecadm, proxyadm, and agentadm commands. See the Oracle Enterprise Manager Ops Center Feature Reference Guide for more information about these commands.
-
On Oracle Solaris systems, these commands are in the
/opt/SUNWxvmoc/bin/directory. -
On Linux systems, these commands are in the
/opt/sun/xvmoc/bin/directory.
2.2 Viewing Infrastructure
You can view the Proxy Controllers and Agent Controllers currently known to Oracle Enterprise Manager Ops Center and see information about their version and status.
2.2.1 Viewing Agent Controllers
You can install Agent Controllers on operating systems and virtualization tools to manage them. You can view them to see information about Agent Controllers, including:
-
Asset Name
-
Zone Type
-
Agent Version
-
Upgrade Version
-
Downgrade Version
-
Agent Status (Online or Offline)
-
Click the Assets section of the Navigation pane.
-
Select a group that contains managed operating systems.
-
Select an operating system smart group from the Operating Systems category, then click the Summary tab.
-
Select a user-defined group that contains operating systems, then click the Membership tab.
-
-
Click the Agent Controllers tab.
Agent Controller information is displayed.
2.2.2 Viewing Proxy Controllers
Proxy Controllers manage assets and perform jobs. You can view the Proxy Controllers to see information about them, including:
-
Status (Online or Offline)
-
Current Version
-
Available Upgrades
-
IP Address
-
Registration Date
-
Click the Proxy Controller in the Administration section of the Navigation pane.
-
Click the Configuration tab in the Center pane.
The Proxy Controller's configuration is displayed.
2.2.3 Viewing the Enterprise Controller Configuration
You can view and manage the configuration of the Enterprise Controller. The configuration displays the settings for the subsystems that make up the Enterprise Controller.
To view the Enterprise Controller configuration, select the Enterprise Controller in the Administration section of the Navigation pane, then click the configuration tab. Select one of the subsystems listed below to display its settings. Do not modify these settings unless directed by Oracle.
-
Agent Provisioning: Manages the provisioning of Agent Controllers.
-
Auto Service Requests: Manages the Auto Service Request (ASR) settings.
-
Database: Manages the database used by Oracle Enterprise Manager Ops Center.
-
EC Manager: Manages the Enterprise Controller.
-
Firmware: Manages firmware downloads.
-
Job Manager: Manages the way that jobs are run.
-
My Oracle Support (MOS): Manages Oracle Enterprise Manager Ops Center's communications with MOS.
-
Network/Fabric Manager: Manages networks and fabrics.
-
OCDoctor: Manages the OCDoctor location and updates.
-
OS Provisioning: Manages network and fabric settings.
-
Permission Cache: Manages cache sizes.
-
Power: Manages energy cost settings.
-
Proxy Manager: Manages the interactions between the parts of the infrastructure.
-
Quartz Scheduler: Manages the quartz scheduler.
-
Role Preferences: Manages role settings.
-
Update: Manages the location of update libraries.
-
Zone Controller: Manages the zone management settings.
2.3 Migrating Agent Controllers Between Proxy Controllers
A Proxy Controller manages each Agent Controller. You can migrate an Agent Controller from one Proxy Controller to another to balance job load or if you intend to uninstall a Proxy Controller. The destination Proxy Controller must be on, or associated with, the asset's network.
To Move Agent Controllers Between Proxy Controllers
-
Select the source Proxy Controller in the Administration section of the Navigation pane.
-
Click the Managed Assets tab.
-
Select one or more assets to move, then click the Migrate Assets icon.
The Asset Migration Wizard is displayed.
-
Select the destination Proxy Controller from the list of Proxy Controllers, or select Auto Balance across Proxy Controllers to automatically select a destination Proxy Controller.
-
Click Migrate.
A job is launched to migrate the selected assets to the destination Proxy Controller.
2.4 Using Connection Modes
Oracle Enterprise Manager Ops Center can operate in either Connected or Disconnected Mode. In Connected Mode, the software communicates with Oracle web sites and other vendors, gathering patch and update information. In Disconnected Mode, the software operates autonomously and does not need an Internet connection.
You can switch between connection modes at any time.
2.4.1 Switching to Disconnected Mode
If you are in Connected Mode, or have not selected a connection mode, you can switch to Disconnected Mode. To use Disconnected Mode, you must download a Knowledge Base bundle.
Before switching to disconnected mode, you must obtain a Knowledge Base bundle using the Harvester script. This procedure is described below.
To Switch to Disconnected Mode
-
Click the Enterprise Controller in the Administration section of the Navigation pane.
-
Click Setup Connection Mode in the Actions pane.
-
Enter the absolute path of the Knowledge Base bundle that you want to use, then click Load Bundle. Use the Browse button to locate the Knowledge Base bundle if you do not know the absolute path.
-
Click Switch to Disconnected Mode.
2.4.2 Switching to Connected Mode
If you are in Disconnected Mode, or have not selected a connection mode, you can switch to Connected Mode. You must have a valid set of My Oracle Support (MOS) credentials in your authentications to use Connected Mode.
-
Click the Enterprise Controller in the Administration section of the Navigation pane.
-
Click Setup Connection Mode in the Actions pane.
-
Click Switch to Connected Mode.
2.5 Using the Harvester
The harvester is a script that you can run on an Internet-facing system to create a Knowledge Base bundle and to download OS update and firmware content. To use disconnected mode, you must use the harvester to obtain a Knowledge Base bundle.
To get a KB bundle, use the following general procedure:
-
Identify a system that can connect to the Internet.
-
Download the harvester bundle.
-
Use the harvester script to download content.
-
Copy the KB bundle and OS update content onto the Enterprise Controller system using portable media.
2.5.1 Identifying a Harvester System
Select a system from which to run the harvester script. This system must use either Oracle Solaris or Linux and must be Internet-facing.
2.5.2 Downloading the Harvester Bundle
The harvester bundle contains the script harvester.sh and signing utilities for signature checking and generation of the downloaded software. To download the script:
-
On the internet-facing system, download the harvester script from
https://updates.oracle.com/OCDoctor/harvester_bundle-latest.zip. -
Unpack the bundle
harvester_bundle-latest.zip.
2.5.3 Using the Harvester Script
You can use the harvester script to obtain a KB bundle and OS update content.
-
Run the harvester script using one or more of the options described below. You can edit the
config.inifile to store some of these values. Values entered in theconfig.inido not need to be provided when the harvester script is run.-
--userMy Oracle Support user name: Specify the valid My Oracle Support user name. You can set this value in theHTTP_USER=""field of theconfig.inifile. This option is required if you have not added the MOS user name to theconfig.inifile. -
--password-filepassword file: Specify the full path name of a file that contains only the MOS password. You can set either the password or the location of the password file in theHTTP_PASSWD=""field of theconfig.inifile. This option is required if you have not added the password to theconfig.inifile. -
--proxy-serverproxy server URL: Specify the URL of the proxy server. You can set this value in thePROXY_URL=""field of theconfig.inifile. -
--proxy-userproxy server user name: Specify a username for the proxy server. You can set this value in thePROXY_USER=""field of theconfig.inifile. -
--proxy-password-fileproxy server password file: Specify the full path name of a file that contains only the proxy server password. You can set either the password or the location of the password file in thePROXY_PASSWD=""field of theconfig.inifile. -
--storage-dirdirectory: Specify the temporary directory for storing the downloaded contents. The default location is/var/tmp/offline. You can set this value in theSTANDALONE_DIR=""field of theconfig.inifile. -
--mark-new-patches: The harvester script creates a dated folder which includes hard links to all the patches that were downloaded in the current run. All patches still go to the storage directory. This flag is useful in incremental downloads to identify which are the newly downloaded files. Using hardlinks eliminates the need for a full copy of each file. You can set this value in theMARK_NEW_PATCHES=field of theconfig.inifile. -
--kb-only: Download only the Knowledge Base bundle without downloading any patches. -
--download-patcheslist: Specify the distributions for which you want to download all the Oracle Solaris patches. Specify a quoted, space separated list of the names of Oracle Solaris OS distributions for which you want to download patches. If the distribution is not specified, the patches for all Oracle Solaris distributions are downloaded. Available distributions are:-
SOLARIS_10_0_SPARC
-
SOLARIS_10_0_X86
-
SOLARIS_9_0_SPARC
-
SOLARIS_8_0_SPARC
-
FIRMWARE
The disk space requirement on the Internet-facing system and the Enterprise Controller to run the harvester script with the
--download-patchesoption is approximately 150 GB for a distribution.Note:
The harvester script might take several hours to finish running with the--download-patchesoption. You can upload the patches in bulk from the EIS DVD. -
-
--download-baselineID: Specify the Oracle Solaris baseline ID to download.Note:
When you use the--download-baselineoption, you must use the--download-patchesoption. You can use the option only for one distribution. -
--show-baselinesdistribution: This option displays the baselines for a given distribution. You can enter only one distribution at a time. Valid distributions are:-
SOLARIS_10_0_SPARC
-
SOLARIS_10_0_X86
-
SOLARIS_9_0_SPARC
-
SOLARIS_8_0_SPARC
-
-
--revisionsnumber: Specify the number of revisions of a patch to download. By default, the revision number is 100. You can set this value in theREVISIONS=field of theconfig.inifile. -
--from-datemm-yyyy: Only download patches that are newer than the specified date. -
--patches-from-filefile : Download all the patches from a file. The format of the file must be one patch per line without the.zipextension. -
--instructions: Use this option to display instructions for moving downloaded Knowledge Base bundles and patches to the Enterprise Controller system. -
--update: Use this option to check for updates for the harvester script.
-
Examples of Running the Harvester Script
Example 2-1 Running Harvester Script with MOS Account
Running the harvester script to download only the knowledge base bundle.
# ./harvester.sh --kb-only
Ops Center Harvester version 2.10 (Jun 18 2012 [Build 57]) (SunOS)
Download log file is located in /var/tmp/harvester-wget.log
Checking for connectivity...
[OK] Connected successfully. No updates were found (current: 2.10, online: 2.10).
[OK] Directory /var/tmp/offline not found. This directory will be created.
[Channels list (channels.xml)] Downloaded successfully
Stage 1: Downloading/refreshing required Knowledge Base files
[AS_3_0_AMD64 Knowledge] Downloaded successfully
[AS_4_0_S390 Knowledge] Downloaded successfully
[AS_3_0_IA32 Knowledge] Downloaded successfully
[ES_3_0_IA32 Knowledge] Downloaded successfully
[ES_3_0_AMD64 Knowledge] Downloaded successfully
[FIRMWARE Knowledge] Downloaded successfully
[ES_4_0_AMD64 Knowledge] Downloaded successfully
[AS_4_0_IA32 Knowledge] Downloaded successfully
[AS_4_0_AMD64 Knowledge] Downloaded successfully
[OS_IMAGES Knowledge] Downloaded successfully
...
...
Example 2-2 Running Harvester Script to Download Oracle Solaris 10 SPARC patches
Running the harvester script to download Oracle Solaris 10 patches up to four revisions for a SPARC distribution
./harvester.sh --download-patches "SOLARIS_10_0_SPARC SOLARIS_10_0_X86" --revisions 4
Example 2-3 Running Harvester Script to Display Baselines for Oracle Solaris 10 SPARC
Running the harvester script to display the available Oracle Solaris baselines for an Oracle Solaris 10 SPARC distribution.
./harvester.sh --download-patches SOLARIS_10_0_SPARC --download-baseline
Example 2-4 Running Harvester Script to Download Security Baselines for Oracle Solaris 10 SPARC
Running the harvester script to download the security baseline DEC-2009 for an Oracle Solaris 10 SPARC distribution.
./harvester.sh --download-patches SOLARIS_10_0_SPARC --download-baseline 40030030
2.5.4 Copying Content to the Enterprise Controller
When you have downloaded the Knowledge Base bundle or OS update content, move it to the Enterprise Controller system using portable media.
2.5.4.1 Copying a Knowledge Base Bundle
This procedure uploads a new knowledge base bundle to the Enterprise Controller. Follow this procedure if you used the --kb-only option.
-
Copy the
standalone-<timestamp>.tar.gzto the Enterprise Controller system. By default, this file is in the/var/tmp/offlinedirectory. -
Use the Switching to Disconnected Mode procedure to upload the Knowledge Base bundle and enable disconnected mode.
2.5.4.2 Copying a Knowledge Base Bundle and All Patches
This procedure uploads a new knowledge base bundle to the Enterprise Controller and uploads patch content.
-
Copy the
standalone-<timestamp>.tar.gzto the Enterprise Controller system. By default, this file is in the/var/tmp/offlinedirectory. -
Copy the
all_unsignedfolder, which includes all patches, to the Enterprise Controller system. By default, this file is in the/var/tmp/offlinedirectory. You can split this folder across multiple DVDs if needed. -
Use the Switching to Disconnected Mode procedure to upload the Knowledge Base bundle and enable disconnected mode.
-
Run the
copy_patches_to_oc.shscript. This script is located in theall_unsignedfolder.
2.5.4.3 Copying a Knowledge Base Bundle and Incremental Patches
This procedure uploads a new knowledge base bundle to the Enterprise Controller and uploads specific patch content. You can follow this procedure if you used the --mark-new-patches option or set the MARK_NEW_PATCHES field in the config.ini file to 1.
-
Copy the
standalone-<timestamp>.tar.gzto the Enterprise Controller system. By default, this file is in the/var/tmp/offlinedirectory. -
Copy the
all_unsigned-<timestamp>folder, which includes the patches downloaded on the day specified by the timestamp, to the Enterprise Controller system. By default, this file is in the/var/tmp/offlinedirectory. You can split this folder across multiple DVDs if needed. -
Use the Switching to Disconnected Mode procedure to upload the Knowledge Base bundle and enable disconnected mode.
-
Run the
copy_patches_to_oc.shscript. This script is located in theall_unsigned-<timestamp>folder.
2.6 Configuring Local Agent Controllers
A local Agent Controller is an Agent Controller installed on the Enterprise Controller or Proxy Controller OS. This enables you to monitor the systems that supports the Enterprise Controller or Proxy Controller and launch some jobs that target the system.
2.6.1 Configuring the Local Agent Controller on the Enterprise Controller
Configuring the Local Agent Controller on the Enterprise Controller system enables you to monitor the system that supports the Enterprise Controller and launch jobs that target it.
Jobs that target the Enterprise Controller's hardware or OS that would cause the Enterprise Controller system to restart, such as an OS update that requires a reboot, cannot be performed through the product.
To Configure the Local Agent Controller
-
Click the Enterprise Controller in the Administration section of the Navigation pane.
-
Click Configure Local Agent in the Actions pane. A confirmation page is displayed.
-
Click OK. A job is launched to configure the local Agent Controller.
2.6.2 Unconfiguring the Local Agent Controller on the Enterprise Controller
You can unconfigure the Local Agent Controller to halt monitoring of the Enterprise Controller system.
To Unconfigure the Local Agent Controller
-
Click the Enterprise Controller in the Administration section of the Navigation pane.
-
Click Unconfigure Local Agent in the Actions pane. A confirmation page is displayed.
-
Click OK. A job is launched to unconfigure the local Agent Controller.
2.6.3 Configuring a Local Agent Controller on a Proxy Controller
Configuring the Local Agent Controller on a Proxy Controller system lets you monitor the system that supports the Proxy Controller and launch jobs that target it.
To Configure a Local Agent Controller
-
Click a Proxy Controller in the Administration section of the Navigation pane.
-
Click Configure Agent on Proxy in the Actions pane. A confirmation window is displayed.
-
Click OK.
A job is launched to configure the local Agent Controller.
2.6.4 Unconfiguring a Local Agent Controller on a Proxy Controller
You can unconfigure the Local Agent Controller to halt monitoring of the Proxy Controller system.
To Unconfigure a Local Agent Controller
-
Click a Proxy Controller in the Administration section of the Navigation pane.
-
Click Unconfigure Agent on Proxy in the Actions pane. A confirmation window is displayed.
-
Click OK.
A job is launched to unconfigure the local Agent Controller.
2.7 Configuring Oracle Configuration Manager
Oracle Configuration Manager is a tool that customizes and enhances the support experience by collecting configuration information and uploading it to the Oracle repository. When the configuration data is uploaded on a regular basis, customer support representatives can analyze this data and provide better service.
Oracle Configuration Manager is installed with Oracle Enterprise Manager Ops Center. If you did not configure Oracle Configuration Manager during installation, you can do so using the command line.
This procedure requires that Java 7 be configured on the Enterprise Controller.
To Configure Oracle Configuration Manager
-
As root, log in to the Enterprise Controller system.
-
Run the
setupCCRcommand.# /var/opt/sun/xvm/ocm/ccr/bin/setupCCR
-
The Oracle Configuration Manager installation text is displayed. Enter the My Oracle Support user name or email address that you want to associate with Oracle Enterprise Manager Ops Center.
Provide your email address to be informed of security issues, install and
initiate Oracle Configuration Manager. Easier for you if you use your My
Oracle Support Email address/User Name.
Visit http://www.oracle.com/support/policies.html for details.
Email address/User Name:
-
If you want security updates to appear on your My Oracle Support page, enter your My Oracle Support password. Press Enter.
Provide your My Oracle Support password to receive security updates via your My Oracle Support account.
Password (optional):
Oracle Configuration Manager is configured.
2.8 Registering the Enterprise Controller
You can register your Enterprise Controller with Oracle. This lets you register your assets, which associates the asset data with a My Oracle Support (MOS) account and makes the assets visible in the MOS portal.
To Register the Enterprise Controller
-
Click the Enterprise Controller in the Administration section of the Navigation pane.
-
Click Register Enterprise Controller in the Actions pane.
The Introduction page is displayed.
-
View the introduction information, then click Next.
The HTTP Proxy page is displayed.
-
If the Enterprise Controller requires an HTTP Proxy to reach the Internet, enter the HTTP Proxy information, then click Next.
-
Server: Enter the server name for the HTTP Proxy.
-
Port: Enter the port number to be used.
-
User: Enter a user name if one is required by the server.
-
Password: Enter a password if one is required by the server.
-
-
Enter a valid My Oracle Support user name and password, then click Next. The Enterprise Controller is registered with the specified user name.
-
Review the registration information, then click Finish.
The Enterprise Controller is registered.
2.9 Running a Self Diagnosis
You can run a self-diagnosis on the Enterprise Controller, on Proxy Controllers, or on operating system assets. The self-diagnosis runs the OCDoctor's --troubleshoot option, which can identify some common issues and aid in troubleshooting.
-
Select the target asset in the Assets section or Administration section of the Navigation pane.
-
Click Self Diagnosis in the Actions pane.
-
Select a task.
-
Select Run New Self Diagnosis to launch a new self diagnosis job.
If the target operating system supports the Enterprise Controller or a Proxy Controller, you can also select Optimize Enterprise Controller or Proxy Controller. This option uses the
--tuningoption to optimize the system for Enterprise Controller or Proxy Controller performance. -
Select Work on Previous Self Diagnosis and select a prior self diagnosis job to review the data from a prior self diagnosis.
-
-
If you selected Work on Previous Self Diagnosis, the data from the prior self diagnosis is displayed. Review the data, then select a task.
-
Select re-run Self Diagnosis to re-run the prior Self Diagnosis.
You can also check Attempt to Fix Issues to automatically fix certain issues.
-
Select Collect Logs to collect logs from the system.
Click Next.
-
-
Review the summary information, then click Finish to launch the job.
-
Review the job details or rerun the wizard and select Work on Previous Self Diagnosis to view the data gathered by the self diagnosis.
2.10 Viewing and Changing the Enterprise Controller and Proxy Controller Status
You can check the status of the Enterprise Controller and Proxy Controllers from the command line, and stop or start them if necessary. Oracle Enterprise Manager Ops Center only functions while the Enterprise Controller is online, and each Proxy Controller must be online for the product to interact with its managed assets.
2.10.1 Checking the Status of the Enterprise Controller
The Enterprise Controller can be in one of two states. In the online state, the Enterprise Controller is running normally. In the offline state, the Enterprise Controller is stopped and cannot be used.
You can check the status of the Enterprise Controller using the ecadm command.
To Check the Status of the Enterprise Controller
-
As root, log in to the Enterprise Controller system.
-
Use the
ecadmcommand with thestatussubcommand to check the status of the Enterprise Controller.For example:
# ./ecadm status
online
The status of the Enterprise Controller is displayed.
2.10.2 Starting the Enterprise Controller
The Enterprise Controller can be in a stopped state due to a system reboot or maintenance. While the Enterprise Controller is stopped, Oracle Enterprise Manager Ops Center does not function.
You can start the Enterprise Controller using the ecadm command.
To Start the Enterprise Controller
-
As root, log in to the Enterprise Controller system.
-
Use the
ecadmcommand with thestartsubcommand to start the Enterprise Controller.The following options may be used:
-
-h | --help: Displays the usage synopsis for the subcommand.
-
-w | --wait: ecadm does not exit until all services have been started.
-
-t | --temporary: The state change is made temporary until next reboot.
-
-v | --verbose: Displays verbose error and informational messages.
-
-l | --logfile <logfile>: Captures any output from ecadm in the <logfile>.
For example:
# ./ecadm start -vw
ecadm: Starting Enterprise Controller with SMF...
ecadm: ... milestone "satellite-enable" succesfully enabled
ecadm: ... Waiting for Enterprise Controller services to go "online"
ecadm: Enterprise Controller services have started
#
The Enterprise Controller is started.
-
2.10.3 Stopping the Enterprise Controller
When the Enterprise Controller is online, Oracle Enterprise Manager Ops Center functions normally. However, certain maintenance tasks can only be performed when the Enterprise Controller is offline.
You can stop the Enterprise Controller using the ecadm command.
To Stop the Enterprise Controller
-
As root, log in to the Enterprise Controller system.
-
Use the
ecadmcommand with thestopsubcommand to stop the Enterprise Controller.The following options may be used:
-
-h | --help: Displays the usage synopsis for the subcommand.
-
-w | --wait: ecadm does not exit until all services have been started.
-
-t | --temporary: The state change is made temporary until next reboot.
-
-v | --verbose: Displays verbose error and informational messages.
-
-l | --logfile <logfile>: Captures any output from ecadm in the <logfile>.
For example:
# ./ecadm stop -vw
ecadm: Shutting down Enterprise Controller using SMF...
ecadm: ... milestone "satellite-enable" successfully disabled
ecadm: ... waiting for services to go "offline"
ecadm: Enterprise Controller services have stopped
#
The Enterprise Controller is stopped.
-
2.10.4 Checking the Status of a Proxy Controller
You can check the status of a Proxy Controller using the proxyadm command.
To Check the Status of a Proxy Controller
-
As root, log in to the Proxy Controller system.
-
Use the
proxyadmcommand with thestatussubcommand to check the status of the Proxy Controller.For example:
# ./proxyadm status
online
The status of the Proxy Controller is displayed.
2.10.5 Starting a Proxy Controller
You can start a Proxy Controller using the proxyadm command.
-
As root, log in to the Proxy Controller system.
-
Use the
proxyadmcommand with thestartsubcommand to start the Proxy Controller.The following options may be used:
-
-h | --help: Displays the usage synopsis for the subcommand.
-
-w | --wait:
proxyadmdoes not exit until all services have been started. -
-t | --temporary: The state change is made temporary until next reboot.
-
-v | --verbose: Displays verbose error and informational messages.
-
-l | --logfile <logfile>: Captures any output from
proxyadmin the <logfile>.
For example:
# ./proxyadm start -w
proxyadm: Starting Proxy Controller with SMF...
proxyadm: Proxy Controller services have started
#
The Proxy Controller is started.
-
2.10.6 Stopping a Proxy Controller
You can stop a Proxy Controller using the proxyadm command.
-
As root, log in to the Proxy Controller system.
-
Use the
proxyadmcommand with thestopsubcommand to stop the Proxy Controller.The following options may be used:
-
-h | --help: Displays the usage synopsis for the subcommand.
-
-w | --wait:
proxyadmdoes not exit until all services have been started. -
-t | --temporary: The state change is made temporary until next reboot.
-
-v | --verbose: Displays verbose error and informational messages.
-
-l | --logfile <logfile>: Captures any output from
proxyadmin the <logfile>.
For example:
# ./proxyadm stop -w
proxyadm: Shutting down Proxy Controller using SMF...
proxyadm: Proxy Controller services have stopped
#
The Proxy Controller is stopped.
-
2.10.7 Putting a Proxy Controller in Maintenance Mode
You can put a Proxy Controller in maintenance mode. While in maintenance mode, a Proxy Controller cannot discover new assets or act as a target for asset migration. However, the Proxy Controller continues to manage its current assets.
-
In the Administration pane, select a Proxy Controller.
-
Click Put in Maintenance Mode in the Actions pane.
A confirmation window is displayed.
-
Click OK.
The Proxy Controller is placed in maintenance mode.
2.10.8 Removing a Proxy Controller from Maintenance Mode
You can remove a Proxy Controller from maintenance mode. When a Proxy Controller is removed from maintenance mode, it can discover assets and act as a target for asset migration as normal.
-
In the Administration pane, select a Proxy Controller.
-
Click Clear Maintenance Mode in the Actions pane.
A confirmation window is displayed.
-
Click OK.
The Proxy Controller is removed from maintenance mode.
2.11 Managing Proxy Controller Networks
Proxy Controllers must have access to networks to manage the assets on those networks. You can associate Proxy Controllers with specific networks and enable or disable those networks.
Note:
If a Proxy Controller is connected to an asset using multiple networks, but management traffic between the Proxy Controller and agent must use a specific network, the Proxy Controller must have a NIC whitelisting file to identify the usable NICs.2.11.1 Associating Networks With a Proxy Controller
You can associate networks with a Proxy Controller. A Proxy Controller can manage assets on any network that has been associated with it. You can only associate a network with a Proxy Controller if the network is reachable from the Proxy Controller.
-
In the Administration pane, select the Proxy Controller where you want to associate networks.
-
Click Associate Networks in the Actions pane. The Network/Proxy Controller Associations page is displayed.
-
Use the arrow buttons to add networks to, or remove networks from, the Associate with Proxy Controller list.
-
Click Finish to associate the selected networks with the Proxy Controller.
2.11.2 Enabling or Disabling Networks for a Proxy Controller
You can enable or disable specific networks for a Proxy Controller. Networks are enabled by default when they are associated with a Proxy Controller.
Enabled networks are used normally. Proxy Controllers cannot manage assets on disabled networks. If you attempt to disable a network on a Proxy Controller that is being used to manage assets, you are asked to migrate those assets to a different Proxy Controller before you can disable the network.
-
In the Administration pane, select the Proxy Controller.
-
Click Enable/Disable Networks in the Actions pane.
-
Use the arrow buttons to add networks to the Enabled and Disabled networks lists.
-
Click Finish.
-
If you are disabling networks that are being used to manage assets, the migrate assets popup is displayed. Click Yes to launch the Migrate Assets Wizard, or click No to leave the assets associated with their current Proxy Controller in an unmanaged state.
-
If you launched the Migrate Assets Wizard and another Proxy Controller is available, the Migrate Assets page is displayed. Select another Proxy Controller for the assets, then click Migrate.
The selected networks are enabled or disabled.
2.12 Configuring Proxy Controllers to Use a Strong Cipher Suite Configuration
If you want to discover assets that use a strong cipher suite configuration, you must download two policy files and move them to your Proxy Controller systems.
To Configure Proxy Controllers to Use a Strong Cipher Suite Configuration
-
On an Internet-facing system, navigate to
http://www.oracle.com/technetwork/java/javase/downloads/jce-7-download-432124.html. -
Select Accept License Agreement.
-
Click the
UnlimitedJCEPolicyJDK7.ziplink and download the file. -
Unzip the
UnlimitedJCEPolicyJDK7.zipfile. -
Move the
local_policy.jarandUS_export_policy.jarfiles to the/usr/jdk/jdk<latest version>/jre/lib/security/directory on the Proxy Controller. -
Restart the Proxy Controller system.
2.13 Configuring DHCP and Subnets for OS Provisioning
To perform OS provisioning, a Proxy Controller must have DHCP configured. You can configure DHCP directly, or direct a Proxy Controller to use an external DHCP server. You can also configure subnets to work with specific DHCP servers.
2.13.1 Configuring DHCP
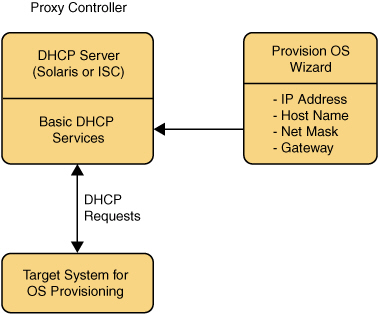
You can configure and enable DHCP services on a Proxy Controller. DHCP configuration configures and enables basic DHCP services on the Proxy Controller to support OS provisioning operations. The Proxy Controller must be in the same subnet as the target hosts for OS provisioning to work.
The DHCP Config action configures and enables either an Oracle Solaris DHCP server, or an Internet Standards Consortium (ISC) DHCP server, on the Proxy Controller that you select.
The DHCP Config action requires that you specify the Ethernet interface through which the Proxy Controller should provide DHCP services, for example bge0. You can establish DHCP services on all the Ethernet interfaces in the Proxy Controller. The Proxy Controller's Ethernet interface that you specify must be connected to the network where the target systems for OS provisioning are connected. In the same way, the Ethernet interface that you select in the Boot Network Device field of the Provision OS Wizard must be connected to the network where the Proxy Controller is providing DHCP services.
The DHCP Config and External DHCP Servers actions are mutually exclusive. Use one of these actions to configure DHCP services to support OS provisioning operations. The DHCP Config action is more commonly used, and is simpler to implement.
The Provision OS Wizard supplies the specific identity information that the target system requests, using the basic DHCP services that you establish on the Proxy Controller.
Figure 2-1, "Basic DHCP Configuration" shows the basic DHCP configuration.
-
In the Administration pane, select the Proxy Controller where you want to configure DHCP services.
-
Click DHCP Config in the Actions pane. The DHCP Configuration window is displayed.
-
In the DHCP Configuration dialog box, provide the following information:
-
DHCP Server: Select either ISC or Oracle Solaris to implement either the Internet Standards Consortium (ISC) reference DHCP server, or the Oracle Solaris native DHCP server. The ISC server is generally preferred.
-
Interfaces: Use the arrow buttons to add the correct Proxy Controller interface or interfaces to the list of selected interfaces. DHCP services are provided on the selected interface or interfaces. DHCP configuration is possible for multiple Ethernet interfaces in the Proxy Controller.
-
Enable DHCP: Select this option to enable the DHCP server that you selected.
-
-
Click Configure DHCP to save the DHCP configuration that you specified.
-
A warning indicates that the procedure removes existing subnets in the DHCP configuration. Click Yes to accept that action and continue.
-
A message indicates that the DHCP configuration job has been submitted. Click OK to dismiss the message. When the job is complete, DHCP services become available.
Note:
You can configure DHCP server on the Proxy Controller to listen to multiple Ethernet interfaces. For example, consider the following network configuration for the Proxy Controller:e1000g0 10.0.0.2 e1000g1 192.168.1.2 e1000g2 172.16.12.2
If you configure the DHCP server to listen to e1000g1 and e1000g2, then the target system must have the IP address in the range of 192.168.1.0/24 or 172.16.12.0/24.
2.13.2 Configuring Subnets
You can configure subnets to use the DHCP server on a Proxy Controller for purposes in addition to OS provisioning, or to define subnets that are used with external DHCP servers.
Configuring subnets is not required to establish the basic DHCP services that are required for OS provisioning, unless you are using an external DHCP server.
You configure subnets for the following reasons:
-
To provide IP address, DNS server, and router information to systems that can request them on the same network where the Proxy Controller is providing basic DHCP services for OS provisioning;
-
If you configure an external DHCP server instead of configuring a DHCP server on a Proxy Controller, you must configure a subnet for each network from which you might receive relayed DHCP requests.
Use the Subnets action to specify an IP address range that the DHCP server can use to assign IP addresses to systems that request them. The IP addresses that you specify in the Low IP Address and High IP Address fields for the subnet define the boundaries of the IP address range.
The IP addresses within the range that you specify cannot be used for OS provisioning operations. For example, if you specify 192.168.0.64 and 192.168.0.128 as the low and high IP addresses, you could not use any of the IP addresses within that range, including the low and high addresses, as values for the IP Address or IP Address Ranges fields in the Provision OS Wizard.
-
In the Administration pane, select the Proxy Controller where you want to configure a DHCP subnet.
-
Select Subnets in the Actions pane. The DHCP Subnets Configuration window is displayed.
-
Select a subnet from the drop-down list. To create a new subnet, select Create New Subnet. To modify an existing subnet, select the existing subnet from the drop-down list. Click Refresh to update the list of subnets.
-
In the DHCP Subnets Configuration dialog box, provide the following information:
-
Subnet Name: Enter the name of the subnet where you want to establish or modify DHCP services.
-
Network IP: Enter the network address.
-
Network Interface: Select the network interface.
-
Netmask: Enter the netmask for the network.
-
Gateway IP: Enter the gateway IP.
-
IP Range: Enter the IP addresses to use as the lower and upper limits of the IP address range that systems on this subnet can use.
-
Name Server: Enter the IP addresses of the DNS servers that systems should use.
-
Domain Name: Enter the names of the DNS domains that systems should use to resolve host names.
-
-
Click Create Subnet to create the subnet configuration that you specified, or click Save Subnet to save your changes to an existing subnet. A message indicates that a job to create the subnet was submitted. Click OK to dismiss the message.
2.13.3 Configuring External DHCP Servers
You can use DHCP servers that are external to Proxy Controllers to provide the DHCP services that OS provisioning operations require.
The DHCP Config and External DHCP Servers actions are mutually exclusive. Use only one of these two actions to configure DHCP services to support OS provisioning operations. The DHCP Config action is more commonly used, and is simpler to implement.
Figure 2-2, "DHCP Configuration Using External DHCP Servers" illustrates DHCP configuration using External DHCP servers.
Figure 2-2 DHCP Configuration Using External DHCP Servers
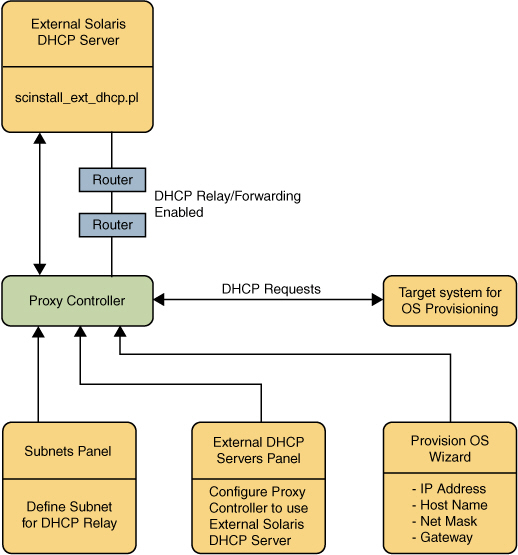
Description of "Figure 2-2 DHCP Configuration Using External DHCP Servers"
You run the scinstall_ext_dhcp.pl script on the External DHCP server to establish communication between the Proxy Controller and the External DHCP server. The Subnets pane allows you to define subnets where DHCP relay traffic is expected. The External DHCP Servers pane configures the Proxy Controller to relay DHCP configuration information that the Provision OS Wizard supplies. The Provision OS Wizard supplies the specific identity information that the target system requests. The target system makes its DHCP requests, which are relayed to the External DHCP server. The routers or other network asset that connects the External DHCP server to the Proxy Controller must have DHCP relay capabilities enabled.
External DHCP Server Requirements
The External DHCP Servers action is only compatible with Oracle Solaris DHCP server and not with ISC DHCP server.
Configuring External DHCP servers requires the following prerequisite tasks:
-
Establish DHCP relay or forwarding services on the network routers, switches, or systems that comprise your network. Refer to the documentation for those components for the required procedures.
-
Use the scninstall_ext_dhcp.pl script to establish the communication channel between a Proxy Controller and the External DHCP server. The scninstall_ext_dhcp.pl script enables ssh access to the DHCP server without requiring passwords.
To Install the scninstall_ext_dhcp.pl Script on the External DHCP Server
You must use wget to get the scninstall_ext_dhcp.pl script from the Proxy Controller to the External DHCP server.
-
On the external DHCP server, execute the following command to get the
scninstall_ext_dhcp.plscript from the Proxy Controller.# wget http://proxy_ip:8004/pub/scninstall_ext_dhcp.pl
Where
proxy_ipis the IP address of the Proxy Controller. -
Grant execute permissions for the script.
# chmod +x scninstall_ext_dhcp.pl
-
Install the script as root user.
# ./scninstall_ext_dhcp.pl install
This performs the following actions:
-
Sets up
scnospadminuser. -
Downloads the
SUNWscnosp-extdhcppackage from the proxy directory. -
Sets up the configuration file for limited commands to run from
scnospadminuser. -
Sets up SSH keys to allow SSH/SCP commands from the Proxy Controller to the external DHCP server without requiring passwords.
Note:
Ensure that you usewget to copy the scninstall_ext_dhcp.pl script from the Proxy Controller to another external DHCP server.To Configure External DHCP Servers
-
In the Administration pane, select the Proxy Controller where you want to configure an external DHCP server.
-
Select External DHCP Servers in the Actions pane. The External DHCP Servers Configuration dialog box is displayed.
-
Select a DHCP server. To create a new DHCP server on the selected Proxy Controller, select Create New DHCP Server. To modify an existing DHCP server, select the existing DHCP server from the drop-down list. Click Refresh to update the list of DHCP servers.
-
In the External DHCP Servers Configuration dialog box, provide the following information:
-
DHCP Server Name: Enter the name of the DHCP server.
-
DHCP Server IP: Enter the IP address of the DHCP server.
-
Network IP: Enter the network address where you want to establish or modify DHCP services.
-
Network Interface: Select a Network Interface.
-
DHCP Type: Select either ISC or Oracle Solaris to implement either the Internet Standards Consortium (ISC) reference DHCP server, or the Oracle Solaris native DHCP server.
-
Netmask: Enter the netmask for the network where you want to establish or modify DHCP services.
-
Gateway IP: Enter the gateway IP.
-
IP Range: Enter the IP addresses to use as the lower and upper limits of the IP address range that systems on this subnet can use.
-
Name Server: Enter the IP addresses of the DNS servers that systems should use.
-
Domain Name: Enter the names of the DNS domains that systems should use to resolve host names.
-
-
Click Create DHCP Server to create the DHCP server configuration that you specified. A message indicates that a job to create the external DHCP server was submitted. Click OK to dismiss the message.
2.14 Configuring the Enterprise Controller for WAN Boot
The Enterprise Controller is configured to be a WAN boot server when Oracle Enterprise Manager Ops Center is installed on an Oracle Solaris operating system.
WAN boot is the default connection for Oracle Solaris 11 provisioning. You can use DHCP or WAN boot for Oracle Solaris 10 provisioning.
2.14.1 Checking the WAN Boot Status
-
Expand the Administration section in the Navigation pane, then click Enterprise Controller.
-
Click the Configuration tab.
-
Select OS Provisioning from the Subsystem menu.
-
For Oracle Solaris 11, see the following property: usesS11WANBoot.
-
For Oracle Solaris 10, see the following property: usesS10WANBoot.
-
2.14.2 Enabling or Disabling WAN Boot
-
Expand the Administration section in the Navigation pane, then click Enterprise Controller.
-
Click the Configuration tab.
-
Select OS Provisioning from the Subsystem menu.
-
For Oracle Solaris 11, see the following property: usesS11WANBoot.
-
For Oracle Solaris 10, see the following property: usesS10WANBoot.
-
-
To enable WAN boot, change the value for the property to true.
-
To disable WAN boot, change the value for the property to false.
See the Oracle Enterprise Manager Ops Center Feature Reference Guide for information about using a WAN boot connection.
2.15 Changing the HTTP Proxy
If your Enterprise Controller accesses the Internet through an HTTP proxy, you can edit the HTTP proxy information.
-
Click the Enterprise Controller in the Administration section of the Navigation pane.
-
Click Change HTTP Proxy in the Actions pane.
The Change HTTP Proxy Wizard is displayed.
-
Enter the HTTP Proxy information, including:
-
Server: Enter the HTTP Proxy server address
-
Port Number: Enter the port number to access on the HTTP Proxy.
-
User Name: Required if the HTTP Proxy requires authentication
-
Password: Required if the HTTP Proxy requires authentication
-
-
Click Update. The HTTP proxy information is updated.