13 Managing Notification Service
Information about events occurring in Oracle Identity Manager are required to be sent to various users, such as requesters, beneficiaries, or administrators. This information about events is sent by using the notification service in the form of notification e-mail messages. The notification service allows you to perform all notification-related operations in Oracle Identity Manager.
An event is an operation that occurs in Oracle Identity Manager, such as user creation, request initiation, or any custom event created by the user. The events are generated as part of business operations or via generation of errors. Event definition is the metadata that describes the event. To define metadata for events, it is important to identify all event types supported by a functional component. For example, as a part of the scheduler component, metadata can be defined for scheduled job execution failed and shutting down of the scheduler. Every time a job fails or the scheduler is shut down, the events are raised and notifications associated with that event are sent.
The data available in the event is used to create the content of the notification. The different parameters defined for an event help the system to select the appropriate notification template. The different parameters that are defined for an event help the system decide which event variables can be made available at template design time.
A notification template is used to send notifications. These templates contain variables that refer to available data to provide more context to the notifications. The channel through which a notification is sent is known as the notification provider. Examples of such channels are e-mail, Instant Messaging (IM), Short Message Service (SMS), and voice. To use these notification providers, Oracle Identity Manager uses Oracle User Messaging Service (UMS).
At the backend, the notification engine is responsible for generating the notification, and utilizing the notification provider to send the notification.
The notification templates and notification providers are described in the following sections:
13.1 Managing Notification Providers
Managing notification providers is described in the following sections:
13.1.1 Using UMS for Notification
UMS offers various capabilities for sending notifications. These capabilities are used by Oracle Identity Manager notification engine to achieve the following:
-
Support for a variety of messaging channels: Messages can be sent and received through e-mail, IM, SMS, and voice. Oracle Identity Manager 11g Release 2 (11.1.2) supports sending notification messages only via e-mail.
-
Robust message delivery: UMS keeps track of delivery status information provided by messaging gateways, and makes this information available to applications so that they can respond to a failed delivery.
This section contains the following topics:
13.1.1.1 Enabling Oracle Identity Manager to Use UMS for Notification
To enable Oracle Identity Manager to use UMS for notification:
-
Configure UMS properties by using the UMSEmailNotificationProviderMBean MBean. To do so:
-
Log in to Oracle Enterprise Manager.
-
Click Application Deployments.
-
Right-click OIMAppMetadata(11.1.1.3.0)(oim_server_name), and select System MBean Browser.
-
In the System MBean Browser, navigate to Application Defined MBeans, oracle.iam, Server: oim_server_name, Application: oim, IAMAppRuntimeMBean, and select UMSEmailNotificationProviderMBean.
-
In the Attributes tab, enter the following information:
-
Policies: The Messaging UMS web service is used for integration between Oracle Identity Manager and UMS. This Web Service can be secured via Oracle Web Services Manager (OWSM) policy. If OWSM policy is attached to the Messaging web service at server level, then provide the name of the corresponding client side policy. Otherwise, leave the field blank. For example, if oracle/wss11_username_token_with_message_protection_service_policy is applied at the server level, then provide the corresponding client policy name here, such as oracle/wss11_username_token_with_message_protection_client_policy.
-
WSUrl: This is the URL of the UMS Web service to be started. Any SOA server can be used, for example:
http://SOA_HOST:SOA_PORT/ucs/messaging/webservice
Here, replace SOA_HOST with the host name of the SOA server and SOA_PORT with the port number to connect to the SOA server.
-
CSFKey: This is the UMS e-mail notification provider credential store (CSF) key name. The key name is populated by default. This key is in the oracle.wsm.security map.
-
-
Click Apply.
-
-
If Oracle Identity Manager and UMS server are in different domains, then you must import the UMS public key into Oracle Identity Manager domain's keystore, and must import Oracle Identity Manager domain's public key into the UMS keystore.
See Also:
"Configuring Oracle User Messaging Service" in the Oracle Fusion Middleware Administrator's Guide for Oracle SOA Suite and Oracle Business Process Management Suite for details about UMS Web service security -
Configure the mail server. UMS uses the local LINUX mail server by default, and no configuration change is required in UMS for configuring this mail server. However, to use any other Simple Mail Transfer Protocol (SMTP) server:
-
In Oracle Enterprise Manager, expand User Messaging Service, and select usermessagingdriver-email (soa_server_name).
-
From the User Messaging Email Driver list, select Email Driver Properties.
-
In the Driver-Specific Configuration section, populate the following mandatory fields:
-
OutgoingMailServer: The name of the SMTP server, for example, stbeehive.oracle.com.
-
OutgoingMailServerPort: The port number of the SMTP server, for example, 465.
-
OutgoingMailServerSecurity: The security setting used by the SMTP server. Possible values can be None, TLS, or SSL.
-
OutgoingUsername: Any valid username similar to your mail client configuration, such as in the firstname.lastname@xyz.com.
-
OutgoingPassword: The password used for SMTP authentication. This consists of the following fields:
Type of Password: Select Indirect Password, Create New User.
Indirect Username/Key: Enter a unique string, for example, OIMEmailConfig. This masks the password and does not expose it in clear text in the configuration file.
Password: Enter a valid password for this account.
-
-
Click Apply.
-
-
If mail server security is SSL, then you must remove DemoTrust store references from the SOA environment. To do so:
-
In a text editor, open the DOMAIN_HOME/bin/setDomainEnv.sh file. Open setDomainEnv.bat file for Microsoft Windows.
-
Remove the following line:
-Djavax.net.ssl.trustStore=$WL_HOME/server/lib/DemoTrust.jks from EXTRA_JAVA_PROPERTIES -
Save and close the file.
-
In a text editor, open the DOMAIN_HOME/bin/startManagedWeblogic.sh file. For Microsoft Windows, open the startManagedWeblogic.bat file.
-
Remove the following weblogic.security.SSL.trustedCAKeyStore property set in JAVA_OPTIONS from this file:
JAVA_OPTIONS="-Dweblogic.security.SSL.trustedCAKeyStore="{MW_HOME}/server/server/lib/cacerts" ${JAVA_OPTIONS}" -
Save and close the file.
-
Restart the Admin and Managed servers.
Note:
For more details on configuring UMS to connect to a mail server with SSL, see "Configuring Oracle User Messaging Service" in the Oracle Fusion Middleware Administrator's Guide for Oracle SOA Suite.
-
-
Edit the username and password in the CSF key. To do so:
-
In Oracle Enterprise Manager, expand WebLogic Domain.
-
Right-click the base domain, and select Security, Credentials. The Credentials page is displayed.
-
In the Credential column, expand the oracle.wsm.security map.
-
Select the record for the Notification.Provider.Key credential key.
-
On the toolbar, click Edit. The Edit Key dialog box is displayed.
-
Edit the values in the User Name and Password fields, and click OK.
-
13.1.1.2 Applying OWSM Policy to the UMS Web Service
Server-side OWSM policy can be applied to the UMS Web service to protect any other Web service that uses EM. The corresponding client side policy, username, and password must be provided in the provider XML or via MBean.
To attach server-side policy to the UMS Web Service:
-
In Oracle Enterprise Manager, expand User Messaging Service, and click usermessagingserver (soa_server).
-
From the User Messaging Service list, select Web Services.
-
In the Web Service Details section, click the Web Service Endpoints tab.
-
In the Endpoint Name column, click Messaging.
-
Click the OWSM Policies tab.
-
Under Directly Attached Policies, click Attach/Detach. A list of available policies and the options to attach and detach policies are displayed.
-
Select a policy from the available policies list, and click Attach. The selected policy is added to the Directly Attached Policies list.
The policy you select is for securing the Messaging UMS web service.
-
To validate the applied policy combination, refresh the page. A message is displayed stating that the validation is successful.
-
Click OK.
To provide the corresponding client-side policy to the in the provider XML, edit the following properties in the UMS XML Bean in Oracle Identity Manager:
To provide the corresponding client-side policy to the UMSEmailProviderMBean, provide the name of the client-side policy in the UMSEmailNotificationProviderMBean MBean. To do so:
-
Login to Oracle Enterprise Manager.
-
Go to Application Deployments. Right-click OIMAppMetadata(11.1.1.3.0)(oim_server1), and select System MBean Browser.
-
Go to Application Defined MBeans, oracle.iam, Server: oim_server1, Application: oim, IAMAppRuntimeMBean, UMSEmailNotificationProviderMBean.
-
Provide the client-side policy name in the policies properties shown in this MBean.
Table 13-1 lists the properties of the UMSEmailProviderMBean.
Table 13-1 UMSEmailProviderMBean Properties
Property Description enabled
A notification provider is used to send the notification e-mail if value for this property is true.
type
In this release of Oracle Identity Manager, this value is EMAIL only, and the property is not used.
itrName
Various configuration values required to send the e-mail via UMS, can be either provided in XML properties or IT resource. If configuration values are to be read from IT resource, then provide the name of the IT resource here. If the IT resource name is present, than the IT resource configuration settings are used. If IT resource name is incorrect or invalid, or the values given in the IT resource instance are invalid, then an error is generated and email is not sent.
Note: Using the IT resource is not a recommended channel to configure UMS in Oracle Identity Manager. This is because there is no mechanism to validate the values provided in the XML or IT resource before sending the e-mail to the server.
ws_url
The URL of UMS Web service to be invoked. Any SOA server can be used, in the following format:
http://SOA_HOST/SOA_PORT/ucs/messaging/webservice
CSFKey
This is the default notification key under oracle.wsm.security map. This key contains username and password required for OWSM policy. The default and recommended username/password in this key is the WebLogic administrator username and password. This can be changed to any valid username/password on the server side, which is SOA. See step 5 in "Enabling Oracle Identity Manager to Use UMS for Notification" for information about editing the default values in CSF key by using Oracle Enterprise Mananger.
policies
If OWSM policy is attached to the given Web service at server level, then provide the name of the corresponding client side policy here. Otherwise, leave this field blank. For example, if oracle/wss11_username_token_with_message_protection_service_policy is applied at server level, then provide the corresponding client policy name here, such as oracle/wss11_username_token_with_message_protection_client_policy.
keystoreAlias
The keystore alias for the target service. For details about the keystore alias, see "Client Aliases" in the Oracle Fusion Middleware Administrator's Guide for Oracle SOA Suite and Oracle Business Process Management Suite.
sender
A valid username of any OIM User. The e-mail ID of this user is used to send the e-mail.
13.1.2 Using SMTP for Notification
By default, the SMTP Email Notification Provider is disabled. This is enabled by setting the value of the enabled attribute to true. To configure SMTP Email Notification Provider properties by using the EmailNotificationProviderMBean MBean:
-
Login to Oracle Enterprise Manager.
-
Click Application Deployments.
-
Right-click OIMAppMetadata(11.1.1.3.0)(oim_server1), and select System MBean Browser. The System MBean Browser is displayed.
-
Navigate to Application Defined MBeans, oracle.iam, Server: oim_server1, Application: oim, IAMAppRuntimeMBean, EmailNotificationProviderMBean. All the attributes of the EmailNotificationProviderMBean MBean is displayed in the Attributes tab.
The Bean of Default SMTP Email notification provider is as follows:
<bean id="EmailServiceProvider" class="oracle.iam.notification.provider.EmailServiceProvider"
lazy-init="true">
<property name="enabled" value="false" />
<property name="type" value="EMAIL" />
<property name="isAuth" value="false"/>
<property name="itrName" value="" />
<!-- Use any existing credential Map e.g. oracle.wsm.security or oim-->
<property name="CSFMap" value="oracle.wsm.security" />
<!-- Either create a new key in above given Map or use existing one e.g. Notification.Provider.Key -->

<property name="CSFKey" value="" />
<property name="connectionTimeout" value="60000" />

<property name="mailServerName" value="" />
<property name="sender" value="xelsysadm" />
</bean>
Table 13-2 describes the properties of Default SMTP Email notification provider.
Table 13-2 Default SMTP Email Notification Provider Properties
| Property | Description |
|---|---|
|
enabled |
This property derives the status of the notification provider. If the value of this property is false, then the provider is inactive. To activate the provider, change the value to true. |
|
type |
This property determines the type of the notification provider. Oracle Identity Manager supports only Email type. |
|
isAuth |
If the value of this flag is false, then authentication is not required at mail server. As a result, you do not need to provide the CSFKey and CSFMap values. But this depends on the mail server in use. Most of the mail servers support this flag. If any mail server does not support this flag, then authentication credentials must be provided in CSFKey and corresponding CSFMap. |
|
itrName |
If you want to provide connectivity information via IT resource instance of type Mail Server, then provide the name of IT resource instance here. This is not a recommended option. |
|
CSFMap |
This property determines the name of the existing CSF Map, for example oim and oracle.wsm.security. |
|
CSFKey |
This property takes the name of the key that contains the authentication credentials, which are username and password. This key must exist under the map name. By default, one key with name Notification.Provider.Key is available under oracle.wsm.security map. This key is used for UMS Email notification provider, and default username and password is weblogic/weblogic1. If UMS email provider is disabled, then use the same map and key to provide the username and password required at mail server for authentication. Otherwise, create a new key under any of the default maps, and provide the name of map and key in these properties. Adding a CSF key is described later in this section. |
|
connectionTimeout |
This is in milliseconds. This is required for setting a maximum time for connection establishment. |
|
mailServername |
This is the name of mail server. |
|
sender |
This is the sender used in Oracle Identity Manager for sending the emails. |
To add a CSF key:
-
Login to Oracle Enterprise Manager.
-
Expand WebLogic Domain.
-
Right-click base_domain, and select Security, Credentials.
-
Expand oracle.wsm.security, and then click Create Key.
-
Create a key of type password. Provide the key name, description, username, and password. Click OK.
13.1.3 Using SOA Composite for Notification
By default, the SOA Email Notification Provider is disabled. You can enable this notification provider by changing the value of the enabled property to true.
To use SOA composite in Oracle Identity Manager for notification:
-
Create a SOA composite with notification activity. For details, see "Using the Notification Service" in the Oracle Fusion Middleware Developer's Guide for Oracle SOA Suite.
Figure 13-1 shows the sample mapping of the composite payload via Expression Builder.
Figure 13-1 Sample Mapping of Composite Payload
Description of "Figure 13-1 Sample Mapping of Composite Payload"
-
Manually deploy the SOA composite on the SOA server. To do so:
-
Create an application connection. To do so:
i. Open the SOA composite in JDeveloper.
ii. Create a new Application Server Connection by right-clicking the project and selecting New, Connections, Application Server Connection.
iii. Name the connection as
SOA_server, and click Next.iv. Select WebLogic 10.3 as the Connection Type.
v. Enter the authentication information. The typical values are:
Username: weblogic
Password: weblogic1
vi. On the Connection screen, enter the hostname, port, and SSL port for the SOA Admin server or Admin server, and enter the name of the WebLogic domain.
vii. Click Next.
viii. On the Test screen, click Test Connection. Verify that the success message is displayed.
-
Deploy the project. To do so:
i. Right-click the project, select deploy, select the project name. Select the to option to create the application connection, which is SOA_server. Verify that the build successful message is stored in the log.
ii. Enter the default revision, and click OK. Verify that the Deployment Finished message is stored in the deployment log.
-
-
Using Enterprise Manager, navigate to soa-infra, (Menu), Workflow Notification Properties, and set the Notification Mode to ALL.
-
Configure the SOA Email Notification Provider properties by using the SOAEmailNotificationProviderMBean MBean. To do so:
-
Log in to Oracle Enterprise Manager.
-
Expand Application Deployments. Right-click OIMAppMetadata(11.1.1.3.0)(oim_server1), and select System MBean Browser.
-
Navigate to Application Defined MBeans, oracle.iam, Server: oim_server1, Application: oim, IAMAppRuntimeMBean, SOAEmailNotificationProviderMBean.
-
-
Change the value of the enabled property from false to true in the SOAEmailNotificationProviderMBean. Figure 13-2 shows the properties of the Bean of SOA Email notification provider.
Figure 13-2 SOAEmailNotificationProviderMBean Properties
Description of "Figure 13-2 SOAEmailNotificationProviderMBean Properties"
Table 13-3 lists some of the properties of the SOA Email Notification Provider.
Table 13-3 SOA Email Notification Provider Properties
Property Description enabled
This property derives the status of the notification provider. If the value of this property is false, then the provider is inactive. To activate the provider, change the value to true.
type
This property determines the type of the notification provider. Oracle Identity Manager supports only Email type.
compositeID
This represents the name of the SOA composite. Name includes pkg/Name!version.
serviceName
This is the name given to the service in the SOA composite.
operationName
This is the name given to the process in the SOA composite.
payloadID
This is the name given to the payload in the SOA composite.
targetNamespace
This is the name of the targetNamespace given in various XMLs generated while creating the SOA composite.
sender
This is the sender used in Oracle Identity Manager for sending the emails.
-
Configure the user messaging drivers. if required. If you do not specify values for the user messaging drivers, then the local Linux mail server is used by default. To use any other mail server:
-
Log in to Oracle Enterprise Manager.
-
Navigate to User Messaging Service, usermessagingdriver-email (soa_server1), Email Driver Properties in Driver-Specific Configuration.
-
Configure the following mandatory values:
-
OutgoingMailServer: Name of the SMTP server, for example, stbeehive.oracle.com.
-
OutgoingMailServerPort: Port of the SMTP server, for example, 465.
-
OutgoingMailServerSecurity: The security setting used by the SMTP server. Possible values can be None, TLS, or SSL.
-
OutgoingUsername: Any valid username, similar to firstname.lastname@abc.com.
-
OutgoingPassword: Select Indirect Password, Create New User. Provide a unique string for Indirect Username/Key, for example, OIMEmailConfig. This will mask the password and not expose it in clear text in the config file. Provide a valid password for this account.
See Also:
"Configuring the Email Driver" in the Oracle Fusion Middleware Administrator's Guide for Oracle SOA Suite and Oracle Business Process Management for more information about configuring user messaging drivers -
-
-
After successful deployment of the SOA composite, trigger the notify API from any client, for example, the reset password event.
13.1.4 Configuring Custom Notification Provider
You can configure and use a custom notification provider, other than the default notification providers, for sending notifications.
To configure a custom notification provider:
-
Implement a custom Notification Provider class extending the oracle.iam.notification.provider.NotificationProviderBase base class.
-
Create a JAR file containing the class, and upload the file by using the UploadJAR utility. For information about using the UploadJAR utility, see "Upload JAR and Resource Bundle Utilities" in the Oracle Fusion Middleware Developer's Guide for Oracle Identity Manager.
-
Create an XML file similar to the following:
<beans xmlns="http://www.springframework.org/schema/beans"\\\\ xmlns:xsi="http://www.w3.org/2001/XMLSchema-instance"\\\\ xmlns:util="http://www.springframework.org/schema/util"\\\\ xsi:schemaLocation="http://www.springframework.org/schema/beans http://www.spri ngframework.org/schema/beans/spring-beans-2.0.xsd http://www.springframework.org /schema/util http://www.springframework.org/schema/util/spring-util-2.0.xsd" def ault-lazy-init="true">
<bean id="<customProvider>" class="<oracle.i am.notification.provider.CustomProvider>" lazy-init="true">
<!--Mandatory Attributes-->
<property name="enabled" value="<true>" />
<property name="type" value="EMAIL" />
<!--Optional Atributes-->
<property name="sender" value="SYSTEM_ADMINISTRATOR_USERNAME" />
</bean>
</beans>
When the value of the enabled property name is true, then this custom provider is used for sending notifications.
-
Import the XML file to MDS by using Oracle Enterprise Manager. For information about exporting and importing metadata files to and from MDS, see "Migrating User Modifiable Metadata Files" in the Oracle Fusion Middleware Developer's Guide for Oracle Identity Manager.
13.1.5 Disabling and Enabling Notification Providers
The notification providers, such as UMS notification provider or EmailNotificationProvider, can be disabled or enabled by using the Enterprise Manager console. For example, to disable UMS notification provider:
-
Login to Enterprise Manager.
-
Go to Application Deployments.
-
Right-click OIMAppMetadata(11.1.1.3.0)(oim_server1), and select System MBean Browser. The System MBean Browser pane is displayed.
-
Go to Application Defined MBeans, oracle.iam, Server: oim_server1, Application: oim, IAMAppRuntimeMBean.
-
Select UMSEmailNotificationProviderMBean.
-
In the Attributes tab, from the Value list corresponding to the Enabled attribute, select false to disable UMS notification provider. To enable UMS notification provider, select true.
13.2 Managing Notification Templates
Oracle Identity Manager provides a set of default notification templates, as shown in Table 13-4.
Table 13-4 Default Notification Templates
| Notification Template | Description |
|---|---|
|
Add Proxy Notification |
Template to send notification after a proxy has been added for a user |
|
Bulk Request Creation |
Template to send notification during a bulk request creation |
|
Create User Self Service Notification |
Template to send notification after a new user is created |
|
End Date |
Template to send notification to the manager when end date of the reportee expires |
|
Forgotten Username Notification |
Template to send notification after user submits the Forgotten Username form |
|
Generated Password Notification |
Template to send notification after a password is generated by Oracle Identity Manager |
|
Pass Bulk Upload Success |
Template to send notification on completion of user upload |
|
Password Expired Notification |
Template to send notification after password has expired |
|
Password Warning Notification |
Template to send notification before password expires |
|
Request Creation |
Template to send notification during a request creation |
|
Request Identity Creation |
Template to send notification during a Create User request |
|
Request Status Change |
Template to send notification during a request status change |
|
Reset Password |
Template to send notification after password has been reset |
|
User Deleted |
Template to send notification to the manager when the user account of the reportee is deleted as a result of expired end date |
Notification templates are described in the following sections:
13.2.1 Creating a Notification Template
Note:
Corresponding to each event that happens, you have to configure an XML file. The XML file defines the behavior of each event. You must first configure the XML for an event. After this is done, you can create a notification template for that event.For information about creating the event XML file, see "Defining Event Metadata" in the Oracle Fusion Middleware Developer's Guide for Oracle Identity Manager.
To create a notification template:
-
Log in to Oracle Identity System Administration.
-
In the left pane, under System Management, click Notification. The Notification page is displayed.
-
From the Actions menu, select Create. The Create Template page is displayed.
-
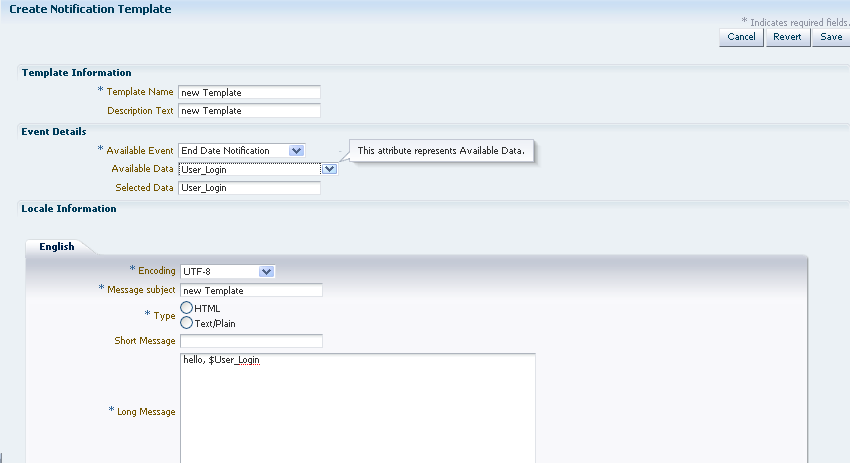
In the Template Information section, enter values for the following fields:
-
Template Name: Enter the template name in this field.
-
Description Text: Enter a brief description of the template in this field.
Note:
The Description Text field cannot be translated and is available only in English.
-
-
In the Event Details section, from the Available Event list, select the event for which the notification template is to be created from a list of available events. Depending on your selection, other fields are displayed in the Event Details section.
-
Under the Locale Information section, enter values in the following fields:
Note:
The Default Locale information is stored in the PTY table and is fetched from there.-
To specify a form of encoding, select either UTF-8 or ASCII.
-
In the Message Subject field, enter a subject for the notification.
-
From the Type options, select the data type in which you want to send the message. You can choose between HTML and Text/Plain.
-
In the Short Message field, enter a short version of the message.
-
In the Long Message field, enter the message that will be sent as the notification. See step 7.
-
-
To use the token for available data in the messages that will be sent as notification:
-
Select the attribute from the list. This attribute will be displayed in the Selected Data field.
-
Copy the attribute and add it in the message text by placing it inside ${}. For example, if selected data is FA_Territory, then include it in the text as ${FA_Territory}.
Figure 13-3 shows the Create Notification Template page with sample values:
Figure 13-3 The Create Notification Template Page
Description of "Figure 13-3 The Create Notification Template Page"
-
-
After you have entered the required values in all the fields, click Save.
-
A message is displayed confirming the creation of the notification template. Click OK.
13.2.2 Searching for a Notification Template
You can perform a simple search or an advanced search for a notification template by using Advanced Administration.
To perform a simple search for a notification template:
-
In Oracle Identity System Administration, under System Management, click Notification. Advanced Administration is displayed with the Notification tab enabled.
-
Click the icon next to the Search field. All the existing notification templates are displayed on the left pane, as shown in Figure 13-4:
-
Select the template that you want to view. The details of the selected notification template are displayed on the right pane.
To perform an advanced search for a notification template:
-
In the left pane of the Advanced Administration, click Advanced Search. The Advanced Search page is displayed, as shown in Figure 13-5:
-
Select one of the following matching options:
-
All: On selecting this option, the search is performed with the AND condition. This means that the search operation is successful based on Search field with any input from the user. Search field with no input from the user is not considered.
-
Any: On selecting this option, the search is performed with the OR condition. This means that the search operation is successful when any search criterion specified is matched.
-
-
Specify the search criteria in the Template Name, Event Name, and Subject Details fields. You can remove any of these fields that you do not want to include in the search by clicking the icon next to it. You can add a field that you want to include in the search by clicking Add Fields, and then selecting the field name from the list.
-
Click Search. The search results table is displayed with details about template names, event names, and subject details, as shown in Figure 13-6:
13.2.3 Modifying a Notification Template
To modify a notification template:
-
In Identity System Administration, under System Management, click Notification.
-
Search for the notification template that you want to modify.
-
Select the template that you want to modify. The the details of a notification template is displayed, as shown in Figure 13-7.
Figure 13-7 Notification Template Modification

Description of "Figure 13-7 Notification Template Modification"
-
Change the values that you want to and click Save.
-
A message is displayed confirming the modification of the notification template. Click OK.
13.2.4 Deleting a Notification Template
To delete a notification template:
-
In the Identity System Administration, under System Management, click Notification.
-
Search for the notification template that you want to delete.
-
Select the template that you want to delete.
-
From the Actions menu, click Delete. A message is displayed prompting you to confirm the delete the operation. Click OK. A message is displayed confirming the delete operation.
13.2.5 Adding and Removing Locales from a Notification Template
To add locales to a notification template:
-
In the Identity System Administration, under System Management, click Notification.
-
Search for the template that you want to add a locale to.
-
From the Actions menu, select Add Locale. The Add Locale page is displayed.
-
In the Locale Name field, click the icon next to the Locale Name field to select a locale from a list. After selecting the locale, and click Confirm.
-
Click Next. The Locale Information page is displayed and the locale that you added is displayed as a tab in the page.
-
In the Locale Information section, specify values for all the fields as mentioned in step 6 of "Creating a Notification Template", and then click Save. The locale is added to the template.
Note:
Notification can be sent in all the locales that are added to the notification template. A user receives notification in the same locale specified in the user preferences. If a locale is not specified in the user preferences, then the notification is sent in the default locale. The default locale is to be specified in the PTY table in Oracle Identity Manager database at the time of installation.
To remove locales from a notification template:
-
Search for the notification template from which you want to remove a locale. Select the template from the search results table.
-
From the Actions menu, click Remove Locale. The Remove Locale page is displayed.
-
Click the icon next to the Locale Name field to select a locale from a list . You can remove a locale from a template only if that template contains multiple locales. You cannot remove a locale if it is the only one associated with the template. Click Save.
-
A message is displayed confirming the removal of the locale. Click OK.
Note:
You must not remove default locale to ensure that a notification is sent every time when there is no user preferred locale is set or when notification template does not contain a locale template matching to user preferred locale.
13.2.6 Configuring Notification for a Proxy
Use the following steps to configure notification for a proxy:
-
Configure a new Email IT resource.
-
Create a new user. (For example, create a user Jane Doe.)
-
Create a second user. (For example, create a user John Doe.)
-
Assign the Jane Doe user as a manager for John Doe.
-
Specify your email ID for John Doe, which enables you to receive notifications in your inbox.
-
Log in as Jane Doe and navigate to the Oracle Identity Self Service.
-
Under My Profile, select My Information. The My Information page is displayed.
-
Expand Proxies. In the Proxies section, add John Doe as a proxy for Jane Doe.
Note:
If you successfully added the proxy, you (John Doe in this case) will receive an email notification message similar to the following:"You have been made the proxy for Jane Doe [JANED] from April 9, 2012 12:00:00 AM to April 30, 2010 12:00:00 AM".
13.3 Configuring Default Email Provider
Oracle Identity Manager sends email notifications during some operations, such as create user and password reset. There are two type of email providers, the default and UMS providers. This section describes how to configure default email provider for sending email notifications.
To configure default email provider:
-
Verify the Email Provider Configuration in Oracle Enterprise Manager. Modify the configuration as required.
-
Login to Oracle Identity System Administration, and set the value of the Email Server system property to point to the IT resource with name Email Server. For information about this system property, see "Managing System Properties".
-
Verify that the Email Server IT resource exists. This IT resource must have Mail Server as the IT resource type, and it must have a server name, for example localhost. If this IT resource is not present for mail server, then create the IT resource. For information about creating IT resources, see "Creating IT Resources" in the Oracle Fusion Middleware Developer's Guide for Oracle Identity Manager.
13.4 Configuring SOA Email Notification
This section contains the following topics:
13.4.1 Configuring Actionable Email Notification on SOA
To configure email notifications on SOA:
-
Before performing the steps to configure email notifications in SOA, ensure the following:
-
Make sure that the user to whom task is assigned has a valid email account set in Oracle Identity Manager.
-
If you want email notifications to be actionable, such as allowing approving or rejecting requests from the email, then ensure that you have configured human task to send actions in the notification. To do so:You can verify this by using SOA Composer. Login to SOA Composer as weblogic user (http://soa_host:soa_port/soa/composer). Go to Open Menu ' Open Tasks. In the popup, select the human task for which you want to verify the settings (Figure 1).
-
Login to SOA Composer by using weblogic user by using the following URL:
http://SOA_HOST:SOA_PORT/soa/composer
-
Go to Open Menu, Open Tasks.
-
In the Notification Settings dialog box, select the human task for which you want to verify the settings.
-
Verify that the Make notification actionable option is selected.
-
-
-
Login to Oracle Enterprise Manager as weblogic user.
-
Go to SOA. Right-click soa-infra (soa_server_name), and select SOA Administration, Workflow notification properties.
-
From the Notification Mode list, select Email.
-
Enter values for the following:
-
Email : From Address: Email account from which notification will be sent to approvers
-
Email : Actionable Address: Email account that will receive approve/reject response sent by approvers via email
-
Email : Reply To Address: Optional email address to which the reply will be sent, for example, no.reply@yourdomain.com
-
-
Click Apply.
-
Go to User Messaging Service. Right-click usermessagingdriver-email (soa_server_name), and select Email driver properties.
-
In the Driver-Specific Configuration section, configure the following minimum attributes for email notifications to work correctly:
-
MailAccessProtocol: Select IMAP or POP3
-
OutgoingMailServer: Name of the SMTP server, for example, myhost.mycompany.com
-
OutgoingMailServerPort: Port of the SMTP server, for example, 465
-
OutgoingDefaultFromAddress: Same as OutgoingMailServer
-
OutgoingPassword: You can provide the password in clear text stored in driverconfig.xml, or store password in CSF by using indirect option.
-
IncomingMailServer: The hostname of the incoming mail server. Required only if receiving emails is supported on the driver instance.
-
IncomingMailIDs: The email addresses corresponding to the user names. Each email address is separated by a comma and must reside in the same position in the list as their corresponding user name appears on the usernames list. Required only if receiving emails is supported on the driver instance.
-
IncomingUserPasswords: You can provide password in clear text stored in driverconfig.xml, or store password in CSF using indirect option.
-
Debug (Optional): Setting this to true logs all email activity on SOA server console but not SOA log files. Set this to true until you are sure that notifications are working correctly.
See Also:
"Configuring Human Workflow Service Components and Engines" and "Configuring Oracle User Messaging Service" in the Oracle Fusion Middleware Administrator's Guide for Oracle SOA Suite and Oracle Business Process Management Suite for detailed information about driver-specific configuration and Human workflow service components -
-
Restart SOA Managed Server.
-
Generate the human task by raising a request.
-
Use your email client to check mails in user's email account.
13.4.2 Troubleshooting SOA Email Notification
Consider the following to troubleshoot issues encountered with SOA email notification:
-
Enable the Debug option in the driver-specific configuration if you are facing issues with sending or receiving notifications. If you modify the email driver properties, then restart SOA server.
-
Send test notifications. To do so:
-
Login to Oracle Enterprise Manager.
-
Go to SOA. Right-click soa-infra (soa_server_name), and select Service Engines, Human Workflow, Notification Management, Send Test Notification.
-
-
Verify that email server and accounts are working. Try sending/receiving emails using your email client.
-
Check the SOA server log. Usually, the issue is with user messaging service configuration. If you have enabled the debug option, then SOA server log provides debugging information.
-
Sometimes if email is not being sent to a particular email account (because of incorrect configuration), then SOA server marks it as bad address. You must manually remove such bad address. To do so:
-
Login to Oracle Enterprise Manager.
-
Go to SOA. Right-click soa-infra (soa_server_name), Service Engines, Human Workflow, Notification Management, View Bad Address, Remove the Bad Address.
-
13.5 Disabling Email Notification
Notifications are sent in the following scenarios by event handlers when users are created through UI or through SPML:
See Also:
"Developing Event Handlers" in the Oracle Fusion Middleware Developer's Guide for Oracle Identity Manager for information about event handlers-
A user is created with manual password as a result of SelfServiceNotificationHandler. To disable sending email notification, remove the SelfServiceNotificationHandler section in the /metadata/iam-features-selfservice/event-definition/EventHandlers.xml in MDS.
-
System Administrator creates user with autogenerated password as a result of PasswordNotificationHandler. To disable sending email notification, remove the PasswordNotificationHandler section in the /metadata/iam-features-passwordmgmt/event-definition/EventHandlers.xml file in MDS.
-
System Administrator changes password manually. The notification can be disabled through UI based on the email checkbox selected on the UI.
-
System Administrator changes password with autogenerated password (reset password) as a result of ResetPasswordActionHandler. This is not a postprocess event handler that can be disabled.
To disable email notifications:
-
Export the /metadata/iam-features-selfservice/event-definition/EventHandlers.xml file from MDS by using Oracle Enterprise Manager. See "Migrating User Modifiable Metadata Files" in the Oracle Fusion Middleware Developer's Guide for Oracle Identity Maanger.
Note:
Save a local copy of the EventHandlers.xml for future reference. -
Remove the following from the EventHandlers.xml file:
<postprocess-handler
class="oracle.iam.selfservice.uself.uselfmgmt.impl.handlers.create.SelfServiceNotificationHandler"
entity-type="User"
operation="CREATE"
name="SelfServiceNotificationHandler"
order="1160"
stage="postprocess"
sync="TRUE">
</postprocess-handler>
-
Export the /metadata/iam-features-passwordmgmt/event-definition/EventHandlers.xml file from MDS by using Oracle Enterprise Manager.
-
Remove the following from the EventHandlers.xml file:
<postprocess-handler
class="oracle.iam.passwordmgmt.eventhandlers.PasswordNotificationHandler"
entity-type="User" operation="CREATE" name="PasswordNotificationHandler"
order="1180" stage="postprocess" sync="TRUE">
</postprocess-handler>
-
Import the files to MDS by following the instructions in "Migrating User Modifiable Metadata Files" in the Oracle Fusion Middleware Developer's Guide for Oracle Identity Maanger.
-
Export the files again to verify that the edits have been correctly uploaded to MDS.
-
Login to Oracle Identity System Administration, and set the Should send notifications in recon or not system property to FALSE. For information about this system property, see "Managing System Properties".
13.6 Testing Notification Configuration
This section describes the following notification configuration tests:
13.6.1 Testing UMS Email Notification
You can use the run.sh script to send notification through UMS. If the script is successful in sending notification through UMS, then the configuration is correct.
To test UMS email notification:
-
Copy the run.sh script and ClientNotificationTest.class file in the same directory in the host on which UMS notification has been configured.
-
Edit the run.sh script with following values:
APPSERVER_TYPE=wls
JAVA_HOME=VALID_JAVA_HOME
OIM_HOME=OIM_HOME
OIM_ORACLE_HOME=VALID_OIM_ORACLE_HOME
-
Run the run.sh script by using the following command:
sh run.sh OIM_HOST OIM_PORT SYS_ADMINISTRATOR_PASSWORD VALID_OIM_USER_WITH_VALID_EMAIL_ID
In this command syntax:
-
OIM_HOST is the host on which Oracle Identity Manager is deployed.
-
OIM_PORT is the Oracle Identity Manager port.
-
SYS_ADMIN_PASSWORD is the System Administration password.
-
VALID_OIM_USER_WITH_VALID_EMAIL_ID is a valid user in Oracle Identity Manager with a valid email ID to which the mail will be sent.
The following is an example of the run.sh command:
sh run.sh myhost.mycompany.com 8003 adminuser Welcome1 testuser
Note:
It might take some time for the mail to be sent to the user's email id. -
13.6.2 Testing SMTP Connectivity
To check the SMTP connectivity from a host, you can telnet from the host and send a test mail, as shown:
>> [aime@slcaa403 config]$ telnet internal-mail-router.mycompany.com 25

>> Trying 192.0.2.20...

>> Connected to internal-mail-router.oracle.com (192.0.2.1).

>> Escape character is '^]'.

>> 220-myhost.mycompany.com ESMTP Oracle Corporation - Unauthorized Use Prohibited

>> 220 Ready at Wed, 11 Jan 2012 09:30:44 GMT

>> MAIL From:<john.doe@mycompany.com>

>> 503 5.0.0 Polite people say HELLO first

>> Hello mycompany.com

>> 250 myhost.mycompany.com Hello anotherhost.mycompany.com [192.0.2.21],

pleased to meet you

>> MAIL From:<john.doe@mycompany.com>

>> 250 2.1.0 <john.doe@mycompany.com>... Sender ok

>> RCPT To:<john.doe@mycompany.com>

>> 250 2.1.5 <john.doe@mycompany.com>... Recipient ok

>> DATA

>> 354 Enter mail, end with "." on a line by itself

>> Testing internal mail router.

>> .

>> 250 2.0.0 q0B9Ui4h013576 Message accepted for delivery

>>