30 Managing Federation-related Schemes and Policies Using Oracle Access Management Console
This chapter introduces the federation-related authentication schemes and policies that must be configured for Oracle Access Management Identity Federation.
This chapter includes the following sections:
-
Introduction to Using Identity Federation and Access Manager in Concert Together
-
Using Authentication Schemes and Modules for Identity Federation 11g Release 2 (11.1.2)
-
Using Authentication Schemes and Modules for Oracle Identity Federation 11g Release 1
-
Managing Access Manager Policies for Use with Identity Federation
30.1 Prerequisites
You define one or more authentication schemes to enable Oracle Access Management Access Manager to work with federation providers to authenticate users that request access to Access Manager-protected resources.
For Identity Federation concepts, background and high-level flows, see "Authentication Overview" in Chapter 3, Deploying Oracle Identity Federation, of Oracle Fusion Middleware Administrator's Guide for Oracle Identity Federation.
30.2 Introduction to Using Identity Federation and Access Manager in Concert Together
The use of federation features with Access Manager varies depending on the release. When integrating with Identity Federation:
-
11g Release 1 (11.1.1) sites, and those upgrading from 11g Release 1 (11.1.1) to 11g Release 2 (11.1.2), can use the integration described in Oracle Fusion Middleware Integration Guide for Oracle Identity Management Suite.
-
Sites with new 11g Release 2 (11.1.2) installations can leverage federation features using the Oracle Access Management Console.
30.3 Using Authentication Schemes and Modules for Identity Federation 11g Release 2 (11.1.2)
This topic is divided as follows:
30.3.1 About Scheme FederationScheme
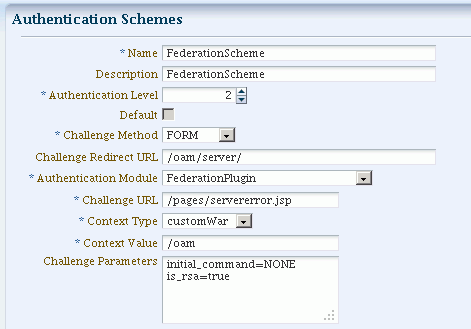
FederationScheme is a general-purpose scheme for use with Identity Federation 11g Release 2 (11.1.2).
Figure 30-1 shows the Access Console page for FederationScheme:
Table 30-1 describes the FederationScheme.
Table 30-1 FederationScheme Element Definitions
| Element | Description |
|---|---|
|
Name |
This is the scheme name. |
|
Description |
This is a brief description of the scheme. |
|
Authentication Level |
This is the trust level of the authentication scheme. |
|
Default |
This is a non-editable box that is checked when the Set as Default button is clicked. |
|
Challenge Method |
You may select a challenge method from those available in the drop-down box. |
|
Challenge Redirect URL |
This is the URL of another server to which user requests must be redirected for processing. |
|
Authentication Module |
This is the authentication module to use with the scheme. |
|
Challenge URL |
This is the URL to which the credential collector will redirect for credential collection. Not used by the federation plug-in. |
|
Context Type |
This element is used to build the final URL for the credential collector. |
|
Context Value |
This element is used to build the final URL for the credential collector. The value depends on the context type. |
|
Challenge Parameters |
This is the list of parameters, if any, to use with the challenge. |
About Scheme FederationMTScheme
The authentication scheme FederationMTScheme is another scheme designed for use with 11g Release 2 (11.1.2). It is meant for multi-tenancy environments.
30.3.2 About Module FederationPlugin
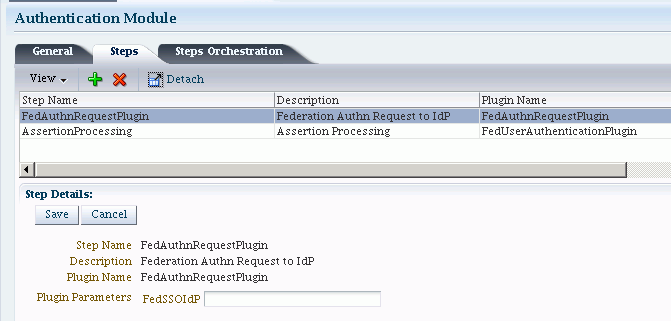
FederationPlugin provides a custom authentication module.
Table 30-2 describes the steps for FederationPlugin.
Table 30-2 FederationPlugin Steps
| Element | Description |
|---|---|
|
Step Name |
This is the name of the step within the module. |
|
Description |
This element contains a brief description of the step. |
|
Plugin Name |
This element specifies the plugin associated with the step. |
Figure 30-3 illustrates the orchestration of the FederationPlugin, which is similar to the orchestration described in Table 16-14, "Steps Orchestration Subtab".
Orchestration enables you to specify the ordering of steps within the plugin, and what to do if each of those steps succeeds or fails.
Table 30-3 describes the orchestration of the FederationPlugin.
Table 30-3 Orchestration of FederationPlugin
| Element | Description |
|---|---|
|
Name |
This is the step name. The steps appear in this column in order of execution, which can be modified with the Initial Step drop-down. |
|
Description |
This is a brief description of the step. |
|
On Success |
This is the action to take upon successful completion of the step, such as execution of next step in the orchestration. |
|
On Error |
This is the action to take upon error, such as taking the specified failure action. |
|
On Failure |
This is the action to take upon step failure. |
30.3.3 Managing Authentication with Identity Federation in 11g Release 2
This section explains how to manage the FederationScheme; and Federation plugin, a custom authentication module.
None.
To view or modify FederationScheme
-
From the Oracle Access Management Console, locate and open the FederationScheme:
Policy Configuration
Shared Components
Authentication Schemes
FederationScheme -
Review
FederationSchemedetails to ensure these are desired for your deployment. Table 30-1 describes field details. -
Click the Save button.
To view or modify FederationPlugin
-
From the Oracle Access Management Console, locate and open the
FederationPlugin:
System Configuration
Access Manager Settings
Authentication Modules
Custom Authentication Module
FederationPlugin -
Review
FederationPlugindetails to ensure these are desired for your deployment. Table 30-2 provides plugin step details. -
Use the icons above the step table to add a step (+) or delete a step (x).
-
Modify the order of steps as needed using the Steps Orchestration tab. Table 30-3 provides orchestration details.
-
Click the Save button.
To Add an Authentication Policy with FederationScheme
Prerequisite: Any resource to be added to a policy must be defined within the same Application Domain as the policy.
Take these steps to set up an authentication policy that uses FederationScheme, and associate a resource that will be protected using this policy:
-
From the Policy Configuration tab, navigation tree, expand the following nodes:
Application Domains Desired Domain -
In the navigation tree, click Authentication Policies, then click the Create button to open a fresh page.
-
Add these General Policy Details (Table 17-9, "Authentication Policy Elements and Descriptions"):
-
Name
-
Authentication Scheme
-
-
Add these Global Policy Elements and Specifications:
-
Description (optional)
-
Success URL
-
Failure URL
-
-
To add resources:
-
Click the Resources tab on the Authentication Policy page.
-
Click the Add button on the tab.
-
Choose a URL from the list.
-
Repeat these steps as needed to add more resources.
-
-
Click Apply to save changes and close the confirmation window.
-
Responses: See "Introduction to Policy Responses for SSO" and "Adding and Managing Policy Responses for SSO".
Figure 30-4 shows the console page to define the authentication policy and associate the policy to the resources.
30.4 Using Authentication Schemes and Modules for Oracle Identity Federation 11g Release 1
This section describes the authentication schemes and modules available for use with the Oracle Identity Federation server in Oracle Fusion Middleware Release 11g R1 (11.1.1).
Note:
The schemes used for Identity Federation in 11g Release 2 (11.1.2) are described in Section 30.3.An authentication scheme is a named component that defines the challenge mechanism required to authenticate a user. Each authentication scheme must also include a defined authentication module.
See Also:
For additional information about schemes, see Section 16.9.30.4.1 About Scheme OIFScheme
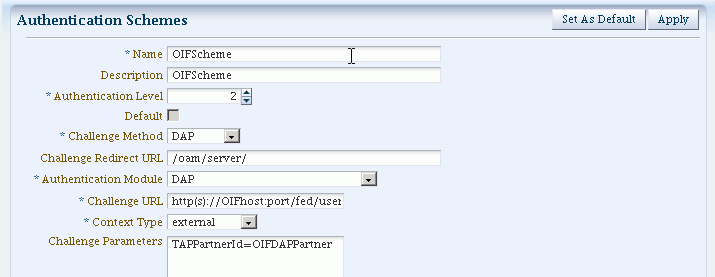
OIFScheme and OIFMTScheme are used for integration with Oracle Identity Federation 11g Release 1 (11.1.1).
Note:
See Section 30.3 for the schemes available with Identity Federation 11g Release 2 (11.1.2).Table 30-4 describes the scheme OIFScheme.
Table 30-4 OIFScheme Definition
| Element | Description |
|---|---|
|
Name |
This is the scheme name. |
|
Description |
This is a brief description of the scheme. |
|
Authentication Level |
This is the trust level of the authentication scheme. |
|
Default |
This is a non-editable box that is checked when the Set as Default button is clicked. |
|
Challenge Method |
Use to select a challenge method from those available in the drop-down box. |
|
Challenge Redirect URL |
This is the URL of another server to which user requests must be redirected for processing. |
|
Authentication Module |
This is the authentication module to use with the scheme. |
|
Challenge URL |
This is the URL the credential collector will redirect to for credential collection. |
|
Context Type |
Use this element to build the final URL for the credential collector. |
|
Challenge Parameters |
This is the list of parameters, if any, to use with the challenge. |
30.4.2 About Module OIFMTLDAPPlugin
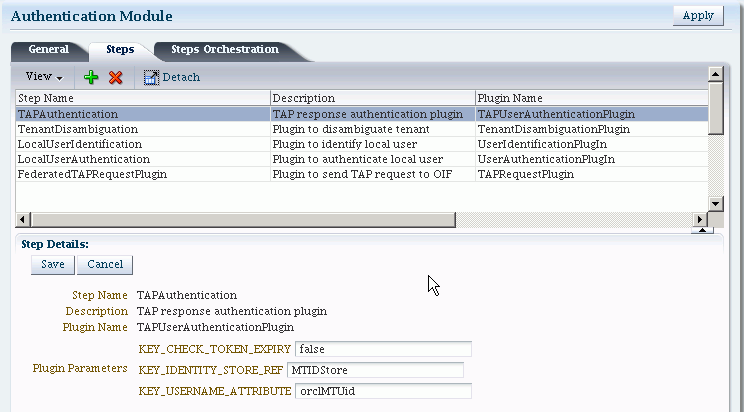
OIFMTLDAPPlugin authenticates federated tenants through Identity Federation and non-federated tenants with the identity store associated with Access Manager.
Table 30-5 describes the steps for OIFMTLDAPPlugin.
Table 30-5 OIFMTLDAPPlugin Steps
| Element | Description |
|---|---|
|
Step Name |
This is the name of the step within the module. |
|
Description |
This element contains a brief description of this step. |
|
Plugin Name |
This element specifies the plugin associated with this step. |
|
Plugin Parameters |
This element lists the parameters, if any, needed for plugin execution. The parameter list varies with the plugin. |
30.4.3 Managing Authentication with Oracle Identity Federation Release 11gR1
This section explains how to manage OIFScheme; and OIFMTLDAPPlugin, a custom authentication module for Identity Federation 11g Release 1 (11.1.1).
None
-
From the Oracle Access Management Console, locate and open the
OIFScheme:
Policy Configuration
Shared Components
Authentication Schemes
OIFScheme -
Review
OIFschemedetails to ensure these are desired for your deployment. For field details, see Table 30-4. -
Click the Save button.
None.
To view or modify OIFMTLDAPPlugin
-
From the Oracle Access Management Console, locate and open the
OIFMTLDAPPlugin:
System Configuration
Access Manager Settings
Custom Authentication Module
OIFMTLDAPPlugin -
Review
OIFMTLDAPPlugindetails to ensure these are configured as desired for your deployment. For field details, see Table 30-5. -
Click the Save button.
To add an Authentication Policy with OIFScheme
The procedure for this task is the same as described in "To Add an Authentication Policy with FederationScheme".
30.5 Managing Access Manager Policies for Use with Identity Federation
This section explains the use of policy responses in Access Manager in the context of federation policies.
-
About Policy Responses with Assertion Attributes for Identity Federation
-
Defining Policy Responses with Assertion Attributes for Identity Federation
30.5.1 About Policy Responses with Assertion Attributes for Identity Federation
A policy can optionally contain one or more authentication responses, or authorization responses, or both. You can configure the use of assertion attributes when setting up Access Manager policy responses with Identity Federation.
You use assertion attributes in the following contexts:
-
Authorization policy conditions
-
Response attributes as HTTP headers
-
Response attributes for identity context
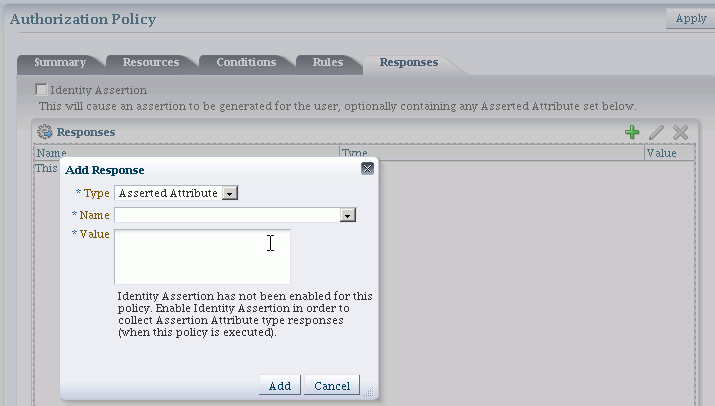
Figure 30-7 shows the Response configuration tab for an authorization policy:
Table 30-6 describes the elements for a policy response.
Table 30-6 Policy Response Elements
| Element | Description |
|---|---|
|
Name |
This is a unique name to distinguish this response from other responses that use the same mechanism (type). |
|
Type |
This is the mechanism used to convey the response form of the action to be taken with the value string. Select Assertion Attribute. |
|
Value |
This is the response expression, set as a variable. To provide the federation data as response attributes in the authentication or authorization policy, the values can reference:
|
30.5.2 Defining Policy Responses with Assertion Attributes for Identity Federation
Use the Oracle Access Management Console to configure policy responses with assertion attributes.
Background on Conditions and Responses for Identity Federation
Identity Federation conditions and responses must be specified separately because they are used for different tasks.
A condition is used to control access to a resource within Access Manager.
For example, if the identity provider is sending a role assertion and the service provider wished to only allow people who had a role of sales to access the resource, you would add a condition wherein:
-
the Condition Namespace would be "Session".
-
the Name would be "fed.attr.role".
-
the Operator is set to EQUALS.
-
value is "sales".
Notes:
-
Replace the role in this example to the actual SAML asserted attribute.
-
If you wanted to use the standard SAML NameID value as the condition then the value would be "attr.fed.nameidvalue".
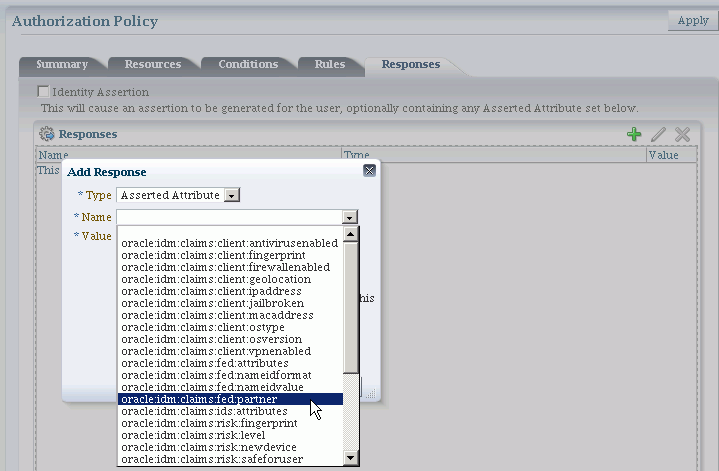
A response, on the other hand, enables you to pass an asserted attribute to the application. For example, if you wanted to pass the asserted attribute role to a back-end application in an HTTP header, you would:
-
go to the Response tab.
-
Add a Header, name
Role(this is the name of the HTTP header). -
The value would be
$session.attr.fed.attr.role.
Again, replace the role in this example to correspond to the actual SAML asserted attribute.
None.
To View or Configure Policy Responses with Assertion Attributes
-
From the Oracle Access Management Console, locate and open the policy to view or configure a response:
Policy Configuration
Application Domains
desired domain
Authentication (Authorization) Policies
desired policy -
Select the Responses tab.
-
Click the relevant icon to add, delete or update a response.
-
When updating, review the response details to ensure these are desired for your deployment. For field details, see Table 30-6.
-
Click the Save button.
Figure 30-8 shows an example of federation response attribute configuration:
30.6 Testing Identity Federation Configuration
After performing the procedure described in the previous section, you have completed all the steps to configure federation in SP mode. To recap, these steps are:
-
Enabling the Identity Federation service using Oracle Access Management Console.
-
Creating an IdP partner or using an existing IdP partner.
-
Ensuring that IdP setup including SAML attributes, global logout, and nameID format are configured.
-
Configuring an authentication/authorization policy that uses
FederationSchemewith federation response attributes; and -
Protecting a resource with this policy.
To test this configuration, access the resource that is protected by the authentication policy and verify that access is granted or denied according to the policy.
Identity Federation provides a Test SP module which allows you to:
-
test Federation SSO with an IdP Partner
-
see the result of the Federation SSO operation as well as the assertion sent by the Identity Provider
Follow these steps to enable or disable the Test SP Module:
-
Enter the WLST environment:
$OH/common/bin/wlst.sh
-
Connect to the Admin Server:
connect()
-
Move to the domain runtime location:
domainRuntime()
-
Execute the following WLST command to enable the Test SP Module:
configureTestSPEngine("true") -
Execute the following WLST command to disable the Test SP Module:
configureTestSPEngine("false")
Note:
The Test SP Module should be disabled in a production environment.To access the Test SP module and perform a federation SSO operation with an IdP partner, perform the following steps:
-
Access the following service:
http(s)://oam-hostname:oam-port/oamfed/user/testspsso
-
Select the IdP with which to perform a federation SSO (note: only enabled IdP partners are listed).
-
Start the federation SSO operation. The browser will be redirected to the IdP Partner for authentication and redirected back to Identity Federation with a federation response.
-
Identity Federation will process the federation assertion and the Test SP module will display the result of the processing (note: no Access Manager session will be created as a result of the operation).
30.7 Using the Default Identity Provisioning Plug-in
11g Release 2 (11.1.2) features a plug-in that you can optionally use to provision a missing identity during a federated SSO operation.
30.7.1 Why Use a Provisioning Plug-in?
When a federated SSO transaction is initiated, the processing flows as follows:
-
The IdP authenticates a user and sends an assertion to Oracle Access Management Identity Federation.
-
Acting as SP, Identity Federation maps the user to the local identity store.
-
If the user does not exist in the local store, the mapping fails.
Resolving this issue requires the ability to provision the user so the transaction can continue.
30.7.2 About the Default Provisioning Plug-in
To handle the identity mapping failure, Identity Federation supports the ability to set up a plug-in, known as the default provisioning plug-in, to provision the missing user in the identity store and enable the federated single sign-on to proceed.
The user is provisioned in the identity store associated with the IdP partner.
You can specify a list of attributes to use in provisioning the plug-in, as explained in the next section.
30.7.3 Using the Default Provisioning Plug-in
You can enable this default provisioning plug-in from the plug-in configuration interface. The steps are as follows:
-
From the plug-in configuration interface select
FedUserProvisioningPlugin. -
In the configuration parameters tab, set the following parameters:
-
KEY_USER_RECORD_ATTRIBUTE_LIST- This is the list of attributes with which the user should be provisioned. These attributes are available as part of the assertion, for example:mail,givenname. (optional) -
KEY_PROVIDERID_ATTRIBUTE_NAME– This is the tenant ID attribute name in the identity store which Identity Federation populates at run-time with the tenant name. (optional) -
KEY_USERID_ATTRIBUTE_NAME– This is the attribute name to use for theuseridvalue from the assertion attributes. (optional)
-
-
Enable user provisioning with the default plug-in by executing the WLST command:
putBooleanProperty("/fedserverconfig/userprovisioningenabled","true")
30.7.4 Switching to a Custom Provisioning Plug-in
A custom provisioning plug-in is also available with Identity Federation.
To switch from the default plug-in to the custom plug-in, follow the guidelines in Developing a Custom User Provisioning Plug-in chapter of the Oracle Fusion Middleware Developer's Guide for Oracle Access Management.
When using the custom plug-in, set the plug-in name with the WLST command:
putStringProperty("/fedserverconfig/userprovisioningplugin","CustomPlugin")
30.8 Configuring the Identity Provider Discovery Service
Identity provider discovery is a service that selects an identity provider (possibly through interaction with the user) to use during SSO. While Identity Federation does not provide an identity provider discovery service, it provides support for using such a service to select an IdP, if one is not passed in the authentication request to the SP during SP-initiated SSO.
For more information about IdP discovery refer to the specifications at:
http://docs.oasis-open.org/security/saml/Post2.0/sstc-saml-idp-discovery-cs-01.pdf
When acting as a service provider, Identity Federation can be configured so that if an SSO operation is initiated without the provider ID of the partner IdP, the user is redirected to an IdP discovery service to select the identity provider with which to perform SSO.
After the user selects an identity provider, the custom page resubmits the SSO request with the chosen IdP to Identity Federation.
30.8.1 Using the Bundled IdP Discovery Service
Identity Federation provides a simple Identity Provider Discovery Service that can be used to determine the Federation IdP Partner to be used at runtime during a Federation SSO operation.
Follow these steps to configure IdP discovery:
-
Enter the WLST environment:
$OH/common/bin/wlst.sh
-
Connect to the Admin Server:
connect()
-
Move to the domain runtime location:
domainRuntime()
-
Execute the following WLST command to configure Identity Federation to use an IdP Discovery Service:
putBooleanProperty("/spglobal/idpdiscoveryserviceenabled", "true") -
Execute the following WLST command to configure Identity Federation to use the default out-of-the-box IdP Discovery Service:
putBooleanProperty("/spglobal/idpdiscoveryservicepageenabled", "true")putStringProperty("/spglobal/idpdiscoveryserviceurl", "/oamfed/discovery.jsp")
30.8.2 Creating a custom IdP Discovery Service
You can configure Identity Federation to interact with a custom IdP Discovery Service deployed remotely.
Follow these steps to configure Identity Federation to use a custom IdP discovery:
-
Enter the WLST environment:
$OH/common/bin/wlst.sh
-
Connect to the Admin Server:
connect()
-
Move to the domain runtime location:
domainRuntime()
-
Execute the following WLST command to configure Identity Federation to use an IdP Discovery Service:
putBooleanProperty("/spglobal/idpdiscoveryserviceenabled", "true") -
Execute the following WLST command to configure Identity Federation to use a custom IdP Discovery Service (replace IDP_DISCOVERY_SERVICE_URL with the fully qualified URL of the Discovery Service):
putBooleanProperty("/spglobal/idpdiscoveryservicepageenabled", "false")
putStringProperty("/spglobal/idpdiscoveryserviceurl", "IDP_DISCOVERY_SERVICE_URL")
At runtime, Identity Federation redirects to the IdP Discovery Service page with the following parameters:
-
return: This is the URL to which the page should send the new request containing the chosen IdP provider ID to Identity Federation. -
returnIDParam: This is the name of the parameter to use to specify the chosen IdP provider ID in the request sent to Identity Federation.
The discovery service gets the values of these parameters, displays a list of IdPs, and sends a new request to Identity Federation specifying the chosen IdP Provider ID.
Note:
Check that the URL query parameter values are correctly URL-encoded.The following is an example of an IdP discovery service page. This page allows the user to select an identity provider (from the list of provider IDs: http://idp1.com, http://idp2.com, http://idp3.com), and submit the chosen provider ID to Identity Federation to continue the SSO flow.
<%@ page buffer="5kb" autoFlush="true" session="false"%>
<%@ page language="java" import="java.util.*, java.net.*"%>

<%
// Set the Expires and Cache Control Headers
response.setHeader("Cache-Control", "no-cache");
response.setHeader("Pragma", "no-cache");
response.setHeader("Expires", "Thu, 29 Oct 1969 17:04:19 GMT");

// Set request and response type
request.setCharacterEncoding("UTF-8");
response.setContentType("text/html; charset=UTF-8");

String submitURL = request.getParameter("return");
String returnIDParam = request.getParameter("returnIDParam");

List idps = new ArrayList();
idps.add("http://idp1.com");
idps.add("http://idp2.com");
idps.add("http://idp3.com");

%>

<html>
  <title>
  Select an Identity Provider
  </title>
<body bgcolor="#FFFFFF"><form  method="POST" action="<%=submitURL%>" id="PageForm" name="PageForm" autocomplete="off">
    <center>
                <table cellspacing="2" cellpadding="5" border="0" width="500">
                    <tr><td colspan="2" align="center">
                         Select an Identity Provider
                    </td></tr>
                    </tr>
                    <tr>
                        <td align="right">Provider ID</td>
                        <td>
                           <select size="1" name="<%=returnIDParam%>">
<%
Iterator idpIT = idps.iterator();
while(idpIT.hasNext())
{
        String idp = (String)idpIT.next();
%>
                                <option value="<%=(idp)%>"><%=idp%></option>
<%
}
%>

                           </select>
                         </td>
                    </tr>
                    <tr>
                         <td colspan="2" align="center">
                            <input type="submit" value="Continue"/>
                         </td>
                    </tr>
                </table>
      </center>
     </form>
    </body>
</html>
30.8.3 Disabling the use of an IdP Discovery Service
Follow these steps to configure Identity Federation to stop using an IdP discovery service:
-
Enter the WLST environment:
$OH/common/bin/wlst.sh
-
Connect to the Admin Server:
connect()
-
Move to the domain runtime location:
domainRuntime()
-
Execute the following WLST command to configure Identity Federation to stop using an IdP Discovery Service:
putBooleanProperty("/spglobal/idpdiscoveryserviceenabled", "false")
putBooleanProperty("/spglobal/idpdiscoveryservicepageenabled", "false")
putStringProperty("/spglobal/idpdiscoveryserviceurl", "/oamfed/discovery.jsp")
30.9 Configuring the Federation User Self-Registration Module
When Identity Federation is acting in Service Provider (SP) mode, the user assertion is mapped to a local user record in the LDAP directory to complete the federated single sign-on. If the mapping fails because the user performing the Federation SSO operation does not have a local account, Identity Federation can be configured to trigger a user self-registration flowto enable the user to create an account locally.
At runtime, when the Assertion mapping operation fails, if self-registration is enabled, the user self-registration framework will:
-
redirect the user to a self-registration page.
-
the self-registration page will contain the following fields:
-
username
-
password
-
confirm password
-
first name
-
last name
-
email address
These fields might be pre-populated with data from the Assertion. Also, any field used in the Assertion Mapping process cannot be edited: the user will not be able to change the information used for the Assertion Mapping operation for security reasons.
-
-
Once the user creates the account, the Federation SSO flow will resume and result with the creation of an Access Manager session. At that point, the user will be redirected to the protected resource.
Follow these steps to enable or disable the user self registration module:
-
Enter the WLST environment:
$OH/common/bin/wlst.sh
-
Connect to the Admin Server:
connect()
-
Move to the domain runtime location:
domainRuntime()
-
Execute the following WLST command to enable the user self-registration module:
putBooleanProperty("/fedserverconfig/userregistrationenabled", "true") putStringProperty("/fedserverconfig/userregistrationurl", "/oamfed/registration.jsp") -
Execute the following WLST command to disable the user self-registration module:
putBooleanProperty("/fedserverconfig/userregistrationenabled", "false")
        putStringProperty("/fedserverconfig/userregistrationurl", "/oamfed/registration.jsp")
You can configure Identity Federation to pre-populate the fields of the self-registration page with the data contained in the Assertion. By default, the self-registration page will populate those fields based on the following:
-
first name: Identity Federation will use either the firstname or givenname attributes contained in the Assertion. The userregistrationfirstnameattr configuration property indicates the list of comma separated attributes that should be used to populate this field. By default, that field is set to firstname,givenname.
-
last name: Identity Federation will use either the lastname or sn attributes contained in the Assertion. The userregistrationlastnameattr configuration property indicates the list of comma separated attributes that should be used to populate this field. By default, that setting is set to lastname,sn.
-
email address: Identity Federation will use either the mail attribute contained in the Assertion, or the Assertion's NameID (referenced by fed.nameidvalue). The userregistrationemailattr configuration property indicates the list of comma separated attributes that should be used to populate this field. By default, that setting is set to mail,fed.nameidvalue.
-
username: Identity Federation is not configured to use any Assertion attributes to populate this field. The userregistrationusernameattr configuration property indicates the list of comma separated attributes that should be used to populate this field. By default, that setting is empty.
If the attributes or NameID are missing from the assertion, the fields will be empty.
To configure the userregistrationfirstnameattr, userregistrationlastnameattr, userregistrationemailattr and userregistrationusernameattr properties:
-
Enter the WLST environment:
$OH/common/bin/wlst.sh
-
Connect to the Admin Server:
connect()
-
Move to the domain runtime location:
domainRuntime()
-
Execute the following WLST command to set the first name field rule:
putStringProperty("/fedserverconfig/userregistrationfirstnameattr", "firstname,givenname") -
Execute the following WLST command to set the last name field rule:
putStringProperty("/fedserverconfig/userregistrationlastnameattr", "lastname,sn") -
Execute the following WLST command to set the email address field rule:
putStringProperty("/fedserverconfig/userregistrationemailattr", "mail,fed.nameidvalue") -
Execute the following WLST command to set the username field rule:
putStringProperty("/fedserverconfig/userregistrationusernameattr", "uid,fed.nameidvalue")
