34 Managing Templates, Endpoints, and Policies
This chapter provides the following information for Security Token Service.
34.1 Prerequisites
Security Token Service must be enabled on the Available Services page, as described in "Enabling and Disabling Security Token Service".
34.2 Introduction
Security Token Service supports control of who can access WSPs by defining Application Domains that provide access to resources based on policies. Application domains identify Web Services, along with authorization rules that determine who can request a security token based on the WSPs.
The following functionality is established by Trust Issuance Policies, which can be managed through Application Domain under the Policy Configuration tab of the Oracle Access Management Console.
-
Resource of type TokenServiceRP representing Relying Parties or Web Service Providers.
-
Token Issuance Policy defining a policy for a set of resources of type TokenServiceRP.
-
Condition defining the identities of the clients that are allowed or denied issuance of tokens for the resources listed in the policy. The clients can either be Requester Partners or User from the Default Identity Store.
Security Token Service supports the creation of Relying Party Partner, representing a remote Web Service Provider that will be the consumer of a security token issued by Security Token Service.
For each Relying Party Partner, it is possible to define URLs that will be mapped to the partner, so that WS-Addressing endpoint specified in a WS-Trust Request can be mapped to an Security Token Service Relying Party Partner.
At runtime, when a client requests a token to be issued, Security Token Service will evaluate the Trust Issuance Policies to determine whether or not the token can be issued:
-
The client will be identified either as a Requester Partner or as an end user
-
If an AppliesTo element was present in the WS-Trust Request and was mapped to a Relying Party Partner, then the TokenServiceRP resource for the Trust Issuance Policy evaluation will be the Partner ID of that Security Token Service Relying Partner.
-
If an AppliesTo element was present in the WS-Trust Request and could not be mapped to a Relying Party Partner, then the TokenServiceRP resource for the Trust Issuance Policy evaluation will be the UnknownRP defined in the Access Manager Application Domain.
-
If an AppliesTo element was missing in the WS-Trust Request, then the TokenServiceRP resource for the Trust Issuance Policy evaluation will be the MissingRP defined in the Access Manager Application Domain.
Security Token Service requires the following items (at a minimum) to process a request and issue a token based on an incoming request (RST):
-
EndPoints
-
One Issuance Template
-
One Validation Template
-
One Requester Partner Profile that contains the token
-
One Relying Party Partner Profile
Note:
Partners might need to be provisioned.An LDAP server is required for the Security Token Service to map the Username token that references the user to an LDAP User record, and then use that record to populate the outgoing token. Partners might need to be provisioned before they are available.
34.3 Searching for an Existing Template
All defined template names appear in the Search Results Table when you open either the Token Validation Template or Token Issuance Template node. To quickly find a specific template or set of templates, you can use the Search controls.
This section explains the controls you can use to refine your search, which are similar whether you are searching for a Token Validation Template or a Token Issuance Template. It includes the following topics:
34.3.1 About Template Search Controls
The following figures show the search pages where you will see many similarities:
Figure 34-1 Validation Templates Search Controls
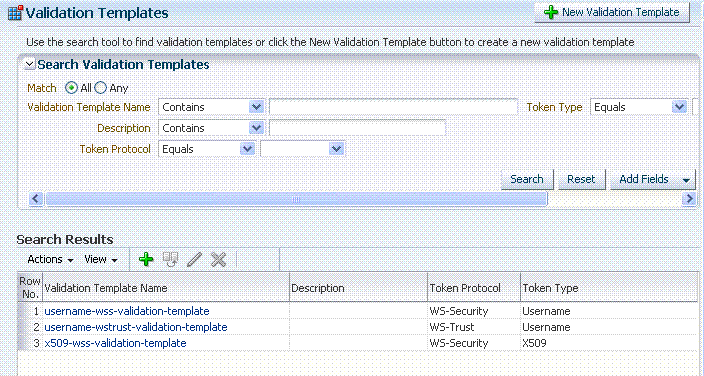
Description of "Figure 34-1 Validation Templates Search Controls"
Figure 34-2 Issuance Template Search Controls
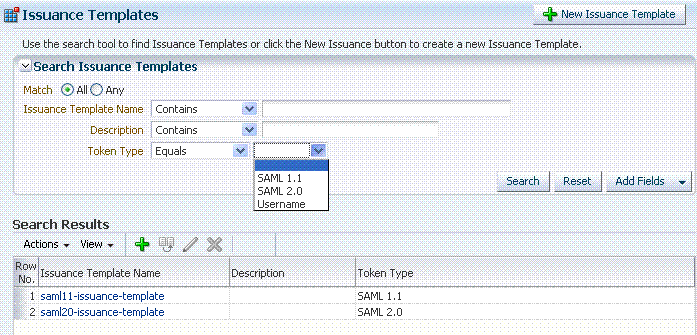
Description of "Figure 34-2 Issuance Template Search Controls"
Table 34-1 describes the controls available to refine a template search. Unless explicitly stated, all elements are available for both Validation and Issuance Template searches.
Table 34-1 Search Validation Template
| Element | Description |
|---|---|
|
Match |
Choose All to search for a template that matches all your specifications. Choose Any to search for a template that matches at least one of your specifications. |
|
Search Operations List |
A list of operations from which you choose one to help refine your search. 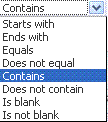 |
|
... Template Name |
Choose an operation from the list and enter information in the field to help refine your search. |
|
Description |
Refine your search using the optional description field. |
|
Token Protocol Validation Template only |
Choose the token protocol from those listed:
|
|
Token type |
Choose the token type. Both standard and custom token types are included.
|
|
Search |
Initiates the Search function using criteria in the form. |
|
Reset |
Resets the Search form with defaults only. |
|
Add Fields |
A list of additional items you can add as search criteria. 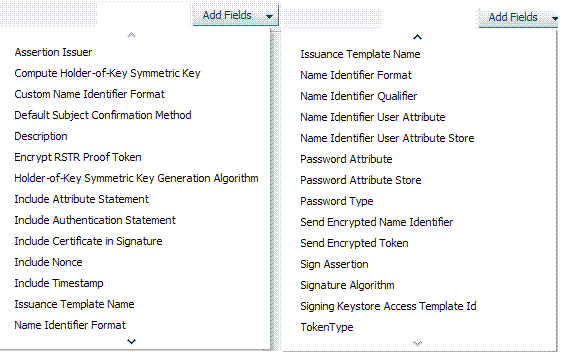 |
|
Search Results Table |
Itemizes the results of your search based on choices in the View menu, described later in this table. |
|
Actions menu Shown: Actions for Validation Template |
Provides the following functions that can be performed on a selection in the results table: 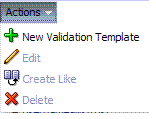
Note: Actions menu functions mirror command buttons above the results table. For example:
|
|
View menu Validation Template only |
A list from which you can identify which information to display in the results table. 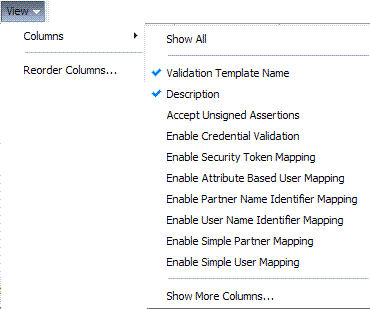 |
|
View menu Issuance Template only |
A list from which you can identify which information to display in the results table. 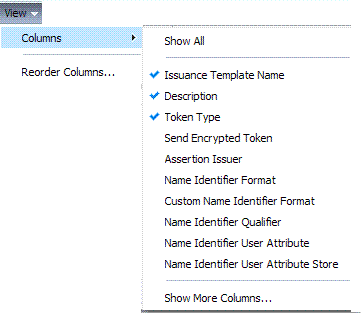 |
|
Controls you can choose to define the order of items listed in the results table:
|
34.3.2 Searching For a Template
Users with valid Administrator credentials can use the following procedure to use search controls to locate a specific template or set of templates. For example, to locate all templates of a certain token type you can simply choose the type of token. To refine the search further to all templates of a specific token type and name.
When performing these steps, fill in as much or as little as you want. Skip any steps that do not apply to you.
See Also:
"About Template Search Controls"-
From the System Configuration tab, expand the Secure Token Services Settings section.
-
In the navigation tree, open the desired Template node. For example: Token Validation Templates.
-
Edit Search Criteria (Table 34-1). For example:
-
Match: All
-
Name: contains em
-
Token Type: equals Username
-
-
Click Search, review results, and click the one you want to open.
34.4 Managing Token Issuance Templates
An issuance template contains rules on how a token will be created and is specific to a token type. Each issuance template indicates Signing and Encryption and also contains Attribute Name, Value Mapping, and Filtering settings to be sent as part of the token.
This section provides the following information:
34.4.1 About Managing Token Issuance Templates
Each Token Issuance Template indicates how to construct a token. In other words, which signing or encryption to use when constructing a token. Each Token Issuance Template also defines the attributes mapping and filtering rules to be applied to the attributes that will be included in the outgoing token. However, Issuance Templates do not list the attributes that will be sent in the outgoing token: these are defined in the Relying Party Partner Profile.
Token Issuance Template details which will differ depending on your chosen token type. Table 34-2 describes where to find more information.
Table 34-2 Issuance Template Requirements
| Topic | Figures and Tables |
|---|---|
|
General Details |
|
|
Issuance Properties: Username Tokens |
|
|
Issuance Properties: SAML Tokens |
|
|
Security: SAML Tokens |
|
|
Attribute Mapping: SAML Tokens |
Figure 34-3 shows the New Issuance Template page with defaults showing. Unless explicitly stated, General information is the same regardless of the Token Type you choose. For more information, see Table 34-3. After you fill in General information and click Save, you cannot return and edit the template name or token type.
Figure 34-3 Issuance Template: General Details and Defaults

Description of "Figure 34-3 Issuance Template: General Details and Defaults"
Table 34-3 Issuance Template: General Details
| Elements | Description |
|---|---|
|
Issuance Template Name |
Enter a unique name for this template. |
|
Description |
Optional. |
|
Token Type |
Choose a standard (or custom, if any) token type from those listed. |
|
SAML, Username, and Custom Token Types |
|
|
Send Encrypted Token |
Click to enable token encryption. |
|
Token Encryption Algorithm |
When token encryption is enabled, choose a Token Encryption Algorithm from those listed. |
Issuance Properties: Username Token Type
If the token type is Username, the Issuance Properties shown in Figure 34-4 are needed for a Username token type template.
Figure 34-4 Issuance Properties: Username Token Type

Description of "Figure 34-4 Issuance Properties: Username Token Type"
Table 34-4 describes the Issuance Properties for the Username token type.
Table 34-4 Issuance Properties: Username Token Type
| Element | Description |
|---|---|
|
Name Identifier User Attribute |
Attribute to be used to populate the Username element in the Username Token. |
|
Name Identifier User Attribute Store |
Choose the user attribute store type:
Note: If the Attribute Store is the Userstore, LDAP is used to retrieve the attribute from the user record. If the Attribute Store is context, data from the incoming token is used as the attribute source. |
|
Password Attribute |
Attribute to be used to populate the Password element in the Username Token. |
|
Password Attribute Store |
Choose the password attribute store type:
Note: If the Attribute Store is the Userstore, LDAP is used to retrieve the attribute from the user record. If the Attribute Store is context, data from the incoming token is used as the attribute source. |
|
Include Nonce |
Indicates whether or not a Nonce made of random data should be included in the Username token. Default: Disabled |
|
Include Timestamp |
Indicates whether or not a the Created element should be included in the Username token. Default: Disabled |
Issuance Properties: SAML Token Types
SAML 1.1 and 2.0 token types require the issuance properties illustrated in Figure 34-5.
Note:
These issuance properties differ from those for Username token type.Figure 34-5 Issuance Properties: SAML Token Types
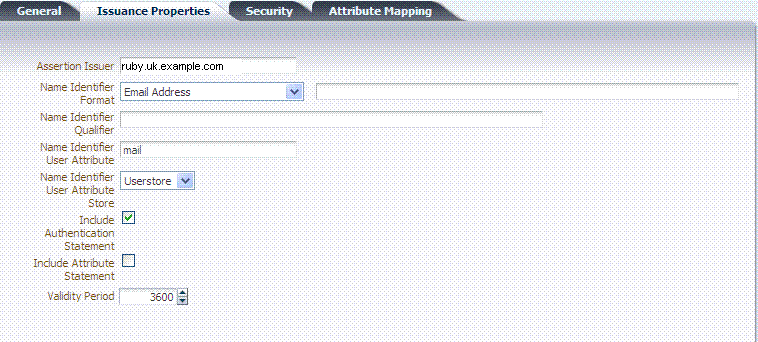
Description of "Figure 34-5 Issuance Properties: SAML Token Types"
Table 34-5 describes all Issuance Properties by token type. Only SAML token types require issuance properties.
Table 34-5 Issuance Properties: SAML Token Types
| Element | Description |
|---|---|
|
Assertion Issuer |
Specifies the identifier representing the issuer of the assertion. This string is used to represent this Security Token Service as the issuer of the assertion. |
|
Name Identifier Format |
Choose a format from the list and then enter the details in the text field. 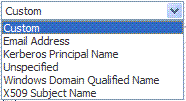 |
|
Name Identifier Qualifier |
Contains the string that will be set as the Name Identifier Qualifier. |
|
Name Identifier User Attribute |
References the attribute that will be used to populate the value of the Name Identifier. |
|
Name Identifier User Attribute Store |
Note: If the Attribute Store is the Userstore, LDAP is used to retrieve the attribute from the user record. If the Attribute Store is context, data from the incoming token is used as the attribute source. |
|
Include Authentication Statement |
Indicates whether or not a SAML Authentication Statement should be included in the Assertion. Default: Disabled Note: An authentication operation is required for a statement of this type to be included. An authentication statement will be included if the incoming token contained some authentication data and that those were validated (for example, the incoming SAML Assertion contains an authentication statement, or a Username Token contains credentials that were validated). |
|
Include Attribute Statement |
Indicates whether or not a SAML Attribute Statement will be included in the outgoing Assertion. A statement of this type will be included only if this flag is set to true and if at least one attribute is included in the outgoing Assertion. Default: Enabled Note: the RP PP will determine which attributes need to be included in an outgoing token. |
|
Validity Period |
Specify the length of time (in seconds) that the token will be valid. Default: 3600 (seconds) |
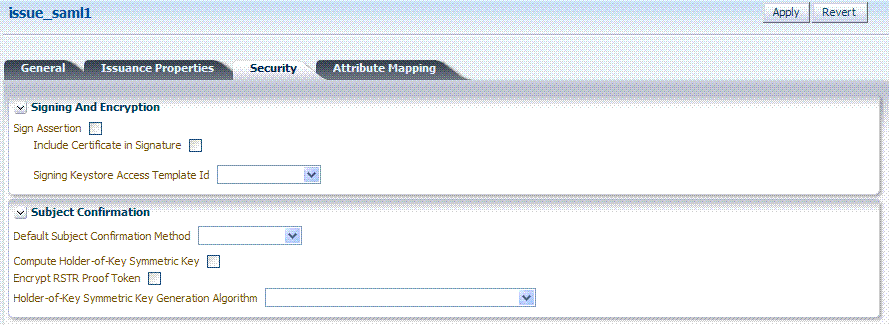
Only SAML token types require Security Details, as shown in Figure 34-6 and described in Table 34-6.
Figure 34-6 Security Details: SAML Tokens
Description of "Figure 34-6 Security Details: SAML Tokens"
Table 34-6 Security Details: SAML Tokens
| Elements | Description |
|---|---|
|
Signing And Encryption |
Indicates whether or not the Assertion will be signed using the Key referenced by the Signing Keystore Access Template ID field. |
|
Sign Assertion |
Indicates whether or not the signing certificate will be included in the Assertion. Default: Enabled |
|
Include Certificate in Signature |
Default: Enabled |
|
Signing Keystore Access Template Id |
References the key to be used to sign assertions created with this issuance template. The key templates are defined in the Security Token Service Settings section. |
|
Subject Confirmation |
|
|
Default Subject Confirmation Method |
Indicates which Subject Confirmation Method will be used by default, if the requester did not specify a method in the WS-Trust request. Possible values are:
|
|
Compute Holder-of-Key Symmetric Key |
Default: Enabled Indicates whether or not Security Token Service will generate random data when creating the Secret Key for the Holder of Key Symmetric Key data.
|
|
Encrypt RSTR Proof Token |
Indicates whether or not the Proof Token must be encrypted when returning the server entropy or secret key to the requester in the WS-Trust response, when the Subject Confirmation method is Holder of Key with Symmetric Key Default: Disabled |
|
Holder-of-Key Symmetric Key Generation Algorithm |
Indicates the symmetric key generation algorithm to use to create the secret key when the Subject Confirmation method is Holder of Key with Symmetric Key:  |
Attribute Mapping: SAML Tokens
When the token type is SAML 1.1 or 2.0, it is possible to define attribute mapping and filter rules that will be applied to the attributes included in the Assertion.
There are three different rules:
-
Attribute name mapping where the local name of an attribute can be changed to another value. For example, givenname can be changed to firstname.
-
Attribute value mapping where the local value of an attribute can be translated to another value. For example, President to CEO.
-
Attribute value filtering where the local value of an attribute can be filtered so it is not included in the outgoing assertion. For example, some sensitive attribute values could be removed while others would be issued.
Table 34-7 Issuance Template: Attribute Mapping, SAML Token
| Element | Description |
|---|---|
|
Attribute Name Mapping |
Defines an optional mapping between the local name of an attribute, and the name used to reference this attribute in the assertion. The mapping is optional. If an attribute does not have a mapping defined, then its local name will be used, and the namespace will be set to
|
|
Attribute Value Mapping |
Defines an optional value mapping for an attribute that will be included in the Assertion. Note: this attribute value mapping applies to an Attribute Name mapping. In order to define an attribute mapping for an attribute, it is required to first define an attribute name mapping for that attribute.
|
|
Attribute Value Filters |
Defines an optional value filtering for an attribute that will be included in the Assertion. Note: This attribute value filtering applies to an Attribute Name mapping. In order to define an attribute filtering for an attribute, it is required to first define an attribute name mapping for that attribute.
|
Attribute Value Condition Filters
This optional value filtering applies to an Attribute Name mapping and will be included in the Assertion. To define an attribute filtering for an attribute, you must first define an attribute name mapping for that attribute. The Condition is associated with the expression to determine whether or not the attribute value should be filtered. The possible Condition values are:
-
regexp: the expression will contain a regular expression, and if it evaluates to true, the attribute value will be filtered.
-
equals: if the attribute value matches the data contained in the expression field, then it will be filtered.
-
not-equals: if the attribute value does not match the data contained in the expression field, then it will be filtered.
-
not-equals: if the attribute value does not match the data contained in the expression field, then it will be filtered.
-
endswith: if the attribute value ends with the data contained in the expression field, then it will be filtered.
-
contains: if the attribute value contains an occurrence of the data contained in the expression field, then it will be filtered.
-
not-contains: if the attribute value does not contains any occurrence of the data contained in the expression field, then it will be filtered.
-
equals-null: if the attribute value is null, then it will be filtered.
-
not-equals-null: if the attribute value is not null, then it will be filtered.
34.4.2 Managing a Token Issuance Template
Users with valid Oracle Access Management Administrator credentials can use this procedure as a guide when developing a new Token Issuance Template (or editing an existing template) Skip any steps that do not apply to you.
The following procedure describes how to create a new Token Issuance Template for a Security Assertion Markup Language (SAML) token.
Confirm that the desired LDAP Identity Store is registered with and configured as the Default Store.
To create a new token Issuance template
-
Display the list of existing Token Issuance Templates.
Oracle Access Management Console
System Configuration
Security Token Service
Token Issuance Templates -
New Token Issuance Template:
-
Click the New Issuance Template button in the upper-right corner (or click the Add (+) command button above the Search Results table).
-
General: Define general information for this template and see:
-
Click Save and dismiss the confirmation window (or click Cancel without saving).
-
Username Token Type: Define issuance parameters for this template and see:
-
SAML Token Type: Define parameters for this template and see:
Table 34-5, "Issuance Properties: SAML Token Types"
Table 34-6, "Security Details: SAML Tokens"
Table 34-7, "Issuance Template: Attribute Mapping, SAML Token"
-
Click Apply (or click Revert without saving it).
-
Close the definition.
-
-
Find an Existing Template: From the Security Token Service section of the System Configuration tab:
-
Find All: Double-click the Token Issuance Templates node and review the results table.
-
Narrow the Search: Specify your search criteria (Table 34-1), click the Search Button, and review the results table.
-
Reset the Search Form: Click the Reset button.
-
-
Edit a Template: Start with the saved page you just created.
Alternatively: Use Step 3 to find the desired template and click the name in the Search Results table to display the definition.
-
Edit details as needed.
-
Click the Apply button at the top of the page to submit changes (or Revert to undo your changes).
-
-
Remove a Template:
-
Click the desired name in the Search Results table to select the item to remove.
-
From the Actions menu, click Delete (or click the Delete (X) command button above the table.
-
Click the Delete button in the Confirmation window (or click No to cancel the operation).
-
34.5 Managing Token Validation Templates
A validation template is used to validate an incoming token and, optionally, map the incoming token to either a Requester Partner or a user record:
-
For OnBehalfOf use cases, a WS-Trust Validation Template must be present.
-
For validating an Assertion, one Issuing Authority Partner Profile must be present.
The Security Token Service Endpoint is linked to a WSS Validation Template that indicates how to validate the token in the WSS header and how to map the token and binding data to a Requester.
This section provides the following topics.
34.5.1 About Managing Token Validation Templates
A Security Token Service Endpoint is always mapped with a WS-Security Validation Template that indicates how to map the request to a requester entry or to a user:
-
If mapping is required and no match is found, processing will fail.
-
If no mapping is required, a default requester partner profile will be used.
-
In either case, a requester partner profile is retrieved.
-
If a mapping is performed to a user record, a default requester partner profile will be used.
-
If a mapping is performed to a requester partner entry, the requester partner profile for this partner will be used.
A validation template determines the token validation rules:
-
Whether or not to validate and map the incoming token.
-
The mapping rules to be used if mapping is enabled.
A validation template is specific to a token type and specific to a protocol as described in Table 34-8.
Table 34-8 Validation Template Protocols
| Protocol | Description |
|---|---|
|
WS-Security |
Validates only WS-Security Tokens:
When you toggle the Token Protocol from WS-Trust to WS-Security, options in the Token Type list do not change. However, the required "Default Partner Profile" list appears from which you must choose one profile for WS-Security. |
|
WS-Trust |
Validates only Tokens included in OBO (on behalf of) field of the RST (request):
|
A validation template mapping rules determines how the incoming data is mapped to a user or a partner, using data from the incoming token:
-
Username for Username Token
-
UserID for Kerberos Token
-
NameID and attributes for SAML Token
-
DN Components for X.509 Token
-
Attributes from a Custom
Mapping is performed as follows:
-
Simple mapping: one incoming attribute matched against one user record attributes
-
Complex LDAP query: LDAP query with placeholders for incoming data (e.g.: (&(sn=%lastname%)(mail=%email%))
-
NameID Mapping table for SAML Token
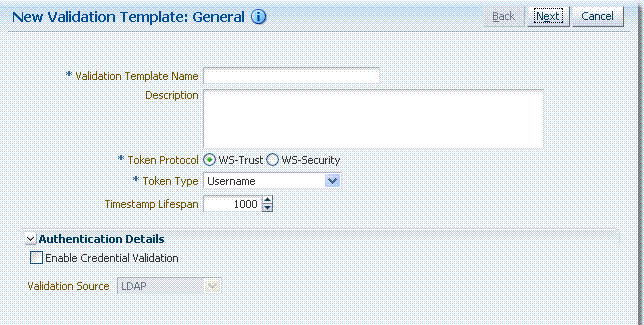
Figure 34-7 illustrates default General details on the New Validation Template page.
Figure 34-7 New Validation Template page: General Page Defaults
Description of "Figure 34-7 New Validation Template page: General Page Defaults"
Table 34-9 describes the elements on the New Validation Template, General page.
Table 34-9 New Validation Template: General Details
| Element | Description |
|---|---|
|
Back |
Click this button to return to the previous page. |
|
Next |
Click this button to proceed to the next page. |
|
Cancel |
Click this button to dismiss the page. |
|
Validation Template Name |
The name you choose for this template. For example:
|
|
Description |
Optional. |
|
Token Protocol |
The type of Validation Template to be created. Type can be either:
|
|
Token Type |
A list of in-bound token types from which you choose the one to use for this template. The token type options depends on the protocol type:
|
|
Default Partner Profile |
Only applies to WS-Security Validation Template References the default requester partner profile to use, in case the incoming request is not mapped to a requester partner. For example, if the request is mapped to a user instead. A requester partner profiles contains settings that are used during the request processing. If the incoming request was mapped to a requester partner, then the partner profile for that requester will be retrieved and used as the requester partner profile |
|
Timestamp Lifespan |
Applies only to Username and SAML Validation Templates. It determines the validity time of a Token (for Username Token, only if it contains a Created element indicating the instant it was created). Default: 1000 (seconds) |
|
Authentication Details |
Specific to username token validation template. |
|
Enable Credential Validation |
Check this box to enable validation using credentials contained in the username token. When enabled, Security Token Service will validate the username and the password elements contained in the username token, using the specified validation source. Note: password digest as defined in the Username Token WS-Security Profile is not supported in this release. See Also: Table 34-10, "New Validation Template: Authentication Details" |
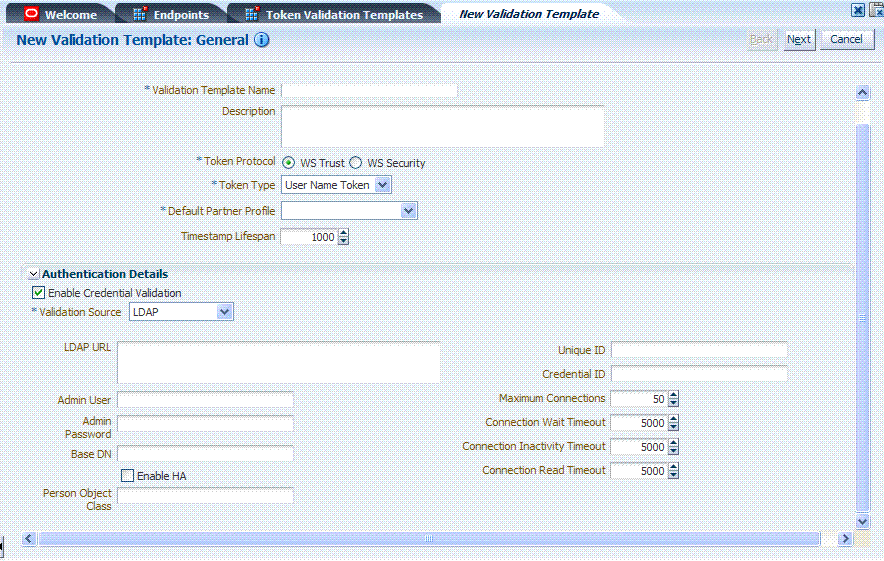
Figure 34-8 illustrates the General details page when Enable Credential Validation is checked and, as a result, the Authentication Details section of the page is visible with its default values. This is specific to username token validation.
Figure 34-8 New Validation Template: General Authentication Details
Description of "Figure 34-8 New Validation Template: General Authentication Details"
Table 34-10 describes Authentication related details that are available when you choose Enable Credential Validation.
Table 34-10 New Validation Template: Authentication Details
| Element | Description |
|---|---|
|
Validation Source |
A list from which you can choose a credential validation sources There are four types of validation sources when validating the credentials contained in a username token:
|
|
LDAP URL |
The URL of the LDAP server. |
|
Admin User |
The username of an account used to perform lookups in the LDAP server. |
|
Admin Password |
The password of an account used to perform lookups in the LDAP server. |
|
Base DN |
The Base search DN used when looking up user records. |
|
Enable HA |
Indicates whether or not the LDAP server is in HA mode, fronted by a load balancer. |
|
Person Object Class |
The person object class associated with the user records. |
|
Unique Id |
The attribute of the user record containing the user unique identifier data.In most cases, is identical to the Credential ID field. |
|
Credential Id |
The attribute of the user record containing the username data. This field will be used to lookup user records, based on the username. |
|
Maximum Connections |
The maximum number of concurrent opened LDAP connections Default: 50 |
|
Connection Wait Timeout |
Maximum amount of time to wait when opening a new connection. Default: 5000 (seconds) |
|
Connection Inactivity Timeout |
Maximum amount of inactivity time for an LDAP connection, before closing it. Default: 5000 (seconds) |
|
Connection Read Timeout |
Maximum number of concurrent opened LDAP connections. Default: 5000 (seconds) |
The Token Mapping section indicates the following:
-
If an incoming token needs to be mapped.
-
If the incoming token needs to be mapped, what kind of mapping is done. For example, mapping token to user, mapping token to partner, and so on.
-
How the mapping is done. For example, by mapping a token attribute to a partner/user attribute, or by using an LDAP query involving several token attributes.
Mapping rules determine how the incoming data is mapped to a user or a partner. The following data of the incoming token is used:
-
Username for UNT
-
UserID for Kerberos
-
NameID and attributes for SAML
-
DN Components for X.509
-
Attributes from custom
Mapping is performed using the following:
-
Simple mapping: One incoming attribute matched against one user record attributes.
-
Complex LDAP query: An LDAP query with placeholders for incoming data. For example,
(&(sn=%lastname%)(mail=%email%)) -
A NameID Mapping table for SAML
Following are several Token Mapping Examples for a new Validation Template:
-
Figure 34-9, "Token Mapping: SAML2 WS-Security Validation Template"
-
Figure 34-10, "Token Mapping, username-wstrust-validation-template"
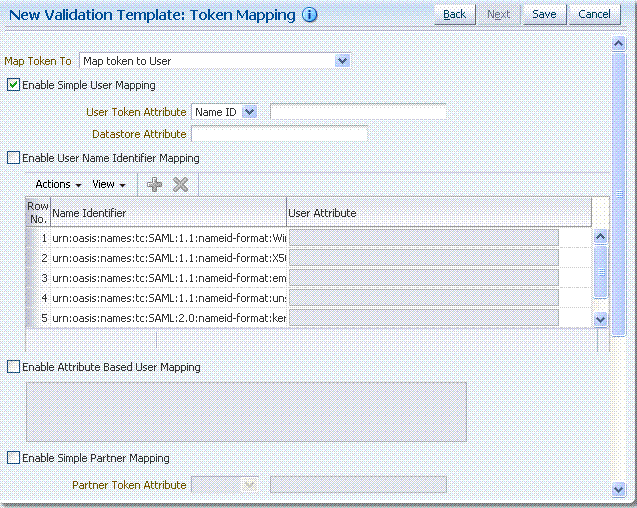
Figure 34-9 shows the mapping configuration settings required for Security Token Service to map the token to a user record, by matching the NameID value to user records that have a matching attribute, based on the NameID format:
-
Enable Map Token to User
-
Enable Simple User Mapping
-
Disable Attribute Based User Mapping
Figure 34-9 Token Mapping: SAML2 WS-Security Validation Template
Description of "Figure 34-9 Token Mapping: SAML2 WS-Security Validation Template"
Figure 34-10 shows the mapping configuration settings required for Security Token Service to map the token to a user record by matching the username element of the Username token to a user record that has a matching uid. The required settings are:
-
Enable Map Token to User
-
Enable Simple User Mapping
-
Datastore Attribute set to uid
-
Disable Attribute Based User Mapping
Figure 34-10 Token Mapping, username-wstrust-validation-template

Description of "Figure 34-10 Token Mapping, username-wstrust-validation-template"
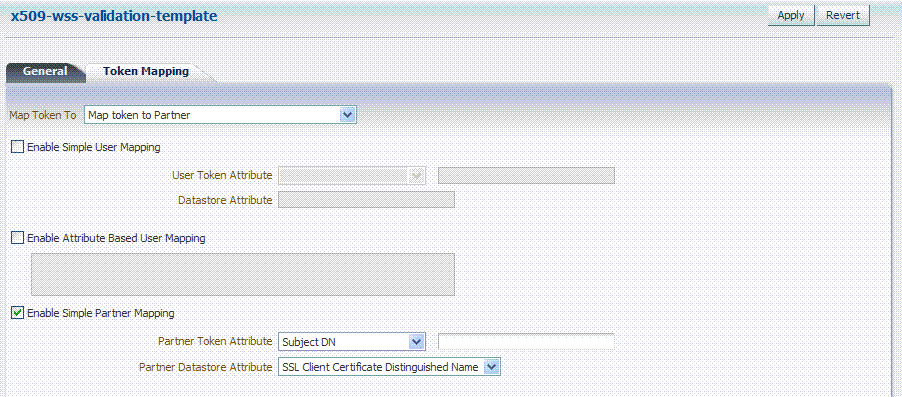
Figure 34-11 shows the mapping configuration settings required for Security Token Service to map the token to a requester partner entry by matching the Subject DN of the certificate to a Requester Partner that has a match on SSL Client Cert DN Identification attribute. The required settings are:
-
Map Token to Partner
-
Disable Simple User Mapping
-
Disable Attribute Based User Mapping
-
Enable Simple Partner Mapping
Figure 34-11 Token Mapping: x509-wss-validation-template
Description of "Figure 34-11 Token Mapping: x509-wss-validation-template"
Not all elements apply to all token types and token protocols. The elements that you must define will vary.
Table 34-11 describes the token mapping elements for validation templates.
Table 34-11 New Validation Template: Token Mapping
| Element | Description |
|---|---|
|
Map Token to |
WS-Security Validation Template: Map Token to list
- - - - - - - - - - WS-Trust Validation Template: Map Token to User Check the box to enable (or clear the checkbox to disable). |
|
Enable Simple User Mapping |
Simple user mapping consists of mapping the incoming token to a user record by using a single token attribute and matching it against a single user record attribute. WS-Security Validation Template: Only Username, SAML Assertion, Kerberos. and X.509. WS-Trust Validation Template: Username, SAML Assertion, Kerberos, X.509, OAM and custom token. The layout is different, depending on the token type of this validation template: Username Token:
SAML Assertion:
Kerberos:
X.509:
OAM:
Custom:
|
|
Enable User Name Identifier Mapping |
When enabled, define the following: WSS and WS-Trust Validation Templates will contain the same section for the Name Identifier mapping settings. A NameID user mapping operation consists of mapping the incoming SAML Assertion to a user record by mapping the NameID Value to a single user record attribute, based on the NameID format When enabled, Security Token Service evaluates the NameID format, and based on the Name Identifier mapping table which user record attribute should be matched against the Name ID value contained in the Assertion. The Name Identifier mapping table holds the user record attributes to be used for the mapping operation. It contains standard NameID formats, but it can be customized to define custom Name ID formats. To add custom NameID format, click the add button on the Name Identifier mapping table, and enter the custom URI. To set an attribute for a specific NameID format to be used for mapping operation, set the user record attribute on the line for that format. |
|
Enable Attribute Based User Mapping |
WSS Validation Template: only Username, SAML Assertion, Kerberos and X.509. WS-Trust Validation Template: only Username, SAML Assertion, Kerberos, X.509 and custom token An Attribute Based User Mapping operation consists of mapping the incoming token to a user record by using an LDAP query and token attributes. The format of the LDAP query defines the mapping rule and specifies the token attributes to be used by their names, surrounded by the percent (%) character. For example, an LDAP query that will map a token based on two token attributes (firstname and lastname) would be (&(sn=%lastname)(givenname=%firstname%)). The possible token attributes depend on the token type. Username Token
SAML Assertion
Kerberos
X.509
Custom Token
|
|
Enable Simple Partner Mapping |
Only for WSS Validation Template and for the following token types: Username, SAML Assertion, Kerberos, and X.509. A simple partner mapping operation consists of mapping the incoming token to a partner requester by using a single token attribute and matching it against a partner identification attributes. The layout is different, depending on the token type of this validation template Username Token
SAML Assertion
Kerberos
X.509
|
|
Enable Partner Name Identifier Mapping |
When enabled, defines the following only for WSS Validation Template and for SAML token types: A NameID user mapping operation consists of mapping the incoming SAML Assertion to a user record by mapping the NameID Value to a single requester partner identification attribute, based on the NameID format. When enabled, Security Token Service will evaluate the NameID format, and based on the Name Identifier mapping table which partner identification attribute should be matched against the Name ID value contained in the Assertion. The Name Identifier mapping table holds the requester partner identification attributes to be used for the mapping operation. It contains standard NameID formats, but it can be customized to define custom Name ID formats. To add custom NameID format, click the Add button on the Name Identifier mapping table, and enter the custom URI. To set an attribute for a specific NameID format to be used for mapping operation, set the requester partner identification attribute on the line for that format. |
34.5.2 Managing Token Validation Templates
This is a server side configuration. A default Token Validation Template exists. Users with valid Administrator credentials can use can use the procedure in this section to add, find, edit, or delete token validation templates. Skip any steps that you do not need.
The Security Token Service Endpoint must be linked to a WS Security Validation Template that indicates:
-
how to validate the token in the Webservice Security header
-
how to map the token and binding data to a Requester
The information here can be applied when you want to validate the following:
-
WS-Security tokens present in the SOAP Header, of type: Username, SAML 1.1, SAML 2.0, X.509 and Kerberos.
-
WS-Trust tokens present in the OnBehalfOf element or in the ValidateTarget element of the WS-Trust request, of type: Username, SAML 1.1, SAML 2.0, X.509, Kerberos, OAM Session Propagation Token and custom tokens.
The following procedure includes several examples of input following specific parameters. Also, a brief translation appears within parentheses (). For instance: Name (username-token): email-wstrust-valid-temp. Values in your environment will be different.
To manage token validation templates
-
Locate and open the desired Token Validation Template as described in "Searching For a Template".
-
New Token Validation Template:
-
Click the New Validation Template button in the upper-right corner (or click the Add (+) command button above the Search Results table).
-
General: Define parameters for this template (Table 34-9). For example:
Name (username-token):email-wstrust-valid-temp
Token Protocol (WS-Security for token protocol): Webservice
Token Type (username):email
Default Partner Profile:requester-profile -
Authentication: Enable Credential Validation for this template, if needed, and provide details (Table 34-10). If the token type is username, enable credential validation if needed for this template and provide the details.
-
Token Mapping: Specify preferences for this template based on your token type (Table 34-11).
-
Click Save and dismiss the confirmation window (or click Cancel without saving it).
-
Close the definition (or edit it as described in Step 4).
-
-
Edit a Template: Start with the saved page you just created.
-
Edit the template definition as needed.
-
Click the Apply button at the top of the page to submit changes (or click Revert to undo your changes).
-
-
Remove a Token Validation Template:
-
Click the desired name in the Search Results table to select the item to remove.
-
From the Actions menu, click Delete (or click the Delete (X) command button above the table.
-
Click the Delete button in the Confirmation window (or click No to cancel the operation).
-
34.6 Managing Security Token Service Endpoints
An endpoint is a Web Service published by Security Token Service where clients can send WS-Trust requests over SOAP. An endpoint is:
-
Protected by a WS Security Policy.
-
Bound to WSS Validation Template that will indicate how to validate the security token and how to map it.
-
Specific to a token type, namely, the one specified in the WSS Validation Template.
Note:
The WS-Security policy protecting the endpoint must be compatible with the WSS Validation Template bound to the endpoint.An endpoint is a Web Service endpoint published by Security Token Service and protected by OWSM Agent. An endpoint is bound to:
-
A WS-Security policy that will determine the WSS requirements in terms of message protection and security tokens
-
A WSS Validation template that will indicate how the request will be processed, how the security token will be validated.
This section provides the following information:
34.6.1 About Managing Endpoints
Security Token Service Endpoint definitions consist of three categories, as shown in Figure 34-12.
Table 34-12 describes the required Endpoints categories.
| Elements | Description |
|---|---|
|
Endpoint URI |
The path to the Endpoint, relative to the Security Token Service base URL The Security Token Service base URL is /sts. |
|
Policy URI |
Choose from a listing of Oracle WSM policies the one used to protect this Endpoint. Oracle Access Management Administrators can add a new custom policy to the available listing.To show this newly created Policy URI in the endpoints table list, use the following wlst command to update the owsmpolicies map:
putStringProperty("/stsglobal/owsmpolicies/<index>", "<newcustom_policypath>)
For example:
putStringProperty("/stsglobal/owsmpolicies/31", "sts/newcustom_policy")
|
|
Validation Template ID |
Choose from a listing of Validation Template names to identify one for use with this Endpoint. |
Once an Endpoint is created, you can remove it but you cannot edit the definition.
34.6.2 Managing EndPoints
Users with valid Oracle Access Management Administrator credentials can perform the following task to add, edit, or remove an Endpoint.
Creating a Token Validation Template to reference
To create or delete an endpoint
-
From the Oracle Access Management Console System Configuration tab, open the Security Token Service section.
-
Open the Endpoints node to display a list of existing Endpoints.
-
New Endpoint: see Table 34-12 and
-
Click the Add (+) button above the table (or choose New Endpoint from the Actions menu).
-
Enter the new Endpoint URI.
-
Choose one of the Oracle WSM policies to protect this Endpoint.
-
Choose the Validation Template to use with this Endpoint.
-
Click Apply to submit the definition and dismiss the confirmation window (or click Revert to dismiss the page without submitting it).
-
Close the page.
-
-
Remove Endpoint:
-
Highlight a row in the Endpoints table and click the Delete (X) button (or choose Delete Selected from the Actions menu).
-
Confirm removal (or cancel the removal).
-
34.7 Managing Token Issuance Policies, Conditions, and Rules
This section provides the following topics:
34.7.1 About Token Issuance Policies
A Token Issuance Policy defines the rules under which a token can be issued for a resource (Relying Party Partner) based on the client's identity, with the client either being a Requester Partner or an end user. If a Requester is NOT present, it is assumed that the User (represented by the on-behalf-of (OBO) token or WSS Token) is trying to access the RelyingParty.
When issuing a token, Security Token Service will determine for which Relying Party that token is created, and it will then evaluate if the client is authorized to request the token for that Relying Party. In order to issue a token, a Token Issuance Policy must be created with the resource involved in the operation, and with possibly a condition. At runtime if the policy evaluation is successful, the token will be issued.
You can add Conditions, Rules, and Responses to this Token Issuance Policy.
34.7.2 About Managing Token Issuance Conditions and Rules
The Token Issuance Policy allows the Administrator to define conditions along with "Allow" and "Deny" rules for the policy. Each Token Issuance Policy can contain one or more conditions, and rules that determine whether access to the requested resource should be granted or denied:
-
An Allow type rule specifies who is authorized to access a protected resource.
Only partners and users listed in the Condition are granted access; everyone else is denied access to the resource.
-
A Deny type rule specifies explicitly who is denied access to the protected resource.
Only partners and users listed in the Condition are denied access; everyone else is granted access to the resource.
Note:
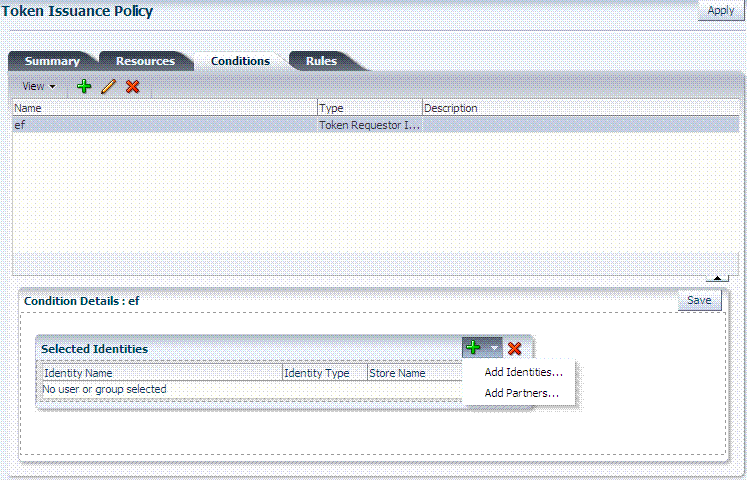
When adding User conditions, the identity store from which the users are to be chosen can be selected from a list. Ensure that you choose the Default User Identity Store, which is the only one used by Security Token Service.Managing Token Issuance Conditions is similar to managing Authorization Conditions and Rules. Figure 34-4 shows the Conditions tab of a Token Issuance Policy.
Figure 34-13 Token Issuance Policies and Conditions
Description of "Figure 34-13 Token Issuance Policies and Conditions"
Table 34-13 describes the Token Issuance Condition requirements.
See Also:
Part IX, "Managing Oracle Access Management Mobile and Social" for details about Adding a Token Issuance Policy for Mobile and Social Authentication ServiceTable 34-13 Conditions tab: Token Issuance Policy
| Element | Description |
|---|---|
|
Summary tab |
|
|
Name |
A unique name for this Token Issuance Policy. |
|
Description |
Optional. |
|
Conditions tab |
Table 17-18 describes elements and controls on the Conditions tab. |
|
Class |
Only Token Requester Identity is allowed for Token Issuance Policy conditions. You choose this in the Add Condition dialog box. |
|
Rules tab |
Table 17-29 describes the elements and controls on the Rules tab for Simple Mode evaluations. Table 17-30 describes the elements on the Rule tab in Expression mode. |
|
Condition Details |
|
|
Add |
Choose from the following populations:
|
|
Entity Name |
The name of the User or Group, as defined in the selected User Identity Store. |
|
Entity Type |
The type of entity you want to locate during a search to add identifies to the condition: User, or Group. |
|
Store Name |
Choose the name of the User Identity Store to search for users or groups to populate the condition. Remember, Security Token Service uses only the Default Identity Store. |
34.7.3 Managing Token Issuance Policies and Conditions
Users with valid Administrator credentials can use the following procedure to add a Token Issuance Policy and Conditions to an Application Domain. When adding resources to this policy, you might want to add the UnknownRP and MissingRP resources.
The Application Domain must already exist.
Note:
You can add Token Issuance Policies to the IAM Suite Application Domain.To manage Token Issuance Policies and conditions
-
Locate the desired domain as described in "Searching for an Existing Application Domain".
-
On the individual Application Domain page, click Token Issuance Policies tab.
-
Create a Token Issuance Policy:
-
In the desired domain, click the Token Issuance Policies tab and then click the Create Token Issuance Policy button to open a fresh page.
-
On the Summary page, enter a unique name and optional description.
-
-
Add Resources: This step presumes that the resource has been defined in the Application Domain and is ready to be added to policies.
-
Click the Resources tab.
-
Click the Add (+) button.
-
Click the Search button to display a list of defined resources you can add.
-
Click the desired resource in the results table, then click Add Selected.
-
Repeat as needed to add any other resources to this policy.
-
-
Add Conditions to a Policy: The only types available are Token Requester Identity or True.
-
Click the Conditions tab, then click the Add button on the Conditions tab to display the Add Condition window.
-
Enter a unique name for this condition in the dialog box.
-
Choose Token Requester Identity from the Type list.
-
Click Add Selected.
-
Proceed with Step 5 to add details for Token Requestor Identity. Otherwise, skip to Step 6.
-
-
Add Conditions Details:
-
Click the Condition name to display Conditions: Details.
-
From the Selected Identities table, click the Add button and choose either:
Add Partners: In the Search field, enter criteria (or click the arrow key beside the field to find all partners); click one or more results then click Add Selected to populate the condition.
Add Identities: Select the Store Name, select the desired Identity Type, enter search criteria and click the Search button; choose one or more results and click Add Selected to populate the condition.
-
Click the Save button on the Condition Details panel.
-
-
Add Rules: Perform these steps to Allow or Deny access based on your Conditions.
-
Click the Rules tab.
-
Check the Rule Mode: Simple or Expression.
-
Expression Mode: Build your expression by entering operators (Table 17-31) and choosing and inserting conditions (Table 17-30).
-
Simple Mode: Click to Match either All or Any of the selected conditions, then using arrows for Allow (or Deny) Rule, move desired conditions from the Available Conditions column into the Selected Conditions column.
-
-
Click Apply and then close the Confirmation window.
-
Find (or Add) TokenServiceRP Resources in the Application Domain: See "Managing TokenServiceRP Type Resources".
34.8 Managing TokenServiceRP Type Resources
A Token Issuance Policy defines the rules under which a token can be issued for a resource (Relying Party Partner) based on the client's identity, with the client either being a Requester Partner or an end user.
When issuing a token, Security Token Service will determine for which Relying Party that token is created, and it will then evaluate if the client is authorized to request the token for that Relying Party.
Note:
To issue a token, a Token Issuance Policy must be created with the resource involved in the operation and, possibly, with a condition. At run time if the policy evaluation is successful, the token will be issued.The resource(s) in a policy can be:
-
A TokenServiceRP type resource represents resources for, and is based on, the Token Service Relying Party (required for Mobile and Social REST clients).
See Also:
Part IX, "Managing Oracle Access Management Mobile and Social" for details about Configuring Access Manager for Mobile and Social Authentication Service -
The pre-existing UnknownRP resource which is needed when Security Token Service is not able to map the Service URL referenced in the
AppliesToelement of the WS-Trust request to an Security Token Service Relying Party Partner entry. -
The pre-existing MissingRP resource which is needed when the
AppliesToelement of the WS-Trust request is missing.
Note:
Both the MissingRP and UnknownRP are defined in the IAM Suite Application Domain.A resource of type TokenServiceRP, Figure 34-14, represents an Security Token Service Relying Party Partner defined in the Security Token Service Partner Store.
Figure 34-14 Pre-defined Resource Type: TokenServiceRP

Description of "Figure 34-14 Pre-defined Resource Type: TokenServiceRP "
Resources of type TokenServiceRP are used in Token Issuance Policies, which are evaluated when Security Token Service issues tokens at run time. This is a predefined resource type, which cannot be deleted. However, additional operations can be created, edited or deleted as needed. Predefined operations are shown with a lock icon.
For more information, see:
-
About Managing TokenServiceRP Type Resources in Access Manager
-
Managing TokenServiceRP Type Resources in Application Domains
34.8.1 About Managing TokenServiceRP Type Resources in Access Manager
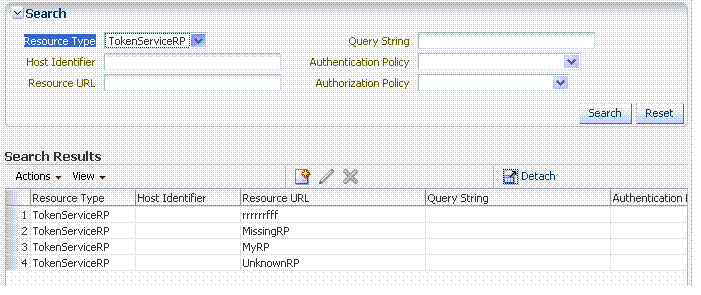
Use the Search controls for the Application Domain to locate resources of a specific type within the domain. Figure 34-15 shows the search controls for the IAM Suite resources. Resource Type TokenServiceRP is the search criteria. The Search Results table lists all resources of this type within the Application Domain.
Figure 34-15 Search: Resource Type TokenServiceRP in Application Domain
Description of "Figure 34-15 Search: Resource Type TokenServiceRP in Application Domain"
The TokenServiceRP resources in this domain include those provided out of the box, and described earlier:
-
UnknownRP resource
-
MissingRP resource
34.8.2 Managing TokenServiceRP Type Resources in Application Domains
Users with valid Administrator credentials can use the following procedure to add TokenServiceRP resources to an Application Domain.
Note:
-
If
AppliesTois present in the RST but the requester could not be mapped, use theTokenServiceRP:UnknownRPresource. -
If
AppliesTois not present, useTokenServiceRP:MissingRP, otherwise select the appropriate resource.
To manage TokenServiceRP Resources
-
Locate the desired Application Domain as described in "Searching for an Existing Application Domain".
-
Add TokenServiceRP Resource to the Application Domain:
-
Click the New Resource button on the Application Domain Search page.
-
Specify the Resource Type as TokenServiceRP.
-
Enter a Resource URL that is the Relying Party ID for whom the token issuance policy will be defined.
-
Click the Apply button at the top of the page to submit this and dismiss the confirmation window.
-
-
Find TokenServiceRP Resources:
-
In the desired Application Domain, open the Resources tab to display the Search controls.
-
From the Resource Type, choose TokenServiceRP, and click Search.
-
Review the Search Results table and click a name to open the Resource Definition.
-
34.9 Making Custom Classes Available
When Security Token Service does not support the token that you want to validate or issue out-of-the-box, a developer can write custom validation and issuance module classes. This section describes how to make custom classes available using the console.
The information here can be applied when you have:
-
WS-Security User Name Token
-
WS-Trust Custom Token
-
Issuing Custom Token
Note:
You can also write a script that includes WebLogic Scripting Tool commands for any operation that you can accomplish through the console. For more information, see Oracle Fusion Middleware WebLogic Scripting Tool Command Reference.This section provides the following topics:
34.9.1 About Making Classes Available
After writing the custom token validation and/or issuance classes, you must add Custom Token Configuration to Security Token Service to indicate when and how these classes should be used.
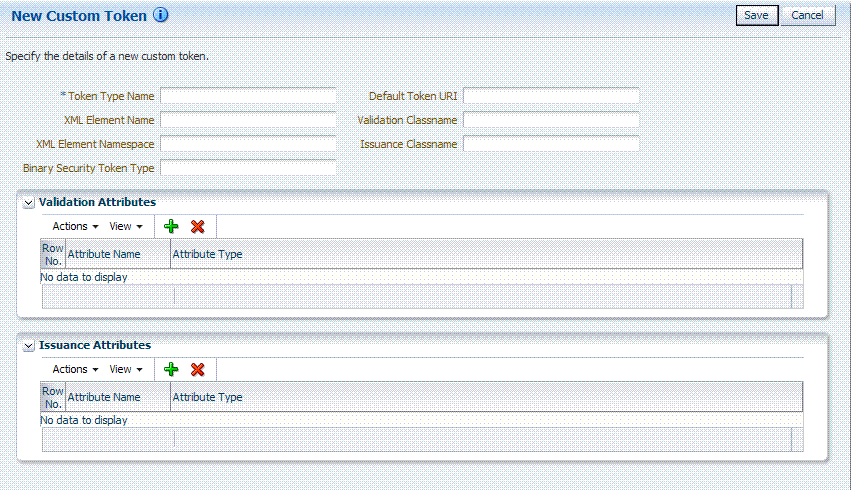
On the New Custom Token page only the Token Type Name is required (identified with an asterisk, *), as shown in Figure 34-16. Not all elements apply to all custom tokens. However, if you submit information that is incomplete, a dialog box appears to identify what is missing.
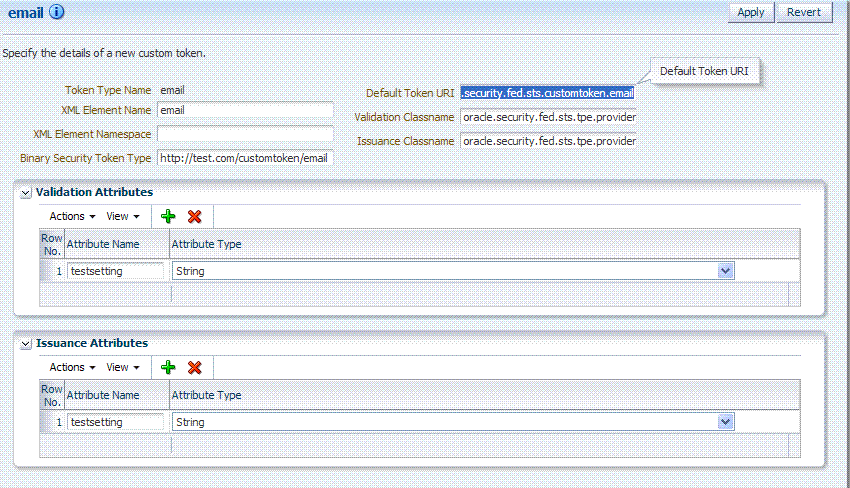
After successful submission of new custom token details, the saved page is available for editing as shown in Figure 34-17.
For the custom token, you must decide on the XML Element Name, XML Element Namespace, Binary Security Token Type, and so on. Table 34-14 describes the elements on a Custom Token page based on the examples in this chapter.
Table 34-14 New Custom Token Elements
| Element | Description |
|---|---|
|
Token Type Name |
The unique name you choose for this custom token. For example: email_token Note: After you save a new custom token configuration, you cannot edit this name. |
|
Default Token URI |
The URI for this custom token. This URI can then be used in the RST to request that a custom token of this type should be issued. For the example in this chapter, the value would be: oracle.security.fed.sts.customtoken.email |
|
XML Element Name |
The name you decide on, which will be associated with the Token Type Name. For example: If you specify Note: Minimally, you need either an XML Element Name or Binary Security Token Type. |
|
Validation Classname |
The name of the custom token validation class that you made available to Security Token Service. For example: oracle.security.fed.sts.tpe.providers.email.EmailTokenValidatorModuleImpl Note: Minimally, you need either an issuance class name or validation class name, depending on whether you want to issue or validate a custom token. |
|
XML Element Namespace |
The namespace of the custom token element name. For example: http://email.example.com |
|
Issuance Classname |
The name of the custom token issuance class that you made available to Security Token Service. For example: oracle.security.fed.sts.tpe.providers.email.EmailTokenIssuerModuleImpl Note: Minimally, you need either an Issuance classname or Validation classname, depending on whether you want to issue or validate a custom token. |
|
Binary Security Token Type |
Enables the class to validate a custom token sent in as a BinarySecurityToken. The ValueType of the BinarySecurityToken for this custom token. If Security Token Service receives a Binary Security Token with this ValueType, it will be forwarded to this custom token's Validation class for validation. |
|
Validation Attributes |
This section enables you to add (or remove) validation attributes. The table displays existing validation attributes, if any. For this example:
Note: You will add a value to the attribute when creating a Token Validation Template. |
|
Issuance Attributes |
This section enables you to add (or remove) issuance attributes. The table displays the following information for existing issuance attributes.
Note: You will add a value to the attribute when creating a Token Issuance Template. |
|
Save |
Click this button on the New Custom Tokens page to save your configuration information. |
|
Cancel |
Click this button to dismiss your configuration details. |
|
Apply |
Click this button to submit your changes. |
|
Revert |
Click this button to dismiss your changes. |
Task overview: Adding custom tokens for custom classes
-
Create a JAR file containing only your custom
TokenIssuerModule orTokenValidatorModuleclasses (or both). No XML metadata or manifest is needed. -
Review information in Figure 34-17 and Table 34-14.
-
Add the JAR to the OAM Server hosting Security Token Service and create a new custom token, as described in Section 34.9.3, "Managing Custom Tokens".
34.9.2 About Narrowing a Search for Custom Tokens
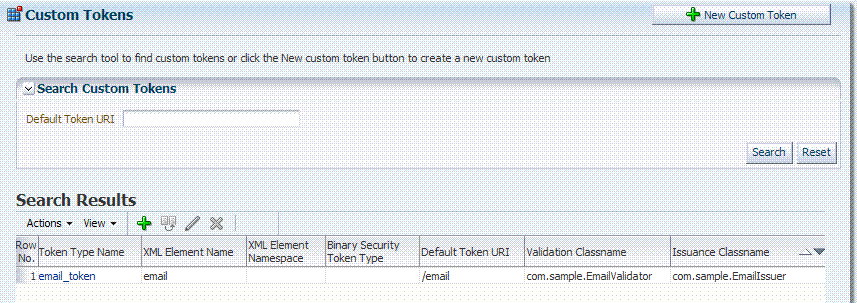
Figure 34-18 illustrates the Custom Tokens Search controls and Results table. These appear when you double-click the Custom Tokens node in the navigation tree. By default, all currently defined custom tokens are listed when the Search Results table is displayed.
Table 34-15 describes the Custom Tokens Search elements and controls. No wild cards (*) are allowed in Custom Token searches.
Table 34-15 Custom Tokens Search Elements and Controls
| Element | Description |
|---|---|
|
Default Token URI |
The URI that was defined for the custom token. You can enter the entire URI or only part of it. For instance, if you enter "ai" the Search Results table will display all custom tokens defined with a token URI that includes the letters "ai". Note: Wild cards are not allowed in Custom Token searches. |
|
Search |
Initiates the Search function using criteria provided in the form. |
|
Reset |
Resets the Search form with defaults only. |
|
Search Results |
Provides the results of your search based on your choices in the View menu. |
|
Actions menu |
Provides the following functions that can be performed on a selection in the results table: 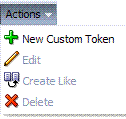
Note: Actions menu functions mirror command buttons above the results table. For example:
|
|
View menu |
Provides functions you can use to display various information in the results table: 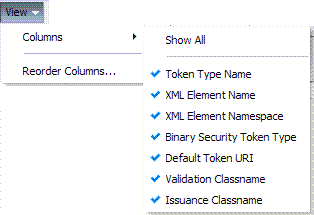 |
|
Controls affecting the ordering of items listed in the results table:
|
34.9.3 Managing Custom Tokens
Users with valid Administrator credentials can use the procedure in this section to manage custom tokens for custom Token Module classes.
The following procedure includes steps to add, edit, and delete custom tokens or attributes of a custom token. Skip any steps that you do not need.
Refer to the developer creating the custom tokens and the Oracle Fusion Middleware Developer's Guide for Oracle Access Management for details about:
Writing a TokenValidatorModule Class
Writing a TokenIssuanceModule Class
To make custom classes available
-
Create and add the JAR containing your Issuance and Validation classes to the OAM Server hosting Security Token Service using one of these methods:
-
Add the custom token jar and the sts-common.jar that is available in DOMAIN_HOME/config/fmwconfig/mbeans/oam to the Managed Server classpath by editing the startup script.
-
Add the custom token jar and the sts-common.jar that is available in DOMAIN_HOME/config/fmwconfig/mbeans/oam to the DOMAIN_HOME/lib directory to automatically add these jars to the Managed Server classpath.
-
Restart the OAM Server.
-
-
New Custom Token: From the Oracle Access Management Console System Configuration tab, open the Security Token Service section and:
-
Open the Custom Tokens node to open the Search controls.
-
Click the New Custom Token button.
-
Fill in the New Custom Token page with details for your custom classes (Table 34-14).
-
Click Save and dismiss the confirmation window (or click Cancel to dismiss the page without submitting it).
-
Close the page (or edit as described in Step 4).
-
Proceed to Step 4, if needed, or to "Managing a Custom Security Token Service Configuration".
-
-
Find Custom Tokens: From the Security Token Service section of the System Configuration tab:
-
Find All: Click the Search button and view the results table with all custom tokens listed.
-
Narrow the Search: Enter some or all characters in the desired Default Token URI, click the Search Button, and review the results table.
-
Reset the Search Form: Click the Reset button.
-
-
Edit Custom Token Configuration: Start with the saved page you just created.
Alternatively: Use Step 3 to find the desired Custom Token, then double-click the name in the Search Results table to open the page.
-
In the named Custom Token page, click the appropriate field and edit as needed.
-
Add Attributes: Click the Add (+) icon for the Attributes table, enter the Attribute Name and an Attribute Type (Table 34-14).
-
Remove Attributes: From the Attributes table, click the row containing the attribute to remove, click the Delete (X) icon for the table, and dismiss the Confirmation window.
-
Apply Changes: Click the Apply button at the top of the page to submit changes.
-
-
Remove a Custom Token:
-
Click the desired name in the Search Results table to select the item to remove.
-
From the Actions menu, click Delete (or click the Delete (X) command button above the table.
-
Click the Delete button in the Confirmation window (or click No to cancel the operation).
-
34.10 Managing a Custom Security Token Service Configuration
This tasks consists of the following procedures:
34.10.1 Creating the Validation Template
Users with valid Oracle Access Management Administrator credentials can perform the following task to create a Validation Template with a Token Protocol of Webservice Trust to map the token to the requester.
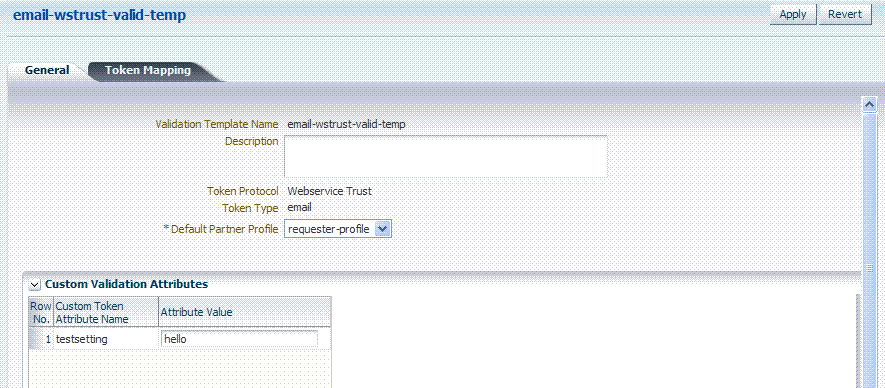
The template in this example can be used for the module classes described earlier in this chapter. Full implementation details are shown in the following figures. As you review these, notice how specifications for this template reference the module class code:
To create the validation template for the custom module classes
-
Display the list of existing Token Validation Templates.
Oracle Access Management Console
System Configuration
Security Token Service
Token Validation Templates -
Click the New Validation Template button in the upper-right corner (or click the Add (+) command button above the Search Results table).
-
General: Set the following for use with the custom token.
Validation Template Name: email-wstrust-valid-temp
Token Protocol: Webservice Trust
Token Type: email
Default Partner Profile: requester-profile
Custom Validation Attributes: testsetting: hello
-
Token Mapping: Set the following for use with the custom token in this chapter.
Check the box beside Map Token To User (to enable it).
Check the box beside Enable Simple User Mapping and enter:
User Token Attribute: STS_SUBJECT_ID
Datastore Attribute: mail -
Click Save and dismiss the confirmation window.
-
Proceed to "Creating the Issuance Template for a Custom Token".
34.10.2 Creating the Issuance Template for a Custom Token
This is a server side configuration. Users with valid Oracle Access Management Administrator credentials can perform the following task to create a Token Issuance Template.
Each Token Issuance Template indicates how to construct a token, and which signing or encryption to use when constructing a token. Each Token Issuance Template also defines the attributes to be sent as part of the outbound token for mapping, and filtering data. However, Issuance Templates do not list mapping or filtering rules, which are defined in the Relying Party Partner Profile.
The template in this example can be used for the email custom token described earlier in this chapter. Implementation details are shown in the following figures, and described in the accompanying procedure. As you review these, notice how specifications for this template reference the module class code:
When you have a custom token type deployed, the Issuance Properties are tailored to accommodate the custom token. For instance, the custom email token type was chosen for the issuance template show in Figure 34-22.
This procedure produces a companion Issuance Template for the custom module classes in this chapter. For the example:
-
Ignore the Token Encryption Algorithm, which is not used for the custom token type: email.
-
Fill in a value for the Custom Token Attribute, which is populated from the custom token code.
To create the Issuance Template for the custom module classes
-
Find existing Token Issuance Templates.:
System Configuration
Security Token Service
Token Issuance Templates
Search button (with or without filling in search criteria) -
New Token Issuance Template:
-
Click the New Issuance Template button in the upper-right corner (or click the Add (+) command button above the Search Results table).
-
General: Set the following for use with the custom token in this chapter.
Issuance Template Name: email-issuance-temp
Token Type: email -
Click Save and dismiss the confirmation window (or click Cancel without saving).
-
Issuance Properties: Set the following for use with the custom token in this chapter.
Custom Token Attribute Value: world -
Click Apply and dismiss the confirmation window (or click Revert without saving it).
-
Close the definition (or edit it as described in Step 4).
-
-
Edit a Template: Find the desired template, edit details, and click Apply.
Alternatively: Use Step 3 to find the desired template and click the name in the Search Results table to display the definition.
34.10.3 Adding the Custom Token to a Requester Profile
You can either edit an existing requester profile to add your custom token to the Token Type Configuration table, or create a new requester profile to use with the custom token. Either way, configure:
-
Token Type: email (your custom token)
-
Validation Template: email-wstrust-valid-temp
Your Custom Token and Validation Template must be defined.
To create or edit a requester profile for the custom token
-
From the Oracle Access Management Console System Configuration tab, open the Security Token Service section.
-
In the navigation tree, open the Partner Profiles node and double-click the Requestor Profiles node to display a list of existing profiles
-
Existing Profile:
-
In the Search Results table of the Requester Profiles page, click the name of the desired profiles.
-
Token and Attributes: Fill in the following details for the custom token in this chapter and then click the Save button at the top of the page.
Token type:email
Validation Template:email-wstrust-valid-temp -
Click Save, dismiss the confirmation window, and close the page (or click Cancel to dismiss the page without submitting it).
-
Proceed to "Adding the Custom Token to a Requester Profile".
-
-
New Profile: Click the New Requester Profile button to display the New Partner Profile page where you enter details:
-
General: Fill in the following details for the custom token in this chapter and then click the Next button at the top of the page.
Profile ID:unique_requesterprofile_name
Default Relying Party Profile:unique_relyingparty_name -
Add Token Type Configuration: Fill in the following details for the custom token in this chapter and then click the Save button at the top of the page.
Token type:email
Validation Template:email-wstrust-valid-temp -
Proceed to "Adding the Custom Token to a Requester Profile".
-
34.10.4 Adding the Custom Token to the Relying Party Profile
You can either edit an existing Relying Party profile, or create a new one to issue the custom token by default, and refer to the Issuance Template and related information. Either way, configure:
-
Default token to issue: email (your custom token)
-
Issuance Template:
email-issuance-temp
Your Custom Token and Issuance Template must be defined.
To edit the requester profile for the custom module classes
-
From the Oracle Access Management Console System Configuration tab, open the Security Token Service section.
-
In the navigation tree, open the Partner Profiles node and double-click the Relying Party Profiles node to display a list of existing profiles.
-
Existing Profile:
-
In the Search Results table of the Relying Party Profiles page, click the name of the desired profile.
-
Click the Token and Attributes tab.
-
Token Type Configuration: Click the Add (+) button above the Token Type Configuration table and enter the following details:
Token type:email
Issuance Template:email-issuance-temp -
Attributes: Click the Add (+) button above the Attributes table and define the following:
Attribute name: mail
Store Type:Userstore
Include in Token:(check to enable)
Encryption (leave blank)
Value (leave blank) -
Click Apply, dismiss the confirmation window, and close the page (or click Cancel to dismiss the page without submitting it).
-
-
New Profile: Click the New Relying Party Profile button to display the New Partner Profile page where you enter details:
-
General: Fill in the following details for the custom token in this chapter and then click the Next button at the top of the page.
Profile ID:unique_relyingparty-name
Default Token:email -
Click the Token and Attributes tab and perform Steps 2c and 2d, then click Apply.
-
34.10.5 Mapping the Token to a Requestor
If you don't have a Username Validation Template (username-wss-valid-template), use the Oracle Access Management Console to create one to map the token to the requester.
Validation Template Name: username-wss-valid-template
Token Type: Username
Proceed to "Creating an /wssuser EndPoint"
34.10.6 Creating an /wssuser EndPoint
Mapping the Token to a Requestor
-
From the Oracle Access Management Console System Configuration tab, open the Security Token Service section.
-
Double-click the Endpoints node to display a list of existing Endpoints.
-
New Endpoint:
-
Click the Add (+) button above the table (or choose New Endpoint from the Actions menu).
-
Enter the new Endpoint URI: /wssuser
-
Choose the Oracle WSM policy: sts/wss_username_service_policy
-
Choose the Validation Template: username-wss-validation-template.
-
Click Apply to submit the definition and dismiss the confirmation window (or click Revert to dismiss the page without submitting it).
-
Close the page.
-

