5 Investigation Using OAAM
Oracle Adaptive Access Manager provides a streamlined and powerful forensic interface for security analysts and compliance officers. Users can easily evaluate alerts and identify related access requests and transactions to uncover fraud and misuse.
This chapter includes the following sections:
5.1 Fraud Investigation
Oracle Adaptive Access Manager largely automates the task of preventing fraud/misuse. Prevention is accomplished by analyzing risk and taking preventative actions to either block access in extremely high risk situations or challenge users via mechanisms including KBA and OTP when the risk is medium. In all OAAM deployments there will be some measure of human review required for situations that are either edge cases, false negatives, or when real-time interdiction is not feasible or desired. In these scenarios, human investigators are required to review individual incidents, perform forensic investigation to uncover related incidents, and take action to influence future risk evaluations to reduce false positive and negatives.
Examples of scenarios requiring human investigators are as follows:
-
Jeff is a fraud analyst on the BigMart team. He reviews suspect transactions to identify fraud. The deployment primarily utilizes a manual case creation and investigation flow. Fraud analysts start each investigation by searching for transactions with high severity alerts. When fraud is identified, fraud analysts record findings, black list entities of various sorts, and close out cases with a disposition.
-
Jeff is a fraud analyst on the BigMart team. The deployment primarily utilizes automated case creation and investigation flow. Analysts start each investigation by searching for new cases. They drill in on the sessions for which the case was generated. When fraud is identified analysts record findings, black list entities of various sorts and close out cases with a disposition.
-
John Smith calls the BigBank customer service claiming to have lost money out of his account. John claims that there was a wire transfer for $129 out of his account last week that he did not initiate. Sarah is a Customer Service Representative (CSR) at BigMart. She opens case 321 for John via his username jsmith and enters notes based on the information he provided. The case displays John's username in the title so any CSR viewing the case can always see what user this case is for. Sarah escalates the case and tells jsmith he will be contacted within 24 hours by an investigator. Mike works on the BigBank Security team. He is responsible for investigating customer service related security issues. He searches for cases with an escalated status and filters by date. Mike opens the newly escalated case from Sarah, the CSR. Mike can view customer and user specific data and the notes from the CSR as a starting point. He searches for wire transfer transactions John Smith has performed for values between $100 and $200. Mike compares the transactions returned to determine if this looks like fraud.
-
Jeff is a security analyst at Acme Corp. Acme has online purchase and user profile change transactions defined in the deployment. Jeff is searching for transactions that involved addresses in the 95060 zipcode. He selects all transaction types and adds a filter for address.zipcode. When he runs the query the zipcode column appears in the results. When the zipcode column is added the rest of the columns resize horizontally to optimize the screen real estate available.
-
Jeff is a security analyst at Acme Corp. Acme has online purchase and user profile change transactions defined in the deployment. Jeff is searching for ecommerce transactions that involved dollar totals greater than $500. He selects the ecommerce transaction type and adds a filter for total dollar amount. The add fields menu contains all the specific entities, entity data and linked entity data. When he runs the query the dollar total column appears in the results. When the new column is added the rest of the columns resize horizontally to optimize the screen real estate available.
5.1.1 What is Fraud Investigation?
The purpose of a fraud investigation is to evaluate situations where the security policies have detected a high risk scenario that require human intelligence and/or non-electronic interaction to determine whether fraud has occurred and if there were other related incidents. Fraud investigators examine suspicious session and transaction data across events to locate related incidents. The OAAM Investigation Interface is designed to simplify and streamline the investigation process.
5.1.2 Fraud Investigation Roles
Before an investigator can access and start using Oracle Adaptive Access Manager for investigation, he will need to have the appropriate role with specific permissions. User roles determine the tasks that the user can perform within the application. Roles relate to the type of work the user performs. Permissions are also defined in the application to specify the functions each role can perform. Different menus and options may be available depending on the user's role and permissions.
Fraud Investigator and Fraud Investigation Manager are out-of-the-box roles provided by Oracle Adaptive Access Manager. Fraud investigators or fraud investigation managers are responsible for the investigation of fraud scenarios and suspicious patterns. Table 5-1 summarizes the out-of-the-box permissions associated with fraud investigators.
A Fraud Investigator investigates a specific fraud scenario or suspicious pattern through an Agent case that is escalated from a CSR case because investigation is needed for some reason, auto-generated, or manually created. A Fraud Investigation Manager also investigates cases, but he has access to actions that the Fraud Investigator does not have. Table 5-1 shows the permissions of a Fraud Investigator and a Fraud Investigation Manager side by side.
Table 5-1 Fraud Investigation Role Permissions
| Action | Investigator Permissions | Investigation Manager Permissions |
|---|---|---|
|
Actions |
All functions of Investigator role |
All functions of Investigator role and some special privileges |
|
Search Cases |
|
|
|
Create New CaseFoot 1 |
Only Agent cases |
Only Agent cases |
|
View Case Details |
|
|
|
Edit Case |
|
|
|
Search session |
Search sessions |
Search sessions |
|
Link sessions |
Link sessions |
Link sessions |
|
Unlink sessions |
Unlink sessions |
Unlink sessions |
|
View linked sessions |
View linked sessions |
View linked sessions |
|
Add to group |
Add to group |
Add to group |
|
Link to case |
Link to case |
Link to case |
|
View all entity and transaction data in the clear |
Fraud Investigators and Investigation Managers can view all entity and transaction data in the clear. Other roles will see masked text for any encrypted entity or transaction data fields. |
Fraud Investigators and Investigation Managers can view all entity and transaction data in the clear. Other roles will see masked text for any encrypted entity or transaction data fields. |
Footnote 1 By default only Investigators and Investigation Managers have access to create Agent cases. The property for investigator access is oaam.permission.creatagentcase=oaam.perm.create.case.type.agent. CSRs can be given access to Agent cases if permission is granted to them. For information on granting this permission, refer to Section C.2.8, "Configuring Agent Case Access."
5.1.3 What is an Agent Case?
OAAM provides case management functionality tailored to forensic investigation. An OAAM Agent case is a repository for findings and investigation information used to manage and conduct investigations on fraudulent sessions and transactions. The following are some specific functions of an Agent type case. Agent cases are used to perform the following:
-
An investigator utilizes a case to capture findings gathered in the process of investigation
-
Cases are used to manage the life cycle of an investigation.
-
White/black listing of devices, location and other entities.
-
Influence future risk evaluations based on findings
-
Export finding to a spreadsheet
5.1.4 How are Agent Cases Created?
The decision to create a fraud case stems from its sources. Examples of sources are as follows:
-
Investigators monitor or analyze the sessions from a given day continuously. If they find a high "fraud" alert that warrants immediate attention, they file an Agent case. A Fraud Investigator picks up the case and begins investigating further. The Fraud Investigator can create an agent case for alerts, multiple block sessions from a user, multiple blocked sessions from a device, high risk scores, and other situations.
-
A configurable action creates an Agent case automatically as a supplementary action that is triggered based on a result action and/or a risk score after a checkpoint execution.
-
A CSR escalates a case because investigation is needed for some reason.
5.1.4.1 Manually Created Case
Only an investigator can manually create an Agent case directly. No user information is shown or required for creation of an Agent case. The only required inputs to create an Agent case are Organization ID, name, and description. Manually created Agent cases have a Pending status when the case is created.
5.1.4.2 Auto-Generated Case
An auto-generated case is created when a security administrator configures an action to create an Agent case when specific rules trigger. In other words, the new Agent case is dynamically created as a result of a particular event. This Agent case contains the session data for which it was created. An investigator starts his investigation by performing a search for all cases with New status.
5.1.4.3 Escalated Cases
These special escalated cases are created by CSRs. The CSR submits a CSR case for investigators to look into when there is suspicious activity associated with the case. The case retains the user details used to create the CSR case. Once escalated, the case is treated as an Agent case. It will no longer be visible to the CSR. They have the Escalated status and when accessed for the first time, the status automatically changes to Pending. An investigator can start his investigation by searching for cases with the Escalated status and filters the results on the severity column so the highest severity cases are shown at the top. Best practice is to open the escalated case and view the logs for notes entered by the CSR and CSR Manager. For example, the notes can show that the CSR escalated the CSR case to an Agent case because he suspected fraud activity. The log shows that the case was created, then escalated, then accessed, and then the status changed.
Example of searching by Escalated status: A CSR Manager escalates a CSR case. Matt is a fraud investigator specializing in customer specific security issues. He searches for all cases with the Escalated case status.
When the escalated case is expired, an expired flag is set for the case to let investigators know that the case requires their attention. For example, if escalated cases are set to 24 hours and if the case is open and has not been accessed in more than 24 hours, the flag is set to Expired.
When the Fraud Investigator accesses the expired case, it is reactivated and the expiration date is extended for another 24 hours (or however long it has been configured for). For details on configuring expiry of cases, refer to Section C.2.7, "Configuring Expiry Behavior for Agent Cases."
5.1.5 Case Ownership
Initially Current Owner is Investigator Who Creates Agent Cases
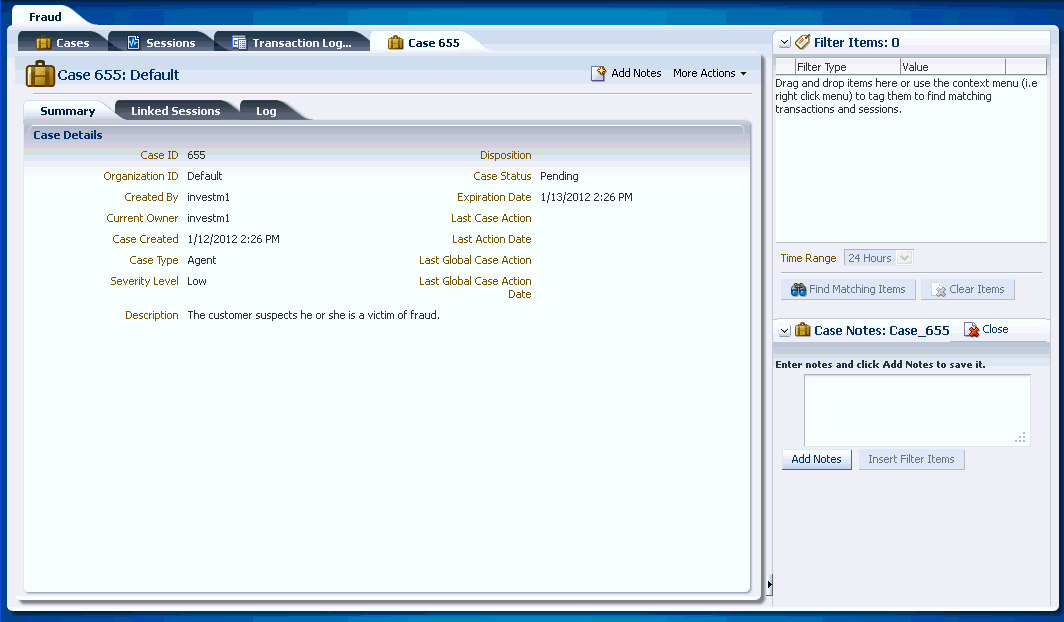
Initially the current owner of the case is the investigator who created the case.
-
The Investigator logs in to the system.
-
He creates a case.
The Case Details page appears.
-
The Case Status is Pending.
-
The Created By field shows the investigator
-
The Current Owner field shows the investigator.
-
User details are not shown because this case is not created for a user.
-
The Current Owner is the Investigator Who is Working on the Case Currently
The Current Owner is the investigator who is working on the case currently.
As soon as the investigator opens the case, the following details are shown in the Case Details page:
-
The Current Owner changes from the previous owner to the investigator opening the case.
-
The Created By field still shows the investigator who created the case or that it is automatically generated.
-
The status of the case is Pending.
CSR Escalates a Case to an Agent Case Does Not Have Access to the Case
As soon as the CSR escalates the case, he will not be able to see the case in the Search results table:
-
A CSR logs in to the system.
-
He creates a new case
-
He escalates the case to an Agent case and adds notes.
-
Now the CSR does not have permissions to see the details of the case.
-
When an investigator opens the case
-
The Current Owner changes from the CSR to the investigator.
-
The Created by field still shows the CSR.
-
The status of the case is Pending.
-
Ownership in Concurrent Access of Case
OAAM allows two agents to concurrently access a case. When two investigators try to open a case, the investigator who has the case opened is the current owner.
-
Investigator1 logs in and searches for a case with status New.
-
He can see the case in the results. For example, Case ID 132.
-
Another user Investigator2 logs in and searches for a case with status New.
-
He can also see the case, Case ID 132, in the results.
-
Investigator2 opens the case and the status changes to Pending.
-
Investigator2 is the current owner of the case.
-
Investigator1 still sees the case as New in the results.
-
He tries to open this new case but a message appears saying that Investigator2 is the current owner of the case and he can choose to continue or cancel.
-
If he chooses to cancel, nothing will happen and Investigator2 remains the current owner.
-
If he chooses to continue, he will become the current owner and the status of the case is Pending.
Two Investigators Add Notes to a Case
OAAM allows concurrent write access to cases, and if the two agents add notes to the case, OAAM saves both agents' notes. Notes are displayed and attributed to the correct agent.
5.1.6 How Fraud Investigators Use Agent Cases for Investigation?
Oracle Adaptive Access Manager Agent cases are used to manage investigations into fraudulent activity. An Agent case is created to capture the runtime data identified as suspect, provide a repository for investigation notes and feedback findings into the engine which improves future risk analysis. Once an Agent case is created, the main purpose of an investigator is to help identify if a fraud occurred. To achieve this goal, investigators use detail pages and compare pages to identify the relationship, pattern, or historical patterns. Search and detail pages provide fraud investigators the ability to:
-
Drill into individual sessions to see the exact chain of events that led to an alert
-
View and search for complex relationships between different data types
-
White/black list entities "on the fly" without leaving the investigation flow
This feeds back into risk evaluation. For example, a high risk device group.
-
Link session data to a case to further narrow the investigation
A fraud investigator can quickly view the data involved in an incident and quickly locate related situations by easily harnessing the complex data relationships captured by OAAM. Then, he identifies the case as fraud or not fraud and closes the case with a disposition.
5.1.7 Closing a Case
When an investigation is complete a case is closed with a disposition. A disposition both summarizes how the case was resolved and how the findings may influence future risk evaluation.
5.1.8 Agent Case Feedback
Agent case "feedback" closed findings into the risk engine to improve accuracy of future evaluations automatically. If a deployment is utilizing predictive risk analysis then the out of the box clustering model will take into account sessions contained in cases with confirmed fraud and confirmed not fraud dispositions.
For example, an investigator creates an Agent case and links several fraudulent sessions to it. Later, the investigator closes the case with a disposition of confirmed fraud. A predictive model is rebuilt every "n" hours to take into account data from sessions linked to cases with a confirmed fraud disposition. Investigators can determine the frequency of rebuilding the models. Each session in the system is compared to see how close it is to the fraudulent ones. The closer the match the higher the risk. An example evaluation would be, was the probability more than 50% that this login session is fraudulent based on all sessions linked to confirmed fraud cases?
5.2 Investigation Workflow
OAAM provides three workflows, which make it easier for an investigator to examine fraudulent transactions. The investigation workflow includes interfaces to search and compare runtime data, isolate related incidents, capture findings, and affect future risk analysis. Each customer deployment generally utilizes a combination of the following three common workflows depending on business need:
-
Alert-centric
-
Auto-generated
-
Escalated
The steps for starting an investigation are different depending on the type of deployment. The following table lists the steps for each type of investigation workflow and how to get started.
Table 5-2 Investigation Workflows
| Investigation Flow | Description | Steps |
|---|---|---|
|
Alert-centric |
The deployment primarily utilizes the manual case creation. A new Agent case is created when a suspicious activity or fraud scenario is detected and needs investigation. |
The process is as follows: |
|
Auto-generated |
The deployment primarily utilizes the automated case creation. A security administrator configures an action to create an Agent case when specific rules trigger. When a rule triggers or rules trigger, in addition to the actions and alerts, a case is generated automatically. The auto-generated case requires a review of the transaction. |
The process is as follows: |
|
Escalated |
The deployment uses the customer service escalated case and investigation flow. A CSR escalates a CSR case for an investigator to look at because the CSR suspected fraud activity. The case becomes an Agent case. Because the case originated from a customer service case, it contains specific user information in the details. |
Alert-Centric Investigation Flow
A Fraud Investigators starts each investigation by searching for sessions or transactions with high severity alerts and reviewing suspect transactions to identify fraud. He views the data involved in an incident and locates related situations by using the complex data relationships captured by OAAM. He creates a case to link data to narrow the investigation. When fraud is identified the investigator records findings, blacklists entities, and closes out cases with a disposition.
Henry is a security analyst at the online ecommerce division of Big Mart. Henry opens the Search Transaction page from the OAAM Investigation Interface. In the Search Transaction page, he selects Transaction Type as Retail Ecommerce and Alert Level as High and queries for online order transactions with high severity alerts in the last hour.
Seven transactions are returned in the search results. The Search Results table lists the transactions, the transaction type, transaction status, and alerts. The Search Results table also contains a Transaction Date column that can be sorted in ascending or descending order. Henry click the down icon in the Transaction Date column header to filter results by ascending time stamp. In the Transaction Search page, Henry selects the first transactions to view its details. In the Search Results table, he clicks the orange square next to the high alert in the Alert column to display the total count of high alerts and alert messages in a popup. In the popup, he sees there is a single high alert with the message "Device with multiple low frequency credit cards."
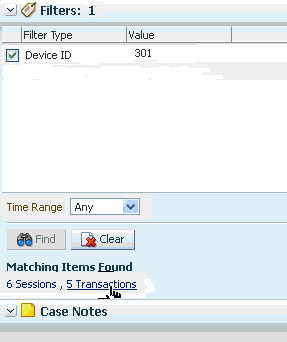
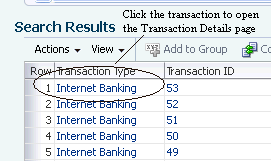
Seeing this Henry clicks the Transaction ID in the Search Results table to open the Transaction Details page. He can view the transaction in detail such as the run time values of the transaction and entity data along with the session information in the Transaction Details page. The transaction looks suspect so he wants to find other transactions with the same credit card and device in the last 7 days. The Filters panel of the Utility panel provides a quick way to perform targeted searches for sessions and transactions simultaneously. He drags and drops the credit card number and device ID from the details pages into the Filter panel area and selects 7 days in the Time Range field to filter the transactions and sessions that have occurred within the past 7 days. He clicks the Find button in the Utility Panel to filter the transactions to identify sessions and transactions that are connected based on the credit card and device ID.
No sessions or transactions are returned in the Matching Items Found section of the Utility Panel. He wants to exclude Device ID temporarily from the search and deselects the checkbox that precedes the Device ID label and clicks Find to run a query again. No sessions or transactions are returned in the Matching Items Found section. He excludes the credit card number from the search by deselecting its checkbox and selects the checkbox that proceeds the Device ID in the Filter panel and clicks Find to run a query again. 20 transactions and 4 sessions are returned. He was able to quickly find related sessions and transactions using the Utility Panel.
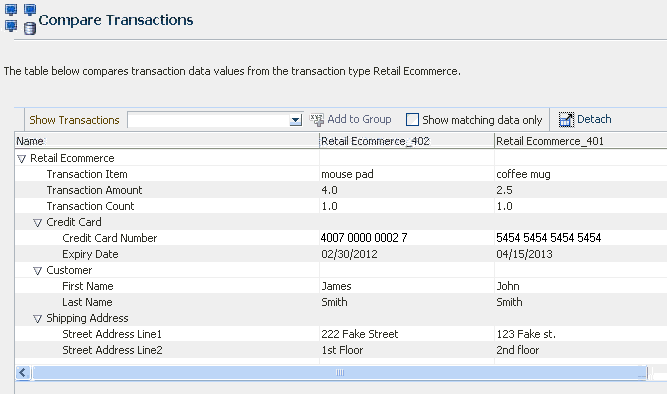
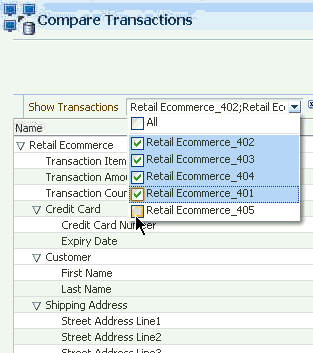
Henry clicks the Number of Transactions link in the Matching Items Found section of the Utility Panel to see the transactions filtered by Device ID. In the Filtered Transactions page, he views a listing of the transactions. Henry wants to see the transactions together in detail. Out of the available transactions, he applies the Show Transactions filter in the Filtered Transactions page and selects the first six to compare and clicks the Compare button on the search results toolbar to open the Compare Transactions tab. Ten transactions maximum can be compared by default. He compares and contrasts the transaction and entity data side by side. He clicks the Detach button to detach the results so there is more real estate. To highlight matching details, he select the Highlight Matching checkbox and clicks the Previous or Next arrow to highlight the matching data elements, stepping though the matches top to bottom. Highlighting allows Henry to visually compare and enables him find the data elements that are matching. From the data shown, Henry can see each transaction utilized a different card and each one purchased a single high value item.
Henry uses the Show Transactions filter again and selects the next six to compare. He wants to detect abnormal patterns in online buying behavior indicative of fraud. The same pattern exists. Henry determines the device should be watch listed.
From the Transaction Comparison screen Henry selects the device ID in the session data listing and uses the Add to Group feature to add it to a high risk group. Add to Group allows an investigator to add entities, transaction data, and session elements to a respective administration group to help with investigating an issue further, rebuilding predictive models, and evaluating rules. If such a group does not exist, he can create it.
Henry then selects all the transactions and adds them to a new case. The sessions in which the selected transactions occurred will be linked to the case. Linking sessions and transactions to cases enables investigators to formulate hypotheses on potential fraud activities of potential interest. The investigator can link any number of sessions as might be connected to an investigation. He enters notes on his findings then closes the case with a disposition of "confirmed fraud." A closed case is one which needs no further investigation since the issue has been resolved. Closed cases contain dispositions that describe the way in which the issue was resolved in the case.
Auto-Generated Case Investigation Flow
The investigator starts each investigation by searching for new Agent cases dynamically created as a result of a particular event. He performs a search for all cases with new status. The fraud investigator selects the first case. A session is already linked to the case so he drills in on the session for which the case was generated. He looks at the case and other data in the linked session. He views the data involved in an incident and locates related situations by using the complex data relationships captured by OAAM. When fraud is identified the investigator records findings, blacklists entities, and closes out cases with a disposition.
A security administrator configures an action to create Agent cases when specific rules trigger. (For information, see Chapter 16, "Managing Configurable Actions.") These auto-generated cases require a review of the transaction. The details pages contain the information needed by the investigator in order to accomplish this task. An example workflow is shown below for an auto-generated case.
John is a fraud investigator for the bank. John searches for new Agent cases dynamically created as a result of blocked access requests.
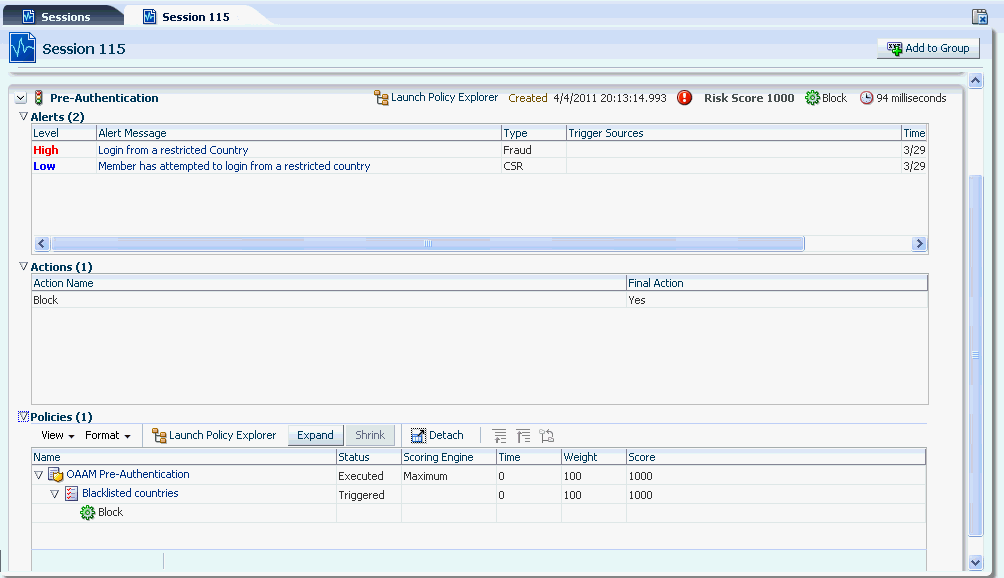
John opens one of the auto-generated cases in the listing to start working on it. Automatically the case status changes from New to Pending and the current case owner becomes John. Other investigators can now see that this case is actively being worked on (since the case has an owner, John, and the status is not new, but pending). When case <case_number> was automatically created the session which was blocked was linked to the case so all the session data is captured and ready for review. This includes a full set of the alerts triggered in the session. John sees a session in which five different alerts were triggered. John can easily read the alert messages to understand what was going on in this situation. He sees that the highest alert was generated because the access attempt was from an IP known to be an anonymizing proxy. The bank security policy restricts banking while utilizing an anonymizing proxy as they are often used by criminals to hide their true geographic location.
John clicks the IP address to drill in on the location to investigate further. He sees that the most severe alert is one that concerns an IP address (an anonymizing proxy). This opens the IP address details page in an adjacent user interface tab. John selects the users tab to see what user accounts have been utilized from this high risk IP address. He sees that there are four different bank users potentially affected by the activity originating from this location.
John clicks the sessions tab of the IP details page to list sessions from this IP address.
He selects them all and links them to case <case_number> that he is working on. This way he collects the data he has found along with notes as to why he did this. In this case all the sessions had been blocked but if there were sessions that had not been blocked then linking those sessions to the case for further follow up is extremely useful since without the data cross referencing ability of the details pages such a situation may have gone undetected.
Now all data from these linked sessions is captured in case <number>. John sees that the same device <device_number> was used in all these blocked access attempts.
John clicks device <device_number> to open the device details page. In the device details an investigator can also see data relationships and sessions for this device but can as well view the fingerprinting details of the device itself. For example, the browser locale used.
John opens the alerts tab to view the types of alerts and frequency of each generated from activity by involving this device. For example he can see the aggregate count for the anonymizer alert is four.
John follows up with phone calls to the four affected customer account holders to further confirm that they were not the ones attempting these blocked attempts. Feeling he has investigated this incident to the fullest and confirmed fraud John is ready to close the case and move on to the next incident. Before closing the case John exports the linked sessions to Excel.
John feels confident that this device has only been used for fraudulent access attempts so he determines it should be blacklisted. Directly from the details page John adds the device to the Restricted Devices group. This ensures it cannot be used to access online banking even if the other session data seems valid and no other rules trigger. This is very important as fraudsters often hit multiple times testing the security of an application to see how they can get around it. Device fingerprinting can be the one data point that stays the same across fraudulent attempts.
John closes the case as confirmed fraud with notes summarizing his findings. His manager or auditors can view a full log of case activity including actions taken, notes and individuals involved.
Since the case was marked as confirmed fraud the combinations of specific data found in the fraudulent access requests are automatically consumed by the risk evaluation engine to "teach" it what fraud looks like. This helps improve accuracy of future risk evaluations. Likewise, if John has found that the alerts he saw were not the result of fraud he would have closed the case and marked it as not fraud. This would also adjust future risk evaluations to reduce false positives.
Escalated Agent Cases Investigation Flow
An investigator starts the investigation by searching for all the cases with the Escalated status. He filters the results on the severity column so the highest severity cases are shown at the top. He opens the escalated case and views the logs for notes entered by the CSR and CSR Manager. He searches for sessions based on the user in the case. He views the data involved in an incident and locates related situations by using the complex data relationships captured by OAAM. When fraud is identified the investigator records findings, blacklists entities, and closes out cases with a disposition.
Matt is an investigator specializing in customer specific security issues. He searches for all cases with the Escalated case status.
Best practice is for investigators not to open cases that other investigators are working on. The first time an investigator accesses a case, the status changes to Pending automatically. This allows investigators to know if another investigator is already working on the case. Matt opens the escalated case. The status automatically changes from Escalated to Pending and the current owner becomes Matt. Best practice is to open the escalated case and view the logs for notes entered by the CSR and CSR Manager. He sees they escalated the CSR case to an Agent case because they suspected fraud activity. Because the case originated from a customer service case, it contains specific user information in the details. Matt looks at the case details and notes that jsmith is the user. He writes down the user ID because he needs it to search for sessions.
Matt navigates to the Linked Sessions tab and opens Linked Sessions to search for sessions by the user ID, jsmith. jsmith has sessions so Matt looks for the most recent session by filtering on the date and the timestamp. Matt wants the most recent one because it caused the escalation.
He reviews the alerts messages to understand what occurred. The highest alert was generated because the access attempt was from an IP known to be an anonymizing proxy. Matt clicks the IP address to drill in on location logins to investigate. He looks at other locations from the past to determine if a fraud potentially occurred. Since he has more questions, he calls the actual user, jsmith, and talks to him and takes notes. When Matt is satisfied his conclusion, he closes the case with a disposition.
5.3 OAAM Investigation Search and Analysis Features
The OAAM investigation interface allows investigators to create and manage Agent cases via five key pages and panels:
-
Agent Case search
-
Sessions search
-
Transactions search
-
Utility Panel
-
Case Notes
This section describes the key components an investigator uses to navigate through the investigation workflows, and highlights the tools required to conduct investigations and work with Agent cases.
The Investigation interface provides fraud investigators the ability to:
-
View runtime data of sessions and transactions
-
Compare transactions
-
Perform a drill-down of key objects, people, and entities
-
Manage Agent cases
-
Quickly add or remove datapoints to use in searches or compare
The tabs cannot be closed and only one Agent case can be worked on at a time in the console. Specific searches enable fraud investigators to make discoveries and uncover hidden truths from a collection of data and information to find suspicious transactions. Risk analysis can be performed on data elements added to groups.
5.3.1 Agent Case Search
From the Agent Cases Search an investigator can search for cases that he is interested in that meet his criteria. The Search Results table displays the list of cases he has access to with links to more details. From the page, he can perform the following tasks:
-
Quickly access a case based on his search criteria
-
Create a new case
-
View a list of cases
Note:
Agent cases from previous releases are still visible if the environment is upgraded.
For example, the investigator can search for new Agent cases dynamically created as a result of a particular event.
5.3.2 Search for Sessions and Transactions
From the Sessions and Transaction search pages, the Investigators can search for OAAM runtime data in a transaction-centric manner. He can search by default filters such as date range, alert type and level and he can add and configure additional filters that are required. Configured filters can be saved for reuse later.
For example, the investigator begins the investigation by searching for Retail Ecommerce transactions in the last 24 hours at a certain alert level.
Search Transactions provide these features:
-
Add to Group
-
Compare
-
Link to Case
-
Export to EXCEL
5.3.2.1 Sessions Search
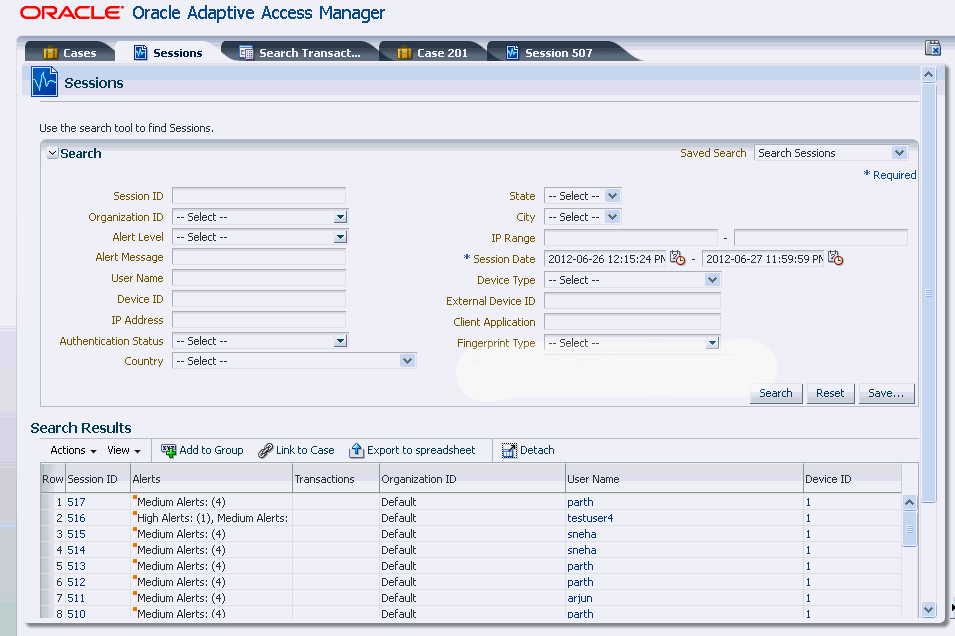
From the Sessions Search page, the investigator can search for potentially suspicious sessions based on various filter criteria. The investigator can then determine the sessions that need investigation based on authentication and entity information included in a session, such as:
-
User information
-
Device used by user to login
-
Location from where the user logged from
-
Fingerprint details of the device
-
Alerts triggered and generated
-
Transactions
Table 5-2 shows the Sessions Search page with criteria to search and filter by.
5.3.2.2 Transaction Search
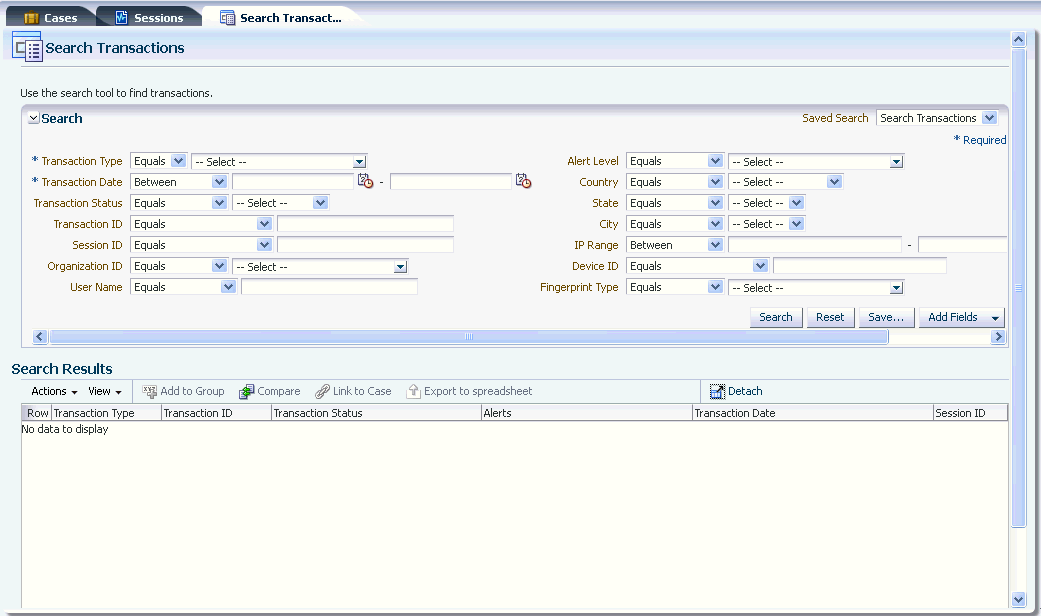
From the Transactions search page, the investigator can search and filter transactions for important details that can be examined to determine fraud in an investigation. The data and context of each transaction is available even for encrypted data fields. Using the transaction search, the investigator can locate relevant transactional data and the runtime data created based on the transaction definitions and view the relationship between entities. This deep visibility into user activity allows him to analyze for possible occurrences of fraud.
Note:
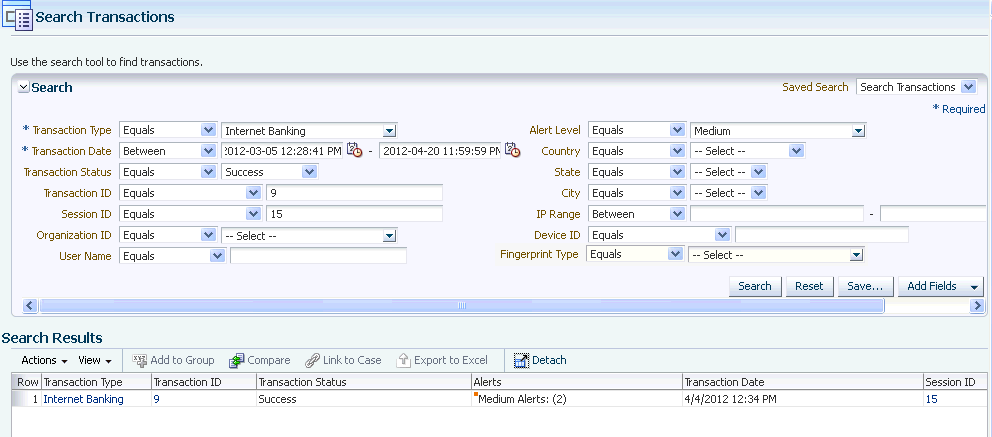
The Search Transactions is only available for investigators or investigation manger roles.Figure 5-3 shows the Search Transactions page.
5.3.3 Utility Panel
The investigation utility panel provides a persistent interface for common operations security analysts and compliance officers perform multiple times in the process of an investigation. It is specialized for performing searches and is readily accessible from every page in the OAAM workflows. It is used for quickly finding sessions and transactions that are related to one another based on common data.
The Utility Panel consists of the following:
-
Filter Items panel
The Filters panel is used to quickly search for related sessions and transactions.
-
Case Notes panel
An investigator can capture their findings at any time in the case notes using the utility panel.
If no case is open an investigator can easily search and open an existing case or create a new one via the panel.
Using the Utility Panel enables the investigator to:
-
Quickly locate sessions and transactions with data in common
-
Iterate on a query to expand and contract returns
-
Both view aggregate numbers of sessions and transactions found and drill in to expand investigation
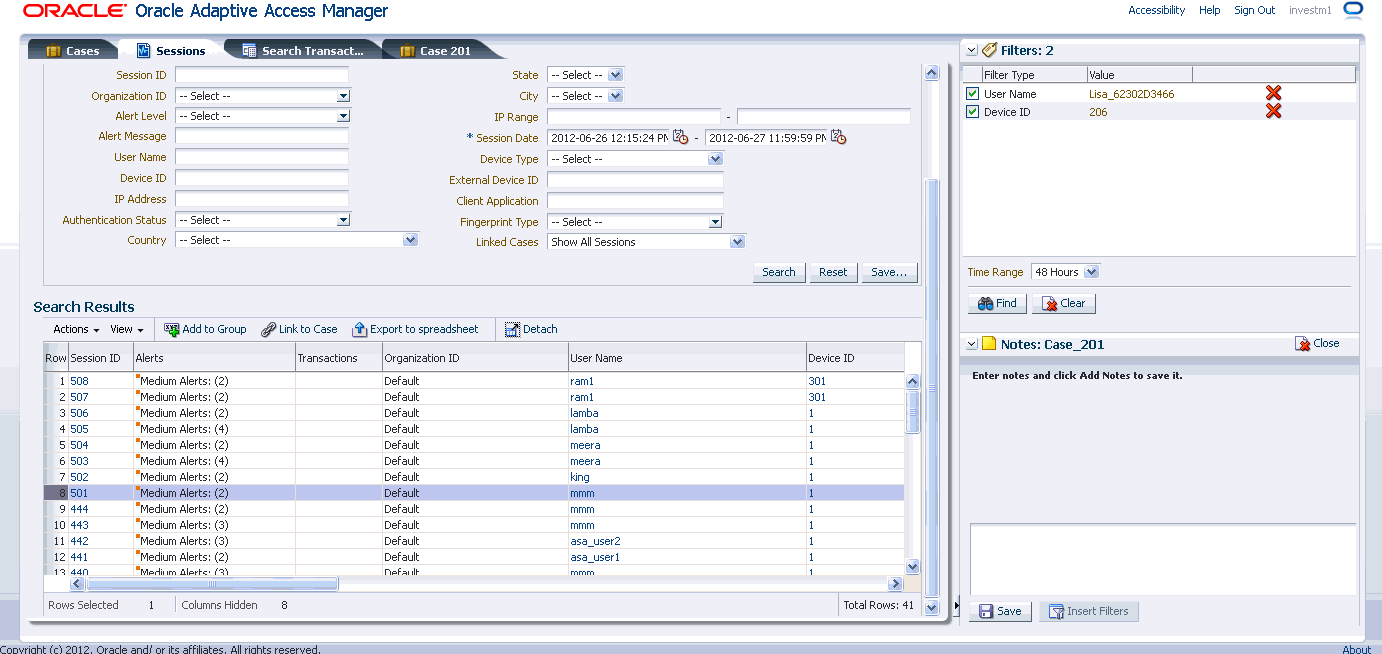
The Filters panel provides a quick way to perform targeted searches for sessions and transactions simultaneously. Investigators drag and drop individual data points from different pages, such as the case linked sessions tab, search sessions, search transaction and compare transactions. Alternatively, the right-click context menu may be used to add data points. Data points that may be used as filters include username, device ID, IP, city, state country, transaction data and practically any other runtime data.
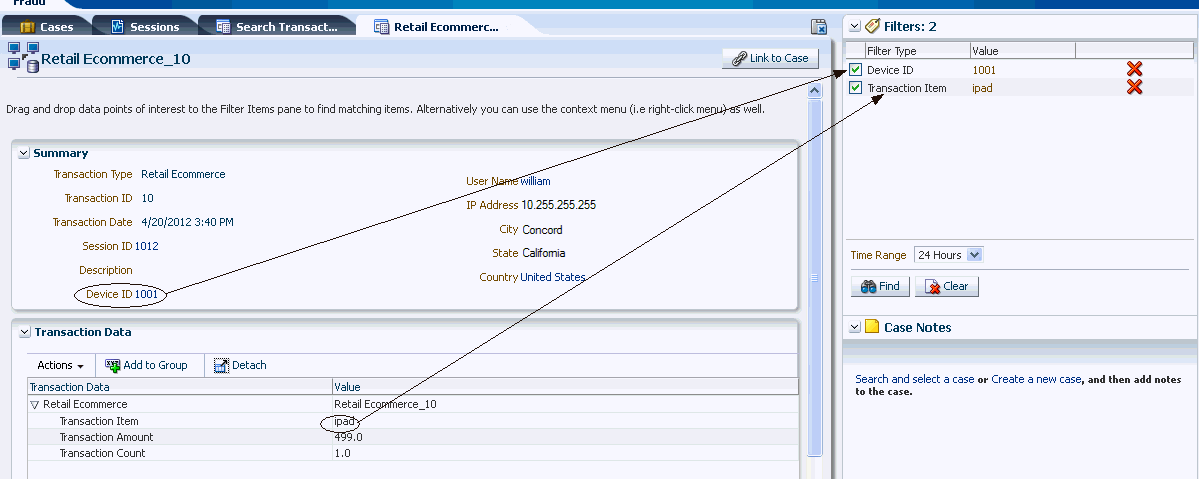
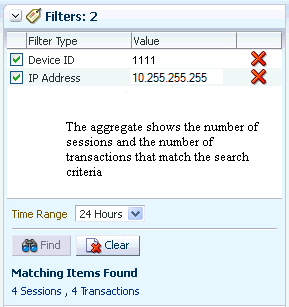
Filters may be easily added, disabled or removed. Query results are aggregate number sessions and transactions that match the active filters in the given time range. Clicking the aggregate numbers will display lists of the sessions or transactions.
The Case Notes area lists all the notes for the current case in a descending order based on time. By adding notes to a case, an investigator can document and share results of findings, hidden relationships or unusual behavior. He can add notes directly in the Case Notes panel by adding the notes and clicking Add Note as he continues with the investigation at anytime. As part of documenting his findings, the investigator can save the filter criteria so other investigators can see the related data points for the case. There is no limits to the number notes the investigator can add. If the investigator wants to add more notes, the panel has the feature for scrolling. Tracking the discovery process over time enables an investigator to share results with other fraud investigators and show others how he arrived at his conclusions.
Note:
OAAM allows two users to concurrently access a case. If the two users both add notes to the case, then OAAM saves both users' notes; however the second user's notes show as added by the first user.5.3.4 Compare Transactions
You can compare parameters of entities and transaction details so that connections can be discerned. Selecting multiple transaction search results of the same transaction definition type and clicking the Compare button on the search results toolbar opens the Compare Transactions tab. Ten transactions maximum can be compared by default.
You can compare and contrast the transaction and entity data side by side.
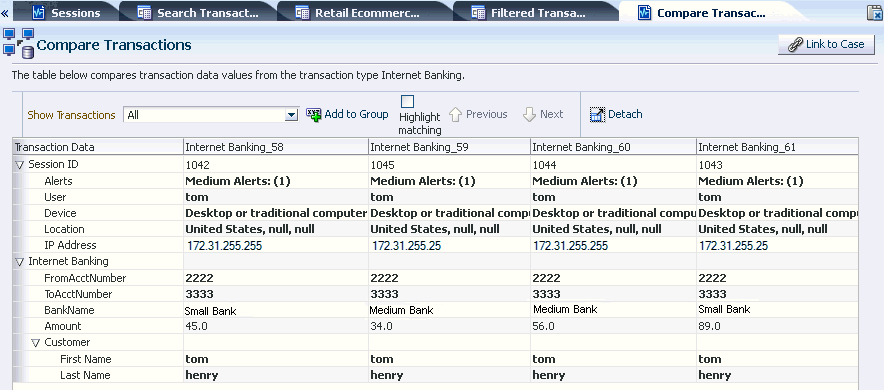
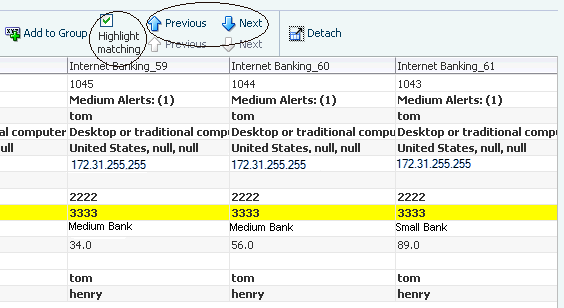
You can highlight and focus on matching details.
You can drag and drop additional data elements involved in suspect transactions, one by one to see if there is other activity which needs evaluation.
5.3.5 Add and Remove Fields
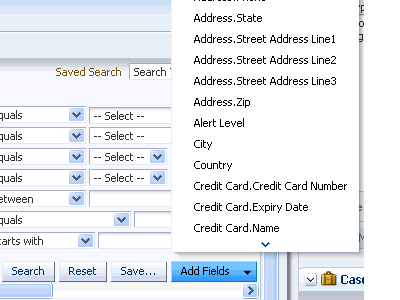
Investigators can search for OAAM runtime data in a transaction-centric manner using the Sessions and Transactions search pages. Common query filters such as date range, alert type and level are shown by default and you can add and configure additional filters that are required. Configured filters can be saved for reuse.
5.3.6 Add to Group
Add to Group allows an investigator to add entities, transaction data, and session elements to a respective administration group to help with investigating an issue further, rebuilding predictive models, and evaluating rules. For example, the investigator finds that a data element, the credit card, is suspect, and he wants to blacklist that credit card. The investigator can add the credit card used in the purchases to a high risk credit card group. If such a group does not exist, he can create it.
The Add to Group feature is available for all data types listed in:
-
Linked Sessions
-
Session Search
-
Session Details
-
Search Transactions
Data types associated with the sessions for the selected transactions can be added to a group
-
Transaction Details
Data types associated with the sessions for the selected transactions can be added to a group
-
Compare Transactions
Data types associated with the sessions for the selected transactions can be added to a group. Add to group in the Transaction Compare page is only applicable for the visible transactions. (For example, if the investigator selected four transactions for comparison from the search page, but filtered the view to display only two transactions, Add to Group adds only the elements from the two displayed transactions)
5.3.6.1 Use Case: Add Data to Group
Jeff is a fraud investigator looking into a case generated by OAAM. On further research, he finds out that the credit card used was a stolen credit card. The credit card could have been used in different transactions like shopping cart, retail ecommerce, and so on. The investigator wants to list all the different transactions that used this credit card in the last one week to estimate the damage. The card number is one of the entity fields. The investigator selects all or multiple transaction types and search on the entity fields.
| Filter | Choice |
|---|---|
| Transaction type | Select All the Transactions |
| Entity | Credit Card |
| Credit Card Number | xxxx xxxx xxxx 1234 |
Upon searching for transaction data, Jeff gets all the transactions where this Credit Card has been used. He can now select a transaction and click the button Add to Group. A dialog is displayed where Jeff can select transaction data like To Account Number to be added to a group. He selects the radio button associated with this field in the dialog and clicks Next.
The next page is where Jeff can add this data to a group. He can either create a new group or use existing group of the group that stores this type of data.
5.3.7 Link Sessions to an Agent Case
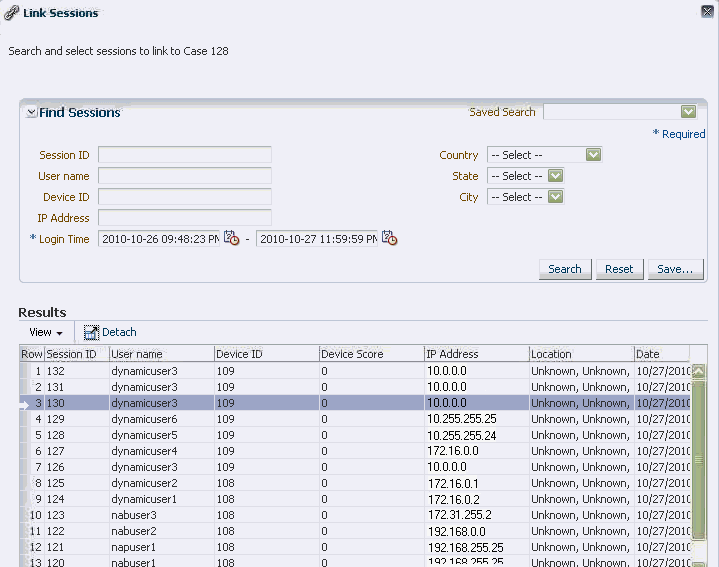
If the investigator feels that there is a connection between the sessions and activities involved, he can search for those sessions and link them to an existing case or a new case. He would add linking notes and descriptions.
Linking sessions to cases enables investigators to formulate hypotheses on potential fraud activities of potential interest. The investigator can link any number of sessions as might be connected to an investigation. For example, an investigator could identify three sessions which were found to contain similar fraud. The sessions could be selected from Sessions search and linked to an existing case. The session in which the selected transaction occurred will be linked to the case. If an Agent case is open in the console, the case ID is automatically selected as the case to link to. If an investigator wants to change the value or there is no case open the investigator can search existing cases and create a new case to link to.
He can also unlink one or more sessions already linked to this case if the sessions are no longer relevant to the case.
The investigator can link sessions and transactions to a case from the following pages:
-
Sessions Search
-
Sessions Details
-
Search Transactions
-
Transaction Details
-
Transactions Compare
To link sessions with transactions to a case from sessions and transactions pages and add notes about linking the sessions, proceed as follows.
-
Select transactions or sessions that are suspicious and click the Link to Case button in the search results toolbar.
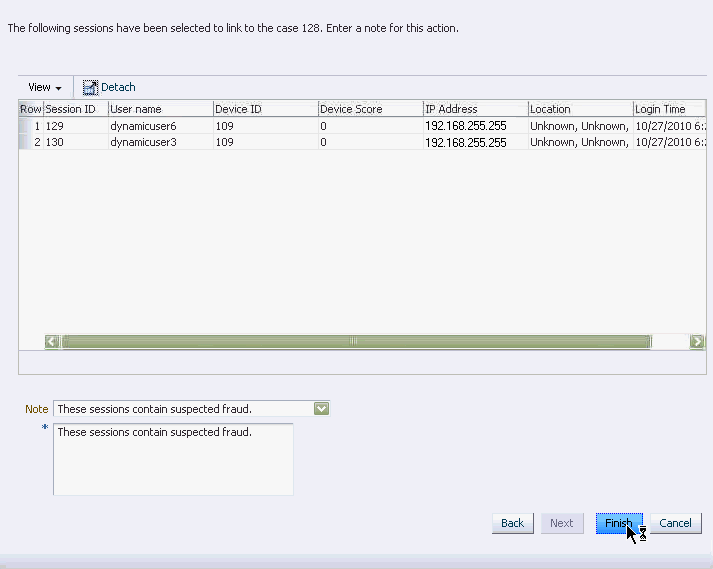
A dialog appears listing the sessions have been selected to link to the case. Instructions are given to enter a note for linking the session.
-
Enter notes by selecting the best description for the situation from the Canned Notes dropdown list and enter any additional comments in the notes box.
-
Click Link Sessions to link sessions to the case.
A dialog appears with a confirmation that the selected sessions are linked to the case successfully.
-
Click OK in the Link to Case confirmation dialog to confirm.
The Case Details page is opened.
5.3.8 Select Transaction to Link Sessions to a Case
Link sessions of the transaction to the Agent case.
-
Select the transactions and click the Link to Case button in the search results toolbar.
A dialog appears with the instructions to open a case to link sessions. Either search and select an existing case or create a new case, and then link the sessions.
If the investigator has no case open, then he has the option to either search for a case or create a new case. The Search and select option opens the cases search page. Create new case opens the create task flow with the popup
-
Click the Open existing case button to open an existing case.
-
In the Link to Case dialog, enter criteria and click Search.
-
Click Next.
Another Link to Case dialog appears listing sessions that have been selected to link to the case. Instructions are given to enter a note for this action.
-
Select the list item that best describes the situation. Enter any additional comments.
-
Click Link Sessions.
-
Click OK in the Link to Case confirmation dialog to confirm.
Usage example: Gary is a Fraud Investigator for Dollar Bank. Gary searches for a new case to work on. He does a search for all cases with new status and filters the view by cases with least time to overdue at the top. Gary selects the first case, looks at the alerts and other data in the linked session. He then searches to find other sessions from North Korea. One other session is returned when he searches for the last six months. Gary links this second session to the case so relationships based on data from both of the sessions can be used to investigate. Gary notices that the two linked sessions were from the same device. Gary continues the investigation by looking into other sessions from this device in the past year. He finds there is another session from this device that says it was from China. He links that session as well. Each of the three sessions used a different IP address. Next Gary individually looks for sessions from each IP. Two of the IPs was only used in those sessions. The third IP from China had 178 sessions in the last three months. He wants to see the users potentially affected by this situation so he opens the IP details screen and views the users tab. A listing of all the users with details for each is shown. Gary looks into the identity management product to investigate each user to see if any have contact information in China. None of them do, all are Americans living in the continental US. Gary exports the list of user to XLS and contacts the customers who accounts were being used to ask a few questions. He finds that none of them had been in North Korea or China so he enters the conversations in the case notes. He asks them to change their passwords and resets their challenge questions. He also adds them to a victim watch list group and the device to a high risk watch list. Gary then closes the case with a confirmed fraud disposition.
5.3.9 View High Alerts in Sessions and Transactions
When performing an investigation in the alert-centric investigation workflow, begin by searching for transactions with high severity alerts. View the full set of the alerts generated in the session and read the alert messages to understand what occurred in this situation. View why the alert was generated and drill in on data points to start the investigation.
Note:
Operators for the search filter are provided in the operator drop-down list. The operator for the search filter allows the investigator to refine the results of the search.For example, Transaction Type Equals or Does not Equal transaction_type_value.
To search for transactions with high severity alerts, proceed as follows:
-
In the Agent Cases page, click the Search Transaction tab to open the Transaction search page.
-
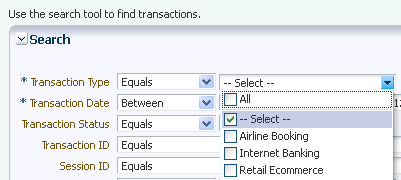
Select a transaction type from the Transaction Type field and an operator for the search filter from the operator drop-down list.
To search for transactions, select the transaction type to filter certain transactions by specific types. In the Transaction Name field, select the transaction type. For example, "Internet Banking," "Retail Ecommerce," and so on.
-
Enter start and end dates in the Transaction Date fields to search for transactions. The dates are mandatory. The date is set to the last 24 hours by default.
An error message is displayed if special characters are entered. Also, the To Date cannot be greater than the From Date.
Table 5-3 describes the date and time field operators.
Table 5-3 Date and Time Field Operators
Operator Description Does not Equal
Specifies that only transactions that do not occur on the specified date are matched.
Before
Specifies that only transactions before the specified date are matched.
After
Specifies that only transactions after the specified date are matched.
On or after
Specifies that only transactions on or after the specified date are matched.
Between
Specifies that only transactions that occur between the specified dates are matched.
-
Select High as the Alert Level and click Search.
In the results table of Transaction search page, transactions with High severity alerts are listed.
-
Click the Transaction Date column header to filter results by ascending order. The transaction at the top of the list is the oldest.
-
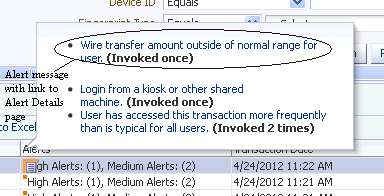
In the Results table, click the orange square next to the high alert in the Alert column to display the total count of high alerts and alert messages in a popup.
-
Click the Alert message link to open the Alert detail page.
-
Using the details pages, view information on the generation of the alert, the message, alert level, message type, and the alert's relationship to other data types such as user, device, location, sessions, browser, operating system, locales, and others.
Table 5-4 lists the detail pages and the type of information provided by each page.
Alert Details Tabs Description Summary
View general information about the alert and the alert template with the current details (level/type)
View alert groups with which an alert is associated
Users
View users that have a session in which this alert was triggered.
This report enables the investigator to see which users and how many times the alert was generated for each user during login process.
Devices
View devices that have been in a session in which this alert was triggered.
This report enables the investigator to see which devices and how many times the alert was generated for each device during login process.
Locations
View locations that have been in a session in which this alert was triggered.
This report enables the investigator to see which locations and how many times the alert was generated for each location during login process.
Sessions
View sessions in which this alert was triggered.
Fingerprint Data
View fingerprints created in the login process during which the alert was generated.
5.3.10 Search for Suspect Transactions to Review
If the investigator has further details about the suspect transactions he wants to review, such as dollar amount, an entity the transaction is related to, transaction ID number, session ID number, or other search criteria, he can narrow his search results using the Transaction search page.
To search for transactions, proceed as follows:
-
In Agent Cases page, click the Search Transactions tab.
Table 5-5 lists the transaction filters to search and filter transactions.
Table 5-5 Search Transactions Filters
Filter Description Transaction Type
The transaction type. For example, Internet Banking, Retail Ecommerce, and so on. The transaction name field is a mandatory field to which the search would be specific. If the type of transaction are selected, corresponding transaction data and entity data fields that can be selected from to add to the search are populated in OAAM Admin. You can perform a multi-select of transaction name attribute.
Transaction Date
The transaction date is the time that the transaction was submitted.
Transaction Status
The transaction status is the current state of a transaction. The values are: success, failure or pending.
Transaction ID
Transaction ID is a unique identifier created each time a customer submits a transaction.
Session ID
The session ID is the identifier of the authenticated session in which the customer logged in before performing the transaction.
Organization ID
The Organization ID is a unique identifier for the organization you belong in. Each user belongs to only one Organization ID. It identifies what tenant applications a user utilizes and scopes which OAAM policies runs for them.
User Name
The user name is the name of entered for login authentication.
Alert Level
Severity of the alert whether high, medium, low.
Country
Country ID
State
State ID. The State list is dynamically populated with respect to what has been selected for Country. For example, if United States is selected, whatever states are available for that country are shown under States.
City
City ID. The City list is dynamically populated with respect to what has been selected for in Country and State.
IP Range
Range of IP addresses
Device ID
Device identification
Entity Data
Entity data are attributes related to entities, which are mapped to the particular transaction type that has been selected for the search. For example, add the search field, BankName, if Internet Banking was selected as the Transaction Name. Investigators can perform searches using corresponding values of these attributes.
Transaction Data
Transactional data includes specific attributes related to the transaction type. For example ToAccountNumber or FromAccountNumber in a money transfer.
Note:
Search by encrypted fields is not supported. Entity fields and transaction fields, which are encrypted, cannot be used as the search transaction filters and are not available as dropdowns. -
Select a transaction type from the Transaction Type field and an operator for the search filter from the operator drop-down list.
To search for transactions, select the transaction type to filter certain transactions by specific types. In the Transaction Name field, select the transaction type. For example, "Internet Banking," "Retail Ecommerce," and so on.

-
Enter start and end dates in the Transaction Date fields to search for transactions. The dates are mandatory. The date is set to the last 24 hours by default.
An error message is displayed if special characters are entered. Also, the To Date cannot be greater than the From Date.
Table 5-3 describes the date and time field operators.
-
In the search field, enter the criteria and use the search operator to refine the search results and then click Search.
An error message is displayed if special characters are entered.
-
To add a filter, click the Add Fields down arrow button.

-
From the list of parameters, choose the additional filter. For example, "Address.Zip."
-
In the search field, enter the criteria.
-
In the search field, enter the criteria, use the search operator to refine the query in the text field, and click Search.
The transactions that match the search criteria appear in the Search Results table. By default, the search results are sorted by Session ID. Sort by transaction name, transaction status and date.
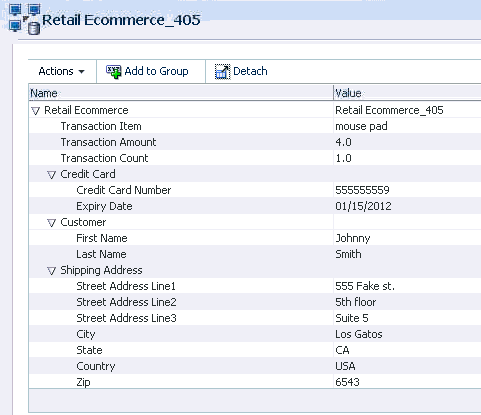
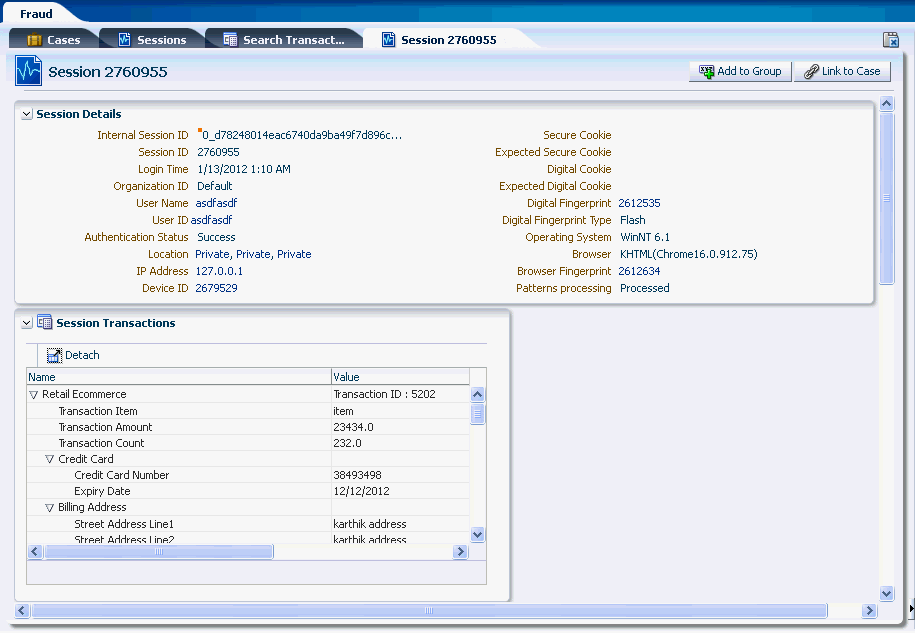
View a transaction in detail by clicking the transaction name link. The Transaction Details page displays the run time values of the transaction and entity data along with the session information.
-
Export the search results into a spreadsheet by selecting the rows and clicking Export. The limit is 25 rows.
-
Add the transaction and entity data and authentication entities into groups, which can be further used in rules evaluation using the Add to Group option. For example, blacklisted accounts, suspicious merchants, and so on.
5.3.11 View Transaction and Entity Data
After locating the transaction, review the transaction and entity data in detail to find relevant entities. Through review decide whether or not a data element is relevant. The Transaction Details page displays the run time values of the transaction and entity data along with the session information.
-
In the search results table in the Search Transaction page, click the transaction link.
-
View general information about the transaction in the Summary section.
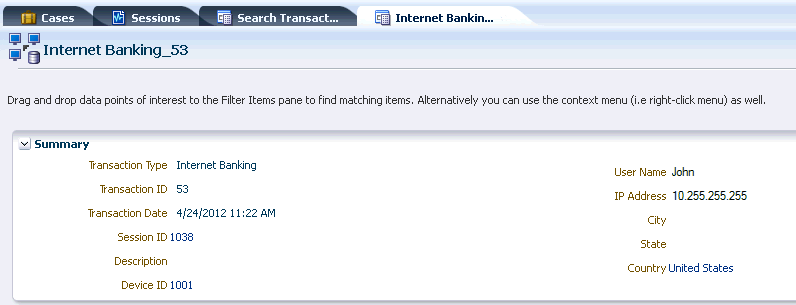
Table 5-6 provides details about the summary information that appears in the Summary panel.
Table 5-6 Summary Information in Transactions
Details Description Transaction Type
The transaction type. For example, Internet Banking, Retail Ecommerce, and so on. The transaction name field is a mandatory field to which the search would be specific. When the type of transaction is selected, corresponding transaction data and entity data fields that can be selected from to add to the search are populated in OAAM Admin. You can perform a multi-select of transaction name attribute.
Transaction ID
Transaction ID is a unique identifier created each time a customer submits a transaction.
Transaction Date
The day and time the transaction occurred
Session ID
Unique identifier of session in which the login or transactions occurred. The link takes the investigator to the Session Details page.
Description
Notes about the transaction.
Device ID
Uniquely identifies each device and is auto-generated by the application.
User Name
Login name given by user to login.
IP Address
Address mapped to a location usually, although some addresses are unknown or private
City
City ID. The City list is dynamically populated with respect to what has been selected for in Country and State.
State
State ID. The State list is dynamically populated with respect to what has been selected for Country. For example, if United States is selected, whatever states are available for that country are shown under States.
Country
Country ID
-
View transactional data, entity instances, and related instances in the Transaction Data panel.
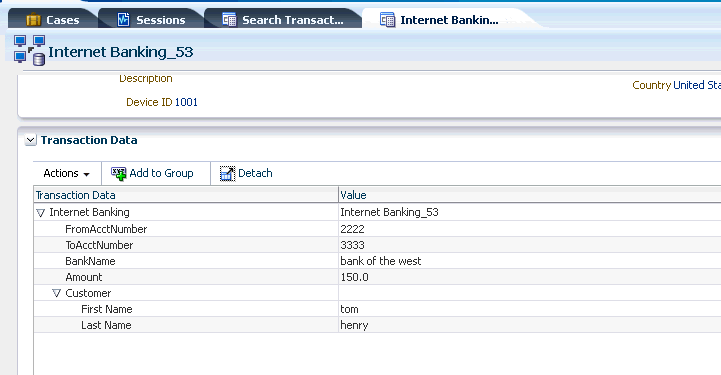
Table 5-7 provides details about the transaction data that appears in the Transaction Data panel.
Table 5-7 Transactional Data in Transaction Details
Transaction Data Description Transaction Type
The transaction type. For example, Internet Banking, Retail Ecommerce, and so on. The transaction name field is a mandatory field to which the search would be specific. When you select the type of transaction, corresponding transaction data and entity data fields that you can select from to add to the search are populated in OAAM Admin. You can perform a multi-select of transaction name attribute.
Entities
Entities involved in the transaction.
Values
Data entered by the user that is part of the transaction.
-
View session data to take a closer look at exactly what occurred in the session.
Session data shown in the panel include:
-
Alerts and actions
-
Final action
-
Alerts table displays additional information like alert level, alert message, trigger date, and so on.
-
The rules and policy names are linked under trigger sources and can open the corresponding detail pages.
View alert activity in the Sessions Data panel. The Alerts list displays the alerts that were launched during the session. In the Alerts History list, view the alert level of the launched alerts, any messages associated with the alerts, the alert type, and the time and date that the alert rules were triggered.
Alert Information Description Alert Level
Severity of the alert whether high, medium, low.
Alert Message
Text message configured in the alert.
Alert Type
Type of the alert whether fraud, investigation, information, or other reason
Trigger Sources
Rules that generated the particular alert
Timestamp
The time the alert was generated.
-
5.3.12 Identify Related Sessions and Transaction
The Utility Panel enables fraud investigators to make discoveries and uncover hidden truths from a collection of data and information. A transaction may look suspect, so the investigator may want to find other transactions with the same Device ID, user name, IP address, city, state, or country shown in Transaction Details. Filter the transactions so that you can identify sessions and transactions that are connected based on the datapoints.You can perform searches using any valid data point at any time.
To filter transactions, proceed as follows:
-
In the Sessions, Session Details, Linked Sessions, Search Transactions, Transaction Details, and Compare Transaction pages, drag an individual datapoint you want to use as a filter on other transactions, and then drop the datapoint onto the Filtered Items panel of the Utility Panel. Alternatively, use the context menu to select any data element for matching.
The selected datapoint is displayed in the Filtered Items panel.
-
Continue dragging and dropping datapoints into the Filtered Items panel to refine your search.

-
If you want to delete the datapoint from the search, click the red x icon to the right of the datapoint.
-
If you want to exclude a datapoint temporarily from the search, deselect the checkbox that precedes the datapoint label.
-
In the Time Range, you can select:
-
Any: Do not restrict the time range
-
24 hours: Filter the transactions and sessions that have occurred within the past 24 hours
-
48 hours: Filter the transactions and sessions that have occurred within the past 48 hours
-
7 days: Filter the transactions and sessions that have occurred within the past 7 days
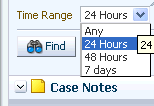
The default time range used for the search is the last 24 hours.
-
-
Click Find to search for matches.
OAAM searches for matching sessions and transactions based on the current datapoints in the Filtered Items panel. The result count for sessions and transactions are shown at the bottom of the Filtered Items panel.
This aggregate shows the number of sessions and the number of transactions that match the search criteria. For example, the sessions and transactions use the same credit card and device.
Note:
The datapoints listed in the Utility Panel are not persisted across sessions. It is cleared when a case is closed. -
Refine the search to include other datapoint by dragging the datapoint to the Utility panel.
-
Click Find.
The aggregate now shows the number of sessions and the number of transactions that use the data elements. For example, the sessions and transactions use the same credit card and device.
-
Click the count, to open the corresponding filter page. The filter page shows the matching transactions or sessions in the search results table.
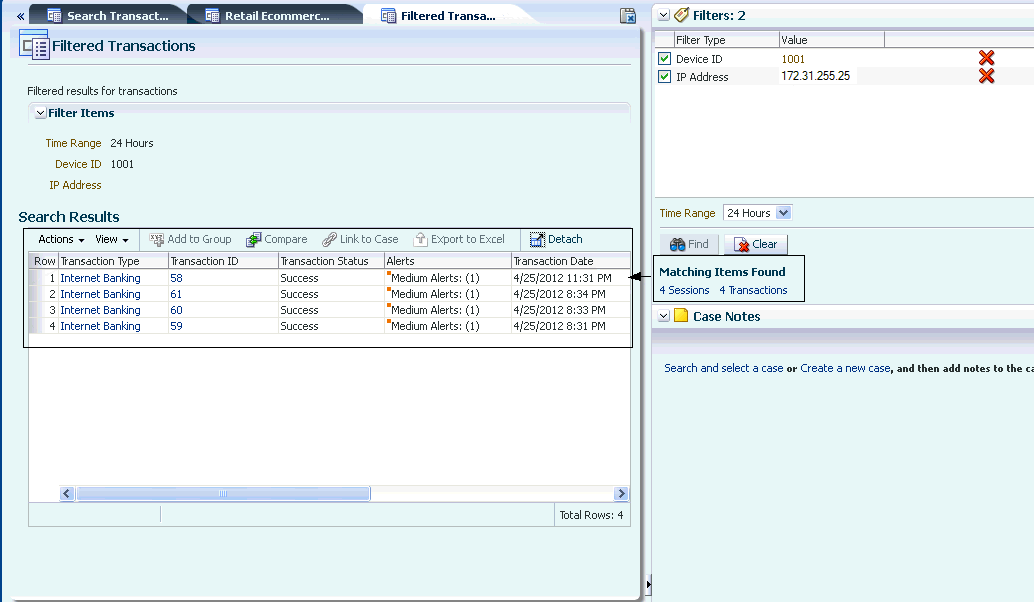
5.3.13 View Transactions from the Filtered Transaction Page
If the investigator wants to see the specific transactions, he navigates to the Filtered Transactions page.
To open filtered transactions page, proceed as follows:
-
Click the Number of Transactions link in the Utility Panel to see the transactions filtered by the datapoints you have specified earlier.
Since the page that opens is only a Filtered Transactions page rather than the Transaction Search page, you can have multiple ones opened.

-
From the filter page, view the alerts.
Transaction Information Description Transaction Type
The type of transaction that was performed. Links to Transaction Details page.
Transaction ID
Transaction ID is a unique identifier created each time a customer submits a transaction. Links to Transaction Details page
Transaction Status
Status of the transaction.
Alerts
The alerts that were triggered.
Transaction Date
The day and time the transaction occurred
Session ID
Unique identifier of session in which the login or transactions occurred. The link takes the investigator to the Session Details page.
-
Select Transactions to compare.
5.3.14 Compare Transactions
Compare parameters of transactions and customer details so that connections can be discerned. Selecting multiple transaction search results of the same transaction definition type and clicking the Compare button on the search results toolbar opens the Compare Transactions tab. Ten transactions maximum can be compared by default.
You can filter and view only the common data elements between the selected transactions. By default, all the data elements for the selected transactions will be displayed in the comparison page including the non-common data elements.
To select two or more transactions of the same type and perform a comparison on the values, proceed as follows:
-
In the Utility panel, click the number for matching transactions in the Related Items Found section to see filtered data elements.
-
In the Search Results table of the Filtered Transaction page, select two or more transaction search rows of the same transaction type, and click Compare.
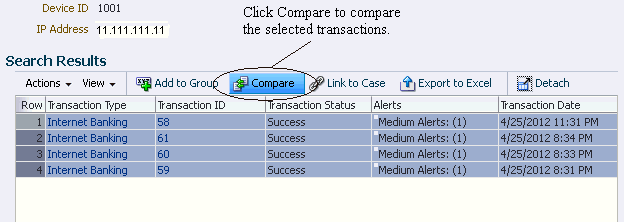
The Compare option is disabled until at least two transactions are selected from the search results.
Comparison is only available for the same type of transactions. Ten transactions maximum can be compared by default. Out of the ten transactions that are available by default, the investigator can choose to view a few transactions by applying a filter.
-
On the Compare Transaction tab, compare and contrast the transaction and entity data side by side.

-
Out of the available transactions, choose to view a few transactions by applying a filter.
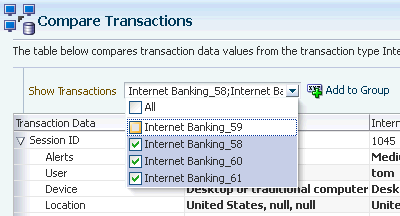
-
To highlight matching details, select the Highlight Matching and click the Previous or Next arrow to walk through the details.

-
Drag and drop additional data elements involved in suspect transactions, one by one, to the Filtered Items panel to see if there is other activity which needs evaluation.
You can also compare transaction from the Transaction Search page.
-
Click the Transactions tab.
-
In the Transaction type field choose the Transaction Type and operator of equals.
-
In Transaction ID field, enter the number of the unique identifier created when the customer submitted the transaction.
-
Add another field.
-
In the Transaction ID field, enter the other transaction ID.
-
Click Search.
-
Select transactions from the Transaction search results and click Compare.
The Compare Transactions page appears with a results table that compares transaction data values from the transaction type Retail Ecommerce.
-
To highlight the matching data, select the Highlight Matching box. Then click the down or up arrow key to highlight one match at a time.
-
Compare the transactions.
5.3.14.1 Use Case: Comparing Transaction Data
Jeff is a fraud investigator looking into a case generated by OAAM.
The user "John" appears to be fraudulent and has performed several wire transfers to different account numbers in the bank. The investigator wants to list all the account numbers and the amount transferred each time in the result. The investigator selects a specific transaction type to search on the entity fields.
| Filter | Entity Field |
|---|---|
| Transaction name | Wire Transfer |
| Entity | Customer |
| Entity First name | John |
| Result | |
| Transaction Data | Amount |
| Entity | Account |
| Transaction field | To Account number |
Jeff selects two transaction search rows of the same the type Wire Transfer and clicks the Compare button. Jeff is taken to the Compare Transactions tab which compares transaction and entity data.
5.3.15 Add the Data Element Utilized in the Fraudulent Transactions to a Group
To add a data element to a group from the Transaction Compare Panel, proceed as follows:
-
Select a row to add entities, transaction data, and session elements to a specific data group and click Add to Group. For example, if an investigator selected transaction1, transaction2, and transaction3 and they have account numbers 123, 234, and 345. All three account numbers are added to the suspicious account group.
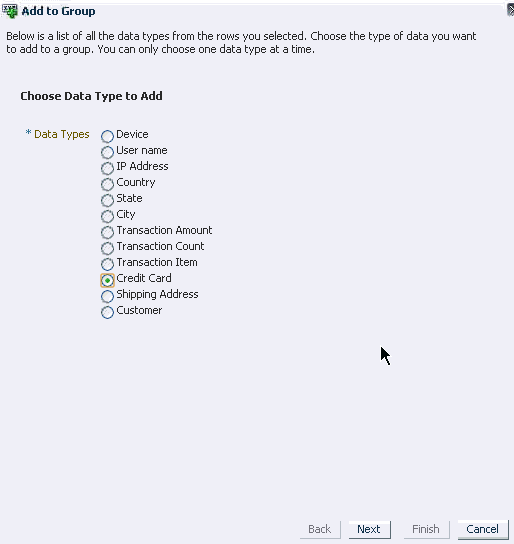
Add to Group dialog appears with instructions, "Below is a list of all the data types from the rows you selected. Choose the type of data you want to add to a group. You can only choose one data type at a time."
-
Choose the data type and click Next to open another dialog which will allow you to select a group to add your data element to or create a group first and then add your data element.
5.3.15.1 Search from existing group
To select an existing group and add the entity to the selected group, proceed as follows:
-
Choose Search from existing group.
Based on the data type selected, the corresponding available groups that the entity can belong to are shown.
-
For example, if an account number is selected, numeric group types are listed.
-
For example, if an account holder name is selected, string group types are listed.
-
-
Enter the group name in the Group Name field and click Search. You could also select a group from the list without performing a search.
When you click Search, existing groups and descriptions are listed in the search results.
-
Select the group from the list to which to add the entity.
The Preview shows the group name and members associated with group. If no members are associated, this message is shown: "No members associated with the group."
Its existing members can be viewed in a preview area below the available groups table. The existing members list is relevant so that the investigator can determine whether any of the selected entities is a member of the selected group and decide whether to select or deselect it for adding.
Entity cannot be added to the same Group multiple times.
-
Click Next.
Data elements to be added to the group are listed in the next screen. Group selected and data elements to add are shown on this page.
-
To go back and change the data element, click the Back button. To proceed with adding these data elements, click the Finish button.
If you clicked Finish, the Add to Group dialog appears with the message, "Successfully added device to selected groups."
-
Click OK to dismiss the dialog.
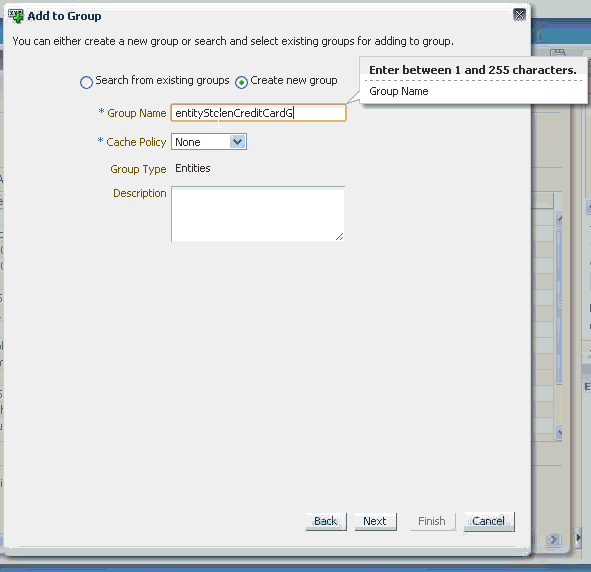
5.3.15.2 Create New Group to Add Data Element to
Create New Group enables you to create a new group and add the entity to this newly created group.
-
Select Create New Group to begin the process for creating a new group to add the entity to.
-
Enter the name of the group in the Group Name field. You can enter up to 256 ASCII characters or up to 85 UTF-8 characters.
-
Select a cache policy from the Cache Policy field. Choices are None or Full Cache.
-
Enter a description in the Description box and click Next. You can enter up to 256 ASCII characters or up to 85 UTF-8 characters.
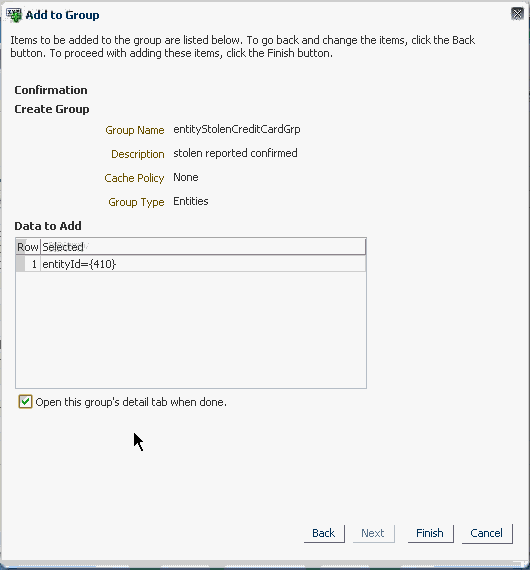
-
Data elements to be added to the group are listed in the Add to Group dialog. To go back and change the data elements, click the Back button. To proceed with adding the data elements, click the Finish button.
When the Open this group's detail tab when done checkbox is selected, the group details page opens after you click Finish.
If the Group with the same name already exists an error occurs, otherwise the Group is created in the database and the entity added to this new group within the same transaction.
-
Click the Entities tab to ensure the entity has been added to the newly created group.
Note:
The group definitions but not their members are available for import and export and in the snapshot. You must explicitly export and import the members as needed.5.3.16 Close a Case with a Disposition
After an investigator finishes investigating a situation and comes up with a conclusion ("he put the pieces together"), he closes the case with a disposition. A closed case is one which needs no further investigation since the issue has been resolved. Closed cases contain dispositions that describe the way in which the issue was resolved in the case. Cases only have dispositions when they are closed.
-
Open the Case Details page.
You have the choice to Add Notes, Change Status, or Change Severity.
-
Click Change Status. The Changed Status dialog appears. Select a status for this case and enter notes. Then, click Submit
The choices are Status, Canned Notes, and Notes. The statuses to choose from are New, Pending, and Closed.
-
In the Status list, select Closed.
A Disposition field appears in the dialog.
-
Select a disposition from the following choices:
-
Confirmed Fraud
-
Duplicate
-
False Negative
-
False Positive
-
Issue Pending
-
Issue Resolved
-
Not Fraud
-
-
Select Canned Notes which best describes the situation.
-
Enter some final notes summarizing findings. Manager or auditors can view these notes on the case activity including actions taken and individuals involved.
-
Click Submit.
A confirmation dialog is displayed.
-
Click OK to dismiss the confirmation dialog.
5.3.17 Search for Auto-Generated Agent Cases with Current Status "New" and Open Case
A case is the container for storing the details an investigator gathers when he is investigating. Once a case is created, the investigator searches for it to view its details.
To search for auto-generated cases to work on, proceed as follows:
-
From the Cases Search page, filter all Agent cases by the most recent hours and select New in the Case Status field. Then click Search.
For example, to search for auto-generated cases created in the last two hours, the investigator would make the following selections:

-
The results table contains a Case ID column that can be sorted in ascending or descending order by clicking the Case ID column header. The up/down arrow next to it indicates the current order of the data. Click the Case ID column header to filter results by ascending order. The lowest Case ID number is the oldest.
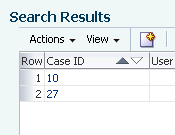
-
Click the Case ID to open the case.
When an investigator accesses a case with the New status to start working on it, the status automatically changes to Pending and the Current Owner becomes the investigator.
The Case Details page provides information about the current owner and the case status.
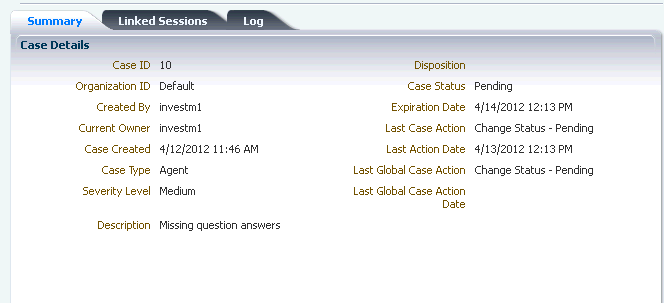
Other investigators can now see that the case is actively being worked on since the case has an owner and the status is not New but Pending. Best practice is for investigators not to open cases that other investigators are working on.
5.3.18 View Linked Sessions
When the case was automatically created the sessions were linked to the case so all the session data is captured and ready for review. This includes a full set of the alerts triggered in the session. The investigator can read the alert messages to understand what was going on in this situation. He can look at the highest alert and see how it was generated. For example, the bank security policy might restrict banking while utilizing an anonymizing proxy as they are often used by criminals to hide their true geographic location, and an alert was triggered when an access attempt was made from an IP known to be an anonymizing proxy.
-
In the Case Details page, click the Linked Sessions tab to view the alerts and details of the sessions.
The Linked Sessions tab enables him to view all of the sessions that are linked for the case he is investigating. The tab also displays information such as the date at which it was linked, alerts, transactions, and any notes provided at the time of linking. Table 5-10 summarizes the columns available in the Search results.
Table 5-10 Link Sessions Columns
Field Description Linked On
The date the sessions were associated with the case by an investigator.
Session ID
Unique identifier of sessions that have been associated to the Agent case by a fraud investigator.
User Name
Unique identifier of the individual who submitted the account problem.
Device ID
Unique identifier of the device that was used for the transactions.
Device Score
Level of risk that has been calculated for specific device that has been used in the session by the user.
IP Address
Unique network identifier issued by an Internet Service Provider to a user's device every time he is logged on to the Internet. IP address of the device from which the login was made
Location
Geographic location of the device from which the login was made.
Transactions
Transactions that took place in the session.
Alerts
Alerts that are triggered and generated for a user during the transaction process.
Session Date
The date and time that the session occurred
Note
Notes concerning why the session was linked.
-
A small orange square is shown in the upper left-hand corner of the alerts in the Alert column. When the cursor is placed over the square, a larger triangle with a note icon is displayed. Click the triangle to view the total count of alerts of a severity level and alert messages in a popup.
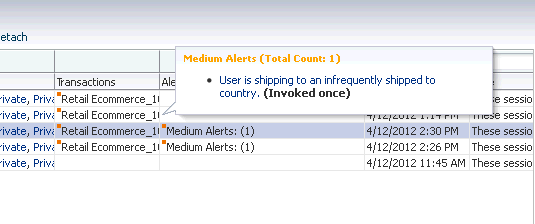
A full set of the alerts triggered in the session can be viewed and alert messages can be read to understand what occurred in this situation. View why the alert was generated and continue investigating, looking at each detail.
-
Click the alert message link in the alert popup to open the Alert Details page for more details.
-
Using the details pages, view information on the generation of the alert, the message, alert level, message type, and the alert's relationship to other data types such as user, device, location, sessions, browser, operating system, locales, and others.
Table 5-11 lists the detail pages and the type of information provided by each page.
-
Alert Details Tabs Description Summary
View general information about the alert and the alert template with the current details (level/type)
View alert groups with which an alert is associated
Users
View users that have a session in which this alert was triggered.
This report enables the investigator to see which users and how many times the alert was generated for each user during login process.
Devices
View devices that have been in a session in which this alert was triggered.
This report enables the investigator to see which devices and how many times the alert was generated for each device during login process.
Locations
View locations that have been in a session in which this alert was triggered.
This report enables the investigator to see which locations and how many times the alert was generated for each location during login process.
Sessions
View sessions in which this alert was triggered.
Fingerprint Data
View fingerprints created in the login process during which the alert was generated.
-
-
To view transaction and session details: In the Transactions column, click the orange square next to the transaction in the session to display the transactions that occurred during the session in a popup. Then click the Transaction to view more data.
A summary section and a transaction data section are shown.
Table 5-12 Summary and Transaction Data
Details Description Transaction Type
Type of transaction. For example, Internet Banking, Retail Ecommerce, and so on.
Transaction ID
Transaction ID is a unique identifier created each time a customer submits a transaction.
Transaction Date
The day and time the transaction occurred
Session ID
Unique identifier of session in which the login or transactions occurred. The link takes the investigator to the Session Details page.
Description
An additional description of the transaction that occurred.
Device ID
Unique identifier of the device that was used for the transactions. The link takes the investigator to the Device Details page.
User Name
Login name given by user to login. Links to User Details page.
IP Address
Address mapped to the location of the transaction.
City
City where the transaction took place.
State
State where the transaction took place.
Country
Country where the transaction took place.
Transaction Data
Transaction type, entities, and runtime data.
-
Investigate further investigate by picking data points from the sessions to drill in on details.
5.3.19 View Relevant Transaction's Details Such Transactional and Summary Data
In the Search Transactions page, click a transaction in the Transaction Type column in the Search results table to view the transaction in greater details through the Transaction Details page.
The following options are also available on this page:
-
Add to Group
-
Link to Case
5.3.19.1 View Summary Information
The top section displays the general information about the transaction along with the session ID.
Table 5-13 Summary Information in Transactions
| Details | Description |
|---|---|
|
Transaction Type |
The type of transaction. For example, Internet Banking, Retail Ecommerce, and so on. |
|
Transaction ID |
Transaction ID is a unique identifier created each time a customer submits a transaction. |
|
Transaction Date |
The day and time the transaction occurred |
|
Session ID |
Unique identifier which identifies a user's online transaction session. Link to Session Details page. |
|
Description |
Note link |
|
Device ID |
Uniquely identifies each device and is auto-generated by the application. Links to Device Details page. |
|
User Name |
Login name given by user to login. Links to User Details page. |
|
IP Address |
Address mapped to a location usually, although some addresses are unknown or private. Links to IP Details page. |
|
City |
City ID. The City list is dynamically populated with respect to what has been selected for in Country and State. Links to City Details page. |
|
State |
State ID. The State list is dynamically populated with respect to what has been selected for Country. For example, if United States is selected, whatever states are available for that country are shown under States. Links to State Details page. |
|
Country |
Country ID. Links to Country Details page. |
5.3.19.2 View Transaction Data
The Transaction details are displayed in a name and value table. The following information is displayed as specified in the order below:
-
Transaction Data
-
Entity instances
-
Related Entity Instances
5.3.19.3 View Session Data
In the Transaction Details page, view alerts and actions.
Session data shown in this section include:
-
Alerts and actions
-
Final action
-
Alerts table displays additional information like alert level, alert message, trigger date, and so on.
-
The rules and policy names are linked under trigger sources and can open the corresponding detail pages.
| Alert Information | Description |
|---|---|
|
Alert Level |
Severity of the alert whether high, medium, low. |
|
Alert Message |
Text message configured in the alert. Links to Alert Details |
|
Alert Type |
Type of the alert whether fraud, investigation, information, or other reason. |
|
Trigger Sources |
Rules that generated the particular alert |
|
Timestamp |
The time the alert was generated. |
5.3.20 View Transaction or Session Oriented Results
To open filtered sessions page, proceed as follows:
-
Click the Session Count link to see the sessions filtered by the datapoints specified earlier.
-
From the filter page, view the following data elements:
Table 5-16 Search Results from the filter page
Field Description Session ID
Unique identifier for the session. Links to Session Details.
Alerts
Alerts that were generated from the transaction.
Transactions
Transactions that were filtered by datapoints.
Organization ID
Identifies the organization to which the user belongs.
User Name
Login name given by user to login. Links to User Details page.
Device ID
Uniquely identifies each device and is auto-generated by the application.
IP Address
Address mapped to a location usually, although some addresses are unknown or private
Location
Place where the transaction occurred
Session Date
Time duration when the sessions occurred.
Client Type
Virtual Authentication Devices. Device or application used for authentication or fingerprinting. For example: TextPad, KeyPad, Question Pad, login page, flash tracker. auth.client.type.enum is the enum used
User ID
Unique Identifier of that user
Note: The Add to Group feature is available from this page.
5.3.21 Compare Multiple Instances of the Same Transactions
Compare transaction data to find out similarity. Selecting multiple transaction search results of the same transaction definition type and clicking the Compare button opens the Compare Transactions tab, which can be used to compare these transactions.
The investigator can filter and view only the common data elements between the selected transactions. By default, all the data elements for the selected transactions will be displayed in the comparison page including the non-common data elements.
To select two or more transactions of the same type and perform a comparison on the values, proceed as follows:
-
In the Utility panel, click the number for matching transactions in the Related Items Found section to see filtered data elements.
-
In the Search Results table of the Filtered Transaction page, select two or more transaction search rows of the same transaction type, and click Compare.
The Compare option is disabled until at least two transactions are selected from the search results.
Comparison is only available for the same type of transactions. Ten transactions maximum can be compared by default. Out of the ten transactions that are available by default, the investigator can choose to view a few transactions by applying a filter.
Clicking Compare opens a new tab and the transaction values are displayed for examination.
-
On the Compare Transaction tab, compare and contrast the transaction and entity data side by side.
Ten transactions maximum can be compared by default.
-
Out of the available transactions, choose to view a few transactions by applying a filter.
-
Drag and drop additional data elements involved in suspect transactions, one by one, to the Filtered Items panel to see if there is other activity which needs evaluation.
5.3.21.1 Use Case: Comparing Transaction Data
Jeff is a fraud investigator looking into a case generated by OAAM.
The user "John" appears to be fraudulent and has performed several wire transfers to different account numbers in the bank. The investigator wants to list all the account numbers and the amount transferred each time in the result. The investigator selects a specific transaction type to search on the entity fields.
| Filter | Entity Field |
|---|---|
| Transaction name | Wire Transfer |
| Entity | Customer |
| Entity First name | John |
| Result | |
| Transaction Data | Amount |
| Entity | Account |
| Transaction field | To Account number |
Jeff selects two transaction search rows of the same the type Wire Transfer and clicks the Compare button. Jeff is taken to the Compare Transactions tab which compares transaction and entity data.
5.3.22 Add Case Notes
A utility panel contains a Case Notes area and lists all the notes for the current case in a descending order based on time. By adding notes to a case, the investigator can document and share results of findings, hidden relationships or unusual behavior. The investigator can add notes directly into the Case Notes panel by entering notes and clicking Add Note as he continues with the investigation.
As part of documenting his findings, the investigator can save the filter criteria so other investigators can see the related data points for the case. To include the filter, he clicks Insert Filter Item so that he can add the filter detail as a note. There is no limits to the number notes the investigator can add. If the investigator wants to add more notes, the panel has the feature for scrolling. Tracking the discovery process over time enables an investigator to show others how he arrived at his conclusions.
To add new notes to the case directly in the Case Notes panel, proceed as follows:
-
Enter notes in the Case Notes panel.
-
Click the Add Note button in the Case Notes panel after adding a note to the Case. All case notes could be seen in the panel in a descending order based on time. This is very useful information for the investigators since they know the full history of the case before they start working on it.
-
Add filtered data elements and their value to the case as notes by clicking Insert Filter Items. This enables investigators to see the related data points for the Case.
This action will only add the data elements that are actually used in the search and not all the data elements in the Filter Items panel. For example, a device ID
1234might be added to the filter data elements, but may not be checked which means it is not being used in the search and hence will not be inserted.
Later, when you click the Close Case button in Case Notes, the Filter Utility panel is automatically refreshed including the Case Notes panel.
Note: Linking notes are not seen in the Case Notes panel. Only case notes added directly in the Case Notes panel and notes added using Add Note in the tool bar are seen.
Case notes are mandatory.
5.3.23 Close a Case with a Disposition
After an investigator finishes investigating a situation and comes up with a conclusion ("he put the pieces together"), he closes the case with a disposition.
-
Open the Case Details page.
Choices are to add notes, change the status of a case, or change the severity of a case.
-
Click Change Status. The Changed Status dialog appears. Select a status for this case and enter notes. Then, click Submit
-
In the Status list, select Closed.
A Disposition field appears in dialog.
-
Select a disposition from the following choices:
-
Select Canned Notes which best describes the situation.
-
Enter some final notes summarizing findings. Manager or auditors can view these notes on the case activity including actions taken and individuals involved.
-
Click Submit.
A confirmation dialog is displayed.
-
Click OK to dismiss the confirmation dialog.
5.3.24 Open a Newly Escalated Case
Best practice is for investigators not to open cases that other investigators are working on. The first time an investigator accesses a case, the status changes to Pending automatically and the current owner becomes the investigator opening the case. Best practice is to open the escalated case and view the logs for notes entered by the CSR and CSR Manager.
Escalated cases contain the following tabs:
-
Summary - Lists the details about the case
-
Linked Sessions - Lists the sessions linked to the case
-
Logs - Lists the case action logs
The Summary tab shows the case detail and if the case is an escalated case then it shows the details of the user associated with the case. Agent cases that are user less show a User Details section.
5.3.25 View Case Logs
Because the case originated from a customer service case, it contains specific user information in the details. Look at the case details and notes the user. Write down the user ID because you will need it to search for sessions.
The logs sections to show the logs of action performed on the case. The search filters are as follows:
| Filters | Description |
|---|---|
|
Notes Keyword |
Keyword from Canned Notes |
|
ARM ID |
CSR identifier |
|
Action |
Last action in the case. For example, yesterday jsmith called customer service claiming to have lost money out of his account. The CSR escalated the case and told jsmith he would be contacted within 24 hours. About 36 hours later, jsmith calls back to see why he has not been contacted. The CSR must view the case escalated yesterday for jsmith. He searches cases for jsmith with an Escalate action and ones that are not overdue in the last 48 hours. |
|
Created Date |
Date case was created. |
5.3.26 View User Data
The following information is displayed in User Data for escalated cases.
| Data | Description |
|---|---|
|
User Name |
User for whom case is created |
|
User ID |
Auto generated? |
|
Organization ID |
The identifier of the application. (In a multitenant deployment, CSRs only have access to cases limited to their Application ID. CSR Managers and investigators can access cases from multiple applications) |
|
Last Online Action |
The last action that user executed. For example, the Answered challenge question field show Challenge Question or if user is blocked, Block. |
|
Date of Last Online Action |
Date when last online action was executed. |
|
Temporary Allow Expiration Date |
When a temporary allow is enabled. This field shows when it expires. If temporary allow is 7 days, the expiry date is a week from today. |
|
Temporary Allow Active |
If temporary allow is active, this field shows Yes, otherwise the field shows No. |
|
OTP Bypass Active |
Similar to temporary allow but OTP challenges are ignored instead of blocks |
|
OTP Bypass Expiration Date |
Date and time OTP Bypass is no longer be active |
|
Completed Registration |
If a user completed registration, this field shows Yes; otherwise it shows No. To be registered, a user may need to complete all of the following tasks: personalization (image and phrase), registering KBA questions/answers, and providing email/cell phone contact information. |
|
Questions Active |
If user completed registration, but questions were reset, and he did not go back to register new ones, this field displays No. This field shows Yes if the user completed registration and questions exist that can be used to challenge him. |
|
OTP Delivery method active |
User has either email or cell phone registered for the OTP challenge |
|
Personalization Active |
When an image, a phrase and questions are active for the user, this field displays, Yes. If anyone of these are reset, this field displays No. |
5.3.27 View Case Details
The following information is displayed in Case Details.
| Details | Description |
|---|---|
|
Case ID |
Unique case number to identify the case. |
|
Organization ID |
The Organization ID of the case. |
|
Created By |
This displays the name of the fraud investigator who created the case. If the case was created by a configurable action Created by displays dynamic. |
|
Current Owner |
Name of the investigator who is working on this case currently |
|
Case Created |
The date when the Agent Case was created |
|
Case Type |
Agent, CSR or Escalated (Escalated cases cannot be created) |
|
Severity Level |
The severity level is set by the user who creates the case and used as a marker to communicate to users how severe the case is. Anyone can change the severity of cases |
|
Description |
The details for the case. A description is required. |
|
Disposition |
When a case is closed the disposition describes the way in which the issue was resolved. Cases only have dispositions when they are closed. If a case has any status besides closed, the disposition is blank. |
|
Case Status |
The case status is Pending when the Agent case is created manually and New when an Agent case is created automatically (with Configurable Action) and changes to Pending once the case is accessed. The case status is Escalated for escalated cases and changes to Pending when the investigator accesses this case. Case status is changed when accessed by various administrators. |
|
Expiration Date |
Agent cases and escalated cases have a default expiration date of 24 hours from the date of creation. If the case has not been accessed before the expiration date, it has the status of Overdue. Each time a case is accessed, the expiration date of the Agent case or escalated case is reset to a new value; by default the date is reset to 24 hours from the date of accessing the case. |
|
Last Case Action |
The last action performed in the escalated or Agent case. There are no user details in Agent cases. |
|
Last Action Date |
The date when last action occurred. |
|
Last Global Case Action |
For an Agent case that is not created from an escalated CSR case, the last global case action field is always empty. For an Agent case associated to a user (escalated case), the last global case action is the last case action performed by the user associated with the Agent case. The case action could be performed on any case (CSR/Fraud Investigator) |
|
Last Global Case Action Date |
The last action performed against the user online. |
Summary Shows Current Owner and Fraud Investigator Who Created Case
The summary data displays the current owner as well as the fraud investigator who created the case. If the case was created by a configurable action "dynamic" is shown as the originator of the case.
5.3.28 Search for Potentially Suspicious Sessions Based on Various Criteria
-
Click the Sessions tab. The Sessions Search page is displayed.
The session filters are:
Table 5-20 Session Search Filters
Filters Description Session ID
ID for the session.
Organization ID
Identifies the organization to which the user belongs.
Alert Level
Severity of the alert whether high, medium, low.
Alert Message
Text message configured in the alert.
User Name
Login name given by user to login.
Device ID
Uniquely identifies each device and is auto-generated by the application.
IP Address
Address mapped to a location usually, although some addresses are unknown or private
Authentication Status
Status of the session (each login/transaction attempt creates a new session). For information, refer to Authentication Status.
Country
Country ID
State
State ID. The State list is dynamically populated with respect to what has been selected for Country. For example, if United States is selected, whatever states are available for that country are shown under States.
City
City ID. The City list is dynamically populated with respect to what has been selected for in Country and State.
IP Range
Range of IP addresses
Login Time
The time the customer logged in to perform the transaction. For example, 5/11/09.
Device Type
Reflects if a device was laptop/desktop or a mobile device
Client Application
Shows the native mobile application the user was accessing
External Device ID
Utilized if an MDM or other 3rd party solution provides a unique mobile device identifier
-
In the Sessions search page, narrow down the number of sessions that are returned by specifying criteria in the search filters.
For example, search through sessions in the last 12 hours with High alerts and a Blocked or Locked authentication status (sessions filtered by Time, Alert Level and Action).
5.3.29 View a List of Sessions Matching Specified Criteria
After clicking the Search button, the search results show a list of sessions that match the criteria.
Table 5-21 Sessions Search Results
| Fields | Definition |
|---|---|
|
Session ID |
ID for the session. |
|
Alerts |
Severity of the alert and number of alerts. Click the More button (orange square) to see details on the number of alerts for the severity level and the alert triggered. |
|
Transactions |
Types of transactions that took place during the session. Click the More button (orange square) to access links to open the transaction details page of the specific transaction. This page contains general summary for the transaction and transaction data with entity and transactional data with values. |
|
Organization ID |
Identifies the organization to which the user belongs. |
|
User Name |
Login name given by user to login. |
|
Device ID |
Uniquely identifies each device and is auto-generated by the application. |
|
IP Address |
Address mapped to a location usually, although some addresses are unknown or private |
|
Location |
Country ID, State ID, and City ID |
|
Authentication Status |
Status of the session (each login/transaction attempt creates a new session). |
|
Log in Time |
The time the customer logged in to perform the transaction. For example, 5/11/09. |
|
Pre-Authentication Score |
Score for Pre-Authentication checkpoint. |
|
Post-Authentication Action |
Action for Post-Authentication checkpoint. |
|
Client Type |
Virtual Authentication Devices. Device or application used for authentication or fingerprinting. For example: TextPad, KeyPad, Question Pad, login page, flash tracker. auth.client.type.enum is the enum used |
|
User ID |
Unique Identifier of that device |
|
Internal Session ID |
System generated ID for the session |
5.3.30 View Forensic Record and General Details of a Session
A Session Details page displays an overview of the events that transpired during a particular session for fraud analysis. It contains:
-
General session data points such as user, device, location, and other details
-
Additional information about the custom fingerprinting type along with available out of the box fingerprint information.
-
A forensic record of the session, including transactions and checkpoints that were evaluated. Each checkpoint displays the policies in that checkpoint, alerts that were triggered during the session for that checkpoint, and the final action for that checkpoint.
5.3.30.1 Runtime Information
The Session Details page contains several panels. Panels are not displayed if information is not available. Except for the Session Details and Session Transactions panels, all other panels are displayed in the order of execution. Looking at the Session Details page, the flow of events is seen, the sequence when the events happened within the session.)
5.3.30.1.1 Session Details
The Session Details panel shows all the related information regarding the login transaction. It shows the authentication status, IP address from which the user logged in, user name, User ID, cookie information, autolearning processing status, the login time, and type of digital fingerprint used to collect digital fingerprint. If custom fingerprinting is used, then it shows the custom fingerprinting type name.
Usage example: You see a session, (name or ID) with a velocity alert and a locked authentication status. In your experience this combination is pretty rare and often indicative of a fraud attempt. This may be a case of stolen authentication credentials so you want to look into it. You open the details screen for this session to take a closer look at exactly what went on in this session. You see that the login had triggered a KBA challenge and there were three failed attempts to answer the question which resulted in the lock. You also see that the user was dynamically added to a high risk users group as a result of this rule. Drill in on the policy that caused the challenge to see what rules triggered. You also want to see if this user has any CSR cases related to this lockout. Search the CSR cases and determine if Phillip called in to have his KBA questions reset.
5.3.30.1.2 Session Transactions
The Session Transactions panel shows transactions in a name and value table. The following information is displayed as specified in the order below:
-
Transaction Data
-
Entity instances
-
Related Entity Instances
Usage example: Jeff is a fraud investigator looking into an automatically generated case. In the case, he can see there were two alerts generated. To see exactly why they were triggered he opens the Session Details. From this view he can see the rule instances that were triggered, the policies that contained them, the checkpoints linked to the policies and the transactions related to the checkpoints. He can also easily see if there were any action or score overrides. All entities and transaction data is easily accessible on the session detail page. It includes external transaction ID and transaction status from the protected application. Investigators can use this data to trace a suspect transaction back to an application transaction and see if the transaction was successful, rejected, delayed, or blocked.
5.3.30.1.3 Checkpoints
An investigator is interested in why a particular rule triggered. For example, he might look at which policy and rules triggered the alert.
Information can be gathered by looking at these details. For example, a user who successfully went through Pre-Authentication and Post-Authentication checkpoints knew the password and the questions and answers and there fore, there is a good chance that he is a valid user. On the other hand, a user who attempted to answer the questions twice and succeeded in providing a correct answer on his third attempt might be considered suspicious. This user did not know the answers right away so there is a chance that he may be a fraud trying out new answers.
5.3.30.1.4 Policies
A list of policies in that checkpoint are displayed in the Policies panel. View the rules and action that triggered.
Table 5-22 Policies in a Checkpoint
| Item | Description |
|---|---|
|
Name |
The name of the policies that are under the checkpoint, rules under the policies, the conditions under the rules, and the action triggered. |
|
Status |
Executed (for policies) and Triggered (for rules). |
|
Scoring Engine |
A scoring engine is provided at the policy level and at the checkpoint level. The policy scoring engine is applied to rule scores to determine the risk for each policy. |
|
Time |
The time of the occurrence. |
|
Weight |
Percentage value used to influence the total score. |
|
Score |
Level of risk that has been calculated for specific situations or parts of a situation, expressed as a number. There are multiple policies under one checkpoint. The scores of these policies are used to determine a score for the checkpoint. |
5.3.30.2 Action, Alerts, and Scores
Figure 5-16 shows an example of alerts, actions, and scores displayed in a Session Details page.
The Alerts panel shows alerts that were generated for a checkpoint during the session and details about the alerts, as shown in the table below. Each checkpoint could trigger multiple alerts. High-level alerts are displayed in bold red.
Table 5-23 Sessions Checkpoint Actions
| Item | Description |
|---|---|
|
Level |
Severity of the alert whether high, medium, low. |
|
Alert Message |
Text message configured in the alert. |
|
Type |
Type of the alert whether fraud, investigation, information, or other reason |
|
Trigger Source |
Rules that generated the particular alert |
|
Timestamp |
The time the alert was generated. |
All actions are displayed in the Actions panel with a Action Name column and a separate column indicating whether or not the action is final. The final action is also displayed in the top right section of checkpoint panel.
Scores are displayed for the policy and checkpoint. The scores are useful in detecting the probability of fraud or business scenarios and in decision making.
5.3.30.3 Outcomes from Each Checkpoints
Checkpoint panels are arranged in chronological order of execution and display the checkpoints and a list of the actions and alerts that were triggered at those checkpoints. By default, checkpoint panels are collapsed. In the initial opened view, only the transactions and the final alerts are displayed in the expanded form. All other panels are collapsed. Expand all the panels to view additional information for that checkpoint.
The first checkpoint panel could be one for Pre-Authentication. On top of the panel, the total amount of time taken for this checkpoint to execute, the final action, and the final risk score are shown.
5.3.31 Searching for Transactions
The Transaction Search page allows investigators to search transactions independent of session. To search for transactions, you must select the transaction type to filter certain transactions by specific types. Based on the transaction type, corresponding entity and transaction fields available to be added are displayed. These are attributes of the transaction. Enter values for the attributes to search for and filter transactions results. The Transaction Type and Transaction Date fields are mandatory. The date is set to the last 24 hours by default.
Clicking one of the transactions opens a Transactions Detail page. The Add to Group feature is available for all data types listed.
To search for transactions, proceed as follows:
-
In Agent Cases page, click the Transactions tab.
-
To search for transactions, you must select the transaction type to filter certain transactions by specific types. In the Transaction Name field, select the transaction type. For example, "Internet Banking," "Retail Ecommerce," and so on.

-
Enter values in the Transaction Date fields. They are mandatory. The date is set to the last 24 hours by default.
An error message is displayed if you enter special characters. Also, the To Date cannot be greater than the From Date.
-
In the search field, enter the criteria and use the search operator to refine your query to search and filter transaction results and then click Search.

Table 5-24 lists the transaction filters to search and filter transactions.
Table 5-24 Search Transactions Filters
Filter Description Transaction Type
The transaction type. For example, Internet Banking, Retail Ecommerce, and so on. The transaction name field is a mandatory field to which the search would be specific. If you select the type of transaction, corresponding transaction data and entity data fields that you can select from to add to the search are populated in OAAM Admin. You can perform a multi-select of transaction name attribute.
Transaction Date
The transaction date is the time that the transaction was submitted.
Transaction Status
The transaction status is the current state of a transaction. The values are: success, failure or pending.
Transaction ID
The transaction ID is the unique numerical reference assigned to each transaction that has been processed.
Session ID
The session ID is the identifier of the authenticated session in which the customer logged in before performing the transaction.
Organization ID
The Organization ID is a unique identifier for the organization you belong in. Each user belongs to only one Organization ID. It identifies what tenant applications a user utilizes and scopes which OAAM policies runs for them.
User Name
The user name is the name of you entered for login authentication.
Alert Level
Severity of the alert whether high, medium, low.
Country
Country ID
State
State ID. The State list is dynamically populated with respect to what has been selected for Country. For example, if United States is selected, whatever states are available for that country are shown under States.
City
City ID. The City list is dynamically populated with respect to what has been selected for in Country and State.
IP Range
Range of IP addresses
Device ID
Device identification
Entity Data
Entity data are attributes related to entities, which are mapped to the particular transaction type that has been selected for the search. For example, you can add the search field, BankName, if you selected Internet Banking as the Transaction Name. Investigators can perform searches using corresponding values of these attributes.
Transaction Data
Transactional data includes specific attributes related to the transaction type. For example ToAccountNumber or FromAccountNumber in a money transfer.
Note:
Search by encrypted fields is not supported. Entity fields and transaction fields, which are encrypted, cannot be used as the search transaction filters and are not available as dropdowns.An error message is displayed if you enter special characters.
-
To add a filter, click the Add Fields down arrow button.

-
From the list of parameters, choose the additional filter. For example, "Address.Zip."
-
In the search field, enter the criteria.
-
Use the search operator to refine your query in the text field. For example, "Equals." Then, click Search.
The transactions that match the search criteria appear in the Search Results table. By default, the search results are sorted by Session ID. You can sort by transaction name, transaction status and date.
You can view a transaction in detail by clicking the transaction name link. The Transaction Details page displays the run time values of the transaction and entity data along with the session information.
-
Search on the related entity data.
-
Export the search results into a spreadsheet by selecting the rows and clicking Export. The limit is 25 rows.
-
Add the transaction and entity data and authentication entities into groups, which can be further used in rules evaluation using the Add to Group option. For example, blacklisted accounts, suspicious merchants, and so on.
5.3.32 Searching for Transactions by Entities of a Single Transaction Type
You can use entity attributes to perform a search to list all the transactions related to that entity. To do this:
-
In Agent Cases page, click the Transactions tab.
-
To search for transactions, you must select the transaction type to filter certain transactions by specific types. In the Transaction Name field, select the transaction type. For example, "Internet Banking," "Retail Ecommerce," and so on.
-
Enter values in the Transaction Date fields. They are mandatory.
An error message is displayed if you enter special characters. Also, the To Date cannot be greater than the From Date.
-
Add entity data and transaction data search fields after selecting the Transaction Type. To add the filter, click the Add Fields down arrow button.
-
Entity data are attributes of entities that relate to the transaction type selected to be search on. For example, add the search field, BankName, if you selected Internet Banking as the Transaction Type. Investigators can perform searches using corresponding values of these attributes.
-
Transactional data includes specific attributes related to the transaction type. For example ToAccountNumber or FromAccountNumber in a money transfer.

The Add Fields list depends on the transaction type selected. For single transaction types, transaction data and entity instances for a particular transaction are displayed along with the default authentication entities, such as Transaction Date, IP Range, Device ID, and so on.
-
-
Export the search results into a spreadsheet by selecting the rows and clicking Export. The limit is 25 rows.
-
Add the transaction and entity data and authentication entities into groups, which can be further used in rules evaluation using the Add to Group option. For example, blacklisted accounts, suspicious merchants, and so on.
5.3.32.1 Use Case: Search by Entity Fields
Jeff is a fraud investigator is looking into a case generated by OAAM. On further research, he finds out that the Address used is a fake address. The investigator wants to list all the transactions that used this address. The investigator selects a specific transaction type to search on the entity fields.
| Filter | Entity Field |
|---|---|
| Transaction name | Wire Transfer |
| Entity | Address |
| Address Line 1 | House No. 123 |
| Address Line 2 | Fake Street |
| Address City | Fake City |
| Address State | Fake State |
5.3.32.2 Use Case: Search for ATM Transactions By ATM Card
Jeff is a fraud investigator who needs to find all the ATM transactions that used a stolen ATM card in the last one week to estimate the damage. He can perform a search to list all transactions related to an entity with entity field attributes as search filters. The ATM card number is one of the entity fields in the Card Entity. Jeff uses the ATM card number search filter along with the transaction type to list all transactions that use the ATM card.
| Filter | Entity Field |
|---|---|
| Transaction name | Select All the Transactions |
| Entity | ATM |
| ATM Card Number | xxxx xxxx xxxx 1234 |
5.3.32.3 Use Case: List All Account Numbers and Amount Transferred Each Time
Jeff is a fraud investigator looking into a case generated by OAAM.
The user "John" appears to be fraudulent and has performed several wire transfers to different account numbers in the bank. The investigator wants to list all the account numbers and the amount transferred each time in the result. The investigator selects a specific transaction type to search on the entity fields.
| Filter | Entity Field |
|---|---|
| Transaction name | Wire Transfer |
| Entity | Customer |
| Entity First Name | John |
| Result | |
| Transaction Data | Amount |
| Entity | Account |
| Transaction field | To Account number |
5.3.33 Searching Transactions by a Combination of Entities and Transaction Data
You can use entity field attributes to perform a search to list all the transactions related to that entity. To do this:
-
Click the Transactions tab on the Agent Cases page.
-
On the Transactions Search page, select a single transaction type and entities. All the available entity fields are displayed as a result. You can also add fields to search on using the Add Field list.
-
Enter entity attribute values to filter results on and click Search. The search results contain transaction logs with matching entity data.
When a single transaction type is selected, you can filter search results on both entity data (and related entity data) as well as transaction data.
-
Search on the related entity data.
5.3.33.1 Use Case: Search by Entity and Transaction Data
Jeff is a fraud investigator looking into a case generated by OAAM.
The user "John" appears to be fraudulent and has performed several wire transfers to this account number "1234" in the bank. The investigator wants to determine the number of transactions and the amount transferred each time. The investigator selects a specific transaction type to search on the entity fields.
| Filter | Entity Field |
|---|---|
| Transaction name | Wire Transfer |
| Transaction Data | To account number - 1234 |
| Entity | Customer |
| Entity First Name | John |
5.3.34 Searching Transactions by Entities Across Multiple Transaction Types
You can search entities across these transaction type using entity attributes as search filters. This scenario is used when a common entity is shared across transactions.
-
Click the Transactions tab on the Agent Cases page.
-
On the Transactions Search page, select All as the transaction types in the dropdown. All the available entity fields are display as a result.
You must select the transaction type first in order to proceed with the different modes of search. Transaction data and entity data are not populated if transaction type is not selected.
-
Add entity attribute fields and related entity attribute fields of the entities across these selected transaction types.
The Add Fields list depends on the transaction type selected. For multiple or all transactions, only top level entities along with their relationships which are common across the transaction type selected are displayed.
Note:
Transaction data and entity instances are not displayed. -
Enter entity attribute values to filter results on and click Search. The search results contain transaction logs with matching entity data.
The transaction name is a combination of Transaction Type and Transaction ID. For example, wiretransfer_12.
Clicking the transaction name opens the Transactions Detail page. The Transaction Details page displays the run time values of the transaction and entity data along with the session information.
Note:
The Add to Group option is disabled when more than one transaction is selected in the results.By default, the search results are sorted by Session ID. You can also sort by transaction name, transaction status and date. For multiple transactions in a single session, results are automatically grouped next to each other since the results are sorted on session ID.
The Alerts display is similar to the Sessions search. Hovering the mouse enable you to view the alerts messages along with the number of occurrences.
Note:
You will not be able to search on the related entity data. -
Search on the related entity data.
-
Save the search template along with the results layout and reuse them as needed. You can also set one of the search templates as your default search page.
-
Export the search results into a spreadsheet. The limit is 25 rows.
5.3.34.1 Use Case: Search Credit Card in Different Transactions (Shopping Cart and Retail Ecommerce)
Jeff is a fraud investigator looking into a case generated by OAAM. On further research, he discovers that the credit card used is a stolen credit card. The credit card could have been used in different transactions like shopping cart, retail ecommerce, and so on. The investigator wants to list all the different transactions that used this credit card in the last one week to estimate the damage. The card number is one of the entity fields. The investigator selects all or multiple transaction types and search on the entity fields.
| Filter | Choice |
|---|---|
| Transaction type | Select All the Transactions |
| Entity | Credit Card |
| Credit Card Number | xxxx xxxx xxxx 1234 |
5.3.35 Opening Details Pages from Sessions Search Page
Click the Session ID, User Name, Device ID, IP Address, Location, and Alert to open the corresponding details pages to view additional information.
Note:
If the checkpoint is not run, the Pre-Authentication or Post-Authentication checkpoint displays a score of -1.Table 5-25 Search Session results
Open a details pages from another details page, up to a maximum of 10 tabs. The details page tabs also contain linked parameters, which can launch the details pages.
Note:
When multitenancy is enabled, investigators do not have access to details pages from anywhere in the OAAM Administration Console.5.3.36 Viewing a Particular Alert for a Session
Details for an alert includes message, level, type and cross reference on other data types such as user, device, location, sessions, browser, operating system, and locales. The Alert Details page enables an investigator to quickly see the relationship between not just the users who have generated this alert but also other data relationships that would be useful, such as locales that have been used while generating this alert.
To view a particular alert that had been triggered and generated for a session in greater detail, proceed as follows:
-
Click the Sessions tab to open the Sessions search page.
-
Search for sessions by entering the Session ID in the Session ID field and the alert message in the Alert Message field, and clicking Search.
-
In the Results table, click the orange square next to the alert in the Alert column to display alert message popup.
-
Click the alert message displayed in the popup to open the Alert Details page.
-
Using the details pages, view information on the generation of the alert, the message, alert level, message type, and the alert's relationship to other data types such as user, device, location, sessions, browser, operating system, locales, and others.
Table 5-26 lists the detail pages and the type of information provided by each page.
Alert Details Tabs Description Summary
View general information about the alert and the alert template with the current details (level/type)
View alert groups with which an alert is associated
Users
View users that have a session in which this alert was triggered.
This report enables you to see which users and how many times the alert was generated for each user during login process.
Devices
View devices that have been in a session in which this alert was triggered.
This report enables you to see which devices and how many times the alert was generated for each device during login process.
Locations
View locations that have been in a session in which this alert was triggered.
This report enables you to see which locations and how many times the alert was generated for each location during login process.
Sessions
View sessions in which this alert was triggered.
Fingerprint Data
View fingerprints created in the login process during which the alert was generated.
5.3.37 Viewing Transaction Search Results
After clicking Search in the Transactions Search page, transactions that match the criteria are shown in the results table.
Table 5-27 summarizes the columns in the transaction search results.
Table 5-27 Search Transactions Results
| Data | Definition |
|---|---|
|
Transaction Type |
Type of transaction. Clicking the Transaction Name link in the transaction search results opens a details tab about that transaction instance. The tab will contain transaction and entity data as well as session data. This field provides a link to Transaction Details page of a particular transaction. |
|
Transaction ID |
ID of the transaction. This field provides a link to Transaction Details page of a particular transaction. |
|
Transaction Status |
Status of the Transaction. |
|
Alerts |
Alerts for the transaction instance. Clicking the alerts links opens alerts summary pop with a link to the Alert Details page. |
|
Transaction Date |
Date when transaction occurred. |
|
Session ID |
The session ID of the user. Clicking the Session ID link opens the Session Details tab. |
You can view a transaction in detail by clicking the Transaction Type link in Search Results. The Transaction Details page displays the run time values of the transaction and entity data along with the session information.
By default, the search results are sorted by Session ID. You can also sort by Transaction Type, Transaction Status and Transaction Date.
5.3.37.1 Use Case: View Transaction Details
Jeff is a fraud investigator looking into a case generated by OAAM. The user "John" appears to be fraudulent and has performed several wire transfers to different account numbers in the bank. The investigator wants to list all the account numbers and the amount transferred each time in the result. The investigator selects a specific transaction type to search on the entity fields.
| Filter | Entity Field |
|---|---|
| Transaction name | Wire Transfer |
| Entity | Customer |
| Entity First name | John |
| Result | |
| Transaction Data | Amount |
| Entity | Account |
| Transaction field | To Account number |
Jeff selects any one of the search results and clicks the transaction name link, which take Jeff to the Transaction Details page.
5.3.38 Linking Sessions to a New Case
To link sessions to a case:
-
Select the sessions and click Link to Case in toolbar to link the sessions to a new Agent case or an existing one.
A dialog appears with the instructions, "Open a case to link sessions. Either search and select an existing case or create a new case, and then link the sessions." Three buttons are shown: Create New Case, Open existing case, and Cancel.
-
Click Create New Case.
A Link to Case dialog appears with instructions to enter details. The case type is Agent and cannot be changed.
-
Enter details for the following fields:
Organization ID
Severity Level: Choices are Low, Medium, High
Canned Descriptions: Choices are Cannot Login, Forget Question Answers, Possible Fraud, and OTP Override.
Description
-
Click Next.
Another Link to Case dialog appears with the message, "The following sessions have been selected to link to the case <case_number>. Enter a note for this action."
As part of the linking enter notes describing why the sessions were linked.
-
Enter Canned Notes. Choices are "These sessions contain suspected fraud" and "These sessions contain corporate misuse."
-
Click Link Sessions. A dialog appears with a message, "The selected sessions were linked to Case_<number> successfully."
-
Click OK to dismiss the dialog.
The case log records the notes as well as the user who performed the link action. These sessions stay linked to the case unless they are unlinked by an investigator or manager.
5.3.39 Linking Sessions to a Case from Case Details
To link sessions, proceed as follows:
-
On the Case Details page, click the Linked Sessions tab.
-
Click the Link Sessions button.
A Linked Session dialog opens where investigators can find the sessions to add.
-
Filter sessions on Session ID, User Name, IP Address, Device ID, and Location and specifying a specific login time range.
-
From the results, select the sessions to link to this case and click Next.
Select one or more sessions to link at a time. These are the sessions that are part of the case that needs investigation.
A dialog appears showing that the sessions that can be linked to the case.
-
In the Notes field, select a note from the Note list or enter a note between 1 and 4000 characters into the text box to describe why the sessions are being linked.
-
Click Finish.
The sessions are linked to the case and appear in the Linked Sessions tab.
5.3.40 Verifying Entities in a Group
You can verify "entities in group". For example, if a you want to verify if the account number being used in a transaction belongs to a "suspicious account" group, then the transaction should be blocked. The condition you would use is Transaction: Check Transaction Count Using Filter Condition.
5.3.41 Exporting Linked Session for Further Analysis
The investigator can select one or more linked sessions and export them as MS-Excel document (XLS) for further analysis. Only MS-Excel document export is available.
The maximum number of linked session allowed to be exported is pre-configured for 1000. To change the limit, edit the following configurable property:
oaam.xls.case.linkedsession.export.row.upperbound=1000
To export linked sessions for further investigation and analysis:
-
In the Case Details page, click the Linked Sessions tab.
The Linked Sessions page opens, listing all the linked sessions.
-
Select the linked sessions and click Export Linked Sessions.
-
Select Save File, browse for the location for file to be saved and click Export.
The sessions are exported with the following details:
-
Row
-
Session ID
-
Linked On
-
User Name
-
Device ID
-
Device score
-
IP Address
-
Location
-
Transactions
-
Alerts
-
Session date
-
Note
-
5.3.42 Unlinking Linked Sessions
If they feel that the linked sessions are not relevant to the case, an investigator can unlink them from the case.
To unlink linked sessions:
-
On the Case Details page, click the Linked Sessions tab.
-
Click Unlink Sessions on the toolbar.
The Unlink Sessions dialog opens, listing all the selected sessions to be unlinked.
-
Enter notes about why the sessions are being unlinked.
-
Select the linked sessions to unlink and press Unlink.
The sessions are unlinked from the case.
5.3.43 Saving Case Details for Later Reference, Portability and Offline Investigation
Save case details including summary, log list, linked sessions to a file in XLS format for later reference, portability and offline investigation.
To save case details from the Cases search page:
-
Select the cases from the Search Results table and click Export to XLS.
-
When the Export Dialog is opened, select to save the file to Excel.
You can also save the case details from the Case Summary, Case Logs and Case Linked Sessions pages as well by clicking the Export to XLS.
Note:
The default number of rows you can select for export is 100 rows. An error occurs if you try to select more than 100 rows to export.5.3.44 Using OAAM BI Publisher Reports for Investigation and Forensics
This section provides two examples of report usage in investigation and forensics. See Chapter 24, "Reporting and Auditing" for information on setting up BI Publisher reports.
5.3.44.1 Session Activity Aggregates
BI Publisher reports can be used to show the results of checkpoints.
-
Total number of each action by checkpoint
-
Total number of each alert by checkpoint
-
Total number of sessions with risk score ranges (0 - 600, 601 - 800, 801 - 1000) by checkpoint
Login Analysis Aggregates Report
For example, George is a security and compliance officer. He has been asked to configure a solution to run login risk evaluations offline that are deemed too expensive to run in real-time. He is using the out of the box run task to perform the whole login chain of checkpoints on every session in the selection. After the load and run are complete George generates an aggregate report showing metric for total numbers of each action, alert, risk scores in Pre-Authentication and Post-Authentication data.
For example, George is a security and compliance officer. He has been asked to configure a solution to run login risk evaluations offline to test new policies before they are rolled out to production. When testing to see the difference in results between one policy configuration and another he performs a run with policy set A then he runs this report and exports to HTML. Next he does the same with policy set B and compares the two reports to see if policy changes are behaving as expected.
5.3.44.2 Search Sessions By Case Disposition
As Investigation Managers and business analysts, you can assess the effectiveness of OAAM and your fraud team. As part of investigating, you can run a report that returns all sessions that have been linked to a case with a specified disposition. The results will show the case IDs each session is linked to.
Search sessions by case disposition Report
At the end of the week a manager runs the report to find a list of all sessions with organization ID "Sears" and that have been linked to a case with a "confirmed fraud" disposition.
5.4 Managing Cases
Case management procedures are documented below.
5.4.1 Searching for Agent Cases
A case is the container for storing the details an investigator gathers when he is investigating. Once a case is created, you search for it to view its details.
Once a case is created, you search for it to view its details.
To search for cases
-
From the Cases Search page, filter your search using the search filters and fields.
Table 5-28 describes the Case search filters.
Search Criterion Description Organization ID
To locate cases for an organization, select the Organization ID. Fraud investigators are able to see the cases from only those organization's users to which they have access. Escalated cases associated with the Organization ID to which the fraud investigator has access are also included in the search result if it fits the query criterion.
User Name
The User Name field is blank for Agent cases.
User ID
The UserID field is blank for Agent cases.
Case ID
To locate a specific case, enter the Case ID.
Description
To locate a case by a keyword that is in the description, enter the word you want. Search by description displays all cases with any matching words in the description field.
Case Type
To filter cases by case type, select Agent. Investigators and investigation managers work on Agent cases. Agent cases are used specifically by fraud investigators and investigation managers for analyzing data and finding relationships between sessions and cases.
Severity Level
To filter cases by severity level, select Low, High, or Medium. The severity level is a marker to communicate to case personnel how severe this case is. The severity level is set by whomever creates the case.
Case Status
To filter cases by case status, select New, Pending, Closed, Escalated.
Expired
To filer the list by expired, select the option you want.
The options available are:
-
Hide Expired
-
Show Only Expired
Created Date
To locates cases created within a given create date range, enter the start and end dates you want for the range.
Disposition
To filter cases by dispositions, you can select:
-
Confirmed Fraud
-
Duplicate
-
False Negative
-
False Positive
-
Issue Pending
-
Issue Resolved
-
Not Fraud
The disposition describes the way in which the issue was resolved in a case. Cases only have dispositions when they are closed.
Last Action
Search based on the last action that was taken in case.
Notes
Search for cases that contain specific keywords in their log. For example, if you search for all Agent type cases that contain the word chargeback, a case with a note that contains "The device used seems to be related to a number of chargebacks" would return in the list of cases.
Created by
Search by user name of the investigator who created the case.
Current Owner
Search by user name of the investigator who is working on this case currently (who performed the last action)
-
-
Click Search.
After the case is located, click the Case ID to view the case details.
When a specific case is located, an option is available for performing several different tasks, which are described in this chapter.
-
If you want to save the search template along with the results layout and reuse them as needed, click Save. You can also set one of the search templates as your default search page.
Note:
If multitenancy is enabled, search results display all the cases with users who belong to the organizations that the CSR has access to if they match the search criteria. User less cases are part of the result set if the case owner's Organization ID is on the investigator's access permission list and the case matches the search criteria.Searching for Auto-generated Cases to Work On
When you perform an investigation from an auto-generated case, you begin by searching for new auto-generated cases.
To search for auto-generated cases to work on, proceed as follows:
-
From the Cases Search page, filter all Agent cases by the most recent hours and select New in the Case Status field. Then click Search.
For example, to search for auto-generated cases created in the last two hours, you would make the following selections:

-
The results table contains a Case ID column that can be sorted in ascending or descending order by clicking the Case ID column header. The up/down arrow next to it indicates the current order of the data. Click the Case ID column header to filter results by ascending order. The lowest Case ID number is the oldest.

-
Click the Case ID to open the case.
When an investigator accesses a case with the New status to start working on it, the status automatically changes to Pending and the Current Owner becomes the investigator.
The Case Details page provides information about the current owner and the case status.

Other investigators can now see that the case is actively being worked on since the case has an owner and the status is not New but Pending. Best practice is for investigators not to open cases that other investigators are working on.
When you perform an investigation from an escalated case, begin by searching for a pending escalated cases.
To search for cases to work on, proceed as follows:
-
From the Cases Search page, filter all Agent cases by time and select Escalated in the Case Status field. You can specify the user name in the User Name field. Then click Search.
For example, to search for the case escalated yesterday for smith, you would make the following selections.

-
The results table contains a Case ID column that can be sorted in ascending or descending order by clicking the Case ID column header. The up/down arrow next to it indicates the current order of the data. Click the Case ID column header to filter results by ascending order. The lowest Case ID number is the oldest.

-
Click the Case ID to open the case.
When an investigator accesses a case with the New status to start working on it, the status automatically changes to Pending and the Current Owner becomes the investigator.
The Case Details page provides information about the current owner and the case status.

Other investigators can now see that the case is actively being worked on since the case has an owner and the status is not New but Pending. Best practice is for investigators not to open cases that other investigators are working on.
You can search for all Agent type cases that were created by an investigator in the last "n" hours.
-
From the Cases Search page, filter all Agent cases by time.
-
Enter the name of the investigator in the Created By field. Then click Search.
A list of all cases manually created by the user are displayed.
Searching for Cases by the Actions Taken
Investigators can search both CSR and Agent cases based on actions that were taken in them.
Example: Yesterday jsmith called customer service claiming to have lost money out of his account. The CSR escalated the case and told jsmith he would be contacted within 24 hours. jsmith calls back 36 hours later to see why he has not been contacted. The fraud investigator needs to view the case escalated yesterday for jsmith. He searches cases for jsmith with an Escalate action and ones that are not expired.
-
From the Cases Search page, select Agent in Case Type field.
-
Enter jsmith in the User Name field.
-
Select Escalated as the Case type.
A list of all cases manually created by the user are displayed.
-
Filter escalated cases by last 24 hours and click Search.
The escalated case for jsmith appears in the search results table.
Searching Cases by Case Status
On the Agent case search page there is a field for Case Status for investigators to search on. Case status is the current state of a case. It tells the investigator if the investigation is new, pending, closed, or escalated when he searches for cases to work on. Table 5-29 shows the status values used for cases.
| Status | Definition |
|---|---|
|
A new case is one that has been created but not worked on yet. It is the status of a case when it is created. Cases are New when they are created through a configurable action (auto-generated) |
|
|
An investigation is pending if an investigator is still working on it. The status of a case that is not yet resolved. Manually created cases are Pending when they are created. |
|
|
A closed case is one which needs no further investigation since the issue has been resolved. Closed cases contain dispositions that describe the way in which the issue was resolved in the case. Cases only have dispositions when they are closed. For example, if fraud is identified, fraud investigators record findings, blacklist high risk entities related to the case, and close the case with a disposition. |
|
|
Escalated |
An escalated case is one that originated from a customer service case. The CSR submits a CSR case for investigators to review when there is suspicious activity associated with the specific user in the case. For example, A CSR Manager escalates a CSR case. An investigator specializing in customer specific security issues searches for all cases with the Escalated case status. |
Searching Cases by Disposition
An investigator manager searches for all Agent type cases that have a confirmed fraud disposition.
-
From the Cases Search page, select Agent in Case Type field.
-
Select Confirmed Fraud in the Disposition field and click Search.
A list of all cases confirmed as fraud by an investigator are listed in the search results table.
5.4.2 Create Agent Cases
Procedures for creating cases are presented below.
5.4.2.1 Creating an Agent Case Manually
A new Agent case is created when a suspicious activity or fraud scenario is detected and needs investigation. Only an investigator can create an Agent type case directly. No user information is shown or required for the creation of an Agent type case. The only required inputs to create an Agent case are Organization ID, severity level, and description.
An investigator is allowed to open and work on one Agent case at a time. He cannot have more than one tab with an open case. If he tries to create an Agent case while he has another case opened, a warning appears with the message that the current case workflow will be replaced with the new case workflow.
The Create button is disabled until all the fields are entered. Required fields are marked with a "*" (asterisks). If invalid parameters were entered, an error message is displayed and the new case is not created.
To create an Agent case:
-
In the Cases Search page, click New Case.
The Create Case dialog appears with Agent specified as the Case Type because the system already knows from the login that an investigator is creating this case. He will not be able to change the Case Type.
-
Enter the Organization ID the case is created for.
A list of Organization IDs for which he has access to is provided. From the list he can select one Organization ID. Later, he can create a case for a different Organization ID if he needs to.
Note:
You do not have to enter a user name or User ID because the Agent case is a user less one. -
Select a severity level from the Severity Level list
The available severity levels are High, Medium, and Low.
-
Enter a description of the case in the Description text box, or select descriptions from the Description list, or do both.
The Description text box can contain alphanumeric and special characters, but it should not exceed 4000 characters. Select a description from the Canned Description list, one at a time for any number of times. When a canned description is selected, a description is automatically added to the Description text box. Each description selected from the list is appended to the previous.
Description is a required field. The Create button is disabled until a description is entered.
-
Click Create.
The case is created and the Case Details page opens for the new case. The Case Details page shows Pending as the status of the case. The investigator is listed in the Created by and Current Owner fields. There are no user details shown in the Case Details because the case is a manually created Agent case. The new Agent case does not contain any linked sessions. When viewing the logs, Create Case is displayed as the Action. Figure 5-21 shows a Case Details page when the case is first created manually.
Manual Agent Case Creation Example
An investigator creates an Agent type case for the 1st Bank Organization ID. He is not given the option to create cases of other types (CSR case). Organization ID is a required field. The new Agent case does not contain any linked sessions. He is not required to enter any user information to create the case since Agent cases are not linked to any single user.
5.4.2.2 Creating a Case Like Another Agent Case
To create a new case that is similar— or "like"—an existing Agent case:
-
From the Cases Search page, select an Agent case by clicking in the checkbox next to case in the Search Results table.
The Create Like button is disabled if multiple rows are selected in the Search Results table.
-
The Create Case Like dialog appears with Organization ID, Severity level and description pre-populated from the original case.
-
Edit any of these fields.
Do not leave any fields blank.
The Create button is disabled until the required fields are filled in.
-
Click Create.
Click Cancel to cancel changes and return to the Cases Search page.
Click Create to create a new case.
A new Agent case is created with data from the original case and the changes, and the Case Details page opens for the new case. A new Agent case created like an escalated Agent case does not contain any user data. The case status is Pending.
5.4.2.3 Search and Select and Create a New Case Feature
The Search and Select and Create a New Case links allow an investigator to search for a case or create a new case if he does not have a case opened. The Search and select a case link opens the Cases search page. The Create new case opens the Create Case dialog so that he can create a case.
5.4.2.4 Setting Up OAAM to Create an Agent Case Automatically
To configure an action so that an Agent case is created automatically, you would have to:
-
Create a custom rule action called create_agent_case.
-
Add a rule with the rule condition you want to a policy for the appropriate checkpoint. Configure it such a way that it will trigger and return the action create_agent_case whenever the specified conditions are met. For example, whenever a suspicious activity occurs the create Agent case action is triggered.
Steps are provided as follows:
-
Create an action instance of the action template CaseCreationAction and associate it to the checkpoint.
-
Log in as a security administrator.
-
In the Navigation tree, expand Configurable Actions.
-
Double-click Action Instances.
The Action Instances Search page is displayed.
-
From the Action Instances Search page, click New Action Instance.
The New Action Instance page appears where you can enter details to create the Create Agent Case action.
-
Click Choose Action Template.
-
Select the CaseCreationAction. The java class name for the configurable action is
com.bharosa.vcrypt.tracker.dynamicactions.impl.CaseCreationAction
This CreateCaseAction configurable action is provided out of the box.
-
In the Name field, enter Create Agent Case.
-
In the Description field, enter a description for the Create Agent Case action.
-
In the Log Level field, enter the log level.
The log level indicates whether the execution status of instance should be recorded.
Disable turns off logging
Enable turns on logging
Log if error turns on logging when errors occur
Only if there is an error will the execution status be recorded in the logs. Otherwise, the instance triggering is not recorded in the logs.
-
-
Set the parameters of Create Agent Case Action as follows:
-
Enter "2" (for Agent type) as value of Case Type.
-
Enter "2" (for Medium) or "3" (for High) for the Severity.
-
Enter a case description. For example, "Failed login."
-
Enter the userId for "Case Creator UserId" parameter. Make sure that userId has a proper role and access permissions for creating the case. For our example, the Case Creator is Dynamic.
-
-
Set the trigger criteria for when to trigger the action.
The criteria should be either a score or an action or both. These are compared against the values for the selected checkpoint.
-
If the evaluated action matches the action provided, the configurable action is triggered.
-
If the Rules Engine returns a score in the range provided, the configurable action is executed.
For example, if you want to create a case whenever the action type is block, Oracle Adaptive Access Manager will create a case whenever there is an action, "block," in the policy. If you want to create a case whenever the score is greater than 500, Oracle Adaptive Access Manager will create a case when the score is greater than 500 in that particular session.
When both action and score are specified, the configurable action is executed only if both of criteria match with the outcome from the Rules Engine.
-
-
Enter the create_agent_case for the action.
-
Save the action instance.
Click Apply.
If the action instance is created successfully, a confirmation appears.
-
Click OK to dismiss the dialog.
When the trigger criteria are fulfilled, you see an automatic creation of an Agent case by the configurable action.
The status of the case is New.
The new Agent case has autolinked sessions based on the action instance parameters.
If an Investigator opens the case, the Status of the case changes to "Pending." The Current Owner is the Investigator and the Created by displays the Case Creator UserId. User Details are also shown for this case.
Sessions that correspond to the action instance parameters like checkpoint, score range, execution type are autolinked to the Agent case that is created by the configurable action.
5.4.3 Closing Multiple Cases
To close multiple cases:
-
Log in as an investigator. The Cases Search page is displayed.
-
In the Search Results table, select the cases you want to close.
-
Click the Bulk Edit button.
-
Select Closed as the status.
-
Select the disposition and enter notes.
-
Click Save.
-
Click OK to dismiss the Confirmation dialog.
5.4.4 Changing Severity Level of a Case
When a case is created it is assigned a severity level to indicate its importance and allow administrators to filter cases. The severity level is shown on the Case Details page.
-
In the Case Details page, click More Actions and select Change Severity.
The Change Severity dialog appears.
-
In the Severity List, select the severity level you want.
The available severity levels are High, Medium, and Low. If a customer suspects fraud, then the severity level assigned would be High. If the customer wants a different image, then the severity level assigned would be Low. Escalate or de-escalate the severity level of a case when necessary.
-
In the Notes list, select the type of note you want.
-
If necessary edit the note to add information about the action you are taking.
-
Click Submit.
The case severity is saved to the case log.
-
Click OK to dismiss the confirmation dialog.
5.4.5 Changing Status of a Case
The status of a case can be changed manually or automatically.
5.4.5.1 Changing the Status of a Case Manually
The scenarios show how to change the case status manually.
5.4.5.1.1 Changing the Status of the Case to New Manually
To change the status of a case to New manually:
-
In the Case Details page, click More Actions and select Change Status.
The Change Status dialog appears.
-
In the Status list, select New.
-
Enter a note describing the issue.
Select from existing notes, or enter a new note, or both.
Existing notes to choose from are the following:
-
Manager Review
-
Other
-
-
Click Submit.
A confirmation dialog is displayed.
-
Click OK.
5.4.5.1.2 Changing the Status of the Case to Pending Manually
To change the status of a case to Pending manually:
-
In the Case Details page, click More Actions and select Change Status.
The Change Status dialog appears.
-
In the Status list, select Pending.
-
Enter a note describing the issue.
Select from existing notes, or enter a new note, or both.
Existing notes to choose from are the following:
-
Manager Review
-
Issue in Progress
-
Other
-
-
Click Submit.
A confirmation dialog is displayed.
-
Click OK.
5.4.6 Bulk-Editing Agent Cases
Only an Investigation Manager can bulk edit Agent cases.
To change the case settings for multiple cases at once:
-
Log in as an Investigation Manager. The Cases Search page is displayed.
-
Select the cases you want.
-
Click Bulk Edit.
Note:
For out-of-the-box OAAM roles, the Bulk Edit button is disabled for the Investigator role and enabled for the Investigation Manager role. -
Change the case settings you want and add notes.
The Close action is allowed regardless of severity.
Severity is editable regardless of status. You can also change the severity of cases irrespective of their Closed status.
-
Click OK to perform the bulk edit.
A confirmation dialog appears with a message that the bulk editing operation was performed successfully. If you are closing a case and there are Agent cases that were already in the Closed status at the time of the bulk edit operation, a message appears, saying that the Agent cases have to be in the New or Pending status for a bulk close action to be executed.
-
Click OK to dismiss the dialog.
When you refresh the search, the status is shown for those cases in the results.
Last Case Action on the Search page is not updated immediately after a bulk edit. It is updated when you launch the Search page again.
Usage Example: Zeek is a Dollar Bank fraud investigation manager. He always searches for overdue cases at the beginning of his shift. He exports the list of cases in a XLS and sends it via email to his team as a reminder. If Zeek finds that a number of overdue cases have already been resolved but were mistakenly left open he selects them all and closes them with a resolved status and notes.
5.5 Multitenant Access Control
Multitenancy access control handles access to the OAAM Administration Console for each organization so that it results in a different experience for fraud investigators and CSRs of multiple tenants. Businesses can limit a fraud investigator's access to certain Organization IDs through multitenant access control.
For example, Second Bank is an international bank with hundreds of fraud investigators across the world. Second Bank has deployed OAAM to secure both the consumer banking application and the business banking application. The bank divides its team into two organizations: fraud investigators who investigate consumer banking issues and those who investigates only business banking issues. Second Bank has strict control over all session, policy, and other data visible to each of these fraud investigator organizations if multitenant access control is enabled. When the consumer banking fraud investigators search, view, create, edit cases they only see data related to consumer banking. Likewise the business banking fraud investigators only see data for business banking.
Table 5-30 summarizes the multitenant access control experience in OAAM for investigators.
Table 5-30 Multitenant Experiences for Fraud Investigators
| Task | Fraud Investigator Experience |
|---|---|
|
Create CSR Case |
N/A |
|
Create Agent Case |
Fraud Investigators can only create cases for the organization(s) they have access to. |
|
Search Cases |
Fraud Investigators can search for and view cases from those organizations to which they have access to. |
|
Case Details |
Fraud Investigators can see the case detail for cases that belong to any user belonging to an organization they have access to or cases that are associated with their Organization ID. |
|
Case Actions |
Fraud Investigator can perform case actions on a cases they have access to. |
|
Sessions Search and Details Pages |
Fraud Investigator will not be able to access the detail pages if multi-tenancy access control is enabled. If multitenant access control is disabled, the Fraud Investigator is able to access details pages from any sessions search if the link is available. |
|
Search Sessions |
Fraud Investigators can search sessions that belong to users in the organizations that they have access to and those organizations to which they have access. |
|
Link Sessions |
Fraud Investigators can link sessions to the cases belonging to organizations that they have access to. Also in search sessions for linking, Fraud Investigators are able to view the sessions of only those organizations to which they have access. |
Multitenancy access control is only applicable for case management data access. Hence multitenancy access control is only applicable for Investigator and CSR roles.
5.6 Best Practices and Recommendations
Best practices and recommendations are provided below:
-
An investigator looks into suspicious situations either escalated from customer service or directly from alerts.
-
A Fraud Investigation Manager would want to see which cases need to be given attention by his team.
-
A Fraud Investigation Manager must routinely search for overdue cases to make sure none of the cases are pending.
-
If a customer suspects fraud, then the severity level assigned is High. For example, if the customer wants a different image, then the severity level assigned is Low. Severity levels of a case can be escalated or de-escalated as necessary. Anyone can change the severity of cases.
-
Investigators should not open cases that other investigators are working on.
-
An Investigator should open an escalated case and view the logs for notes entered by the CSR and CSR Manager. For example, the notes can show that the CSR escalated the CSR case to an Agent case because he suspected fraud activity.
-
Investigators should filter the time-stamp column so the oldest case is on top.
-
Use the Transaction: Check Transaction Count Using Filter condition to verify entities in a group. For example, if a user wants to verify if the account number being used in a transaction belongs to a "suspicious account" group, then the transaction should be blocked.
