19 Creating and Managing Entities
Oracle Adaptive Access Manager can evaluate the risk associated with a transaction in real-time to prevent fraud and misuse. Any process a user performs after successfully logging in can be termed as a transaction. The core elements of an Oracle Adaptive Access Manager transaction are entities and transaction data. This chapter focuses on creating and managing entities that are used in an OAAM transaction.
This chapter includes the following topics:
19.1 Concepts
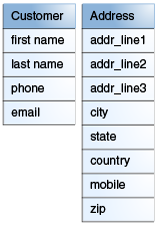
An entity is a data structure that can be reused in multiple transactions. For example, the Address entity could be used as a shipping address, billing address, home address, and so on. Most entities also combine multiple data points into the structure for data optimization. For example, the set of properties in an address could include addr_ line1, addr_line2, addr_line3, city, state, zip, country, and mobile entity properties. The properties of a customer could include first name, last name, phone, and email entity properties, as shown in Figure 19-1.
Entities
-
Reduce configuration time since they are only set up once
-
Minimize stored data. For example, John's shipping address is saved in the database once and all transactions from John refer to that instance.
-
Increase processing speed. For example, John's credit card is stored as a hash and compared as such.
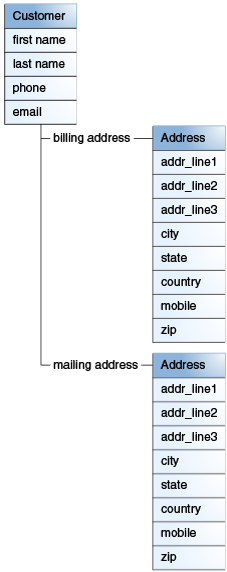
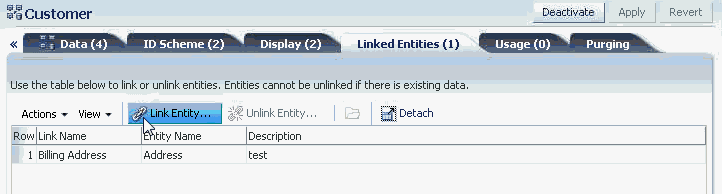
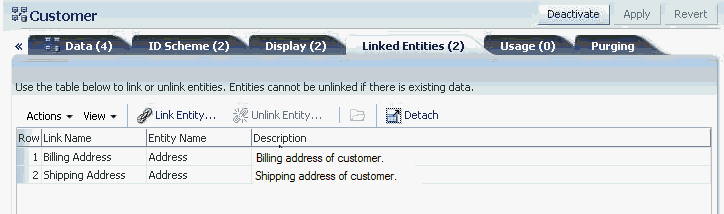
Entities can be defined and associated as an instance of a transaction. The following example shows the Address entity. A security administrator can define a Customer entity to be used in an ecommerce transaction. As part of the Customer entity definition, he can link the Address entity as a Shipping Address and as a Billing Address, as shown in Figure 19-2. The Address entity is shown below with its two instances, Shipping Address and Billing Address. An entity definition is the original model on which the entity instance is patterned. Entity instance creation will only be possible if its corresponding entity definition already exists in the database.
An entity can be linked to another entity. A relationship is the association between entities. The Patient entity can be linked to another entity of type Address. The relationship between "Patient" and "Address" entities can be said to be one-to-one (1:1) because they have a one to one direct mapping. The Address entity is not dependant on the Patient and can reside by itself. It can be linked to other entities like Customers and Providers.
An entity can have many references to other entities. For instance, the "Patient" entity can have multiple instances of the "Address" entity like "Home Address," "Work Location" and so on. You cannot create multiple linked entity instances for a parent entity instance for a given relationship name, hence a one to many relationship between two entities for a given relationship name is not supported. The "Patient" entity cannot have multiple home addresses.
An individual instance of information transfer can be called a transaction. Bill pay, wire transfer, and address change are transactions. Transactions in OAAM are used for fraud detection. They can be evaluated using a set of rules and predictive models. The core elements of a transaction are entity data and transaction data. Entity data refers to the entities defined and associated as an instance of a transaction. Oracle Adaptive Access Manager can take inputs from a variety of sources and channels and quickly map application data using the OAAM Administration Console.
Data could be mapped to attributes of the entity. An entity data map is shown below.
| Key: first name | Value: Mark |
|---|---|
| Key: last name | Value: Henry |
| Key: email | Value: x@y.com |
| Key: shipping.addr_line1 | Value: #1, Lex residence |
| Key: shipping.addr_line2 | Value: Redmond street |
| Key: shipping.zip | Value: 418001 |
| Key: customer id | Value: 9876543210 |
An attribute of an entity can be an entity itself. Such an attribute is called a linked entity. For instance, "Shipping Address" is a linked entity of the entity, "Customer."
Customer: Customer ID (attribute)
first name (attribute)
last name (attribute)
email (attribute)
shipping address (linked entity) - type
address:address line1
address line2
Zip
Entities reduce configuration time since they are only set up once. This minimizes stored data. For example, a user's shipping address is saved in the database once and all transactions from the user refer to this instance. Entities increases processing speed because the data is saved as a hash and compared as such. At runtime the transaction will include this data and risk evaluations can be made against the data.
The key concepts of entities are the following:
-
You create an entity by specifying the details about its attributes.
-
You can create associations to reflect relationships between entities.
-
You can define an entity to be used in a transaction.
-
You can run risk evaluations against the entity data.
-
You can search on entity data which includes attributes that are related to entities that are mapped to a particular transaction type to find potential fraud.
-
You can add entity data to groups for use in rules evaluation. (For example, you can add credit cards and accounts to a blacklisted group, so any transaction from this account or credit cards can be blocked).
-
You can create, update, or search entities in the context of a client application that provides the transaction.
Configuration that defines a reusable data structure such as address.
When an entity linked to another entity or used in a transaction definition an instance is created such as home address or work address
When an entity instance is used in a runtime operation an individual occurrence is created such as the shipping address used in order number 356893
Entity data may be configured as one of four types including string, numeric, date and Boolean. The string data type is used for the majority of use cases. The numeric data type should be used when arithmetic calculations will be performed on the data by the rules. The date data type is used for data specific data. Boolean data type is used for True/False data.
When runtime entity data is displayed in the OAAM Administration Console the labels shown will be those defined in the ID Scheme tab of the entity definition.
When an entity is linked to another the linked entity is given a name which will be used to identify it in other Admin console screens including transaction definitions.
19.2 How to Create Entity Definitions
Security administrators utilize the OAAM Administration Console to configure entities such as an address or credit card. This section contains instructions for creating simple and complex entities. For instructions for defining the transaction, refer to Chapter 20, "Managing Transactions, refer to Chapter 20, "Managing Transactions.".
19.2.1 Entity Elements
An entity definition includes entity type, the data elements and their properties, the ID scheme, and linked entities if there are any.
Best Practices: The entity data type, length, and so on should not be altered after the entity has been defined and used in a transaction.
19.2.1.1 Data Elements
Data elements are used to describe the attributes that make up an entity. For example, the credit card entity has attributes such as address line 1, address line 2, city, zip, and state. Data elements, such as description, length, type, and so on, are used to describe each attribute.
19.2.1.2 Display Element
Display elements are the elements you want to present and the order in which you want to present the value of an entity in a user interface. For example, if you want to display an address, you would want to show address line 1 as the first item, address line 2 as the second item, city as the third item, state as the fourth item, and zipcode as the fifth item.
19.2.1.3 ID Scheme
An ID scheme consists of the data elements that can uniquely identify an entity, in other words, you are defining the unique combination that identifies the entity. For example, the credit card entity has many attributes, but the way to uniquely identify a credit card is by using the 16-digit credit card number. In that case, the ID scheme is just the credit card number.
Another example, the address entity has address line 1, address line 2, city, state, and zipcode as attributes. Address line 1, address line 2, and zipcode, without the state and city attributes, can still be used to identify the address uniquely.
For session details to appear for transaction and entity data, transactions are sent with all the ID scheme attributes. ID scheme is similar to a composite key on the table. All attributes that had been defined in the ID scheme must be sent in order for the ID scheme to be able to uniquely identify and update the transaction. For example, if SSN is the only attributes present in ID Scheme, the incoming transaction is uniquely identified when SSN present. If an entity does not include SSN, it is considered a new entity when an entity is created. For example, the entity with firstname, lastname, SSN is a different entity than an entity with firstname, lastname, and telephone.
19.2.2 Overview of Creating a Simple Entity Definition
A simple entity is created without any previously linked entities or new linked entities. An overview for creating a simple entity is presented in this section. For detailed instructions on creating an entity definition, refer to Creating an Entity Definition.
-
Open the Entity Definition Search page, as described in Section 19.3.2, "Searching for Entity Definitions."
-
Create an entity with an entity name, key and description.
-
Click New Entity at the upper right corner to create a new entity.
-
Enter entity name, definition key, and description, and click Apply.
The definition key is the unique identifier for an entity definition. For example, you specify "address" as the key for an entity definition. You will not be able to create another entity definition with the same key value.
-
Click OK when the confirmation dialog appears. The entity was created successfully.
-
-
Add attributes to the entity. For information, refer to Section 19.2.4.2, "Adding and Editing Data Elements."
-
Click the Data tab and then the Add button in the toolbar to add a row for an attribute.
-
Define the attributes of the entity and click Apply.
-
-
Define the ID scheme. For information, refer to Section 19.2.4.3, "Selecting Elements for the ID Scheme."
-
In ID Scheme tab, click Add to add data elements.
-
Select the ID labels and click Add.
-
When the confirmation dialog appears, click OK.
The data elements added successfully
-
Add another data element.
-
-
Specify display elements. For information, refer to Section 19.2.4.4, "Specifying Data for the Display Scheme."
-
Click Display tab and then the Add button in the toolbar to choose the display elements of the entity.
-
Select the display element and then click Add.
-
Click OK to dismiss the confirmation dialog.
-
-
Activate the entity. For information, refer to Section 19.2.4.7, "Activating Entities."
A simple entity is created without any previously linked entities or new linked entities.
19.2.3 Overview of Creating a Complex Entity Definition
An entity can be linked to multiple entities based on a relationship name. A complex entity has other entities linked to it by a relationship name. For instance, a Customer can be defined by following attributes:
Customer: first name (Simple attribute)
last name (Simple attribute)
email (Simple attribute)
shipping address (linked entity of type address)
address: addr line1
addr line2
zip
phone number
Shipping address is a relationship name which links customer to another entity of type address.
An overview for creating a complex entity is presented in this section. For detailed instructions on creating an entity definition, refer to Creating an Entity Definition.
-
Open the Entity Definition Search page, as described in Section 19.3.2, "Searching for Entity Definitions."
-
Create an entity with an entity name, key and description.
-
Click New Entity at the upper right corner to create a new entity.
-
Enter entity name, key, and description.
-
Click OK when the confirmation dialog appears. The entity was created successfully.
-
-
Add attributes to the entity. For information, refer to Section 19.2.4.2, "Adding and Editing Data Elements."
-
Click the Data tab and then the Add button in the toolbar to add a row for an attribute.
-
Define the attributes of the entity and click Apply.
-
-
Define the ID scheme. For information, refer to Section 19.2.4.3, "Selecting Elements for the ID Scheme."
-
In ID Scheme tab, click Add to add data elements.
-
Select the ID labels and click Add.
-
When the confirmation dialog appears, click OK.
The data elements added successfully
-
Add another data element.
-
-
Specify display elements. For information, refer to Section 19.2.4.4, "Specifying Data for the Display Scheme."
-
Click Display tab and then the Add button in the toolbar to choose the display elements of the entity.
-
Select the display element and then click Add.
-
Click OK to dismiss the confirmation dialog.
-
-
Link the entity to another entity. For information, refer to Section 19.2.4.5, "Creating Associations to Reflect Relationships between Entities."
-
Activate the entity. For information, refer to Section 19.2.4.7, "Activating Entities."
19.2.4 Creating an Entity Definition
Follow the steps in this section to create a new entity definition. You will have to provide the required information for all tabs of the Entities Details page before you can activate the entity.
Note:
After creating an entity, you must activate it if you want to use it in a transaction. Only active entities can be used in a transaction. By default an entity is disabled when it is created. For information on activating an entity, refer to Section 19.2.4.7, "Activating Entities."19.2.4.1 Initial Steps
To create an entity, follow these steps.
-
Open the Entity Definition Search page, as described in Section 19.3.2, "Searching for Entity Definitions."
-
In the Entity Definition Search page, click the New Entity button.
Alternative methods to open create pages are listed in Section 3.10, "Search, Create, and Import."
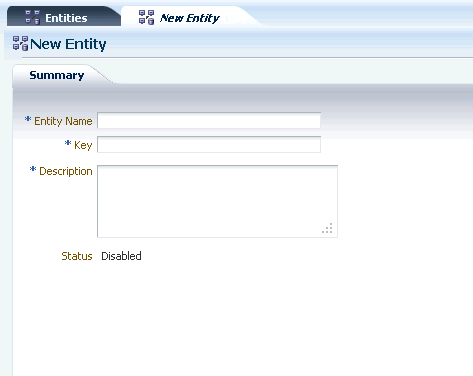
A New Entity page is shown in Figure 19-3.
-
In the New Entity page, enter a unique entity name in the Entity Name field.
For example, for the Address entity, enter Address in the Entity Name field.
-
Enter an entity key (string) in the Entity key field that will indicate the entity.
The entity Key is the unique identifier provided by the system integrator which is used when creating and updating entities via the API. Enter the key provided by the integrators. When modifying transactions, do not change the key. The key may be referenced by other applications.
-
Enter a description about the data element in the Description field. For example, you can enter "Address of customer."
-
Click Apply to apply your changes.
A confirmation dialog appears with a message that the entity was created successfully.
-
Click OK to close the dialog.
The Entity Details page appears for the entity that you have just created.
The page contains seven tabs:
-
Summary - General Details
-
Data - Data Elements (Used for adding and editing data elements of entity)
-
ID Scheme - Data Elements (Used for adding and editing data elements of an entity)
-
Display - Display Elements (Used for adding and editing display elements of the entity based on the Identification Scheme)
-
Linked Entity - Data Element (Used for linking entities)
-
Usage - Displays information on how the entity is being used
-
Purging - Enables set up of purging for entity data
The tab titles for Data, ID Scheme, Linked Entities, and Display will show the number of data elements present, in parenthesis, when you have added your elements.
-
19.2.4.2 Adding and Editing Data Elements
Use the Data tab to specify or the data elements that are part of that entity.
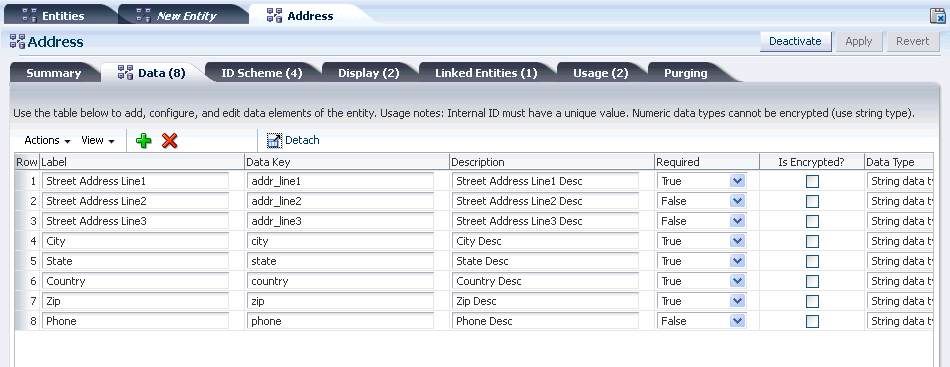
For an entity like Address, the attributes could be Address Line1, Address Line2, Address Line3, City, State, Zipcode, and Country. Metadata elements, such as a label, description, data type, and so on, describe the properties of the attribute.
Define the elements for each attribute of an entity by following these instructions:
-
Enter a label for the attribute in the Label field.
For example, Address Line1.
-
Specify the data key in the Entity Data key field.
Ensure that the Entity Data Key used is the exact string coming from the protected application. The Entity data key is used to identify the data element. The data key is specified for internal use. It is typically used in rule conditions and other purposes.
-
Enter a description about the data property in the Description field.
For example, the address of the customer logging in.
-
Specify whether the element is required in the Required field.
Some data elements are not populated all the time because the entity can function without this data. Those elements are marked True or False for whether they are required For example "Address Line2" in an address is not required since many addresses do not have "Address Line2."
-
Specify whether the element should be encrypted in the Is Encrypted field.
If Is Encrypted? is set to True, data is encrypted so that it can be stored securely in the database; thereby protecting sensitive data.
Encryption is used for string data fields; other data fields are not required to be encrypted.
Encrypted fields have the following constraints:
-
These fields should not be used in rules. If they are used, you cannot specify regular values for comparing against these fields; the values will have to be encrypted values.
-
These fields cannot be used in the search criteria while querying for transactions through the query screen.
Numeric fields cannot be encrypted.
-
-
Specify the data element's data type in the Data type field and click Apply.
A data type is an attribute that specifies the type of data that the attribute can take: Boolean data type, Date data type, Name value profile, Numeric data type, and String data type.
Note:
Encryption is not allowed for a numeric data type. When a numeric data type is selected, the "Is Encrypted" column becomes inactive. -
When the confirmation dialog appears, click OK.
-
If you want to add another element, click the Add button on the toolbar and repeat Steps 1 through 7.
You can use the Delete button to delete the data elements within the entity.
Note:
The Row and Column values are automatically assigned based on the data type and should not be changed unless you want to rearrange values in the database.19.2.4.3 Selecting Elements for the ID Scheme
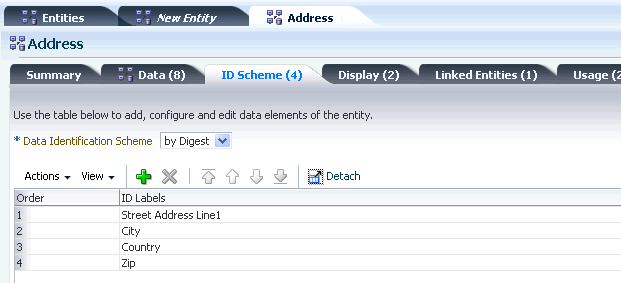
In the ID Scheme tab, select the elements that you want to use to uniquely identify the entity.
The Address entity has Address Line1, Address Line2, Address Line3, City, State, Zipcode, and Country as attributes. The Address Line1, City, Country, and Zipcode attributes can be used to identify the address uniquely. The Address Line2 attribute is not necessary.
Address Line1 alone would not uniquely identify an address. For example, 150 Main Street can exist in more than one location.
An example of a ID Scheme tab is shown in Figure 19-5.
-
Select the Data Identification Scheme.
Identification Scheme determines how an entity is uniquely identified using the elements that are part of the entity. The elements that are selected should be stored as plain text (key) or encrypted (digest).
-
By Key: This scheme creates a unique identifier by simply concatenating the selected elements of the entity.
Tip:
When transactions are created, OAAM generates keys for the ID attributes of the transaction by concatenating the key-attributes of elements defined in the ID scheme of an entity. The character used to concatenate the entity key-attributes is specified through the property,tracker.transaction.key.generation.scheme.concatenate.separator. The default value for the character is "^". Since the character "^" is used by OAAM, ensure that the entity-key-data value you enter does not contain "^". -
By Digest: This scheme creates a unique identifier by hashing the values of the selected elements of the entity. The resultant key is usually cryptic. Use this scheme when the data values are large or if they need to be secured.
-
-
Click the Add button on the toolbar to add a data element.
-
In the Add Data Elements screen, select the data elements to add to the ID Scheme and click Add.
You can select one or several data elements to add to the identification scheme. After the data elements are added, they are not available in the list for further selection.
-
Select the order of the elements
The order of the rows in the ID scheme tab determines how information is stored in the database and uniquely identified. The order determines how the data is concatenated while forming the data that identifies the entity. Order is not required and is automatically pre-filled if you do not fill in that information.
Since order is important, if changes are required later, you can reorder the columns by dragging and dropping the rows.
You can use the Delete button to delete the data elements within the entity.
19.2.4.4 Specifying Data for the Display Scheme
In the Display tab, define the display scheme. The display scheme specifies the data elements to present and their order when you display the value of the entity in reports:
-
The data elements form the entity data that can be displayed.
-
The order determines how the data is concatenated while forming the data to be displayed for the entity
An example of a Display tab is shown in Figure 19-6.
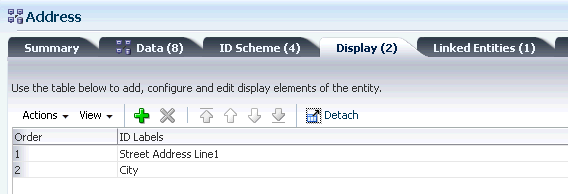
The Data elements that you have selected to present are shown in the Transaction Details page.
To select the data elements, follow these steps.
-
Click the Add button to add a data element.
-
In the Add Data Elements screen, select the data elements to add for displaying and click Add.
For example, for an address, you can choose to present Street Address Line1 and City.
-
Select the order of the elements
The order determines what is shown first, second, third, and so on when the data is displayed for the entity. Order is not required and is automatically pre-filled if you do not fill in that information.
For example, if you want to display an address, you would want to show Street Address Line1 as the first item and City as the second item.
Since order is important, if changes are required later, you can reorder the columns by dragging and dropping the rows. For example, in the display, you might decide that you want "City, State, Zip code" for addresses in the UK and USA.
You can use the Delete button to delete the display elements.
19.2.4.5 Creating Associations to Reflect Relationships between Entities
An entity can be linked to another entity. The Patient entity can be linked to another entity of type Address. The relationship between "Patient" and address entities can be said to be one-to-one (1:1) because they have a one to one direct mapping. The Address entity is not dependant on the Patient and can reside by itself. It can be linked to other entities like Customers and Providers.
To create associations between entities, perform the following steps:
-
From the entity's detail page, click the Linked Entity tab, and then the Link button in the toolbar to select the entity to link to this entity.
-
In the Entity Name field, enter the name for the entity you want to select to link to this entity and click the Search button next to the Entity Name field.
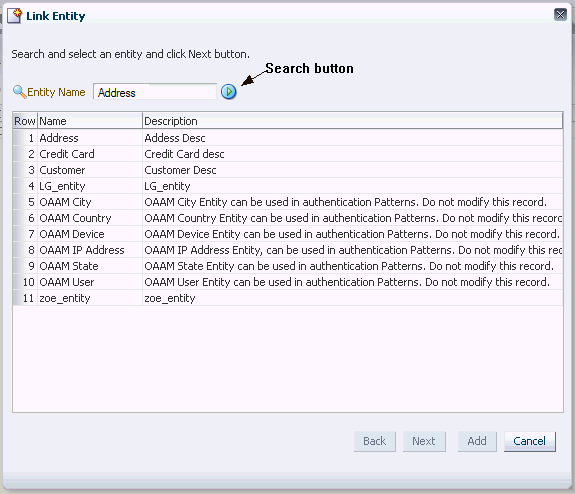
The entity appears in the results table with the name and description.
Note:
An entity cannot be linked to itself. For example, a Patient cannot be linked to another patient. -
Select the entity from the list of entities to link to this entity and click Next.
Only one entity can be selected at a time. The selected entity for linking is displayed with its attributes and links. For example, Street Address Line1, Street Address Line2, Street Address Line3, City, State, Country, Zip, and Phone are examples of attributes that could be listed for Address.
-
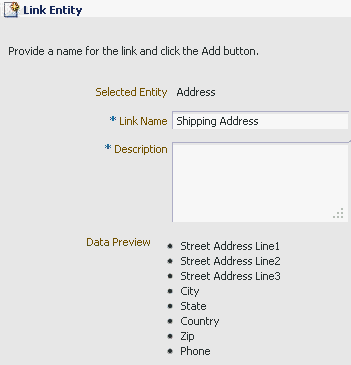
Enter a link name and description and click Add to link the entities. The linking name is the relation between the two entities.
The Data Preview displays the data fields of the entity.
For example, the Customer entity is linked to another entity of the type Address, and Shipping Address is the relationship name.
Shipping Address is the entity instance of the entity selected. The relationship name must be unique within the entity. For example, a Patient and a Provider entity can have linked entities with the same name "Home Address", but a Patient entity cannot have two Home Addresses.
19.2.4.6 Setting Up Entity Purging During Entity Creation
To set up purging for entity data, refer to Section 19.4, "Setting Up Targeted Purging for Entity Data."
19.2.4.7 Activating Entities
After creating an entity, you must activate it if you want to use it in a transaction. Only active entities can be used in a transaction. By default an entity is disabled when it is created.
-
In the Entity Definition Search page, select the row for each entity you want to activate.
-
Click the Activate button.
When you click Activate, the entity is validated for errors (if data elements are present). If there are any errors, they must be fixed before the entity is activated.
Only active entities can be used in a transaction. Make sure to activate an entity definition if you want to use it in a transaction.
19.2.5 What Happens When You Create an Entity Definition
When you create an entity definition, OAAM stores the information in its database schema:
-
Entity header-data (name, key, and so on) in VT_ENTITY_DEF
-
Entity data field definitions in VT_DATA_DEF_ELEM (with link through VT_DATA_DEF_MAP and VT_DATA_DEF).
-
ID Scheme and Display Scheme data in VT_DATA_DEF_ELEM (with link through VT_DATA_DEF_MAP and VT_DATA_DEF)
-
The relationship between entities (definitions) in VT_ENT_DEFS_MAP. The RELATION_TYPE column is used to specify the name of the relationship. For example an entity named "Patient" could have a relation to the "Address" entity with the RELATION_TYPE as "Home Address".
19.3 Managing Entities
This section contains procedures to manage entities.
19.3.1 Managing Entity Associations
Linking entities is extremely helpful in modularizing and reusing entity data. For instance you have an employee entity definition and a customer entity definition. Suppose you want to store address information for both the definitions. It is a better and more consistent approach to create an address entity definition and link it to employee and customer rather than adding address related attributes to the two entities individually.
Linked entity data can be used in transaction related rules for detecting and preventing fraud. Linked entities are stored in the VT_ENT_DEFS_MAP table
This section provides tasks related to linking entities.
19.3.2 Searching for Entity Definitions
To open the Entity Definition Search page, double-click Entities in the Navigation tree.
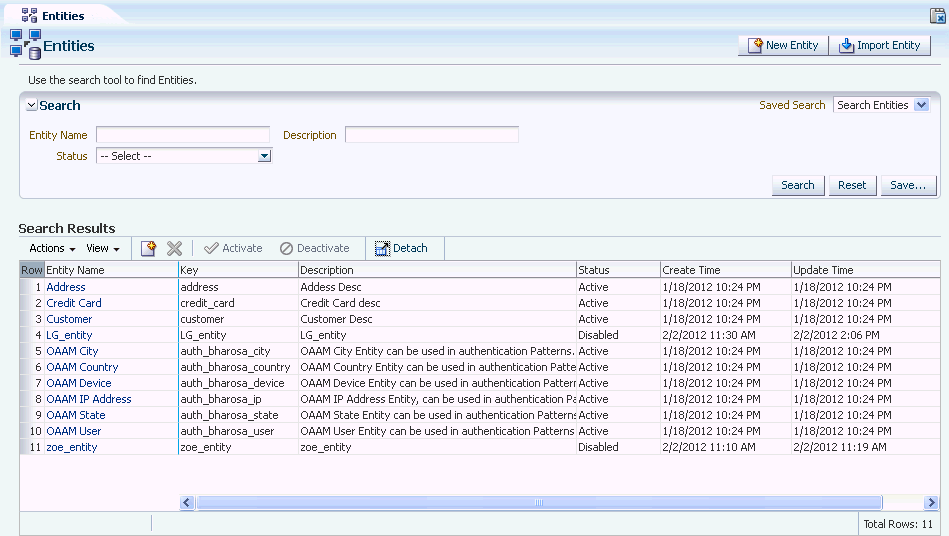
The Entity Definition Search page is the starting place for managing entities. From the Entity Definition Search page, you can:
-
List entities
-
Search for entities
-
Create new entities
-
Import/export entities
-
Activate/deactivate entities
-
Delete entities
-
Open the Entity Details page
An example of an Entity Definition Search page is shown in Figure 19-9.
19.3.3 Viewing Details of a Specific Entity
To view the details of a specific entity:
-
Open the Entity Definition Search page, as described in Section 19.3.2, "Searching for Entity Definitions."
-
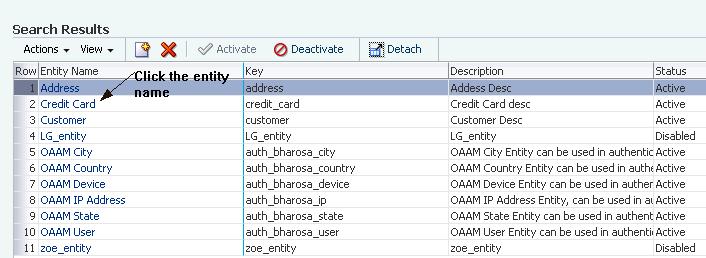
From the Entity Definition Search page, search for the entity you want.
-
In Search Results, click the entity name to open the Entity Details page.
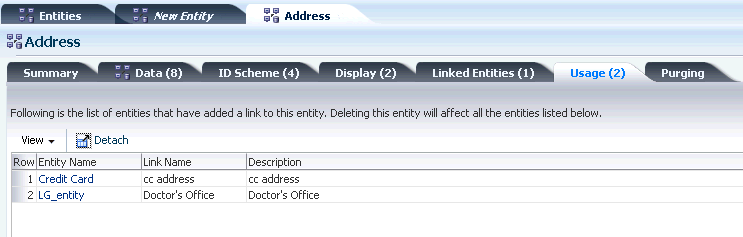
19.3.4 Viewing Entity Usage
The Usage tab can be used to view the list of entities to which a particular entity is linked. You can also delete one more such links from this page.
To view how the entity is being used, follow these steps:
-
If you are not in the Entity Details page of the entity you want details about, follow the instructions in Section 19.3.3, "Viewing Details of a Specific Entity."
-
Click the Usage tab to view a list of entities that have added a link to this entity.
The Usage tab indicates if the entity is being used by other entities and how edits to an entity impacts other entities.
If this entity is linked multiple times by another entity, the entity name displays different entity instance names of the entities it is linked to.
19.3.5 Editing the Entity
To edit the details of a specific entity:
Note:
Be cautious when editing entities. If you edit an entity and it is in several transactions, then the edits are applied to all instances of the entity in the different transactions.-
If you are not in the Entity Details page of the entity you want to edit, follow the instructions in Section 19.3.3, "Viewing Details of a Specific Entity."
-
From the Summary tab, you can modify the name and description of the entity; and activate or deactivate the entity.
-
From Data and ID Schemes tabs, you can modify the data elements of the entity.
If you delete a data element from the scheme, it is added to the Add list and available the next time you select Add Data Elements.
-
From the Display tab, you can edit the way the entity is displayed.
-
Click Apply.
19.3.6 Removing or Unlinking Entities
Unlinking a relationship is the same as deleting the relationship. However, deleting the linked entity is not the same. For example, you have a link customer->address (shipping address). Unlinking or deleting the relationship would delete the shipping address entry from the database. However, the address entity definition would still persist. Only its link with customer (with name shipping address) will be deleted. It might be still linked to customer by any other name (for example, billing address) or any other entity definition, for example, employee.
You can remove the selected instance of the linked entity only if there are no references to this instance in a transaction.
To unlink entities from an entity:
-
If you are not in the Entity Details page of the entity you want to unlink entities from, follow the instructions in Section 19.3.3, "Viewing Details of a Specific Entity."
-
Click the Link Entities tab and select the entity to unlink.
-
Click the Unlink Entity button to unlink the selected entity.
19.3.7 Changing the Relationship Name
To change the relationship name, follow these steps:
-
If you are not in the Entity Details page of the entity you want to edit, follow the instructions in Section 19.3.3, "Viewing Details of a Specific Entity."
-
Click the Linked Entities tab.
-
Highlight the linked entity and from the Actions menu, select Open Linked Entities.
-
From the Edit Linked Entities dialog, you can edit the information in the Link Name and Description fields, and click Save.
The relationship name is used in passing entity data while creating entity instances. It is also used when entities are used in transactions. During the mapping phase while creating transaction definitions, you need to link source data to the linked entity data. There are no particular conventions for naming. Although, symbol dot (.) should not be used.
19.3.8 Importing and Exporting Entities
This section contains instructions to import and export entities.
19.3.8.1 Exporting Entities
-
Open the Entity Definition Search page, as described in Section 19.3.2, "Searching for Entity Definitions."
-
In the Entity Definition Search page, enter the search criteria you want and click Search.
-
Select the row for each entity you want to export.
-
Click the Export button or select Export Selected from the Actions menu.
-
In the Export Entities screen, click Export.
-
In the Save screen, click OK.
19.3.8.2 Importing Entities
-
Open the Entity Definition Search page, as described in Section 19.3.2, "Searching for Entity Definitions."
-
In the Entity Definition Search page, click Import.
-
In the Entities Import screen, click Browse and locate the entity file you want to import.
-
Click OK.
19.3.9 Deactivating and Deleting Entities
This section contains information on deactivating and deleting entities.
19.3.9.1 Deactivating Entities
-
Open the Entity Definition Search page, as described in Section 19.3.2, "Searching for Entity Definitions."
-
In the Entity Definition Search page, enter the search criteria you want and click Search.
-
Select the row for each entity you want to deactivate.
-
Press the Deactivate button.
19.3.9.2 Deleting Entities
-
Open the Entity Definition Search page, as described in Section 19.3.2, "Searching for Entity Definitions."
-
In the Entity Definition Search page, enter the search criteria you want and click Search.
-
Select the row for each entity you want to delete and select the Delete button from the toolbar.
If the entities selected for deletion are not used or linked to a transaction, a warning message is shown asking for confirmation.
If an entity is used, you will not be allowed to delete it.
-
Click Delete to delete the entities.
-
In the confirmation dialog, click Yes.
If you deactivate an entity, it will not be available for you to use in transactions. Entities that are referenced by transactions cannot be deleted or deactivated.
19.4 Setting Up Targeted Purging for Entity Data
Most entity related data are non-transactional and persistent in nature. To effectively manage the non-transactional and persistent entity data archival and purging, use targeted purging policies.
The targeted purging policy determines the inclusion and exclusion of entity definitions to purge from the database. You can decide not to purge the data at all or to purge at a different time sequence from other entities. To set up targeted purging for entity data, follow the instructions below:
-
Set up the archive tables and the flag to true, if you want the entity and transaction data to be archived.
You cannot selectively choose to only archive the data since archiving is part of the purge process.
-
If you are not in the Entity Details page of the entity you want to view, follow the instructions in Section 19.3.3, "Viewing Details of a Specific Entity."
-
Click the Purge tab.
-
If you want to purge data, deselect the option, "Do not purge any entity data." If you do not want to purge data, select "Do not purge any entity data."
Note: Entity definition and transaction definitions are retained even though the data is being purged.
The purging mechanism is hierarchical. Data is purged from transaction down to entity and then related entities.
-
Set the database to delete data older than a specified number of days.
The purge-unused-entity-data-older-than-days option determines what data, including related entities, should be purged.
You must convert years and months into days for the unit to specify.
Data that has not been updated in the last 180 days is purged by default.
If the retention period is 0, then the data is never purged. The retention period cannot take alphabetic characters or negative numbers.
The retention period cannot be null or empty if you chose the option to purge the data.
19.5 Best Practices
This section outlines some best practices for entity creation.
-
Any data structure that will be reusable across transactions should be an entity.
-
Any sensitive data, such as credit card and social security numbers, should be encrypted in the database.
-
Ensure that the Data Key used is the exact string coming from the protected application.
-
If you want to rearrange the fields in the database for performance purposes, you can modify the row and column values. Only the first 3 columns out of the ten are indexed by default. Rearranging the fields impacts performance.