8 Setting Up OTP Anywhere
OTP Anywhere is a secondary risk-based challenge solution consisting of a server generated one time password delivered to an end user via a configured out of band channel. Supported OTP delivery channels include short message service (SMS), email, and instant messaging.
This chapter focuses on setting up Oracle Adaptive Access Manager to use OTP for secondary, risk-based user challenges. Out of the box, OAAM provides User Messaging Service (UMS) as the delivery method. For other custom methods, refer to the Oracle Fusion Middleware Developer's Guide for Oracle Adaptive Access Manager.
This chapter contains the following sections:
8.1 Introduction and Concepts
This section introduces you to the concept of One Time Password (OTP) and how it is used in Oracle Adaptive Access Manager.
8.1.1 What is a One Time Password
A one-time password is a randomly generated, single-use authentication credential. OTP is a form of secondary authentication that is used in addition to standard user name and password credentials to strengthen the existing authentication and authorization process, thereby providing additional security for users. When the user is OTP-challenged, a one-time password is generated and delivered to the user through one of the configured channels. The user must retrieve the one-time password and enter it when prompted, before the one-time password expires.
The one-time password may be either numeric or alphanumeric and any configured length and the randomization algorithm is pluggable.
The following are major benefits of using out-of-band OTP:
-
The one time password is delivered to the valid user through one of the configured channels. These can include SMS, IM, and email.
-
The user does not require any proprietary hardware or client software of any kind.
8.1.2 About Out-of-Band OTP Delivery
Oracle Adaptive Access Manager 11g contains one time password authentication capabilities that support delivery of the OTP via the following three out-of-band channels:
-
email
-
SMS
-
instant messaging
By default, only cell phone registration is displayed on the OTP Registration page.
8.1.3 How Does OTP Work?
During the Registration process in OAAM, the user is asked to register for questions, image, phrase and OTP (email, phone, and so on) if the deployment supports OTP. Once successfully registered, OTP can be used as a secondary authentication to challenge the user.
The administrator can enable the OTP if the deployment supports OTP. The login process begins with entering standard user name and password credentials. During a session, for example, when the user is making a large transaction, if the user is OTP-challenged, the password is delivered to the user through the configured delivery channel. The user retrieves the one-time password, then enters it.
If the correct answer is provided, the user is directed to continue with the operation. If the user answers incorrectly, he is allowed other attempts until he either answers correctly or is locked out of his account after a certain number of failures. By default, the user is allowed three attempts to provide the correct answer.
8.1.4 OTP Failure Counters
The failure counter is incremented when the user supplies an incorrect answer during a challenge.
OTP failure counters consolidate failures from different channels. For example, if multiple channels are used, the OTP status displays Locked if the combined OTP counters are above the threshold. So, if user failed SMS twice and Email once and threshold is 3, the user is locked.
The Reset Action resets all challenge failure counters:
-
Reset KBA: Re-register KBA; KBA and OTP counters are reset to zero
-
CSR KBA reset: Re-register KBA; KBA and OTP counters are reset to zero
-
Reset OTP: Re-register OTP; KBA and OTP counters are reset to zero
The Unlock action unlocks the user account for both KBA and OTP:
-
Unlock KBA: KBA and OTP counters are reset to zero
-
Unlock OTP: KBA and OTP counters are reset to zero.
8.1.5 Challenge Type
The challenge type is the delivery channel used to send an OTP to challenge the user. For example, policies can challenge using OTP via the challenge type (email, SMS, or IM).
| Challenge Type | Description |
|---|---|
|
ChallengeEmail |
OTP challenge via email |
|
ChallengeSMS |
OTP challenge via SMS |
|
ChallengeIM |
OTP challenge via instant messaging |
An integrator can create or configure a challenge type to handle a challenge that is required, such as generating the "secret" used for the challenge to delivering the "secret" to the user and finally validating the user's input.
The challenge type properties are used to associate a challenge type with a Challenge Processor, the java code needed to perform any work for challenges.
8.1.6 KBA vs. OTP
Oracle Adaptive Access Manager deployments may choose to use both KBA and OTP or each separately or no challenge mechanisms at all. If both KBA and OTP are being used in a deployment, the security team may choose to use OTP first for high risk situations and then KBA.
For example, a user logging in from a new IP addresses in a city he often logs in from is relatively low risk on its own, so a KBA challenge is a good option to gain additional verification that this is the valid user. If, however, a user is attempting a funds transfer of more than $1000 using a device and location he has never accessed from previously and the user has never performed a transfer, a stronger measure such as OTP Anywhere would be warranted.
If a customer has both KBA and OTP enabled, the priority is configurable through properties. The default is to OTP challenge first and then KBA challenge for high risk situations.
For information on KBA and OTP Anywhere priority, see Table 10-33, "OAAM Challenge Trigger Combinations".
8.2 Quick Start
The first step in starting to use OTP Anywhere is to enable it using the Properties Editor in the OAAM Administration Console.
This checklist provides you with the basic steps for enabling OTP Anywhere out of the box. Included are links to pertinent documentation and prerequisites.
Table 8-2 Quick Start for Enabling OTP Out of the Box
| # |
Task | Details |
|---|---|---|
|
1 |
Enable OTP Anywhere Registration |
OTP Challenge is not enabled by default. It has to be enabled by setting the following properties to true:
|
|
2 |
Make SMS Challenge Type Available. |
Enable the SMS Challenge Type by setting the following property to true:
This makes it possible for the policies to challenge using OTP via SMS. |
|
3 |
Configure UMS URLs and Credentials. |
Set the following properties:
|
8.3 Setup Roadmap
Table 8-3 lists the high-level tasks for configuring OTP for use with OAAM.
| Number | Task | Information |
|---|---|---|
|
1 |
Enable and configure User Messaging Service (UMS) for SMS delivery gateways on the SOA that the OAAM Server is configured to send messages through and the SMS delivery channel. UMS comes with a number of drivers that handle traffic for a specific channel. Configure UMS to use SMS for sending the one-time password. |
|
|
2 |
Set up UMS URLs and credentials so that OAAM can communicate with the UMS server via web services APIs to send the OTP code to the user via the challenge type. |
Section 8.5, "Setting Properties in OAAM for UMS Integration." |
|
3 |
Enable the SMS challenge type so that it can be used to challenge the user if secondary authentication is required. |
|
|
4 |
Enable registration and user preferences. The user can use the pages for profile registration and resetting OTP profile. |
|
|
5 |
Set up the registration and preferences page input fields for the user. Input properties includes maximum length for the email address the user can enter, validation for the email address field (expression), and so on. Note: Any user facing strings need to be duplicated into resource bundle. |
|
|
6 |
Configure your policies to use OTP challenges. |
Section 8.9, "Configuring Your Policies and Rules to Use OTP Challenge." |
|
7 |
The registration page could be fully customized using the resource bundle (client_resource_<locale>.properties file). Also, the challenge type message subject, the body of the message, and the message itself could be fully customized by specifying the custom values in resource bundle files and deploying the changes via OAAM extension shared libraries |
Section 8.10, "Customizing OTP Registration Text and Messaging." |
8.4 Prerequisites for Configuring OTP
Ensure that the following prerequisites are met before configuring OTP for your application:
Figure 8-2 shows an OTP implementation.
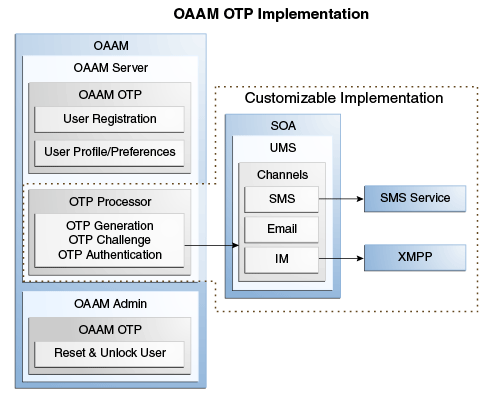
8.4.1 Install SOA Suite
Install the Oracle SOA Suite, which contains UMS.
For information, refer to the Oracle Fusion Middleware Installation Guide for Oracle SOA Suite and Oracle Business Process Management Suite.
8.4.2 Configure the Delivery Channels
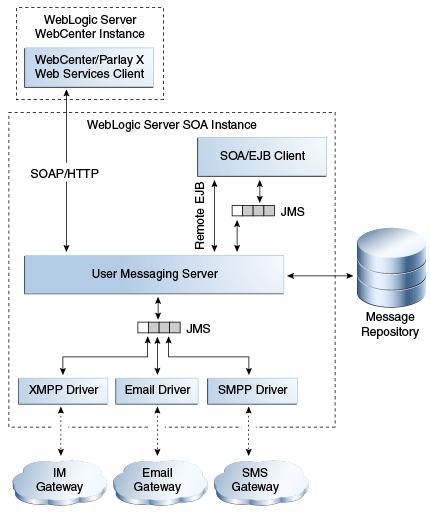
In addition to the components that comprise UMS itself, the other key entities in a messaging environment are the external gateways required for each messaging channel. These gateways are not a part of UMS or Oracle WebLogic Server. Since UMS drivers support widely-adopted messaging protocols, UMS can be integrated with existing infrastructures such as an email servers or XMPP servers. Alternatively, UMS can connect to outside providers of SMS service that support SMPP.
UMS must be configured for appropriate delivery gateways on the SOA that the OAAM Server is configured to send messages through.
UMS Drivers connect UMS to the messaging gateways, adapting content to the various protocols supported by UMS. Drivers can be deployed or undeployed independently of one another depending on what messaging channels are available in a given installation.
8.4.2.1 Email Driver
Configure the Email driver to a SMTP server. See the "Configuring the Email Driver" section of Oracle Fusion Middleware Administrator's Guide for Oracle SOA Suite for how to configure the Email driver.
8.4.2.2 SMPP Driver
Short Message Peer-to-Peer (SMPP) is one of the most popular GSM SMS protocols. User Messaging Service includes a prebuilt implementation of the SMPP protocol as a driver that is capable of both sending and receiving short messages.
Note:
For SMS, unlike the Email driver that is deployed out-of-the-box, you need to deploy the SMPP driver first before modifying the configurations.Configure the SMPP driver as described in the "Configuring the SMPP Driver" section of the Oracle Fusion Middleware Administrator's Guide for Oracle SOA Suite. You will need to provide parameter values for connecting to the driver gateway vendor.
Table 8-4 Connecting to the Vendor
| Parameter | Description |
|---|---|
|
SmsAccountId |
The Account Identifier on the SMS-C. This is your vendor account ID which you need to get from the vendor. |
|
SmsServerHost |
The name (or IP address) of the SMS-C server. TransmitterSystemId |
|
TransmitterSystemPassword |
The password of the transmitter system. This includes Type of Password (choose from Indirect Password/Create New User, Indirect Password/Use Existing User, and Use Cleartext Password) and Password. This is the password corresponding to your vendor account ID |
|
TransmitterSystemType |
The type of transmitter system. The default is Logica. |
|
ReceiverSystemId |
The account ID that is used to receive messages. ReceiverSystemPassword |
|
ReceiverSystemType |
The type of receiver system. The default is Logica. |
|
ServerTransmitterPort |
The TCP port number of the transmitter server. |
|
ServerReceiverPort |
The TCP port number of the receiver server. |
|
DefaultEncoding |
The default encoding of the SMPP driver. The default is IA5. Choose from the drop-down list: IA5, UCS2, and GSM_DEFAULT. |
|
DefaultSenderAddress |
Default sender address |
After providing the parameter values, press Apply. To have these settings take effect, the driver has to be restarted.
8.5 Setting Properties in OAAM for UMS Integration
To set up the UMS server for OAAM, proceed as follows:
-
Log in to the OAAM Administration Console.
-
In the Navigation pane, double-click Properties under the Environment node. The Properties Search page is displayed.
-
Enter
bharosa.uio.default.ums.integration.webservicein the Name field and click Search. -
Click to select the property in the Search Results section, change the value to the UMS Server Web service URL, and click Save.
-
Continue searching for properties and changing their values to set up the server for use with OAAM. The UMS server properties are shown in Table 8-5.
-
After you set up the UMS server properties, restart the application.
The properties to set for the UMS server URLs and credentials are listed below.
Note: End point is the Web Services URL that OAAM uses to send calls into UMS.
Table 8-5 UMS Server URLs and Credentials
| Property | Default Value | Description |
|---|---|---|
|
bharosa.uio.default.ums.integration.webservice |
UMS Server Web service URL http://<UMS Server URL>:<UMS Port>/ucs/messaging/webservice |
|
|
bharosa.uio.default.ums.integration.parlayx.endpoint |
UMS Server ParlayX Endpoint URL http://<UMS Server URL>:<UMS Port>/sdpmessaging/parlayx/SendMessageService |
|
|
bharosa.uio.default.ums.integration.useParlayX |
false |
Configures the use of web service or parlayx API. The value is false by default (Web services recommended) |
|
bharosa.uio.default.ums.integration.userName |
User name for UMS server |
|
|
bharosa.uio.default.ums.integration.password |
Password for UMS server |
|
|
bharosa.uio.default.ums.integtaion.policies |
UMS authentication policies |
|
|
bharosa.uio.default.ums.integration.fromAddress |
jane@mycompany.example.com |
OAAM from address for OTP messages |
|
bharosa.uio.default.ums.integration.message.status.poll.attempts |
3 |
Number of times to attempt status poll each time the wait page is displayed |
|
bharosa.uio.default.ums.integration.message.status.poll.delay |
1000 |
Delay between status polls while the wait page is being displayed |
|
bharosa.uio.default.ums.integration.sleepInterval |
10000 |
|
|
bharosa.uio.default.ums.integration.deliveryPage.delay |
3000 |
8.6 Enabling OTP Challenge
To enable the SMS challenge type on the OAAM Server, proceed as follows:
-
Log in to the OAAM Administration Console.
-
In the Navigation pane, double-click Properties under the Environment node. The Properties Search page is displayed.
-
If you want to enable the SMS challenge type, enter
bharosa.uio.default.challenge.type.enum.ChallengeSMS.availablein the Name field and click Search.If you want to enable the Email challenge type, enter
bharosa.uio.default.challenge.type.enum.ChallengeSMS.availablein the Name field and click Search. -
Click to select the property in the Search Results section, change the value to
true, and click Save. -
Continue searching for properties and changing their values to define the challenge type. SMS and Email challenge type properties are shown in Table 8-6 and Table 8-7.
Properties defining the SMS challenge is provided below.
Table 8-6 Properties for SMS Challenge Type
| Property | Default Value | Description |
|---|---|---|
|
bharosa.uio.default.challenge.type.enum.ChallengeSMS |
2 |
SMS Challenge enum value |
|
bharosa.uio.default.challenge.type.enum.ChallengeSMS.name |
SMS Challenge |
Name of SMS challenge type |
|
bharosa.uio.default.challenge.type.enum.ChallengeSMS.description |
SMS Challenge |
Description of SMS challenge type |
|
bharosa.uio.default.challenge.type.enum.ChallengeSMS.processor |
com.bharosa.uio.processor.challenge.ChallengeSMSProcessor |
Processor class for SMS challenge type Specifies the java class for handling challenges of this type. The challenge mechanism is customizable through Java classes. See the Oracle Fusion Middleware Developer's Guide for Oracle Adaptive Access Manager for information. |
|
bharosa.uio.default.challenge.type.enum.ChallengeSMS.requiredInfo |
mobile |
Required fields to challenge user with SMS challenge type A comma separated list of inputs from registration input enum |
|
bharosa.uio.default.challenge.type.enum.ChallengeSMS.available |
false |
Availability flag for SMS challenge type Specifies if the challenge type is available for use (service ready and configured). To enable/disable an OTP challenge type, the available flag should be set. |
|
bharosa.uio.default.challenge.type.enum.ChallengeSMS.otp |
true |
OTP flag for SMS challenge type |
Properties to define the email challenge type are presented below:
Table 8-7 Properties for Email Channel Type
| Property | Default Value | Description |
|---|---|---|
|
bharosa.uio.default.challenge.type.enum.ChallengeEmail |
1 |
Email Challenge enum value |
|
bharosa.uio.default.challenge.type.enum.ChallengeEmail.name |
Email Challenge |
Name of email challenge type |
|
bharosa.uio.default.challenge.type.enum.ChallengeEmail.description |
Email Challenge |
Description of email challenge type |
|
bharosa.uio.default.challenge.type.enum.ChallengeEmail.processor |
com.bharosa.uio.processor.challenge.ChallengeEmailProcessor |
Processor class for email challenge type Specifies the java class for handling challenges of this type. The challenge mechanism is customizable through Java classes. See the Oracle Fusion Middleware Developer's Guide for Oracle Adaptive Access Manager for information. |
|
bharosa.uio.default.challenge.type.enum.ChallengeEmail.requiredInfo |
|
Required fields to challenge user with email challenge type A comma separated list of inputs from registration input enum |
|
bharosa.uio.default.challenge.type.enum.ChallengeEmail.available |
false |
Availability flag for email challenge type Specifies if the challenge type is available for use (service ready and configured). To enable/disable an OTP challenge type, the available flag should be set. |
|
bharosa.uio.default.challenge.type.enum.ChallengeEmail.otp |
true |
OTP flag for email challenge type |
8.7 Enabling Registration and Preferences
The following properties must be enabled so the registration and preferences pages can be used to enable profile registration and changing preferences.
Table 8-8 Enable OTP Profile Registration and Preference Setting
| Property | Description |
|---|---|
|
bharosa.uio.default.register.userinfo.enabled |
Setting the property to true enables the profile registration pages if the OTP channel is enabled and requires registration. |
|
bharosa.uio.default.userpreferences.userinfo.enabled |
Setting the property to true enables the user to set preferences if the OTP channel is enabled and allows preference setting. User Preferences is a page that allows the user to change their image/phrase, challenge questions, un-register devices, and update their OTP profile. |
To enable registration and preferences:
-
Log in to the OAAM Administration Console.
-
In the Navigation pane, double-click Properties under the Environment node. The Properties Search page is displayed.
-
Enter
bharosa.uio.default.register.userinfo.enabledin the Name field and click Search. -
Click to select the property in the Search Results section, change the value to
true, and click Save. -
Enter
bharosa.uio.default.userpreferences.userinfo.enabledin the Name field and click Search. -
Click to select the property in the Search Results section, change the value to
true, and click Save.
8.8 Setting Up the Registration Page
Setting up the registration page involves the following tasks:
8.8.1 Enabling the Opt-Out for OTP Registration and Challenge
If you want the user to be able to opt-out of registering an OTP profile, you can enable a Decline button on the OTP registration page. If he chooses to decline registration of an OTP profile, he will not be asked again to register OTP, and he will not receive OTP challenges. However if a customer representative resets a user's OTP profile through a reset all, the user will have an opportunity to register OTP again.
Even if the user has opted out of OTP registration and challenge, he can still access the OTP page in User Preferences and add register for OTP.
To control the presence of the Decline button on the profile registration pages:
-
Log in to the OAAM Administration Console.
-
In the Navigation pane, double-click Properties under the Environment node. The Properties Search page is displayed.
-
Enter
bharosa.uio.default.otp.optOut.enabledin the Name field and click Search.Click to select the property in the Search Results section, change the value to true, and click Save. in the Name field and click Search. -
Click to select the property in the Search Results section, change the value to
true, and click Save. -
Enter
bharosa.uio.default.register.userinfo.decline.enabledin the Name field and click Search. -
Click to select the property in the Search Results section, change the value to
true, and click Save. -
Enter
bharosa.uio.default.userpreferences.userinfo.enabledin the Name field and click Search. -
Click to select the property in the Search Results section, change the value to
true, and click Save.
Note:
The property to opt-out must be set to true for the Decline button to be available. If the other two properties are true and opt-out is false, the button will not be displayed.8.8.2 Configuring Checkboxes and Fields on the Registration Pages
To configure terms and conditions checkboxes and fields in the OTP registration page, add the properties in the sections following to the oaam_custom.properties file.
To configure checkboxes and fields, follow these steps:
-
Create a work folder called
oaam_extensions. (The folder can be created anywhere as long as it is outside the installation folder.) -
Locate
oracle.oaam.extensions.war, which is located in the IAM_Home/oaam/oaam_extensions/genericdirectory. -
Explode
oracle.oaam.extensions.warinto theoaam_extensionsfolder. -
Open the
oaam_custom.propertiesfile in theWEB-INF/classes/bharosa_propertiesdirectory of theoracle.oaam.extensions.warfile. -
Add properties from Section 8.8.2.1, "Configure Terms and Conditions Checkboxes" and Section 8.8.2.2, "Configuring Text Fields on Registration and Preference Pages."
-
Rejar
oracle.oaam.extensions.warfrom the parent folder ofoaam_extensionsusing the command:jar -cvfm oracle.oaam.extensions.war oaam_extensions\META-INF\MANIFEST.MF -C oaam_extensions/ . -
Shut down the OAAM Admin and OAAM Server managed servers.
-
Start the WebLogic Server where Oracle Adaptive Access Manager is deployed and log in to the WebLogic Administration Console.
-
Navigate to Domain Environment > Deployments and lock the console.
-
Click the Install button.
-
Browse to the location of the
oracle.oaam.extensions.warfile and select it by clicking the radio button next to the .war file and clicking Next. -
Ensure Install this deployment as a library is selected and click Next.
-
Select deployment targets, OAAM Admin and OAAM Server.
-
Click Next again to accept the defaults in this next page and then click Finish.
-
Click the Save button and then Activate Changes.
-
Start the OAAM Admin and OAAM managed servers.
8.8.2.1 Configure Terms and Conditions Checkboxes
Table 8-9 shows the properties to configure checkboxes in the registration page.
Table 8-9 Terms and Conditions Checkbox
| Property | Default Value | Description |
|---|---|---|
|
bharosa.uio.default.userinfo.inputs.enum.terms |
4 |
Terms and Conditions enum value |
|
bharosa.uio.default.userinfo.inputs.enum.terms.name |
Terms and Conditions |
Name for Terms and Conditions checkbox |
|
bharosa.uio.default.userinfo.inputs.enum.terms.description |
Terms and Conditions |
Description for Terms and Conditions checkbox |
|
bharosa.uio.default.userinfo.inputs.enum.terms.inputname |
terms |
HTML input name for Terms and Conditions checkbox |
|
bharosa.uio.default.userinfo.inputs.enum.terms.inputtype |
checkbox |
HTML input type for Terms and Conditions checkbox |
|
bharosa.uio.default.userinfo.inputs.enum.terms.values |
true |
Required values for Term and Conditions checkbox during registration and user preferences |
|
bharosa.uio.default.userinfo.inputs.enum.terms.maxlength |
40 |
HTML input max length for Terms and Conditions checkbox |
|
bharosa.uio.default.userinfo.inputs.enum.terms.required |
true |
Required flag for Term and Conditions checkbox during registration and user preferences |
|
bharosa.uio.default.userinfo.inputs.enum.terms.order |
5 |
Order on the page for Terms and Conditions checkbox |
|
bharosa.uio.default.userinfo.inputs.enum.terms.enabled |
true |
Enabled flag for Terms and Conditions enum item |
|
bharosa.uio.default.userinfo.inputs.enum.terms.regex |
.+ |
Regular expression for validation of Terms and Conditions checkbox |
|
bharosa.uio.default.userinfo.inputs.enum.terms.errorCode |
otp.invalid.terms |
Error code to get error message from if validation of Terms and Conditions fails |
|
bharosa.uio.default.userinfo.inputs.enum.terms.managerClass |
com.bharosa.uio.manager.user.DefaultContactInfoManager |
Java class to use to save / retrieve Terms and Conditions from data storage |
8.8.2.2 Configuring Text Fields on Registration and Preference Pages
Set up text and fields on registration and preference pages. Input properties includes maximum length for the email address the user can enter, validation for the email address field (expression), and so on.
If user information registration or user preferences is set to true, the settings are used for the OTP registration and preferences page. The bharosa.uio.default.userinfo.inputs.enum property values are shown in Table 8-10.
Table 8-10 OTP Registration Input Properties
| Property | Description |
|---|---|
|
inputname |
Name used for the input field in the HTML form |
|
inputtype |
Set for text or password input |
|
maxlength |
Maximum length of user input |
|
required |
Set if the field is required on the registration page |
|
order |
The order displayed in the user interface |
|
regex |
Regular expression used to validate user input for this field |
|
errorCode |
Error code used to look up validation error message (bharosa.uio.<application ID>.error.<errorCode>) |
|
managerClass |
java class that implements com.bharosa.uio.manager.user.UserDataManagerIntf (if data is to be stored in Oracle Adaptive Access Manager database this property should be set to com.bharosa.uio.manager.user.DefaultContactInfoManager) |
Mobile Input Registration Field Properties
Add these properties to configure the mobile registration fields.
Table 8-11 Mobile Input - Properties File
| Property | Default Value | Description |
|---|---|---|
|
bharosa.uio.default.userinfo.inputs.enum.mobile |
0 |
Mobile phone enum value |
|
bharosa.uio.default.userinfo.inputs.enum.mobile.name |
Mobile Phone |
Name for mobile phone field |
|
bharosa.uio.default.userinfo.inputs.enum.mobile.description |
Mobile Phone |
Description for mobile phone field |
|
bharosa.uio.default.userinfo.inputs.enum.mobile.inputname |
cell number |
HTML input name for mobile phone field |
|
bharosa.uio.default.userinfo.inputs.enum.mobile.inputtype |
text |
HTML input type for mobile phone field |
|
bharosa.uio.default.userinfo.inputs.enum.mobile.maxlength |
15 |
HTML input max length for mobile phone field |
|
bharosa.uio.default.userinfo.inputs.enum.mobile.required |
true |
Required flag for mobile phone field during registration and user preferences |
|
bharosa.uio.default.userinfo.inputs.enum.mobile.order |
1 |
Order on the page for mobile phone field |
|
bharosa.uio.default.userinfo.inputs.enum.mobile.enabled |
true |
Enabled flag for mobile phone enum item |
|
bharosa.uio.default.userinfo.inputs.enum.mobile.regex |
\\D?(\\d{3})\\D?\\D?(\\d{3})\\D?(\\d{4}) |
Regular expression for validation of mobile phone field |
|
bharosa.uio.default.userinfo.inputs.enum.mobile.errorCode |
otp.invalid.mobile |
Error code to get error message from if validation of mobile phone entry fails |
|
bharosa.uio.default.userinfo.inputs.enum.mobile.managerClass |
com.bharosa.uio.manager.user.DefaultContactInfoManager |
Java class to use to save / retrieve mobile phone from data storage |
Add the following properties to configure fields for a second mobile device to register:
| Property | Default Value | Description |
|---|---|---|
|
bharosa.uio.default.userinfo.inputs.enum.mobile2 |
2 |
Mobile phone enum value |
|
bharosa.uio.default.userinfo.inputs.enum.mobile2.name |
Mobile Phone 2 |
Name for mobile phone field |
|
bharosa.uio.default.userinfo.inputs.enum.mobile2.description |
Mobile Phone 2 |
Description for mobile phone field |
|
bharosa.uio.default.userinfo.inputs.enum.mobile2.inputname |
cell number 2 |
HTML input name for mobile phone field |
|
bharosa.uio.default.userinfo.inputs.enum.mobile2.inputtype |
text |
HTML input type for mobile phone field |
|
bharosa.uio.default.userinfo.inputs.enum.mobile2.maxlength |
15 |
HTML input max length for mobile phone field |
|
bharosa.uio.default.userinfo.inputs.enum.mobile2.required |
true |
Required flag for mobile phone field during registration and user preferences |
|
bharosa.uio.default.userinfo.inputs.enum.mobile2.order |
2 |
Order on the page for mobile phone field |
|
bharosa.uio.default.userinfo.inputs.enum.mobile2.enabled |
true |
Enabled flag for mobile phone enum item |
|
bharosa.uio.default.userinfo.inputs.enum.mobile2.regex |
\\D?(\\d{3})\\D?\\D?(\\d{3})\\D?(\\d{4}) |
Regular expression for validation of mobile phone field |
|
bharosa.uio.default.userinfo.inputs.enum.mobile2.errorCode |
otp.invalid.mobile |
Error code to get error message from if validation of mobile phone entry fails |
|
bharosa.uio.default.userinfo.inputs.enum.mobile2.managerClass |
com.bharosa.uio.manager.user.DefaultContactInfoManager |
Java class to use to save / retrieve mobile phone from data storage |
The follow properties are used for defining email registration on the OTP registration page of an authenticator:
| Property | Default Value | Description |
|---|---|---|
|
bharosa.uio.default.userinfo.inputs.enum.email |
1 |
Email address enum value |
|
bharosa.uio.default.userinfo.inputs.enum.email.name |
Email Address |
Name for email address field |
|
bharosa.uio.default.userinfo.inputs.enum.email.description |
Email Address |
Description for email address field |
|
bharosa.uio.default.userinfo.inputs.enum.email.inputname |
|
HTML input name for email address field |
|
bharosa.uio.default.userinfo.inputs.enum.email.inputtype |
text |
HTML input type for email address field |
|
bharosa.uio.default.userinfo.inputs.enum.email.maxlength |
40 |
HTML input max length for email address field |
|
bharosa.uio.default.userinfo.inputs.enum.email.required |
true |
Required flag for email address field during registration and user preferences |
|
bharosa.uio.default.userinfo.inputs.enum.email.order |
2 |
Order on the page for email address field |
|
bharosa.uio.default.userinfo.inputs.enum.email.enabled |
false |
Enabled flag for email address enum item |
|
bharosa.uio.default.userinfo.inputs.enum.email.regex |
.+@[a-zA-Z_]+?\\.[a-zA-Z]{2,3} |
Regular expression for validation of email address field |
|
bharosa.uio.default.userinfo.inputs.enum.email.errorCode |
otp.invalid.email |
Error code to get error message from if validation of email address entry fails |
|
bharosa.uio.default.userinfo.inputs.enum.email.managerClass |
com.bharosa.uio.manager.user.DefaultContactInfoManager |
Java class to use to save / retrieve email address from data storage |
The following is an example of an enum for adding a second email to register:
| Property | Default Value | Description |
|---|---|---|
|
bharosa.uio.default.userinfo.inputs.enum.email2 |
2 |
Email address enum value |
|
bharosa.uio.default.userinfo.inputs.enum.email2.name |
Email Address 2 |
Name for email address field |
|
bharosa.uio.default.userinfo.inputs.enum.email2.description |
Email Address 2 |
Description for email address field |
|
bharosa.uio.default.userinfo.inputs.enum.email2.inputname |
email2 |
HTML input name for email address field |
|
bharosa.uio.default.userinfo.inputs.enum.email2.inputtype |
text |
HTML input type for email address field |
|
bharosa.uio.default.userinfo.inputs.enum.email2.maxlength |
40 |
HTML input max length for email address field |
|
bharosa.uio.default.userinfo.inputs.enum.email2.required |
true |
Required flag for email address field during registration and user preferences |
|
bharosa.uio.default.userinfo.inputs.enum.email2.order |
2 |
Order on the page for email address field |
|
bharosa.uio.default.userinfo.inputs.enum.email2.enabled |
false |
Enabled flag for email address enum item |
|
bharosa.uio.default.userinfo.inputs.enum.email2.regex |
.+@[a-zA-Z_]+?\\.[a-zA-Z]{2,3} |
Regular expression for validation of email address field |
|
bharosa.uio.default.userinfo.inputs.enum.email2.errorCode |
otp.invalid.email |
Error code to get error message from if validation of email address entry fails |
|
bharosa.uio.default.userinfo.inputs.enum.email2.managerClass |
com.bharosa.uio.manager.user.DefaultContactInfoManager |
Java class to use to save / retrieve email address from data storage |
8.9 Configuring Your Policies and Rules to Use OTP Challenge
Policies in the Challenge checkpoint determine the type of challenge to present the user. For more information, refer to Section 10.11.1, "OAAM Challenge."
To configure a policy with a rule that OTP-challenge users for specific scenarios, perform the following steps:
-
Log in to the OAAM Administration Console.
-
Double-click Policies in the Navigation pane.
The Policies Search page displays.
-
In the Policies Search page, click the New Policy button.
The New Policy page appears. In the Summary tab, create a post-authentication security policy:
-
For Policy Name, enter OTP Challenge for Many Failures.
-
For Description, enter a description for the policy.
-
For Checkpoint, select Post-Authentication.
-
Modify the policy status, scoring engine, and weight according to your requirements.
By default, the policy status is Active. A policy that is disabled is not enforced at the checkpoint.
-
Click Apply.
-
Click OK to dismiss the confirmation dialog.
-
-
Click the Rules tab to select it.
-
Add general summary information about the rule.
-
On the conditions tab, add
User: Check OTP failurescondition or other OTP-related conditions.
-
-
On the Results tab, specify
OAAM challengeas the Action group. -
Link the policy to all users.
In default policies, if OTP is enabled, KBA challenges occurs after a user is OTP blocked.
High risk user are OTP challenged. The user is presented with the appropriate virtual authentication device and receives the OTP through the proper channel. If the user fails the OTP challenge, he is KBA-challenged.
8.10 Customizing OTP Registration Text and Messaging
The registration page text, the challenge type message subject, the body of the message, and the message itself could be fully customized by specifying the custom values in resource bundle files and deploying the changes via OAAM extension shared libraries.
To customize content and messaging of the registration pages you will add properties, described in the sections following, to the client_resource_locale.properties file.
-
Create a work folder called
oaam_extensions. (The folder can be created anywhere as long as it is outside the installation folder.) -
Locate
oracle.oaam.extensions.war, which is located in the IAM_Home/oaam/oaam_extensions/genericdirectory. -
Explode
oracle.oaam.extensions.warinto theoaam_extensionsfolder. -
Create a
client_resource_locale.propertiesin IAM_Home\oaam\oaam_extensions\generic\WEB-INF\classes. -
Add the customized text and messages to this file.
For example, to customize the terms and conditions, add the following line to
client_resource_locale.properties:bharosa.uio.default.userinfo.inputs.enum.terms.name=I agree to the COMPANY A terms & conditions. Click to view full <a href="javascript:infoWindow('terms');">Terms & Conditions</a> and <a href="javascript:infoWindow('privacy');">Privacy Policy</a>.For example, to customize the message displayed when a user registers his mobile phone, add the following line to
client_resource_locale.properties:bharosa.uio.default.register.userinfo.message=For your protection please enter your mobile telephone number so we may use it to verify your identity in the future. Please ensure that you have text messaging enabled on your phone. -
Rejar
oracle.oaam.extensions.warfrom the parent folder ofoaam_extensionsusing the command:jar -cvfm oracle.oaam.extensions.war oaam_extensions\META-INF\MANIFEST.MF -C oaam_extensions/ . -
Shut down the OAAM Admin and OAAM Server managed servers.
-
Start the WebLogic Server where Oracle Adaptive Access Manager is deployed and log in to the WebLogic Administration Console.
-
Navigate to Domain Environment > Deployments and lock the console.
-
Click the Install button.
-
Browse to the location of the
oracle.oaam.extensions.warfile and select it by clicking the radio button next to the .war file and clicking Next. -
Ensure Install this deployment as a library is selected and click Next.
-
Select deployment targets, OAAM Admin and OAAM Server.
-
Click Next again to accept the defaults in this next page and then click Finish.
-
Click the Save button and then Activate Changes.
-
Start the OAAM Admin and OAAM managed servers.
8.10.1 Customizing Terms and Conditions
To customize the Terms and Condition text, add the following properties to the resource bundle, client_resource_<locale>.properties:
Table 8-15 Messaging of Terms and Conditions
| Property | Descriptions |
|---|---|
|
bharosa.uio.default.userinfo.inputs.enum.terms.name |
I agree to the [ENTER COMPANY OR SERVICE NAME HERE] terms & conditions. Click to view full <a href="javascript:infoWindow('terms');">Terms & Conditions</a> and <a href="javascript:infoWindow('privacy');">Privacy Policy</a>. |
|
bharosa.uio.default.userinfo.inputs.enum.terms.description |
Message and Data Rates May Apply. <br/>For help or information on this program send "HELP" to [ENTER SHORT/LONG CODE HERE]. <br/>To cancel your plan, send "STOP" to [ENTER SHORT/LONG CODE HERE] at anytime.<br/><br/>For additional information on this service please go to <a href="" target="_blank">[ENTER INFORMATIONAL URL HERE]</a>.<br/><br/><b>Supported Carriers:</b><br/>AT&T, Sprint, Nextel, Boost, Verizon Wireless, U.S. Cellular®, T-Mobile®, Cellular One Dobson, Cincinnati Bell, Alltel, Virgin Mobile USA, Cellular South, Unicel, Centennial and Ntelos |
The value for bharosa.uio.default.userinfo.inputs.enum.terms.name includes placeholder links that use OAAM Server popup messaging for "Terms & Conditions" and "Privacy Policy". The property and resource keys for the contents of the popups are listed as follows.
Table 8-16 Terms & Conditions and Privacy Policy Popup Messaging
| Property | Descriptions |
|---|---|
|
bharosa.uio.default.messages.enum.terms.name |
Terms and Conditions |
|
bharosa.uio.default.messages.enum.terms.description |
PLACEHOLDER TEXT FOR TERMS AND CONDITIONS |
|
bharosa.uio.default.messages.enum.privacy.name |
Privacy Policy |
|
bharosa.uio.default.messages.enum.privacy.description |
PLACEHOLDER TEXT FOR PRIVACY POLICY |
8.10.2 Customizing Mobile Input Registration Fields
To customize mobile input fields, these properties can be added to the resource bundle, client_resource_<locale>.properties:
8.10.3 Customizing Registration Page Messaging
To customize the registration page messaging, add the following registration properties to client_resource_<locale>.properties:
Table 8-18 Registration Resource Bundle
| Property | Default Value |
|---|---|
|
bharosa.uio.default.register.userinfo.title |
OTP Anywhere Registration |
|
bharosa.uio.default.register.userinfo.message |
For your protection please enter your mobile telephone number so we may use it to verify your identity in the future. Please ensure that you have text messaging enabled on your phone. |
|
bharosa.uio.default.register.userinfo.registerdevice.message |
Check to register the device that you are currently using as a safe device: |
|
bharosa.uio.default.register.userinfo.continue.button |
Continue |
|
bharosa.uio.default.register.userinfo.decline.message |
If you decline you will not be asked to register again. |
|
bharosa.uio.default.register.userinfo.decline.button |
Decline |
8.10.4 Customizing Challenge Messaging
To customize the challenge type fields, add the following properties to the resource bundle, client_resource_<locale>.properties:
Table 8-19 Challenge Type Resource Bundle Items
| Property | Default Value |
|---|---|
|
bharosa.uio.default.ChallengeSMS.message |
For your protection please enter the code we just sent to your mobile telephone. If you did not receive a code please ensure that text messaging is enabled on your phone and click the resend link below. |
|
bharosa.uio.default.ChallengeSMS.registerdevice.message |
Check to register the device that you are currently using as a safe device: |
|
bharosa.uio.default.ChallengeSMS.continue.button |
Continue |
8.10.5 Customizing the OTP Messaging
To customize the OTP messaging, add these properties to the resource bundle, client_resource_<locale>.properties:
Note:
User facing strings need to be duplicated into resource bundle. Resource bundle values can be customized by adding them to theclient_resource_<locale>.properties and deploying the file in OAAM Extensions Shared Library.8.11 Other Configuration Tasks
If you want to change the defaults for expiry time, password generation, failure counter, and challenge type devices for OTP, the procedures are provided in this section for your reference.
8.11.1 Configuring One Time Password Expiry Time
Note:
This property works for the OTP API, but as of now OAAM Server does not use the API. Hence, by default, OAAM Server OTP is valid for the session or until used.To set up OTP SMS password expiry time, add the following property:
bharosa.uio.default.challenge.type.enum.ChallengeSMS.otpexpirytimeMs
To set up OTP email password expiry time, add the following property:
bharosa.uio.default.challenge.type.enum.ChallengeEmail.otpexpirytimeMs to oaam_custom.properties.
The time is in milliseconds. If the value is not in milliseconds, you will have to perform a conversion. For example, if you want to set the expiration time for OTP to be 5 minutes, then you need to set the property to 300000 ms (5 minutes).
8.11.2 Configure One-Time Password Generation
You can configure the one-time password through properties edits. The following properties are used to generate the OTP:
# OTP pin generation config
bharosa.uio.otp.generate.code.length = 5
bharosa.uio.otp.generate.code.characters = 1234567890
The default OTP codes will be 5 characters made up of the numbers 0-9 (for example: 44569).
bharosa.uio.otp.generate.code.length designates the length of the OTP.
bharosa.uio.otp.generate.code.characters designates the characters to use when generating the OTP.
An example is shown below for generating a 4 character OTP code with numbers 0-9 and letters a-d (for example: 0c6a):
bharosa.uio.otp.generate.code.length = 4
bharosa.uio.otp.generate.code.characters = 1234567890abcd
8.11.3 Configuring Failure Counter
When a user fails the OTP challenge, a counter is updated to indicate that user has had a failure.
The failure counter is set by default in the OAAM Challenge Policy, but you can customize it by following these instructions:
-
Open the OAAM Challenge Policy.
-
Open the appropriate maximum failed OTP rule and edit the appropriate properties. For information, refer to the table below.
Table 8-21 OAAM Maximum OTP Failed Rule Details
Rule Rule Condition and Parameters Results Max failed SMS attempts
User: Check OTP failures
OTP Challenge Type = ChallengeSMS
Failure More than or Equal To = 3
If above or equal = TRUE
Action = NONE
Alert = NONE
Score = 0
Max failed Email attempts
User: Check OTP failures
OTP Challenge Type = ChallengeEmail
Failure More than or Equal To = 3
If above or equal = TRUE
Action = NONE
Alert = NONE
Score = 0
Max failed Question attempts
User: Challenge Maximum Failures
Number of Failures More than or equal to = 3
Current Question Count only? = False
If above or equal, return = True
Action = NONE
Alert = NONE
Score = 0
8.11.4 Configuring Challenge Type Devices for OTP
If you want to change the default challenge type devices used for challenges, proceed as follows:
-
Log in to the OAAM Administration Console.
-
In the Navigation pane, double-click Properties under the Environment node. The Properties Search page is displayed.
-
Enter
bharosa.uio.default.use.authentipad.checkpointin the Name field and click Search.Click to select the property in the Search Results section, change the value tofalse, and click Save. in the Name field and click Search. -
Click the New Property button to add a new property:
bharosa.uio.default.ChallengeType.authenticator.device=Device
Then click Save to save the property.
Examples of configuring SMS and Email challenges to use the device textpad are shown below:
bharosa.uio.default.ChallengeSMS.authenticator.device=DeviceTextPad
bharosa.uio.default.ChallengeEmail.authenticator.device=DeviceTextPad
Table 8-22 shows the properties for the various authentication device types. In the example, the SMS and Email authenticators will be the device text pad since the value, DeviceTextPad, was specified. If DeviceKeyPadAlpha was specified as the value, an alphanumeric KeyPad would be displayed.
Table 8-22 Authentication Device Type
| Property | Description |
|---|---|
|
None |
No HTML page or authentication pad |
|
DeviceKeyPadFull |
Challenge user using KeyPad. |
|
DeviceKeyPadAlpha |
Challenge user with the alphanumeric KeyPad (numbers and letters only, no special characters) |
|
DeviceTextPad |
Challenge user using TextPad. |
|
DeviceQuestionPad |
Challenge user using QuestionPad. |
|
DevicePinPad |
Challenge user using PinPad. |
|
DeviceHTMLControl |
Challenge user using HTML page instead of an authentication pad. |
After configuration, the OTP device will be displayed at the next log in to the application.