19 Integrating Juniper Networks Secure Access (SA) and OAAM
The integration of Juniper Networks Secure Access (SA) and Oracle Adaptive Access Manager provides enterprises with a remote access control solution with strong multi-factor authentication and advanced real time fraud prevention capabilities to enable secure access to an enterprise's applications.
This chapter explains how to configure OAAM for integration with Juniper Secure Access (SA). The topics include:
19.1 Introduction
To access a protected enterprise resource in the network security trust zone, the user must access SSL VPN, which is the secured gateway for any remote access.
Juniper SA is a series of SSL VPN appliances that ensure that remote and mobile employees, customers, and partners have secure anytime, anywhere access to corporate resources and applications.
Oracle Adaptive Access Manager 11g safeguards vital online business applications with strong yet easily deployed risk-based authentication, anti-phishing, and anti-malware capabilities.
SAML (Security Assertion Markup Language) is an XML-based open standard for exchanging authentication and authorization data between security domains.
In this integration, Juniper SA, which controls access to resources, uses OAAM during authentication to minimize risk and enhance security during the authentication of the user. The combined solutions enable the detection of fraud and risk during authentication and accordingly strongly authenticate the user using OAAM capabilities like Challenge, Block, and other actions. Juniper SA is configured to use Security Assertion Markup Language (SAML) to exchange user authentication and authorization data.
Figure 19-1 shows the high level flow between Juniper SA and OAAM. For information on the authentication flow, see Section 19.2.1, "Authentication Flow."

19.2 Authentication and Forgot Password Flows
The two integration use cases focus on integrating OAAM for authentication and forgot password flows in Juniper SSL VPN.
-
OAAM detects fraud and risk during authentication and provides strong authentication capabilities like
Challenge,Block, or other actions. The integration redirects the user to OAAM to fulfill the authentication sequence if the user is not authenticated. -
OAAM provides password reset authentication. The Forgot Password flow allows users to reset their password after successfully answering challenge questions.
19.2.1 Authentication Flow
The following process explains how a user logs into a Web application or URL that is secured by Juniper SA with OAAM providing the authentication flow.
-
The user tries to access a Web application or URL that is secured by Juniper SA. Juniper SA is configured to use SAML.
-
Juniper SA detects whether the user is authenticated or not. If authenticated, the user is allowed to proceed to the Web application.
-
If not authenticated, the user is redirected to the OAAM Server. The OAAM Server displays the OAAM Login page and prompts the user to enter the User ID.
-
Once the user enters the User ID, as part of credential collection, OAAM evaluates the Pre-Authentication checkpoint to verify if the user has to be blocked. OAAM then checks to see if the user has registered for the Authentication Pad. If so, OAAM displays the registered Authentication Pad; otherwise, OAAM displays a generic text pad.
-
The OAAM Server displays the Password page with the Authentication Pad and prompts the user to enter the password.
-
Once the password is entered, OAAM uses Oracle Platform Security Services (OPSS) to validate it against the user store (the user store can be LDAP, Active Directory, or other authentication provider). OPSS is a standard-based, portable, integrated, enterprise grade security platform for Java applications.
OAAM also identifies the device by running the device identification process.
-
If the credentials are incorrect, OAAM displays an error page and asks the user to enter the credentials again.
-
If the credentials are correct, OAAM evaluates the Post-Authentication checkpoint. Based on the outcome of the checkpoint, OAAM challenges or blocks the user.
-
If the outcome of Post-Authentication is
ALLOW, then OAAM determines if the user has to be registered. Based on the types of registration, it takes the user through the registration pages.Registration is the enrollment process, the opening of a new account, or other event where information is obtained from the user. During the Registration process, the user is asked to register for questions, image, phrase and OTP (email, phone, and so on) if the deployment supports OTP.
-
If the outcome of Post-Authentication is
CHALLENGEand if the user is already registered for at least one of the challenge mechanisms, OAAM challenges the user. If able to answer the challenge, the user is allowed to the next step. -
After successful authentication, OAAM gets the user attributes from the user store and then creates the SAML assertion based on the user attributes from the user store, signs it and then posts the assertion to the Juniper SA redirection URL. Juniper SA consumes and validates the assertion and logs the user to the user requested target page or web application.
-
If the outcome of the Post-Authentication checkpoint is
BLOCK, then the user is blocked and will not be able to access the web application that the user tried to access.
19.2.2 Forgot Password Flow
The following process explains how a user resets the password after successfully answering all challenge questions.
This use case focuses on integrating OAAM for the Forgot Password flow with Juniper SA.
-
The user tries to access a Web application or URL that is secured by Juniper SA. Juniper SA is configured to use SAML.
-
Juniper SA detects whether the user is authenticated or not. If authenticated, then the user is allowed to proceed to the web application.
-
If not authenticated, the user is redirected to the OAAM Server.
-
The OAAM Server displays the OAAM Login page and prompts the user to enter the User ID.
-
Once the user enters the User ID, OAAM evaluates the Pre-Authentication checkpoint and checks to see if the user has to be blocked. OAAM then checks to see if the user has registered for the Authentication Pad. If so, it displays the registered Authentication Pad; otherwise, it displays the generic text pad.
-
The OAAM Server display the Password page with the Authentication Pad and prompts the user to enter the password.
-
The user clicks the Forgot Password link.
-
The OAAM Server starts the Forgot Password flow by running the Forgot Password checkpoint.
-
Based on the outcome, OAAM Server either challenges or blocks the user.
-
If able to successfully answered the challenge, the user is prompted to enter the new password.
-
Then OAAM makes a call to the user store to update the password.
-
It then gets the user attributes from the user store and then creates the SAML assertion, signs it and then posts the assertion to the Juniper SA redirection URL.
19.3 Security and Authentication Integration
To integrate Oracle Adaptive Access Manager and Juniper Networks Secure Access (SA) to use Oracle Adaptive Access Manager's Authentication and Forgot Password flows, refer to procedures in this section.
19.3.1 Integration Roadmap
Table 19-1 lists a summary of the high-level tasks for integrating Oracle Adaptive Access Manager and Juniper SA.
| No. | Task | Information |
|---|---|---|
|
1 |
Review pre-requisites. |
For information, refer to Pre-requisites. |
|
2 |
Configure the authentication provider. |
For information, refer to Configure the Authentication Provider. |
|
3 |
Configure Oracle Platform Security Services for authentication. |
For information, refer to Configure Oracle Platform Security Services (OPSS) for Integration. |
|
4 |
Import server properties. |
For information, refer to Import the SAML Configuration-Related Server Properties Using the OAAM Administration Console. |
|
5 |
Set up Certificate of Trust. |
For information, refer to Set Up Certificate for Signing the Assertion. |
|
6 |
Modify integration properties. |
For information, refer to Modify Integration Properties Using the OAAM Administration Console. |
|
7 |
Configure Juniper SSL |
For information, refer to Configure Juniper Networks Secure Access (SA). |
19.3.2 Pre-requisites
Before starting tasks in this chapter, be aware that:
-
Synchronizing system clocks on Juniper SA and OAAM Servers nodes is required. The time must be synchronized between the Juniper SA system clock and the OAAM Server clock. The time on the Juniper SA system clock must not be ahead of the OAAM Server clock.
-
Oracle WebLogic is required. Consult the current certification matrix for the WebLogic version. Currently this integration is tested on OAAM 11g on Oracle WebLogic only.
-
This integration is implemented in SAML 1.1 version.
19.3.3 Configure the Authentication Provider
In WebLogic, Authentication providers are used to prove the identity of users or system processes. Authentication providers also remember, transport, and make that identity information available to various components of a system (through subjects) when needed.
You can use WebLogic's embedded LDAP, AD (Active directory), and other authentication providers as the Identity Store.
To configure an Authentication provider:
-
Log in to the Oracle WebLogic Administration Console as a WebLogic administrator. For example:
http://hostname:7001/consoleThe default port is
7001. -
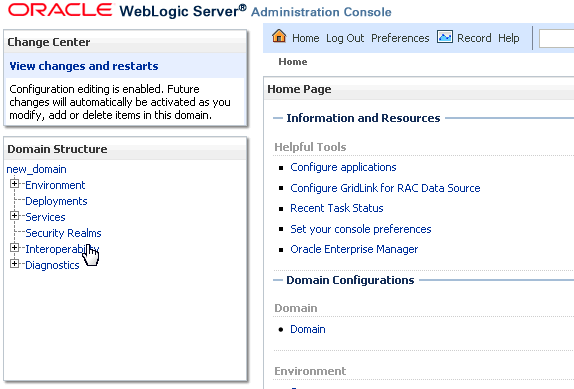
Select Security Realms from the Domain Structure section in the left pane.
-
Click the name of the realm you are configuring in the Summary of Security Realms page. For example,
myrealm.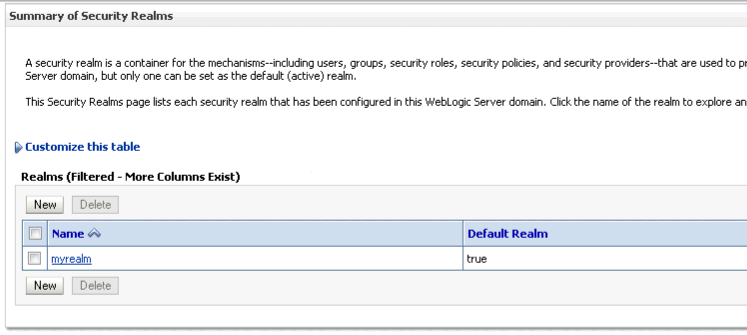
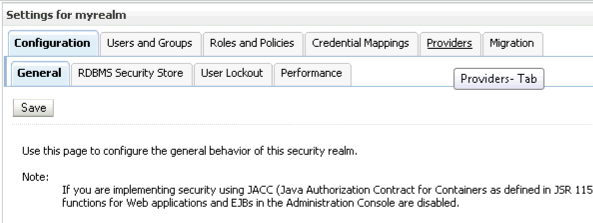
The Settings for myrealm page is displayed.
-
Click the Providers tab to display the Authentication subtab.
-
Select DefaultAuthenticator to use embedded LDAP. For other Identity stores choose the appropriate provider. For example, AD Authenticator for Active directory.

-
Reorder the providers so that DefaultAuthenticator is in the first position.
-
Click Reorder to display the Reorder Authentication Providers page.
-
Select DefaultAuthenticator and use the arrow buttons to move it into the first position in the list.
-
Click OK to save your changes.
-
-
If you are using the embedded LDAP, you must perform the following steps:
-
In the Oracle WebLogic Administration Console, click base_domain in Domain Structure in the left pane.
-
Click the Security tab.
-
Click the Embedded LDAP tab.
-
Select the Master First option.
-
Click Save.
-
-
Restart the WebLogic Administration server and the managed servers.
19.3.4 Configure Oracle Platform Security Services (OPSS) for Integration
Oracle Platform Security Services (OPSS) provides enterprise product development teams, systems integrators (SIs), and independent software vendors (ISVs) with a standards-based, portable, integrated, enterprise-grade security framework for Java Standard Edition (Java SE) and Java Enterprise Edition (Java EE) applications. The OPSS abstraction layer is used for authentication. The authentication configuration must be performed in WebLogic. For information on OPSS, see Oracle Fusion Middleware Application Security Guide.
-
On the machine where OAAM is installed, navigate to WebLogic_Domain
/config/fmwconfig. -
Back up
jps-config.xml. -
Open the jps
config.xml. -
Before closing tag
</jpsContexts>add the following jps context:<!-- This context is used for OAAM Juniper Integration --> <jpsContext name="idcontext"> <serviceInstanceRef ref="user.authentication.loginmodule"/> <serviceInstanceRef ref="idstore.ldap"/> <serviceInstanceRef ref="credstore"/> <serviceInstanceRef ref="keystore"/> <serviceInstanceRef ref="policystore.xml"/> <serviceInstanceRef ref="audit"/> </jpsContext>
-
Save the file and exit.
Note:
Once you save the file, you might want to use an XML editor to check that all the tags are correct. You can also open the file in Internet Explorer to see whether there are any tags missing. If your changes are correct you will be able to open the file successfully in Internet Explorer. -
Stop and start the WebLogic Administration Server, OAAM Admin Server and OAAM Managed Server, since these changes requires a restart.
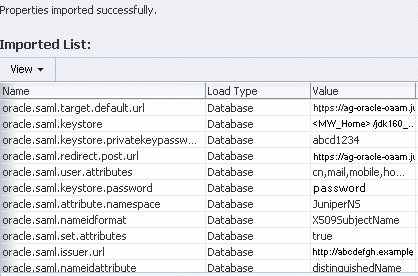
19.3.5 Import the SAML Configuration-Related Server Properties Using the OAAM Administration Console
Import the SAML configuration-related properties so they are added in the OAAM database.
To import the SAML configuration-related properties, proceed as follows:
-
Log in to the OAAM Administration Console as a security administrator. For example:
http://hostname:port/oaam_admin -
In the Navigation pane, click Properties under the Environment node.

-
Click Import Properties in the Properties page to import server properties for the integration
-
Browse for
saml_properties.zipin the IDM_ORACLE_HOME/oaam/initdirectory, and click Open, and then, click Import.Once the import is complete it will show you the properties successfully imported.
-
Click Done to complete the import.
This will import the properties needed for the integration. You will modify these properties according to your environment in Section 19.3.7, "Modify Integration Properties Using the OAAM Administration Console."
19.3.6 Set Up Certificate for Signing the Assertion
A certificate authority (CA) is a trusted third-party that certifies the identity of third-parties and other entities, such as users, databases, administrators, clients, and servers. The certificate authority verifies the party identity and grants a certificate, signing it with its private key.
To set up the certificate of trust between Juniper SA and OAAM, follow the procedures contained in these sections:
19.3.6.1 Create Private Key for Certificate
The first step is to create a private key for the certificate. To create this private key, proceed as follows:
-
Change the working directory to the security properties directory MW_HOME/
jdk160_18/jre/lib/security. -
Create the private key using a key and certificate management utility, called
keytool. Enter the following command withcacertsas the keystore:keytool -genkey -keyalg rsa -validity 1825 -keysize 2048 -alias OAAMCert -keystore cacerts -storepass changeit -
Enter the details for the certificate.
An example of the output is shown as follows:
What is your first and last name?
  [Unknown]:  ag-oracle-oaam
What is the name of your organizational unit?
  [Unknown]: Juniper
What is the name of your organization?
  [Unknown]: Juniper
What is the name of your City or Locality?
  [Unknown]:  Sunnyvale
What is the name of your State or Province?
  [Unknown]:  CA
What is the two-letter country code for this unit?
  [Unknown]:  US
Is CN=ag-oracle-oaam, OU=Juniper, O=Juniper, L=Sunnyvale, ST=CA, C=US correct?
  [no]:  yes
Note:
Typically theCNof the certificate is the name of the machine. -
When prompted, enter the keystore password:
Enter key password for <OAAMCert>
        (RETURN if same as keystore password):
Reenter new password:
Remember this password as it is needed later for the integration.
19.3.6.2 Create a Certificate Request
After you create the private key and self-signed certificate, use the keytool command to generate a Certificate Signing Request (CSR):
-
Change the working directory to MW_HOME
/jdk160_18/jre/lib/security. -
Run this command to create the certificate request:
keytool -certreq -alias OAAMCert -file server.csr
-keystore cacerts -storepass changeit
In this example you created a certificate request in a file called
server.csr.
19.3.6.3 Submit the Certificate Signing Request (CSR) to a Certificate Authority
Submit the Certificate Signing Request (CSR) to a certificate authority to obtain a digital certificate. The certificate authority will issue the certificate. You would have to receive the issued certificate and the root CA Certificate which signed the request.
For testing, you can act as your own certificate authority to sign the certificates. For production scenarios, a certificate from a certificate authority has to be used.
For production scenarios, you can skip Section 19.3.6.4, "Act as Your Own Certificate Authority" and go to Section 19.3.6.5, "Import the Certificate into Your Keystore" to import the certificate from an external certificate authority.
19.3.6.4 Act as Your Own Certificate Authority
For testing purposes, you can act as your own certificate authority to self-sign the certificates. The following sets of instructions walk through setting up to self-sign the certificates. To set this up, proceed with the subsequent example.
19.3.6.4.1 Prerequisites
The package OpenSSL must be installed in the machine you will use to manage your certificates or create the certificate requests. OpenSSL is an open source implementation of the Secure Sockets Layer (SSL) protocol. OpenSSL implements basic cryptographic functions and provides utility functions.
19.3.6.4.2 Create the Necessary Directories
To create the necessary directories, proceed as follows:
-
Create a directory where all certificate files will be kept. The default directory is
/etc/pki/tls/. As root, issue the following command to create your own directories:# mkdir -m 0755 /etc/pki_jungle
-
Then, create the certificate authority's directory by issuing the commands:
# mkdir -m 0755 \
/etc/pki_jungle/myCA \
/etc/pki_jungle/myCA/private \
/etc/pki_jungle/myCA/certs \
/etc/pki_jungle/myCA/newcerts \
/etc/pki_jungle/myCA/crl
where
-
myCAis your certificate authority's directory -
myCA/privateis the directory where your private keys are placed. Be sure that you set restrictive permissions to all your private keys so that they can be read only by root, or the user with whose privileges a server runs. The consequences of a certificate authority private key being stolen would be catastrophic. -
myCA/certsdirectory is where your server certificates will be placed -
myCA/newcertsdirectory is where OpenSSL puts the created certificates in PEM (unencrypted) format and in the formcert_serial_number.pem(For example:07.pem). OpenSSL needs this directory, so you must create it -
myCA/crlis where your certificate revocation list is placed
19.3.6.4.3 Initial OpenSSL configuration
-
To copy the default OpenSSL configuration file (
openssl.cnf) from/etc/pki/tlsto your certificate authority's directory and name itopenssl.my.cnf, issue the following command as root:# cp /etc/pki/tls/openssl.cnf /etc/pki_jungle/myCA/openssl.my.cnf
-
Since this file does not need to be world readable, you can change its attributes by issuing the command:
# chmod 0600 /etc/pki_jungle/myCA/openssl.my.cnf
-
Create the file that serves as a database for OpenSSL, by issuing the command:
# touch /etc/pki_jungle/myCA/index.txt
-
Create the file which contains the next certificate's serial number, by issuing the command:
# echo '01' > /etc/pki_jungle/myCA/serial
Since you have not created any certificates yet, set it to "
01":
19.3.6.4.4 Create the CA Certificate and Private Key
After completing the initial configuration, you can now generate a self-signed certificate that will be used as your certificate authority's certificate to sign other certificate requests and a private key.
-
Change to your certificate authority's directory.
As root, issue the OpenSSL command:
# cd /etc/pki_jungle/myCA/
This is where you should issue all OpenSSL commands since it is the location of your OpenSSL's configuration file (
openssl.my.cnf). -
Then, create your certificate authority's certificate and private key. As root, issue the following command:
# openssl req -config openssl.my.cnf -new -x509 -extensions v3_ca
-keyout private/myca.key -out certs/myca.crt -days 1825
This creates a self-signed certificate with the default CA extensions which are valid for five years.
-
When prompted for a passphrase for your certificate authority's private key, set a strong passphrase.
-
When prompted, provide information that will be incorporated into your certificate request. Information for the certificate authority is similar to the example that is shown:
Country Name (2 letter code) [GB]:GR
State or Province Name (full name) [Berkshire]:Greece
Locality Name (For example, city) [Newbury]:Thessaloniki
Organization Name (For example, company) [My Company Ltd]:My Network
Organizational Unit Name (For example, section) []:My Certificate Authority
Common Name (For example, your name or your server's hostname)
[]:server.example.com
Email Address []:whatever@server.example.com
Two files are created:
certs/myca.crt:This is your certificate authority's certificate and can be publicly available and world readable.private/myca.key: This is your certificate authority's private key. Although it is protected with a passphrase, you should restrict access to it so that only root can read it. -
Although your certificate authority's private key is protected with a passphrase, you should restrict access to it so that only root can read it. To do so, issue the following command:
# chmod 0400 /etc/pki_jungle/myCA/private/myca.key
19.3.6.4.5 More OpenSSL Configuration (Mandatory)
Modifications to/etc/pki_jungle/myCA/openssl.my.cnf are necessary because you use a custom directory for your certificates' management.
-
Open
openssl.my.cnfin a text editor as root and find the following section (around line 35):_________________________________________________________ [ CA_default ] dir = ../../CA # Where everything is kept certs = $dir/certs # Where the issued certs are kept crl_dir = $dir/crl # Where the issued crl are kept database = $dir/index.txt # database index file. #unique_subject = no # Set to 'no' to allow # creation of # several certificates with # the same subject. new_certs_dir = $dir/newcerts # default place for new certs. certificate = $dir/cacert.pem # The CA certificate serial = $dir/serial # The current serial number #crlnumber = $dir/crlnumber # the current crl number must be # commented out to leave a V1 CRL crl = $dir/crl.pem # The current CRL private_key = $dir/private/cakey.pem # The private key RANDFILE = $dir/private/.rand # private random number file x509_extensions = usr_cert # The extentions to add # to the cert -
Modify the path values to conform to your custom directory and your custom certificate authority key (private key) and certificate and save your changes:
__________________________________________________________
 [ CA_default ]
dir     = .                                # <--CHANGE THIS
certs           = $dir/certs
crl_dir         = $dir/crl
database        = $dir/index.txt
#unique_subject = no
new_certs_dir   = $dir/newcerts
certificate     = $dir/certs/myca.crt      # <--CHANGE THIS
serial          = $dir/serial
#crlnumber      = $dir/crlnumber
crl             = $dir/crl.pem
private_key     = $dir/private/myca.key    # <--CHANGE THIS
RANDFILE        = $dir/private/.rand
x509_extensions = usr_cert
_____________________________________________________________
19.3.6.4.6 Sign the Certificate Request
Now you will sign the certificate request and generate the server's certificate. To do so, proceed as follows:
-
First, copy the
server.csrto your certificate authority's directory by issuing the following command:# cp server.csr /etc/pki_jungle/myCA/
-
Change to your certificate authority's directory by issuing the following command:
# cd /etc/pki_jungle/myCA/
-
Then, sign the certificate request by issuing the command:
# openssl ca -config openssl.my.cnf -policy policy_anything
-out certs/server.crt -infiles server.csr
-
Supply the certificate authority's private key to sign the request. You can check the
openssl.my.cnffile about what "policy_anything" means. In short, the fields about theCountry,StateorCityare not required to match those of your certificate authority certificate.After the steps have been completed, two new files are created:
-
certs/server.crt.This is the server's certificate, which can be made available publicly.
-
newcerts/01.pemThis is the same certificate, but with the certificate's serial number as a file name. It is not needed.
-
-
Now, delete the certificate request (
server.csr) since it is no longer needed.
19.3.6.5 Import the Certificate into Your Keystore
The SSL VPN must import the public key of this server certificate to decrypt the message sent from OAAM.
You must import the Root CA Certificate followed by the certificate which was issued to you by the certificate authority. The name of the root certificate is myca.crt and the name of the issued certificate is server.crt.
To import a certificate into a keystore, proceed as follows:
-
Change the working directory to MW_HOME
/jdk160_18/jre/lib/security. -
Import the root certificate into your keystore using the following
keytoolcommand:keytool -importcert -alias rootCA -file myca.crt -keystore cacerts -storepass changeit
In the preceding syntax:
-
aliasrepresents the alias of the Root CA Certificate. -
rootCA-file represents the name of the file that contains the Root CA Certificate. -
keystorerepresents the name of your keystore.
-
-
Open
server.crtin a text editor and remove everything except for content between theBEGIN CERTIFICATEandEND CERTIFICATEtags. -
Import the issued certificate into your keystore using the following
keytoolcommand:keytool -importcert -alias OAAMCert -file server.crt -keystore cacerts -storepass changeit
In the preceding syntax:
-
aliasrepresents the alias of the certificate, which must be the same as the private key alias assigned in Create Private Key for Certificate. -
server.crtrepresents the name of the file that contains the certificate. -
keystorerepresents the name of your keystore.
-
-
Enter the key password for
<OAAMCert>.The certificate reply was installed in keystore.
Note:
Ensure that the alias is the same as the one you used when creating the request.19.3.7 Modify Integration Properties Using the OAAM Administration Console
To define the SAML configuration properties required to establish the integration, proceed as follows:
-
Log in to the OAAM Administration Console.
-
Double-click Properties to open the Properties page.
-
Now type
oracle.saml*in the Name field and click Search to search the integration properties. -
In the search results, click the property you must modify.
-
In the Properties tab, modify the value for the property and click Save.
The properties imported as part of integration that need to be modified are shown in Table 19-2, "SAML Integration Properties".
Table 19-2 SAML Integration Properties
| Properties | Description |
|---|---|
|
oracle.saml.integration.version |
The SAML version used for integration Possible values are The default value is Juniper SA also supports SAML2.0. You must decide the version of SAML to use. |
|
oracle.saml.target.default.url |
The target URL (homepage) the user wants to navigate to after successful SAML assertion validation by Juniper SA For example: |
|
oracle.saml.keystore |
The full path of the keystore used for storing the certificate required to sign the assertion. In our case it will be
|
|
oracle.saml.keystore.password |
The password of the keystore |
|
oracle.saml.keystore.certalias |
The alias of the certificate used for assertion |
|
oracle.saml.keystore.privatekeypassword |
The private key password |
|
oracle.saml.redirect.post.url |
The URL where SAML assertion is posted For example: |
|
oracle.saml.set.attributes |
Indicates if additional attributes need to be sent to the Juniper SA as part of the assertion Possible values are The default value is |
|
oracle.saml.user.attributes |
List of attributes required to be appended as part of the assertion The property is only used if |
|
oracle.saml.attribute.namespace |
The name of the namespace used for assertion. The default vale is For SAML1.1 only. |
|
oracle.saml.nameidformat |
The The default value is |
|
oracle.saml.nameidattribute |
The The default value is This must be |
|
oracle.saml.issuer.url |
The URL of the issuer of SAML This is the machine where the OAAM authentication server is running. For example: |
19.3.8 Configure Juniper Networks Secure Access (SA)
To configure Juniper Networks Secure Access (SA) for this integration, you must:
For more information on Juniper SA configuration, see the Juniper Networks Secure Access Administration Guide available at
http://www.juniper.net/techpubs
19.3.8.1 Create SAML 1.1 Authentication Server
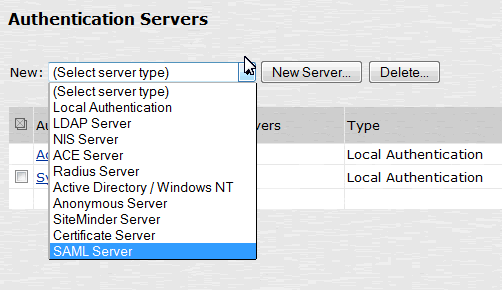
You must create an Authentication Server in Juniper SA. To do so, proceed as follows:
-
Log in to your Juniper SSL VPN Administrator Console.
-
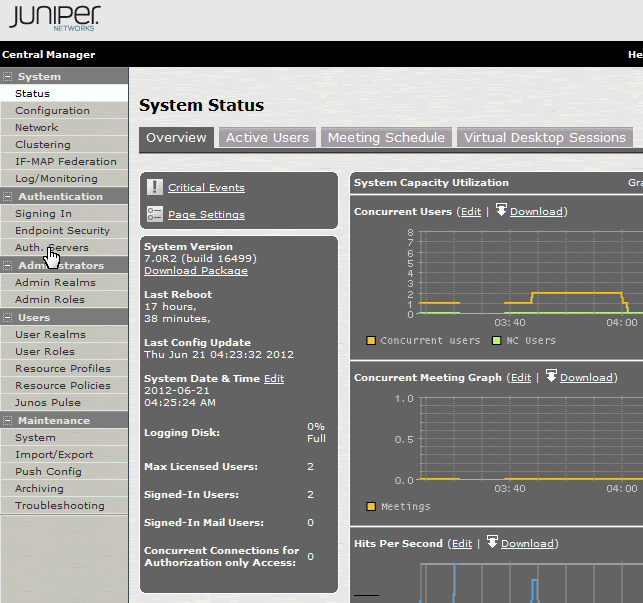
In the Juniper Administration Console in the left pane, expand the Authentication menu, and then click Auth. Servers.
-
From the New drop-down list, select SAML Server, and then click New Server.
The following dialog is displayed.

-
Define the Authentication Server with the values in Table 19-3.
Table 19-3 Create an Authentication Server
Parameter Details Value Server Name
Name of SAMLServer
OAAM SAML 1.1
Enter same value as shown.
SAML Version
SAML version for authentication server
1.1
Enter same value as shown.
Source Site Inter-Site Transfer Service URL
The entry URL of OAAM server. This is where the user gets redirected to for authentication.
Example: @
https://ag-oracleoaam.acmegizmo.com:14301/oaam_server/juniperLoginPage.jspSpecify the host and port according to your environment.
User Name Template
The template used for extracting the value that identifies the authenticated user
<assertionNameDN.cn>Enter the same value as shown. You also need to keep '
<' and '>' at beginning and endAllowed Clock Skew (minutes)
Allowed clock skew for assertion.
30Enter the same value as shown.
SSO Method
SSO method used for SAML
PostResponse Signing Certificate
The certificate used for signing the response.
This is the certificate you obtained from certificate authority. You have imported the same certificate into the Keystore in the step Import the Certificate into Your Keystore.
-
Import the server certificate (for example,
server.crt) created (in Section 19.3.6.4.6, "Sign the Certificate Request").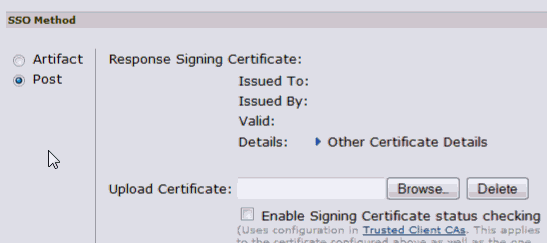
-
Click Save Changes to save the changes.
19.3.8.2 Create a User Realm for SAML
An authentication realm specifies the conditions that users must meet to sign in. A realm consists of a grouping of authentication resources.
To create a user realm for SAML, proceed as follows:
-
From the Juniper Administration Console, in the left pane, expand the Users menu, point to User Realms, and then click New User Realm.
-
Specify the name as
OAAM SAML 1.1 User Realm. -
Select the Authentication Server
OAAM SAML 1.1that was created in the last step as the authentication server for this user realm. -
Save the changes.
Now you should see the newly created user realm.
-
From the Juniper Administration Console, in the left pane, expand the Users menu, point to User Realms, and then click OAAM SAML 1.1 User Realm.
-
From the
OAAM SAML 1.1. User Realm, click the Role Mapping tab to configure one or more role mapping rules.
19.3.8.3 Create Sign-In Policy
Create a Sign-In policy which defines the URL on which you need to go on the Juniper SA to get redirected to OAAM for authentication.
-
To create a sign-in policy, in the Juniper Administration Console, expand the Authentication menu, point to Signing In, and then click Sign-in Policies.
-
Click New URL and in the Sign-in URL field that is displayed, enter
*/OAAM11/for the URL. -
For Sign-in Page, select Default Sign-in Page.
-
For Authentication Realm, select the OAAM SAML 1.1 User Realm that was created earlier.
-
Click Save Changes and make sure it is enabled
19.4 Verify the Integration
Once you have configured all required components, the next step is to test the Login and Forget Password flows. Follow the subsequent steps to verify that OAAM and Juniper SA were integrated successfully.
-
Open up a web browser and go to the target/protected resource URL that is protected by Juniper.
Make sure there are no instances or windows of the Web browser where you logged in to the Juniper Administration Console.
The target/protected resource URL is the value of the
oracle.saml.target.default.urlproperty specified in the OAAM Administration Console.The user will be taken to the OAAM Server login page.
-
Complete the login process.
It should take you to the Juniper Sign In page that displays the username and shows the sign-in page that has bookmarks and link to resources.
-
Open a Web browser and go to the target/protected resource URL that is protected by Juniper.
Make sure there are no instances or windows of the Web browser where you logged in to the Juniper Administration Console.
The target/protected resource URL is the value of the
oracle.saml.target.default.urlproperty specified in OAAM Administration Console.The user will be taken to the OAAM Server login page.
-
Enter the username and click Continue.
-
In the Password page click the Forgot your password link.
-
Answer the challenge questions or OTP.
After successfully answering the challenge, the user will be allowed to change the password and log in to the Juniper Sign In page.
19.5 Debug the Integration
To debug the integration on the OAAM end, enable the debug logs by following these steps:
-
Log in to Oracle Enterprise Manager Fusion Middleware Control. For example:
http://host.domain.com:7001/em/
For information on using Fusion Middleware Control, see Oracle Fusion Middleware Administrator's Guide.
-
Expand the WebLogic Domain node and click the OAAM Server.
-
Right-click to select Log and then Log Configuration to open the log configuration for the OAAM Server.
The default logging will be set to
FINERlevel -
Change the log level to
NOTIFICATION:1(INFO). Also, select Persist log level state across component restarts. Click the Apply button to save changes.
The debug logs will be in located in:
MW_HOME/user_projects/domains/YOURDOMAIN/servers/oaam_server/
logs/oaam_server-diagnostic.log
19.6 Troubleshooting Common Problems
This section describes common problems you might encounter in an Oracle Adaptive Access Manager and Juniper Networks Secure Access (SA) integrated environment and explains how to solve them.
In addition to this section, review the Oracle Fusion Middleware Error Messages Reference for information about the error messages you may encounter.
For information about additional troubleshooting resources, see Section 29.1, "Using My Oracle Support for Additional Troubleshooting Information."
19.6.1 Juniper SA and OAAM Clock Synchronization
Ensure that the Juniper SA and OAAM Servers system clocks are synchronized. Juniper SA system clock should not be ahead of OAAM Server clock. Refer to the Juniper Networks Secure Access Administration Guide to reset the date and time in the Juniper application. You can visit the Juniper Technical Documentation website at
19.6.2 Absence of a Correct Certificate on Juniper
After the OAAM flow has completed, the user is not redirected to the protected resource and an InvalidCryptoException is seen in the Web browser:
The logs seen in the Juniper Administration Console is as follows:
Logs(Juniper admin->Log/monitoring->Events): ERR24377 : Caught a SAML exception
'InvalidCryptoException' while verifying response. Error:
SAMLSignedObject::verify() failed
to validate signature value.
The correct certificate is absent on Juniper.
Ensure that server certificate (for example, server.crt) has been uploaded in Juniper. Refer to Section 19.3.8.1, "Create SAML 1.1 Authentication Server".
19.6.3 Signing Failure in SAML Response
After entering the password in OAAM, a screen with the following message appears:
There has been an error reaching your destination
The following exception is seen in the OAAM server log file (namely oaam_server_server1.log):
java.lang.NullPointerException
      at java.io.PrintWriter.write(PrintWriter.java:429)
      at jsp_servlet.__samlsubmit._jspService(__samlsubmit.java:96)
      at weblogic.servlet.jsp.JspBase.service(JspBase.java:34)
      at weblogic.servlet.internal.StubSecurityHelper$ServletServiceAction.run(StubSecurityHelper.java:227)
      at weblogic.servlet.internal.StubSecurityHelper.invokeServlet(StubSecurityHelper.java:125)
      at weblogic.servlet.internal.ServletStubImpl.execute(ServletStubImpl.java:300)
      at weblogic.servlet.internal.ServletStubImpl.onAddToMapException(ServletStubImpl.java:416)
      at weblogic.servlet.internal.ServletStubImpl.execute(ServletStubImpl.java:326)
      at weblogic.servlet.internal.ServletStubImpl.execute(ServletStubImpl.java:183)
There was a signing failure in the SAML response.
Ensure that the following properties are set to the right values:
For information, refer to Table 19-2, "SAML Integration Properties".
| Properties | Description |
|---|---|
| oracle.saml.keystore | The full path of the keystore used for storing the certificate required to sign the assertion. In our case it will be
|
| oracle.saml.keystore.password | The password of the keystore |
| oracle.saml.keystore.certalias | The alias of the certificate used for assertion |
| oracle.saml.keystore.privatekeypassword | The private key password |
19.6.4 Entry Point URL for OAAM
On accessing the protected resource, the following error message is seen:
There has been an error reaching destination
The entry point URL for OAAM was not set correctly in Juniper.
Check the URL in the browser. If it is not set to https://OAAM_HOST:OAAM_PORT/oaam_server/juniperLoginPage.jsp, it must be changed to this correct value.
To do this:
-
Login to Juniper Administration Console.
-
Click Auth servers on the left pane.
-
Select the server corresponding to OAAM. For example, OAAM server.
-
Set the Source Site Inter-Site Transfer Service URL to
https://<OAAM_HOST>:<OAAM_PORT>/oaam_server/juniperLoginPage.jsp
-
Save the changes.