 Understanding Vendor Information Maintenance
This chapter provides an overview of vendor information maintenance, lists prerequisites, and discusses how to:
Establish self-service security for vendors.
Maintain users.
Maintain vendor address information.
Maintain vendor contact information.
Configure supplier self-registration.
Self-register suppliers.
Send email messages.
Understanding Vendor Information Maintenance
PeopleSoft eSupplier Connection is a self-service web application that features employee-facing (internal) and supplier-facing (external) transactions that enable your suppliers to view and modify their own business information at their convenience.
Suppliers can add and update their own vendor addresses, email, and phone information in the system. They can also review, edit, and add contact information.
As soon as suppliers save their changes, your PeopleSoft database is updated.
Your suppliers can self-register, whether or not they are an existing vendor. You can set up standard roles and accessible pages for self-registered users, and track the logins and account usage for self-registered supplier users.
See Also
Maintaining Vendor Information
Prerequisites
Before suppliers can use PeopleSoft self-service transactions, they need access to the system. PeopleSoft self-service security enables vendor administrators to give their employees access to vendor self-service transactions.
You can also enable transaction access for different functional roles within the supplier organizations.
Establishing Self-Service Security for Vendors
You establish overall security for PeopleSoft eSupplier Connection just as you do for any other PeopleSoft application: by associating a permission list (which controls access to the system's web page components) with a role and associating the role with a user profile (user ID). Each user has one user profile but can be assigned multiple roles.
Note. Your PeopleSoft users are internal, while your vendors' users are external.
Self-Service Security Sample Data
PeopleSoft delivers sample permission lists, roles, and a user profile (SUPPLIER) as examples of how to set up vendor data and control self-service transactions. This example shows the sample roles that PeopleSoft provides for supplier-facing transactions:
Note. All external supplier users must be assigned the Supplier - External User role (or one with similar permissions) to access the PeopleSoft system; it features PeopleTools-related permissions that control personalization and navigation access. In addition, if your installation includes the PeopleSoft Applications Portal, all external supplier users must also be assigned the PAPP_USER role (or one with similar permissions). The role contains the permissions that are necessary for homepage personalization and configurations.
To view the sample permission lists that are associated with the provided supplier roles:
Access the Roles component in PeopleTools Security.
Select a sample supplier role from the list on the Roles search page.
The Permission Lists page in the Roles component displays the associated sample permission lists.
Click View Definition to access the Permission List component, where you can view the pages that are enabled by the selected permission list.
Internal Supplier Administrators
To set up security for external PeopleSoft eSupplier Connection users, at least one internal user, the supplier application administrator, must be assigned the PeopleSoft Supplier-Application Admin role. With this role, the administrator can create and update user IDs (except his or her own) to grant external vendor access to PeopleSoft eSupplier Connection. Vendors must first be assigned at least one vendor ID as part of user ID creation.
To set up external users, use the internal Vendor User pages (Vendors, Vendor Setup/Maintenance, and Vendor User).
External Supplier Administrators
To enable external users to administer security, the internal supplier application administrator must assign the Supplier-Application Admin role to at least one external user who belongs to each vendor ID.
External vendor administrators can:
Create and update users within the vendor ID to which they have access.
Grant self-service transaction access to the vendor IDs to which they have administrative access.
You can assign a variety of roles to the vendors' users. To enable an administrative user to create new users and grant new user roles, that user must have role grant capabilities, which you define on the Role Grant page within PeopleTools. This example illustrates how the page appears:
This diagram illustrates internal and external-based user maintenance flow where an internal system administrator controls the overall setup of supplier information, and external administrators setup external user within the supplier's organization:
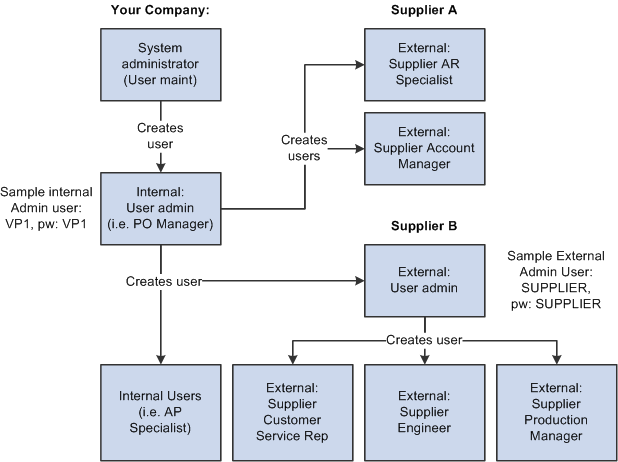
Internal and external user maintenance example
See Also
PeopleTools PeopleBook: Workflow Technology
PeopleTools PeopleBook: Security Administration
Maintaining Users
To set up vendor users, use the Define Vendor User (UM_DISTR_INTVND) component.
Once your supplier application administrators define them, your suppliers' administrators can perform their own user maintenance.
This section discusses how to:
Perform vendor user setup.
Maintain external users.
 Pages Used to Maintain Users
|
Page Name |
Definition Name |
Navigation |
Usage |
|
UM_DISTR_VNDR_INT |
Vendors, Vendor Information, Add/Update, Define Vendor User (internal) |
Internal users with the Supplier Application Administrator role can create external administrators, give other internal users access to vendor IDs, and create or update vendors' users. |
|
|
UM_DISTR_VNDR_EXT |
Maintain Supplier Information, User Profiles (external) |
External vendor administrators can create and maintain their own vendor users and give them access to vendor data. |
|
|
EXT_VND_SELECT |
Click the Add A Supplier button on the Security - Setup User page. |
Suppliers can add new vendors to be assigned to vendors' users. |
|
|
VENDOR_USER |
Vendors, Vendor Information, Add/Update, Vendor User |
Associate users with vendors. |
Performing Vendor User Setup
Access the Vendor User Setup page (Vendors, Vendor Information, Add/Update, Define Vendor User) (internal).
To set up vendor users:
Enter logon information, completing these fields in particular:
|
Select to disable this user's access to the PeopleSoft system. |
|
|
Access Profile Symbolic ID |
Each user ID has an encrypted access profile. Select a symbolic ID to use as a search key or intermediary between the user ID and the access ID. See PeopleTools PeopleBook: Security Administration |
|
Select a base language for the user. |
|
|
Rate Type |
PeopleSoft MarketPay uses this field. |
Assign roles to the user.
Note. To set up security for external users, you must assign the PeopleSoft Supplier Application Administrator role to internal users. See Establishing Self-Service Security for Vendors.
Associate (existing) vendor IDs to the user.
Each user ID can be associated with one or multiple vendor codes. This enables the user to view and, with the proper permissions, maintain data for the associated vendors. When the user logs in to PeopleSoft eSupplier Connection, the system determines to which vendor the user is associated. If the user is associated with multiple vendors, the Select Vendor page lists the vendors.
See PeopleTools PeopleBook: Security Administration
Maintaining External Users
Access the Security - Setup User page (Maintain Supplier Information, User Profiles) (external).
The values on this page duplicate the fields on the Vendor User Setup page, but they apply to external users only and are designed for the casual self-service user.
See Also
Establishing Self-Service Security for Vendors
Maintaining Vendor Address Information
This section lists the pages used to maintain vendor address information.
Pages Used to Maintain Vendor Address Information|
Page Name |
Definition Name |
Navigation |
Usage |
|
PO_SS_VND_LIST |
Maintain Supplier Information, Addresses |
Suppliers select a vendor to navigate to its inquiry or maintenance pages. This page is available only if more than one vendor is associated with the user. |
|
|
PO_SSVNDR_CURADDR |
Maintain Supplier Information, Addresses Select a vendor on the Maintain Addresses - Select Vendor page. |
Suppliers access pages to view, add, or maintain address, email, and phone information. |
|
|
PO_SSVNDR_ADDRDTL |
Click one of the following on the Maintain Addresses - Current Addresses page:
|
Suppliers can view, add, or maintain address, email, and phone information. Note. The fields on this page vary according to the country that is selected. |
|
|
Maintain Addresses - Future Address Information |
PO_SSVNDR_ADDRFDTL |
Click the Future Addresses link on the Maintain Addresses - Address Information page. |
Suppliers can review addresses that are not yet in effect and add or edit future addresses. Note. The fields on this page vary according to the country that is selected. |
Maintaining Vendor Contact InformationThis section lists the pages used to maintain vendor contact information.
Pages Used to Maintain Vendor Contact Information|
Page Name |
Definition Name |
Navigation |
Usage |
|
PO_SS_VND_LIST |
Maintain Supplier Information, Contacts |
Suppliers select a vendor to navigate to its inquiry or maintenance pages. This page is available only if more than one vendor is associated with the user. |
|
|
PO_SSVNDR_CURCNTCT |
Maintain Supplier Information, Contacts Select a vendor on the Maintain Contacts - Select Vendor page. |
Access pages to view, add, or maintain current contact information. |
|
|
PO_SSVNDR_CNTCTDTL |
Click one of the following on the Maintain Contacts - Current Contact page:
|
View, add, or maintain current contact information. |
|
|
Maintain Contacts - Future Contacts |
PO_SSVNDR_CNTFTDTL |
Click the Future Contacts link on the Maintain Contacts - Contact Information page. |
View, add, or edit contacts to go into effect on a future date. |
Configuring Supplier Self-RegistrationThis section describes how to:
Set up supplier self-registration.
Manage supplier users.
Understanding Supplier Self-RegistrationIf your company has large numbers of suppliers which you need to provide user accounts and provide external access to, having an administrator register many users is not efficient. You can set up the system to allow supplier users to create accounts individually by defining a registration code which can be sent manually to external users to create their own account. The supplier will need to know the registration code and their vendor ID to create a supplier user account. The registration code can be set up to expire base on a date to limit the time that an external user can create the account. In addition new component assists the internal administrator to monitor these supplier side accounts.
Note. To enable external suppliers to self-register you
must set up a URL and external web server that is configured for guest sign-on
access.
It is recommended that you create a separate web server for the self-registration
process than the web server you are using for standard supplier access. Also,
please refer to the AUC_GUEST user profile as an example of the roles and
permissions lists that you might want to use for the guest sign on you set
up.
Pages Used to Configure Supplier Self-Registration|
Page Name |
Definition Name |
Navigation |
Usage |
|
WV_REG_SETUP |
Set Up Financials/Supply Chain, Common Definitions, Suppliers, Supplier Registration Setup |
Configure the self-registration process for suppliers. |
|
|
WV_USR_MGMT |
Set Up Financials/Supply Chain, Common Definitions, Suppliers, Supplier User Management |
Maintain supplier users and search for information on supplier usage and new accounts. |
Setting Up Supplier Self-Registration
Access the Supplier Registration Setup page (Set Up Financials/Supply Chain, Common Definitions, Suppliers, Supplier Registration Setup).
|
Registration Code |
Enter a code that the supplier must enter to create an account. You will need to send this code to suppliers when you invite them to register. Creating a list of proper emails you wish to send this code to is a manual process external to the PeopleSoft system. This email should include a URL for a web server with guest sign-on access as well as the registration code. |
|
Effective Until |
Enter the date until which the registration code will be effective. Once this date passes the suppliers can no longer create a user account. |
|
ID Number Verification |
Select the type of ID number, such as a tax ID or DUNS number, that you want to use as additional security to track and verify transactions for vendors. The ID number verification provides security during the supplier registration process where external users are enabled to create a user when they have a vendor defined in your system. When you enter an ID in this field, the system requires the external user to enter the specific ID for the user's vendor (not location) level as part of creating a new supplier user account. The system stores identification numbers for vendors at the vendor and vendor-location levels, but only uses IDs at the vendor level for validation. Requiring identification numbers is optional, and you can only use one number per vendor. |
|
User ID |
Enter a sample user ID that determines the roles and security available for any self-registered users when they create an account. Any role that is defined for that user ID will get assigned to any supplier that self-registers. This User ID should contain the minimum access to supplier side components you wish to enable as the roles tied to this user are copies to the new user that is created. |
|
Default SetID |
Enter the setID used for your vendor table. The system uses this to verify the vendor ID when users self-register. |
|
View Associated Roles |
Click to display the list of roles associated with the sample user ID. These are the roles that all self-registered users will have at the time the user is created. |
|
View List of Pages Accessible |
Click to display a list of pages accessible to the sample user ID. These are the pages to which all self-registered users will have access. |
|
Exclude PeopleTools Pages |
Select to exclude PeopleTools pages from the list of pages that suppliers can access, showing only the functional pages |
Managing Supplier Users
Access the Supplier User Management page (Set Up Financials/Supply Chain, Common Definitions, Suppliers, Supplier User Management, Supplier User Management).
This page is designed for the internal administrator to monitor external supplier users of the system.
You can use multiple search methods to narrow the supplier users search results. For example, you can enter a vendor ID and then search on how many user accounts have been created for that vendor in a given date range, or show the last login date for all the users at a given vendor.
Search Criteria
|
User ID, SetID, and Vendor ID |
Select to filter search results. |
|
Component |
Select to filter search results by components users have access to. |
|
Role Name |
Select to filter search results by roles associated with users. |
Account Create Date
|
From Date and To Date |
Enter a date range and click Search. The system returns the names of the users that have created accounts within the date range. |
Last Login Date
|
From Date and To Date |
Enter a date range and click Search. The system returns the names of the users that have logged in within the date range. |
|
Include Deactivated Accounts |
Select to include deactivated accounts in the search. |
Supplier Users
|
Deactivate Selected Users |
Click to deactivate the user's accounts that you have selected after searching. |
|
Activate Selected Users |
Click to activate the user's accounts that you have selected after searching. |
Self-Registering SuppliersThis section provides an overview of supplier self-registration and discusses how suppliers can:
Sign on to the system.
Register as a supplier.
Understanding Supplier Self-RegistrationTo use PeopleSoft eSupplier Connection, a supplier user needs to:
Receive a code from their supplier administrator.
Access the self-registration pages on PeopleSoft eSupplier Connection.
Enter the self-registration information, including a valid code and vendor ID.
Pages Used to Self-Register Suppliers|
Page Name |
Definition Name |
Navigation |
Usage |
|
AUC_LOGIN_PGLT |
Opens on login. |
Login to PeopleSoft eSupplier Connection or create an account. Important! This pagelet needs to be configured for the homepage by the administrator, who must also configure the web server URL to bypass sign-on setup. To enable a supplier user to create their own account, it is necessary to use a web server with bypass sign on because prior to creating an account, the URL logs them on as a guest to access the self-registration pagelet the first time. |
|
|
Supplier Registration (external) |
WV_REGISTER |
Click the Register as a Supplier link on the Login pagelet. |
Register as a supplier and create an account. |
Signing On to the System
Access the Login pagelet (opens on login).
Note. This pagelet is accessible from a URL on the email you send to suppliers to self-register. Suppliers use the ID AUC_GUEST and password AUC_GUEST to sign on to the system and then access the Login pagelet to register as a supplier.
|
Register as a Supplier |
Click to access the Supplier Registration page and self-register as a supplier. |
Registering as a Supplier
Access the Supplier Registration page (click the Register as a Supplier link on the Login pagelet).
|
Code |
Enter the supplier registration code. This code is required for registration. Note. The buyer sets up this code on the Registration Setup page, and provides it to the supplier. |
|
Vendor ID |
Enter a valid vendor ID. This is required for registration. Note. The buyer provides this code to the supplier if needed. |
|
ID Number |
Enter a vendor ID number. The registration setup enables suppliers to self-register. As part of the setup process, the ID number verification provides an additional security measure during the registration. The system uses the ID number in addition to the vendor ID to track and verify transactions for a supplier. If the ID number field has been specified on the internal Registration Setup page, the system validates that the number the vendor enters matches the number specified for that vendor. If the number you enter does not match the ID number, the system displays an error message and does not allow the creation of the vendor user. Note. The message content includes the type of ID number that was entered for the vendor's verification. The system stores identification numbers for vendors at the vendor and vendor-location levels, but only uses ID numbers at the vendor level for validation. Identification numbers are optional, and you can only use one number per vendor. If an ID number has not been defined for a vendor, the ID Number field is not available or required. |
Sending Email Messages
The Email Message page is accessible from several supplier- and employee-facing pages. Users can send an email that contains a link to the page from which the Email Message page was accessed.
The body of the message contains two URLs: one that an internal recipient uses to access the referenced page through the PeopleSoft Applications Portal, and one that an external recipient uses to access the page through an external portal (in this case, the supplier portal registry). Even though the recipients get a URL, they need the correct privileges to access the system.
Note. This email messaging is not intended to be the facility for sending out self-registration emails, which should be done manually.
For example, a supplier who sends email notification from one of the pages in the ASN History component would use this version of the Email Message page: