 Defining Policy Set Security
This chapter discusses how to:
Define policy set security.
Create calendars.
Create user-defined fields and user data codes.
Establish cost summary groups.
Set up user preferences.
Defining units of measure (UOMs) and UOM conversions.
Define selection criteria.
Defining Policy Set Security
To create policy sets by user, use the Policy Sets by User component. To define role security, use the Inventory Policy Role Security component.
Policy security is a means of providing individual users access to specific policy sets or items. For example, system administrators can authorize individual users to use policy sets and can then restrict access to individual items within a policy set.
This section discusses how to:
Authorize users access to policies by policy set.
Authorize users access to policies by user ID.
Authorize users access to specific policy items according to roles that the user performs.
 Pages Used to Define Policy Set Security
|
Page Name |
Definition Name |
Navigation |
Usage |
|
DP_USERPOLICIES |
Inventory Policy Planning, Define Security, Users By Policy Set |
Authorize users access to policies by policy set. |
|
|
DP_POLICYUSERS |
Inventory Policy Planning, Define Security, Policy Sets By User |
Authorize users access to policies according to the user. |
|
|
DP_IPROLESECURITY |
Inventory Policy Planning, Define Security, Authorize Roles |
Authorize users access to specific policy items according to roles that the user performs. |
Authorizing User Access to Policies by Policy Set
Access the Users By Policy Set page (Inventory Policy Planning, Define Security, Users By Policy Set).
Select users from the User field to give them access to the policy set that you select. After you save the selection, the system makes the policy set available for the user in drop-down lists throughout PeopleSoft Inventory Policy Planning.
Authorizing Users Access to Policies According to the User
Access the Policy Sets By User page (Inventory Policy Planning, Define Security, Policy Sets By User).
Select sets from the Policy Set field that you want to make available to the user that you logged on as. After you save the selection, the system makes the set available for the user in drop-down lists throughout PeopleSoft Inventory Policy Planning.
Authorize Users Access to Specific Policy Items According to Roles
That the User Performs
Access the Authorize Roles page (Inventory Policy Planning, Define Security, Authorize Roles).
After authorizing a user to use a policy set, you can provide additional levels of security for the set by assigning specific policy items to users according to the role that they play in the organization.
By authorizing roles, you can divide a policy set into slices for certain users, providing them with access to their policy item data but restricting them from working with the entire policy set. You assign users login user IDs, and a role when setting up the system. This role determines which policy items users have access to in the PeopleSoft Inventory Policy Planning system.
|
Role Name |
Defines the type of organizational responsibility that a user performs when serving in a role. |
|
Build This Role |
Click to build access for this role. The system repopulates PeopleSoft Inventory Policy Planning records that associate the role with the policy set. This option builds security for this role for all policy sets that it is associated with. Note. You do not have to rebuild the role each time you create new items. Build the role only after you've modified the role's criteria. This is not a destructive process and can be run while users are on the system. |
|
Rebuild All Security |
Click to rebuild security for all roles across all policy sets. You can make multiple changes for different roles, save the changes, and then rebuild all of the records at once instead of individually. Note. This system builds security for all roles, for all policy sets in the system. |
|
Policy Set |
Displays the set for which you are authorizing roles. The set determines which user-defined fields are available to the role. Users can use only those sets that have been authorized for them. |
|
No Rules - All Policy Items |
Select to grant the role access to all of the policy items in this set. Otherwise, you should define the rules which determine the policy items you want the role to have access to. If you select this check box and have fields defined with rules, then the system removes all rows in the grid when you click Save. |
|
Field Name |
Select a field of data which you want to use to limit the role access to policy items. The fields and criteria that you enter for users are the rules by which the system authorizes them access to policy items within a policy set. Fields available for filtering are determined from the user data code associated with the policy set. |
|
Criteria |
Enter values that you want to use to limit the data from the fields that you select. Normally, you grant the role access to the entire set or you limit the access to a single field. For example, if location is selected, you can put the location code for France or Spain in the criteria field, and this limits the role to accessing only policy items created for the location. When you select the same field more than once in the grid, the system grants the role access to all policy items that match the criteria listed. For example, if you select the UD01 field three times, before you save the page, you must make three different entries in the Criteria field. If you enter A in one row, B in the second, and D in the third, then the system grants access to only those UD01 fields in the policy set that are A, B, or D. The criteria that you select are specific values for the field, you cannot select a range of values. The system doesn't grant the role access to any other policy set items in the set that do not have the selected field equal to the values that you select. If you add rows with a different field of data, the row is used with AND. In the previous example, suppose you add a row and use the Location field and enter France, and add a second row with the Location field and enter Spain as the location, the access granted will be if UD01 is A, B, or D AND the location is either France or Spain. This means that the user would have access to items with all six possible combinations. |
Creating Calendars
This section provides an overview of calendars, calendar patterns and weight profiles, and periods, and discusses how to:
Define calendar patterns.
Create and maintain calendars.
Define calendar periods.
Define calendar weight profiles.
Change daily calendar weights.
Understanding CalendarsCalendars define the start and end dates for each time-phased period in PeopleSoft Inventory Policy Planning. They also control how the system applies inventory policy parameters for each day of the year by using weights. The system stores weights for each day and distributes raw data into different period buckets based on weights.
Along with establishing daily data, the calendar contains multiple sets of period definitions. A number of periods per year and a total number of periods within a date range make up a period definition. You further define each period code with a list of periods that are associated with period numbers that divide some or all of the calendar into segments.
You can create calendars in PeopleSoft Inventory Policy Planning. In Inventory Policy Planning, the calendar controls the time elements for policy sets.
Here are some key factors for working with calendars:
Establish an overall time frame that might extend over several years.
Set up a standard calendar which includes the generally observed corporate holidays or vacations. You can then copy this calendar to other calendars as a starting point when setting up calendars to reflect local operating conditions.
Define calendars that are specific to individual organizations.
Define multiple calendars that cover the same date ranges.
Change days within a specific calendar to contain various elements of data.
Calendar Patterns and Weight Profiles
Calendar patterns are week-long templates that you use to maintain calendar weights for each day in a weight profile. The week is from Monday through Sunday. Use patterns to set up daily weights attributes quickly for calendar weight profiles and apply them to a range of dates within the weight profile.
Weight profiles are templates that you use to create and maintain daily weights for policy sets . One weight profile must be defined on each policy set as a default. When you create new policy items, the item uses the default weight profile that is associated with the set. Afterward, you can change the weight profile for an individual item to a different weight profile. You can have unlimited weight profiles but only one profile for each policy item and only one default profile for each policy set.
See Creating Calendars.
Calendar Periods
Periods define time buckets for a calendar. The system numbers each calendar period within a year, either based on a calendar or fiscal year, and assigns it a starting date and ending date. The system uses calendar period definitions to subdivide calendars into groups of days that Inventory Policy Planning use.
The definitions also allow the system to associate fiscal years and periods with underlying calendars, based on calendar years. For example, suppose that an organization's fiscal year runs from July to June on a monthly basis and you associate month one with July. The calendar period definition runs from July 1 of the starting year to June 30 of the ending year. In turn, the definition associates period one in each fiscal year with the month of July.
You cannot overlap start and end dates within a single period definition. However, the same day can belong to a different period in another period definition. The period definitions are independent of the daily weight attributes and therefore, the same day within the same calendar has identical attributes even if it's contained in multiple period definitions.
Pages Used to Create Calendars|
Page Name |
Definition Name |
Navigation |
Usage |
|
DP_CALENDARPATTERN |
Inventory Policy Planning, Define Policy Elements, Calendars, Patterns |
Define calendar patterns. |
|
|
DP_CALENDARS |
Inventory Policy Planning, Define Policy Elements, Calendars, Calendar Structure, Define Calendar Structure |
Create and maintain calendars. |
|
|
DP_CALENDARS_2 |
Inventory Policy Planning, Define Policy Elements, Calendars, Calendar Structure, Periods |
Define calendar periods. |
|
|
DP_WEIGHTPROFILES |
Inventory Policy Planning, Define Policy Elements, Calendars, Weight Profiles |
Define calendar weight profiles. |
|
|
DP_CALENDARWGTS |
Inventory Policy Planning, Define Policy Elements, Calendars, Change Calendar Weights |
Change daily calendar weights. |
|
|
DP_COPYWTPROFILE |
Inventory Policy Planning, Define Policy Elements, Calendars, Copy Weight Profiles |
Create weight profiles for new calendars using profiles from existing calendars. |
|
|
DP_CALENDARDELETE |
Inventory Policy Planning, Process Deletions, Calendars |
Remove calendars. The system provides descriptive information about the calendar. Click the Delete button to remove a calendar. The system prevents the deletion if the calendar is used by a policy set. |
Defining Calendar Patterns
Access the Define Calendar Patterns page (Inventory Policy Planning, Define Policy Elements, Calendars, Patterns).
|
Pattern Code |
Enter a code for use when you apply the pattern to a period of data. You assign pattern codes to weight profiles by using the Weight Profiles page. You can add a new calendar pattern at any time, and you must define at least one calendar pattern before you add a new weight profile. |
|
Demand Weight |
Enter the relative weight for each day. The values spread demand across days within periods. The system uses the number as relative weighting in relation to the numbers that are entered for the other days of the period across which a total is spread. |
Creating and Maintaining Calendars
Access the Define Calendar Structure page (Inventory Policy Planning, Define Policy Elements, Calendars, Calendar Structure, Define Calendar Structure).
|
Calendar ID |
Enter a code for identifying the calendar in PeopleSoft Inventory Policy Planning. This field is required. |
|
Start Date |
Enter a date that is early enough to cover the entire period of historical data that you plan to use in the system. The date is required and cannot be changed after you save the calendar. |
|
End Date |
Enter a date that is far enough in the future to cover all future planning periods. PeopleSoft recommends that you start and end the overall calendar on the first and last day of a year even if the organization's fiscal year is different. The system requires the date and can extend it during the life of the calendar. |
|
Displays the weight profile that calculates trading days for the calendar. Use the Weight Profiles page to select whether or not to calculate for trading days. If a weight profile is not selected for calculating trading days for a calendar, then the trading days automatically change to one per period. Only one weight profile may be designated as the trading days calculator for a calendar. Note. When a weight profile is selected for use in calculating trading days, the currently selected profile appears here. If weight profile is not selected, this field is not visible. Trading days are adjustment factors that the system applies to any calendar day when the forecast daily weight is greater than zero. The system uses the weights when converting between period codes, such as monthly to weekly, to adjust the period totals depending on the number of respective trading days on the calendar. |
Defining Calendar Periods
Access the Periods page (Inventory Policy Planning, Define Policy Elements, Calendars, Calendar Structure, Periods).
You can define multiple period codes for a calendar along with varying date ranges that increase calendar flexibility.
To create calendar periods:
If you are creating additional periods, click the Add Row button.
If this is the first time that calendar periods are added for the calendar, you do not need to perform this step.
Enter the period code for the calendar, and a description.
Select a period type that determines which periods per year the calendar uses.
The system inserts the default value for the selected period type in the Periods Per Year field. You can override that value; however, to customize the periods per year, select the Periodic period type.
If you previously added a period code, the system enters default values in the Start Date, End Date, and Forecast Period/Year start and end fields. You can override these values as needed.
Enter a start and end date to set up the date range for the period code.
The system provides a default start and end date from the calendar. Values are required for both fields.
Enter values in the Forecast Period/Year fields for the start and end date to define a starting period other than the system default.
Use this feature to distinguish between a yearly calendar and a fiscal calendar. Yearly calendars match the start date, but you offset the date by entering the period that matches the start of the fiscal year. Values are required for both fields. If you're setting up weekly periods codes, you must indicate what week is the first week of the year.
Click the Recreate button.
If this is the first time that periods are defined for the calendar, click the Create button.
The system populates the lower portion of the page with more detailed period information.
You can change the details for an existing period definition at any time; however, you cannot change all of the fields. To change the period type or the starting date or starting period year, you must delete the period definition and recreate it. You can change the end date, end period, and year, as well as any of the individual period start and end dates.
The system can recreate period date ranges automatically. This process deletes existing period data and creates new periods and ranges that are based on the date and period details that you provide. If you need to extend the period definition end date, select a new end date, period and year; then click the Extend button to create new periods at the end of the existing periods, extending the periods through to the new end date.
|
Period Code |
Enter a unique code that the system uses to retrieve data that you define for this period definition. Periods cannot overlap or have gaps between them. Within a single definition, you must include each day in a period, and a day cannot belong to more than one period. |
|
Period Type |
Select a value that determines the type of periods that make up the calendar. The formats for all period types are recurring through the end date for the calendar. The field is required. Values include:
|
|
Periods Per Year |
Enter the number of periods that occur in one year for the period type that you selected. The system provides a default value that is based on the period type that you select. |
|
Total Periods |
Displays the total number of periods in the calendar horizon when periods are created. |
|
Start Date and End Date |
Enter a start and end date to define a subset of periods within the calendar, or change the start date to match the period one start date. The start and end dates must be within or equal to the start and end dates that you define on the Calendars page.
Note. When adding weekly periods based on a calendar year,
make sure that the start date is at the beginning of the week that you want
to have as week one. |
|
Forecast Period/Year |
The system populates these start and end values based on the information that you enter in the Start Date and End Date fields. Enter either a forecast period, a year, or both to create or maintain the start and end date of the calendar manually. |
|
Recreate |
Click to rebuild period definitions if you change the forecast date, period, or year. |
|
Click if you want the system to calculate the start and end period dates automatically for the period of time that you add. This increases the time over which the period code is valid by extending the end date. Note. If you click the Extend button, you must recalculate the trading days to populate the trading days value for those extended periods. |
The predefined periods in Inventory Policy Planning may not match periods that you want to use for the organization. After you create or recreate a period code, you can view and change start and end dates for each period within a period code. Since periods within period codes cannot overlap, there are some limitations on how you can change the dates. The system provides alerts to assist you in making these changes.
The system also displays the total number of trading days in this period. Trading days are adjustment factors that are applied to any calendar day when the forecast daily weight is greater than zero. This is a display-only field.
Defining Calendar Weight Profiles
Access the Calendar Weight Profiles page (Inventory Policy Planning, Define Policy Elements, Calendars, Weight Profiles).
You can change weights by applying pattern codes for specific date ranges of the calendar. Because this function enables you to make changes to a range of dates and not display the results of that activity, the function provides no applicable value for PeopleSoft Inventory Policy Planning.
Changing Daily Calendar Weights
Access the Change Calendar Weights page (Inventory Policy Planning, Define Policy Elements, Calendars, Change Calendar Weights).
A daily calendar displays each day along with any weights for the day. Use the calendar to adjust the daily weight attribute by entering the relative demand weight for the day. This spreads demand across periods. The system uses the number as relative weighting in relation to the numbers entered for the other days of the month or period across which a total is spread.
Creating User-Defined Fields and User Data Codes
To create user defined fields, use the Create User Defined Fields component.
This section provides an overview of user data, user data codes, and planning fields, lists common elements, and discusses how to:
Set up user-defined character fields.
Set up user-defined numeric fields.
Review summary data for user-defined fields.
View character or numeric planning field properties.
Understanding User DataUser-defined fields are fields that are defined by naming them or mapping them to existing planning fields. The purpose of user-defined fields is to provide you with a means of naming fields. This makes the data in the field more meaningful to the organization.
Existing planning fields are system provided and can be imported from other PeopleSoft applications to provide specific inventory data. When you map user-defined fields, you use the same data, but you refer to it by the name that you assign to it. The system provides user-defined fields, enabling you to store data in a way that is not supplied by the standard set of fields in the system. User-defined fields provide you with flexibility in defining which fields are important to you for inventory policies and makes it possible to link them accordingly.
User-defined fields are grouped within a user data code that is assigned to the policy set. When you create a set, you must select a user data code and the user-defined fields to use from within that user data code.
This diagram illustrates how user-defined fields link to a policy set:
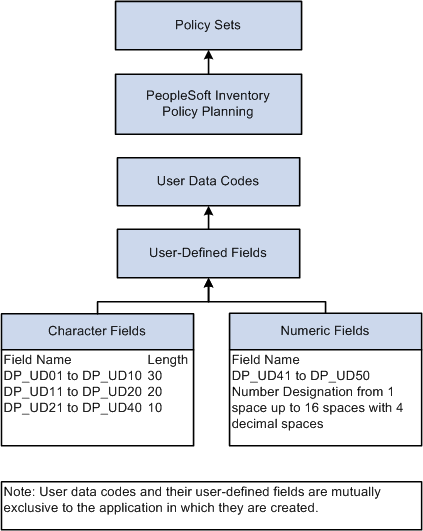
User data code relationships with policy sets
User-defined fields are made up of two types of fields, either character or numeric. Each data code has 40 different length character fields and 10 numeric fields that are available for mapping and creating sets of data. Numeric fields can be up to 16 digits and can have up to four decimal positions.
Note. PeopleSoft Inventory Policy Planning uses the user field features and the types of planning fields that are available are PeopleSoft Inventory fields. PeopleSoft Inventory Policy Planning user-defined fields are attached to a policy set.
User Data Codes
User data codes that are defined for PeopleSoft Inventory Policy Planning can contain up to 50 user-defined fields, but do not include item code and location.
While it might be useful for viewing purposes, you do not need to define these user-defined fields in sequential order. For example, DP_UD15 may be the only field in use, or could be used in addition to DP_UD01-UD10. You might find it beneficial to associate the user field length to a planning field of similar length. Try not to map a 30-character user field to a planning field that is only five characters. There are shorter user fields that can be used for that planning field, making that 30-character user field available for mapping to a much longer planning field.
When you add a new user data code, the system creates an inactive set of 50 user-defined fields.
Changing a user data code includes changing the attributes of an already active field and adding a new field to the user data code by modifying its attributes and activating it. However, you can't deactivate or alter the maximum length of the fields. You can't delete a user data code that contains fields that are used in a policy set.
Note. If you are changing the attributes of a user-defined field that is already active, when you change the validation method or values, ensure that the item data that is already used is valid. When shortening field length, ensure that existing data doesn't exceed the new length or it truncates.
Planning Fields Available for Mapping to User-Defined Fields
This table lists the planning fields that are available for mapping to user-defined fields in PeopleSoft Inventory Policy Planning:
|
Field Name |
Field Caption |
Field Length |
Field Type |
|
CONSIGNED_FLAG |
Consigned Purchase |
1 |
CHAR |
|
COST_ELEMENT |
Cost Element |
4 |
CHAR |
|
COST_GROUP_CD |
Cost Group |
6 |
CHAR |
|
EXCESS INVENTORY |
Excess Inventory |
2 |
CHAR |
|
INV_ITEM_ID |
Inventory Item ID |
18 |
CHAR |
|
INV_STOCK_TYPE |
Stock Type |
4 |
CHAR |
|
ITM_STATUS_FUTURE |
Item Status Future |
1 |
NUM |
|
NO_REPLENISH_FLG |
Not Included in Replenishment |
1 |
NUM |
|
PLANNER_CD |
Planner Code |
12 |
CHAR |
|
RELATED_ITEM_ID |
Related Item |
15 |
CHAR |
|
REPLENISH_CLASS |
Replenish Class |
4 |
CHAR |
|
SOURCE_CODE |
Source Code 2 |
2 |
CHAR |
|
USE_UP_QOH |
Use Up QOH |
1 |
CHAR |
|
HISTORICAL_LEAD |
Historical Lead |
16.4 |
NUM |
|
QTY_AVAILABLE |
Quantity Available |
16.4 |
NUM |
|
SHELF_LIFE |
Shelf Life |
16.4 |
NUM |
Common Elements Used in This Section|
Amend Character Fields |
Click to access the User Defined Character Fields page and map to user-defined character fields to planning fields or to fields as uniquely defined fields. Character fields use alphanumeric characters, not only numbers, in their definitions. |
|
Amend Numeric Fields |
Click to access the User Defined Numeric Fields page and map user-defined numeric fields to planning fields or to fields as uniquely defined fields. Numeric fields use numbers, not alphanumeric characters, in their definitions. |
|
Description |
Enter the name by which you want to recognize this field. When you change a description and the field is already in use on a policy set, the description also changes in all the referenced locations. If you select a planning field and do not enter a description, the system field description is the default value here. |
|
Field Format |
If you are on the user defined numeric fields page, this field displays the maximum number of digits and the decimal precision that you can use for this field's value. If the field is a numeric-based field, then the field format of 16.4 represents a field that is capable of storing a number ranging from 1 to 16 digits with up to four decimal places. |
|
Field in Use |
Select to indicate that this field is available for use with the policy set. You cannot delete user-defined fields, but you can make them unavailable to the system by clearing the Field In Use field. If you deselect the Field In Use check box make sure that the field isn't being used elsewhere in the system. When you deselect the option, the system removes the fields from use with a policy set. |
|
Field Length and Length |
If you are using the User Defined Character Fields page, enter the number of characters that make up the length of the field if you are not selecting a planning field from the list of available values. If you select a planning field ID from the list, you do not need to enter the length because the system provides the value based on the field that you select. If you enter a description and field length, the system automatically selects the Field In Use option. A description is required for fields when you select the Field In Use option and do not select a planning field from the list. You can also enter a new description to replace the system planning field description. |
|
Field Name |
Displays the system field name. The system uses this name to track and retrieve the value that you select to use with the field. You cannot change the name. |
|
Maximum Length |
Displays the maximum number of characters that you can use for this field's value. |
|
Planning Field ID |
Select a field to which you want to add a definition for the field to map to. The values in the drop-down list vary between character and numeric fields. You can leave the Planning Field ID field empty if you do not want to map the user field to a PeopleSoft field, but you'd rather manually maintain the field within PeopleSoft Inventory Policy Planning. |
|
Planning Field Properties |
Click to access all of the planning fields that are available for mapping. If you access the page from the User Defined Numeric Fields page, all numeric fields appear. If you access the page from the User Defined Character Fields page, all available character fields appear. The page provides the planning field ID, description, field length, and field type and enables you to see the length of a field before you map it to a specific user-defined fields. |
|
Return to Define User Data Codes |
Click to access summary information about all of the user-defined fields that are defined as in use for this user data code. |
|
Return to Summary Page |
Click to access summary information about all of the user-defined fields that are defined as in use for this user data code. As you return to this page, all changes you made to the characters or numeric pages are displayed in the summary grid. You also save information that you enter for user-defined numeric and character fields on this page. |
Pages Used to Create User-Defined Fields and User Data Codes|
Page Name |
Definition Name |
Navigation |
Usage |
|
DP_VIEW_UDFIELDS |
|
Review summary data for user-defined fields. |
|
|
DP_MAINTUDFIELDS |
Click the Amend Character Fields link on the Define User Data Codes page. |
Set up user-define character fields, field lengths, and indicate if they are in use. |
|
|
DP_MAINTUDFIELDS2 |
Click the Amend Numeric Fields link on the Define User Data Codes page. |
Set up user-define numeric fields and indicate if they are in use. |
|
|
DP_INQ_FLDSPROP |
Click the Planning Field Properties link on the Define User Data Codes page. |
View planning field properties. |
|
|
DP_COPY_UDFIELDS |
Inventory Policy Planning, Define Policy Elements, Policy Sets, Copy User Data Codes |
Create user data codes by copying existing codes. User-defined fields make up user data codes. |
|
|
DP_DELETE_UDCODE |
Inventory Policy Planning, Process Deletions, User Data Codes |
Remove unused user data codes from PeopleSoft Inventory Policy Planning. The system provides descriptive information about the data codes. Click the Delete button to remove the codes. When a data code is used in a policy set, the system prevents its removal. |
Reviewing Summary Data for User-Defined Fields
Access the Define User Data Codes page (Inventory Policy Planning, Define Policy Elements, Policy Sets, Define User Data Codes. You can also click the Return to Summary Page link on the User Defined Character Fields page or the User Defined Numeric Fields page to access the Define User Data Codes page).
All user-defined numeric and character fields that are selected as in use with this user data code appear on this page.
Setting Up User-Defined Character Fields
Access the User Defined Character Fields page (click the Amend Character Fields link on the Define User Data Codes page).
Character fields are made up of alphanumeric characters. Setting up user-defined character and numeric fields generally involves a similar process but with several differences. The first difference is that character fields use DP_UD01 – DP_UD40 as user-defined fields, and numeric fields use DP_UD41– DP_UD50 as user-defined fields. The other difference is that you can adjust the character field length, whereas the numeric field is a fixed setting. This enables processing of larger or smaller numbers, along with the decimal places.
Setting Up User-Defined Numeric Fields
Access the User Defined Numeric Fields page (click the Amend Numeric Fields link on the Define User Data Codes page).
You use numeric fields for numeric values.
Viewing Planning Field Properties
Access the Planning Fields Properties page (click the Planning Field Properties link on the Define User Data Codes page).
Values that appear on this page depend on which type (character or numeric) of user-defined field that you use. Only planning fields that are available for use with PeopleSoft Inventory Policy Planning or user-defined fields with which you are working appear.
Establishing Cost Summary Groups
To set up cost summary groups, use the Cost Summary group component.
A cost summary group summarizes investment, holding, and carrying costs for groups of inventory policy items. Individual items within a policy set compose the group. Selection criteria that is based on the Inventory Policy master record determine which items from that set are in a particular summary group.
By applying different policy parameters to various items within the group, you can see the effect that each item has on the group's total costs. Because a single item can belong simultaneously to multiple groups, it is possible to analyze inventory costs based on a variety of criteria.
You can change information that is associated with a cost summary group at any time; however, the group record's total cost aggregation won't reflect changes until you update the cost summary by using the Update Cost Summary feature when you review policy information. The feature displays the aggregate cost information for the group as of the last update. It also displays the current aggregate cost for the group based on the current cost data for all of the items that are assigned to that cost summary group. You can also see the net change between the current cost values and the value from the last update.
This section discusses how to define cost summary group details.
Pages Used to Establish Cost Summary Groups|
Page Name |
Definition Name |
Navigation |
Usage |
|
DP_CSUMGRP |
Inventory Policy Planning, Define Policy Elements, Inventory Policy Items, Define Cost Summary Groups |
Define cost summary group details. |
|
|
DP_DELCSUMGRP |
Inventory Policy Planning, Process Deletions, Cost Summary Groups |
Remove cost summary groups from the PeopleSoft Inventory Policy Planning system. Fields of data that belong to the groups appear for informational purposes. When you delete the group, the system removes the group and its associated records. |
Defining Cost Summary Group Details
Access the Define Cost Summary Groups page (Inventory Policy Planning, Define Policy Elements, Inventory Policy Items, Define Cost Summary Groups).
A default policy set must exist to which you can assign the cost summary group. Only items that match the selection criteria that you define are included in the cost summary group. You must define at least one selection criteria.
See Defining Selection Criteria.
Setting Up User Preferences
To define user preferences, use the IP User Preferences component.
User preferences are default values that you set up for individual users that determine the settings that the system uses when those users request policy set data from workbenches and inquiries. Although you define the defaults, you can override them after you access the workbench or inquiry.
This section discusses how to create user-preference details.
Page Used to Set Up User Preferences|
Page Name |
Definition Name |
Navigation |
Usage |
|
DP_IPUSERPREFS |
Inventory Policy Planning, User Preferences |
Create user-preference details for individual users of PeopleSoft Inventory Policy Planning. |
Creating User-Preference Details
Access the User Preferences page (Inventory Policy Planning, User Preferences).
|
Default Grid Format |
Determines the type of display that you want to use for inquiries or workbenches. Values include:
|
|
Inquiry Template |
Select the default template that you want to use for inquiries. Inquiry display templates determine what fields of data appear during inquiries. |
Defining the Operator Default
This section discusses how to define the operator preference.
Page Used to Define the Operator Default|
Page Name |
Definition Name |
Navigation |
Usage |
|
Operator Defaults |
DPIP_OPER_DEFAULTS |
Inventory Policy Planning, Operator Defaults |
Assign the default policy set for the operator. |
Assigning the Operator Default
Access the Operator Defaults page (Inventory Policy Planning, Operator Defaults).
|
Policy Set |
Select the default policy set for the operator. |
Defining UOMs and UOM Conversions
This section provides an overview of UOMs and UOM conversions and discusses how to:
Add UOMs.
Define UOM conversions.
Understanding UOMsThe system uses units of measure (UOMs) to record how you quantify policy items. Using PeopleSoft Inventory Policy Planning, you can add UOM and conversions. And, if you are using Inventory Policy Planning as a stand-alone application, you can create UOMs by using the Units of Measure feature.
Note. If you are using PeopleSoft Inventory Policy Planning along with PeopleSoft Financials, Distribution and Manufacturing, you do not define UOMs by using this feature.
When the system records quantity data, the UOM in which the quantity is expressed is also recorded. When the system stores a UOM in one unit but requires it in another, it calculates for either quantity by using a conversion factor between the two UOMs. This ensures a standard method of calculating required quantities and amounts.
When you create a policy item, the system uses one of these methods to assign the item's UOM:
Transfers the UOM with the policy item information.
Converts the value by using a UOM conversion factor.
The PeopleSoft Inventory Policy Planning application uses UOMs that you set up for use across all PeopleSoft applications. You create and maintain system UOMs by using the Common Definitions feature on the Set Up Financials/Supply Chain menu. You can also create a UOM by using PeopleSoft Inventory Policy Planning if the application is a stand-alone application.
UOM Conversions
A UOM conversion changes the way that an item is measured. To do this, the system uses a conversion factor. This a number or factor that is applied to a quantity with one UOM to convert it to a quantity with another UOM.
Conversion routines are generally the same; however, the use of the routines occurs at different points across PeopleSoft applications. For example, the system uses conversions when Inventory Policy Planning pulls forecast items from a published forecast. The system checks the items and makes the conversions at each point.
UOM conversions include:
Used in bill of material (BOM) component explosions.
The conversion applies universally between two UOMs, regardless of the subject of the measurement. For example, there are always 12 inches in a foot and 100 centimeters in a meter. This is a required conversion factor that you maintain by using the Unit of Measure Conversions page.
Used in conversions between item ID and policy item for the same two UOMs.
Item-specific conversions vary depending on the subject being measured. For example, suppose that one box of light bulbs contains 12 individual bulbs, while a box of nails contains 1000 individual nails. This type of conversion factor is more commonly used where the UOM represents some form of packaging or grouping. Another example of an item-specific conversion is defining the weight per gallon for liquid raw materials.
The system uses this attribute as a UOM in special cases where you might want to convert an item based on a characteristic rather than the base unit, generic, or item-specific UOM. During hierarchical processing, weight conversions are given top priority. You maintain weight conversions by using the Other Data page. To access the page, select Define Policy Elements, Inventory Policy Items, Define Policy Items, Other Data.
The system uses this attribute as a UOM in special cases where you might want to convert an item based on a characteristic rather than the base unit, generic, or item-specific UOM.
During hierarchical processing, the system first checks for a weight conversion. If one is not found, it checks for a volume conversion before checking for other types of conversions. You maintain volume conversions by using the Other Data page.
Define conversion factors by using the Unit of Measure Conversions page, or for item-specific conversions, you can use the Other Data page. Enter the larger unit in the From Unit column, followed by the smaller unit in the To Unit column. The system uses the conversion factor to multiply values in the first unit to give the second unit's value. This table lists examples of generic conversions:
|
From Unit |
To Unit |
Conversion Factor |
|
Feet |
Inches |
12 |
|
Yard |
Feet |
3 |
|
Meter |
Centimeter |
100 |
|
Kilogram |
Gram |
1000 |
|
Kilogram |
Pounds |
2.2 |
Note. There isn't a need to define conversion factors for both directions. For example, in the preceding table, it isn't necessary to define a from unit of inches and a to unit of feet. To verify that the conversion units are set up correctly, you can read the table from right to left to see whether the conversion makes sense. For example, there are 12 inches in a foot, or there are three feet in a yard.
Note. The system does not verify that the UOM isn't being used elsewhere in the system.
Note. The system does not verify that the UOM isn't being used elsewhere in the system before it is changed.
If you delete the conversion factor, it's possible to leave the system without a conversion for a UOM that it needs. In this instance, the system sends Work Queue alerts about its inability to find the conversion factor. If this happens, a conversion does not occur, even if different UOMs are present.
PeopleSoft Inventory Policy Planning uses these standards in converting UOMs:
Uses the same hierarchical search as it processes for the conversion factor.
Converts incoming data to the base UOM for the policy item.
Uses a hierarchy to determine UOM conversion factors when items have different UOMs, or you select to display the item in a different UOM.
Converts all policies to the standard inventory UOM by using inventory rounding rules before publishing the information to other PeopleSoft Supply Chain Management (PeopleSoft SCM) applications.
Publishes policy information to PeopleSoft SCM and external sources in any valid UOM that you select.
The system uses this hierarchy to find a UOM conversion. It will go down the hierarchy until it determines a policy item conversion factor:
Uses the weight as the conversion factor if the unit to which you want to convert matches the weight of the policy item.
Uses the volume as the conversion factor if the unit to which you want to convert matches the volume of the policy item.
Checks for a PeopleSoft Inventory Policy Planning policy item-specific UOM conversion factor.
Checks for a generic UOM conversion factor.
Reports that the conversion was not completed for that policy item if any of the previous conditions are not met.
In this case, the system doesn't make the conversion and creates an error message.
Pages Used to Set Up UOMs|
Page Name |
Definition Name |
Navigation |
Usage |
|
DP_MAINTUOMCONV |
Inventory Policy Planning, Define Policy Elements, Units of Measure, Conversions |
Define UOM conversions. |
Defining UOM Conversions
Access the Unit of Measure Conversions page (Inventory Policy Planning, Define Policy Elements, Units of Measure, Conversions).
To maintain a UOM conversion, enter a new value in the Conversion Factor field. A conversion factor is the factor that is applied to the From Unit field quantity to convert it to the equivalent quantity in theTo Unitfield. To create a new conversion, select values for the From Unit and To Unit fields.
You can change conversion factors at any time, which only affects future uses of the factor in calculations. Make sure that the conversion factor is not referenced in other parts of the system before deleting it.
See Also
Defining Selection Criteria
Across PeopleSoft Inventory Policy Planning functions, you can use a feature for creating data subsets. The feature makes it possible for you to control and filter ranges of data or types of data to be selected for a particular purpose. You create the subset by establishing selection criteria for the field. For example, if you want to limit the number of items or view data for a specific location, you can select a range of records to limit the Item Code or Location field.
The system provides selection criteria grids to filter data. This is an example of a selection criteria grid:
Use the grid to provide filter elements for the data subset.
|
Open ( (open parenthesis) |
Select the open parenthesis character to signify the start of a group of criteria that you want to enclose. For example, if you have three criteria, you can create a selection criteria of (A or B) and C by placing an open parenthesis on the line for A. |
|
Field Name |
Select a field on which to filter. The system uses the field you define as the basis for further limiting data when you use the Criteria field. Fields that are available for selection are dependent on the function that you use. |
|
Operator |
Determines the action that the system applies to the criteria that you enter in the Criteria field. For example, suppose you want only item IDs that start with AA to be placed in the data file, use the = (like) operator. You should enter the correct form of the criteria to match the operation that you want the system to perform. Available operators depend on the page that you use. Values include:
|
|
Criteria |
Enter the value that you want the system to use when applying the operators. For example, if you select >= for an Item Code field and enter AA100 as the criteria, then the system includes only values that are equal to or above the criteria. |
|
Date |
Enter the date criteria if the field selection includes a date value. Some pages do not display a Date field. |
|
Close ) (close parenthesis) |
Select the close parenthesis character to signify the end of a group of criteria that you want to enclose. For example, if you have three criteria, you can create a selection criteria of (A or B) and C by placing an close parenthesis on the line for B. |
|
Next |
Provides a means of creating And or Or statements for the operators and criteria that you enter. Use the AND option to create additional criteria for the field. Use the OR option to create contrasting criteria. |
Note. When you save selection criteria or filters on certain pages, the system performs validation to insure that you have selected the open and close parentheses in the correct order. For example, the system validates that you don't have a close parenthesis prior to an open parenthesis, and that you have a close parenthesis for every open parenthesis. However, the system validation does not ensure that the placement of parentheses is correct for the logical selection you are trying to perform.