 Understanding How to Receive Stock in PeopleSoft Inventory Using Mobile
Receiving
Understanding How to Receive Stock in PeopleSoft Inventory Using Mobile
ReceivingThis chapter provides an overview of receiving stock in PeopleSoft Inventory using Mobile Inventory and discusses how to:
Set up the PeopleSoft system for use with Mobile Receiving.
Receive purchase order receipt lines using a mobile device.
Receive items by ad hoc receipt using a mobile device.
Understanding How to Receive Stock in PeopleSoft Inventory Using Mobile
ReceivingThe Mobile Receiving task flow integrates with the PeopleSoft Purchasing system to receive and put away received goods. Receiving rules are defined in the PeopleSoft system business processes leading up to the actual receipt. These processes include setting up items and creating requisitions and purchase orders. Mobile Receiving leverages this base information, and makes the process of receiving goods more efficient and accurate and moves data into the PeopleSoft system in real time.
Note. To make changes to a receipt after an item has been received, you need to use the PeopleSoft system online Receiving pages.
When stock arrives at the receiving location, you receive it using a mobile device with the Mobile Receiving task flow. You can receive inventory or non-inventory items, with or without associated purchase orders. Receipts with a purchase order can be for items that will be stocked in inventory, for items that will go directly to par locations, or for items that will go directly to various departments. A receipt without a purchase order (ad hoc receipt) can be interfaced to the same products as a purchase order receipt. Only non-inventory items can be received without a purchase order.
If the source of a receipt is not a current vendor the PeopleSoft system, then you can enter it during Mobile Inventory Receiving.
If the attention to or location information for delivery is not in the PeopleSoft system, then you can enter it during Mobile Inventory Delivery.
This diagram illustrates the flow of information through the Mobile Receiving process beginning with when the shipment arrives at the ship to location:
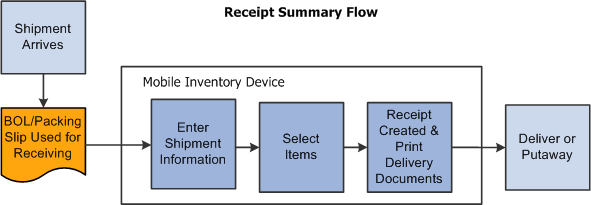
Receipt Summary Flow
When a shipment arrives at the receiving location, it typically arrives with a bill of lading or packing slip. These documents can be used to gather information needed to record the receipt. Using a mobile device at the receiving location, you can enter shipment information. You select items to be received and determine if there are additional items in the shipment that need to be received. After determining all of the items that have been received, you can create and print a receipt. The information is relayed back to the PeopleSoft system where you can perform the downstream receipt processes.
Note. Entering shipment information is optional.
You can also select to print delivery documents. Delivery information becomes available only after the item has been received. When you select to print delivery documents, the system uses the receipt information and initiates the RECV_DEL multi-process job. The job gathers receiving data for the Receipt Delivery Detail report.
Simple and Advanced Selection of Items for Receipt
The difference between a simple and an advanced search for receipt items is the number of input fields that you can use. After you enter information in the selection fields, the rest of the search is the same. The search produces a list of purchase order lines and you select the lines to include in the receipt.
You use a simple search when the shipment is for one purchase order ID. You enter the purchase order ID and the mobile device displays a list of items for that purchase order that match the default ship to location and the due dates that are in the date range selection. You select the purchase order lines and schedules that are in the shipment and enter or adjust the quantity received.
An advanced search is used if you need to refine the selection criteria beyond just the purchase order and default ship to. Some examples include receiving a past due purchase order in which the due date is prior to the Days +/- field value.
Another example might be when a shipment includes items from multiple purchase orders. In this case you have several options. First, you can create one receipt for each purchase order using a simple search. Second, you can use the advanced selection to create a list of purchase order lines that you can receive in one shipment. To do this, you enter selection criteria to find matches in the shipment's purchase order lines.
A final example might be when a packing slip does not include the purchase order ID. In this case you can search for the purchase order by entering a vendor, manufacturing item ID and so on.
 Purchase Order Receipts
To take advantage of the purchasing authorizations established during the requisition and purchasing process, goods and services that you receive need to be referenced against a purchase order. With Mobile Receiving, the purchase order must exist; however, lines and schedules might not be known by the person recording the receipt.
The system provides default receiving and purchase order business units, derived from User Preferences, but you can override the values. The Mobile Receiving application automatically assigns a number to the receipt, but you can override the number. A component interface built on top of the Add/Update Receiving page processes the transaction from Mobile Receiving. Component interfaces for Mobile Receiving include MIN_PO_RECV_CI and PO_RECEIPT_CI.
See Understanding Mobile Inventory Management Setup in PeopleSoft.
This diagram illustrates the flow for how a purchase order shipment is received and a receipt is created for the transaction. It also highlights the Mobile Receiving part of the flow:
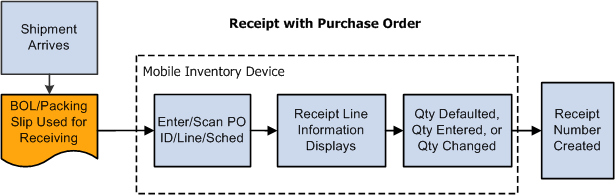
Receipt with purchase order flow
When a purchase order is defined and the shipment arrives at the receiving location, you use a mobile device to enter or scan the purchase order ID, if the purchase order ID is bar coded on the packing slip. Upon reading the purchase order, the mobile device displays the purchase order receipt line information including the vendor item description ID and default quantity, if it exists.
A setup option is available to control which item ID displays on the mobile page. You can select to display the item by:
Purchase order line item.
Vendor item.
Manufacturing item.
If your user preferences are set to provide a default purchase order quantity or quantity remaining for receiving, the mobile device displays the quantity for you. However, if your user preferences are set for blind receiving or not to provide default quantities, then the system does not provide a quantity.
These user preferences are defined on the Receiver Setup page. To access the page, select: Set Up Financials/Supply Chain, Common Definitions, User Preferences Define User Preferences, click the Procurement link, and then the Receiver / RTV Setup link. Select the Blind Receiving Only check box to not display a quantity. Or, select the No Order Qty button to not display the purchase order quantity.
You can view additional details about individual items by clicking the Show link. Select the lines included in this receipt, enter or change the receipt quantity and save. When saving the receipt, you can trigger the RECV_DEL multi-process job to create the Receipt Delivery Detail report. Repeat the receiving process to receive more purchase order lines. After receiving the items, you can then use the mobile device with Mobile Delivery to complete the delivery verification of the items. When you save the receipt, the system provides the option to close short purchase order lines that are being received.
Other processes that the system can trigger are based on user preferences. For example: interface receipts and streamline subcontract. However, for this release we are not providing the ability to change these triggers and these triggers receive their default values from user preferences.
Note. You can add receipts for lot-controlled and serial-controlled items, device tracked items, and asset items. You cannot enter values for the receipt until you access the PeopleSoft system's Receiving page to enter the values after you save the mobile receipt.
Ad Hoc Receipts
Ad hoc receipts are receipts without a purchase order and provide you the capability to track a package from receipt to delivery. For example, if a salesperson ships samples to a doctor's office, a purchase order or accounts payable transaction is not generated, but the samples are received and delivered.
Another example might be when a department orders supplies using a credit card. In this case, there is not a purchase order and an invoice is not sent to accounts payable. When these items arrive, the receipt needs to be recorded and the items delivered to the appropriate person or department.
Note. To use the ad hoc receipt transaction, ensure that the Change Non PO Receipt Price check box is selected on the Receive Setup page for your user preferences. To access the check box, select: Set Up Financials/Supply Chain, Common Definitions, User Preferences, Define User Preferences, click the Procurement link, and then click the Receiver / RTV Setup link.
This diagram illustrates the process flow to receive an item and create an ad hoc receipt. It highlights the part of the flow where you use Mobile Receiving:
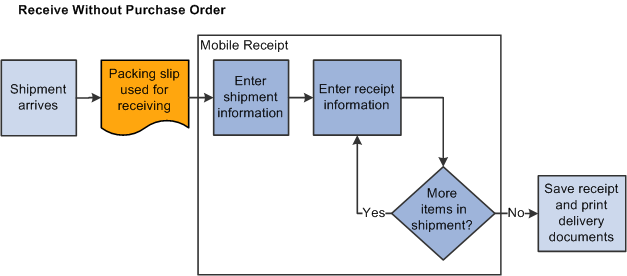
Ad hoc receipt process flow
Using ad hoc receipts, you can provide basic information about the receipt, add multiple items to the receipt, and save the receipt into the PeopleSoft system where you can review and update the receipt. The receipt is also available to a mobile device so that Mobile Delivery can complete the delivery of the received items.
See Also
Setting Up Component Interfaces for Mobile Inventory Management
Setting Up the PeopleSoft System for Use with Mobile ReceivingThis section discusses how to:
Establish Mobile Receiving installation options for purchase orders with receipts.
Establish Mobile Receiving installation options for ad hoc receipts.
Define user preferences for Mobile Receiving.
Define Mobile Receiving purchasing options.
Establish printer defaults for the Mobile Receiving Delivery report.
Pages Used to Set Up the PeopleSoft System for Mobile Receiving|
Page Name |
Definition Name |
Navigation |
Usage |
|
Installation Options - Mobile Inventory |
INSTALLATION_MIN |
Set Up Financials/Supply Chain, Install, Installation Options, and select either the Receiving PO or Receiving Ad Hoc task flow |
Establish Mobile Receiving options for purchase orders with receipts. Establish Mobile Receiving options for ad hoc receipts. |
|
User Preferences - Mobile Inventory |
MIN_USER_TASK_OPT |
Set Up Financials/Supply Chain, Common Definitions, User Preferences, Define User Preferences Inventory |
Define user preferences for Mobile Receiving. |
|
Mobile Receiving |
BU_OPT_MOBILE_REC |
Set Up Financials/Supply Chain, Business Unit Related, Purchasing, Purchasing Definition, and click the Mobile Receiving link |
Establish Mobile Receiving Ad Hoc default values. |
|
Receiver Setup |
OPR_DEF_RECV_SEC |
Set Up Financials/Supply Chain, Common Definitions, User Preferences, Define User Preferences, Procurement. Click the Receiver / RTV Setup link. |
Establish printer defaults for the Mobile Receiving Delivery report. |
Establishing Mobile Receiving Installation Options for Purchase Orders
with ReceiptsAccess the Installation Options - Mobile Inventory page (Set Up Financials/Supply Chain, Install, Installation Options, Mobile Inventory, and select the Receiving PO task flow).
You use installation options to define default values for Mobile Receiving pages in the PeopleSoft system and to control the behavior of the transaction.
|
Delivery Signature Required |
Select to indicate that the mobile application requires a signature of the person receiving a delivery. When this option is selected, the Perform Delivery page requires a signature. |
|
Rows Displayed |
Enter the maximum number of rows that you want to display in the tables for the Mobile Receiving application. |
|
Display Item |
Select the item ID value that you want to display for the receipt line when it is displayed in Mobile Receiving. Values include:
The display value that you select will be the item ID displayed in the Mobile Receiving page. You can view the other item ID values by opening the Show table. |
|
Display Lookups |
Select this check box to display the Lookup icons for fields in this transaction. The Lookup icon enables you to view a list of values and select one. |
|
Display Description |
Select to display the item descriptions. If this option is selected, the description always displays for description only lines. |
|
Display Filter Related Fields |
Select to display the Filter field and Filter button on the page. Deselect the check box to remove the filter functionality from the page. |
|
Display Show/Hide in Tables |
Select to display the Show and Hide icons in tables. Note. When you use the PeopleSoft system, values in a grid are equivalent to values in an Application Development Framework (ADF) table. |
|
Expand Comments |
Select to indicate that if comments are entered for a purchase order at the header level, at the line lever, or for the ship to location, then the comments section of the Mobile Inventory - Receiving pages is expanded in the comments section. |
|
Print Delivery Report |
Select to run a Delivery report when you create the receipt. The system initiates the RECV_DEL multi-process job in the same business event in the PeopleSoft system. |
|
Set Select Checkbox |
Select to set the default value for the Sel check box to selected when you access the Receiving - Receive Lines page. |
|
Filter All Alternate Items |
Select to indicate that you want the system to search through all possible alternate items when filtering a table. If an alternate item identifier is entered in the Filter field, the item ID (MASTER_ITEM_TBL) that matches the alternate is shown in the table. Deselect to indicate that only the item ID is to be used for filtering, which also improves system performance. |
See Using the Mobile Inventory Installation Page.
Establishing Mobile Receiving Installation Options for Ad Hoc ReceiptsAccess the Installation Options - Mobile Inventory page (Set Up Financials/Supply Chain, Install, Installation Options, Mobile Inventory, and select the Receiving Ad Hoc task flow).
You use the installation options to define default values for Mobile Receiving pages in the PeopleSoft system and to define page values available on a mobile device.
Each field on this page is also on the Installation Options - Mobile Inventory: Receiving PO task flow page.
See Also
Using the Mobile Inventory Installation Page
Receiving Purchase Order Receipt Items Using a Mobile Device
Defining User Preferences for Mobile ReceivingAccess the User Preferences - Mobile Inventory page (Set Up Financials/Supply Chain, Common Definitions, User Preferences, Define User Preferences, Mobile Inventory and select the Receiving PO task flow).
Note. Select the Receiving Ad Hoc task flow to define ad hoc receiving user preferences.
The User Preferences - Mobile Inventory: Receiving PO task flow and Receiving Ad Hoc task flow pages use the same values as the corresponding Installation - Mobile Inventory pages. When you are setting up user preferences, you can select the Use Installation Values check box to use installation values instead of defining user preferences. When you select the check box, user preferences values are no longer available.
See Also
Receiving Purchase Order Receipt Items Using a Mobile Device
Receiving Items by Ad Hoc Receipt Using a Mobile Device
Defining Mobile Receiving Purchasing Options
Access the Mobile Receiving page (Set Up Financials/Supply Chain, Business Unit Related, Purchasing, Purchasing Definition, and click the Mobile Receiving link).
You use this page to define default values that will be used by the Receiving Ad Hoc component.
|
Vendor ID |
Select a vendor ID that will be used as the default value when creating an ad hoc receipt. |
|
Category ID |
Select an item category that will be used as the default value when creating an ad hoc receipt and the item ID is blank. |
|
Unit of Measure |
Select a unit of measure that will be used as the default value when creating an ad hoc receipt and the item ID is blank. The system uses the UNITS_TBL record to validate the unit of measure. |
|
Alternate Item Group |
Select an option that determines the alternate item group to which the system should use if you are using the Alternate Item feature. For additional information about alternate items: |
Establishing Printer Defaults for the Mobile Receiving Delivery Report
Access the Receiver Setup page (Set Up Financials/Supply Chain, Common Definitions, User Preferences, Define User Preferences, Procurement and click the Receiver / RTV Setup link).
Use this page to set up printer default values in the Mobile Receiving Printer section of the page. These values are used by the Receiving PO and Receiving Ad Hoc components when printing the Mobile Receipt Delivery report.
|
Server Name |
Select a Process Scheduler Server Name that will be used for running the print delivery report. |
|
Output Destination Type |
Select an output destination type as printer to direct the delivery report to the printer. |
|
Output Destination Format |
Select a output destination format for printing the delivery report. |
|
Output Destination |
Select the Printer to print the receipt delivery report . |
See Defining Receiving and RTV User Preferences.
Receiving Purchase Order Receipt Items Using a Mobile DeviceThis section discusses how to:
Search for purchase order items to receive.
Select purchase order items to include in the receipt and input the quantity received.
Enter purchase order receipt line information.
Enter multiple pro numbers for a purchase order receipt line.
Update purchase order receipt header information.
Confirm the creation of a purchase order receipt.
Pages Used to Receive Purchase Order Receipt Items Using a Mobile Device
|
Page Name |
Navigation |
Usage |
|
Receiving PO Selection |
Mobile Inventory, Receiving PO |
Search for purchase order items to receive. |
|
Receiving PO - Receive lines |
Mobile Inventory, Receiving PO. Click the Lookup icon on the Receiving page |
Select purchase order schedules to receive and define the quantity to receive. |
|
Receiving PO - Line Details |
Mobile Inventory, Receiving PO. Click the expand icon next to an item. |
Enter purchase order receipt line information. |
|
Receiving PO - Multiple Pro Number |
Mobile Inventory, Receiving PO. Click the expand icon next to an item, then click the Multiple link. |
Enter multiple pro numbers for a purchase order receipt line. |
|
Receiving PO - Header Details |
Mobile Inventory, Receiving PO. Click the Header link on the Select Items page. |
Update purchase order receipt header information |
|
Receipt Created |
Click the Add Item button on the Receive Item page |
Confirm the creation of a receipt. |
Searching for Purchase Order Items to Receive
Access the Receiving page (Mobile Inventory, Receiving PO).
When you access the Receiving PO page, the system provides default values from the PeopleSoft system Purchasing set up pages, including user preferences setup. To view all of the default settings, click the Advanced Search and the Options links.
You can change the values which will become the default values on the mobile device until you exit the transaction. The changes that you make are only recognized by the receiving transaction and not recognized by other mobile transactions. The changes do not update the user preferences settings in the PeopleSoft system.
|
Unit |
Displays the receiving business unit from the user's default business unit. You can change the business unit. The field is required. |
|
Receiver |
Enter the receipt number that you want to use to create the receipt. The system assigns the number when you save the receipt. The default value for the field is Next. You do not have to enter a number if you use the default value. The assigned number is based on the autonumbering sequence defined in the PeopleSoft system for receipts. This field is required. |
|
PO Unit (purchase order unit) |
Enter a purchase order business unit. The system defaults the value from user preferences. You can also use the Receipts page in the PeopleSoft system to record the receipt. |
|
Order ID |
Enter the purchase order number or purchasing contract number. Entering a contract ID retrieves all of the purchase order schedules associated with the contract. If you enter a value in this field and tab out of the field, the system immediately initiates the search to find the purchase orders that matched the value. If there is at least one row that matches the search, the system displays the Receive Lines page. |
|
Search |
Click to initiate the search for an order ID. The search feature is also initiated when you tab out of the Order ID field. The system searches for a purchase order ID or purchase order IDs that have the entered contract ID on the purchase order schedule. The returned search displays the purchase order schedules that can be received. You can receive one or all of the schedules. The search results include the values that match the selection criteria of the advanced search. The values included in the Advanced Search table are included when the search is initiated. |
|
Advanced Search |
Click to expand the Advanced Search table where you can define additional purchase order search criteria. |
|
Options |
Click to expand the Options table where you can change processing options for purchase order item receipts for the session. |
Advanced Search
Access the Receiving PO: Advanced Search table (click the Advanced Search link on the Receiving PO page).
When you click the Advanced Search link or the Expand button, you can view and update additional search criteria for purchase orders. Values in these fields are used to qualify the list of purchase orders.
Options
Access the Receiving PO: Options table (click the Options link on the Receiving PO page).
Use this page to change processing and display options for receiving purchase order items. Most of the settings on this page default from the Installation Options - Mobile Inventory or the User Preferences - Mobile Inventory page for the task flow. Most fields can be changed for the session.
Selecting Purchase Order Items to Receive
Access the Receiving PO - Receive Lines page (click the Look Up icon on the Receiving PO page).
The Receive Lines page provides a list of the purchase order items that met the purchase order search and Advanced Search that you entered. Using the page you can select all or individual items to receive.
Note. You can select multiple purchase order lines to add to the receipt as long as the vendor is the same for each purchase order. You cannot select multiple purchase order lines if the vendors are different.
The business unit and the receipt number appear at the top of the page. If you did not assign a receipt number, Next appears in the header, and the system assigns the next receipt number when you save the receipt.
The system retrieves purchase orders lines that have open purchase order schedules. The search results are sorted in descending order by:
Purchase order business unit.
Purchase order ID.
Purchase order line.
Purchase order line schedule.
|
Filter (field) |
Enter a value on which to search the list of purchase order items. You can reduce the list by entering a string of characters on which to search. For example, if you want to reduce the list by an item name, such as mask, enter the value and the system limits the list to just those items with mask in their description. The system searches these fields:
|
|
Filter (button) |
Click to filter the list of items based on the value that you enter in the Filter By field. The filter feature is also initiated when you tab out of the Filter field. |
|
Clear |
Click to clear the filter results. After clearing the results, you can enter a new filter value. |
|
Enter the tracking number assigned to the shipment in which the material arrived. Note. If you enter a Pro number in the Header page, that value displays on this page. |
|
|
Apply |
Click to apply the value in the Pro Number field to all of the receipt lines with a blank pro number. The apply action is also initiated when you tab out of the Pro Number field. The system does not replace the Pro number on receipt lines that already have a Pro number assigned to them. |
|
Header |
Click to view and maintain header information for the purchase order receipt. |
|
Click to show additional information about the receipt line. These options are available if you selected the Display Show/Hide in tables check box in the Options table. When you click to show additional line information, the item information appears depending on the value that you selected in the Display Item field for the Options table. For example, if the vendor item is displayed in the main table, then the purchase order item and the manufacturing item display in the table. Also, if any representations of the item ID are blank, the system does not display the field. For example if the manufacturing item ID is blank, the system does not display the Mfg Item ID field in the expanded table. Here is a list of item IDs that might display in the Show table:
Other fields that are displayed in the Show table include:
|
|
|
|
Click to hide additional information. |
|
Sel |
Click to select or deselect an individual item to add to the receipt. The initial default value of the check box depends on the Set Select Checkbox setting in the Options table. If the Set Select Checkbox check box is selected, the default value for the check box is selected. If the Set Select Checkbox check box is not selected, the default value for the Sel check box is deselected. If the Sel check box in the table is deselected and you enter or change the quantity, the system will select the Sel check box. You will not immediately see the change. When you refresh the page, the system selects the check box. Refreshes for the page happen when you:
|
|
PO Item ID, Mfg Item (manufacturing item), andVndr Item (vendor item) |
Displays the items that met the search criteria you entered. The column value depends on the value that you selected in the Display Item field in the Options table. The description is displayed below this field if you selected the Display Description check box on the Options table. Purchase order header, line, and ship to comments are displayed if the Expand Comments check box is selected on the Options table. If the Expend Comments check box is not selected on the Options table, then the Comments link is displayed in the collapsed state. The Comments link is not displayed if comments do not exist for the receipt line. |
|
Qty (quantity) |
Enter the quantity delivered. A default value is based on user preferences values for blind receiving and receipt quantity options. The unit of measure appears with the quantity. |
|
UOM (unit of measure) |
Displays the purchase order line's unit of measure. |
|
Save |
Click to receive the items that you selected on this page. When you save the selections, the system performs similar logic as it does for the PeopleSoft system's online Receiving page to process the receipt. If the save is successful, the system displays the receipt number that it generated. See Receiving Shipments.
Note. If an error prevents the receipt from saving, the
system provides an error message with information about the error. When an
error occurs, the Receive Lines page displays only the lines that are being
received. Lines with the Sel check box deselected
will not be displayed. |
|
Click to select all of the items in the list. The system places a check mark in the Sel check box for each item. The system adds these items to the receipt when you click the Save button. |
|
|
Click to deselect all of the items in the list. The system removes the check mark from the Sel check box. |
|
|
Return to Add |
Click to access the Receiving PO page. When you click the link, you are indicating that you want to cancel the current receipt and start over with a new receipt. The system provides a warning message for you to save any changes that you made to the receipt. Click the Continue button to proceed to the Receiving PO page without saving changes. Click the Return button to return to the Receiving PO selection page. |
|
Click the View Sel button to display the receipt rows that have been selected to be received. Click the View All button to view all rows from the original purchase order line selections. When you click either button, the system toggles to the other button. For example, when you initially access the Receiving PO selection page, the system displays all purchase order rows and makes the View Sel button available. Then, after selecting or deselecting rows to include on the receipt, you can click the View Sel button to display just the rows that you've selected. When you access the list, the system displays the View All button that you can click to return to the original list. This feature is useful when the purchase order receiving quantity option is set to blind receiving or there is not a default quantity. In this case, as you enter receipt quantities, the system selects the Sel check box for you, and because that selection isn't immediate, you can use the View Sel button to view the selected rows immediately. |
Entering Purchase Order Receipt Line InformationAccess the Receiving PO: Line Details page (from the Receiving PO page, click the expand icon next to a line).
Use this page to enter line details for the purchase order receiving line.
|
Multiple |
Click to enter multiple tracking numbers for a receipt line. |
Entering Multiple Pro Numbers for a Purchase Order Receipt LineAccess the Receiving PO - Multiple Pro Number page (From the Receiving PO - Line Details page, click the Multiple link).
Use this page to enter multiple pro numbers for a purchase order receipt line.
To enter multiple pro numbers for a purchase order receipt line:
Enter a pro number in the Pro Number field.
Click the Add button.
The system displays the pro number as an open field. A delete icon is available to the right of the pro number.
Click the Apply button to apply the pro numbers to the receipt line.
Updating Purchase Order Receipt Header Information
Access the Header Details page (click the Header link on the Receiving PO - Select Items page).
Use this page to view or define shipping information for the purchase order receipt.
|
Carrier |
Select the freight carrier that delivered the shipment. To locate a carrier, click the Look Up icon. |
|
Pro Number (progressive number) |
Enter the tracking number assigned to the shipment in which the material arrived. When you add the number and click the OK button, the system updates the Pro Number field on the Receiving - Select Items page and also updates the Pro number for all receipt lines with a blank Pro number. |
|
Packing Slip |
Enter the packing slip. This value is typically listed on the packing slip provided by the supplier. |
|
Invoice |
Enter the invoice ID. If this receipt is processed through a vendor's Evaluated Receipts Settlement process, this field value may be the same as the Packing Slip field value. |
|
OK |
The system applies the Pro number, packing slip, and invoice values to all receipt lines that have a blank value. |
|
Cancel |
Click to cancel any changes that you made to this page and return to the Receiving - Select Items page. |
Confirming the Creation of a Purchase Order ReceiptAccess the Receipt created page (click the Save button on the Receiving - Select Items page).
The system displays this page after you successfully create a purchase order receipt. The information includes the business unit in which the receipt was created and the receipt number. You can now access the receipt information using the PeopleSoft system. Receipts created using Mobile Receiving and Receiving Ad Hoc will have a Receive Source field value of Mobile on the Receiving - Header Details page in the PeopleSoft system. Click the OK button to access the Receiving page. The system clears the previous receipt information and enables you to create another receipt.
Note. If an error prevents the receipt from saving, the
system provides an error message with information about the error. When an
error is encountered the system displays the error and the Receive Lines page
will display only the lines that are being received. All the lines with the Sel check
box deselected will not be display.
Also, the system suppresses some warning messages, such as early receipts.
Warning messages that are suppressed by the system are not displayed and
are not errors, and do not prevent the creation of the receipt.
If user preferences have been define for additional processing of the receipt, the system triggers the additional processes. These include:
Process receipts will be triggered if user preferences value Interface receipts is selected.
If the Run Close Short check box is selected the Close Short process will run when the Process Receipts process is run.
If a receipt line is an inventory item then items will be putaway based on the inventory putaway rules defined.
Streamline subcontract will be triggered if the user preferences value is selected.
To enter serial, lot, device tracking, or asset information, you must use the online PeopleSoft system Receiving page. You can also maintain receipt rejection information in the PeopleSoft system Receipt Lines page - More Details tab.
Receiving Items by Ad Hoc Receipt Using a Mobile DeviceThis section discusses how to:
Define information for ad hoc receipts.
Select items to receive using ad hoc receipts.
Update ad hoc receipt header information.
Confirm ad hoc receipt creation.
Pages Used to Receive Items by Ad Hoc Receipt on a Mobile Device
|
Page Name |
Navigation |
Usage |
|
Receiving Ad Hoc |
Mobile Inventory, Receiving Ad Hoc |
Define information for ad hoc receipts. |
|
Receiving Ad Hoc - Receive Items |
Mobile Inventory, Receiving Ad Hoc, and click the Add button |
Select items to receive using ad hoc receipts. |
|
Receiving Ad Hoc - Header Details |
Mobile Inventory, Receiving Ad Hoc, click the Add button, and click the Header link. |
Update ad hoc receipt header information. |
|
Receipt Created |
Click the Save button on the Receiving Ad Hoc page. |
Confirm receipt creation. |
Defining Information for Ad Hoc Receipts
Access the Receiving Ad Hoc page (Mobile Inventory, Receiving Ad Hoc).
Use this page to define basic information about an ad hoc receipt and to establish processing options for ad hoc receiving.
Note. To use this transaction, ensure that the Change Non PO Receipt Price check box is selected on the Receive Setup page for your user preferences. To access the check box, select: Set Up Financials/Supply Chain, Common Definitions, User Preferences, Define User Preferences, click the Procurement link, and then click the Receiver / RTV Setup link.
Note. The Receipt Accrual process does not include ad hoc receipts in its processing because the Receipt Accrual skips these receipts.
|
Unit |
Displays the user's default business unit. You can change the business unit. A business unit is required. |
|
Receiver |
Enter the receipt number that you want to use to create the ad hoc receipt. The system assigns the number when you save the receipt. The default value for the field is Next. You do not have to enter a number if you use the default value. The number is based on the autonumbering sequence defined in the PeopleSoft system for receipts. This field is required. |
|
Vendor |
Enter the vendor short name from whom the shipment was received. The default value for the field is based on the business unit's default vendor for Mobile Receiving Ad Hoc. The field is required. |
|
Receipt Source |
Enter the source of the receipt if the source is not a valid vendor ID in your PeopleSoft system. |
|
Carrier |
Enter the freight carrier that delivered the shipment. |
|
Ship To |
Enter the ship to location. The default value from user preferences initially appears in the field. You can override the value. The field is required. |
|
Add |
Click the Add button to add items to receive using this ad hoc receipt. The Add feature is also initiated when you tab out of the Ship To field. For more information about the Add feature, see "Selecting Items to Receive Using Ad Hoc Receipts." |
Options
Access the Options table (click the Options link on the Receiving Ad Hoc page).
Use this page to change processing and display options for ad hoc receiving items. Most of the settings on this page default from the Installation Options - Mobile Inventory or the User Preferences - Mobile Inventory page for the task flow. Most fields can be changed for the session.
|
Rows to Display |
Enter the number of rows to display on the Receiving Ad Hoc - Receive Item page. |
|
Display Lookups |
Select to display the Lookup icons used for ad hoc receiving searches. |
|
Display Description |
Select to display the item descriptions. The description will always display for description only lines. |
|
Display Show/Hide in tables |
Select to display the Hide and Show links on the Receiving Ad Hoc - Receive Item page. You can expand and collapse additional item information tables using the links. |
|
Print Delivery Report |
Select to run a Delivery report when you create the receipt. The system initiates the RECV_DEL multi-process job in the same business event in the PeopleSoft system. |
|
Print Server |
Enter the server to which you want to send the Delivery report. This setting defaults from the Receiver Setup page. (Set Up Financials/Supply Chain, Common Definitions, User Preferences, Define User Preferences. Click the Procurement link, and then click the Receiver/RTV Setup link. |
|
Output Type |
Select the type of output for the Delivery report. Currently the only option is Printer. This setting defaults from the Receiver Setup page. (Set Up Financials/Supply Chain, Common Definitions, User Preferences, Define User Preferences. Click the Procurement link, and then click the Receiver/RTV Setup link. |
|
Output Format |
Select a format for the Delivery report. Options include Crystal Report (*.rpt), HP format (*.lis), and Line Printer Format (*.lis). This setting defaults from the Receiver Setup page. (Set Up Financials/Supply Chain, Common Definitions, User Preferences, Define User Preferences. Click the Procurement link, and then click the Receiver/RTV Setup link. |
|
Output Destination |
Enter the system name of the printer to which you want to print the Delivery report. This setting defaults from the Receiver Setup page. (Set Up Financials/Supply Chain, Common Definitions, User Preferences, Define User Preferences. Click the Procurement link, and then click the Receiver/RTV Setup link. |
Selecting Items to Receive Using Ad Hoc ReceiptsAccess the Receiving Ad Hoc - Receive Item page (Mobile Inventory, Receiving Ad Hoc, and click the Add button).
You use this page to enter items for receipt. The page displays the business unit and either the receipt ID that you entered or Next, indicating the system assigns a receipt ID when you save the mobile transaction.
When you click the Add Item button, the system adds the item and the quantity to receive in the lower section of the page. You can change the quantity and unit of measure in the section. For description only lines, the unit of measure and item category defaults from the purchase order business unit Mobile Receiving page fields.
You can also expand the Show icon to view additional information about receipt lines. The values in Show information table can vary depending on the Options settings for ad hoc receiving. You can view additional receipt line information if the Display Hide/Show in table check box is selected in the search options.
You can change the quantity of the item to receive and use the Delete button to remove the item from the ad hoc receipt. As you add items to the list, the most recent item appears at the top of the table list.
Click the Add Item button to continue adding items to the receipt. Each item that you add creates a new receipt line. When you finish adding items to the receipt, click the Save button. The system creates the new ad hoc receipt and updates the PeopleSoft system with the information.
|
Pro Number (progressive number) |
Enter the tracking number assigned to the shipment in which the material arrived. |
|
Attn To (attention to) |
Enter the person to whom, and/or place to where the services or goods are to be delivered. The system adds the value that you enter to the RECV_LN_DISTRIB record. If the person selected is a valid value in the PeopleSoft system, then the system populates the Location field. However, you can enter an value in this field that is not in the PeopleSoft system. |
|
Location |
Enter a location to indicate where the item is to be delivered. If a default value exists for the field, you can override the value. The Location field is required. |
|
Item |
Enter the item ID that you are receiving. You must enter either an item ID or an item description. The item is added to the receipt as a receipt line. If you enter the item ID, the system populates the Descr field with the item's description and the UOM with the item's standard UOM. |
|
Descr (description) |
Enter a value that describes the item being received. If an item is entered, the system provides the default value for the item's description. You cannot change the description. If you do not enter an item, the Descr field is required so you must enter a description. When you enter an item the system does not immediately display the item's description. After you click the Add Item button, the system adds the item to the table and the item description appears with the item. |
|
Qty (quantity) |
Enter the quantity of the item that you are receiving for this ad hoc receipt line. The Qty field is required. When you enter a quantity and tab out of the field, the system triggers the Add Item functionality. |
|
Add Item |
Click the Add Item button to add an item to a list of items that are being received. The Add Item feature is also initiated when you tab out of the Qty field. Once you have performed the Add Item feature, the most recent item added appears at the top of the list of items and the cursor is placed on the Pro Number field. For the Receiving Ad Hoc - Receive Item page, the Save button, Header link, and Return to Search link appear at the top of the table. When there are two or more rows, these fields appear at the top and at the bottom of the table. |
After you enter an item description, and click the Add Item button, the system updates the page as shown in this example:
|
Header |
Click to update receipt header information such as Receipt Source, Carrier, and Pro Number. |
|
Return to Add |
Click to access the Receiving Ad Hoc - Add page where you can begin another receipt. You will receive a warning message if you click this button prior to saving the receipt you are processing. |
|
Qty (quantity) |
Enter the quantity of the item that you are receiving. The unit of measure appears with the quantity. You can change the unit of measure. |
|
|
Click to delete an item from the table list. The system removes the item and refreshes the list. |
Updating Ad Hoc Receipt Header InformationAccess the Receiving Ad Hoc - Header Details page (click the Header link on the Receiving Ad Hoc page).
Use this page to view or define header information for an ad hoc receipt.
|
Receipt Source |
Enter the source of the receipt if the vendor does not exist in the PeopleSoft system. |
|
Carrier |
Enter the freight carrier that delivered the shipment. |
|
Pro Number (progressive number) |
Enter the tracking number assigned to the shipment in which the material arrived. When you add the number and click the OK button, the system updates the Pro Number field on the Receiving Ad Hoc - Receive Item page and also updates the Pro number for all receipt lines with a blank Pro number |
Confirming Ad Hoc Receipt CreationAccess the Receipt Created page (click the Add Item button on the Receive Item page).
The system displays this page after you successfully create ad hoc receipts. The information includes the business unit in which the receipt was created and the receipt number. You can now access the receipt information using the PeopleSoft system.
Click the OK button to access the Receiving Ad Hoc page, where you can add another ad hoc receipt.
Receipts that you create using Mobile Receiving and Receiving Ad Hoc components will have a Receive Source field value of Mobile. Also, if you selected the Print Delivery Flag check box, when you save the receipt, the system triggers the Print Delivery process, RECV_DEL multi-process job.