| Oracle® Communications Converged Application Server Administrator's Guide Release 5.1 Part Number E27704-01 |
|
|
PDF · Mobi · ePub |
| Oracle® Communications Converged Application Server Administrator's Guide Release 5.1 Part Number E27704-01 |
|
|
PDF · Mobi · ePub |
This chapter describes the Converged Load Balancer (CLB) provided with the Converged Application Server.
The CLB is a SIP-aware load balancer that you can use to provide load distribution and failover services for your Converged Application Server deployment. The CLB load balances HTTP, HTTPS, SIP, and SIPS traffic.
Note:
CLB is intended for SIP-only or converged (SIP and HTTP) application deployments. To load balance HTTP-only application servers, Oracle recommends that you use the WebLogic load balancer plug-in. For more information the plug-in, see the Oracle Fusion Middleware documentation set.In contrast to traditional, HTTP-focused load balancers, the CLB takes into account the inherent differences between SIP and HTTP applications. For example, in a SIP environment, a single client request can multiple actual requests or responses to be generated or multiple applications to be invoked.
By distributing workload among multiple servers, the converged load balancer increases overall throughput of the system. It also increases the availability of your system by monitoring Converged Application Server health. If a target server becomes unavailable, the CLB redirects the flow of traffic to an available server in the cluster. When the unavailable server becomes available again, CLB resumes targeting the cluster.
Converged Load Balancers are stateless. Thus, Converged Load Balancer instances can easily be added to a deployment for redundancy or to increase traffic capacity.
You configure the Converged Load Balancer in the Admin Console. At startup time, the Converged Load Balancer retrieves its running configuration from the Admin Server. At first start-up, the Converged Load Balancer must be able to retrieve a running configuration before it can operate. At subsequent start-ups, it attempts to retrieve the configuration, but operates with a local copy of the last retrieved configuration if unsuccessful. Additionally, the Converged Load Balancer can poll the Admin Console specified configuration at configured intervals. This enables changes to be applied at runtime.
Configurable parameters for the Converged Load Balancer include its load balancing policy, health monitoring settings, network connections, and other settings. The network settings are divided between internal and external interfaces, isolating the two types of networks. The internal interface receives traffic only from the Converged Application Server, while an external listener receives traffic only from user agents, as described in the following section.
The Converged Load Balancer distributes traffic to clustered Converged Application Servers in a given WebLogic domain.
The Converged Load Balancer is intended to reside at the same location as the target cluster, either on the same machine or on a different machine in the same data center. It is not intended to be used with geographically distributed clusters.
The Converged Load Balancer does not perform IP address virtualization. Therefore, if external clients to address converged application services, an IP sprayer or other network router element must be present to expose a virtual IP (VIP) address for the services. However, if the Converged Load Balancer in invoked from within an internal network only and NATing is not required, you can use round-robin DNS or the IP address virtualization facility offered by the Linux operating system.
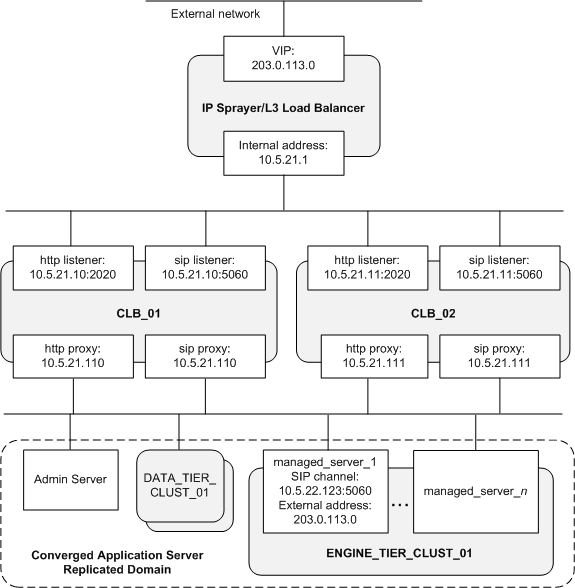
Figure 13-1 shows an example deployment scenario in which the CLB is deployed behind an IP sprayer.
As shown in Figure 13-1:
An IP sprayer exchanges traffic with the external network at the public address 203.0.113.0. No special configuration is required for the IP sprayer. The source IP of the Converged Application Server instance handling a session is conveyed in internal headers managed by the Converged Application Server and Converged Load Balancer.
Two Converged Load Balancers, labelled CLB_01 and CLB_02, distribute traffic to the managed servers in the engine tier cluster. For redundancy, Oracle recommends using at least two Converged Load Balancers.
The Converged Load Balancers need to have network access to the Administration Server in order to retrieve its runtime configuration.
The SIP containers are hosted on a single engine tier cluster, ENGINE_TIER_CLUST_01. Oracle recommends using only a single engine tier cluster for the engine tier managed servers in the deployment, since session failover is not supported across servers in different engine tier clusters.
Each managed server includes a SIP channel configuration that specifies the external address used to address the hosted services. In the figure, the network channel configuration would specify the VIP presented by the IP sprayer, 203.0.113.0. The HTTP channel require no special or additional configuration.
Local properties control configurable behavior of the Converged Load Balancer, such as its listen ports. In the figure, the Converged Load Balancers listen on port 2020 for HTTP messages and port 5060 for SIP messages.
If the proxy address is specified, the source address values of the messages received by the managed servers from the Converged Load Balancers are the proxy address. For example, Figure 13-1 shows the address of 10.5.21.110 for the Converged Load Balancer instance CLB_01 proxy.
There are a few points to consider when planning your application deployments. For SIP applications, the engine tier servers must be mirrored environments. That is, all servers in the engine tier must have the same SIP applications.
For HTTP applications, the servers do not need to be mirrored. The CLB can direct traffic to a particular server based on the request URL. You specify specialized HTTP application routing rules using the context URL setting for the servers.
Converged Load Balancers direct messages to the managed servers in your deployment according to the rules you configure. The Converged Load Balancer can target clustered servers only. You would need to add a standalone server to a cluster to enable it to be targeted by the Converged Load Balancer.
In routing requests, the Converged Load Balancer handles HTTP requests differently from SIP requests. For HTTP requests, the CLB first attempts to match the request URL with the context roots of the applications for which it performs load balancing. The context root is the common URL root pattern that identifies the application resource in the request.
The CLB selects one server instance from the list of servers that match the context root based on the configured load balancing algorithm. A SIP request does not have a context root associated with it, so SIP requests bypass the pattern matching step. Consequently, while the servers in a cluster can be heterogeneous in terms of HTTP applications, they must be homogenous in terms of SIP applications.
For new requests (that is, those that are not associated with existing sessions), the Converged Load Balancer can distribute the requests based upon the following algorithms:
Round-robin, in which the load balancer targets managed servers on a rotating basis.
Consistent hash, in which the load balancer targets the managed server to service the request based on the value of a hash-key extracted from the request. The hash key is extracted based upon a key derived from the message, such as a header value, as described in the following section.
When using the consistent hash load distribution algorithm, the Converged Load Balancer makes a routing determination based on the value you specify as the policy key. You can configure different keys for each protocol, HTTP and SIP.
By default, the Converged Load Balancer determines the hash key used to make a server targeting decision for new SIP messages based on the value of the call ID header (call-id). For HTTP traffic, the determination is made based on the values of the remote host and remote port headers.
By implementing a DCR plug-in, you can specify complex key extraction logic.
The DCR plug-in extends the DcrPlugin interface, which defines two methods, one for HTTP and the other for SIP messages. The methods accept as input the message and return a value used as the consistent hash key.
To install the DCR plug-in, you add the DcrPlugin implementation to a Java archive and place it in the following directory:
domain_home/config
Next, specify the name of the JAR file that contains the DcrPlugin implementation in the Dcr File Name field in the Load Balancing Policy tab.
For more information on the DcrPlugin interface, see the Converged Application Server Javadoc.
The Converged Load Balancer supports session affinity (also called session stickiness). Session affinity ensures that the same server instance that handled an initial request receives subsequent messages associated with that session.
The Converged Load Balancer supports session affinity differently between HTTP/HTTPS and SIP/SIPS.
To support session affinity for HTTP and HTTPS sessions, the Converged Load Balancer uses cookies. If cookie support is disabled for the browser, it uses URL rewriting.
For SIP/SIPS session affinity, the Converged Load Balancer adds server instance information to the BEKey and BERoute parameters. For the BERoute parameter, it adds the information as a header to the outgoing request.
When a message associated with the existing session returns with the BEKey or BERoute header value, the Converged Load Balancer is able to target the server instance that previously services the session.
It includes the key in outgoing responses. The client should retain the key in subsequent messages to enable the Converged Load Balancer and Converged Application Server to identify messages associated with an existing session.
It is possible for a server associated with an existing session to become unavailable while the session is ongoing. If the Converged Load Balancer detects that a server instance associated with an existing session is unavailable, it selects a healthy instance from the same cluster and forwards the request to the selected instance.
In the event of server failover, session maintenance can only occur if the session fails over to another server in the same cluster. That is, a managed server in a cluster cannot take over a session for a server in another cluster.
If all managed servers in a cluster are unavailable, the message is sent to another cluster. However, since session information is lost, the new managed server can only respond with an error response. To avoid this scenario, Oracle recommends using a single engine tier cluster for all engine tier managed servers in the domain.
Configuring the Converged Load Balancer involves the following general steps:
Deploy and perform the initial configuration of the Converged Load Balancer software. See "Deploying the Converged Load Balancer" for more information.
Configure the load balancing policy for the Converged Load Balancer. See "Configuring the Load Balancing Policy" for more information.
Configure the network connections. See "Configuring Network Connections" for more information.
Identify the target managed server clusters for which the load balancer with distribute traffic. See "Configuring Target Clusters" for more information.
Configure any additional optional settings, such as health monitoring settings. See "Configuring Server Health Checks" for more information.
Configure the channel settings for the engine tier managed servers to accommodate the Converged Load Balancer instances.
In the channel configuration, you should set the connection address from the engine tier servers to the internal, server-side interface of the Converged Load Balancer. See "Configuring Network Connection Settings" for more information.
The following sections provide more information about each of the configuration steps.
The Converged Load Balancer software is included with the Converged Application Server installation. It is deployed with the domain files. After you create the domain, you can find the Converged Load Balancer files in the following directory:
domain_home/clb
After you create the domain, you need to specify local configuration settings for the Converged Load Balancer, such as the location of the Admin Server. You need to specify local settings for each load balancer instance in your deployment.
In contrast to local settings, common settings are specified in the Administration Server interface, and are shared by the load balancer instances in the deployment.
After creating the domain, configure the Converged Load Balancer local settings as follows:
Open the clb.properties file in the clb directory for editing.
In clb.properties file, configure the following properties:
clb.server.name: Set to a unique name for this load balancer instance.
admin.server.address: Set to the IP address of the Converged Application Server administration server for the domain.
admin.server.port: Specify the port number on which the Converged Application Server administration server listens for administrative traffic.
Save the file.
Additional load balancer configuration options are configured in the Administration Console interface. See "Configuring Network Connections" for more information.
The Converged Load Balancer supports the consistent-hash load distribution algorithm for SIP traffic, and consistent-hash or round-robin policies for HTTP traffic. For consistent hash, you can specify the hash key using a Data Centric Rule (DCR) file. DCR offers flexible consistent hash key options. If you do not specify custom rules, the Converged Load Balancer uses the default rules specified in the configuration.
To use a DCR, before configuring the load balancer policy, create the file that contains the rules used to implement the consistent hash algorithm. See "Using Data Centric Rules to Customize Load Distribution Selection" for information about creating the DCR file.
You can configure different policies between SIP and HTTP traffic. To configure the load balancing policy:
In the Administration Console interface, click the Converged Load Balancer link in the Domain Structure tree.
In the Configuration tab, click the LoadBalancingPolicy subtab.
Configure the following settings:
Http Policy: The policy the Converged Load Balancer applies to HTTP message distribution.
Sip Policy: The policy the Converged Load Balancer applies to SIP message distribution.
Dcr File Name: The name and location of the file archive that contains your DcrPlugin implementation. Specify the location relative to the domain home, which is where the DCR file should be located.
Default Http Keys: If you do not specify a DCR file, the headers or request parameters specified in this field are used as the consistent hash key. By default, this is "remote-host,remote-port", which indicates the a concatenation of the hostname and port of the request source will be used to determine the target managed server instance to service this request.
Default Sip Keys: If you do not specify a DCR file, the headers or request parameters specified in this field are used as the consistent hash key. By default, this is "call-id", which is the identifier for the SIP call.
Click Save to commit your configuration changes.
After deploying the Converged Load Balancer, you can configure the connection settings for the load balancer. The settings define:
Converged Load Balancer host settings, which identify the connection settings used for administration purposes.
Server-side connections, or connections from the load balancer to the application server
Client-side connections, or connections from the external network to the load balancer.
Include the listener and proxy settings (as shown in Figure 13-1) for the load balancer instance.
Configure the Converged Load Balancer host connection settings as follows:
In the Administration Console interface, click the Converged Load Balancer link in the Domain Structure tree.
Under the Configuration tab, click the Servers subtab.
Click the New button.
In the Create the Load Balancer Server page, configure these settings:
LoadBalancer Server Identifier: The Converged Load Balancer instance name. This value should match the value you set for the LoadBalancer Server Identifier field for this instance in the clb.properties file.
Http Proxy Bind Address: The address to which web traffic connections to backend managed servers are bound. In the example deployment shown in Figure 13-1, the bind address for the HTTP proxy is 10.5.21.110.
Sip Proxy Bind Address: The address to which SIP traffic connections to backend managed servers are bound. In the example deployment shown in Figure 13-1, the bind address for the SIP proxy is 10.5.21.110.
Monitoring Address: Enter the IP address or hostname of the Converged Load Balancer host by which the Admin Server monitors the status of the Converged Load Balancer.
Monitoring Port: Enter the port on which the Admin Server monitors the status of the Converged Load Balancer.
Server Description: An optional description of the CLB instance.
Click Save.
The new instance configuration appears in the list of Converged Load Balancer Servers. From this page, you can remove the Load Balancer Server instance or create additional ones.
Repeat the steps for each Converged Load Balancer instance you want to deploy.
This section describes how to configure the client side network interfaces for the Converged Load Balancer. For converged application traffic, you would typically need at least two client-side network interface settings, one for HTTP and one for SIP. The interface settings encompass protocol settings as well as whether security is enabled for the interface.
To configure client-side network interface settings:
In the Administration Console interface, click the Converged Load Balancer link in the Domain Structure tree.
Under the Configuration tab, click the Listeners subtab.
Click the New button.
In the Create a Listener page, configure these settings:
Listerner Id: Enter an identifying name for this listener.
Load Balancer Name: Choose the load balancer instance associated with tis listener. The load balancer instances you have configured in the Servers tab, as described in "Configuring the Converged Load Balancer Host Settings", appear in the Load Balancer Name menu.
Address: Enter the IP address on which the load balancer listens for traffic from the client network.
Protocol: Choose the communication protocol for which the interface listens for traffic, from these options:
sip for SIP traffic.
http for web traffic.
Secure: Select to enable security for the interface. Selecting this check box activates the next two options on the page.
CertNickName: The alias of the server security certificate associated with the Converged Load Balancer host, and used by clients to authenticate the connection. You should import the certificate into the Converged Load Balancer keystore. The default load balancer keystore is named keystore.jks, and appears in the config directory under the load balancer home.
ClientAuthEnabled: Whether the load balancer should use two-way authentication to authenticate the client. If enabled, you should import the certificates of the trusted clients into the Java key store, keystore.jks, in the config directory under the load balancer home.
Click Save.
The client-side network connection settings appear in the Listener configuration list. From there, you can remove the listener definition or create additional listeners.
The server side network settings control connections from the load balancer to the engine tier servers. You can configure connection parameters specific for HTTP or SIP connections made by the proxy module.
The proxy settings are preconfigured with default settings. In most cases, you will need to tune the settings based on the nature of your deployment.
To configure proxy settings:
In the Administration Console interface, click the Converged Load Balancer link in the Domain Structure tree.
Under the Configuration tab, do one of the following, depending on whether you are configure SIP or HTTP settings:
For HTTP proxy settings, click the Http and then Http Proxy subtabs
For SIP proxy settings, click the Sip and then Sip Proxy subtabs.
Click the Http Proxy subtab.
Configure the default configuration settings applicable to the traffic, include:
Max Connections Per Backend: The maximum number of connections allowed for each backend server. The default is 20.
Keep Alive Timeout: The time after which the Converged Load Balancer closes the socket for an idle connection. The default is 30.
Send Retry Count: The maximum number of times that the Converged Load Balancer will attempt to send a given request to a managed server. The default is 3.
Send Buffer Size: The size of the Send buffer used for all socket connections established to the managed server instances. The default is 4096.
Receive Buffer Size: The size of the Receive buffer used for all socket connections established to the managed server instances. The default is 4096.
Click the Save button.
Optionally, use the other settings in the ThreadPool, Network, Http Proxy and OverloadProtection subtabs to configure the interface. See the on-screen descriptions of each field for more information.
The proxy interface settings are now configured. You can now configure load balancer target settings and load balancing policies.
The load balancer distributes messages to application servers based on your target configuration. The targets identify the engine tier clusters to which the load balancer should distribute messages.
To identify a target, you only identify the name of the engine tier cluster in the target configuration. You do not have to identify individual server instances that belong to the cluster. They are automatically targeted based on the cluster configuration.
While the load balancer distributes SIP and generic HTTP traffic to the servers as determined by the target cluster configuration, web application traffic can be targeted to a specific cluster based on the target URL in the incoming request. You use web modules to define distribution targets based on the context root of the request URL. This enables you to serve the web application on a separate cluster from other applications.
Before starting, make sure that you have configured the clusters for the Converged Application Server instances. You can check and modify the cluster configuration by clicking the Environment link and then Cluster in the Domain Structure tree. To identify the cluster to the load balancer, you will need to use the same name for the cluster as assigned in the Cluster Properties page.
After defining the cluster configuration, specify load balancer targets as follows:
In the Administration Console interface, click the Converged Load Balancer link in the Domain Structure tree.
Under the Configuration tab, click the Targets subtab.
Click the New button.
From the Cluster Name menu, choose the cluster that should be targeted by the load balancer instances. The cluster definitions you have created in the domain's environment settings appear in the menu list.
Click the Enabled check box to enable load distribution for this cluster.
This check box provides a convenient mechanism for removing or adding a cluster as a load distribution target manually. For example, you might manually disable the cluster to perform maintenance tasks, such as software upgrades.
Click the Save button.
If needed, target a specific cluster for handling web application requests as follows:
Under the Configuration tab, click the WebModules subtab.
Click the New button.
Type a unique name for the web application distribution rule in the WebModule Id field.
For the Target Name menu, choose the cluster that should receive requests addressed to this application. The clusters you have defined in the Target tab appear in the menu.
In the WebModulePolicy menu, choose the distribution algorithm by which the load will be distributed among the servers in this cluster. Options are round-robin, consistent-hash, or default. If you choose default, the load balancer uses the distribution method specified as the general policy for HTTP traffic.
In the ContextRoot field, specify the URL path that the load balancer users to select traffic for this target cluster.
For example, the context root /sip-server would apply to web applications available at: for web applications exposed at /sip-server/main.jsp or /sip-server/TelcoApp/conference.jsp.
Click the Save button.
The new web module configuration setting appears it the list. You remove the settings or create additional web module distribution rules from there.
The CLB can monitor the health of the backend server instances to which it distributes traffic.
You can configure one of several methods by which the health monitor checks the availability of the Converged Application Server instances, including:
SIP OPTIONS ping, in which the CLB sends an OPTIONS message to the Converged Application Server instance. Any response (in this case, a SIP Response 404) indicates the availability of the server.
JMX notification, in which the CLB registers as a notification listener to the ServerNames attribute of the ClusterRuntimeMBean. Change to the cluster view map generate a notification. Since this mechanism requires at least one instance in the cluster to be available, as a supplementary measure, the CLB periodically checks the server instance connections.
OCCASClusterService notification is the default and recommended mechanism. The OCCASClusterService is a service that runs separately from the managed server instances. The service generates notifications in the form of HTTP requests to the CLB when the state of a cluster changes, for instance, when an instance in the cluster becomes unavailable.
The OCCASClusterService notification mechanism sends state notification messages to the address specified by the HTTP listener in the CLB configuration. Therefore, to use OCCASClusterService notification mechanism, you must configure an HTTP listener that the CLB will use to listen for the managed server instance's health state. See "Configuring the Converged Load Balancer Host Settings" for information about configuring the HTTP proxy settings.
To configure the health monitor mechanism, follow these steps:
In the Administration Console interface, click the Converged Load Balancer link in the Domain Structure tree.
If you are using OCCASClusterService notification mechanism, verify the listener configuration as follows:
Under the Configuration tab, click the Listeners subtab.
Verify the default listener configuration, or create a new listener configuration. The listener should listen for HTTP protocol traffic. See "Configuring Client-Side Network Settings" for more information on how to configure a listener.
Under the Configuration tab, click the HealthMonitor subtab.
From the Policy menu, choose the monitoring mechanism used by the health monitor.
By default, this is set to ClusterNotify, the recommended option. Other options are PING, for SIP OPTIONS ping, or JMX, which uses the CLusterRuntimeMBean.
If using PING or JMX, verify the other settings for the health monitor. The default values for the other values should be appropriate for most implementations.
Click the Save button to commit your changes to the configuration.
The health monitor now performs server monitoring of all managed instances in the target clusters based on your settings.
You start the Converged Load Balancer using the start script located in the CLB installation directory.
To start the load balancer:
Change directories to the following location under the Converged Application Server domain:
domain_home/clb/
Run the start script appropriate for you operating system:
startClb.cmd for Microsoft Windows systems.
startClb.sh for Linux-based systems.
The Converged Load Balancer process starts up.
To stop the process, you can use the Control-C key sequence.
The Admin Console presents extensive information on the operation of the CLB. It presents information by protocol, with information organized by SIP traffic activity and HTTP traffic activity.
To view monitoring information:
In the Administration Console interface, click the Converged Load Balancer link in the Domain Structure tree.
Click the Monitoring tab.
Click either:
Http subtab to view HTTP traffic statistics
Sip subtab to view SIP traffic statistics
You can tune the performance of the CLB by protocol. The settings include thread size, queue size, buffer size, and so on.
To configure performance settings:
In the Administration Console interface, click the Converged Load Balancer link in the Domain Structure tree.
Click the Configuration tab.
Click either:
Http subtab to tune HTTP traffic statistics.
Sip subtab to tune SIP traffic statistics.
|
Copyright © 2005, 2012, Oracle and/or its affiliates. All rights reserved. Legal Notices |
|