| Oracle® Healthcare Data Warehouse Foundation Secure Installation and Configuration Guide Release 6.1 E27595-06 |
|
|
PDF · Mobi · ePub |
| Oracle® Healthcare Data Warehouse Foundation Secure Installation and Configuration Guide Release 6.1 E27595-06 |
|
|
PDF · Mobi · ePub |
This section describes how to install HDWF securely.
Oracle recommends that you capture the following information required to install HDWF before starting the installation. It proves useful for cross-verification during the installation process.
| HDWF Configuration | Value |
|---|---|
|
Type of Install: Fresh or Upgrade (from HDWF 6.0 to HDWF 6.1) |
|
|
ORACLE_HOME name and location |
|
|
HDWF home (HDWF installation location) |
|
|
Database server host name and port number |
|
|
HDWF database service name |
|
|
System user credentials |
|
|
Tablespace encryption |
|
|
HDWF tablespace name |
|
|
HDWF tablespace initial size (in MB) |
|
|
HDWF temporary tablespace name |
|
|
HDWF schema user credentials |
|
|
HDWF data file location name |
|
|
HDWF interface tablespace name |
|
|
HDWF interface tablespace initial size (in MB) |
|
|
HDWF interface temporary tablespace name |
|
|
HDWF interface schema user credentials |
|
|
HDWF interface data file location name |
|
|
Would you like to overwrite the HDWF Oracle seed data? |
|
|
Would you like to overwrite the HDWF interface Oracle seed data? |
|
|
Are you installing on Exadata database system? |
|
|
Compression Method: HCC or OLTP |
Oracle HDWF installer uses OUI, a user-interface driven installation tool to install HDWF data warehouse.
The media pack from eDelivery contains the HDWF installer for Linux 64-bit OS. Following is the media pack folder structure:
MEDIA_PACK_LOCATION
/hdwf61
/software
/install
/stage1
where MEDIA_PACK_LOCATION refers to the location of the HDWF media pack.
The installer acts in two phases:
In the first phase, the installer collects information that is required for HDWF installation. During this phase, you can move backward and forward through the screens, revising your entries.
During the second phase, the installer runs the scripts to set up the HDWF 6.1 database according to the information provided in the first phase.
Select one of the following options based on your installation needs:
Server installation - Select this option if you are running the HDWF installer directly on a database server. See Section 5.3.
Remote installation - Select this option if you are installing HDWF remotely on a database server by running the installer from a different machine. See Section 5.4.
The installer provides the following installation types:
Complete - This option performs a new installation of HDWF 6.1. It does not create a new database instance. Instead, it creates a new tablespace and a new schema in this newly created tablespace. While an existing database instance can be used for a new installation of HDWF 6.1, an existing tablespace cannot be used.
Upgrade - This option upgrades an existing HDWF version 6.0 to 6.1. The upgrade installation uses an existing schema. No new schema is created. The existing data files for interface tables and HDWF tables are used.
Extract the contents of the HDWF media pack to your system.
Ensure that ORACLE_HOME, ORACLE_SID, and PATH environment variables are setup in your session.
Set the X Window display output to the IP address of your local computer. Use the standard format for IP addresses and append :0 at the end. For example (based on your shell):
setenv DISPLAY 198.51.100.89:0
or export DISPLAY 198.51.100.89:0
For Linux 64-bit OS, navigate to the <media_pack_location>/ hdwf61/software/install/ folder.
Change protections on files to 755:
chmod 755 *
Start the following OUI:
./runInstaller -invPtrLoc < HDWF_HOME >/oraInst.loc
While installing HDWF, the OUI generates the following log files:
installActions<timestamp>.log - this log file records the action of the installer and can be used to diagnose issues with the installer.
oraInstall<timestamp>.out - this output file records the output of SQL scripts run by the installer.
oraInstall<timestamp>.err - this error file records the errors from the SQL scripts run by the installer.
The log files are time stamped and each installation session creates a new log file.
On a Linux machine, the log files are located at $ORACLE_BASE/oraInventory/logs.
For example:
/u01/app/oraInventory/logs
In addition to the OUI generated log files, HDWF install log files are generated at:
/<HDWF_HOME>/oracle.hsgbu.hdwf/oracle/hdwf61/install/logs
While reporting any problems that occur during HDWF installation, ensure that you include all the above log files.
The installer creates the following directory structure on the server it is run:
hdwf_home
/oracle.hsgbu.hdwf
/oracle
/hdwf61
/install
/scripts (HDWF SQL scripts)
/logs (Installation log files)
/rpt (Installation report files)
hdwf_home refers to the root installation directory of the Oracle HDWF product. Create an empty directory for this purpose.
For a fresh installation, perform the following steps:
The Welcome screen appears on running the installer. Click Next to continue the installation.
In the Select Installation Type screen:
Select Complete to perform a fresh installation of HDWF 6.1.
Click Next.
In the Specify Home Details screen:
Specify the root installation directory of HDWF 6.1.
Note:
Use lowercase for directory names, for all platforms, to be created and used by the installer.Click Next.
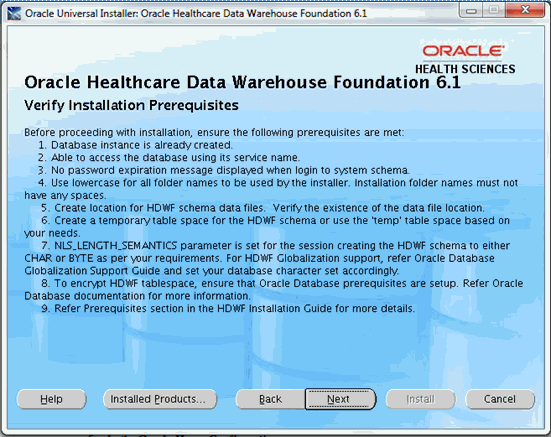
In the Verify Installation Prerequisites screen, verify the prerequisites mentioned before installation, and click Next.
Figure 5-4 Verify Installation Prerequisites
In the Oracle Home Configuration screen:
Enter the ORACLE_HOME location. This refers to the location of the Oracle database installation on the machine where the installer is run.
Click Next.
In the HDWF Database Configuration screen:
Enter the database server host name where the HDWF schema is created.
Enter the database server port number.
Enter database system user password.
Enter the HDWF database service name.
Click Next.
In the HDWF Tablespace Encryption Configuration screen:
Figure 5-7 HDWF Tablespace Encryption Configuration
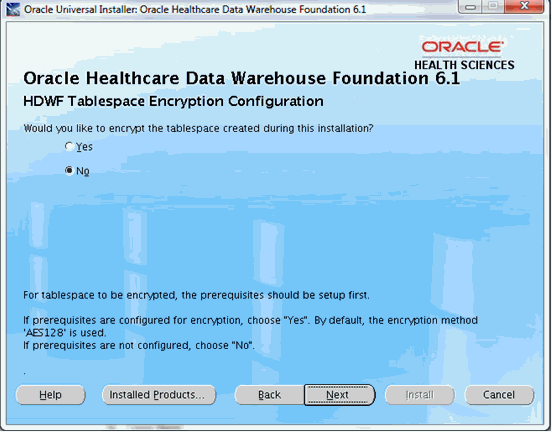
Encrypting the tablespace requires prerequisites to be set.
If the prerequisites are set for tablespace encryption, click Yes, else click No.
Click Next.
In the HDWF HDM Tablespace and Schema Configuration screen:
Figure 5-8 HDWF HDM Tablespace and Schema Configuration
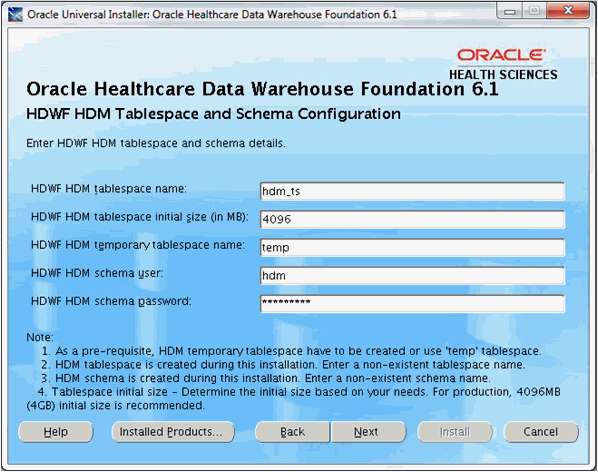
Enter the HDWF HDM tablespace name.
Enter the HDWF HDM tablespace initial size in MB.
Enter the HDWF HDM temporary tablespace name created as part of the prerequisites.
Note:
The installer does not create the temporary tablespace. It should be created as part of the prerequisite steps or the default temp tablespace can be used.Enter the HDWF HDM schema user name.
Enter the HDWF HDM schema user password.
Click Next.
In the HDWF HDM Tablespace and Schema Configuration screen:
Figure 5-9 HDWF HDM Tablespace and Schema Configuration
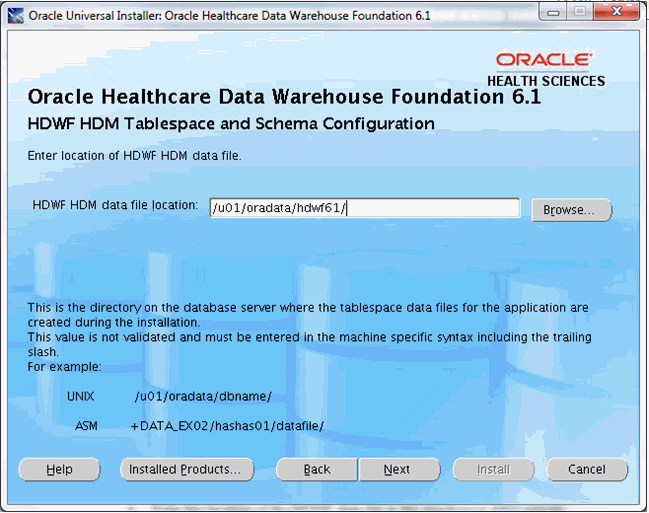
Enter the location of the HDWF data file in the machine or ASM specific syntax including the trailing slash.
This is the directory on the database server where the data files for the application are created during the installation.
This value is not validated and must be entered in the machine or ASM specific syntax including the trailing slash.
For example,
Unix: /u01/oradata/dbname/
ASM: +DATA_EX02/hashas01/datafile/
Note:
ASM location must always start with + and should be entered with + as shown above.
Failure to enter the trailing slash will not stop the installation. However, the data file name will be prefixed with the folder name.
The HDWF data file name will be the name of tablespace entered. For example, if the HDWF tablespace name is hdwf_ts, the data file created by the installer is hdwf_ts.dbf.
Click Next.
In the HDWF Interface HDI Tablespace and Schema Configuration screen:
Figure 5-10 HDWF Interface HDI Tablespace and Schema Configuration
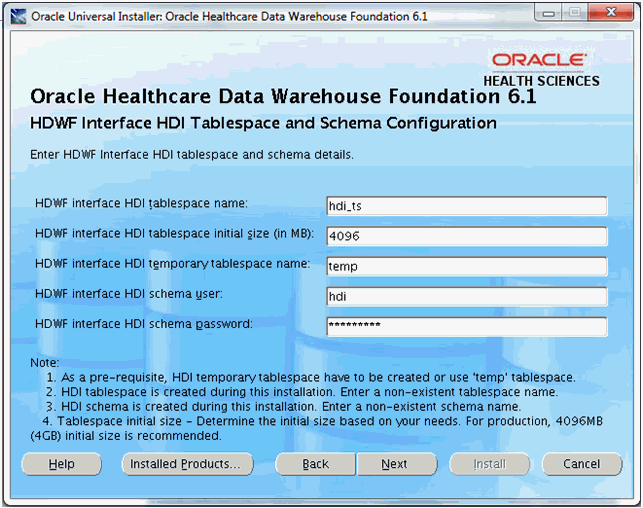
Enter the HDWF interface HDI tablespace name.
Enter the initial size of the HDWF interface HDI tablespace in MB.
Enter the HDWF temporary HDI tablespace name created as part of the prerequisites.
Note:
The installer does not create the temporary tablespace. It should be created as part of the prerequisites.Enter the HDWF interface HDI schema user.
Enter the HDWF interface HDI user password.
Click Next.
In the HDWF Interface HDI Tablespace and Schema Configuration screen:
Figure 5-11 HDWF Interface Tablespace and Schema Configuration
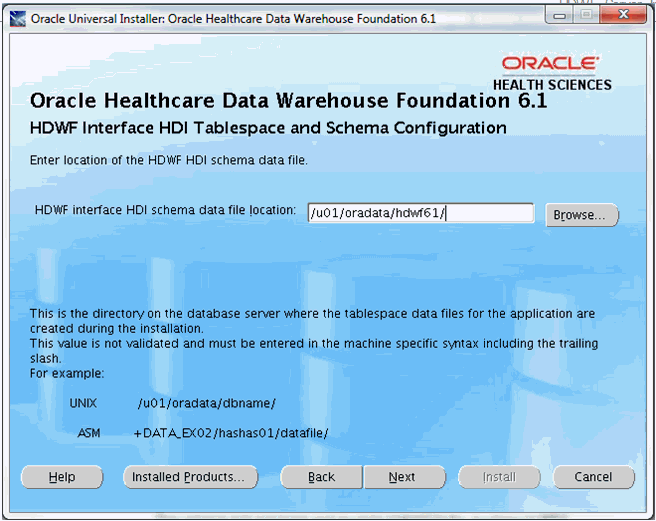
Enter the location of the HDWF interface data file in the machine or ASM specific syntax including the trailing slash.
This is the directory on the database server where the data files for the application are created during the installation.
This value is not validated and must be entered in the machine or ASM specific syntax including the trailing slash.
For example,
Unix: /u01/oradata/dbname/
ASM: +DATA_EX02/hashas01/datafile/
Note:
ASM location must always start with + and should be entered with + as shown above.
Failure to enter the trailing slash will not stop the installation. However, the data file name will be prefixed with the folder name.
The HDWF data file name is the name of the tablespace entered. For example, if the HDWF tablespace name is hdwf_ts, the data file created by the installer is hdwf_ts.dbf.
Click Next.
In the HDWF Exadata Configuration screen:
Select Yes if HDWF is installed on Exadata database machine.
Click Next and go to step 13.
Select No if HDWF is not installed on Exadata database machine.
Click Next and go to step 14.
In the Table Compression Configuration screen:
Figure 5-13 Table Compression Configuration
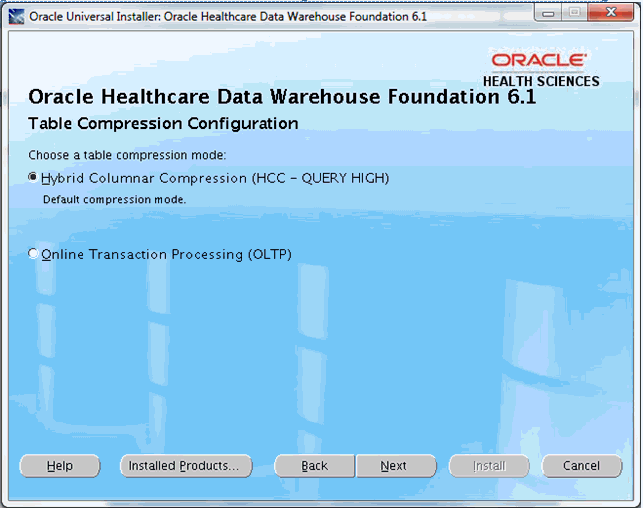
Select a table compression mode: Hybrid Columnar Compression (HCC - Query High) or Online Transaction Processing (OLTP).
Click Next.
In the Verify Configuration Parameters screen:
Verify all the configuration parameters listed on this screen before proceeding.
If required, click Back to make changes to your installation settings else click Next.
Review the information on the Pre-installation Summary screen, which displays the global settings, the space requirements, and the product to install.
If required, click Back to make changes to your installation settings.
Click Install to continue.
The HDWF installation begins and the Install screen is displayed. OUI copies the files to the HDWF home location and runs the HDWF SQL scripts to create the database.
The install screen displays the location of the log file that records the results of the installation activities for this session. Note the location of the log file.
Note:
The progress bar does not display the installation progress when the database is created using SQLPlus.To review the installation progress or monitor the current installation activity, view the log file created at the location displayed on the Install screen.
After the installation is complete, the End of Installation screen is displayed.
This screen displays:
Successfully installed HDWF 6.1, if the installation is successful.
Location of the HDWF installer log file: <HDWF_Home>\oracle.hsgbu.hdwf\oracle\hdwf61\install\logs\ folder.
Location of the installation report: <HDWF_ Home>\oracle.hsgbu.hdwf\oracle\hdwf61\install\rpt\ folder.
Note:
Review the installation report and save it in a secure location for future use.Click Exit after reviewing the installation information. At the confirmation prompt, click Yes to exit the HDWF installer.
Review the generated installation log files for errors. For details, see Section 5.2.
Contact Oracle support, if necessary, to resolve any errors.
For the upgrade installation, perform the following steps:
The Welcome screen appears on running the installer. Click Next to continue the installation.
In the Select Installation Type screen:
Select Upgrade to upgrade HDWF 6.0 to 6.1.
Click Next.
In the Specify Home Details screen:
Specify the root installation directory of HDWF 6.1.
Note:
Use lowercase for directory names, for all platforms, to be created and used by the installer.Click Next.
In the Verify Installation Prerequisites screen, verify the prerequisites mentioned before installation, and click Next.
In the Oracle Home Configuration screen:
Enter the ORACLE_HOME location. This refers to the location of the Oracle database installation on the machine where the installer is run.
Click Next.
In the HDWF Database Configuration screen:
Enter the database server host name where the HDWF schema exists.
Enter the database server port number.
Enter the database system user password.
Enter the HDWF database service name.
Click Next.
In the HDWF HDM Schema Configuration screen:
Figure 5-20 HDWF HDM Schema Configuration
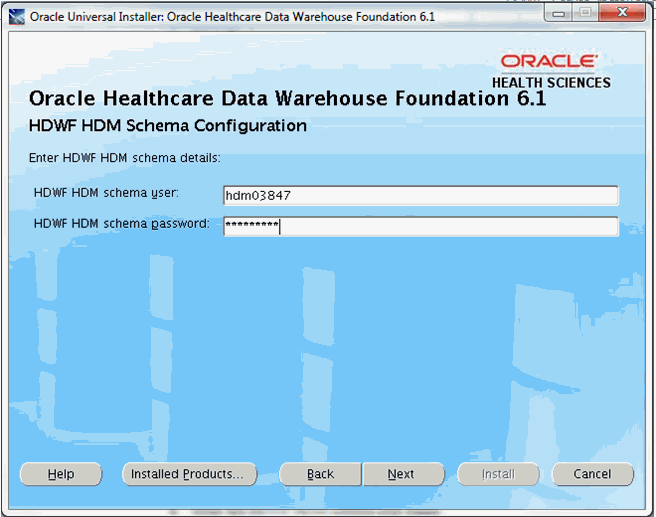
Enter the HDWF HDM schema user name.
Enter the HDWF HDM schema user password.
Click Next.
In the HDWF HDM Codes Data Configuration screen:
Figure 5-21 HDWF HDM Codes Data Configuration
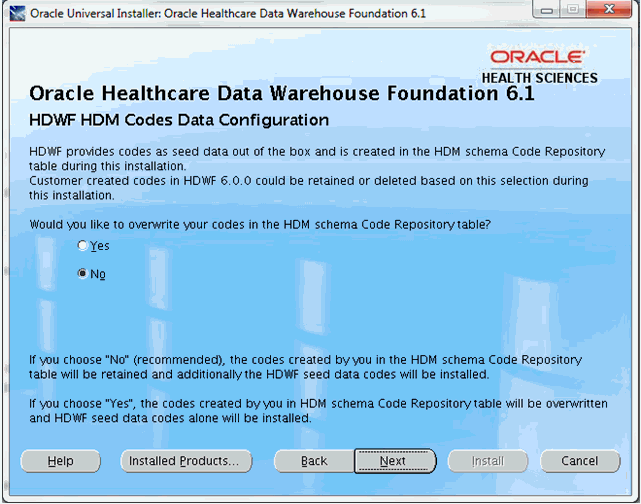
Overwrite the HDM seed data.
Select No to preserve your seed data in HDM Code Repository tables (recommended).
Select Yes if you want to overwrite your seed data with Oracle's seed data in HDM Code Repository tables.
Click Next.
In the HDWF HDI Interface Schema Configuration screen:
Figure 5-22 HDWF Interface HDI Schema Configuration
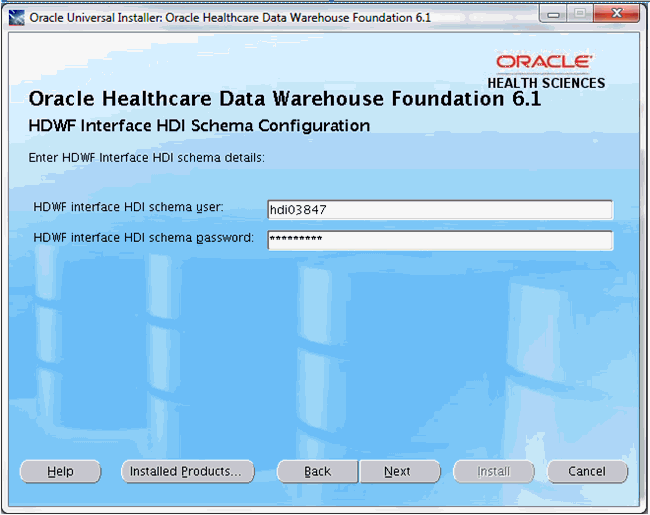
Enter the HDWF interface HDI schema user name.
Enter the HDWF interface HDI schema user password.
Click Next.
In the HDWF Interface Codes Data Configuration screen:
Figure 5-23 HDWF Interface Codes Data Configuration
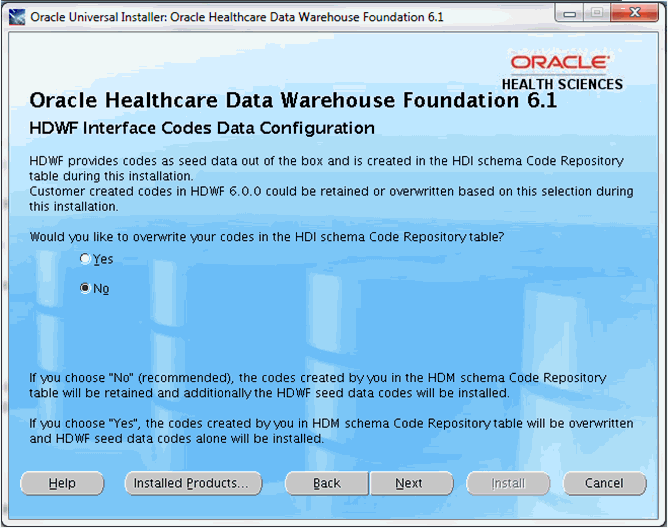
Overwrite the HDI seed data.
Select No to preserve your seed data in HDI Code Repository tables (recommended).
Select Yes if you want to overwrite your seed data with Oracle's seed data in HDI Code Repository tables.
Click Next.
In the HDWF Exadata Configuration screen:
Select Yes if HDWF is installed on Exadata database machine.
Click Next and go to step 12.
Select No if HDWF is not installed on Exadata database machine.
Click Next and go to step 13.
In the Table Compression Configuration screen:
Figure 5-25 Table Compression Configuration
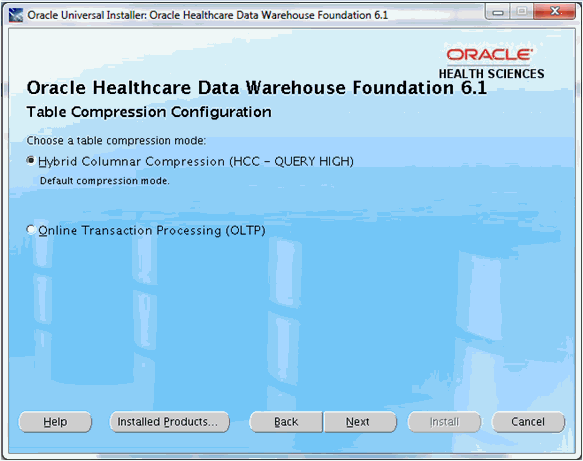
Select a table compression mode: Hybrid Columnar Compression (HCC - Query High) or Online Transaction Processing (OLTP).
Click Next.
In the Verify Configuration Parameters screen:
Verify all the configuration parameters listed on this screen before proceeding.
If required, click Back to make changes to your installation settings.
Click Next.
Review the information on the Pre-installation Summary screen, which displays the global settings, the space requirements, and the product to install.
If required, click Back to make changes to your installation settings.
Click Install to continue.
The HDWF installation begins and the Install screen is displayed. OUI copies the files to the HDWF home location and runs the HDWF SQL scripts to create the database.
The install screen displays the location of the log file that records the results of the installation activities for this session. Note the location of the log file.
Note:
The progress bar does not display the installation progress when the database is created using SQLPlus.To review the installation progress or monitor the current installation activity, view the log file created at the location displayed on the Install screen.
After the installation is complete, the End of Installation screen is displayed.
This screen displays:
Successfully Installed HDWF 6.1, if the installation is successful.
Location of the HDWF installer log file: <HDWF_ Home>\oracle.hsgbu.hdwf\oracle\hdwf61\install\logs\ folder.
Location of the installation report: <HDWF_ Home>\oracle.hsgbu.hdwf\oracle\hdwf61\install\rpt\ folder.
Note:
Review the installation report and save it in a secure location for future use.Click Exit after reviewing the installation information.
At the confirmation prompt, click Yes to exit the HDWF Installer.
Review the generated installation log files for errors. For details, see Section 5.2.
Contact Oracle support, if necessary, to resolve any errors.
The HDWF installer can also be used to remotely install HDWF 6.1. For example, the installer can be run from a Linux 64-bit OS and installed on a remote system.
The installer creates the following directory structure on the system where it is run.
hdwf_home
/oracle.hsgbu.hdwf
/oracle
/hdwf61
/install
/scripts (HDWF SQL scripts)
/logs (Installation log files)
/rpt (Installation report files)
hdwf_home refers to the root installation directory of the Oracle HDWF product. Create an empty directory for this purpose.
In addition to the prerequisites mentioned in Chapter 4, the following are also applicable for this installation option.
Make sure the following are available on the client machine:
Oracle Unix or Linux 64-bit OS
Oracle Database 11.2.0.4 client
Follow the steps in Section 5.1.3 to set up the installer to run on a Linux 64-bit operating system.
Perform the following steps:
The Welcome screen appears on running the installer. Click Next to continue the installation.
In the Select Installation Type screen:
Select Complete to perform a fresh installation of HDWF 6.1.
Click Next.
In the Specify Home Details screen:
Specify the root installation directory of HDWF 6.1.
Note:
Use lowercase for directory names, for all platforms, to be created and used by the installer.Click Next.
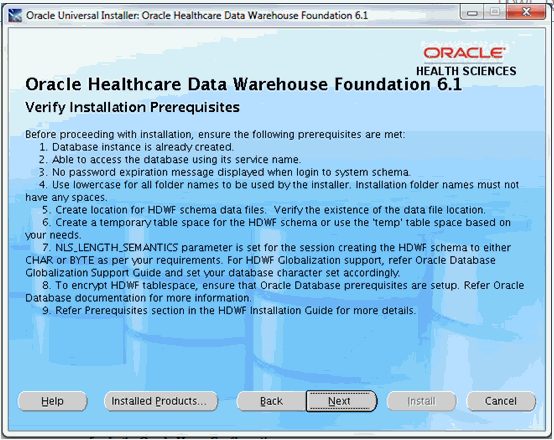
In the Verify Installation Prerequisites screen, verify the prerequisites mentioned before installation, and click Next.
Figure 5-29 Verify Installation Prerequisites
In the Oracle Home Configuration screen:
Enter the ORACLE_HOME location. This refers to the location of the Oracle database installation on the machine where the installer is run.
Click Next.
In the HDWF Database Configuration screen:
The database details mentioned in this step correspond to the details of the database server (remote machine) where HDWF will be installed.
Enter the database server host name where the HDWF schema will be created.
Enter the database server port number.
Enter the database system user password.
Enter the HDWF database service name.
Click Next.
In the HDWF Tablespace Encryption Configuration screen:
Figure 5-32 HDWF Tablespace Encryption Configuration
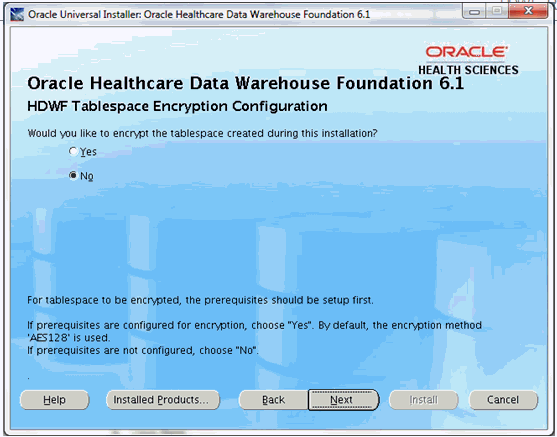
Encrypting the tablespace requires prerequisites to be set.
If the pre-requisites are set for tablespace encryption, select Yes, else select No.
Click Next.
In the HDWF HDM Tablespace and Schema Configuration screen:
Figure 5-33 HDWF HDM Tablespace and Schema Configuration
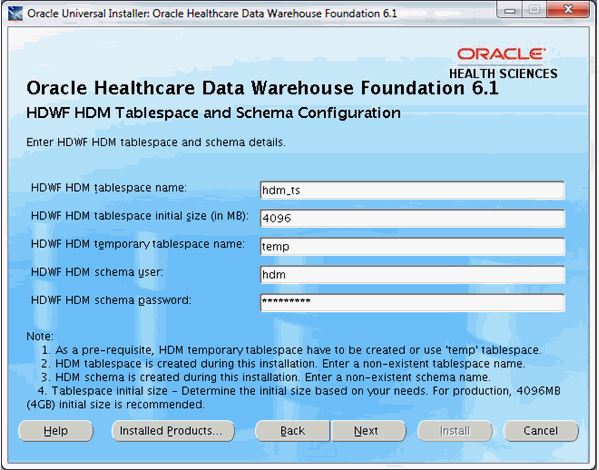
Enter the HDWF HDM tablespace name.
Enter the HDWF HDM tablespace initial size in MB.
Enter the HDWF HDM temporary tablespace name created as part of prerequisites.
Note:
The installer does not create the temporary tablespace. It should be created as part of the prerequisite steps or the default temp tablespace can be used.Enter the HDWF HDM schema user name.
Enter the HDWF HDM schema user password.
Click Next.
In the HDWF HDM Tablespace and Schema Configuration screen:
Figure 5-34 HDWF HDM Tablespace and Schema Configuration
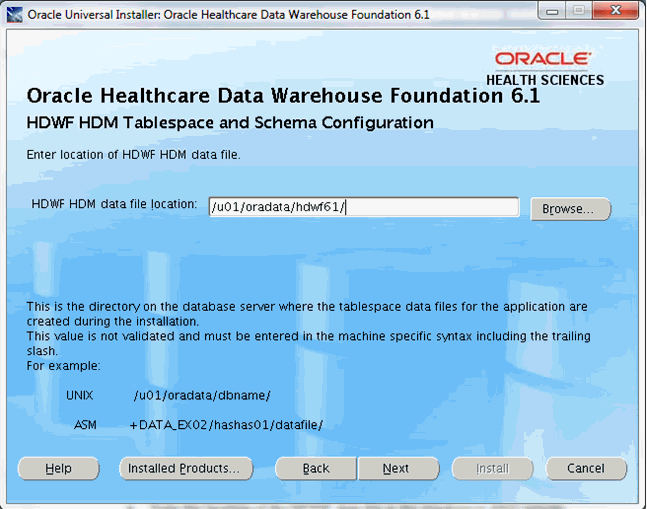
Enter the location of the HDWF data file in the machine or ASM specific syntax including the trailing slash.
This is the directory on the database server where the data files for the application are created during the installation.
This value is not validated and must be entered in the machine or ASM specific syntax including the trailing slash.
For example,
Unix: /u01/oradata/dbname/
ASM: +DATA_EX02/hashas01/datafile/
Note:
ASM location must always start with + and should be entered with + as shown above.
Failure to enter the trailing slash will not stop the installation. However, the data file name will be prefixed with the folder name.
The HDWF data file name will be the name of table space entered. For example, if the HDWF tablespace name is hdwf_ts, the data file created by the installer will be hdwf_ts.dbf.
Click Next.
In the HDWF Interface HDI Tablespace and Schema Configuration screen:
Figure 5-35 HDWF Interface HDI Tablespace and Schema Configuration
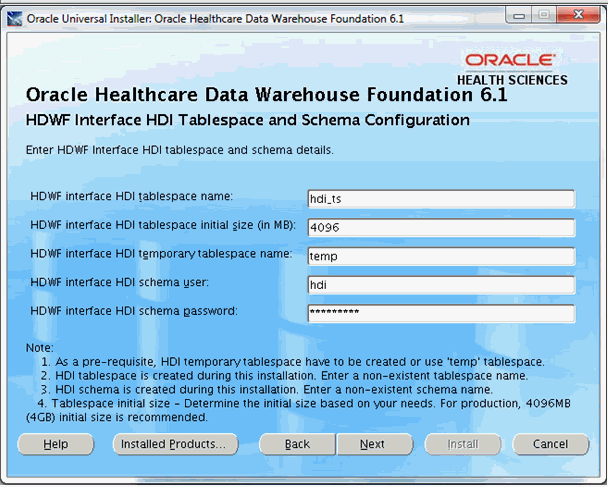
Enter the HDWF interface HDI tablespace name.
Enter the initial size of the HDWF interface HDI tablespace in MB.
Enter the HDWF interface HDI temporary tablespace name created as part of the prerequisites.
Note:
The installer does not create the temporary tablespace. It should be created as part of the prerequisites.Enter the HDWF interface HDI schema user.
Enter the HDWF interface HDI user password.
Click Next.
In the HDWF Interface HDI Tablespace and Schema Configuration screen:
Figure 5-36 HDWF Interface HDI Tablespace and Schema Configuration
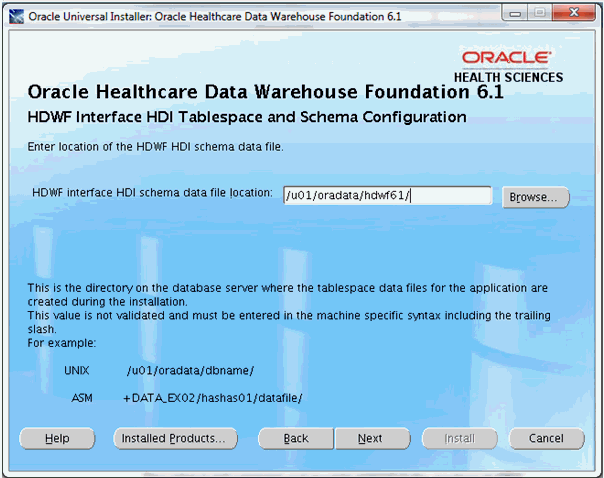
Enter the location of the HDWF interface data file in the machine or ASM specific syntax including the trailing slash.
This is the directory on the database server where the data files for the application are created during the installation.
This value is not validated and must be entered in the machine or ASM specific syntax including the trailing slash.
For example,
Unix: /u01/oradata/dbname/
ASM: +DATA_EX02/hashas01/datafile/
Note:
ASM location must always start with + and should be entered with + as shown above.
Failure to enter the trailing slash will not stop the installation. However, the data file name will be prefixed with the folder name.
The HDWF data file name will be the name of interface tablespace entered. For example, if the HDWF interface tablespace name is hdwf_int_ts, the data file created by the installer is hdwf_ int_ts.dbf.
Click Next.
In the HDWF Exadata Configuration screen:
Select Yes if HDWF is installed on an Exadata database machine.
Click Next and go to step 13.
Select No if HDWF is not installed on an Exadata database machine.
Click Next and go to step 14.
In the Table Compression Configuration screen:
Figure 5-38 Table Compression Configuration
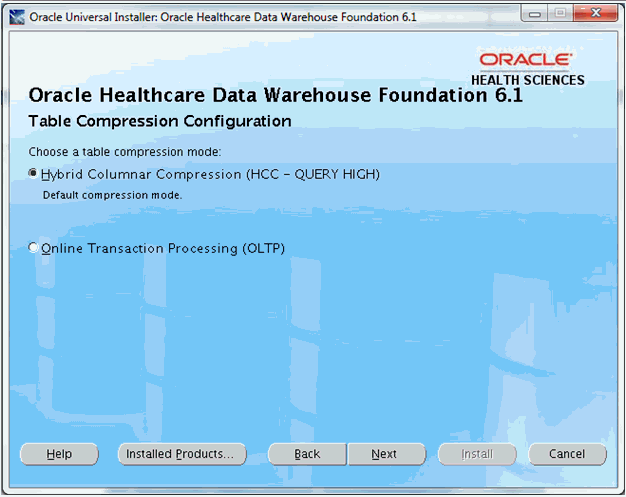
Select a table compression mode: Hybrid Columnar Compression (HCC - Query High) or Online Transaction Processing (OLTP).
Click Next.
In the Verify Configuration Parameters screen:
Verify all the configuration parameters listed on this screen before proceeding.
If required, click Back to make changes to your installation settings.
Click Next.
Review the information on the Pre-installation Summary screen, which displays the global settings, the space requirements, and the product to install.
If required, click Back to make changes to your installation settings.
Click Install to continue.
The HDWF installation begins and the Install screen is displayed. OUI copies the files to the HDWF home location and runs the HDWF SQL scripts to create the database.
The install screen displays the location of the log file that records the results of the installation activities for this session. Note the location of the log file.
Note:
The progress bar does not display the installation progress when the database is created using SQLPlus.To review the installation progress or monitor the current installation activity, view the log file created at the location displayed on the Install screen.
After the installation is complete, the End of Installation screen is displayed.
This screen displays:
Successfully installed HDWF 6.1, if the installation is successful.
Location of the HDWF installer log file - <HDWF_ Home>\oracle.hsgbu.hdwf\oracle\hdwf61\install\logs\ folder.
Location of the installation report - <HDWF_ Home>\oracle.hsgbu.hdwf\oracle\hdwf61\install\rpt\ folder.
Note:
Review the installation report and save it in a secure location for future use.Click Exit after reviewing the installation information.
At the confirmation prompt, click Yes to exit the HDWF Installer.
Review the generated installation log files for errors. For details, see Section 5.2.
Contact Oracle support, if necessary, to resolve any errors.
Perform the following steps:
The Welcome screen appears on running the installer. Click Next to continue the installation.
In the Select Installation Type screen:
Select Upgrade to upgrade from HDWF 6.0 to 6.1.
Click Next.
In the Specify Home Details screen:
Select the root installation directory of HDWF 6.1.
Note:
Use lowercase for directory names, for all platforms, to be created and used by the installer.Click Next.
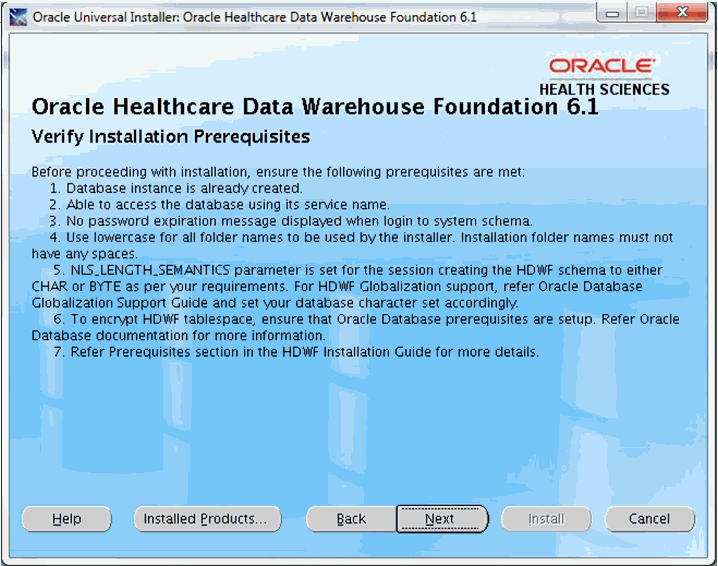
In the Verify Installation Prerequisites screen, verify the prerequisites mentioned before installation, and click Next.
Figure 5-42 Verify Installation Prerequisites
In the Oracle Home Configuration screen:
Enter the ORACLE_HOME location. This refers to the location of the Oracle database installation on the machine where the installer is run.
Click Next.
In the HDWF Database Configuration screen:
Enter the database server host name where the HDWF Schema will be created. Click Next.
Enter the database server port number.
Enter database server system user password.
Enter the HDWF database service name.
Click Next.
In the HDWF HDM Schema Configuration screen:
Figure 5-45 HDWF HDM Schema Configuration

Enter the HDWF HDM schema user name.
Enter the HDWF HDM schema user password.
Click Next.
In the HDWF HDM Codes Data Configuration screen:
Figure 5-46 HDWF HDM Codes Data Configuration
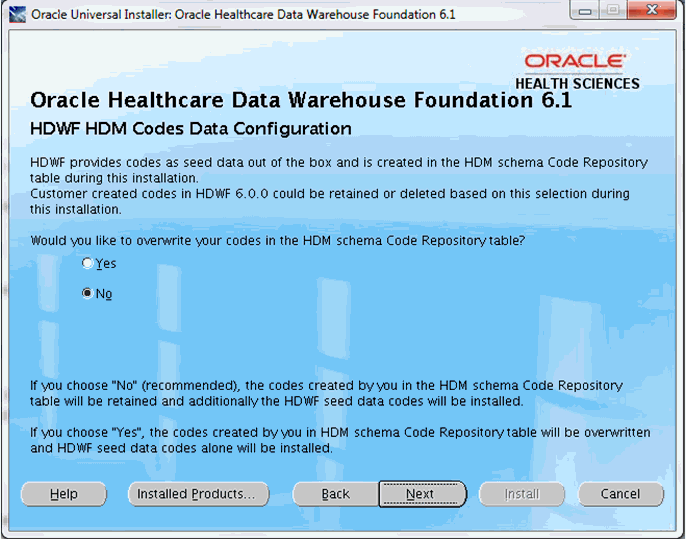
Overwrite the HDWF HDM seed data.
Select No to preserve your seed data in HDI Code Repository tables (recommended).
Select Yes if you want to overwrite your seed data with Oracle's seed data in HDI Code Repository tables.
Click Next.
In the HDWF Interface HDI Schema Configuration screen:
Figure 5-47 HDWF Interface HDI Schema Configuration

Enter the HDWF interface HDI schema user name.
Enter the HDWF interface HDI schema user password.
Click Next.
In the HDWF Interface Codes Data Configuration screen:
Figure 5-48 HDWF Interface Codes Data Configuration
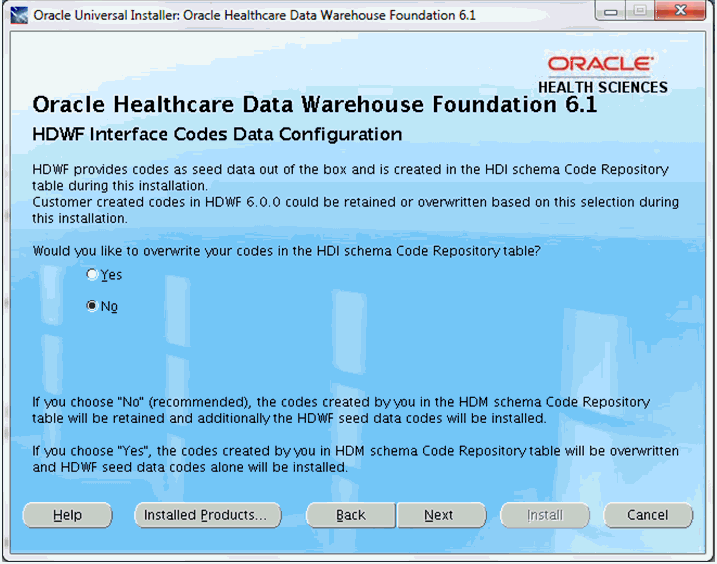
Overwrite the HDWF Interface HDI seed data.
Select No to preserve your seed data in HDI Code Repository tables (recommended).
Select Yes if you want to overwrite your seed data with Oracle's seed data in HDI Code Repository tables.
Click Next.
In the HDWF Exadata Configuration screen:
Select Yes if HDWF is installed on Exadata database machine.
Click Next and go to step 12.
Select No if HDWF is not installed on Exadata database machine.
Click Next and go to step 13.
In the Table Compression Configuration screen:
Figure 5-50 Table Compression Configuration

Select a table compression mode: Hybrid Columnar Compression (HCC - Query High) or Online Transaction Processing (OLTP).
Click Next.
In the Verify Configuration Parameters screen:
Verify all the configuration parameters listed on this screen before proceeding.
If required, click Back to make changes to your installation settings.
Click Next.
Review the information on the Pre-installation Summary screen, which displays the global settings, the space requirements, and the product to install.
If required, click Back to make changes to your installation settings.
Click Install to continue.
The HDWF installation begins and the Install progress screen is displayed. OUI copies the files to the HDWF Home location, and runs the HDWF SQL scripts to create the database.
The install screen displays the location of the log file that records the results of the installation activities for this session. Note the location of the log file.
Note:
The progress bar does not display the installation progress when the database is created using SQLPlus.To review the installation progress or monitor the current installation activity, view the log file created at the location displayed on the Install screen.
After the installation is complete, the End of Installation screen is displayed.
This screen displays:
Successfully installed HDWF 6.1, if the installation is successful.
Location of the HDWF installer log file - <HDWF_ Home>\oracle.hsgbu.hdwf\oracle\hdwf61\install\logs\ folder.
Location of the installation report - <HDWF_ Home>\oracle.hsgbu.hdwf\oracle\hdwf61\install\rpt\ folder.
Note:
Review the installation report and save it in a secure location for future use.Click Exit after reviewing the installation information.
At the confirmation prompt, click Yes to exit the HDWF Installer.
Review the generated installation log files for errors. For details, see Section 5.2.
Contact Oracle support, if necessary, to resolve any errors.
The following data migration scripts are not executed as a part of the upgrade installation by the HDWF 6.1 OUI installer.
You must review these scripts and execute them after the HDWF upgrade installation is complete.
hdwf_interface_migration_ddl_6_1.sql
This script must be run on the interface tables schema and migrates data from HDI_APPT and HDI_SURGCL_CASE_APPT to HDI_APPT_SVCPRV. It copies the integration ID pattern of the original tables (HDI_APPT. INT_ID, HDI_SURGCL_CASE_APPT. INT_ID) as is in the target table (HDI_APPT_SVCPRV. INT_ID).
hdwf_migration_ddl_6_1.sql
This script must be run on the HDWF Schema and migrates data from HDM_APPT to HDM_APPT_SVCPRV. It copies the integration ID pattern from the source table (HDM_APPT. INTEGRATION_ID) to the target table (HDM_APPT_SVCPRV. INTEGRATION_ID).
You may select any integration ID pattern for new records that will be populated in HDI_APPT_SVCPRV. To version old records that are migrated to HDI_APPT_SVCPRV from HDI_APPT or HDI_SURGCL_CASE_APPT, use the old integration ID pattern in HDI_APPT_SVCPRV.