| Oracle® Health Sciences Cohort Explorer Secure Installation and Configuration Guide Release 1.0.0.1 E28205-01 |
|
|
PDF · Mobi · ePub |
| Oracle® Health Sciences Cohort Explorer Secure Installation and Configuration Guide Release 1.0.0.1 E28205-01 |
|
|
PDF · Mobi · ePub |
This section describes the configuring of the master repository topology components and steps for updating existing topology components.
This chapter includes the following:
While installing and configuring the ODI Server, follow the guidelines documented in section "Managing the Security in Oracle Data Integrator" in the document Oracle® Fusion Middleware Developer's Guide for Oracle Data Integrator 11g Release 1 (11.1.1).
This section includes the following:
The Cohort ETL objects consist of ODI Master Repository and the ODI Work Repository, which must be deployed in the ODI Server.
After deploying the ODI Master Repository, change all connection configurations as described in the Oracle Health Sciences Cohort Explorer Installation Guide to point to the customer database connection parameters.
The ODI Work Repository contains only metadata for Cohort ODI ETLs. The metadata is used within the context of the ODI Server, so follow the security guidelines applicable to the ODI Server while deploying these objects.
Lock and expire default user accounts.
Keep only the minimum number of ports open. Close all ports not in use.
Oracle Health Sciences Cohort Explorer does not use the Telnet service.
Telnet listens on port 23 by default.
If the Telnet service is available on any computer, Oracle recommends that you disable Telnet in favor of Secure Shell (SSH). Telnet, which sends clear-text passwords and user names through a log-in, is a security risk to your servers. Disabling Telnet tightens and protects your system security.
Oracle Health Sciences Cohort Explorer does not use the following services or information for any functionality:
Simple Mail Transfer Protocol (SMTP). This protocol is an Internet standard for E-mail transmission across Internet Protocol (IP) networks.
Identification Protocol (identd). This protocol is generally used to identify the owner of a TCP connection on UNIX.
Simple Network Management Protocol (SNMP). This protocol is a method for managing and reporting information about different systems.
File transfer Protocol (FTP). This protocol is used for downloading or uploading files from the file server.
Therefore, restricting these services or information does not affect the use of Oracle Health Sciences Cohort Explorer. If you are not using these services for other applications, Oracle recommends that you disable these services to minimize your security exposure. If you need SMTP, identd, or SNMP for other applications, be sure to upgrade to the latest version of the protocol to provide the most up-to-date security for your system.
When designing a secure deployment, design multiple layers of protection. If a hacker should gain access to one layer, such as the application server, that should not automatically give them easy access to other layers, such as the database server.
Providing multiple layers of protection may include:
Enabling only those ports required for communication between different tiers, for example, only allowing communication to the database tier on the port used for SQL*NET communications, (1521 by default).
Placing firewalls between servers so that only expected traffic can move between servers.
Due to the complexity in setting up SSL it is not enabled by default during installation. Communications between the browser and the application servers should be restricted to SSL. See the WebLogic 11g guidelines for instructions on enabling SSL.
Following are the installation steps:
Get the master repository and work repository zip files from the installation package. The file names are—Cohort_Explorer_ODI_Master_Repository.zip and Cohort_Explorer_ODI_Work_Repository.zip
You must create a database schema for the ODI master repository and the ODI work repository. You may create different schemas for each repository if there is a business reason to do so. Oracle recommends creating a single schema for both repositories.
Creating an ODI master repository involves two steps:
Open Oracle Data Integrator.
Select File, then New, then Create a new ODI repository Login in the New Gallery window.
Click OK. The Repository Connection Information window opens.
Enter values for all the properties as described below.
Figure 3-1 Repository Connection Information Window
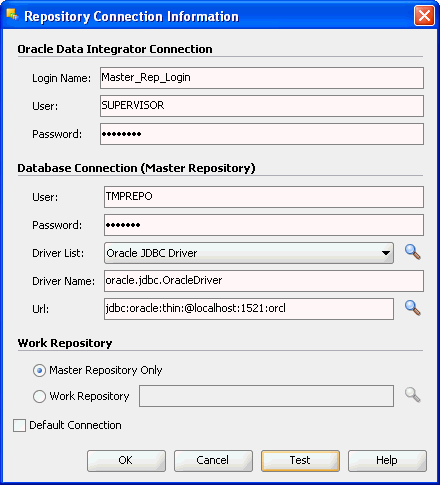
Oracle Data Integrator Connection details:
Login name: Provide any value.
User: The default value is Supervisor.
Password: Provide any value.
Database Connection (Master Repository) details:
User: Provide the OHSCE data mart schema name in the database.
Password: Provide the OHSCE data mart schema password.
Driver List: Select Oracle JDBC Driver from the drop-down list.
Driver Name: Auto-populated when you select the Driver list.
URL: Use the search icon to get the URL format and provide the host, port and SID values of the master repository.
Select Master Repository Only.
Click OK. A login name is created with the name provided.
Open Oracle Data Integrator.
Select File, then New, then Master Repository Import Wizard.
Click OK. The Master Repository Import Wizard window opens.
Figure 3-2 Master Repository Import Wizard
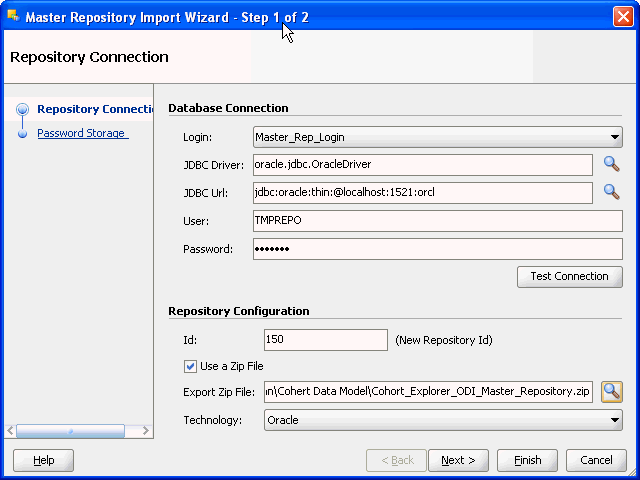
Select the Database login name from the drop-down list. The other fields in the section get automatically updated.
Provide the repository ID in the Repository Connection section.
Note:
Each repository ID must be unique. ODI does not allow the import of a repository if its ID already exists.The repository zip files already contain the following IDs: 10, 0, 999, 100, 189, 111, 1, 11, 99, 900, 101, 666, 8, 600, 3, 892, 6, 66, 102, 103, 104, 105, 109, 110, 111, 199, 333, 777, 551, 512, 801, 802, 767, 803, 804, 805, 806, 807, 808, 809, 810, 811, 812, 813, 302, 303, 304, 305, 306. Provide IDs different from these while creating a repository.
Select the Use Zip File option and browse for the zip file containing the master repository.
Click Finish. The master repository is created.
Creating an ODI work repository involves two steps:
Connect to the master repository.
Select Topology, then Repositories, right-click on Work repositories, and select Create Work Repository. A Create Work Repository window opens.
Figure 3-3 Create Work Repository Window-Step 1
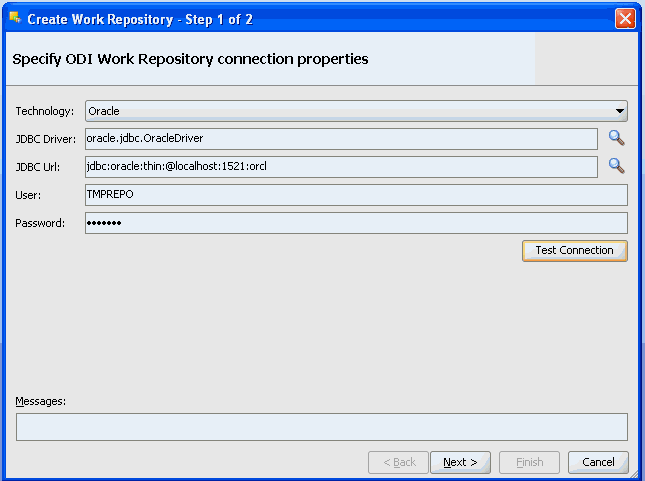
Select the following values for these fields:
Technology: Oracle
JDBC Driver: Use the search icon to select Oracle JDBC Driver. The syntax is populated automatically.
JDBC URL: Use the search icon to get the URL format and provide the host, port and SID values of the work repository.
User: Work repository schema user name
Password: Work repository schema password
Click on Test Connection to verify whether or not the connection is successful. Click Next.
Figure 3-4 Create Work Repository Window-Step 2
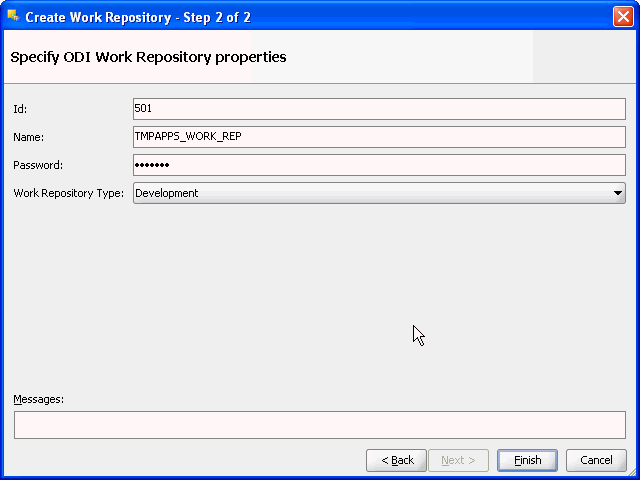
Provide the necessary values for the fields in step 2 of the Create Work Repository window.
ID: The Work Repository ID
Note:
Each repository ID must be unique. ODI does not allow the import of a repository if its ID already exists.The repository zip files already contain the following IDs: 10, 0, 999, 100, 189, 111, 1, 11, 99, 900, 101, 666, 8, 600, 3, 892, 6, 66, 102, 103, 104, 105, 109, 110, 111, 199, 333, 777, 551, 512, 801, 802, 767, 803, 804, 805, 806, 807, 808, 809, 810, 811, 812, 813, 302, 303, 304, 305, 306. Provide IDs different from these while creating a repository.
Name: The name of the repository
Password: The password for the repository
Work Repository Type: Select the type of the work repository
Click Finish. The work repository is created successfully. You are prompted to create a login name for the work repository.
Provide a login name for the work repository and click OK.
To import the OHSCE work repository into ODI:
Disconnect from the master repository.
Re-connect to the work repository with the login name created in the previous step.
Select the Designer tab, then select the Connect Navigator icon to select Import, then Work repository as shown below.
The Import work repository window opens. Select the Import Mode as Synonym Mode Insert.
Select Import from a zip File.
Select the work repository zip file and click OK.
During the import of the work repository, you are prompted to declare different work repository numbers in the master repository like in below screenshot. Click OK for each one of them. The Import report appears.
Click Close. The application is now installed successfully.
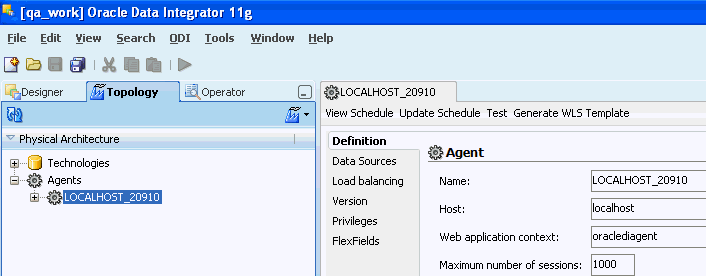
After a successful ODI installation, the ODI physical agent called LOCALHOST_20910, automatically appears. Modify the properties of the ODI agent as follows:
Select the Topology tab.
Navigate to Physical Architecture, then right-click on Agents, and finally select LOCALHOST_20910.
Edit the following:
Name: Enter a new name for the agent.
Host: Enter the host name where the ODI repository is installed.
Port: Enter a new port number or retain the default.
Save your changes. The new physical agent is created.
Figure 3-7 Configuring the ODI Physical Agent
During the installation the following physical data servers are created automatically:
ORACLE_HDM
ORACLE_TMP_DATAMART
Configure these data servers as described below:
In the Topology tab, under the Physical Architecture tab, expand Oracle, select the physical data server created for HDM and double-click on it. You see the Definition details for the HDM data server as seen in the following screenshot.
Figure 3-8 Configuring the Physical Data Server
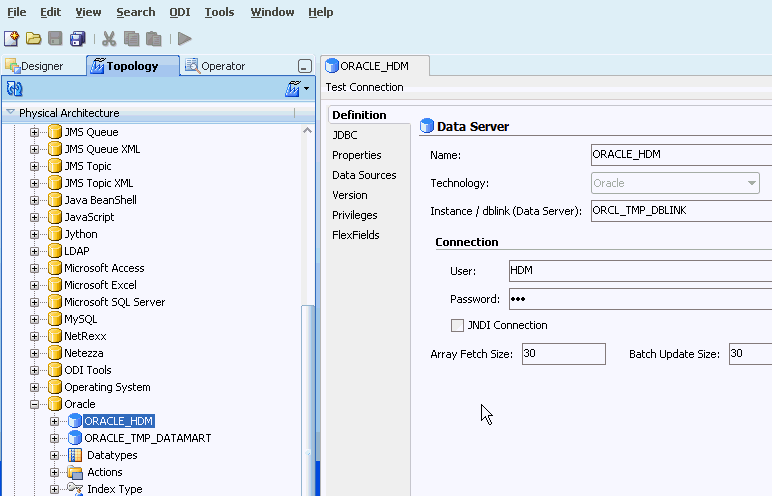
Update Definition tab properties as follows:
Connection User name and Password: Provide the user name and password for connecting to the HDM schema.
Instance/ DBlink (data server): Enter NET_SERVICE_NAME. This is the TNS entry name of the HDM schema
Update the JDBC tab properties of the system containing HDM schema:
JDBC Driver: The field is automatically populated.
JDBC URL: Provide the host, port and SID of the HDWF schema.
Figure 3-9 Configuring JDBC Properties of the Physical Data Server
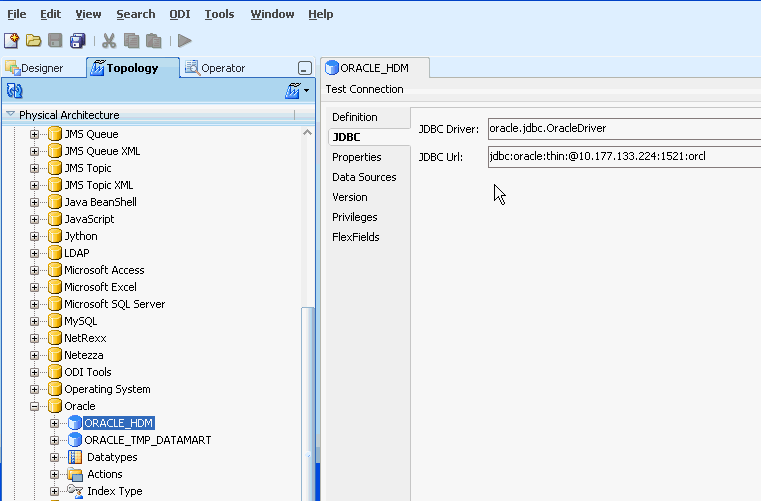
Click the Test Connection button to test whether or not the values are correct.
Click Save on the menu bar. The existing Physical Data Server ORACLE_HDM is updated.
Repeat steps from 1 to 5 on the physical data server ORACLE_TMP_DATAMART, created for the OHSCE data mart.
The installation of OHSCE creates two schemas: ORACLE_HDM.HDM and ORACLE_TMP_DATAMART.TMPAPPS.
To update the existing physical schema:
Connect to the master repository and navigate to Topology, Technologies, then Oracle.
Figure 3-10 Configuring the Physical Schema
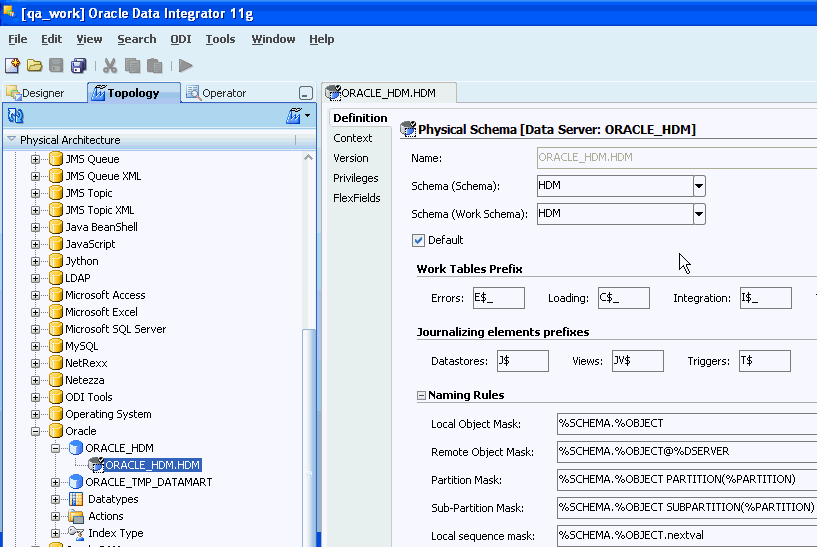
Double-click on ORACLE_HDM and provide the Connection details (User and password).
Navigate to the JDBC tab and provide the JDBC URL (the server where the data base is installed).
Click Save.
Repeat the above steps for ORACLE_TMP_DATAMART.
Double-click on ORACLE_HDM.TRCHDM, select Source schema name from the Schema and Work Schema drop-down lists.
Repeat the above steps for ORACLE_TMP_DATAMART.CDM.
Note:
For further references on Topology configuration, follow the these ODI guides:Oracle® Fusion Middle ware Getting Started with Oracle Data Integrator 11g Release 1 (11.1.1)
Oracle® Fusion Middleware Developer's Guide for Oracle Data Integrator 11g Release 1 (11.1.1)
ODI requires a database link between the source (HDWF Schema) and the target OHSCE data mart schema; to move data from the source to temporary tables that are created in the target.
For details, refer to ODI architecture in the Oracle® Data Integrator User's Guide.
To create a database link:
Connect to the ODI Work Repository.
Copy the TNS string from the HDM tnsnames.ora in the HDWF schema to the tnsnames.ora of the OHSCE Data Mart Schema.
Open the Initial Setup folder within the Execution Plans folder in ODI. The Initial Setup folder contains a Create DBLink task.
Right-click the package Create DBLink and select Execute.
For security purposes, you must revoke all unnecessary grants on the OHSCE schema. You need DBA privileges to perform this action.
Run the command select * from session_privs to find out all the privileges granted on the database.
Run the following script from the SQL Plus prompt: cohort_revoke_grants.sql. The script prompts you for the OHSCE schema name. The script revokes all grants except the following three grants that are necessary for the ETL execution: