| Oracle® Enterprise Manager Cloud Control Administrator's Guide 12c Release 1 (12.1.0.1) Part Number E24473-09 |
|
|
PDF · Mobi · ePub |
| Oracle® Enterprise Manager Cloud Control Administrator's Guide 12c Release 1 (12.1.0.1) Part Number E24473-09 |
|
|
PDF · Mobi · ePub |
Administration Groups greatly simplify the process of setting up targets for management in Enterprise Manager by automating the application of management settings such as monitoring settings or compliance standards. Typically, these settings are manually applied to individual target, or perhaps semi-automatically using custom scripts. However, by defining Administration Groups, Enterprise Manager uses specific target properties to direct the target to the appropriate Administration Group and then automatically apply the requisite monitoring and management settings. This level of automation simplifies the target setup process and also enables a datacenter to easily scale as new targets are added to Enterprise Manager for management.
This chapter covers the following topics:
Administration groups are a special type of group used to fully automate application of monitoring and other management settings targets upon joining the group. When a target is added to the group, Enterprise Manager applies these settings using a Template Collection consisting of Monitoring Templates, compliance standards, and cloud policies. This completely eliminates the need for administrator intervention. The following illustration demonstrates the typical Administration Group workflow:
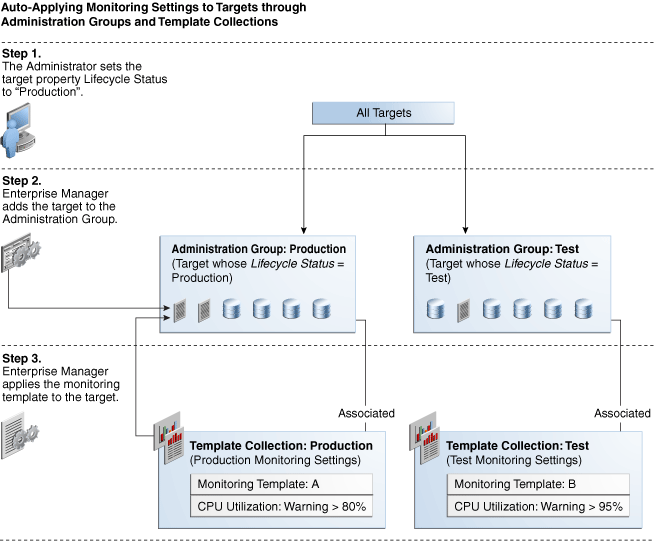
The first step involves setting a target's Lifecycle Status property when a target is first added to Enterprise Manager for monitoring. At that time, you determine where in the prioritization hierarchy that target belongs; the highest level being "mission critical" and the lowest being "development." Target Lifecycle Status prioritization consists of the following levels:
Mission Critical (highest priority)
Production
Stage
Test
Development (lowest priority)
As shown in step two of the illustration, once Lifecycle Status is set, Enterprise Manger uses it to determine which Administration Group the target belongs.
In order to prevent different monitoring settings to be applied to the same target, Administration Groups were designed to be mutually exclusive with other Administration Groups in terms of group membership. Administration groups can also be used for hierarchically classifying targets in an organization. For example, in the previous illustration, you have an Administration Group hierarchy consisting of two subgroups: Production targets and Test targets, with each subgroup having its own Template Collections. In this example, the Production group inherits monitoring settings from Monitoring Template A while targets in the Test subgroup inherit monitoring settings from Monitoring Template B.
In order to create an Administration Group, you must have both Full Any Target and Create Privilege Propagating Group target privileges.
Developing an Administration Group is performed in two phases:
Planning
Plan your Administration Group hierarchy by creating a group hierarchy based on how you manage your targets.
Plan the management settings associated with the Administration Groups in the hierarchy.
Management settings: Monitoring settings, Compliance standard settings, Cloud policy settings
For Monitoring settings, you can have additional metric settings or override metric settings lower in your hierarchy
For Compliance standards or Cloud policies, additional rules/policies lower in the hierarchy are additive
Implementation
Enter the group hierarchy definition and management settings in Enterprise Manager.
Create the Administration Group hierarchy.
Create the Monitoring Templates, compliance standards, cloud policies and add these to Template Collections.
Associate Template Collections with Administration Groups.
Add targets to the Administration Group by assigning the appropriate values to the target properties such that Enterprise Manager automatically adds them to the appropriate Administration Group.
As with any management decision, the key to effective implementation is planning and preparation. The same holds true for Administration Groups.
Step 1: Plan Your Group Hierarchy
You can only have one Administration Group hierarchy in your Enterprise Manager deployment, thus ensuring that Administration Group member targets can only directly belong to one Administration Group. This prevents monitoring conflicts from occurring as a result of having a target join multiple Administration Groups with different associated monitoring settings.
To define the hierarchy, you start with the highest (root) level consisting of all targets that have been added to Enterprise Manager. On the next level of the hierarchy, you organize the targets into groups such that all targets that are monitored and managed in the same way are part of the same group.
The attributes used to define Administration Group membership criteria are based on target properties, which are attributes of every target that specify operational information and within the organization. For example, location, line of business to which it belongs, and lifecycle status. Target properties that can be used in the creation of Administration Groups are:
Lifecycle Status
Note:
Lifecycle Status target property is of particular importance when creating Administration Groups as it denotes a target's operational status. Lifecycle Status can be any of the following: Mission Critical, Production, Staging, Test, or Development.Location
Line of Business
Department
Cost Center
Contact
Target Version
Customer Support Identifier
You cannot manually add targets to an Administration Group. Instead, you set the target properties of the target (prospective group member) to match the membership criteria defined for the Administration Group. Once the target properties are set, Enterprise Manager automatically adds the target to the appropriate Administration Group.
In the following illustration, two Administration Groups are created, Production and Test, because monitoring settings for production targets will differ from the monitoring settings for test targets.
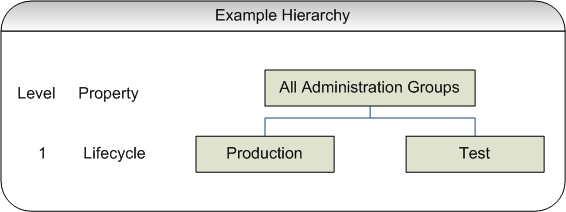
In this example, the group membership criteria are based on the Lifecycle Status target property. Targets whose Lifecycle Status is 'Production' join the Production group and targets whose Lifecycle Status is 'Test' join the Test group. For this reason, Lifecycle Status is the target property that determines the first level in the Administration Group hierarchy, and each value of the Lifecycle Status property determines the membership criteria of each Administration Group in the first level.
Additional levels in the Administration Group hierarchy can be added based on other target properties. Typically, additional levels are added if there are additional monitoring (or management) settings that need to be applied and these could be different for different subsets of targets in the Administration Group. For example, in the Production group, there could be additional monitoring settings for targets in Finance line of business that are different from targets in Sales line of business. In this case, an additional level based on Line of Business target property level would be added.
The end result of this hierarchy planning exercise is summarized in the following table.
| Tree Root Level | Level 1 Target PropertyLifecycle Status | Level 2 Target PropertyLine of Business |
|---|---|---|
|
All Targets |
Production or Mission Critical | Finance |
| Sales | ||
| Staging, Test, or Development | Finance | |
| Sales |
Each cell of the table represents a group. The values in each cell represent the values of the target property that define membership criteria for the group.
It is possible to have the group membership criteria be based on more than one target property value. In that case, any target whose target property matches any of the values will be added to the group. For example, in the case of the Production group, if the Lifecycle Status of a target is either Production or Mission Critical, then it will be added to the Production group.
It is also important to remember that group membership criteria is cumulative. For example, for the Finance group under Production or Mission Critical group, a target must have its Lifecycle Status set to Production or Mission Critical AND its Line of Business set to Finance before it can join the group.
For this planning example, the resulting Administration Group hierarchy would appear as shown in the following graphic.
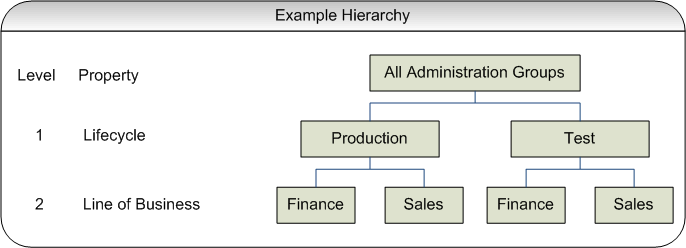
It is important to note that a target can become part of hierarchy if and only if its property values match criteria at both the levels. A target possessing matching values for lifecycle status cannot become member of the Administration Group at the first level.
Step 2: Assign Target Properties
After establishing the desired Administration Group hierarchy, you must make sure properties are set correctly for each target to ensure they join the correct Administration Group. Using target properties, Enterprise Manager automatically places targets into the appropriate Administration Group without user intervention. You can set target properties at the same time you add targets to Enterprise Manager (either using the Enterprise Manager console or using the EM CLI verb add_target). For targets that have already been added to Enterprise Manager, you can also set the target properties via the console or using EM CLI. The benefit of setting the target properties prior to the creation of the Administration Group hierarchy is that once the group hierarchy is created, the targets whose properties are set will automatically join their appropriate Administration Groups. However, target properties can be set after the Administration Group hierarchy is created.
For small numbers of targets, you can change target properties directly from the Enterprise Manager console.
From an Enterprise Manager target's option menu, select Target Setup, then select Properties. 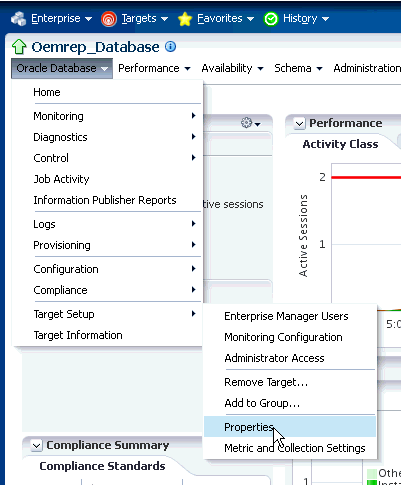
On the Target Properties page, click Edit to change the property values.
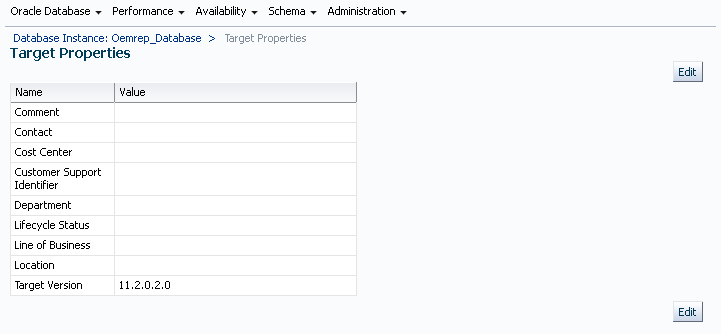
Once you have set the target properties, click OK.
For large numbers of targets, it is best to use the Enterprise Manager Command Line Interface (EM CLI) set_target_property_value verb to perform a mass update. For more information about this EM CLI verb, see the Enterprise Manager Command Line Interface guide.
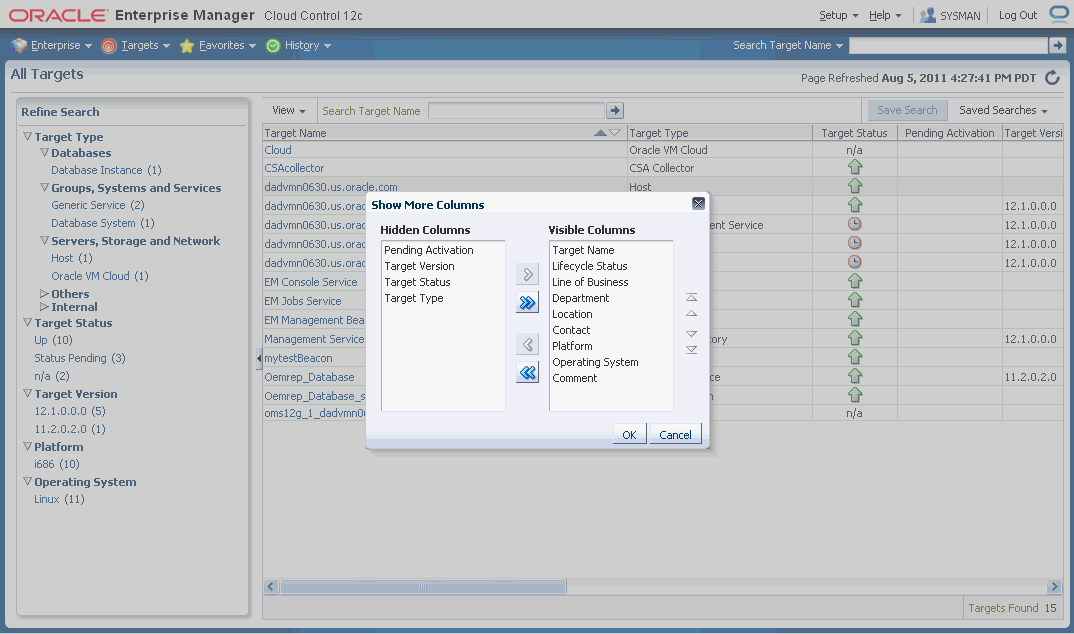
At any time, you can use the All Targets page to view properties across all targets. To view target properties:
From the Targets menu, select All Targets to display the All Targets page.
From the View menu, select Columns, then select Show All.
Alternatively, if you are interested in specific target properties, choose Columns and then select Show More Columns to display column selector, as shown in following graphic.
Step 3: Prepare for Creating Template Collections
Template collections contain the monitoring settings and other management settings that are meant to be applied to targets as they join the Administration Group. Monitoring settings for targets are defined in Monitoring Templates. Monitoring templates are defined on a per target type basis, so you will need to create Monitoring Templates for each of the different target types in your Administration Group. You will most likely create multiple Monitoring Templates to define the appropriate monitoring settings for an Administration Group. For example, you might create a database Monitoring Template containing the metric settings for your production databases and a separate Monitoring Template containing the settings for your non-production databases. Other management settings that can be added to a Template Collection include Compliance Standards and Cloud Policies. Ensure all of these entities that you want to add to your Template Collection are correctly defined in Enterprise Manager before adding them to Template Collections.
If you have an Administration Group hierarchy defined with more than two levels, such as the hierarchy shown in the following figure, it is important to understand how management settings are applied to the targets in the Administration Group.
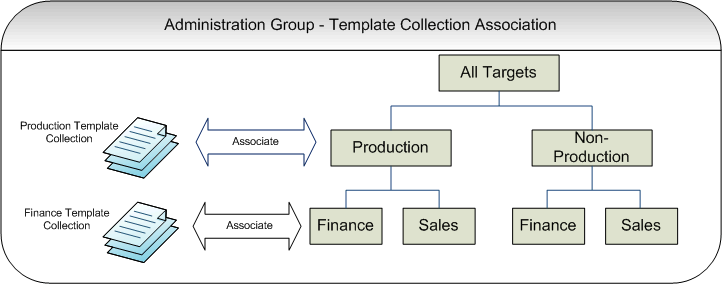
Each group in the Administration Group hierarchy can be associated with a Template Collection (containing Monitoring Templates, compliance standards, and cloud policies). If you associate a Template Collection containing monitoring settings with the Production group, then the monitoring settings will apply to the Finance and Sales subgroup under Production. If the Finance group under Production has additional monitoring settings, then you can create a Monitoring Template with only those additional monitoring settings. (Later, this Monitoring Template should be added to another Template Collection and associated with the Finance group). The monitoring settings from the Finance Template Collection will be logically combined with the monitoring settings from the Production Template Collection. In case there are duplicate metric settings in both Template Collections, then the metric settings from the Finance Template Collection takes precedence and will be applied to the targets in the Finance group. This precedence rule only applies to the case of metric settings. In the case of compliance standard rules and cloud policies, even if there are duplicate compliance standard rules and cloud policies in both Template Collections, they will be all applied to the targets in the Finance group.
Once you have completed all the planning and preparation steps, you are ready to begin creating an Administration Group.
With the preparatory work complete, you are ready to begin the four step process of creating an Administration Group hierarchy and Template Collections. The Administration Group user interface is organized to guide you through the creation process, with each tab containing the requisite operations to perform each step.
This process involves:
Creating the Administration Group hierarchy.
Creating Template Collections.
Associating Template Collections to Administration Group.
Synchronizing the targets with the selected items.
The following graphic shows a completed Administration Group hierarchy with associated Template Collections. It illustrates how Enterprise Manager uses this to automate the application of target monitoring settings.

The following four primary tasks summarize the Administration Group creation process. These tasks are conveniently arranged in sequence via tabbed pages.
Important:
In order to create an Administration Group, you must have both Full Any Target and Create Privilege Propagating Group target privileges.Task 1: Access the Administration Group and Template Collections page.
Task 2: Define the hierarchy.
From the Hierarchy tab, you define the Administration Group hierarchy that matches the way you manage your targets. See Defining a Hierarchy.
Task 3: Define the Template Collections.
From the Template Collections tab, you define the monitoring and management settings you want applied to targets. See Defining Template Collections.
Task 4: Associate the Template Collections with the Administration Groups
From the Associations tab, you tie the monitoring and management settings to the appropriate Administration Group. See Associating Template Collections with Administration Groups.
All Administration Group operations are performed from the Administration Groups home page.
From the Setup menu, select Add Target and then select Administration Groups. The Administration Groups homepage displays. 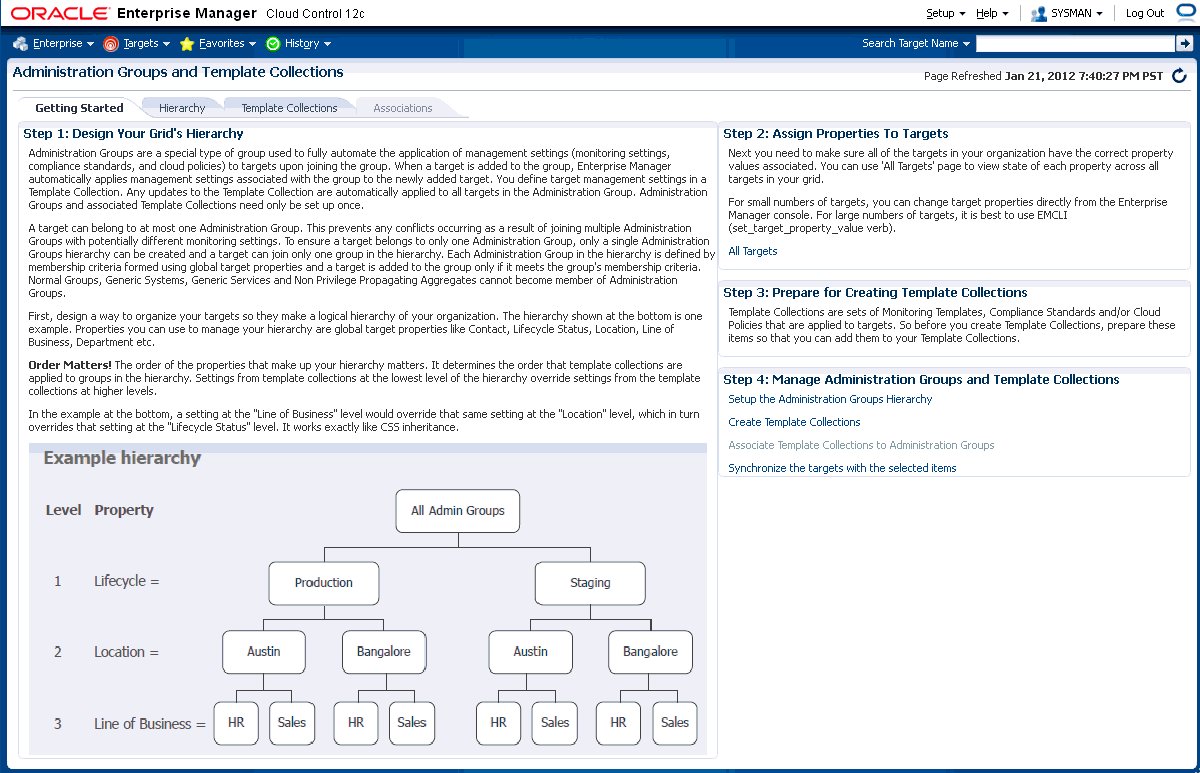
Read the relevant information on the Getting Started page. The information contained in this page summarizes the steps outlined in this chapter. For your convenience, links are provided that take you to appropriate Administration Group functions, as well as the Enterprise Manager All Targets page where you can view target properties.
On this page you define the Administration Group hierarchy that reflects the organizational hierarchy you planned earlier and which target properties are associated with a particular hierarchy level.
On the left side of the page are two tables: Hierarchy Levels and Hierarchy Nodes.
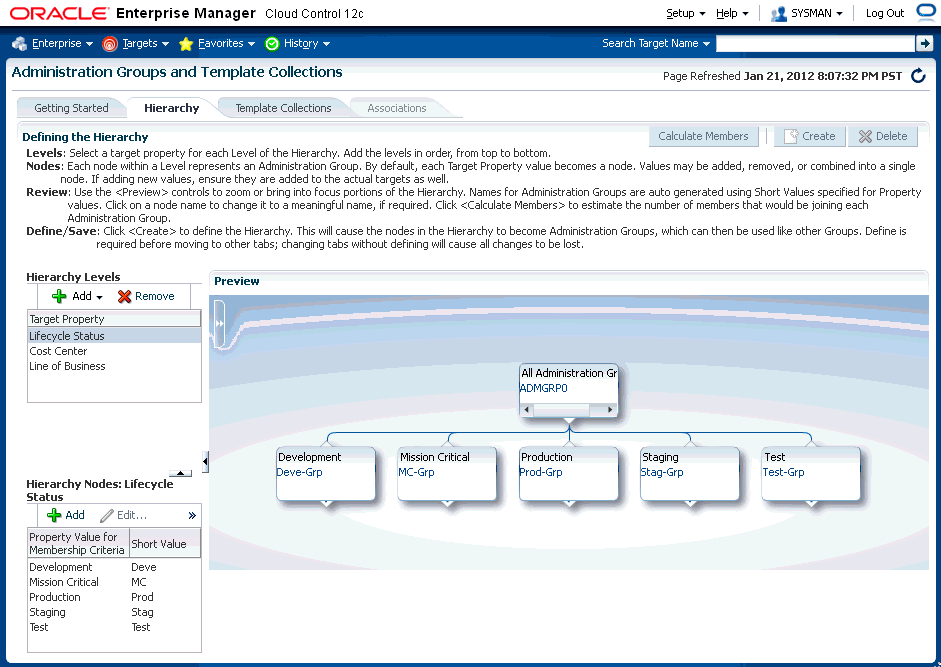
The Hierarchy Levels table allows you to add the target properties that define Administration Group hierarchy. The Hierarchy Nodes table allows you to define the values associated with the target properties in the Hierarchy Levels table. When you select a target property, the related property values are made available in the Hierarchy Nodes table, where you can add/remove/merge/split the values. In the Hierarchy Nodes table, each row corresponds to a single Administration Group.
Adding a Hierarchy Level
On the Administration Group page, click the Hierarchy tab.
From the Hierarchy Levels table, click Add and choose one of the available target properties. Repeat this step until you have added all target properties of interest.
Click on one of the newly added target properties in the Hierarchy Levels list. The membership values for property are displayed in the Hierarchy Nodes table.
Enterprise Manager finds all existing values of the target property across all targets and displays them in the Hierarchy Nodes table. For some target properties, such as Lifecycle Status, predefined property values already exist and are automatically displayed in the Hierarchy Nodes table. However, property values that are not yet available, will need to be added.
The next step shows you how to add property values.
From the Hierarchy Nodes table, click Add. The associated property value add dialog containing existing values from various targets displays. Add the requisite value(s). Multiple values can be specified using a comma separated list. For example, to add multiple locations such as San Francisco and Zurich, add the Location target property to the Hierarchy Level table. Select Location and then click Add in the Hierarchy Nodes table. The Values for Hierarchy Nodes dialog displays. Enter "San Francisco,Zurich" as shown in the following graphic. 
Note: You cannot specify additional values for properties with predefined values (such as Lifecycle Status) or read-only properties (such as Target Version). Also, you cannot specify more than 25 property values (the Hierarchy Nodes table can have only 25 rows). If more than 25 property values need to be accommodated, values can be merged.
Click OK. The two locations "San Francisco" and "Zurich" appear as nodes in the Preview pane as shown in the following graphic. 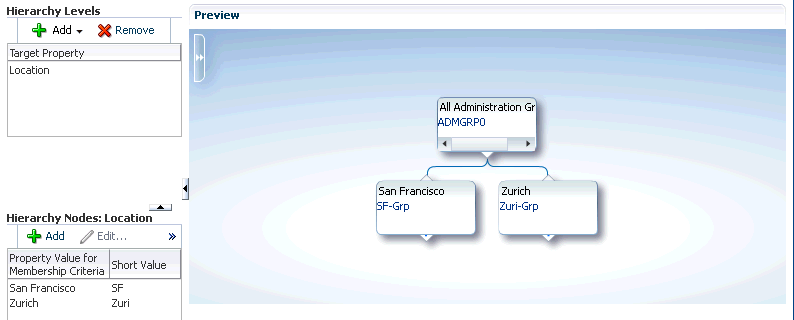
Sometimes it is useful to treat multiple property values as one. For example, if a combination of values is needed, such as Production or Mission Critical for the Lifecycle Status property, they need to be merged (combined into a single node).
To merge property values:
Select a target property from the list of chosen properties in the Hierarchy Levels table. The associated property values are displayed.
Select two or more property values by holding down the Shift key and clicking on the desired values.
Click Merge. If Merge is not visible, click Overflow on the Hierarchy Nodes table.
Continue adding hierarchy levels until the group hierarchy is complete. The Preview pane dynamically displays any changes you make to your Administration Group hierarchy.
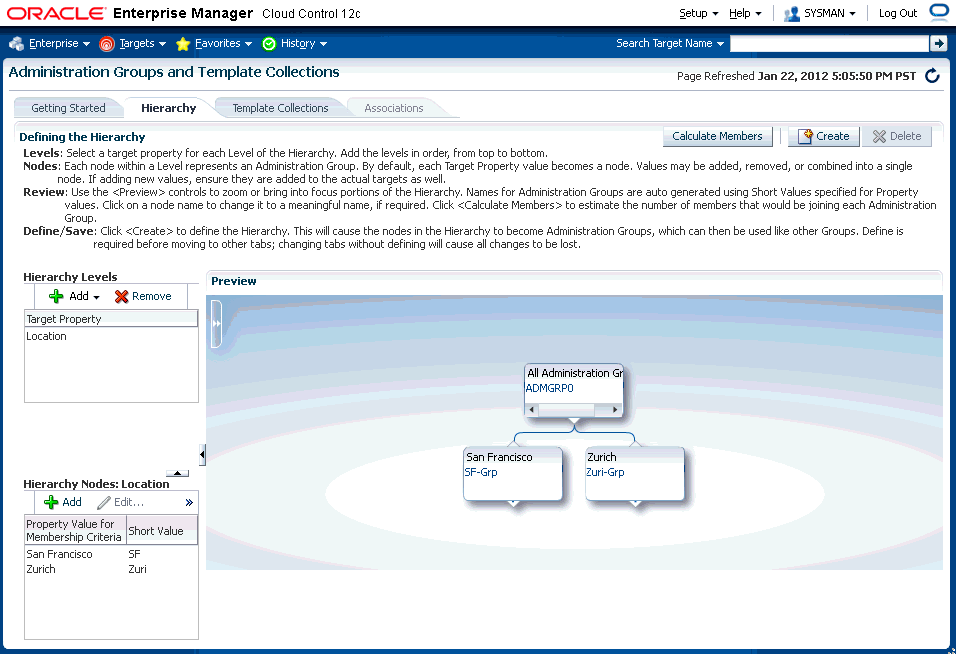
Click Create to define the hierarchy.
IMPORTANT:
Review and define the complete hierarchy before clicking Create. Once the Administration Group hierarchy is created, you cannot add additional levels to the hierarchy without deleting and recreating the entire hierarchy.Once your Administration Group hierarchy has been created, the only change you can make is to add/remove group membership criteria property values, which equates to creating/deleting additional Administration Groups for a given level. Using the previous example, if in addition to San Francisco and Zurich you add more locations, say New York and Bangalore, you can click Add in the Hierarchy Node table to add additional locations, as shown in the following graphic. 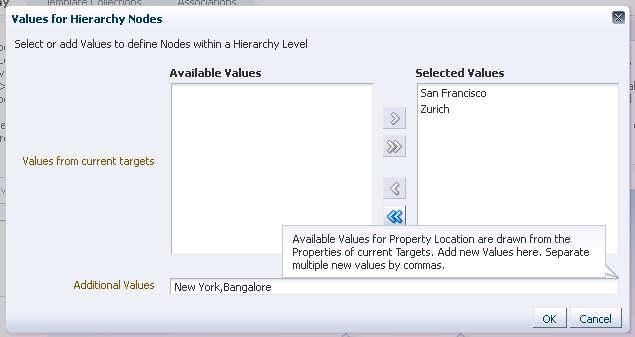
Click Update to save your changes.
A Template Collection is a assemblage monitoring/management settings to be applied to targets in the Administration Group . Multiple Monitoring Templates can be added to a Template Collection that in turn is associated with an Administration Group. However, you can only have one Monitoring Template of a particular target type in the Template Collection. The Monitoring Template should contain the complete set of metric settings for the target in the Administration Group. You should create one Monitoring Template for each type of target in the Administration Group. For example, you can have a Template Collection containing a template for database and a template for listener, but you cannot have a Template Collection containing two templates for databases. When members targets are added to an Administration Group, the template monitoring and management settings are automatically applied.
You create Template Collections when you define Administration Groups. Template collections may consist of three types of monitoring/management setting categories:
Monitoring Templates (monitoring settings)
Compliance Standards (compliance policy rules)
Cloud Policies (cloud policies such as determining when to start virtual machines or scale out clusters).
When creating a Template Collection, you can use the default Monitoring Templates, compliance standards, or cloud templates supplied with Enterprise Manager or you can create your own.
To create a Template Collection:
Click the Template Collections tab. The Template Collection page displays. 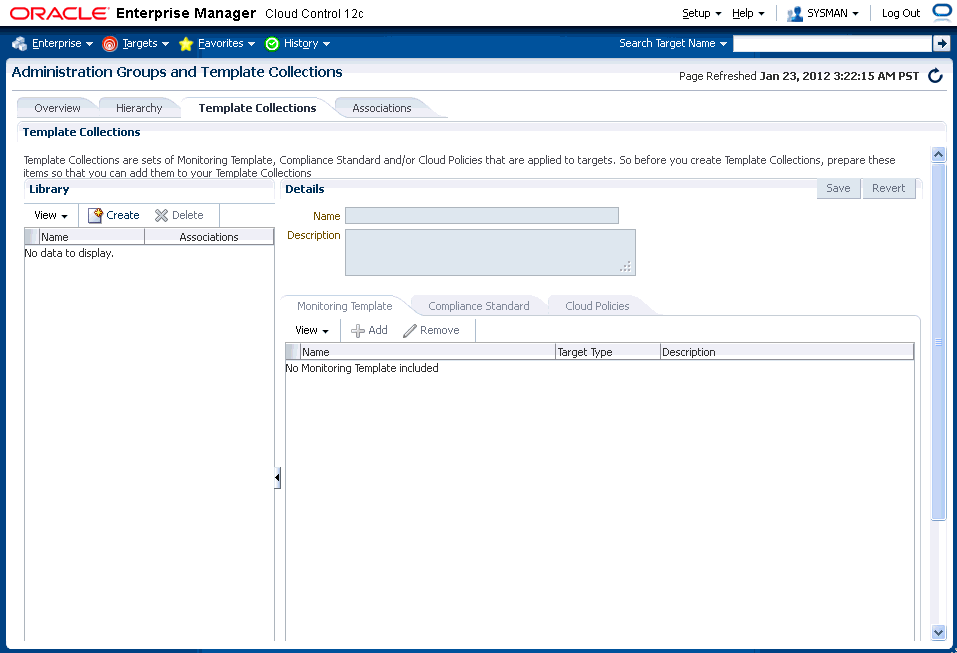
Click Create.
In the Name field, specify the Template Collection name.
Click the Template Collection member type you want to add (Monitoring Template, Compliance Standard, Cloud Polices). The requisite definition page appears.
Click Add. A list of available template entities appears.
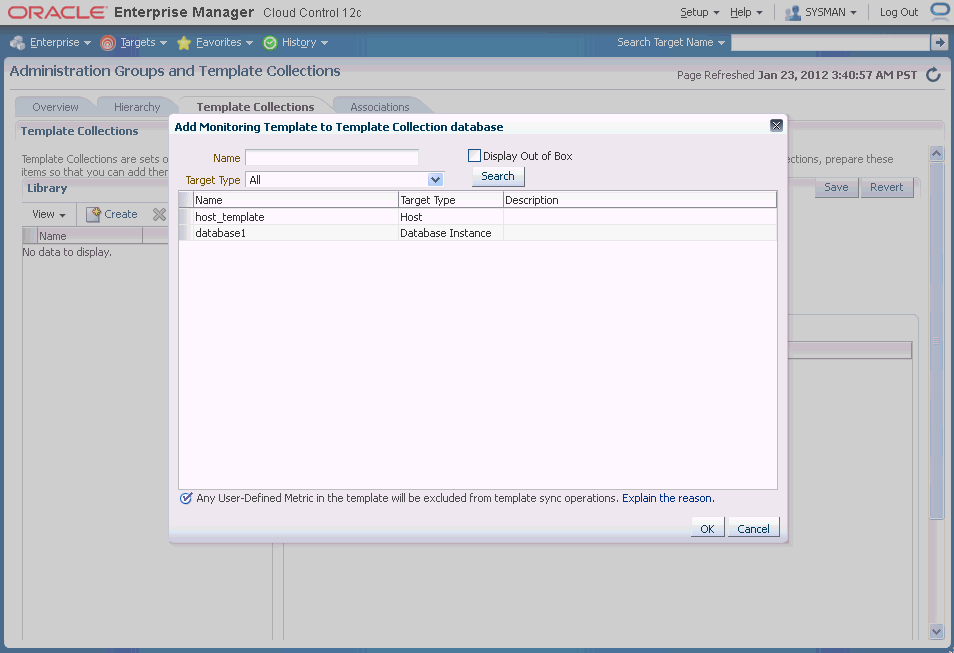
Select the desired template entities you want added to the Template Collection.
Click OK.
Continue adding template entities (Monitoring Template, Compliance Standard, Cloud Policies) as required.
Click Save. The newly defined collection appears in the Template Collections Library.
To create another Template Collection, click Create from the Library region and create and repeat steps two through eight. Repeat this process until you have created all required Template Collections.
Note:
When editing existing Template Collections, you can back out of any changes made during the editing session by clicking Revert. This restores the Template Collection to its state when it was last saved.Required Privileges
To create a Template Collection, Create Template Collection resource privilege. To include a Monitoring Template into a Template Collection, you need at least View privilege on the specific Monitoring Template or View Any Monitoring Template privilege, which allows you to view any Monitoring Template and add it to the Template Collection. The following table summarizes privilege requirements for all Enterprise Manager operations related to Template Collection creation.
| Enterprise Manager Operation | Minimum Privilege Requirement |
|---|---|
| Create Administration Group hierarchy. | Full Any Target
Create Privilege Propagating Group |
| Create Monitoring Templates. | No privileges required |
| Create Template Collection. | Create Template Collection (resource privilege
VIEW on the Monitoring Template to be added to the Template Collection or View any Monitoring Template (resource privilege) |
| Create compliance standards. | Create Compliance Entity
No privileges are required to view compliance standards. |
| Create cloud policies. | Create Any Policy
View Cloud Policy |
| Associate Template Collection with Administration Group. | VIEW on the specific Template Collection.
OPERATOR on the group |
| Perform on-demand synchronization. | OPERATOR on the group or MANAGE_TC_OPERATION (subset of OPERATOR) |
| Define global synchronization schedule. | Enterprise Manager Super Administrator privileges. |
| Set the value of target properties for a target (allows the target to "join" an Administration Group). | Configure Target on the specific target |
| Delete an Administration Group hierarchy. | Full Any Target |
Once you have defined one or more Template Collections, you need to associate them to Administration Groups in the hierarchy. You can associate a Template Collection with one or more Administration Groups. As a rule, you should associate the Template Collection with the applicable Administration Group residing at the highest level in the hierarchy as the Template Collection will also be applied to targets joining any subgroup.
The Associations page displays the current Administration Group hierarchy diagram. Each Administration Group in the hierarchy can only be associated with one Template Collection.
Associating a Template Collection with an Administration Group
Click the Template/Group Associations tab. The Template/Group Associations page displays.
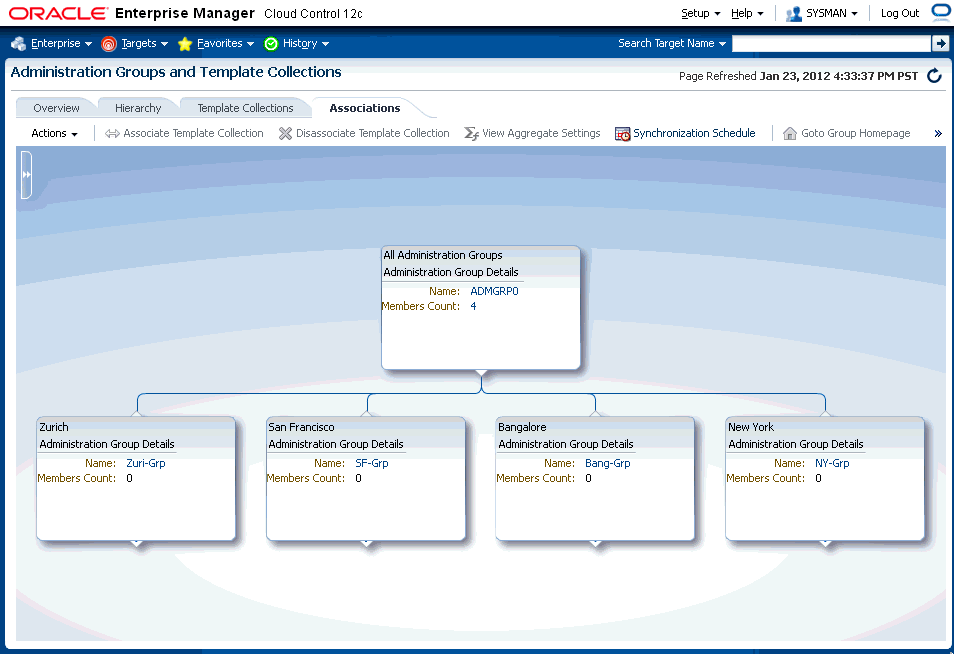
Select the desired Administration Group in the hierarchy.
Click Associate Template Collection. The Choose a Template Collection dialog displays.
Choose the desired Template Collection and click Select. The Template Collection details are displayed. If too much information is displayed, you can use the Zoom and Layout controls located at the upper-left corner of the hierarchy display region.
Note:
All sub-nodes in the hierarchy will inherit the selected Template Collection.Repeat steps 1-3 until Template Collections have been associated with the desired groups.
Note:
The target privileges of the administrator who performs the association will be used when Enterprise Manager applies the template to the group.Note:
Settings from Monitoring Templates applied at lower levels in the hierarchy override settings inherited from higher levels. This does not apply to compliance standards or cloud policies.Setting the Global Synchronization Schedule
In order to apply the Template Collection/Administration Group association, you must set up a global sychronization schedule. This schedule is used to perform synchronization operations, such as applying templates to targets in Administration Groups. If no synchronization schedule is set up, then most synchronization changes will remain in pending mode. When there are any pending synchronization operations, they will be scheduled on the next available date based on the synchronization schedule. Thus, it important to set the synchronization schedule as there is no default setting.
To set up the synchronization schedule:
Click Synchronization Schedule. The Synchronization Schedule dialog displays.
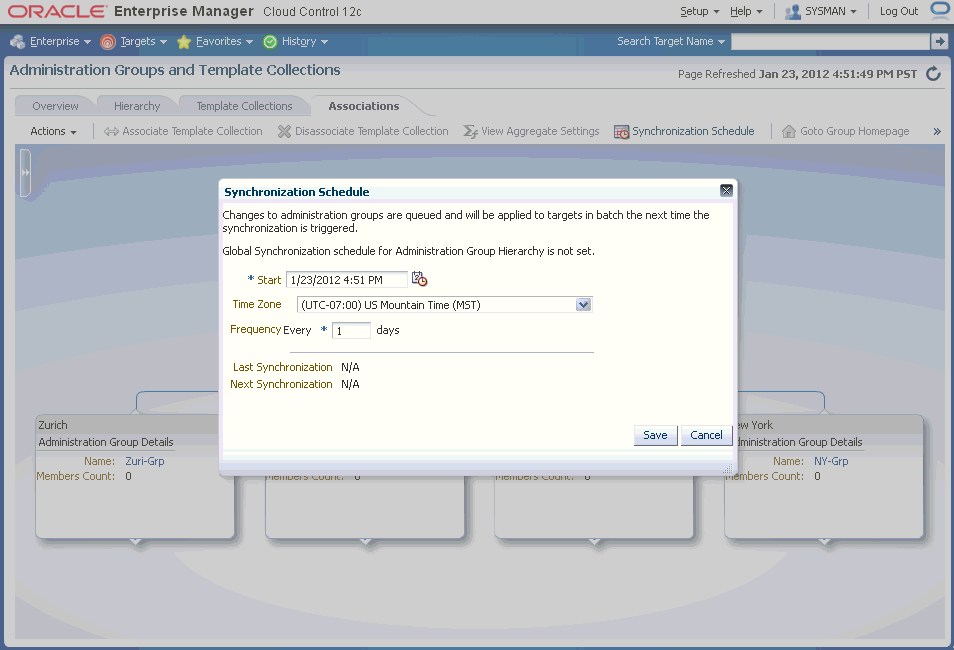
Click Edit and then choose a date and time you want the Administration Group-Template synchronization to take place. By default, the current date and time is shown.
Note:
You can specify a start date for synchronization operations and interval in days. Whenever there are any pending sync operations, then they will be scheduled on the next available date based on the this schedule.Click Save.
Synchronization Sequence of Events
The following table summarizes when template synchronization operations (such as apply operations) occur on targets in Administration Groups.
| Action | When Synchronization Occurs |
|---|---|
| Target is added to an Administration Group (by setting its target properties) | Immediate upon joining the Administration Group. |
| Template collection is associated with the Administration Group. | Targets in an Administration Group will be synchronized based on next scheduled date in global Synchronization Schedule. |
| Changes are made to any of the templates in the Template Collection. | Targets in an Administration Group will be synchronized based on the next scheduled date in global Synchronization Schedule. |
| Target is removed from an Administration Group (by changing its target properties). | No change in target's monitoring settings.Compliance Standards and Cloud Policies will be disassociated with the target. |
| Template collection is disassociated with Administration Group. | No change in target's monitoring settings.Compliance Standards and Cloud Policies will be disassociated with the target. |
| User performs an on-demand synchronization by clicking on the Start Synchronization button in the Synchronization Status region in the Administration Group's homepage. | Immediate synchronization operation occurs. |
Viewing Synchronization Status
You can check the current synchronization status for a specific Administration Group directly from the group's homepage.
Select an Administration Group in the hierarchy.
Click Goto Group Homepage.
From the Synchronization Status region, you can view the status of the Monitoring Template, compliance standard, and/or cloud policies synchronization (In Sync, Pending, or Failed).
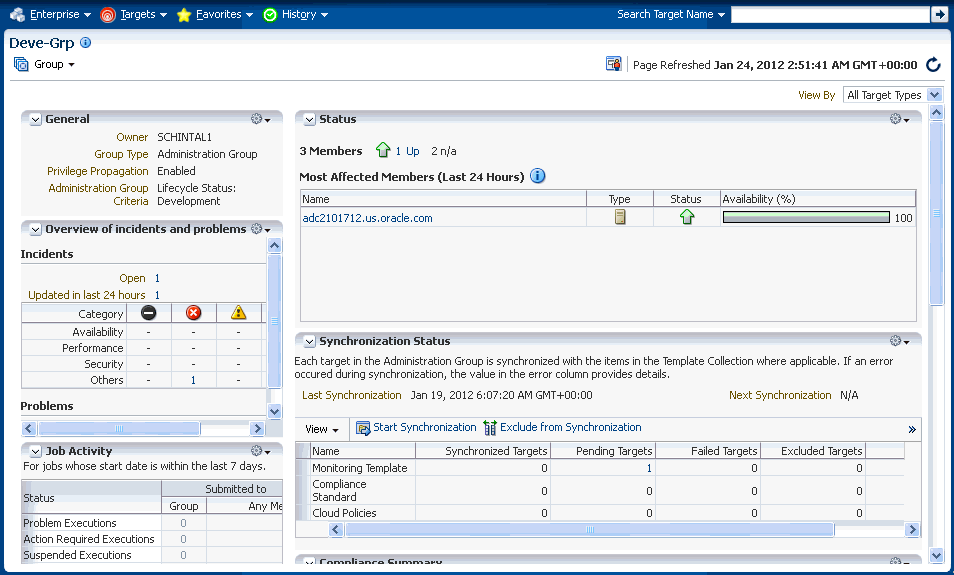
You can initiate an immediate synchronization by clicking Start Synchronization.
Disassociating a Template Collection from a Group
To remove a Template Collection from an Administration Group.
From the hierarchy diagram, select the Administration Group with the Template Collection you wish to remove.
Click Disassociate Template Collection.
The Template Collection is immediately removed. See Synchronization Sequence of Events for more information.
Viewing Aggregate Settings
For any Administration Group, you can easily view what Template Collection components (Monitoring Templates, compliance standards, and/or cloud policies) are associated with individual group members.
Note:
For Monitoring Templates, the settings for a target could be a union of two or more Monitoring Templates from different Template Collections.From the hierarchy diagram, select the desired Administration Group.
Click View Aggregate Settings.
The Aggregate Settings page appears. This page displays all Monitoring Templates, Compliance Standards and Cloud Policies associated with the selected Administration Group (listed by target type).
Viewing the Administration Group Homepage
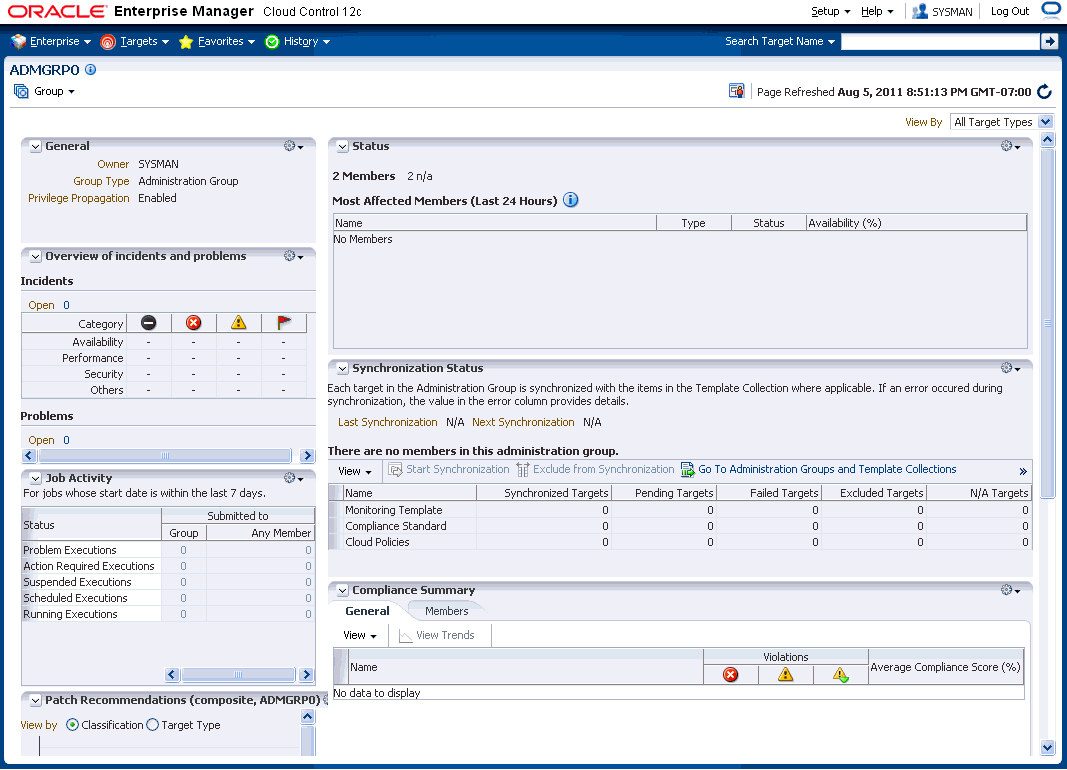
Like regular groups, each Administration Group has an associated group homepage providing a comprehensive overview of group member status and/or activity such as synchronization status, job activity, or critical patch advisories. To view Administration Group homepages:
From the hierarchy diagram, select an Administration Group.
Click Goto Group Homepage. The homepage for that particular Administration Group displays.
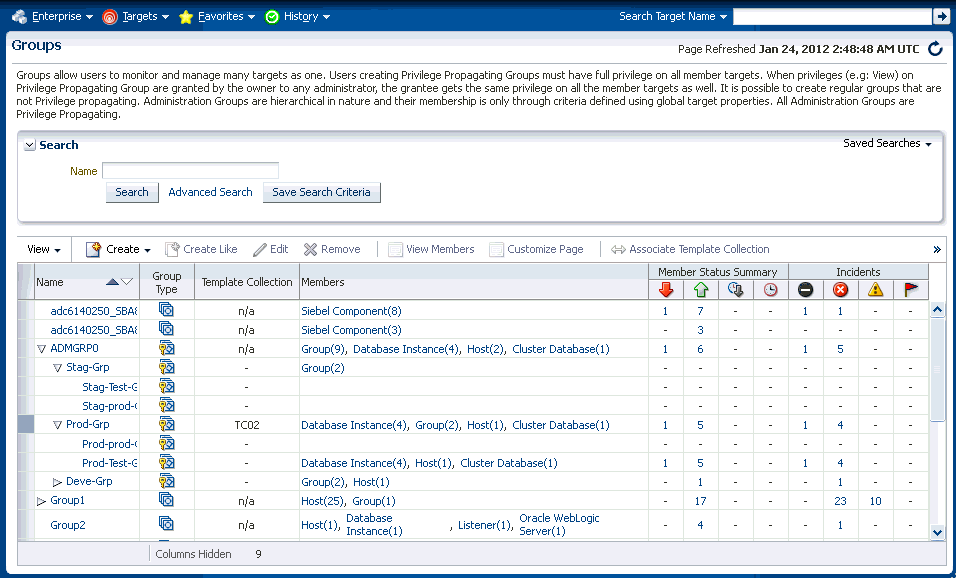
Alternatively, from the Enterprise Manger Targets menu, choose Groups. From the table, you can expand the group hierarchy.
Identifying Targets Not Part of Any Administration Group
From the Associations page, you can determine which targets do not belong to any Administration Group by generating an Unassigned Targets Report.
From the Actions menu, select Unassigned Targets Report. The report lists all the targets that are not part of any Administration Group. The values for the target properties defining the Administration Groups hierarchy are shown. 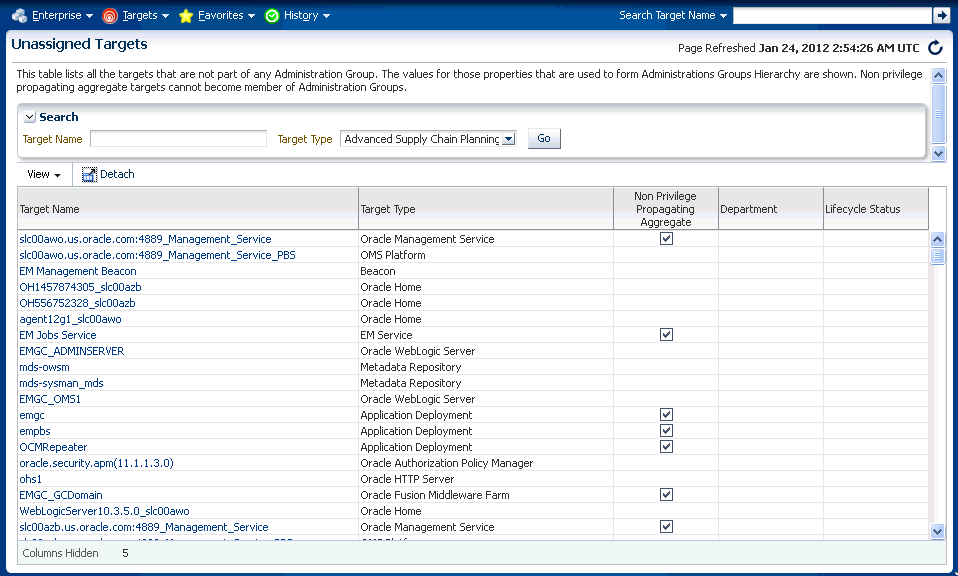
From the View menu, choose the customization options to display only the desired information.
Note:
The Non-Privilege Propagating Aggregate column indicates whether a target is a non-privilege propagating aggregate. This type of target cannot be added to an Administration Group, which are by design privilege propagating. For this reason, any aggregate target added to Administration Group must also be privilege propagating.On this page, you can review the list to see if there any targets that need to be added to the Administration Group. Click on the target names shown in this page to access the target's Edit Target Properties page where you can change the target property values. After making the requisite changes and clicking OK, you are returned to the Unassigned Targets page
If so, you can set the target properties of these targets to add them to the appropriate Administration Groups. For information on changing target properties, see "Planning".
Click your browser back button to return to the Administration Groups and Template Collections homepage.
You can completely remove an Administration Group hierarchy or just individual Administration Groups from the hierarchy. Deleting an Administration Group will not delete targets or Template Collections, but it will remove associations. Any stored membership criteria is removed. When you delete an Administration Group, any stored membership criteria is removed.
To remove the entire Administration Group hierarchy:
From the Setup menu, select Add Target, then select Administration Groups.
Click on the Hierarchy Definition tab.
Click Delete.
To remove individual Administration Groups from the hierarchy:
From the Setup menu, choose Add Target, then select Administration Groups.
Click on the Hierarchy Definition tab.
From the Hierarchy Levels table, choose the target property that corresponds to the hierarchy level containing the Administration Group to be removed.
From the Hierarchy Nodes table, select the Administration Group (Property Value for Membership Criteria) to be removed.
Choose Remove from the drop-down menu.