| Oracle® Enterprise Manager Cloud Control Administrator's Guide 12c Release 1 (12.1.0.1) Part Number E24473-09 |
|
|
PDF · Mobi · ePub |
| Oracle® Enterprise Manager Cloud Control Administrator's Guide 12c Release 1 (12.1.0.1) Part Number E24473-09 |
|
|
PDF · Mobi · ePub |
This chapter describes how to set up and use an iDevice to remotely connect to Enterprise Manager for the purpose of managing incidents and problems in Cloud Control.
The chapter contains the following sections:
Cloud Control Mobile can be deployed to the following Enterprise Manager Cloud Control 12c minimum configurations:
A new installation of the Enterprise Manager Cloud Control 12c (12.1.0.1) patched release (released February 2012 or later)
An existing Enterprise Manager Cloud Control 12c (12.1.0.1) installation with Bundle Patch 1 (BP1) applied
Additional requirements are as follows:
Initial setup involves the following tasks:
Connect to a Wi-Fi or 3G network
Install and configure VPN
Download the Cloud Control Mobile app and sync with your iDevice
Add a Cloud Control URL to connect to the installed Enterprise Manager
When you first install the app, there is no default Enterprise Manager connection, so you must supply a Cloud Control URL. There are two ways to do this:
Use the iDevice Settings app
Launch the Cloud Control Mobile app
In either case, first log in to VPN if required before proceeding with the instructions below. Without the VPN connection, the login screen will not appear.
iDevice Settings
Define a default Cloud Control URL as follows:
Tap the Settings icon on the Home screen.
Tap Cloud Control in the apps list.
On the Cloud Control screen, enter a name to identify the site and type the Cloud Control URL to which to connect. The URL should be of the form:
https://www.yoursite.com/em
Tap Settings to store the information and return to the list of apps.
You can now launch the Cloud Control Mobile app to log in.
Initial App Launch
Define a default Cloud Control URL as follows:
Tap the Cloud Control Mobile icon on the Home screen.
On the Add Site screen, enter a name to identify the site and type the Cloud Control URL to which to connect. The URL should be of the form:
https://www.yoursite.com/em
Before you can type in the name field you may first have to clear the field by tapping the X at the right.
Tap Done to store the information.
Tap Done on the Sites screen. Note that you also have the option to add additional sites before exiting this screen.
Tap Settings on the Sites navigation bar to close the Sites list screen.
Tap Save on the Settings navigation bar to complete the action.
Proceed with the login.
You encounter the login screen under the following conditions:
After supplying a default Cloud Control URL upon initial launch
Anytime you subsequently launch the app
When you log out
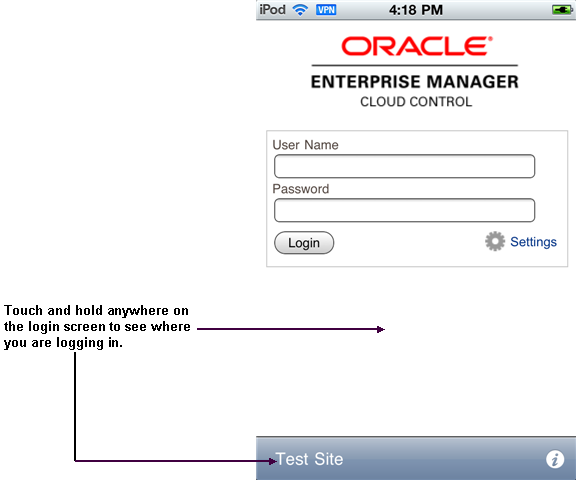
Tap the Settings icon to see a list of sites or to change the default login site. See Managing Settings for more information.
Specify your credentials and tap Login; the Incident Manager opens, displaying the my open incidents and problems view.
If your Enterprise Manager installation does not have a site certificate signed by a valid certificate authority, an alert overlays the login screen noting an invalid certificate. You have the option to continue with the login or change the URL to which you are trying to connect.
Note:
If your installed Enterprise Manager uses single sign-on, the SSO process supplants site login. Upon completion of single sign-on, the workflow proceeds to the my open incidents and problems view.Cloud Control Mobile has its own settings interface apart from the iDevice Settings app that you use to manage all apps.
In managing Cloud Control Mobile app settings, you perform the following actions:
Add a site
Edit a site
Delete a site
Change the default site
Each action starts with the same basic steps:
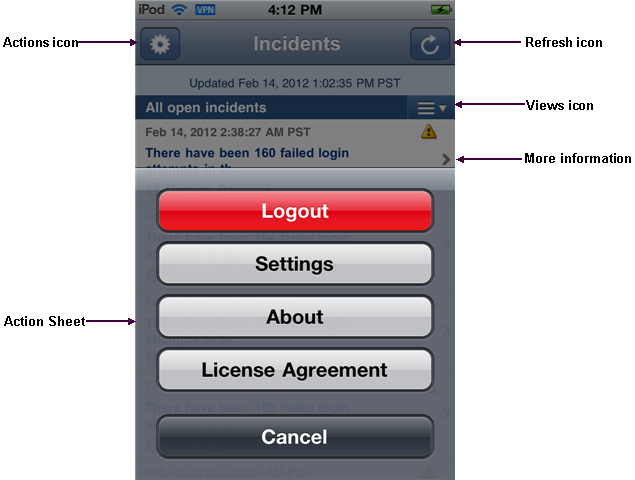
Tap the actions icon on the right of the navigation bar.
Tap Settings in the action sheet.
Tap the Edit Sites table row.
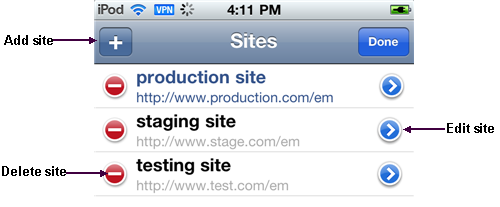
Tap Edit. The Sites management screen appears:

Then proceed as described below for each individual action.
Add a Site
Tap the + sign on the left of the Sites navigation bar.
Type a name and a URL for the site to be added.
Tap Done on the Add Site navigation bar to close the screen.
Tap Done on the Sites navigation bar to exit edit mode.
Tap Settings on the Sites navigation bar to close the Sites list screen.
Tap Save on the Settings navigation bar to complete the action.
Edit a Site
Tap the blue arrow to the right of the URL to be edited.
Change the values as appropriate.
Tap Done on the Edit Site navigation bar to close the screen.
Tap Done on the Sites navigation bar to exit edit mode.
Tap Settings on the Sites navigation bar to close the Sites list screen.
Tap Save on the Sites navigation bar to complete the action.
Delete a Site
Tap the red circle to the left of the URL to be deleted.
Tap Delete that appears on the right in the table row.
Tap Done on the Sites navigation bar to close the screen.
Tap Settings on the Sites navigation bar to close the Sites list screen.
Tap Save on the Settings navigation bar to complete the action.
Change the Default Site
Tap the site to be the new default. The check mark to the right in the table row confirms your selection.
Tap Settings to close the Sites list screen.
Tap Save to complete the action.
After a brief moment, the Login screen appears. Specify credentials to log in to the new site.
Note that you also can change the default site in iDevice Settings for Cloud Control.
Connecting to Cloud Control remotely, you can do the following in Incident Manager:
View your open incidents and problems; drill down to incident and problem details, including associated updates and events
See the list of incidents for a given problem; link to these incidents and their details
Acknowledge incidents and problems
Manage incident and problem workflow for better tracking (change status, assign owner, escalate, and so forth)
See who has been notified about an issue and what comments have been added by administrators
In addition, The FAQ that follows may help in understanding differences, subtleties, and nuances between the mobile app and its browser-based counterpart.
How do I view more issues?
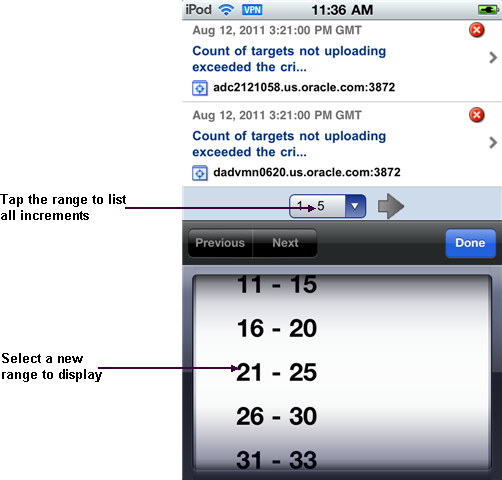
The app displays five rows at a time. Use the next and previous controls at the bottom of the display to scroll the list. Or tap the number range itself (1 - 5) to pick from a list of increments.

How do I view issue details?
Simply tap the line that identifies the incident or problem. On the Details screen, you can continue to drill down to updates and events as well as expand the summary description.
Are the views the same in the mobile app as in the browser-based product?
Yes, except for event-related views (standard or custom), which are not available in the app. Any custom views created in the browser-based product augment the list of standard views.
Can I refresh the view?
Yes, just tap the refresh icon on the left of the navigation bar. When you do, the timestamp reflects the date and time of the refresh.
Can I view target details?
Yes, first drill down to incident details, then tap the target name to jump to target details. Tap Incident to return to the incident details.
Can I set search criteria or create a custom view?
No, you cannot set search criteria or create a custom view in the mobile app, but you can create and manage views in the browser-based product, which are then available in the mobile app.
Can I invoke the incident rules feature?
No, but you can receive notifications generated by incident rules on your mobile device, provided your Enterprise Manager account has the appropriate notification preferences.
Can I connect to My Oracle Support?
If a problem has an assigned SR number, you can click the number to view the SR details in the My Oracle Support (MOS) Mobile app.
Can I access guided resolution information and diagnostics?
No.
Do all iDevices work the same way with the mobile app?
Pretty much. The one difference you will note on an iPad is that if you tap a link to an issue or a target in an external source such as Safari or an e-mail message, Safari launches, pointing to the relevant page in the browser-based product, where you are greeted with the usual Cloud Control login screen. With the other devices, tapping a link in an external source launches the mobile app.
This section covers the following operational tasks in Cloud Control Mobile:

Although navigation is intuitive, the following sections offer guidance on viewing incidents and problems. As the interactions are slightly different, there is a separate section for each type of issue.
Viewing Incidents
Use the following guidelines as you view incidents in the list:
An arrow on the right indicates availability of additional information.
Tap anywhere in the incident row to drill down to incident details.
The summary appears at the top. As summaries can be lengthy, you may need to tap the opening lines of the summary to view the complete summary. Tap Incident to return to incident details.
Problem ID in incident details is a link to problem details. If you follow the link, tap Incidents there to return to the starting point; that is, the original list view where you first opened the incident.
In the incident details view, target name is a link to target details. Tap Incident there to return to incident details.
Tracking information appears below target name in the incident details view.
Scroll down in incident details and tap All Updates to see the equivalent of the Updates tab in the browser-based product. Tap Incident there to return to incident details.
Scroll further and tap Event List to see the equivalent of the Events tab in the browser-based product. Tap Incident there to return to incident details.
Viewing Problems
Use the following guidelines as you view problems in the list:
An arrow on the right indicates availability of additional information.
Tap anywhere in the problem row to drill down to problem details.
The summary appears at the top. As summaries can be lengthy, you may need to tap the opening lines of the summary to view the complete summary. Tap Problem to return to problem details.
If the problem has an SR number assigned, tap the number to log in to the My Oracle Support (MOS) Mobile app using your MOS credentials. You can then view the SR details and take appropriate action. Go to the Home screen and tap the Cloud Control Mobile app icon to return to problem details.
In the problem details view, target name is a link to target details. Tap Problem there to return to problem details.
Tracking information appears below target name in the problem details view.
Scroll down in problem details and tap All Updates to see the equivalent of the Updates tab in the browser-based product. Tap Problem there to return to problem details.
Scroll further to see additional details such as first and last incident and number of incidents in which the problem has occurred.
Scroll further and tap Incident List to see the equivalent of the Incidents tab in the browser-based product. Tap Problem there to return to problem details.
Each incident summary in the list is a link to the details of the incident. If you follow the link, tap Incidents there to return to the starting point; that is, the original list view where you first opened the issue.
When you first log in, the my open incidents and problems view appears by default. You can change the view as follows:
Open the Views menu by tapping the views icon (three horizontal lines to the right of the current views title).
Tap the view you want. The check mark to the right confirms your selection.
Tap Incidents to display the new view.
You can perform the following actions while viewing incident or problem details:
Acknowledge the issue
Manage the workflow of the issue
To acknowledge an incident or problem:
While viewing the details, tap Actions.
Tap Acknowledge in the action sheet.
A message confirms the update on the Details screen.
Note that the Acknowledge action may not appear in the action sheet for a variety of reasons; for example, the issue has already been acknowledged or closed, or you do not have the right permissions to acknowledge the issue.
To manage the workflow of an incident or problem for better tracking:
Use a touch-and-hold gesture at any time within the app to display on the bottom of the screen the current site to which you are logged in or about to log in. If the site name is unavailable, the URL appears. With the site identity displayed, tap the information icon on the right to access the Settings screen, where you can manage your sites and change the default site. Repeat the touch-and-hold gesture to remove the site display from the bottom of the screen.

If you have logged out of the app and find that you are stuck on a page trying to return to Cloud Control Mobile, you have a couple of options to resolve the issue:
Open iDevice Settings and change the Cloud Control default URL.
Force quit the app and restart Cloud Control Mobile. For example, press and hold the On/Off button on top of the device until the power off slider appears, and then press the Home button until the app closes.