11g Release 1 (11.1.3)
Part Number E20388-03
Contents
Previous
Next
|
Oracle® Fusion
Applications CRM Extensibility Guide 11g Release 1 (11.1.3) Part Number E20388-03 |
Contents |
Previous |
Next |
This chapter contains the following:
Extending CRM Applications: Top Tasks
Extending CRM Applications: How It Works
Customizing Oracle Fusion CRM Applications Using Oracle Fusion CRM Application Composer: Explained
Object Relationships: Explained
Creating a Work Area: Explained
Saved Searches for CRM Objects: Explained
Securing Custom Objects: Explained
Supported Classes and Methods for Use in Groovy Scripts: Explained
Importing and Exporting Custom Objects: Explained
FAQs for Extending Oracle Fusion CRM Applications
The Oracle Fusion CRM Application Composer is but one tool that lets you customize and extend your Oracle Fusion CRM applications. Before you start to extend and customize any application within Oracle Fusion CRM, refer first to the Oracle Fusion Applications Extensibility Guide to learn more about all the extensibility options and tools that are available to you.
The Oracle Fusion Applications Extensibility Guide walks you through the customization process for all Oracle Fusion applications, not just within Oracle Fusion CRM. After reviewing that guide, you can then review the Oracle Fusion CRM Extensibility Guide to understand in more detail how to use the Application Composer to extend and customize an application within Oracle Fusion CRM.
The Oracle Fusion CRM Application Composer is a browser-based configuration tool that enables business analysts and administrators, not just application developers, to customize and extend an Oracle Fusion CRM application. Make the type of data model changes which, for non-CRM applications, can only be made by application developers. For example, easily create a new object and related fields, then create new Enterprise pages where that object and its fields are exposed to users. The Application Composer is a design time at runtime tool, which means that you can navigate to the Application Composer directly from a CRM application, make your changes, and see most changes take immediate effect in real time, without having to sign back in to the application. Data model changes, such as the creation of custom fields, do require that you reauthenticate before you can see those changes.
The Application Composer hides the complexity of customization from business analysts by leveraging a set of standard design patterns and wizards. You focus on the application changes that your business requires (object model extensions and layout changes, for example), and the Application Composer creates the underlying object artifacts for you.
Access the Application Composer from any CRM application at runtime by using the Navigator menu, and selecting Application Composer under the Tools category. The first view of the Application Composer is the main Overview page, which is the entry point into all your customization options.
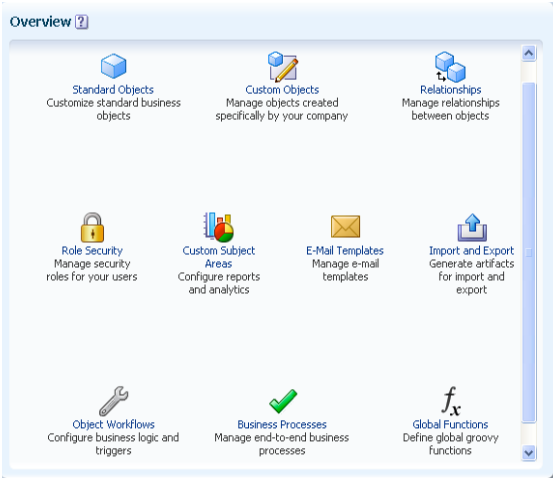
From the Application Composer's Overview page, you can make application changes such as:
Customize objects by adding new fields, or create entirely new objects.
Create foreign key-based relationships between two objects.
Customize Enterprise pages by exposing your newly created fields for an object, or create an entirely new work area for your newly created objects.
Expose object relationships on Enterprise pages in the form of subtabs or tree nodes.
Write application logic, such as triggers, validation rules, and workflows, for an object or for use across multiple objects.
Implement functional and data-level security for custom objects.
Enable objects for custom reporting.
To access the Application Composer, log in with the Customer Relationship Management Administrator job role. Then, select Application Composer under the Tools category in the Navigator menu to navigate to the main Overview page.
From the main Overview page, select the application you want to customize using the Application choice list. Then:
Use the object tree to select the object you want to customize, or click the New icon to create a new object.
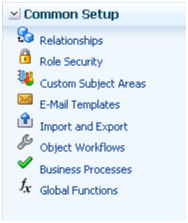
Use the links in main Overview page, also known as the local area, to select a customization task.
Or, use the links in the Common Setup pane.
Change the selected application in the Application choice list at any time to customize another CRM application.
The Application Composer is but one tool that lets you customize and extend your Oracle Fusion CRM applications. To learn more about extensibility options that are available to you across all Oracle Fusion applications, see the Oracle Fusion Applications Extensibility Guide.
The Oracle Fusion CRM Application Composer provides a series of task flows which let you customize and extend an Oracle Fusion CRM application according to the needs of your users. For example, you can create new fields for an existing standard object, and expose those new fields on the object's work area. Or, create a brand new custom object and related fields, then create a work area where that object and its fields are exposed to users. The task flows available to you are dependent upon the CRM application that you are customizing. This topic provides an overview of which CRM Application Composer task flows are available for use in each CRM application.
This topic addresses extensibility for these CRM applications:
Oracle Fusion Common CRM
Oracle Fusion Customer Center
Oracle Fusion Marketing
Oracle Fusion Sales
Oracle Fusion Sales Catalog
You can also refer to the product-specific implementation guides to learn more about how a particular application works with the Application Composer.
The creation of custom objects is not supported for the Oracle Fusion Common CRM application.
For Oracle Fusion Common CRM standard objects, you can do the following in the Application Composer:
|
Customization Task Flow |
Trading Community Org Contact |
Trading Community Resource Profile |
Trading Community Organization Profile |
Trading Community Address |
Activity Task |
Interaction |
Note |
|---|---|---|---|---|---|---|---|
|
Create and expose custom fields on existing pages that are available for extensibility |
Yes |
Yes |
Yes |
Yes |
Yes |
Yes |
Yes |
|
Edit display label and help text of standard fields |
Yes |
Yes |
Yes |
Yes |
Yes |
Yes |
Yes |
|
Create custom currency fields |
No |
No |
No |
No |
No |
No |
No |
|
Index custom fields |
Yes |
Yes |
Yes |
Yes |
No |
Yes |
Yes |
|
Add custom buttons (Groovy script or URL) to selected pages |
No |
Yes |
No |
No |
No |
Yes |
Yes |
|
Add links (URL) to selected pages |
No |
Yes |
No |
No |
No |
Yes |
Yes |
|
Create and expose custom child objects on an object's details page |
No |
No |
No |
No |
Not applicable |
Not applicable |
Not applicable |
|
Create custom field-level and object-level validation logic (Groovy scripts) |
Yes |
Yes |
Yes |
Yes |
No |
Yes |
Yes |
|
Create custom logic at various object trigger points (Groovy scripts) |
Yes |
Yes |
Yes |
Yes |
No |
Yes |
Yes |
|
Create custom saved searches at the site level |
Yes |
Yes |
Yes |
Yes |
No |
Yes |
Yes |
|
Provide Mobile page support |
Yes |
No |
No |
No |
No |
No |
No |
|
Create custom relationships |
Yes |
Yes |
Yes |
Yes |
No |
No |
No |
|
Manage object workflows |
No |
Yes |
No |
No |
No |
No |
No |
|
Web services |
Yes |
Yes |
Yes |
Yes |
Yes |
Yes |
Not applicable |
|
Import data using file-based import |
Yes |
Yes |
Yes |
Yes |
Yes |
Yes |
Yes |
|
Export data using bulk export |
Yes |
Yes |
Yes |
Yes |
Yes |
Yes |
Yes |
|
Create custom subject areas |
No |
Yes |
No |
No |
No |
No |
No |
You can create custom objects for the Oracle Fusion Customer Center application.
For Oracle Fusion Customer Center's standard object, you can do the following in the Application Composer:
|
Customization Task Flow |
Sales Account Profile |
|---|---|
|
Create and expose custom fields on existing pages that are available for extensibility |
Yes |
|
Edit display label and help text of standard fields |
Yes |
|
Create custom currency fields |
No |
|
Index custom fields |
Yes |
|
Add custom buttons (Groovy script or URL) to selected pages |
No |
|
Add links (URL) to selected pages |
No |
|
Create and expose custom child objects on an object's details page |
Yes |
|
Create custom field-level and object-level validation logic (Groovy scripts) |
Yes |
|
Create custom logic at various object trigger points (Groovy scripts) |
Yes |
|
Create custom saved searches at the site level |
No |
|
Provide Mobile page support |
No |
|
Create custom relationships |
Yes |
|
Manage object workflows |
Yes |
|
Web services |
Yes |
|
Import data using file-based import |
Yes |
|
Export data using bulk export |
Yes |
|
Create custom subject areas |
Yes |
You can create custom objects for the Oracle Fusion Marketing application.
For Oracle Fusion Marketing standard objects, you can do the following in the Application Composer:
|
Customization Task Flow |
Sales Lead |
Marketing Campaign |
Marketing Budget |
Marketing Response |
Marketing List |
Marketing Treatment |
Marketing Event Activity |
MarketingAdvertising Activity |
Marketing Claim |
Marketing Claim Settlement (child) |
Marketing Budget Entry |
Marketing Budget Fund Request |
|---|---|---|---|---|---|---|---|---|---|---|---|---|
|
Create and expose custom fields on existing pages that are available for extensibility |
Yes |
Yes |
Yes |
Yes |
Yes |
Yes |
Yes |
Yes |
Yes |
Yes |
Yes |
Yes |
|
Edit display label and help text of standard fields |
Yes |
Yes |
Yes |
Yes |
Yes |
Yes |
Yes |
Yes |
Yes |
Yes |
Yes |
Yes |
|
Create custom currency fields |
No |
No |
No |
No |
No |
No |
No |
No |
No |
No |
No |
No |
|
Index custom fields |
Yes |
Yes |
Yes |
Yes |
Yes |
Yes |
Yes |
Yes |
Yes |
Yes |
Yes |
Yes |
|
Add custom buttons (Groovy script or URL) to selected pages |
Yes |
No |
Yes |
No |
No |
No |
No |
No |
Yes |
Yes |
Yes |
Yes |
|
Add links (URL) to selected pages |
Yes |
Yes |
Yes |
Yes |
Yes |
Yes |
Yes |
Yes |
Yes |
Yes |
Yes |
Yes |
|
Create and expose custom child objects on an object's details page |
Yes |
No |
Yes |
Yes |
No |
No |
No |
No |
Yes |
Not applicable |
No |
Yes |
|
Create custom field-level and object-level validation logic (Groovy scripts) |
Yes |
Yes |
Yes |
Yes |
Yes |
Yes |
Yes |
Yes |
Yes |
Yes |
Yes |
Yes |
|
Create custom logic at various object trigger points (Groovy scripts) |
Yes |
Yes |
Yes |
Yes |
Yes |
Yes |
Yes |
Yes |
Yes |
Yes |
Yes |
Yes |
|
Create custom saved searches at the site level |
Yes |
Yes |
Yes |
Yes |
Yes |
Yes |
No |
No |
Yes |
No |
Yes |
Yes |
|
Provide Mobile page support |
No |
No |
No |
No |
No |
No |
No |
No |
No |
No |
No |
No |
|
Create custom relationships |
Yes |
Yes |
Yes |
Yes |
Yes |
Yes |
Yes |
Yes |
Yes |
No |
Yes |
Yes |
|
Manage object workflows |
Yes |
No |
Yes |
No |
No |
No |
No |
No |
Yes |
Yes |
Yes |
Yes |
|
Web services |
Yes |
Yes |
Yes |
Yes |
Yes |
Yes |
Yes |
Yes |
Yes |
Yes |
Yes |
Yes |
|
Import data using file-based import |
Yes |
Yes |
Yes |
Yes |
Yes |
No |
Yes |
Yes |
No |
No |
No |
No |
|
Export data using bulk export |
Yes |
No |
Yes |
No |
No |
No |
No |
No |
No |
No |
No |
No |
|
Create custom subject areas |
Yes |
Yes |
Yes |
Yes |
Yes |
Yes |
Yes |
Yes |
Yes |
Yes |
Yes |
Yes |
You can create custom objects for the Oracle Fusion Sales application.
For Oracle Fusion Sales standard objects, you can do the following in the Application Composer:
|
Customization Task Flow |
Opportunity |
Sales Competitor |
Partner |
Opportunity Resource (child) |
Opportunity Revenue (child) |
|---|---|---|---|---|---|
|
Create and expose custom fields on existing pages that are available for extensibility |
Yes |
Yes |
Yes |
Yes |
Yes |
|
Edit display label and help text of standard fields |
Yes |
Yes |
Yes |
Yes |
Yes |
|
Create custom currency fields |
Yes |
No |
No |
No |
Yes |
|
Index custom fields |
Yes |
Yes |
Yes |
Yes |
Yes |
|
Add custom buttons (Groovy script or URL) to selected pages |
Yes |
Yes |
Yes |
Yes |
Yes |
|
Add links (URL) to selected pages |
Yes |
Yes |
Yes |
Yes |
Yes |
|
Create and expose custom child objects on an object's details page |
Yes |
Yes |
Yes |
Not applicable |
Not applicable |
|
Create custom field-level and object-level validation logic (Groovy scripts) |
Yes |
Yes |
Yes |
Yes |
Yes |
|
Create custom logic at various object trigger points (Groovy scripts) |
Yes |
Yes |
Yes |
Yes |
Yes |
|
Create custom saved searches at the site level |
Yes |
Yes |
Yes |
No |
No |
|
Provide Mobile page support |
Yes |
Yes |
Yes |
Yes |
Yes |
|
Create custom relationships |
Yes |
Yes |
Yes |
No |
No |
|
Manage object workflows |
Yes |
Yes |
Yes |
No |
No |
|
Web services |
Yes |
Yes |
Yes |
Not applicable |
Not applicable |
|
Import data using file-based import |
Yes |
Yes |
Yes |
Yes |
Yes |
|
Export data using bulk export |
Yes |
Yes |
Yes |
Yes |
Yes |
|
Create custom subject areas |
Yes |
Yes |
Yes |
Yes |
Yes |
The creation of custom objects is not supported for the Oracle Fusion Sales Catalog application.
For Oracle Fusion Sales Catalog's standard object, you can do the following in the Application Composer:
|
Customization Task Flow |
Product Group |
|---|---|
|
Create and expose custom fields on existing pages that are available for extensibility |
Yes |
|
Edit display label and help text of standard fields |
Yes |
|
Create custom currency fields |
No |
|
Index custom fields |
Yes |
|
Add custom buttons (Groovy script or URL) to selected pages |
No |
|
Add links (URL) to selected pages |
No |
|
Create and expose custom child objects on an object's details page |
No |
|
Create custom field-level and object-level validation logic (Groovy scripts) |
No |
|
Create custom logic at various object trigger points (Groovy scripts) |
No |
|
Create custom saved searches at the site level |
No |
|
Provide Mobile page support |
No |
|
Create custom relationships |
No |
|
Manage object workflows |
No |
|
Web services |
No |
|
Import data using file-based import |
Yes |
|
Export data using bulk export |
Yes |
|
Create custom subject areas |
No |
One of the primary customization options available to you when using the Oracle Fusion CRM Application Composer is the ability to extend a CRM application's object model. Customize CRM objects by adding new fields to an existing object (standard objects), or create entirely new objects (custom objects). Standard objects are objects that are delivered with a CRM application, and made available to the Application Composer for customization. Custom objects are objects that you create using the Application Composer. You can create either top-level objects (objects without a parent) or child objects (objects created in the context of a parent).
Review these aspects of the object model extension process in the Application Composer before you begin to customize or extend your CRM application's object model:
Browsing the object tree
Creating a custom object
Using the Object Overview page
Editing an object's attributes
Viewing child and related objects
Deleting a custom object
Access the Application Composer from a CRM application at runtime by using the Navigator menu. The first view of the Application Composer is the main Overview page, which is the entry point into all your customization options.
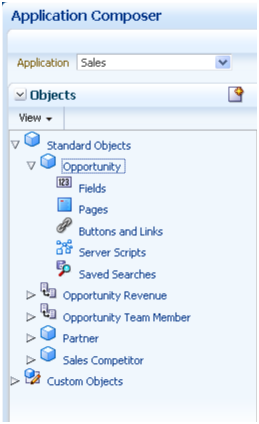
On the main Overview page, the regional pane at left displays the object tree, which lets you browse an application's existing object configuration in a tree format. The object tree reflects the latest configuration of the application: both standard objects as well as custom objects.
To use the object tree:
Select Application Composer from the Navigator menu, under the Tools category.
On the main Overview page, select an application from the Application choice list.
For each object node, whether standard or custom, expand it further to view and edit object details, such as an object's fields and Enterprise pages where the object is exposed.
Tip
At the top of the object tree, you can also click the New icon to create a new custom object.
For both standard and custom objects, you can view and edit the following details:
Fields
Add new fields to an object.
Pages
Modify the pages on which an object appears.
Buttons and links
Add buttons or links to Enterprise pages.
Server scripts
Write application logic that controls the behavior of an object's records.
Saved searches
Define saved searches for an object.
For custom objects, you can also view and edit details for:
Security
Implement functional and data-level security for an object and its records.
To create a new custom object, you first select an application on the main Overview page of the Application Composer. The new custom object will belong to the application that you select. After you select the application:
Select the Custom Objects node or link in either the object tree or local area of the main Overview page.
On the resulting summary table, click the New icon.
Or, at the top of the object tree, click the New icon
Complete the primary identifying attributes for a custom object:
Display Label
An object's display label is the user-friendly label for an object, and also becomes the default page title for the object's work area.
Plural Label
The plural label is used when the object is displayed as the detail section of a master-detail page, such as on a subtab.
Record Name
Use the Record Name field to specify the display label for the object's RecordName field. The RecordName field stores the "name" of the record. For example, for an opportunity object, this RecordName field stores the opportunity's name. Accordingly, if you were creating this object as a custom object, then you would set the Record Name field to Opportunity Name.
Typically, this field is the object's primary user-recognizable identifier for the object, and as such, is usually the identifier that runtime users drill down on, from the overview page to the detail page.
Object Name
The object name is the internal name for the object.
Description
Tip
To create a custom child object, click the Create Child Object button in the standard or custom objects summary table, or from an object's Object Overview page.
Once created, a child object cannot be changed to a parent object. Similarly, a parent object cannot be changed to a child object.
Child objects are discussed below.
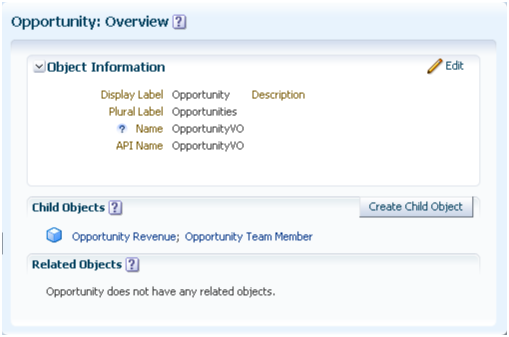
The Object Overview page provides a high-level overview of a standard or custom object. The Object Overview page displays the primary attributes for an object, plus a list of child objects and related objects, if any.
To access the Object Overview page:
Select an application on the main Overview page.
Select a standard or custom object in the object tree.
Or, select the Standard Objects or Custom Objects node or link in either the object tree or local area of the main Overview page, choose an object from the resulting summary table, and select the Edit icon.
From the Object Overview page, you can:
Edit the object's primary attributes, described in the previous section.
View the parent child relationships that were created for this object.
You can also create new child objects from this page, which implicitly creates a new parent child relationship.
View the non-parent child relationships that were created for this object.
After an object has been created, you can edit its attributes from its Object Overview page.
To edit an object's attributes:
Select an application on the main Overview page.
Select the Standard Objects or Custom Objects node or link in either the object tree or local area of the main Overview page.
From the resulting summary table, select an object and then select the Edit icon to navigate to its Object Overview page.
On the Object Overview page, click Edit:
Change the object's display label, plural label, description, and record name at any time.
You cannot change the Object Name and API Name after the object has been created.
A custom object's API name for an object is automatically derived using the logical name followed by _c. You use the API name in Groovy expressions that you build with the expression editor, when writing business logic for the object.
The Object Overview page displays a list of child objects and related objects, if any, that have been created for an object. You can also create new child objects from this page.
A child object is an object with a cascade delete relationship to a parent object. This means that if you delete the parent object, then all its children are automatically deleted. A child object does not exist outside the context of the parent object, and does not have its own work area. You cannot change a child object to a parent object after the child object has been created.
Related objects can exist independently of each other, even if one object is deleted. Related objects are connected in a foreign key-based relationship between two top-level objects, not as parent and child. These types of relationships include reference relationships and dynamic choice list relationships.
Related objects can have either a one-to-many or a many-to-one relationship with the current object. Note that an object can be related to itself to model a hierarchy of the object. In this case, the object itself is displayed on its Object Overview page as a related object. For example, the Department and Sub-department objects would be displayed in this way.
Note
You do not create these types of relationships from this page. Instead, manage relationships from the Relationships page, which you can access from the Application Composer's main Overview page. Or, create a dynamic choice list relationship by creating a dynamic choice list field for an object, which derives its choice list values from another object.
To create a child object for a standard or custom object:
Navigate to an object's Object Overview page.
Click the Create Child Object button. Creating a child object is the same as creating a custom object, except:
The current object is automatically displayed as the parent object.
Specify the Child Collection Name field to specify the internal name for this set of child object records, which can be used later when writing Groovy scripts.
The Application Composer does not support the deletion of either standard or custom objects. If you no longer need an object, optionally enter a note in the description that the object is no longer used.
A relationship is a foreign key association between two objects, and indicates a connection between two objects' data. You can expose this connection on Enterprise pages through the use of child or related object subtabs or tree nodes. Using the Oracle Fusion CRM Application Composer, you can create one-to-many relationships between two objects within the same application, where one object's primary identifier is stored in another object's table. A relationship must exist before you can expose the "many" objects on a subtab or tree node that is displayed on the "one" object's details page or tree. For example, an account can have multiple service requests associated to it. To expose a list of service requests associated with a specific account as a subtab on the account's details page, you must first create a one-to-many relationship between the account and service request objects. You can create these relationships implicitly by creating a child object or by creating a dynamic choice list. Or, create relationships explicitly on the Create Relationship page.
Review these aspects of the relationship creation process in the Application Composer before you begin to create relationships between objects:
Relationship types
Creating reference relationships
Adding subtabs or tree nodes
Many-to-many relationships
Four types of one-to-many relationships exist:
Parent child relationship
Parent child relationships are implicitly created when a custom object is created as a child of a top-level object.
When a child object is created, it is created specifically in the context of its parent. A child object does not have its own work area, and the child object is deleted if the parent object is deleted.
View parent child relationships on the parent object's Object Overview page. If a parent child relationship exists, then the child object is listed on the parent's Object Overview page in the Child Objects region. A top-level object can have many child objects.
You can also view the parent child relationship from the child object's Object overview page. If a parent child relationship exists, then the parent object is listed on the child's Object Overview page in the Object Information region. A child object can have only one parent object.
Relationships that are implicitly created from parent child relationships are also viewable on the Relationships page. The relationship name is automatically generated for you.
Choice list relationship
Choice list relationships are implicitly created between two objects when you create a dynamic choice list field.
View choice list relationships on an object's Object Overview page. If a choice list relationship exists, then the related object is listed on the object's Object Overview page in the Related Objects region.
A dynamic choice list is a field that contains a list of values which are populated from the actual data of another object. For example, you might want to expose on an Enterprise page a dynamic choice list which lets users specify the HR representative of a given department. The HR Representative choice list is a field that you are adding to the department object, but the list of values is populated by actual employees from the employee object.
In the previous example of making a list of accounts available for selection for a trouble ticket, an account can be tied to multiple trouble tickets. The relationship that is created is a one-to-many relationship between the account and trouble ticket objects, which enables users to store an account identifier in the trouble ticket object's table. In this relationship, the account object is the source object and the trouble ticket object is the target object. If a source object is ever deleted from the system, then at runtime, the dynamic choice list will have no values in it.
Later, you might want to expose a related object subtab on the account details page which shows, for a single account, all the trouble tickets that are related to it. You can create this related object subtab because the relationship was already created when you created the dynamic choice list.
These objects are related objects, not parent child objects; related objects are not deleted if the current object is deleted.
Relationships that are implicitly created from dynamic choice list relationships are also viewable on the Relationships page. The relationship name is automatically generated for you.
Note
Generally, the dynamic choice list that you create results in the implicit creation of a choice list relationship. The exception is if you create a dynamic choice list between a CRM object and a common object: resource, organization contact, organization profile, address. In such cases, relationships are not implicitly created.
Reference relationship
Instead of using a dynamic choice list to implicitly create a relationship between two objects, you can also manually create this relationship as a reference relationship.
Reference relationships are explicitly created between two top-level objects using the Create Relationships page.
View reference relationships on an object's Object Overview page. If a reference relationship exists, then the related object is listed on the object's Object Overview page in the Related Objects region.
Using our previous example, perhaps you don't need to display an HR Representative choice list on a department Enterprise page, but you still want to add a department subtab to an employee's details page. In this case, manually create a reference relationship between the employee and department objects where the employee is the source object and the department is the target object. This enables the creation of the department subtab. Such a reference relationship, however, does not automatically create a corresponding HR Representative choice list for use on the department Enterprise page. In fact, once you manually create a relationship, you cannot reuse the relationship to create a choice list. This means that you should carefully consider the need for a choice list before you create a reference relationship.
Standard relationship
Standard relationships are relationships that are already created between two standard objects by the Oracle Fusion CRM application.
You can also view standard relationships on an object's Object Overview page. If a standard relationship exists, then the related object is listed on the object's Object Overview page in the Related Objects region.
Create a foreign key-based, one-to-many relationship between two top-level objects explicitly using the Create Relationship page. Explicitly created relationships are also known as reference relationships.
You can also create a foreign key-based, one-to-many relationship by creating child objects and dynamic choice lists. These implicit relationships are discussed in related topics.
To explicitly create a relationship between two top-level objects within the same application:
Select Relationships in the Common Setup pane.
On the Relationships page, click the New icon.
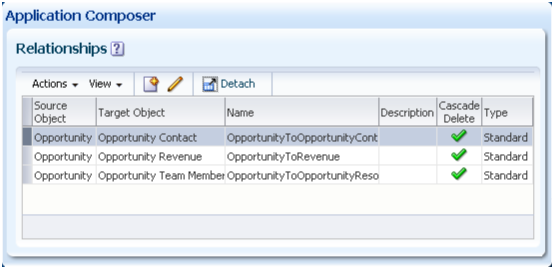
Select the source object and target object.
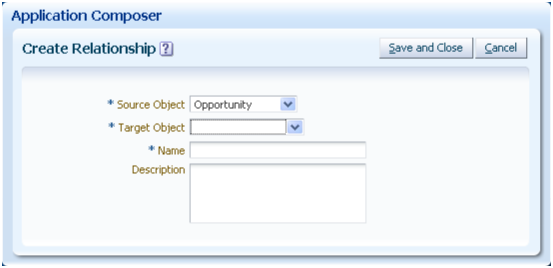
A child object cannot be the source object or target object.
Common components, such as notes, interactions, or tasks, are not available for selection as either source objects or target objects.
In general, you create a relationship between two objects within the same application. You can, however, select common objects as target objects. Common objects include:
Trading Community Resource
Trading Community Organization Contact
Trading Community Organization Profile
Trading Community Address
Once you create a relationship, you can no longer edit the source and target objects.
This relationship adds a field to the target object to store the foreign key details. If the source object is ever deleted, the target object records remain in the system.
Enter the relationship name and description.
Once you create a relationship, you can no longer edit the relationship name.
Optionally add the target object in a subtab to the source object's detail page, or as a tree node.
Note
You can create multiple relationships between the same source and target objects. For example, create both a Primary Contact and Secondary Contact relationship between the contact and opportunity objects.
After you create relationships between objects, you can then expose the "many" objects on a subtab or tree node that is displayed on the "one" object's details page or tree.
When adding a subtab or a tree node to an object's details page or object, you select to add a Child or Related Objects subtab from the object's Pages Overview page. The Application Composer lets you add a subtab or tree node based on any target object that has a relationship with the current object as the source object. Subtabs and tree nodes are discussed in related topics.
Objects can also have a many-to-many relationship. For example, a service request can have multiple employees working on it. At the same time, a single employee can work on multiple service requests. In this scenario, you would create a many-to-many relationship between the service request and employee objects, where the related records from both objects store their primary identifiers in an intersection table.
To create a many-to-many relationship using the Application Composer:
Create a child object of one object, and use this child object to represent the intersection table that stores the record identifiers of both objects.
For example, create a service request member object as a child of the service request object. The service request member object's table records the service request identifier as a foreign key.
Add a dynamic choice list for the new child object whose related object is the other object in the many-to-many relationship.
For example, create a dynamic choice list, Support Representative, for the service request member object where the choice list's related object is employee. The Application Composer automatically creates the underlying relationship for you, where the employee is the source object and the service request member is the target object. The service request member object's table records the employee identifier as a foreign key.
Now, the service request member object's table records two foreign keys: one for the service request object and the other for the employee object. This enables the many-to-many relationship. You can now do the following:
Create a child subtab on a service request's details page. The subtab displays all employees that are working on a specific service request.
Create a related object subtab on an employee's details page. The subtab displays all service requests that an employee is working on, since each employee can work on multiple service requests.
Using the Oracle Fusion CRM Application Composer, you can extend a CRM application's object model by adding new fields to both standard or custom objects. A standard object has a set of standard fields. Standard fields are the fields that are delivered for a standard object in a CRM application. The fields that you add to an object are custom fields. When creating a custom field, the Application Composer provides a set of field types that you can choose from. For example, you can create a check box field, or create a long text field. When you create custom fields for objects and expose the fields on Enterprise pages, the Application Composer automatically creates all the underlying object artifacts for you, and provides full Web service support for those new fields, as well. The Application Composer also makes it easy to enable your object model extensions for importing and exporting.
Review these aspects of editing fields in the Application Composer before you begin to customize or extend your CRM application's object model:
Adding fields to objects
Deleting fields
Use the Fields page to review the list of standard and custom fields for an object, and create custom fields. A CRM object can have a maximum of 625 fields.
To view the Fields page for an object:
Select an application from the Application choice list on the main Overview page.
Select either the Standard Objects or Custom Objects node in the object tree to expand the list of objects.
Select the object itself to further expand the tree hierarchy.
Select the Fields node to navigate to the Fields page.
On the Fields page:
Standard Fields
Review the list of standard fields that are delivered for an object, and optionally modify the display label and help text for a field.
The list of standard fields includes all the fields that are specific to an object, as well as system fields, which could include:
CreatedBy
CreationDate
Id
LastUpdateDate
LastUpdatedBy
RecordName
The custom objects that you create also contain these same system fields, among others.
Custom Fields
Review the list of custom fields that were created specifically for your CRM implementation for either standard or custom objects, and create new custom fields.
To create a custom field, select the New icon from the custom fields table on the Fields page. The Application Composer provides a set of field types that you can choose from when creating new fields:
Text
Long text
Number
Date
Datetime
Check box
Percentage
Currency
Formula
Fixed choice list
Dynamic choice list
The Application Composer does not support the deletion of either standard or custom fields from objects. If you no longer need a field, optionally enter a note in the field description that the field is no longer used.
When you create a custom field, you select from a set of standard field types. Each field type has a corresponding set of standard properties. Some properties are unique to a specific field type, whereas other properties are common across field types. For example, for all field types, you must specify a display label for the field to indicate how you want the field to appear on an Enterprise page.
Before you create a new field for a object, you should understand:
The set of standard field types available for field creation
The common set of field properties that you must specify for a field
How field types work with other components
When creating a new field for a object, the Oracle Fusion CRM Application Composer provides a set of standard field types that you can choose from.
The types of fields that you can create are listed below.
Text
Users can enter a combination of letters, numbers, or symbols. This field type is limited to 254 characters.
Long text
Users can enter a combination of letters, numbers, or symbols. This field type supports 32,000 characters.
Number
Users can enter a number in this field.
Date
Users can enter a date, or select a date from a calendar.
Datetime
Users can enter a date, or select a date from a calendar, and enter a time of day. During field creation, you choose whether to show the date or time, or both.
Check box
Users can select a check box, indicating a true or false attribute of a record.
Percentage
Users can enter a percentage. The system automatically adds the percent sign.
Currency
Users can enter a currency amount.
Fixed choice list
Users can select from a list of static values, populated from an FND lookup type.
Dynamic choice list
Users can select from a list of values, populated from another object's set of records.
Formula
A formula field is a field that is calculated in the runtime CRM application using the Groovy-based expression included in the formula field's definition. This is a read-only field that users in the runtime application do not update. However, the application logic that you write can update these fields directly.
When you create a custom field, you first select the field type. For example, are you creating a check box field, a formula field, or a long text field? You cannot change the field type after the field is created. The specified field type controls which field properties you must define when creating the field. Some properties are common across field types, whereas other properties are unique to a specific field type.
The common field properties that you can define for a custom field are listed in this table, along with the regions on the field configuration pages where they appear and a list of the applicable field types that you must set these properties for. Use this table to understand the common properties that you must define when creating a new field.
|
Field Property |
Field Property Region |
Related Field Types |
|---|---|---|
|
Label Specify the display label for the field. A maximum length of 80 characters is recommended, although no maximum length is actually enforced. |
Appearance These properties control how the field appears to your users in the runtime application. |
Set this property for all field types. |
|
Help Text The help text displays when users hover over the field in the runtime application. A maximum length of 80 characters is recommended, although no maximum length is actually enforced. |
Appearance |
Set this property for all field types. |
|
Display Width Specify the display width for most field types at runtime. The display width is the actual character width for the field on an Enterprise page. Tip When setting the display width, consider the resolution in use where this field will be displayed on an Enterprise page. A display width that is too wide will stretch beyond the resolution of the display and result in scroll bars. Generally, enter a display width of no more than 20 to 25 characters. |
Appearance |
Set this property for all field types except for check box, date, and datetime fields. |
|
Name Enter a unique field name, which is for internal use only. The field name is automatically populated based on the field label you enter, but without spaces. Field names can contain only underscores and alphanumeric characters. They must begin with a letter, not include spaces, not end with an underscore, and not contain consecutive underscores. Field names are limited to 28 characters. You cannot change this property after the field is created. Tip It is possible to create custom fields with different names, but the same display label. Avoid this scenario, however, so that you do not see two fields with the same display label when configuring an Enterprise page. Note The API name is also automatically generated for a field, by taking the logical name and appending _c. The API name is used in your Groovy scripts. |
Name |
Set this property for all field types. |
|
Description Enter a unique field description, which is for internal use only. |
Name |
Set this property for all field types. |
|
Required Indicate if the field is a required field. You can also optionally use the expression editor to write an expression that describes the conditions required for this field to be required. Note If you write an expression to control whether a field is required, then you must also configure the Depends On choice list. This choice list includes fields from the current object, and is used in the evaluation of your expression at runtime. |
Constraints Specify constraints, which let you control the runtime behavior of the field. |
Set this property for all field types except for formula fields. |
|
Updateable Indicate if the field is an updateable field. You can also optionally use the expression editor to write an expression that describes the conditions required for this field to be updateable. This includes being updateable on an Enterprise page, via Web services, through the import and export functionality, and by server scripts. Note If you write an expression to control whether a field is updateable, then you must also configure the Depends On choice list. This choice list includes fields from the current object, and is used in the evaluation of your expression at runtime. |
Constraints |
Set this property for all field types except for formula fields. |
|
Searchable Indicate if you want this field to be made available for selection as an additional search criteria from the Add Fields choice list in the Advanced Search mode. |
Constraints |
Set this property for all field types except for long text and formula fields. |
|
Indexed Enable faster searching by indexing this column. Only a limited number of columns are indexed. Accordingly, use this property only on the most frequently searched fields. You cannot change this property after the field is created. |
Constraints |
Set this property for text, number, date, datetime, currency, and percentage field types. You cannot index long text, formula, and check box fields, or fixed and dynamic choice lists. Note You cannot index long text fields. Instead, your users can use the Oracle Fusion Applications search capability to search these field types. |
|
Fixed Value Specify a literal default value for the field. Warning Do not assign a literal default value to fields that are both required and intended to be unique, as a runtime error could occur. |
Default Value |
Set this property for all field types except for formula fields and dynamic choice lists. |
|
Expression Use the expression editor to write an expression that dynamically sets the default value for a field at runtime. |
Default Value |
Set this property for all field types except for check box and formula fields, and fixed and dynamic choice lists. To set default values for these types of fields, write server scripts. |
When you create new fields for objects, the Application Composer limits you to a set of standard field types. The field types that you can select from are already integrated with other components of the CRM Extensibility Framework to provide you with the most flexibility possible when customizing and extending your CRM implementation:
All field types correspond to API data types; each field type has an API name, such as customfield_c.
When writing a server script using the expression editor, use this _c field name to reference fields.
All field types correspond to your Web service XSD payload.
All field types correspond to your import ODI mappings when using the Application Composer's import and export feature.
Most field types correspond to available fields that you can use to create a custom subject area for reporting. Exceptions include long text, check box, and formula fields.
Using the Oracle Fusion CRM Application Composer, you can extend a CRM application's object model by adding new fields to both standard or custom objects. One field type that you can add to a custom or standard object is a text field. A text field is a field where users in the runtime application can enter a combination of letters, numbers, or symbols.
Create a text field by specifying values for the common set of field properties, such as display label and field name. You also set properties for this field that are specific to the text field type.
The following properties are common across multiple field types:
|
Field Property |
Field Property Region |
|---|---|
|
Label |
Appearance |
|
Help Text |
Appearance |
|
Display Width |
Appearance |
|
Name |
Name |
|
Description |
Name |
|
Required |
Constraints |
|
Updateable |
Constraints |
|
Searchable |
Constraints |
|
Indexed |
Constraints |
|
Fixed Value |
Default Value |
|
Expression |
Default Value |
The following properties are unique to only certain field types, including text fields:
|
Field Property |
Field Property Region |
|---|---|
|
Display Type Indicate if you want this text field to render in the runtime application as a simple text box. Or, indicate if the field should allow multiple lines where text can wrap, or where the user can enter carriage returns. |
Appearance |
|
Maximum Length Indicate the maximum number of characters that a user can enter in the field. You can set a maximum length of 254 characters. If the field is a multiline field, then carriage returns are permitted and count as characters against the total. |
Constraints |
|
Minimum Length Indicate the minimum number of characters that a user can enter into the field. |
Constraints |
Additional specifications for this field type include the following details:
Data type is VARCHAR2 (254 char).
A object can have a total of 625 fields. Of those 625 fields, 350 fields are reserved for text and check box fields, and fixed and dynamic choice lists.
Using the Oracle Fusion CRM Application Composer, you can extend a CRM application's object model by adding new fields to both standard or custom objects. One field type that you can add to a custom or standard object is a long text field. A long text field is a field where users in the runtime application can enter a combination of letters, numbers, or symbols. This field type supports 32,000 characters.
Create a long text field by specifying values for the common set of field properties, such as display label and field name. You also set properties for this field that are specific to the long text field type.
The following properties are common across multiple field types:
|
Field Property |
Field Property Region |
|---|---|
|
Label |
Appearance |
|
Help Text |
Appearance |
|
Display Width |
Appearance |
|
Name |
Name |
|
Description |
Name |
|
Required |
Constraints |
|
Updateable |
Constraints |
|
Fixed Value |
Default Value |
|
Expression |
Default Value |
The following properties are unique to only certain field types, including long text fields:
|
Field Property |
Field Property Region |
|---|---|
|
Display Type Indicate if you want this text field to render in the runtime application as a simple text box. Or, indicate if the field should allow multiple lines where text can wrap, or where the user can enter carriage returns. |
Appearance |
Additional specifications for this field type include the following details:
Data type is CLOB.
A object can have a total of 625 fields. Of those 625 fields, 25 fields are reserved for long text fields.
The long text field type is not supported by custom subject areas. This means that you cannot add long text fields to a custom report.
Using the Oracle Fusion CRM Application Composer, you can extend a CRM application's object model by adding new fields to both standard or custom objects. One field type that you can add to a custom or standard object is a number field. A number field is a field where users in the runtime application can enter a number.
Create a number field by specifying values for the common set of field properties, such as display label and field name. You also set properties for this field that are specific to the number field type.
The following properties are common across multiple field types:
|
Field Property |
Field Property Region |
|---|---|
|
Label |
Appearance |
|
Help Text |
Appearance |
|
Display Width |
Appearance |
|
Name |
Name |
|
Description |
Name |
|
Required |
Constraints |
|
Updateable |
Constraints |
|
Searchable |
Constraints |
|
Indexed |
Constraints |
|
Fixed Value |
Default Value |
|
Expression |
Default Value |
The following properties are unique to only certain field types, including number fields:
|
Field Property |
Field Property Region |
|---|---|
|
Decimal Places Specify how many numbers can be entered and displayed to the right of the decimal point. If at runtime, a user enters more numbers after the decimal point, then the Application Composer rounds up (using the tie-breaking rule, round half up) to derive the field's value. For example, if you enter 2 for the number of decimal places, then at runtime, an entry of 4.986 is displayed as 4.99. |
Constraints |
|
Maximum Length Specify how many numbers a user can enter in the field. During field creation, consider how this property interacts with these other field properties:
|
Constraints |
|
Minimum Value Indicate the minimum numerical value that a user can enter into this field. |
Constraints |
|
Maximum Value Indicate the maximum numerical value that a user can enter into this field. |
Constraints |
Additional specifications for this field type include the following details:
Data type is NUMBER.
A object can have a total of 625 fields. Of those 625 fields, 200 fields are reserved for number, currency, and percentage fields.
Leading zeros are removed.
Using the Oracle Fusion CRM Application Composer, you can extend a CRM application's object model by adding new fields to both standard or custom objects. One field type that you can add to a custom or standard object is a date field. A date field is a field where users in the runtime application can enter a date, or select a date from a calendar. This type of field has no time component.
Create a date field by specifying values for the common set of field properties, such as display label and field name.
The following properties are common across multiple field types:
|
Field Property |
Field Property Region |
|---|---|
|
Label |
Appearance |
|
Help Text |
Appearance |
|
Name |
Name |
|
Description |
Name |
|
Required |
Constraints |
|
Updateable |
Constraints |
|
Searchable |
Constraints |
|
Indexed |
Constraints |
|
Fixed Value |
Default Value |
|
Expression |
Default Value |
Additional specifications for this field type include the following details:
Data type is TIMESTAMP.
A object can have a total of 625 fields. Of those 625 fields, 50 fields are reserved for date and datetime fields.
When you create a custom subject area to be used for custom reporting, you can select fields with this type to use for date leveling.
Using the Oracle Fusion CRM Application Composer, you can extend a CRM application's object model by adding new fields to both standard or custom objects. One field type that you can add to a custom or standard object is a datetime field. A datetime field is a field where users in the runtime application can enter a date, or select a date from a calendar, and enter a time of day. You can show the date or time, or both.
Create a datetime field by specifying values for the common set of field properties, such as display label and field name. You also set properties for this field that are specific to the datetime field type.
The following properties are common across multiple field types:
|
Field Property |
Field Property Region |
|---|---|
|
Label |
Appearance |
|
Help Text |
Appearance |
|
Name |
Name |
|
Description |
Name |
|
Required |
Constraints |
|
Updateable |
Constraints |
|
Searchable |
Constraints |
|
Indexed |
Constraints |
|
Fixed Value |
Default Value |
|
Expression |
Default Value |
The following property is unique to only certain field types, including datetime fields:
|
Field Property |
Field Property Region |
|---|---|
|
Display Type Indicate if you want this datetime field to show the date or time, or both. |
Appearance |
Additional specifications for this field type include the following details:
Data type is TIMESTAMP.
A object can have a total of 625 fields. Of those 625 fields, 50 fields are reserved for date and datetime fields.
When you create a custom subject area to be used for custom reporting, you can select fields with this type to use for date leveling.
This field type supports time zone conversion.
Using the Oracle Fusion CRM Application Composer, you can extend a CRM application's object model by adding new fields to both standard or custom objects. One field type that you can add to a custom or standard object is a check box field. A check box field is a field where users in the runtime application can select a check box, indicating a true or false attribute of a record.
Create a check box field by specifying values for the common set of field properties, such as display label and field name.
The following properties are common across multiple field types:
|
Field Property |
Field Property Region |
|---|---|
|
Label |
Appearance |
|
Help Text |
Appearance |
|
Name |
Name |
|
Description |
Name |
|
Required |
Constraints |
|
Updateable |
Constraints |
|
Searchable |
Constraints |
|
Fixed Value |
Default Value |
Additional specifications for this field type include the following details:
Data type is VARCHAR2.
A object can have a total of 625 fields. Of those 625 fields, 350 fields are reserved for text and check box fields, and fixed and dynamic choice lists.
The check box field type is not supported by custom subject areas. This means that you cannot add check box fields to a custom report.
Using the Oracle Fusion CRM Application Composer, you can extend a CRM application's object model by adding new fields to both standard or custom objects. One field type that you can add to a custom or standard object is a percentage field. A percentage field is a field where users in the runtime application can enter a percentage. The Application Composer automatically adds the percent sign to the number.
Create a percentage field by specifying values for the common set of field properties, such as display label and field name. You also set properties for this field that are specific to the percentage field type.
The following properties are common across multiple field types:
|
Field Property |
Field Property Region |
|---|---|
|
Label |
Appearance |
|
Help Text |
Appearance |
|
Display Width |
Appearance |
|
Name |
Name |
|
Description |
Name |
|
Required |
Constraints |
|
Updateable |
Constraints |
|
Searchable |
Constraints |
|
Indexed |
Constraints |
|
Fixed Value |
Default Value |
|
Expression |
Default Value |
The following properties are unique to only certain field types, including percentage fields:
|
Field Property |
Field Property Region |
|---|---|
|
Decimal Places Specify how many numbers can be entered and displayed to the right of the decimal point. If at runtime, a user enters more numbers after the decimal point, then the Application Composer rounds up (using the tie-breaking rule, round half up) to derive the field's value. For example, if you enter 2 for the number of decimal places, then at runtime, an entry of 4.986 is displayed as 4.99. |
Constraints |
|
Maximum Length Specify how many numbers a user can enter in the field. During field creation, consider how this property interacts with these other field properties:
|
Constraints |
Additional specifications for this field type include the following details:
Data type is NUMBER.
A object can have a total of 625 fields. Of those 625 fields, 200 fields are reserved for number, currency, and percentage fields.
The Application Composer automatically adds the percent sign.
Using the Oracle Fusion CRM Application Composer, you can extend a CRM application's object model by adding new fields to both standard or custom objects. One field type that you can add to a custom or standard object is a currency field. A currency field is a field where users in the runtime application can enter a currency amount.
Create a currency field by specifying values for the common set of field properties, such as display label and field name. You also set properties for this field that are specific to the currency field type.
The following properties are common across multiple field types:
|
Field Property |
Field Property Region |
|---|---|
|
Label |
Appearance |
|
Help Text |
Appearance |
|
Display Width |
Appearance |
|
Name |
Name |
|
Description |
Name |
|
Required |
Constraints |
|
Updateable |
Constraints |
|
Searchable |
Constraints |
|
Indexed |
Constraints |
|
Fixed Value |
Default Value |
|
Expression |
Default Value |
The following properties are unique to only certain field types, including currency fields:
|
Field Property |
Field Property Region |
|---|---|
|
Minimum Value Indicate the minimum numerical value that a user can enter into this field. |
Constraints |
|
Maximum Value Indicate the maximum numerical value that a user can enter into this field. |
Constraints |
|
Exchange Date Optionally specify the exchange date to use to calculate the currency conversion rate. Tip To use the system date when the record was created as the exchange date, specify the field's creation date as the exchange date. |
Exchange Date |
Additional specifications for this field type include the following details:
Data type is NUMBER.
A object can have a total of 625 fields. Of those 625 fields, 200 fields are reserved for number, currency, and percentage fields.
Note
Each currency field uses two number type columns: one column stores the amount itself and the other column stores the currency conversion rate that is calculated from the entered amount's currency code to the corporate currency code.
A CRM object includes the following fields to assist with currency conversion. These fields are automatically added to a CRM object, provided that the object's CRM application allows the creation of currency fields, and are derived from the CRM application's corporate currency setup.
Currency code
This is the currency code for all currency fields for an object.
Corporate currency code
Currency conversion rate type
Currency conversion for a currency field occurs as follows:
At runtime, the user enters the currency amount.
When the user saves the record:
The currency amount is stored using the currency code specified for the object.
The CRM application calculates the currency conversion rate using the object's currency code, corporate currency code, currency conversion rate type, and the currency field's specified exchange date, if any.
In addition to the entered amount, only the conversion rate that is calculated from the entered amount's currency code to the corporate currency code is stored.
If you later change either the currency code or exchange date, the CRM application recalculates the currency conversion rate for the record.
Using the Oracle Fusion CRM Application Composer, you can extend a CRM application's object model by adding new fields to both standard or custom objects. One field type that you can add to a custom or standard object is a fixed choice list. A fixed choice list is a field that contains a list of static values which are populated from FND lookup types. At runtime, your users can select one or more values from this field, depending on the field's definition.
Create a fixed choice list by specifying values for the common set of field properties, such as display label and field name. You also set properties for this field that are specific to the fixed choice list field type.
The following properties are common across multiple field types:
|
Field Property |
Field Property Region |
|---|---|
|
Label |
Appearance |
|
Help Text |
Appearance |
|
Display Width |
Appearance |
|
Name |
Name |
|
Description |
Name |
|
Required |
Constraints |
|
Updateable |
Constraints |
|
Searchable |
Constraints |
|
Fixed Value Tip If this choice list allows multiple values, you can still write an expression to preselect multiple values by default. For example, if the field is comprised of three lookup codes with (Code,Label) of (S,Small),(M,Medium),(L,Large),(XL,Extra Large), then to preselect the Small and Extra Large selections by default, set the default value to the literal string (without quotes): S,XL. |
Default Value |
The following properties are unique to only certain field types, including fixed choice lists:
|
Field Property |
Field Property Region |
|---|---|
|
Display Type Indicate if your users can select only one value, or multiple values, from the choice list at runtime. Selecting the display type is possible only during field creation. |
Appearance |
|
Lookup Type |
List of Values |
|
Constrain List by Parent Field Value Selection |
List of Values |
The values in a fixed choice list are populated from FND lookup types. Select the lookup type whose values you want to display in this choice list. Selecting the lookup type is possible only during field creation.
Or, create a new lookup type and add new values to it. You can also enter a lookup type and select the Edit icon to modify the existing values.
The set of FND lookup types that are available for selection is constrained to those lookup types that are related to this fixed choice list's object (via product code), as well as all custom lookup types that have been created for your CRM implementation.

You can constrain the actual values that display in this fixed choice list at runtime by relating this fixed choice list to a parent fixed choice list. The value selected in the parent fixed choice list drives the values that display in this fixed choice list. For example, you might want your users to see two choice lists on an Enterprise page where they can create a trouble ticket: one choice list for specifying the trouble ticket type and one choice list for specifying the trouble ticket area. If a user selects Hardware from the Type choice list, then the Area choice list should contain a list of only hardware options against which the trouble ticket can be logged.
To do this, select the Constrain List by Parent Field Value Selection check box, select the parent field, and then map the values between the parent lookup type and this field's lookup type.
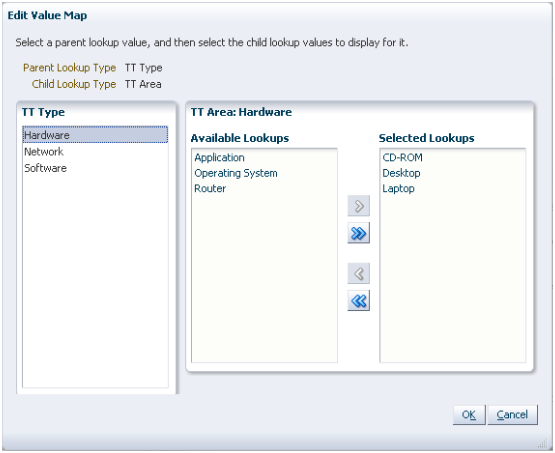
Note
The Constrain List by Parent Field Value Selection check box is available for selection only during field creation, and only if at least one other fixed choice list, which is a single-select choice list, has been defined.
After field creation, however, you can update the mapping between lookup values.
To implement the previous example:
Define the Type fixed choice list.
Define the Area fixed choice list.
Select the Constrain List by Parent Field Value Selection check box and select the parent field, Type.
Finally, map the values between the Type and Area lookup types.
For example, map all relevant hardware values in the Area lookup type's set of values, such as desktop and laptop, to the value of Hardware in the Type's lookup type.
Additional specifications for this field type include the following details:
Data type is VARCHAR2 (1500).
Using the Oracle Fusion CRM Application Composer, you can extend a CRM application's object model by adding new fields to both standard or custom objects. One field type that you can add to a custom or standard object is a dynamic choice list. A dynamic choice list is a field that contains a list of values which are populated from the actual data of another object. For example, you might want to expose on an Enterprise page a dynamic choice list which lets users specify the account that they are logging a trouble ticket against. In this example, the Account Name choice list is a field that you are adding to the trouble ticket object, but the list of values is populated by actual names from the account object.
When creating dynamic choice lists, review the following:
Review the common set of field properties, as well as the dynamic choice list-specific properties, that you must specify.
Review the options available in the List Data Source, Additional List Display Values, and Additional List Search Fields regions.
Understand how a dynamic choice list results in the implicit creation of a relationship.
Note
When you are ready to add this dynamic choice list to a page, note that you cannot add dynamic choice lists to the local search region of a custom work area.
Create a dynamic choice list by specifying values for the common set of field properties, such as display label and field name. You also set properties for this field that are specific to the dynamic choice list field type.
The following properties are common across multiple field types:
|
Field Property |
Field Property Region |
|---|---|
|
Label |
Appearance |
|
Help Text |
Appearance |
|
Display Width |
Appearance |
|
Name |
Name |
|
Description |
Name |
|
Required |
Constraints |
|
Updateable |
Constraints |
|
Searchable |
Constraints |
The following properties are unique to only certain field types, including dynamic choice lists:
|
Field Property |
Field Property Region |
|---|---|
|
Related Object |
List Data Source |
|
List Selection Display Value |
List Data Source |
|
Data Filter |
List Data Source |
|
Additional List Display Values |
Additional List Display Values |
|
Additional List Search Fields |
Additional List Search Fields |
When defining a dynamic choice list, use the following regions to determine what data will display in the list of values at runtime.
List Data Source region
Related Object
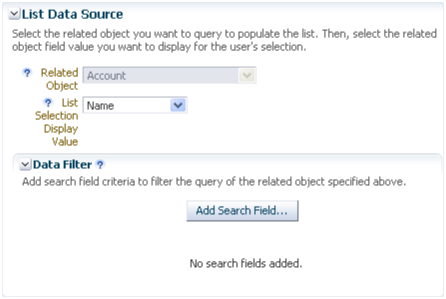
The values in a dynamic choice list are populated from another object's data. Select the related object first, then use the List Selection Display Value choice list to select the related object's field that you want to expose as a field for your own object. Selecting the related object is possible only during field creation.
Note
The set of objects that are available for selection is constrained to top-level objects only. You cannot select a child object as a related object.
In our example, the related object would be Account.
Tip
Once you create a dynamic choice list, you can easily recognize the choice list's related object from the Fields page. The Fields page displays summaries of both standard and custom fields for the selected object. If a dynamic choice list was created, then the Type column includes the related object. In our example, the field type would be Choice List (Dynamic) <Account>.
List Selection Display Value
The List Selection Display Value choice list is the related object's field that is displayed within the dynamic choice list as the first column at runtime. This is the primary field on the related object that your users will use to make the appropriate selection. In our example, the field might be something like Name.
Data Filter
You can further refine the set of data that appears within the dynamic choice list at runtime by using data filters.
In our example, we could filter out any accounts outside a particular region.
Additional List Display Values region
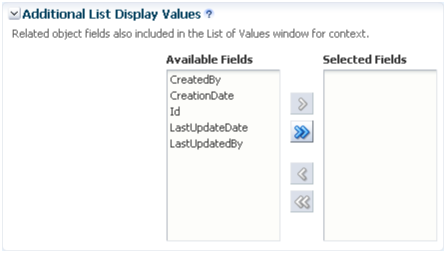
You can further refine the look and feel of the dynamic choice list by selecting additional fields to display in the choice list.
Use the Additional List Display Values shuttle to include additional related object fields in the dynamic choice list at runtime. These additional fields assist your users in making a selection from the choice list. The shuttle does not include the field that you already selected in the List Selection Display Value choice list.
There is no limit on the number of additional fields that you can select.
Additional List Search Fields region
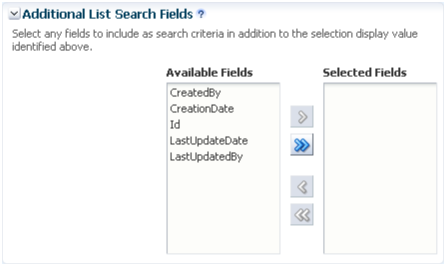
You can indicate which additional related object fields can be added as search criteria in the dynamic choice list's Search and Select dialog.
Use the Additional List Search Values shuttle to include additional related object fields in the dynamic choice list's Search and Select dialog, accessed using the Search... link at runtime. The shuttle does not include the field that you already selected in the List Selection Display Value choice list.
There is no limit on the number of additional fields that you can select.
When you create a dynamic choice list for an object based on a related object, you are implicitly creating a one-to-many foreign key relationship where the current object is the "many" object and the related object is the "one" object. This implicit creation of a relationship lets you later add a related object subtab for the "many" object on the "one" object's details page. You can view these implicitly created choice list relationships on the Relationships page.
In the previous example of making a list of accounts available for selection for a trouble ticket, an account can be tied to multiple trouble tickets. The relationship that is created is a one-to-many relationship between the account and trouble ticket objects, which enables users to store an account identifier in the trouble ticket object's table. In this relationship, the account object is the source object and the trouble ticket object is the target object. If a source object is ever deleted from the system, then at runtime, the dynamic choice list will have no values in it.
Later, you might want to expose a related object subtab on the account details page which shows, for a single account, all the trouble tickets that are related to it. You can create this related object subtab because the relationship was already created when you created the dynamic choice list.
Note
Generally, the dynamic choice list that you create results in the implicit creation of a choice list relationship. The exception is if you create a dynamic choice list between a CRM object and a common object: resource, organization contact, organization profile, address. In such cases, relationships are not implicitly created.
Additional specifications for this field type include the following details:
Data type is VARCHAR2 (1500).
Using the Oracle Fusion CRM Application Composer, you can extend a CRM application's object model by adding new fields to both standard or custom objects. One field type that you can add to a custom or standard object is a formula field. A formula field is a field that is calculated in the runtime CRM application using the Groovy-based expression included in the formula field's definition. For example, write an expression to calculate an employee's annual bonus amount.
Create a formula field by specifying values for the common set of field properties, such as display label and field name. You also set properties for this field that are specific to the formula field type.
The following properties are common across multiple field types:
|
Field Property |
Field Property Region |
|---|---|
|
Label |
Appearance |
|
Help Text |
Appearance |
|
Display Width |
Appearance |
|
Name |
Name |
|
Description |
Name |
The following properties are unique to only certain field types, including formula fields:
|
Field Property |
Field Property Region |
|---|---|
|
Formula Type Specify the field's data type, such as text, number, or date. The type can be specified only during field creation. |
Field Value Type |
|
Display Type If the formula type is Text, then indicate if you want this formula field to render in the runtime application as a simple text box. Or, indicate if the field should allow multiple lines where text can wrap. |
Appearance |
|
Depends On |
Constraints |
Use the Depends On choice list to indicate if the field should be automatically recalculated (using the expression you write) if another field's value changes.
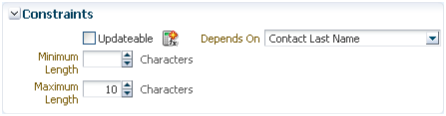
Note
The Depends On choice list includes a list of fields that belong to the same object. If you want this formula field to automatically recalculate if the value of another field on a different object changes, then you must write a server script.
Use the expression editor to write an expression that will calculate the field's value at runtime.
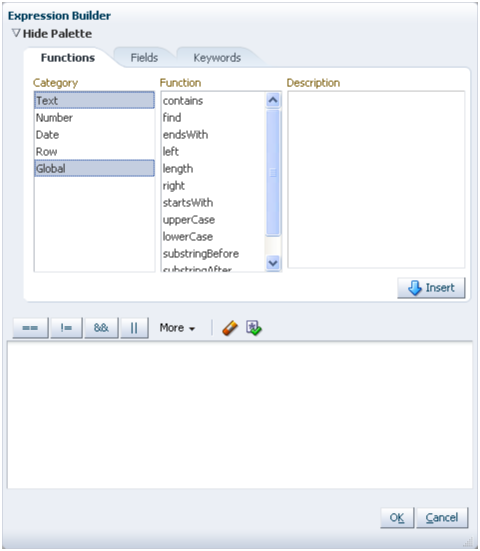
For example, if your expression calculates the value of an employee's annual bonus amount, then you could set the expression to automatically recalculate that amount if the employee's salary changes. Whenever the salary changes, the bonus field immediately reflects the new bonus amount without your users having to refresh the employee's record.
In another example, if your expression determines the right customer phone number to use for an opportunity, then you could set the expression to automatically reset the phone number if the opportunity's customer account changes. Whenever the customer account changes, the phone number field immediately reflects the new phone number without your users having to refresh the opportunity record.
Additional specifications for this field type include the following details:
Data type is set by the Formula Type property.
The formula field type is not supported by custom subject areas. This means that you cannot add formula fields to a custom report.
You cannot search on a formula field.
After you extend a CRM application's object model, your next step is to expose those new objects and fields on Enterprise pages. Customizing and creating Enterprise pages in CRM is a simplified process because the pages available to display an object are limited to a set of standard page types. Every top-level CRM object has an overview page, a creation page, and a details page, collectively known as a work area. When you create new fields, the Oracle Fusion CRM Application Composer provides work area configuration pages where you can add those fields for display. Or, create a new work area for a custom object and its fields using the work area wizard. This combination of standard page types, configuration pages, and a wizard-driven page creation process means that you can quickly and easily expose object model extensions to your users.
Review these aspects of the Enterprise page creation process in the Application Composer before you begin to customize or create new pages for a CRM application:
Using the Pages Overview page
Understanding page types
Defining pages
Creating a work area
Securing objects on pages
Using Oracle Composer to customize pages
The Pages Overview page provides an overview of the set of standard Enterprise pages for an object.
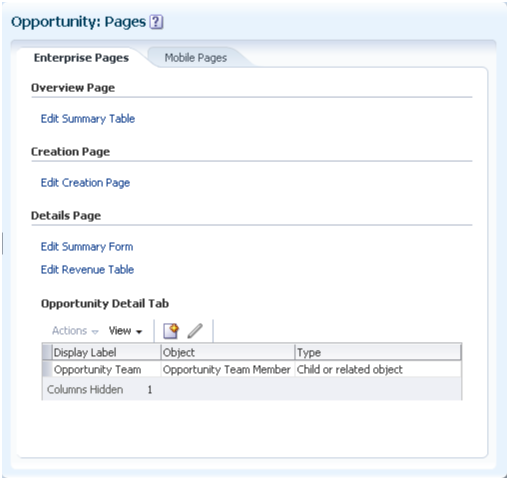
To access the Pages Overview page:
Select an application on the main Overview page.
Select a standard or custom object in the object tree.
Select the Pages node.
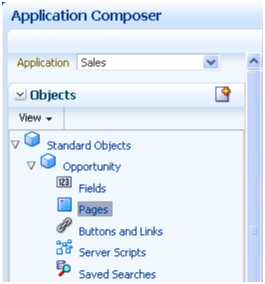
Note
Only top-level objects have pages that you can configure. A child object does not exist outside the context of the parent object, and does not have its own work area.
From the Pages Overview page, you can:
View the pages where the object is already exposed to users, and further customize those pages by adding or removing fields.
Create a new set of pages for an object, collectively known as a work area, if no set of pages has been created yet.
Create one or more subtabs to display on the object's details page.
Replicate your object model extensions into a different type of interface: pages rendered on a mobile device in Oracle Fusion Mobile Sales.
Similar to the work area creation process, the configuration process for mobile pages uses a wizard approach where you can select which custom fields and related objects to add to mobile pages. Select the Mobile Pages tab to access the mobile pages wizard.
Every top-level CRM object can be displayed on a set of standard page types: an overview page, a creation page, and a details page.
Overview page
The overview page provides a list of records for an object and is the starting point in a CRM application for users to view and manage data. Users access an object's overview page from the Navigator menu at runtime.
Note
Only top-level objects have overview pages. If an object was created as a child to another object, then the child does not have an overview page.
The overview page includes two regions:
Summary table
The summary table includes a list of the object records. Depending on the security setup, users can create or edit an object, delete an object, or drill down into an existing record.
Tip
Optionally define saved searches that users can select at runtime to constrain the list of records displayed in the summary table.
Local search region
The local search region is displayed above the summary table. Users can enter search criteria to constrain the list of records that appear in the summary table.
Creation page
The creation page is the Enterprise page where users can create new records for an object. Depending on the security setup, users access the creation page by clicking the New icon or by selecting the New menu item from the Actions menu on the summary table's toolbar.
Details page
The details page is the Enterprise page where users can view more details about an object. Depending on the security setup, users access the details page by clicking the Edit icon or by selecting the Edit menu item from the Actions menu on the summary table's toolbar. Users can also access the details page by clicking the object record name itself in the summary table.
The details page can include both a default summary and a detailed summary. The default summary includes the primary object fields and is always displayed to users. The detailed summary includes additional fields for an object. You cannot add the same field to both the default and detailed summaries.
The details page can also include information that is related to the object record, and displayed in subtabs. For example, the details page for an opportunity could include a subtab that lists customer contacts or previous orders.
Note
Some CRM objects, also known as common objects, do not have a standard work area. These include common components (note, interaction, task) and common objects (resource, organization contact, organization profile, address).
Since every top-level CRM object can be displayed on a set of standard page types, each page type has its own configuration page where you can hide or show fields. After you create new objects and fields, navigate to the Pages Overview page. The Pages Overview page contains hyperlinks to the configuration pages for an object's existing work area. Use these configuration pages to customize the object's work area pages, for example add newly created fields to a creation page.
Note
If the Pages Overview page does not contain these configuration page hyperlinks, then the object does not yet have a work area, and you must create one if you want the object to be visible to users at runtime.
Use the configuration pages available from the Pages Overview page as follows:
Navigator menu
Specify the object label that appears in the Navigator menu at runtime, for custom objects only. The label you specify is what users will select to navigate to this work area.
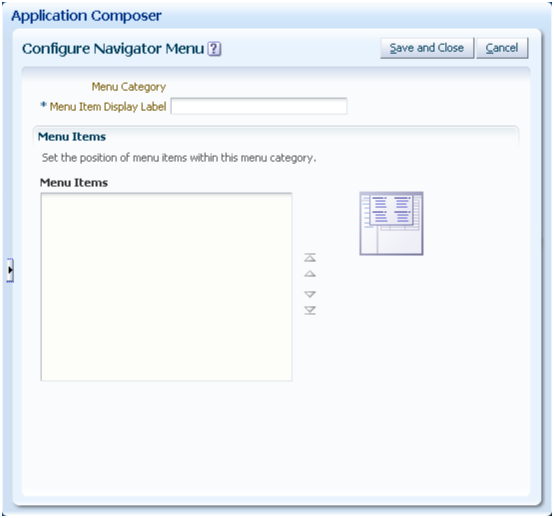
Overview page
The overview page includes two regions, each of which has its own configuration page:
Summary table
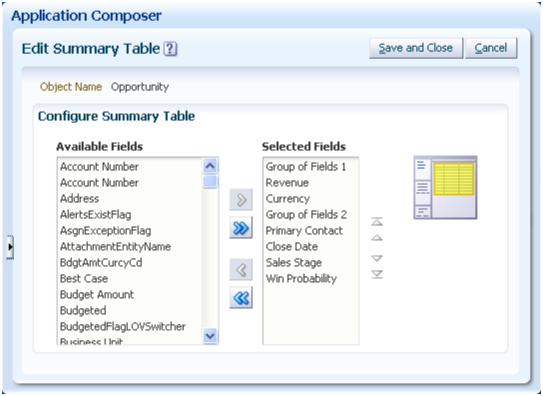
Select the fields that you want to display as columns in the summary table.
Select the Allow Access Grant check box if you want users to be able to grant access to a record in the summary table to another user.
Add custom buttons to the summary table, if you previously created them.
Local search
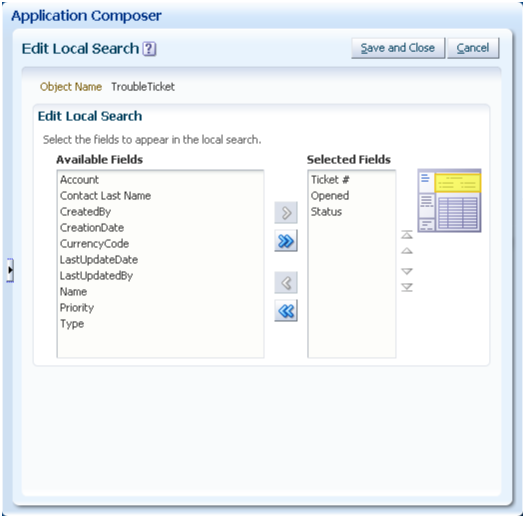
Select the fields that you want to display as search criteria fields in the local search region, for custom objects only.
The list of fields available for selection is displayed to you in a single column, although the local search is formatted as a region with two columns. The first field you select is displayed in the first column, the second field you select is displayed in the second column, the third field you select is displayed in the first column again, and so on.
Note
During field creation, consider indexing any fields that you plan to display as search criteria for your custom objects.
Creation page
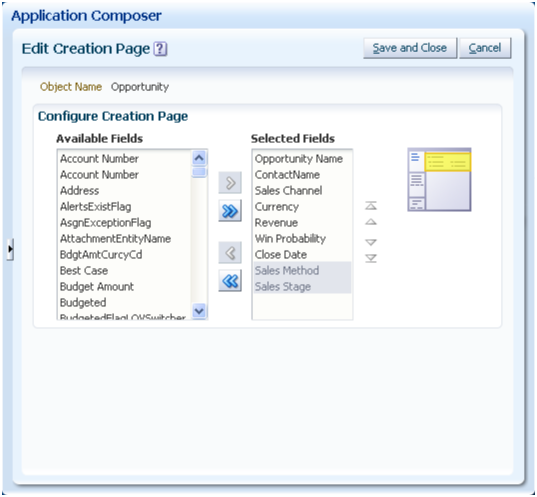
Select the fields that you want to display on the object's creation page.
The fields that you select should include the object's required fields.
The list of fields available for selection is displayed to you in a single column, although the creation page is formatted as a page with three columns. The first field you select is displayed in the first column, the second field you select is displayed in the second column, the third field you select is displayed in the third column, the fourth field you select is displayed in the first column again, and so on.
Details page
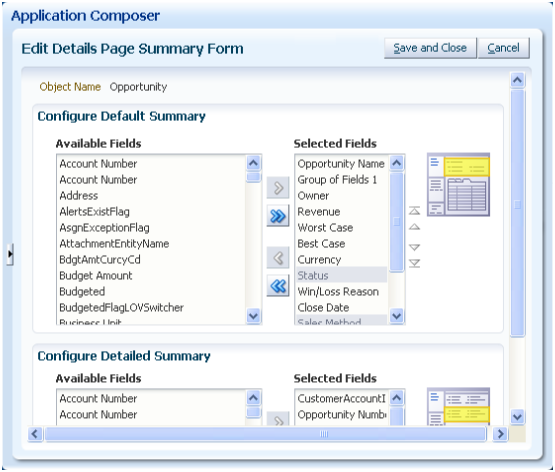
Select the fields that you want to display on the object's details page, including both the default summary and detailed summary regions.
Tip
Include the primary object fields in the default summary, since the detailed summary could be collapsed when users navigate to this page.
The list of fields available for selection is displayed to you in a single column, although the details page is formatted as a page with three columns. The first field you select is displayed in the first column, the second field you select is displayed in the second column, the third field you select is displayed in the third column, the fourth field you select is displayed in the first column again, and so on.
Add custom buttons to the details page, if you previously created them.
The Pages Overview page also lets you configure subtabs that display on the details page. Subtabs include information that is related to the object record. For example, the details page for an opportunity could include a subtab that lists customer contacts or previous orders. Adding subtabs to a details page is discussed in a related topic.
If the object uses a tree to display related pages, rather than subtabs, then you can configure tree nodes that you add to the object's tree. Similar to subtabs, tree node data can be derived from another object, or from another source outside the current Oracle Fusion CRM application altogether. Adding tree nodes to an object's tree is discussed in a related topic.
Note
As previously mentioned, some CRM objects (common components and common objects) do not have a standard work area. This means that the configuration pages available from their Pages Overview page are different than described above. For example, the Trading Community address object has configuration pages for customizing the overview page, creation page, and address details form. The Trading Community organization profile has configuration pages for customizing only the details form and create form.
When you customize pages for common objects, the changes you make are reflected across the multiple applications where the object is used, provided that the applications also share the same metadata repository.
When first created, top-level custom objects do not yet have pages in a runtime CRM application where those objects are exposed to users. After you create such a custom object, you must create a set of pages where records belonging to this object are exposed to users.
The Application Composer employs a wizard approach to walk you through the creation of these pages, also known as a work area. Creating a work area is discussed in a related topic.
You do not create a work area for child objects.
After you create custom objects and fields, you then expose them on Enterprise pages for your users. Your next step is to control which users can access that object's data at runtime. By default, the object and its records are visible and editable only to a default duty role specified by the application. Grant additional access manually for either an object or role, using the Application Composer's security policy configuration pages.
The security options available to you for restricting access to custom objects, including child objects, are discussed in a related topic.
Once you create a set of new pages, or edit preexisting pages delivered by a CRM application, you cannot use Oracle Composer to edit those pages again.
Note
The exception is the customer profile in Oracle Fusion Customer Center. You can create and add new fields to the Sales Account region on the customer profile using Oracle Composer.
When first created, custom objects do not yet have pages in a runtime CRM application where those objects are exposed to users. After you create a top-level custom object, you must create a set of Enterprise pages, also known as a work area, for that object. Every CRM object can be displayed on a work area, which consists of an overview page, a creation page, and a details page. The Oracle Fusion CRM Application Composer employs a wizard approach to walk you through the creation of that object's work area. After you create the initial work area, you can always navigate to the object's Pages Overview page to continue to customize those Enterprise pages using work area configuration pages. You do not create a work area for child objects. To create and modify pages displayed on a mobile device, use the separate Mobile Pages wizard which is also available from the object's Pages Overview page.
Review these aspects of the work area creation process in the Application Composer before you create a new work area for a custom object:
Using the work area wizard
Configuring the Navigator menu
Configuring the local search region
Configuring the overview and creation pages
Configuring the details page
Access the wizard on the Pages Overview page using the same navigation path that you use to configure pages in an existing work area. However, if a work area has not yet been created for an object, then hyperlinks to the work area configuration pages are not displayed. Instead, the Pages Overview page displays only a single hyperlink to launch the work area wizard.
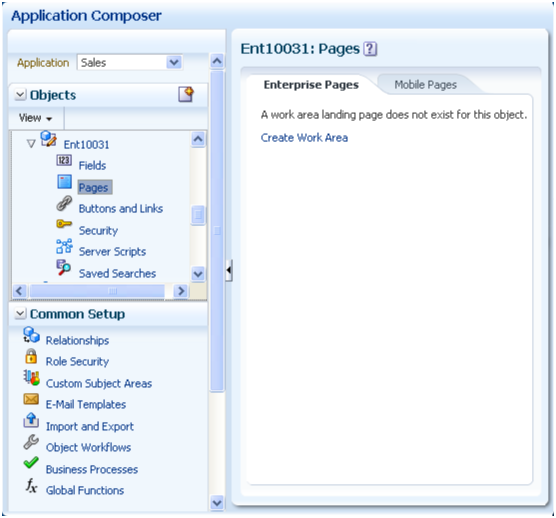
To access the work area wizard:
Select an application on the main Overview page.
Select a standard or custom object in the object tree.
Select the Pages node.
Note
Only top-level objects have pages that you can configure. A child object does not exist outside the context of the parent object, and does not have its own work area.
Select the hyperlink to launch the work area wizard.
Note
Use the work area wizard to create a work area.
Use the work area configuration pages to customize existing work area pages.
As part of the work area creation for a custom object, you must specify the object label that appears in the Navigator menu at runtime. The label you specify is what users will select to navigate to this work area.
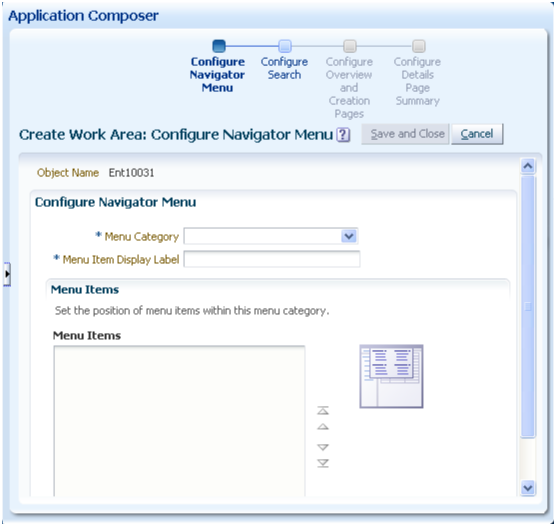
On this page, you can also do the following:
Select a menu category under which the object label appears.
Adjust the position of Navigator menu items within the selected menu category.
For example, move your newly created object label to appear at the top of the list.
After creating the work area for a custom object, the work area label automatically appears in the Navigator menu without your having to reauthenticate.
Note
Changing the object label on the Navigator menu is available in the Application Composer only for custom objects. To change the menu label for a standard object, refer to Fusion Setup Manager documentation.
Select the fields that you want to display as search criteria in the local search region. The local search region appears above the summary table on an object's overview page. Adding fields to this region is optional.
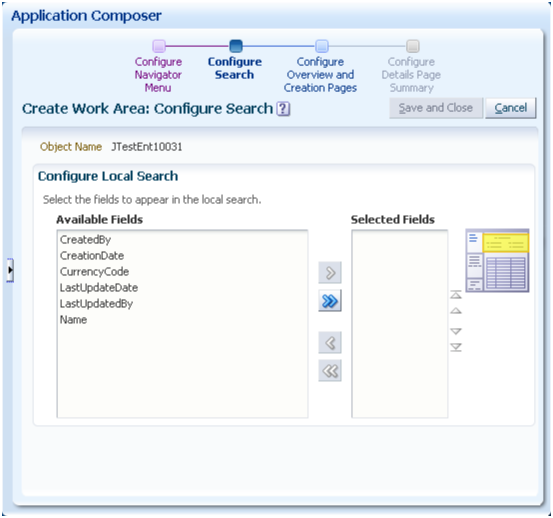
Select the fields that you want to display as search criteria fields in the local search region.
The list of fields available for selection is displayed to you in a single column, although the local search region is formatted as a region with two columns. The first field you select is displayed in the first column, the second field you select is displayed in the second column, the third field you select is displayed in the first column again, and so on.
Note
During field creation, consider indexing any fields that you plan to display as search criteria for your custom objects.
Select the fields that you want to display in the work area's overview page, and in the object's creation page.
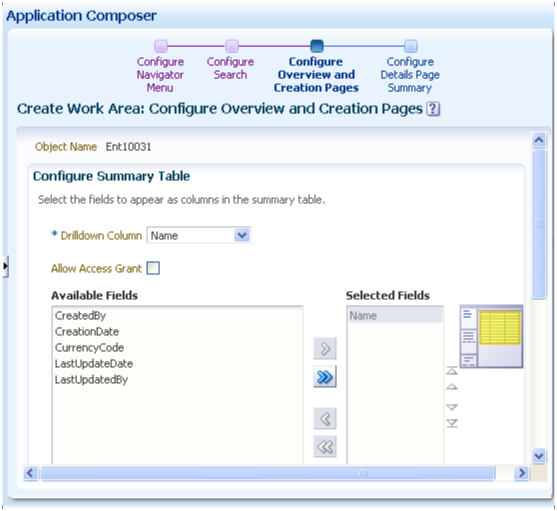
Select the fields that you want to display as columns in the summary table, on the object's overview page.
Select the drilldown column for the summary table.
The drilldown column is the column in the summary table that users can click to drill down to an object record's details page. You cannot change a summary table's drilldown column after the work area is created.
Select the Allow Access Grant check box if you want users to be able to grant access to a record in the summary table to another user, at runtime.
Add custom buttons to the summary table, if you previously created them.
Select the fields that you want to display on the object's creation page.
The fields that you select should include the object's required fields.
The list of fields available for selection is displayed to you in a single column, although the creation page is formatted as a page with three columns. The first field you select is displayed in the first column, the second field you select is displayed in the second column, the third field you select is displayed in the third column, the fourth field you select is displayed in the first column again, and so on.
Select the fields that you want to display on the object's details page.
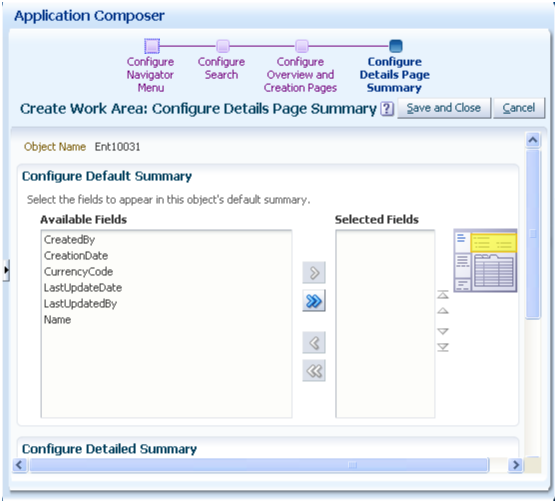
Note
A details page can have subtabs, which include information that is related to the object record. For example, the details page for an opportunity could include a subtab that lists customer contacts or previous orders. To add subtabs to a details page, create the work area first, then navigate back to the Pages Overview page. Adding subtabs to a details page is discussed in a related topic.
Select the fields that you want to display on the object's details page, including both the default summary and detailed summary regions.
Tip
Include the primary object fields in the default summary, since the detailed summary could be collapsed when users navigate to this page.
The list of fields available for selection is displayed to you in a single column, although the details page is formatted as a page with three columns. The first field you select is displayed in the first column, the second field you select is displayed in the second column, the third field you select is displayed in the third column, the fourth field you select is displayed in the first column again, and so on.
Add custom buttons to the details page, if you previously created them.
Select the Allow Attachments check box to enable the attachments feature on the runtime details page, in the collapsible detailed summary.
Every top-level CRM object has a details page as part of its work area. When configuring the details page, you can optionally display details that are related to the current object but derived from another object, or from another source outside the current Oracle Fusion CRM application altogether. You do this by adding subtabs to the details page, and specifying the source of subtab data. Add subtabs to a standard or custom object's details page from that object's Pages Overview page in the Oracle Fusion CRM Application Composer.
Review these aspects of the subtab creation process in the Application Composer before you begin to add subtabs to an object's details page:
Using the Details page
Adding subtabs
Subtab types:
Child or related object subtabs
Context link subtabs
Common component subtabs
Web content subtabs
Note
Subtabs and tree nodes are two master/detail UI patterns which Oracle Fusion CRM applications support.
For custom objects, only subtabs are supported.
For standard objects that are already using tree nodes, such as the Sales Account Profile and Partner objects, additional details adopt the same tree node pattern. In other words, if a standard object uses a tree to display its related pages, then you would expose child or related objects, for example, as tree nodes instead of subtabs on a details page. Adding tree nodes is discussed in a related topic.
The details page is the Enterprise page where users can view more details about an object. Depending on the security setup, users access the details page by clicking the Edit icon or by selecting the Edit menu item from the Actions menu on the summary table's toolbar. Users can also access the details page by clicking the object record name itself in the summary table.
The details page can include both a default summary and a detailed summary. The default summary includes the primary object fields and is always displayed to users. The detailed summary includes additional fields for an object. You cannot add the same field to both the default and detailed summaries.
The details page can also include information that is related to the object record, and displayed in subtabs. For example, the details page for an opportunity could include a subtab that lists customer contacts or previous orders.
Add a subtab to an object's details page from that object's Pages Overview page. The details page must exist already; you cannot add subtabs when first creating a work area.
To add a subtab to an existing details page:
Select an application on the main Overview page.
Select a standard or custom object in the object tree.
Select the Pages node.
Note
Only top-level objects have pages that you can configure. A child object does not have its own work area.
On the Pages Overview page, click the Create Subtab icon in the Details Page region to create one or more subtabs to display on the object's details page.
Select the type of subtab you want to add.
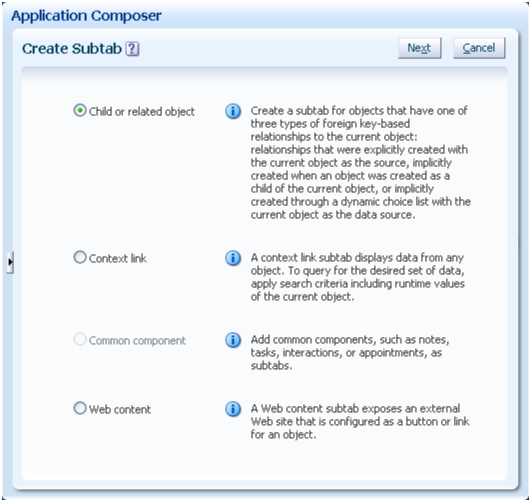
A relationship is a foreign key association between two objects. Using the Application Composer, you can create a one-to-many relationship between two objects within the same application. Once relationships are created, you can expose the "many" objects on a subtab that is displayed on the "one" object's details page. For example, an account can have multiple service requests associated to it. To expose a list of service requests associated with a specific account as a subtab on the account's details page, you must first create a one-to-many relationship between the account and service request objects. In this example, the account is the source object and the service request is the target object. This relationship adds the account identifier to the service request object's table.
The Application Composer lets you add a subtab to an object's details page for either a child object or for three types of related objects. These objects exist in four types of one-to-many relationships:
Parent child relationship
Parent child relationships are implicitly created when a custom object is created as a child of a top-level object.
For example, to enable the creation of a subaccount subtab on an account's details page, you would create the subaccount object as a child of the account object. This relationship adds the account identifier to the subaccount object's table.
Choice list relationship
Choice list relationships are implicitly created between two objects when you create a dynamic choice list field.
For example, to enable the creation of a department subtab on an employee's details page, you would create a dynamic choice list, HR Representative, for the department object where the choice list's related object is employee. The Application Composer automatically creates the underlying relationship for you, where the employee is the source object and the department is the target object. This relationship adds the employee identifier to the department object's table, thus enabling the creation of a department subtab on an employee's details page. The subtab displays all departments that an HR representative can manage, since each HR representative can be in charge of multiple departments of a company.
Reference relationship
Reference relationships are explicitly created between two top-level objects using the Create Relationships page.
Using our previous example, perhaps you don't need to display an HR Representative choice list on a department Enterprise page, but you still want to add a department subtab to an employee's details page. In this case, manually create a reference relationship between the employee and department objects where the employee is the source object and the department is the target object. This enables the creation of the department subtab. Such a reference relationship, however, does not automatically create a corresponding HR Representative choice list for use on the department Enterprise page. In fact, once you manually create a relationship, you cannot reuse the relationship to create a choice list. This means that you should carefully consider the need for a choice list before you create a reference relationship.
Standard relationship
Standard relationships are relationships that are already created between two standard objects by the Oracle Fusion CRM application.
To add a child or related object subtab to an existing details page:
On the Pages Overview page, click the Create Subtab icon.
Select Child or Related Object.

On the Child or Related Object subtab configuration page:
Select the related object from the list of all related objects that is to be exposed on the subtab, and choose the subtab display label.
Optionally hide the New and Delete buttons that appear on the subtab at runtime.
For child object subtabs, you can also optionally hide the Edit button.
For child object subtabs only, specify if you want to display the Manage Permission button on the subtab at runtime.
At runtime, users can select an object record and click that button to specify the level of access another user should have to the selected record.
Select which fields and links you want to display on the subtab summary table at runtime.
You can configure fields and links for the main summary table which lists the child object records or related object records.
Select which buttons you want to display on the subtab at runtime.
Note
This region appears only if you previously created buttons for this object.
Select which fields you want to display on the subtab detail form at runtime.
You can configure fields for the detail form that appears under the summary table. If the subtab's object is a child object, then users can enter child object data into this detail form at runtime. Always include required fields in this section.
If the subtab's object is a related object, then users can associate an existing record of the subtab object to the master object of the page. However, to create new related object records, users must do so in the object's own creation page.
A context link subtab displays a filtered list of records from any top-level object, where the filter is often based on the runtime values from the current object. The object does not have to be related to the current object. Context link subtabs are read only.
To add a context link subtab to an existing details page:
On the Pages Overview page, click the Create Subtab icon.
Select Context Link.

On the Context Link subtab configuration page:
Select the object that is to be exposed on the subtab, and choose the subtab display label.
Optionally constrain the list of records displayed at runtime using a set of search criteria for the selected object, whose runtime values must match the current object record's runtime values.
Tip
Values can be literal values, or derived from the runtime values in the current object record, or from the runtime values in the current object's parent record.
If your search criteria includes a fixed choice list field, then you must specify the fixed choice list's runtime value using the lookup code, not the lookup meaning.
Select which fields you want to display on the subtab's read-only summary table at runtime.
You can configure fields for the main summary table which lists the child object records or related object records.
Select which fields you want to display on the subtab's read-only detail form at runtime.
You can configure fields for the detail form that appears under the summary table.
A common component subtab adds a Notes, Tasks, Interactions or Appointments subtab to show a list of the selected components related to a custom, top-level object. Each component has a standard user interface (UI) that is shared across all Oracle Fusion CRM applications. To customize such a UI for all common components (other than Appointments), select the appropriate object under the Common application, then select the Pages node on the object's navigation tree to access the work area configuration pages.
At runtime, users can access these subtabs and create a common component record that is tied to the object record. For example, a user can record a customer interaction on an service request record.
Notes
Tasks
Interactions
Appointments
To add a common component subtab to an existing details page:
On the Pages Overview page, click the Create Subtab icon.
Select Common Component.
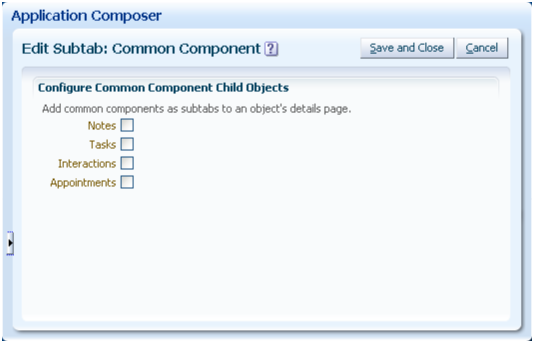
On the Common Component subtab configuration page, select the type of common component you want to add to the details page as a subtab.
A Web content subtab exposes an external Web site right on an object's details page. The Web content is a result of the expression that you define which builds the intended URL.
For example, on the Contact details page, perhaps you want to add a Google map that shows the location of the contact. The Google Maps API expects the URL to be formatted in a certain manner. In this example, write an expression using the fields: Contact Address, Contact City and Contact State. Then, pass the URL to the Google Maps API.
To add a Web content subtab to an existing details page:
On the Pages Overview page, click the Create Subtab icon to create one or more subtabs to display on the object's details page.
Select Web Content.
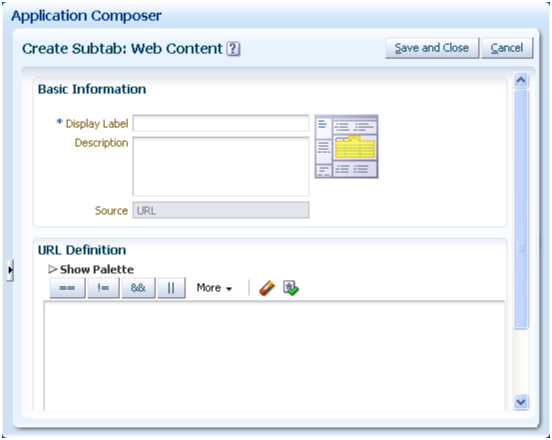
On the Web Content subab configuration page, enter the display label for the subtab, and then define the URL to retrieve the subtab's Web content.
Optionally use the expression editor to build the URL expression that you need.
The expression you build should include the following:
Use the HTTP protocol.
Optionally include field values from the current object as parameters, or user variables.
Enclose static strings in double quotation marks.
For example, "http://www.abc.com/".
For example:
def myURL1 = adf.util.GlobalEncodeField(ContactAddress_c)
def myURL2 = adf.util.GlobalEncodeField(ContactCity_c)
def myURL3 = adf.util.GlobalEncodeField(ContactState_c)
def myfinalURL = "http://maps.google.com/maps?hl=en&q=" + myURL1 + "+" + myURL2 + "+" + myURL3
return(myfinalURL)
Some CRM standard objects, such as the Sales Account Profile and Partner objects, use a tree to display its related pages. When configuring an object's work area, you can optionally display details that are related to the current object by adding tree nodes to the object's tree, and specifying the source of tree node data. Tree node data can be derived from another object, or from another source outside the current Oracle Fusion CRM application altogether. Add a tree node to a standard object's tree from that object's Pages Overview page in the Oracle Fusion CRM Application Composer.
Review these aspects of the tree node creation process in the Application Composer before you begin to add tree nodes to an object's tree:
Adding tree nodes
Tree node types:
Child or related object tree nodes
Context link tree nodes
Web content tree nodes
Note
Subtabs and tree nodes are two master/detail UI patterns which Oracle Fusion CRM applications support.
For custom objects, only subtabs are supported.
For standard objects that are already using tree nodes, such as the Sales Account Profile and Partner objects, additional details adopt the same tree node pattern. In other words, if a standard object uses a tree to display its related pages, then you would expose child or related objects, for example, as tree nodes instead of subtabs on a details page. Adding subtabs is discussed in a related topic.
Add a tree node to an object's tree from that object's Pages Overview page.
To add a tree node to an object's tree:
Select an application on the main Overview page.
Select a standard object, either the Sales Account Profile or Partner object, in the object tree.
Select the Pages node.
Note
Only the top-level objects, Sales Account Profile and Partner, let you add tree nodes.
On the Pages Overview page, click the Create Tree Node icon to create one or more tree nodes to display on the object's tree.
Select the type of tree node you want to add.
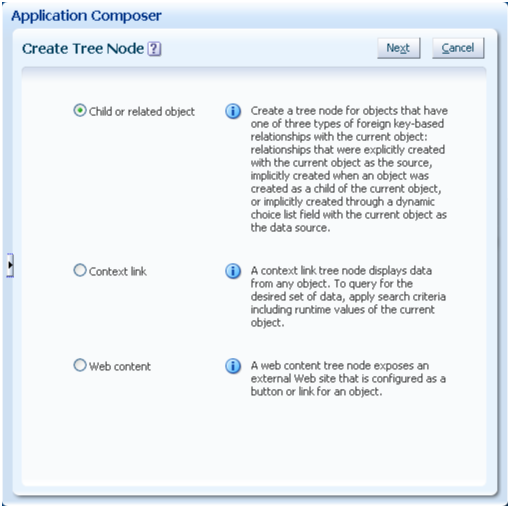
A relationship is a foreign key association between two objects. Using the Application Composer, you can create a one-to-many relationship between two objects within the same application. Once relationships are created, you can expose the "many" objects on a tree node that is displayed on the "one" object's tree. For example, a partner can have multiple contacts associated to it. To expose a list of contacts associated with a specific partner as a tree node on the partner's tree, you must first create a one-to-many relationship between the partner and contact objects. In this example, the partner is the source object and the contact is the target object. This relationship adds the partner identifier to the contact object's table.
The Application Composer lets you add a tree node to an object's tree for either a child object or for three types of related objects. These objects exist in four types of one-to-many relationships, which are described in detail in the related topic about object relationships:
Parent child relationship
Choice list relationship
Reference relationship
Standard relationship
To add a child or related object tree node to an existing tree:
On the Pages Overview page, click the Create Tree Node icon.
Select Child or Related Object.
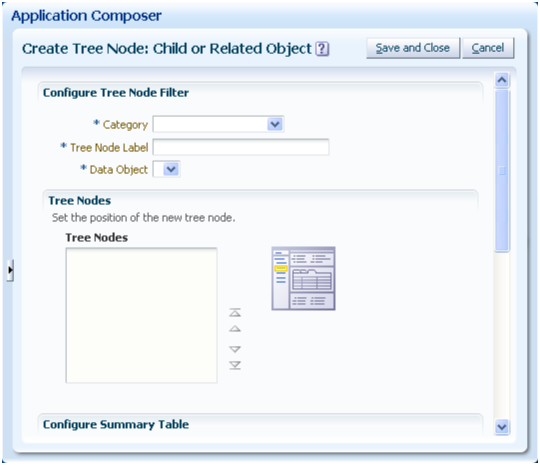
On the Child or Related Object tree node configuration page:
Select the tree node category and enter the tree node label.
Select the related object from the list of all related objects that is to be exposed on the tree node page.
Set the position of the new tree node.
Optionally hide the New and Delete buttons that appear on the tree node page at runtime.
For child object tree node pages, you can also optionally hide the Edit button.
For child object tree node pages only, specify if you want to display the Manage Permission button on the tree node page's summary table at runtime.
At runtime, users can select an object record and click that button to specify the level of access another user should have to the selected record.
Select which fields and links you want to display on the tree node page's summary table at runtime.
You can configure fields and links for the main summary table which lists the child object records or related object records.
Select which buttons you want to display on the tree node page at runtime.
Note
This region appears only if you previously created buttons for this object.
You cannot add buttons to a tree node page for the Sales Account Profile object.
Select which fields you want to display on the tree node page's detail form at runtime.
You can configure fields for the detail form that appears under the summary table. If the tree node's object is a child object, then users can enter child object data into this detail form at runtime. Always include required fields in this section.
If the tree node's object is a related object, then users can associate an existing record of the tree node object to the master object of the page. However, to create new related object records, users must do so in the object's own creation page.
A context link tree node page displays a filtered list of records from any top-level object, where the filter is often based on the runtime values from the current object. The object does not have to be related to the current object. Context link tree node pages are read only.
To add a context link tree node to an object's tree:
On the Pages Overview page, click the Create Tree Node icon.
Select Context Link.
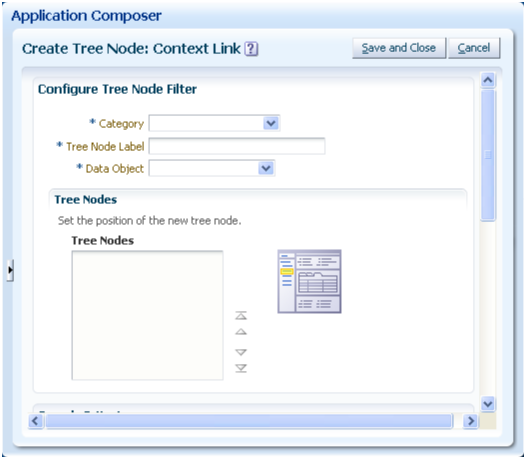
On the Context Link tree node configuration page:
Select the tree node category and enter the tree node label.
Enter the name of the tree node filter.
Select the object that is to be exposed on the tree node page.
Set the position of the new tree node.
Optionally constrain the list of records displayed at runtime using a set of search criteria for the selected object, whose runtime values must match the current object record's runtime values.
Tip
Values can be literal values, or derived from the runtime values in the current object record, or from the runtime values in the current object's parent record.
If your search criteria includes a fixed choice list field, then you must specify the fixed choice list's runtime value using the lookup code, not the lookup meaning.
Select which fields you want to display on the tree node page's read-only summary table at runtime.
You can configure fields for the main summary table which lists the child object records or related object records.
Select which fields you want to display on the tree node page's read-only detail form at runtime.
You can configure fields for the detail form that appears under the summary table.
A Web content tree node page exposes an external Web site on an Enterprise page. The Web content is a result of the expression that you define which builds the intended URL.
For example, on the Contact tree node page, perhaps you want to add a Google map that shows the location of the contact. The Google Maps API expects the URL to be formatted in a certain manner. In this example, write an expression using the fields: Contact Address, Contact City and Contact State. Then, pass the URL to the Google Maps API.
To add a Web content tree node to object's tree:
On the Pages Overview page, click the Create Tree Node icon to create one or more tree nodes to display on the object's tree.
Select Web Content.
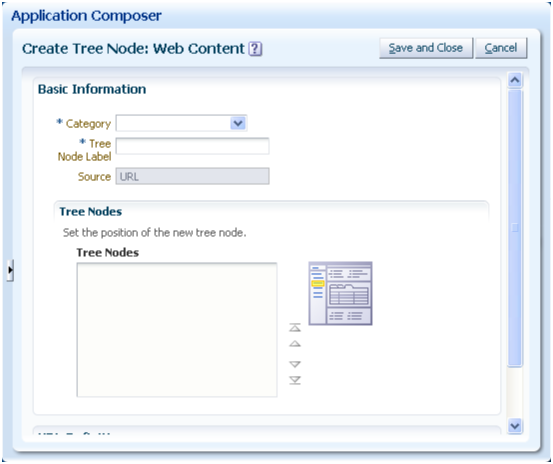
On the Web Content tree node configuration page:
Select the tree node category and enter the tree node label.
Set the position of the new tree node.
Define the URL to retrieve the tree node page's Web content.
Optionally use the expression editor to build the URL expression that you need.
The expression you build should include the following:
Use the HTTP protocol.
Optionally include field values from the current object as parameters, or user variables.
Enclose static strings in double quotation marks.
For example, "http://www.abc.com/".
For example:
def myURL1 = adf.util.GlobalEncodeField(ContactAddress_c)
def myURL2 = adf.util.GlobalEncodeField(ContactCity_c)
def myURL3 = adf.util.GlobalEncodeField(ContactState_c)
def myfinalURL = "http://maps.google.com/maps?hl=en&q=" + myURL1 + "+" + myURL2 + "+" + myURL3
return(myfinalURL)
When configuring the work area for a standard or custom object, you can add custom buttons or links to certain work area locations. A button can perform an action or navigate the user to another page in the runtime application, or to another Web site entirely. A link can take the user to another Web site. Web sites can be either inside or outside the user's firewall. For example, you might want to provide a static link from an overview page to a corporate Web site. Or, you might want to include a button on a summary table, which users can click at runtime to create a new type of record from a selected row, such as escalating an existing "trouble ticket" to a more severe "case" that can be separately managed. To add buttons or links, you first define a button or link for an object. Next, you use the Oracle Fusion CRM Application Composer's work area configuration pages to add that button or link to an overview page or details page.
You add buttons or links from the Create Button or Link page.
To add a button or link:
Select an application on the main Overview page.
Select a standard or custom object in the object tree.
Select the Buttons and Links node.
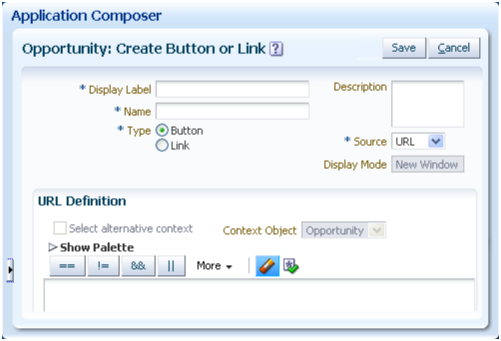
When you define a button, you specify what the button should do once clicked at runtime. To do this, indicate if the button's source is a URL or script.
If the source is a URL, you can enter a static URL, enclosed in double quotation marks. Or define the URL using the expression editor, which provides access to this object's fields to assist you in constructing the URL. If this object has a parent or relationship with a source object, then optionally change the context to access another object's fields for URL definition.
If the source is a script, you can either select a predefined object function from the Method Name choice list, or create a new object function using the expression editor.

Note
The object functions that you can tie to a button must have a return type of void, with no parameters.
After you define a button for an object, you can add that button to a variety of locations in that object's work area:
Summary table on the overview page
Default summary on the details page
Summary table on a details page's subtab
Summary table on a tree node page for a child object
Revenue table on the details page for the opportunity object
When you define a link, you can enter either a static URL, or construct a URL using the expression editor.
Enclose static URLs in double quotation marks. Or define the URL using the expression editor, which provides access to this object's fields to assist you in constructing the URL. If this object has a parent or relationship with a source object, then optionally change the context to access another object's fields for URL definition.
After you define a link for an object, you can add that link to a variety of locations in that object's work area. You can add a link wherever you can add a field. Possible locations include, but are not limited to:
As a column in the summary table on the overview page
Default summary on the details page
As a column in the summary table on a details page's subtab
In the detail form under the summary table on a details page's subtab
As a column in the summary table on a tree node page for a child object
As a column in the revenue table on the details page for the opportunity object
A saved search is a predefined set of search criteria that you define which users can apply at runtime to a standard or custom object's overview page. The overview page provides a list of records for an object in a summary table, which is the starting point in a CRM application for users to view and manage data. If you think your users will be most interested in a particular data set (for example, the top 10 opportunities), then define a saved search for an object. At runtime, users can select a saved search from the Saved Search choice list to constrain the list of records that appear in the summary table. Users can also personalize the list of saved searches by creating new saved searches.
Review these aspects of the saved search definition process in the Oracle Fusion CRM Application Composer before you begin to define saved searches for CRM objects:
Saved searches at runtime
Defining a saved search
The list of saved searches is available from the Saved Search choice list above the overview page's summary table.
The list of saved searches includes the searches you define, as well as any personal searches that users defined themselves using personalization. Searches are displayed in alphabetical order, followed by the Personalize option.
The saved searches that you define for an object are available to all users and roles with functional security access to the object's overview page.
You define a saved search for an object on the object's Create Saved Search page. You define saved searches only for top-level objects, because only top-level objects have overview pages in the runtime CRM application.
To define a saved search for an object:
Select an application on the main Overview page.
Select a standard or custom object in the object tree.
Select the Saved Searches node.
On the Create Saved Search page for the object, enter the display label for the saved search.
The display label is the label that appears in the Saved Search choice list.
Enter the internal name and description for the saved search.
The name is automatically generated based on the specified display label, where all spaces use an underscore. For example, Top Ten Opportunities is automatically populated as Top_Ten_Opportunities.
Specify the search criteria that you want to include.
You can enter up to four search conditions using the following criteria:
Specify the matching criteria, All or Any.
All appends multiple conditions with an AND.
Any appends two conditions with an OR.
If more than two conditions exist, then you cannot select Any.
Field Name
Specify the object field who value you want to include as a search criterion.
Long text and formula fields are not available for use in saved searches.
Tip
For better performance, the fields you include in a saved search should be indexed. You index a field when it's first created.
Operator
Operator values available for selection are dependent upon the type of field selected.
This table lists, for each field type, the operators that are available for selection, as well as the values that you can enter.
|
Field Type |
Available Operators |
Available Values |
|---|---|---|
|
|
Enter a literal value. Note For percentage fields, divide the percentage by 100 to calculate the literal value you should enter as a search criterion. For example, to correctly use 150% in your saved search, you must enter 1.5. |
|
|
Enter a literal value. Tip For fixed choice list fields, you must enter the lookup code, not the lookup meaning. |
|
|
Enter:
|
Value
The values that you specify are applied as the search criteria against the object records at runtime.
See the previous table.
After you create custom objects and fields, you then expose them on Enterprise pages for your users. Your next step is to control which users can access that object's data at runtime. By default, the object and its records are visible and editable only to a default duty role specified by the application. Grant additional access manually using the Oracle Fusion CRM Application Composer's security policy configuration pages. A security policy specifies which users are authorized to access an object's data, and what type of access they have. For example, does a user have view only access, or can the user create and update an object's record, as well? Define security policies for an object by authorizing the roles whose users can access that object's data. Or, define security policies for a role by specifying access levels across multiple custom objects.
Review these aspects of the custom object security process in the Application Composer before you begin to define your security policies:
Securing objects
Securing roles
Enabling function security and data security
CRM Application Composer and the Oracle Authorization Policy Manager (APM)
Default security settings
The object-centric Define Policies page displays a list of the enterprise-level duty roles which map to a CRM job role. Use this page to manage access to either a top-level or child custom object by specifying a security policy for one or more duty roles. When you do this, users with the corresponding roles can access the custom object and its data, depending on the security policies you define.
To access the object-centric Define Policies page:
Select an application on the main Overview page.
Select a custom object in the object tree.
Select the Security node.
Or, from the role-centric Define Policies page, select a custom object.
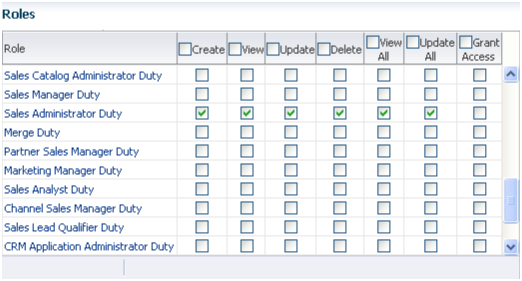
From the object-centric Define Policies page, you can:
Enable function security for a role.
Enable data security for a role.
Allow users to grant access to a specific record at runtime, to users with a given role.
The Role Security page displays a list of the enterprise-level duty roles, which map to a CRM job role. Select a role and click the Define Policies button to navigate to the role-centric Define Policies page, which displays a list of the custom objects for your CRM implementation. Use this page to manage access for users with the corresponding role by specifying a security policy for one or more top-level or child custom objects. When you do this, users with the corresponding role can access the custom objects and related data, depending on the security policies you define.
To access the role-centric Define Policies page:
Select an application on the main Overview page.
Select the Role Security node from the Common Setup pane.
Or, select the Role Security hyperlink in the local area of the main Overview page.
Or, from the object-centric Define Policies page, select a role.
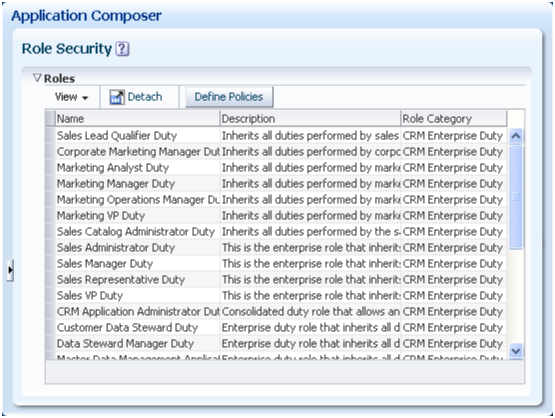
Click the Define Policies button.
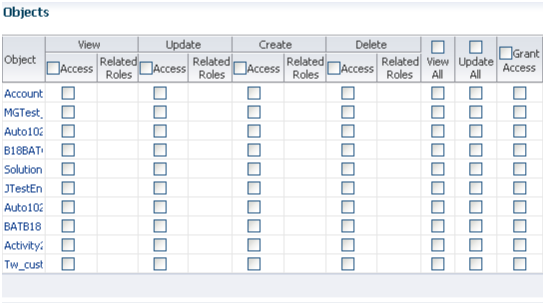
From the role-centric Define Policies page, you can:
Enable function security for a custom object.
Enable data security for a custom object.
Allow users to grant access to a specific record at runtime, to users with a given role.
View related roles, if any.
If a related role is displayed next to an object, then the selected role is inheriting its access to that object from the related role. You can drill down into the related role to view its security policies.
A security policy specifies the type of access to an object and its records that users with the corresponding roles have. Access includes both function security as well as data security. Security settings are the same whether you are defining a security policy for an object or a role.
On the Define Policies page, the first four columns in the table manage function security, which applies to the object as a whole:
Create
Users with the corresponding role can create a record of the object.
View
Users with the corresponding role can view the object's work area pages.
Update
Users with the corresponding role can update a record of the object.
Delete
Users with the corresponding role can delete a record of the object.
The next two columns in the table manage data security.
View All
Users with the corresponding role can view the object's records.
Update All
Users with the corresponding role can update the object's records.
Tip
When clicking View All or Update All, the corresponding View and Update function security check boxes are automatically selected.
Wait for the page to refresh to confirm all your selections.
The last column contains the Grant Access check box. Selecting this check box controls the display of the Manage Permission button on the object's summary table at runtime. At runtime, users with the corresponding role (or an administrative role) can select an object record and click that button to specify the level of access another user should have to the selected record.
Note
To let users view or update records at runtime, you must enable both function security as well as data security for an object. To let users create records, you only have to enable function security. To let users delete records, you must grant users instance-level delete privileges using the Grant Access check box and the runtime Manage Permission button.
Across Oracle Fusion applications, Oracle Authorization Policy Manager (APM) manages the security policies that control access based on roles. However, you define the security policies for custom objects in the Application Composer's object-centric and role-centric Define Policies pages. This is outside APM.
Since you define the security policies outside APM, you cannot later modify the security policies within APM. Instead, modify all security policies for custom objects using only the Application Composer.
By default, top-level custom objects are visible and editable only to users with a default duty role specified by a CRM application. You must manually grant additional access to other duty roles, if desired. For example, if you create a custom object in Oracle Fusion Sales, then only users with the default duty role specified by Sales are automatically granted access to that object. This lets you first access an object and its pages for testing, before you officially grant access to your customizations to users in a production environment.
This table lists the default duty roles that are provided by CRM applications:
|
Application |
Default Duty Role |
|---|---|
|
Oracle Fusion Customer Center |
Sales Administrator Duty Marketing Operations Manager Duty |
|
Oracle Fusion Marketing |
Marketing Operations Manager Duty |
|
Oracle Fusion Sales |
Sales Administrator Duty |
Child objects do not inherit security settings from parent objects. Rather, if you create a custom child object, then a default set of duty roles are granted access to the child object. In other words, a child object is visible and editable only to users with these default duty roles, as follows:
|
Application |
Child Objects of This Parent Object |
Access Granted to These Duty Roles |
|---|---|---|
|
Oracle Fusion Customer Center |
Sales Account Profile |
Sales Administrator Duty Marketing Operations Manager Duty |
|
Oracle Fusion Marketing |
Sales Lead |
Marketing Operations Manager Duty Sales Administrator Duty Channel Operations Manager Duty |
|
Oracle Fusion Marketing |
Marketing Campaign Marketing Response Marketing List Marketing Treatment Marketing Event Activity Marketing Advertising Activity |
Marketing Operations Manager Duty |
|
Oracle Fusion Marketing |
Marketing Budget Marketing Claim Marketing Budget Entry Marketing Budget Fund Request |
Marketing Operations Manager Duty Channel Operations Manager Duty |
|
Oracle Fusion Sales |
Opportunity Sales Competitor |
Sales Administrator Duty |
|
Oracle Fusion Sales |
Partner |
Channel Operations Manager Duty |
|
Oracle Fusion Common CRM |
Trading Community Org Contact Trading Community Resource Profile Trading Community Organization Profile Trading Community Address |
Customer Data Steward Duty |
Groovy is a standard, dynamic scripting language for the Java platform for which the Oracle Fusion CRM Application Composer provides deep support. This topic provides an overview of Groovy scripting, which you can use throughout the Application Composer to enhance your application customizations.
Before you begin to add Groovy scripts to your application customizations, read this topic, which includes:
An explanation of terminology.
The different contexts in the Application Composer in which you can use Groovy scripts.
Refer to the related topic, Groovy Scripting: Examples, to view examples of each type of Groovy script that you can write.
For more information, see the Developer's Guide to Scripting in Oracle Fusion CRM Application Composer on My Oracle Support at https://support.oracle.com. The developer's guide includes:
The basics of Groovy.
A compendium of tips and techniques for getting the most out of Groovy in your applications.
The tips and tricks section also includes an overview of how to work with the expression editor. The expression editor is where you write your Groovy scripts, and includes an Expression Palette, which helps you insert the names of built-in functions, object fields, or function names.
Throughout the document the term script is used to describe one or more lines of Groovy code that the Oracle ADF framework executes at runtime. Often a very-short script is all that is required.
For example, to validate that a CommissionPercentage field's value does not exceed 40%, you might use a one-line script like:
return CommissionPercentage < 0.40
In fact, this one-liner can be conveniently shortened by dropping the return keyword since the return keyword is always implied on the last line of a script:
CommissionPercentage < 0.40
For slightly more complicated logic, your script might require some conditional handling. For example, suppose the maximum commission percentage is 40% if the salesperson's job grade is less than or equal to 3, but 60% if the job grade is higher. Your script would grow a little to look like this:
if (JobGrade <= 3) {
  return CommissionPercentage < 0.40
}
else {
  return CommissionPercentage < 0.60
}
Scripts that you'll write for other purposes like complex validation rules or reusable functions may span multiple pages, depending on your needs.
When a context requiring a Groovy script will typically use a short (often, one-line) script, we emphasize that fact by calling it an expression, however technically the terms script and expression are interchangeable. Anywhere you can provide a one-line expression is also a valid context for providing a multi-line script if the need arises. Whether you provide a short expression or a multi-line script, the syntax and features at your disposal are the same. You need only pay attention that your code returns a value of the appropriate type for the context in which you use it. Each section below highlights the expected return type for the script in question.
There are a number of different contexts where you will use Groovy scripts as you customize existing objects or create new custom ones.
You will write shorter scripts to provide an expression to:
calculate a custom formula field's value
calculate a custom field's default value
make a custom field conditionally updateable, or
make a custom field conditionally required
define the condition for executing an object workflow
You will generally write somewhat longer scripts to define:
a field-level validation rule
an object-level validation rule
a trigger to complement default processing
utility code in a global function, or
reusable behavior in an object function
If you anticipate calling the same code from multiple different contexts, any of your scripts can call the reusable code you write in either global functions or object functions. As their name implies, global functions can be called from scripts in any object or from other global functions. Object functions can be called by any scripts in the same object, or even triggered by a button in the user interface.
For a concrete example of each of these usages, refer to the related topic, Groovy Scripting: Examples.
Groovy is a standard, dynamic scripting language for the Java platform for which the Oracle Fusion CRM Application Composer provides deep support. You can use Groovy throughout the Application Composer to enhance your application customizations. This topic provides simple examples of using Groovy in all of the different supported contexts in your application.
When you need a calculated field or a transient value-holder field with an optional initial, calculated value, use a formula field.
1. For read-only calculated fields:
A formula field defaults to being a read-only, calculated value. It displays the value resulting from the runtime evaluation of the calculation expression you supply. By using the Depends On multi-select list in the field create or edit page, you can configure the names of fields on which your expression depends. By doing this, its calculated value will update dynamically when any of those Depends On fields' value changes. The expected return type of the formula field's expression must be compatible with the formula field type you specified (Number, Date, or Text).
For example, consider a custom TroubleTicket object. If you add a formula field named DaysOpen, you can provide its calculated value with the expression:
(today() - CreationDate) as Integer /* truncate to whole number of days */
2. For transient value holder fields with optional calculated initial value:
If you want to allow the end user to override the calculated value, then mark your formula to be updateable. An updateable formula field is a "transient value holder" whose expression provides the value of the field until the user overrides it. If the user overrides the value, the object remembers this user-entered value for the duration of the current transaction so that your validation rules and triggers can reference it. If you have configured one or more Depends On fields for your updateable formula field, then note that the value of the formula will revert back to the calculated value should any of the dependent fields' value change. If you want a transient field whose initial value is null until the user fills it in, simply provide no formula expression for your updateable formula field to achieve this.
When a new row is created for an object, the value of a custom field defaults to null unless you configure a default value for it. You can supply a literal default value of appropriate type or supply an expression to calculate the default value for new rows. The default value expression is evaluated at the time the new row is created. The expected return type of your field's default value expression must be compatible with the field's type (Number, Date, Text, and so on).
For example, consider a custom CallbackDate field in a TroubleTicket object. If you want the callback back for a new trouble ticket to default to 3 days after it was created, then you can provide a default expression of:
CreationDate + 3
1. To provide an expression to make a custom field conditionally updateable:
A custom field can be updateable or read-only. By default, any non-formula field is updateable. Alternatively, you can configure a conditionally updateable expression. If you do this, it is evaluated each time a page displaying the field is rendered or refreshed. The expected return type the expression is boolean. If you define one for a field, you must also configure the Depends On list to indicate the names of any fields on which your conditionally updateable expression depends. By doing this, your conditionally updateable field will interactively enable or disable as appropriate when the user changes the values of fields on which the conditionally updateable expression depends.
For example, consider a custom TroubleTicket object with Status and Justification fields. Assume you want to prevent a user from editing the justification of a closed trouble ticket. To achieve this, configure the conditionally updateable expression for the Justification field as follows:
Status_c != 'Closed'
After configuring this expression, you must then indicate that the Justification field depends on the Status field as described in "Understanding When to Configure Field Dependencies", in the Developer's Guide to Scripting in Oracle Fusion CRM Application Composer on My Oracle Support at https://support.oracle.com. This ensures that if a trouble ticket is closed during the current transaction, or if a closed trouble ticket is reopened, that the Justification field becomes enable or disabled as appropriate.
Tip
A field configured with a conditionally updateable expression only enforces the conditional updateability through the Web user interface. See "Enforcing Conditional Updateability of Custom Fields for Web Service Access" in the Developer's Guide to Scripting in Oracle Fusion CRM Application Composer, for more information on how to ensure it gets enforced for Web service access as well.
2. To provide an expression to make a custom field conditionally required:
A custom field can be optional or required. By default it is optional. Alternatively, you can configure a conditionally required expression. If you do this, it is evaluated each time a page displaying the field is rendered or refreshed, as well as when the object is validated. The expected return type of the expression boolean. If you define one for a field, you must also configure the Depends On list to indicate the names of any fields on which your conditionally required expression depends. By doing this, your conditionally required field will interactively show or hide the visual indicator of the field's being required as appropriate when the user changes the values of fields on which the conditionally required expression depends.
For example, consider a custom TroubleTicket object with Priority and Justification fields. Assume that priority is an integer from 1 to 5 with priority 1 being the most critical kind of problem to resolve. To enforce that a justification is required for trouble tickets whose priority is 1 or 2, configure the conditionally required expression for the Justification field as follows:
Priority_c <= 2
After configuring this expression, you must then indicate that the Justification field depends on the Priority field as described in "Understanding When to Configure Field Dependencies", in the Developer's Guide to Scripting in Oracle Fusion CRM Application Composer. This ensures that if a trouble ticket is created with priority 2, or an existing trouble ticket is updated to increase the priority from 3 to 2, that the Justification field becomes mandatory.
1. To define a field-level validation rule:
A field-level validation rule is a constraint you can define on any standard or custom field. It is evaluated whenever the corresponding field's value is set. When the rule executes, the field's value has not been assigned yet and your rule acts as a gatekeeper to its successful assignment. The expression (or longer script) you write must return a boolean value that indicates whether the value is valid. If the rule returns true, then the field assignment will succeed so long as all other field-level rules on the same field also return true. If the rule returns false, then this prevents the field assignment from occurring, the invalid field is visually highlighted in the UI, and the configured error message is displayed to the end user. Since the assignment fails in this situation, the field retains its current value (possibly null, if the value was null before), however the UI component in the Web page allows the user to see and correct their invalid entry to try again. Your script can use the newValue keyword to reference the new value that will be assigned if validation passes. To reference the existing field value, use the oldValue keyword. A field-level rule is appropriate when the rule to enforce only depends on the new value being set. You can use the Keywords tab of the Expression Palette to insert the newValue and oldValue keywords.
For example, consider a custom TroubleTicket object with a Priority field. To validate that the number entered is between 1 and 5, your field-level validation rule would look like this:
|
Field-Level Validation Rule Component |
Value |
|---|---|
|
Field Name |
Priority |
|
Rule Name |
Validate_Priority_Range |
|
Rule Body |
|
|
Error Message |
The priority must be in the range from 1 to 5. |
Tip
If a validation rule for field A depends on the values of one or more other fields (e.g. Y and Z), then create an object-level rule and programmatically signal which field or fields should be highlighted as invalid to the user, as explained in "Setting Invalid Fields for the UI in an Object-Level Validation Rule" in the Developer's Guide to Scripting in Oracle Fusion CRM Application Composer.
2. To define an object-level validation rule:
An object-level validation rule is a constraint you can define on any standard or custom object. It is evaluated whenever the framework attempts to validate the object. This can occur upon submitting changes in a web form, when navigating from one row to another, as well as when changes to an object are saved. Use object-level rules to enforce conditions that depend on two or more fields in the object. This ensures that regardless of the order in which the user assigns the values, the rule will be consistently enforced. The expression (or longer script) you write must return a boolean value that indicates whether the object is valid. If the rule returns true, then the object validation will succeed so long as all other object-level rules on the same object return true. If the rule returns false, then this prevents the object from being saved, and the configured error message is displayed to the end user.
For example, consider a TroubleTicket object with Priority and AssignedTo fields, where the latter is a dynamic choice list field referencing Contact objects whose Type field is a Staff Member. To validate that a trouble ticket of priority 1 or 2 cannot be saved without being assigned to a staff member, your object-level rule would look like this:
|
Object-Level Validation Rule Component |
Value |
|---|---|
|
Rule Name |
Validate_High_Priority_Ticket_Has_Owner |
|
Rule Body |
|
|
Error Message |
A trouble ticket of priority 1 or 2 must have a staff member assigned to it. |
Global functions are useful for code that multiple objects want to share. To call a global function, preface the function name with the adf.util. prefix. When defining a function, you specify a return value and can optionally specify one or more typed parameters that the caller will be required to pass in when invoked. The most common types for function return values and parameters are the following:
String: a text value
Boolean: a logical true or false value
BigInteger: a integer of arbitrary precision
BigDecimal: a decimal number of arbitrary precision
Date: a date value with optional time component
List: an ordered collection of objects
Map: an unordered collection of name/value pairs
Object: any object
In addition, a function can define a void return type which indicates that it returns no value.
Note
.A global function has no current object context. To write global functions that work on a particular object, refer to "Passing the Current Object to a Global Function," in the Developer's Guide to Scripting in Oracle Fusion CRM Application Composer.
For example, the following two global functions define standard helper routines to log the start of a block of Groovy script and to log a diagnostic message. Examples in the Developer's Guide to Scripting in Oracle Fusion CRM Application Composer make use of them.
This table describes how to set up a global function to log the start of a block of Groovy script.
|
Global Function Component |
Value |
|---|---|
|
Function Name |
logStart |
|
Return Type |
void |
|
Parameters |
|
|
Function Definition |
|
This table describes how to set up a global function to log a diagnostic message.
|
Global Function Component |
Value |
|---|---|
|
Function Name |
log |
|
Return Type |
void |
|
Parameters |
|
|
Function Definition |
|
Object functions are useful for code that encapsulates business logic specific to a given object. You can call object functions by name from any other script code related to the same object. In addition, you can invoke them using a button or link in the user interface. The supported return types and optional parameter types are the same as for global functions (described above).
For example, you might define the following updateOpenTroubleTicketCount() object function on a Contact custom object. It begins by calling the logStart() global function above to log a diagnostic message in a standard format to signal the beginning of a block of custom Groovy script. It calls the newView() built-in function (described in "Accessing the View Object for Programmatic Access to Business Objects" in the Developer's Guide to Scripting in Oracle Fusion CRM Application Composer) to access the view object for programmatic access of trouble tickets, then calls another global function applyFilter() (described in "Simplifying Most Common View Criteria Creation with a Global Function" in the Developer's Guide to Scripting in Oracle Fusion CRM Application Composer) to apply a filter to find trouble tickets related to the current contact's id and having either Working or Waiting as their current status. Finally, it calls getEstimatedRowCount() to retrieve the count of trouble tickets that qualify for the filter criteria.
This table describes the updateOpenTroubleTicketCount() object function on a Contact custom object:
|
Object Function Component |
Value |
|---|---|
|
Function Name |
updateOpenTroubleTicketCount |
|
Return Type |
void |
|
Parameters |
None |
|
Function Definition |
|
Triggers are scripts that you can write to complement the default processing logic for a standard or custom object. The following triggers are available:
After Create: Fires when a new instance of an object is created. Use to assign programmatic default values to one or more fields in the object.
Before Modify: Fires when the end-user first modifies a persistent field in an existing, queried row.
Before Invalidate: Fires on an existing object when its first persistent field is modified. Fires on a valid parent object when a child row is created, removed, or modified.
Before Remove: Fires when an attempt is made to delete an object. Returning false stops the row from being deleted and displays the optional trigger error message.
Before Insert in Database: Fires before a new object is inserted into the database.
After Insert in Database: Fires after a new object is inserted into the database.
Before Update in Database: Fires before an existing object is modified in the database.
After Update in Database: Fires after an existing object is modified in the database.
Before Delete in Database: Fires before an existing object is deleted from the database.
After Delete in Database: Fires after an existing object is deleted from the database.
Before Commit in Database: Fires before the change pending for the current object (insert, update, delete) is made permanent in the current transaction.
After Commit in Database: Fires after the change pending for the current object (insert, update, delete) is made permanent in the current transaction.
Before Rollback in Database: Fires before the change pending for the current object (insert, update, delete) is rolled back.
After Rollback in Database: Fires after the change pending for the current object (insert, update, delete) is rolled back.
For example, consider a Contact object with a OpenTroubleTickets field that needs to be updated any time a trouble ticket is created or modified. You can create the following two triggers on the TroubleTicket object which both invoke the updateOpenTroubleTicketCount() object function described above.
This table describes how to set up a trigger on the TroubleTicket object.
|
Trigger Component |
Value |
|---|---|
|
Trigger Object |
TroubleTicket |
|
Trigger |
After Insert In Database |
|
Trigger Name |
After_Insert_Set_Open_Trouble_Tickets |
|
Trigger Definition |
|
This table describes how to set up a second trigger on the TroubleTicket object.
|
Trigger Component |
Value |
|---|---|
|
Trigger Object |
TroubleTicket |
|
Trigger |
After Update In Database |
|
Trigger Name |
After_Update_Set_Open_Trouble_Tickets |
|
Trigger Definition |
|
Groovy is a standard, dynamic scripting language for the Java platform for which the Oracle Fusion CRM Application Composer provides deep support. This topic covers the supported classes and methods for use in Groovy scripts.
When writing Groovy scripts, you may only use the classes and methods that are documented in the table below. Using any other class or method may work initially, but will throw a runtime exception when you migrate your code to later versions. Therefore, we strongly suggest that you ensure the Groovy code you write adheres to the classes and methods shown here. For each class, in addition to the method names listed in the table, the following method names are also allowed:
equals()
hashCode()
toString()
In contrast, the following methods are never allowed on any object:
finalize()
getClass()
getMetaClass()
notify()
notifyAll()
wait()
|
Class Name |
Allowed Methods |
Package |
|---|---|---|
|
ADFContext |
getLocale() getSecurityContext() getUserRoles() isUserInRole() |
oracle.adf.share |
|
Array |
Any constructor Any method |
java.sql |
|
Array |
getArray() getElemType() getList() |
oracle.jbo.domain |
|
ArrayList |
Any constructor Any method |
java.util |
|
Arrays |
Any constructor Any method |
java.util |
|
AttributeDef |
getAttributeKind() getIndex() getJavaType() getName() getPrecision() getProperty() getScale() getUIHelper() getUpdateableFlag() isMandatory() isQueriable() |
oracle.jbo |
|
AttributeHints |
getControlType() getDisplayHeight() getDisplayHint() getDisplayWidth() getFormat() getFormattedAttribute() getFormatter() getFormatterClassName() getHint() getLocaleName() parseFormattedAttribute() |
oracle.jbo |
|
AttributeList |
getAttribute() getAttributeIndexOf() getAttributeNames() setAttribute() |
oracle.jbo |
|
BaseLobDomain |
closeCharacterStream() closeInputStream() closeOutputStream() getInputStream() getLength() getOutputStream() getcharacterStream() |
oracle.jbo.domain |
|
BigDecimal |
Any constructor Any method |
java.math |
|
BigInteger |
Any constructor Any method |
java.math |
|
BitSet |
Any constructor Any method |
java.util |
|
Blob |
Any constructor Any method |
java.sql |
|
BlobDomain |
Any constructor getBinaryOutputStream() getBinaryStream() getBufferSize() |
oracle.jbo.domain |
|
Boolean |
Any constructor Any method |
java.lang |
|
Byte |
Any constructor Any method |
java.lang |
|
Calendar |
Any constructor Any method |
java.util |
|
Char |
Any constructor bigDecimalValue() bigIntegerValue() booleanValue() doubleValue() floatValue() getValue() intValue() longValue() |
oracle.jbo.domain |
|
Clob |
Any constructor Any method |
java.sql |
|
ClobDomain |
Any constructor toCharArray() |
oracle.jbo.domain |
|
Collection |
Any constructor Any method |
java.util |
|
Comparator |
Any constructor Any method |
java.util |
|
Currency |
Any constructor Any method |
java.util |
|
DBSequence |
Any constructor getValue() |
oracle.jbo.domain |
|
Date |
Any constructor Any method |
java.util |
|
Date |
Any constructor Any method |
java.sql |
|
Date |
Any constructor compareTo() dateValue() getValue() stringValue() timeValue() timestampValue() |
oracle.jbo.domain |
|
Dictionary |
Any constructor Any method |
java.util |
|
Double |
Any constructor Any method |
java.lang |
|
Enum |
Any constructor Any method |
java.lang |
|
EnumMap |
Any constructor Any method |
java.util |
|
EnumSet |
Any constructor Any method |
java.util |
|
Enumeration |
Any constructor Any method |
java.util |
|
EventListener |
Any constructor Any method |
java.util |
|
EventListenerProxy |
Any constructor Any method |
java.util |
|
EventObject |
Any constructor Any method |
java.util |
|
Exception |
Any constructor Any method |
java.lang |
|
ExprValueErrorHandler |
addAttribute() clearAttributes() raise() raiseLater() warn() |
oracle.jbo |
|
Float |
Any constructor Any method |
java.lang |
|
Formattable |
Any constructor Any method |
java.util |
|
FormattableFlags |
Any constructor Any method |
java.util |
|
Formatter |
Any constructor Any method |
java.util |
|
GregorianCalendar |
Any constructor Any method |
java.util |
|
HashMap |
Any constructor Any method |
java.util |
|
HashSet |
Any constructor Any method |
java.util |
|
Hashtable |
Any constructor Any method |
java.util |
|
IdentityHashMap |
Any constructor Any method |
java.util |
|
Integer |
Any constructor Any method |
java.lang |
|
Iterator |
Any constructor Any method |
java.util |
|
JboException |
getDetails() getErrorCode() getErrorParameters() getLocalizedMessage() getMessage() getProductCode() getProperty() |
oracle.jbo |
|
JboWarning |
Any constructor getDetails() getErrorCode() getErrorParameters() getLocalizedMessage() getMessage() getProductCode() getProperty() |
oracle.jbo |
|
Key |
toStringFormat() |
oracle.jbo |
|
LinkedHashMap |
Any constructor Any method |
java.util |
|
LinkedHashSet |
Any constructor Any method |
java.util |
|
LinkedList |
Any constructor Any method |
java.util |
|
List |
Any constructor Any method |
java.util |
|
ListIterator |
Any constructor Any method |
java.util |
|
ListResourceBundle |
Any constructor Any method |
java.util |
|
Locale |
Any constructor Any method |
java.util |
|
Long |
Any constructor Any method |
java.lang |
|
Map |
Any constructor Any method |
java.util |
|
Math |
Any constructor Any method |
java.lang |
|
MathContext |
Any constructor Any method |
java.math |
|
NClob |
Any constructor Any method |
java.sql |
|
NameValuePairs |
Any constructor getAttribute() getAttributeIndexOf() getAttributeNames() setAttribute() |
oracle.jbo |
|
NativeTypeDomainInterface |
getNativeObject() |
oracle.jbo.domain |
|
Number |
Any constructor bigDecimalValue() bigIntegerValue() booleanValue() byteValue() doubleValue() floatValue() getValue() intValue() longValue() shortValue() |
oracle.jbo.domain |
|
Observable |
Any constructor Any method |
java.util |
|
Observer |
Any constructor Any method |
java.util |
|
PriorityQueue |
Any constructor Any method |
java.util |
|
Properties |
Any constructor Any method |
java.util |
|
PropertyPermission |
Any constructor Any method |
java.util |
|
PropertyResourceBundle |
Any constructor Any method |
java.util |
|
Queue |
Any constructor Any method |
java.util |
|
Random |
Any constructor Any method |
java.util |
|
RandomAccess |
Any constructor Any method |
java.util |
|
Ref |
Any constructor Any method |
java.sql |
|
ResourceBundle |
Any constructor Any method |
java.util |
|
Row |
getAttribute() getAttributeHints() getKey() getLookupDescription() getOriginalAttribute() getOriginalAttributeValue() isAttributeChanged() isAttributeUpdateable() remove() revertRow() revertRowAndContainees() setAttribute() validate() |
oracle.jbo |
|
RowId |
Any constructor Any method |
java.sql |
|
RowIterator |
createAndInitRow() createRow() findByKey() findRowsMatchingCriteria() first() getAllRowsInRange() getCurrentRow() insertRow() last() next() previous() reset() |
oracle.jbo |
|
RowSet |
createAndInitRow() createRow() executeQuery() findByKey() findRowsMatchingCriteria() first() getAllRowsInRange() getCurrentRow() insertRow() last() next() previous() reset() |
oracle.jbo |
|
Scanner |
Any constructor Any method |
java.util |
|
SecurityContext |
getUserName() getUserProfile() |
oracle.adf.share.security |
|
Session |
getLocale() getLocaleContext() getUserData() |
oracle.jbo |
|
Set |
Any constructor Any method |
java.util |
|
Short |
Any constructor Any method |
java.lang |
|
Short |
Any constructor Any method |
java.lang |
|
SimpleTimeZone |
Any constructor Any method |
java.util |
|
SortedMap |
Any constructor Any method |
java.util |
|
SortedSet |
Any constructor Any method |
java.util |
|
Stack |
Any constructor Any method |
java.util |
|
StackTraceElement |
Any constructor Any method |
java.lang |
|
StrictMath |
Any constructor Any method |
java.lang |
|
String |
Any constructor Any method |
java.lang |
|
StringBuffer |
Any constructor Any method |
java.lang |
|
StringBuilder |
Any constructor Any method |
java.lang |
|
StringTokenizer |
Any constructor Any method |
java.util |
|
Struct |
Any constructor Any method |
java.sql |
|
Struct |
getAttribute() setAttribute() |
oracle.jbo.domain |
|
StructureDef |
findAttributeDef() getAttributeIndexOf() |
oracle.jbo |
|
Time |
Any constructor Any method |
java.sql |
|
TimeZone |
Any constructor Any method |
java.util |
|
Timer |
Any constructor Any method |
java.util |
|
TimerTask |
Any constructor Any method |
java.util |
|
Timestamp |
Any constructor Any method |
java.sql |
|
Timestamp |
Any constructor compareTo() dateValue() getValue() stringValue() timeValue() timestampValue() |
oracle.jbo.domain |
|
TreeMap |
Any constructor Any method |
java.util |
|
TreeSet |
Any constructor Any method |
java.util |
|
UUID |
Any constructor Any method |
java.util |
|
UserProfile |
getBusinessCity() getBusinessCountry() getBusinessEmail() getBusinessFax() getBusinessMobile() getBusinessPOBox() getBusinessPager() getBusinessPhone() getBusinessPostalAddr() getBusinessPostalCode() getBusinessState() getBusinessStreet() getDateofBirth() getDateofHire() getDefaultGroup() getDepartment() getDepartmentNumber() getDescription() getDisplayName() getEmployeeNumber() getEmployeeType() getFirstName() getGUID() getGivenName() getHomeAddress() getHomePhone() getInitials() getJpegPhoto() getLastName() getMaidenName() getManager() getMiddleName() getName() getNameSuffix() getOrganization() getOrganizationalUnit() getPreferredLanguage() getPrinciple() getProperties() getProperty() getTimeZone() getTitle() getUIAccessMode() getUniqueName() getUserID() getUserName() getWirelessAccountNumber() |
oracle.adf.share.security.identitymanagment |
|
ValidationException |
getDetails() getErrorCode() getErrorParameters() getLocalizedMessage() getMessage() getProductCode() getProperty() |
oracle.jbo |
|
Vector |
Any constructor Any method |
java.util |
|
ViewCriteria |
createAndInitRow() createRow() createViewCriteriaRow() findByKey() findRowsMatchingCriteria() first() getAllRowsInRange() getCurrentRow() insertRow() last() next() previous() reset() |
oracle.jbo |
|
ViewCriteriaItem |
getValue() makeCompound() setOperator() setUpperColumns() setValue() |
oracle.jbo |
|
ViewCriteriaItemCompound |
ensureItem() getValue() makeCompound() setOperator() setUpperColumns() setValue() |
oracle.jbo |
|
ViewCriteriaRow |
ensureCriteriaItem() getConjunction() isUpperColumns() setConjunction() setUpperColumns() |
oracle.jbo |
|
ViewObject |
appendViewCriteria() createAndInitRow() createRow() createViewCriteria() executeQuery() findByKey() findRowsMatchingCriteria() first() getAllRowsInRange() getCurrentRow() getMaxFetchSize() insertRow() last() next() previous() reset() setMaxFetchSize() |
oracle.jbo |
|
WeakHashMap |
Any constructor Any method |
java.util |
To support the importing and exporting of the custom objects that you created with the Oracle Fusion CRM Application Composer, you must first generate the object artifacts required for both file-based import and bulk export.
In Oracle Fusion, two processes exist to enable the importing and exporting of object data: file-based import and bulk export.
File-based import supports the import of data from an external text or xml file to interface tables and then from interface tables to target application tables.
Note
File-based import bypasses any Groovy validation and trigger logic on an object.
Bulk export lets you extract large volumes of data from CRM objects, both as extracts of a full set of records for an object as well as incremental extracts. The system creates comma or tab-delimited files with the extracted data, which are available to users as attachments to the batch records that have been executed.
The object model extensions that you make using the Application Composer do not create the artifacts required by these import and export processes. For example, file-based import leverages Oracle Data Integrator (ODI).
Accordingly, after completing your object model extensions, generate the required artifacts to register your extensions and make them available for importing and exporting.
Note
The creation of import and export artifacts occurs only in the Oracle Metadata Services (MDS) mainline, and is not supported within the MDS sandbox.
To enable the import and export of custom object data:
Select an application on the main Overview page.
Select the Import and Export link in the Common Setup pane, or in the local area of the main Overview page.
On the Import and Export page, click the Generate button.
After you enable your object model extensions for importing and exporting, you can then schedule your file-based import and bulk export processes using the following tasks, available by selecting Setup and Maintenance from the Tools menu and searching on the task name.
To schedule your custom object imports, select the Manage File Import Activities task.
To initially set up file-based import for importing custom object data, select the Manage File Import Objects and Manage File Import Mappings tasks.
Note
Custom child objects are imported as part of the parent object.
To schedule your custom object exports, select the Schedule Export Processes task.
Note
Both top-level and child custom objects are available as independent exportable objects.
Important
Refer to Oracle Fusion CRM product-specific documentation for additional details on how Oracle Fusion CRM products enable the import and export of custom object data (custom fields) for standard objects.
A fixed choice list and a dynamic choice list are similar in that the ultimate goal of both types of choice lists is to generate a field with a list of values at runtime. However, the list of values for a fixed choice list is derived from an FND lookup type.
The list of values for a dynamic choice list is derived from an existing object's actual data.
Oracle Composer lets you make user interface changes at runtime across all Oracle Fusion applications. In Oracle Fusion CRM transactional pages (non-dashboards), you can use Oracle Composer to expand or collapse regions, set which columns are visible in tables and how they are ordered, and create and edit saved searches. In Oracle Fusion CRM dashboards, you can make additional customizations, such as hiding, showing, or moving regions, and adding new content from the Resource Catalog.
The Oracle Fusion CRM Application Composer also lets you make user interface changes at runtime. However, the types of user interface changes that you can make using the Application Composer are quite different. Specifically, your primary focus when using the Application Composer is to make actual object model changes. For example, you can create a new business object and related fields, and then create new application pages where that object and its fields are exposed to users. The ability to make these types of object model extensions is available only in Oracle Fusion CRM applications. Also, using the Application Composer, you cannot access the Resource Catalog to add new content to a page.
This table describes some of the primary differences between Oracle Composer and the Application Composer:
|
Customization Task |
Available in Oracle Composer? |
Available in Oracle Fusion CRM Application Composer? |
|---|---|---|
|
Make object model extensions and expose your customizations by creating or modifying work area pages |
No |
Yes |
|
Reorder subtabs |
No |
Yes |
|
Customize dashboard pages |
Yes |
No |
|
Add content from the Resource Catalog |
Yes |
No |
|
Select the MDS layer where you want to author customizations, such as at the site layer or job role layer |
Yes |
No, customizations are applied only at the site layer |
|
View results of customizations immediately |
Yes, in the Oracle Composer design interface |
Yes, in the CRM application that you are customizing |
|
Copyright © 2011, Oracle and/or its affiliates. All rights reserved. Legal Notices |
|