| Oracle® Enterprise Manager Cloud Control Advanced Installation and Configuration Guide 12c Release 1 (12.1.0.1) Part Number E24089-09 |
|
|
PDF · Mobi · ePub |
| Oracle® Enterprise Manager Cloud Control Advanced Installation and Configuration Guide 12c Release 1 (12.1.0.1) Part Number E24089-09 |
|
|
PDF · Mobi · ePub |
This chapter introduces you to Enterprise Manager advanced configuration and provides basic information about your Enterprise Manager installation. It describes the directory structure and how to make Enterprise Manager accessible to all your users.
After you review this chapter, you can move on to the other advanced configuration tasks described in this manual.
Specifically, this chapter includes the following topics:
Enterprise Manager is designed to install easily with a set of standard configuration settings so you can get up and running with the software quickly.
However, Oracle realizes that hardware and software management requirements vary dramatically among business enterprises. As a result, Enterprise Manager can be reconfigured after installation so you can:
Implement Enterprise Manager security and firewall features.
Enable End-User Performance Monitoring for your Web applications.
Reconfigure Enterprise Manager components when you need to modify the topology of your network environment.
Maintain and troubleshoot the Enterprise Manager components as your business grows.
Before you perform maintenance and advanced configuration tasks, you must be familiar with the directories and files that are copied to disk when you install Enterprise Manager. Understanding where specific files are located can help you if you need to troubleshoot installation or configuration problems.
When installing Enterprise Manager, if you select a location that does not contain WebLogic Server, then JDK will be installed in the jdk16 directory before installation of WebLogic Server.
Use the following sections to become familiar with the directories that are created on your disk when you install Enterprise Manager:
Understanding the Enterprise Manager Directories Installed with Management Service
Understanding the Enterprise Manager Directories Installed with Management Agent
Identifying the Agent Instance Home When Using the emctl Command
When you install Oracle Enterprise Manager Cloud Control 12c, you install the Oracle Management Service. With the Oracle Management Service, you install the following Oracle home directories:
Oracle Management Service home directory
Middleware WebTier home directory
Middleware Common home directory
Oracle Management Service Instance home directory
Oracle Management Agent home directory
Oracle Management Service Plugins home
Oracle Management Agent Plugins home
The Oracle Management Service is a J2EE application that is installed and deployed using the Oracle WebLogic Server.
The installation procedure installs the Enterprise Manager components within the Cloud Control Home, including the Oracle Management Service. For more details about the OMS directories, see About the Oracle Management Service Home Directory.
Information about the directories that are specific to the Fusion Middleware installation can be found in the Fusion Middleware documentation.
In addition to the Oracle Management Service home directory, the installation procedure installs the Oracle Management Agent that is used to gather management data and perform administration tasks for the targets on the Oracle Management Service host.
The Oracle Management Agent is installed in a separate Oracle home directory which is at the same level as the Fusion Middleware home directory. For more details, see Understanding the Enterprise Manager Directories Installed with Management Agent.
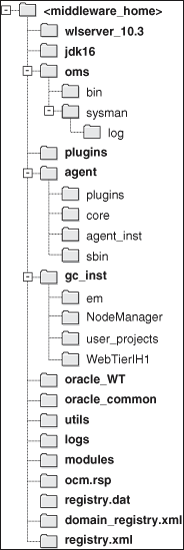
Figure 10-1 shows some of the important directories you should be familiar with in a typical Cloud Control installation. You can use this information as you begin to maintain, troubleshoot, and configure the Oracle Management Service installation.
Table 10-1 describes the directories installed with Enterprise Manager.
Table 10-1 Directories Installed with Enterprise Manager
| Directory | Description |
|---|---|
|
wlserver_10.3, logs, utils, modules |
These directories contain Fusion Middleware files. |
|
jdk16 |
This directory contains JDK configuration files. |
|
oms |
This directory contains OMS configuration files. For more information, see Understanding the Enterprise Manager Directories Installed with Management Service. |
|
plugins |
This directory contains metadata plug-ins configuration files installed on the OMS. |
|
agent |
This directory contains agent configuration files. For more details, see Understanding the Enterprise Manager Directories Installed with Management Agent. |
|
gc_inst |
The OMS instance home directory. For more details, see Understanding the Enterprise Manager Directories Installed with Management Service. |
|
oracle_WT |
This directory contains Oracle WebTier configuration files. |
|
oracle_common |
This directory contains common files used by OMS, Oracle WebTier, and WebLogic Server directories. |
Table 10-2 describes in detail the Oracle Management Service directories installed with Oracle Management Service. In the table, ORACLE_HOME refers to the Oracle Management Service home directory in which the Oracle Management Service is installed and deployed.
Table 10-2 Important Directories in the Management Service Oracle Home
| Directory | Description |
|---|---|
|
The |
|
|
|
This directory contains configuration files for OMS home. The default |
|
This directory contains WebTier instance Oracle Home corresponding to EMGC_OMS#. |
|
|
OMS_INSTANCE_HOME/NodeManager |
This directory contains WebLogic Node Manager properties, logs, and domain information. |
|
|
This is the OMS instance directory and contains emgc.properties and Enterprise Manager log files. |
|
|
This directory contains |
|
|
This directory contains schema log files. The repository log files are under |
The Oracle Management Agent is installed automatically when you install Oracle Management Service. This local instance of the Oracle Management Agent gathers management information about the targets on the Oracle Management Service host. You can then manage those targets, such as the host itself, from the Cloud Control Console.
You can install additional Oracle Management Agents using different installation methods. This enables you to install the Oracle Management Agent on the hosts throughout your enterprise. The Oracle Management Agent can then gather management data about the targets on each host so those targets can be managed from the Cloud Control Console.
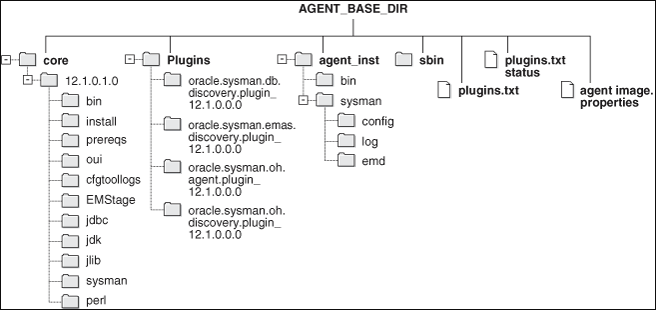
Specifically, the Oracle Management Agent files are installed into the same directory structure shown in the agent directory when you install the Oracle Management Service (Figure 10-1).
The agent directory structure, when you install a standalone agent or install the OMS is the same. The AGENT_BASE_DIR is the directory where agent is installed and contains the following main directories:
AGENT_HOME
AGENT_INSTANCE_HOME
SBIN_HOME
PLUGIN_HOME
The directory that contains the files required to run the Oracle Management Agent is referred to as the AGENT_INSTANCE_HOME directory. For example, to start or stop an Oracle Management Agent, you use the emctl command located in the bin directory of the AGENT_INSTANCE_HOME. Similarly, to configure files for the Oracle Management Agent, you modify the configuration files in the sysman/config directory of the AGENT_INSTANCE_HOME. See Figure 10-2 for the agent directory structure.
Table 10-3 describes some of the important agent directories.
Table 10-3 Important Directories in the Oracle Management Home
When you install Cloud Control, the resulting directory structure can often include multiple subdirectories with the same name. For example, you can have a bin directory within the agent_instance_home directory. Use the emctl command within the agent_instance_home/bin directory to control the Oracle Management Agent.
In addition, you can have a bin directory within the Oracle Management Service Oracle home. Use the emctl command in this directory to control the Oracle Management Service.
To quickly identify the Agent Instance home that is controlled by the files in a particular bin directory, use the following command:
$PROMPT> emctl getemhome
This command displays the path to the current Agent Instance home that will be affected by commands executed by this instance of the emctl command.
As part of the effort to make Oracle products, services, and supporting documentation accessible and usable to the disabled community, Enterprise Manager offers several features that make management data available to users of assistive technology. Enterprise Manager provides the following accessibility features:
Support for Screen Reader
Support for High Contrast
Support for Large Fonts
To enable Screen Reader support, you must modify the following configuration settings:
Enable Accessibility Mode in My Preferences.
Set uix-config.xml flag.
Set web.xml flag.
To enable screen reader mode, do the following:
On the Cloud Control home page, from the Setup menu, select My Preferences and then select Accessibility.
In the Accessibility Preference page, select I use a screen reader. Click Apply.
ADF accessibility mode is a session based setting which takes place immediately and does not require you to restart the Enterprise Manager Management Service.
For ADF pages, you will see an Accessibility Preferences dialog after logging into Cloud Control for the first time. The settings in this dialog are the same as those in the Accessibility Preference page mentioned above.
To enable screen reader mode for UIX pages, do the following:
Locate the uix-config.xml configuration file.
To locate the uix-config.xml file in a Cloud Control installation, change directory to the following location in the Oracle Management Service home:
./oms/sysman/archives/emgc/deployments/EMGC_DOMAIN/emgc.ear/em.war/WEB-INF/uix-config.xml
Open the uix-config.xml file using a text editor and set the following entry:
<!-- An alternate configuration that disables accessibility features  -->
<default-configuration>
<accessibility-mode>screenReader</accessibility-mode>
</default-configuration>
Save and close the file.
Restart the Oracle Management Service.
Note:
UIX accessibility mode is a product-wide setting. You will have to restart the Enterprise Manager Management Service for this setting to take effect.To configure web.xml file, follow these steps:
Locate the web.xml configuration file.
To locate the web.xml file in a Cloud Control installation, change directory to the following location in the Oracle Management Service home:
./oms/sysman/archives/emgc/deployments/EMGC_DOMAIN/emgc.ear/em.war/WEB-INF/web.xml
Open the web.xml file with your favorite text editor and locate the following six lines of the file:
<!-- Uncomment this to enable textual chart descriptions
<context-param>
<param-name>enableChartDescription</param-name>
<param-value>true</param-value>
</context-param>
-->
Remove comments from this section by deleting the first line and the last line of this section so that the section consists of only these 4 lines:
<context-param>
<param-name>enableChartDescription</param-name>
<param-value>true</param-value>
</context-param>
Save and exit the file.
Restart the Oracle Management Service.
Throughout Enterprise Manager, charts are used to display performance data. For most users, these charts provide a valuable graphical view of the data that can reveal trends and help identify minimum and maximum values for performance metrics.
However, charts do not convey information in a manner that can be read by a screen reader. To remedy this problem, you can configure Enterprise Manager to provide a complete textual representation of each performance chart. By default, support for the textual representation of charts is disabled. When textual description for charts is enabled, Enterprise Manager displays a small icon for each chart that can be used as a drill-down link to the textual representation.
To verify whether Screen Reader support has been enabled for ADF pages, follow these steps:
On the Cloud Control home page, click Help and then select About Enterprise Manager.
In the About Enterprise Manager dialog box, ensure that Accessibility Preference - Screen Reader Support is set to Enabled.
If Accessibility Preference - Screen Reader Support is set to Disabled, follow the steps listed in Enabling Enterprise Manager Accessibility Features.
To verify whether Screen Reader support has been enabled for UIX pages, follow these steps:
On the Cloud Control home page, from the Enterprise menu, select Reports and then select Information Publisher Reports.
In the Information Publisher Reports page, click Hardware Summary. The Hardware Summary page is displayed. If accessibility setting has been enabled, you will see the icon shown in Figure 10-3:
Figure 10-3 Icon Representing Textual Representation of Charts

|
Copyright © 2012, Oracle and/or its affiliates. All rights reserved. Legal Notices |
|