| Oracle® Enterprise Manager Cloud Control Getting Started with Oracle Fusion Middleware Management 12c Release 1 (12.1.0.2) Part Number E24215-02 |
|
|
PDF · Mobi · ePub |
| Oracle® Enterprise Manager Cloud Control Getting Started with Oracle Fusion Middleware Management 12c Release 1 (12.1.0.2) Part Number E24215-02 |
|
|
PDF · Mobi · ePub |
This chapter describes how you can perform load and performance testing of applications with real-world production workloads using the Application Replay feature of Enterprise Manager. With Application Replay you can capture application workloads on production systems, and then replay them against test systems while maintaining the precise timing, concurrency, and transaction order of the workload.
This chapter covers the following:
Application Replay enables realistic testing of planned changes to any part of the application stack from application server down to disk, by re-creating the production workload on a test system. Using Application Replay, you can capture a workload on the production system and replay it on a test system with the exact timing, concurrency, and transaction characteristics of the original workload. This enables you to fully assess the impact of the change, including undesired results, new contention points, or plan regressions. In addition, extensive analysis and reporting is provided to help identify any potential problems, such as new errors encountered and performance divergence. Types of changes that can be tested with Application Replay include application server upgrades, hardware updates, O/S changes, configuration changes, and so on.Capturing real-world production workload eliminates the need to develop simulation workloads or scripts, resulting in significant cost reduction and time savings. By using Application Replay, realistic testing of complex applications that previously took months using load simulation tools can now be completed in days. As a result, you can rapidly test planned changes and adopt new technologies with a higher degree of confidence and at lower risk.
Today's enterprise application deployments are highly complex and, therefore, challenging to manage. They comprise multiple tiers, such as Web servers, application servers, and databases, running on multiple hosts. Their software architecture combines multiple independent components, such as client-side user interfaces, business logic and data access mechanisms, in addition to stateful client-server protocols typically built over HTTP.
Due to the complexity of these structures, predicting the behavior of the entire stack in a production environment is extremely difficult. Given the complexity of these deployments, and the absence of system-wide verification techniques, effective testing is critical to ensuring successful deployment after an infrastructure change.
The Application Replay feature provides a testing structure that works by first capturing the entire workload relevant to an application (as generated by the application's Web interface) at the production site.
The captured application workload is then moved to the test environment, where the replay driver infrastructure on one or more hosts, reproduce the captured workload, preserving its original properties, such as concurrency and request timings.
Finally, extensive performance and correctness data from all layers of the stack is collected and reported. This enables you to compare the replay with the original captured workload. In this way, any issues resulting from infrastructure changes that occurred during the replay can be identified, and appropriate troubleshooting action undertaken to prevent them from occurring in production. Moreover, it increases your confidence in a successful deployment.
Benefits
The use of real workloads offers a number of significant advantages over testing techniques based on synthetic workloads. In particular:
It provides a system-wide perspective starting from the user's activity. This is in contrast to the traditional piecemeal testing of individual components that provides little information on their combined behavior and performance under a realistic workload.
Rather than relying on pre-determined scenarios, the use of real workloads provides comprehensive testing, subjecting the system to real users operations. For Web applications, this not only means exploring all possible ways a user interacts with the system, but also all possible load conditions. This is necessary because systems behave quite differently under different workload characteristics (for example, the number of concurrent users).
Far greater insight is obtained into possible errors. Test results include data for every layer of the stack, and these can be correlated across different layers. Besides performance, it also provides a means to verify correct execution, by checking for errors or unexpected server responses.
In order to capture Web application workloads, Application Replay uses Oracle Real User Experience Insight (RUEI). This is a Web-based utility to report on real-user traffic requested by, and generated from, your Web infrastructure. It measures the response times of pages and user flows at the most critical points in your network infrastructure. It provides you with powerful analysis of your network and business infrastructure, while an insightful diagnostics facility allows application managers and IT technical staff to perform root-cause analysis.
Typically, RUEI is installed before the Web servers, behind a firewall in the DMZ. The data collection method is based on Network Protocol Analysis (NPA) technology. This data collection method is shown in Figure 4-1.
When an object is requested by a visitor, RUEI sees the request and starts measuring the time the Web server requires to present the visitor with the requested object. At this point, RUEI knows who requested the page (IP client), which object was requested, and from which server the object was requested (IP server).
When the Web server responds and sends the object to the visitor, RUEI sees that response, and stops timing the server response time. At this stage, RUEI can see whether there is a response from the server, whether this response is correct, how much time the Web server required to generate the requested object, and the size of the object.
RUEI is also able to see whether the object was completely received by the visitor, or if the visitor aborted the download (proof of delivery). Therefore, RUEI can determine the time it took for the object to traverse the Internet to the visitor, and can calculate the Internet throughput between the visitor and the server (connection speed of the visitor).
Further information about RUEI is available from the following location:
http://www.oracle.com/us/products/enterprise-manager/index.html
Application Replay supports the use of synchronization. This ensures that each replayed request sees exactly the same database state it saw during the capture process. In this way, the responses generated during capture and replay can be directly compared. In addition, data divergence between capture and replay is minimized. This is explained at greater length in Section 4.9.7, "Analyzing Replay Results".
While the use of synchronized workload captures is clearly preferable, it is important to understand that:
The use of the synchronization facility places additional requirements on your production and test environments. These are explained in Section 4.5.3, "Using Synchronization".
Non-synchronized workload captures require considerably less disk space. This is because information about the current database state does not need to be retained. Therefore, their use is recommended in test scenarios where differences between the responses generated in the capture and replay environments is not an issue. For example, in loading and stress testing.
This section describes the requirements that must be met, and the issues that should be considered, in order to use the Application Replay facility for workload capture and replay. It is strongly recommended that you carefully review this information before proceeding with a workload capture.
Important:
It is strongly recommended that you review the Oracle Support Web site to obtain up-to-date information about supported RUEI, application server, and database versions, as well as patches, configurations, known issues, and workarounds.This section covers the following:
In order to use RUEI to capture your application workloads, you must ensure that:
RUEI version 12.1 (or higher) has been configured to monitor the required applications. See the Oracle Support Web site (http://www.oracle.com/support/contact.html) for information about required releases and hot fixes. Information about deployment options and requirements is available from the Oracle Real User Experience Insight Installation Guide.
You have a valid user name and password combination. If necessary, contact your RUEI Administrator. Note that the user account must have Security Officer permission. For further information about roles and permissions, see the Oracle Real User Experience Insight User's Guide.
You have the URL used to access the RUEI installation. If necessary, contact your RUEI Administrator.
The configured RUEI logging and masking policies are consistent with the use of Application Replay. This is described in the following section.
RUEI Configuration for Application Replay
As mentioned above, you must ensure that the RUEI logging and masking policies are configured as follows:
Select Configuration, Security, Replay logging policy, and click the Default replay action setting. This must be set to "Complete logging".
Select Configuration, Security, Masking, URL prefix masking, and click the Default masking action setting. This must be set to "Logging".
Note that if you expect a high level of traffic during the workload capture, it is recommended that you select Configuration, Security, Collector data retention policy, and ensure that sufficient storage has been assigned for each application that is planned to be captured.
For further information on these configuration procedures, see Chapter 13 "Managing Security-Related Information" of the Oracle Real User Experience Insight User's Guide.
The following Enterprise Manager privileges must be assigned to users of the Application Replay facility:
ASREPLAY_VIEWER in order to view captures, replays, and replay tasks.
ASREPLAY_OPERATOR in order to create, modify, or submit captures, replays, and replay tasks.
In addition to the above, users must also be assigned the PERFORM_OPERATION_ANYWHERE privilege.
In order to make use of the synchronization functionality within Application Replay, you must ensure that:
Oracle Fusion Middleware has been installed and configured. See the Oracle Support Web site (http://www.oracle.com/support/contact.html) for information about required releases and patch sets. For further information, see the Oracle Fusion Middleware Installation Planning Guide available at the following location:
http://download.oracle.com/docs/cd/E14571_01/install.1111/b32474/start.htm
Oracle Database has been installed and configured. See the Oracle Support Web site (http://www.oracle.com/support/contact.html) for information about required releases and patch sets. For further information, see the relevant Database Installation Guide available at the following location:
http://www.oracle.com/pls/db112/portal.portal_db?selected=11&frame=
The database user needs to be assigned the privileges described in the Oracle Database Security Guide available at the following location:
http://download.oracle.com/docs/cd/B19306_01/network.102/b14266/admusers.htm
The user capturing and replaying application workloads has access to the host directory used to store capture files.
The database user has EXECUTE privilege on DBMS_WORKLOAD_REPLAY.
The files used during replay are on a shared file location that is accessible by all Replay Client systems using the same directory path. If synchronization has been enabled, this is also required for the appropriate database systems.
It is recommended that the time zone and time settings for all host systems (such as RUEI, Oracle Fusion Middleware, and Oracle database) used during capture and replay should be the same to prevent clock skew.
Note that if you are using the database synchronization facility, be aware that only one database capture can be generated against a production environment at given time.
Before a workload can be replayed, the logical state of the application data on the replay system should be similar to that of the capture system when replay begins. Therefore, you should have a strategy in place to restore the application server and database state on the test system. To restore the application server state, you should consult your application administrator. To restore the database state, consider using one of the following methods:
Recovery Manager (RMAN) DUPLICATE command. For further information, see the Oracle Database Backup and Recovery User's Guide.
Snapshot standby. For further information, see the Oracle Data Guard Concepts and Administration.
Data Pump Import and Export. For further information, see the Oracle Database Utilities.
This step is not required, although restarting the database and application server components before starting capture ensures that ongoing and dependent transactions are allowed to be completed or rolled back before the capture begins. This minimizes divergence during replay, which is always desirable. On the other hand, if the database is not restarted before the capture begins, transactions that are in progress, or have yet to be committed, may not be fully captured in the workload. Therefore, ongoing transactions may not be replayed properly, because only the part of the transaction whose calls were captured will be replayed, resulting in data divergence. Moreover, any subsequent transactions with dependencies on the incomplete transactions may also generate errors during replay.Before restarting the database and application server components, determine an appropriate time to shut down the production database before the workload capture when it is the least disruptive. For example, you may want to capture a workload that begins at 8:00 a.m. However, to avoid service interruption during normal business hours, you may not want to restart the database during this time. In this case, you should consider starting the workload capture at an earlier time, so that the database can be restarted at a time that is less disruptive.Once the application is restarted, it is important to start the capture before any user sessions reconnect and start issuing any workload. Otherwise, transactions performed by these user sessions will not be replayed properly in subsequent replays, because only the part of the transaction whose calls were executed after the workload capture is started will be replayed.
Determine and set up the directory where the captured workload will be stored. Before starting the capture, ensure that the directory is empty and has sufficient disk space to store the workload. If the directory runs out of disk space during a capture, the capture will be terminated.
To estimate the required disk space, it is recommended that you run a test capture on your workload for a short duration (typically, a few minutes), and then use this to extrapolate the space required for a full capture. To avoid potential performance issues, you should also ensure that the target replay directory is mounted on a separate file system.
Figure 4-2 shows the architecture of the Application Replay facility.
Figure 4-2 Application Capture and Replay Architecture

The capture part of Application Replay operates within the context of a production environment. This deployment comprises Web and application servers, and a database. The Web-tier capture mechanism is provided by RUEI. It writes information about the monitored traffic to capture files. These contain HTTP requests, responses, and timings, along with all other data necessary to accurately reproduce the production workload against a test system. Once the capture is complete, the generated files constitute a complete representation of the entire production workload. In addition, the synchronization facility also captures the corresponding database workload for both capture analysis.
The replay part of Application Replay operates within the context of a test system. This comprises an application stack that runs the system configuration under test. One or more Replay Clients reproduce the captured workload, preserving its original properties, such as concurrency and request timings. Further, the Application Replay facility uses synchronization to ensure that each replayed request sees the exact application state it saw during capture so that the responses are directly comparable. Finally, it collects a wealth of performance and verification data from all layers of the stack, and allows you to compare the replay with the original capture upon which it is based.
Depending on the volume and concurrency of the workload capture, it may be necessary to deploy multiple Replay Clients, each assigned a portion of the workload. Recommendations about required Replay Clients based on the captured workload is available when scheduling a replay.
To create an application workload capture:
From the Enterprise menu, select Quality Management, then select Application Replay.
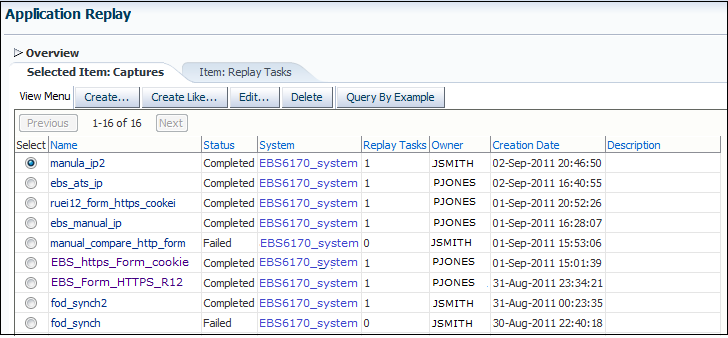
Click Captures. The currently defined captures are listed. An example is shown in Figure 4-3.
Click Create or Create Like. The page shown in Figure 4-4 appears.
Figure 4-4 Create Capture (Overview) Page
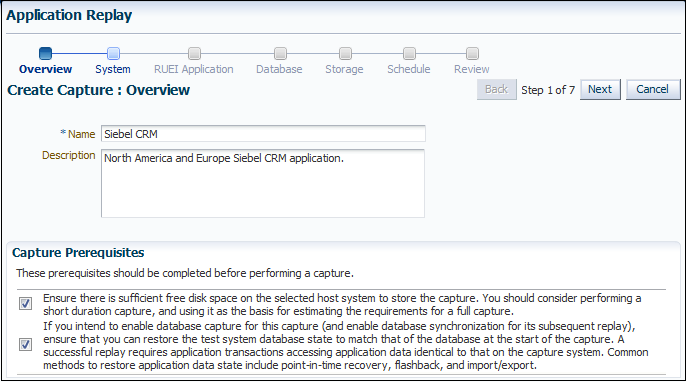
Specify a unique name for the new capture. Optionally, specify a brief description for the traffic to be captured. It is recommended that you include an indication of the purpose and scope of the capture. Carefully review the prerequisite information, and click the acknowledgement check boxes to indicate that they have been met. When ready, click Next. The page shown in Figure 4-5 appears.
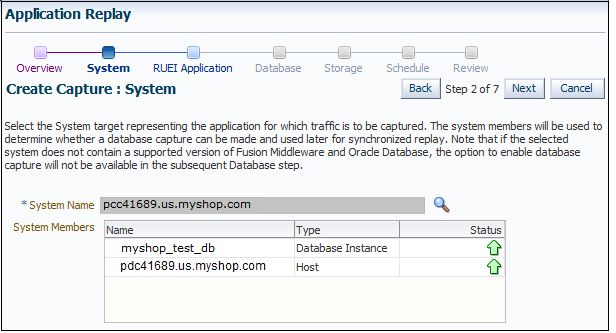
Click the Select System icon, and select the target that represents the applications for which traffic is to be captured. It is recommended that you review the status of the selected component, and ensure that it will be available throughout the planned capture. Note that if the selected target does not include supported versions of Oracle Fusion Middleware and Oracle Database components, the Create Capture (Database) Page (shown in Figure 4-7) is not available, and is skipped. When ready, click Next. The page shown in Figure 4-6 appears.
Figure 4-6 Create Capture (RUEI Application) Page
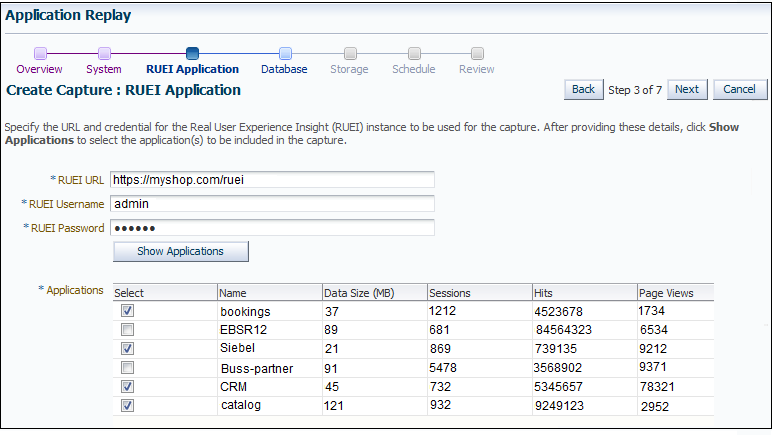
Specify the URL used to access the RUEI installation. This must be based on a secure (HTTPS) connection. Specify a valid user name and password combination. The specified user must have Security Officer permission. If necessary, contact your RUEI Administrator for this information.
Click Show Applications to view the applications currently being monitored by the specified RUEI deployment. Note that you can use the traffic information available for each application to determine its suitability for capture. In particular, when selecting the applications to be included in the capture, you should ensure that the applications are running, and traffic volumes and error levels are within acceptable bounds. When ready, click Next. The page shown in Figure 4-7 appears.
Figure 4-7 Create Capture (Database) Page
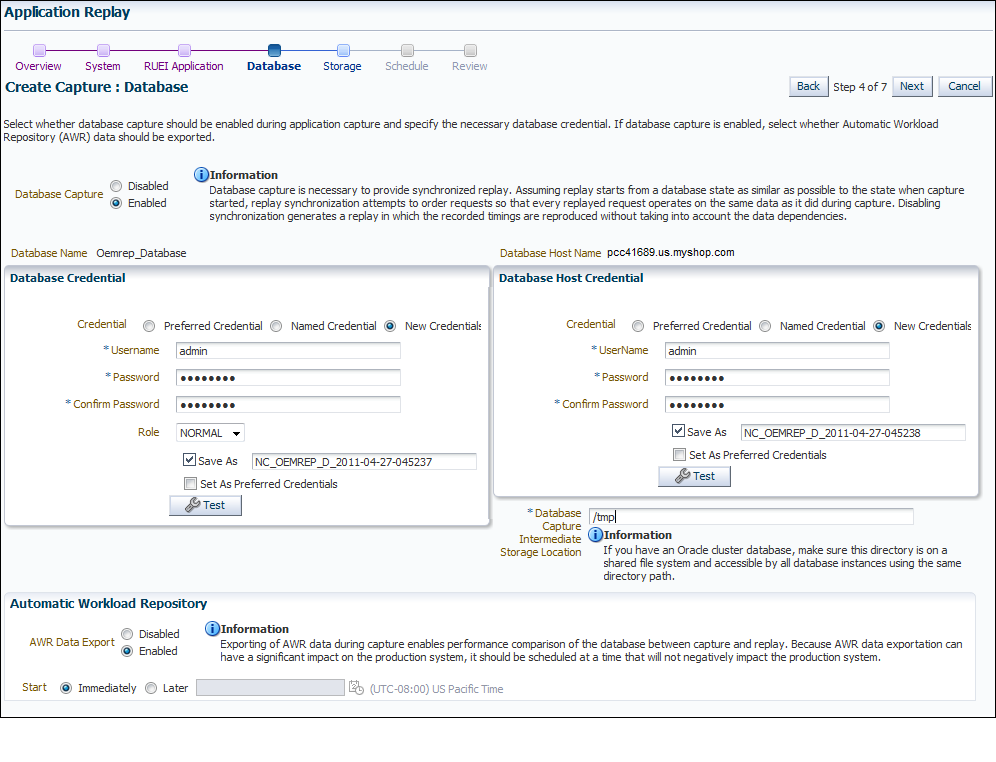
Specify whether database capture should be enabled during application capture. This is required for synchronized replay. If enabled, specify the necessary database and host credentials, the file system location on the database host system used for intermediate capture storage, and whether Automatic Workload Repository (AWR) data should be exported. Note that if AWR export is enabled, you need to specify when exporting should begin. By default, it is performed immediately after capture is completed. When ready, click Next. The page shown in Figure 4-8 appears.
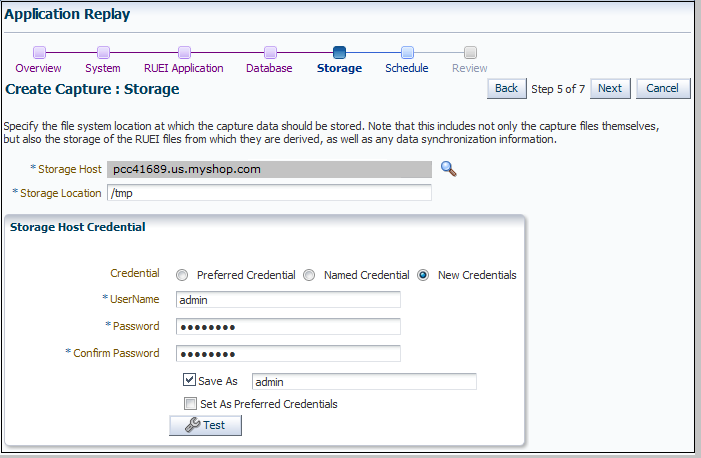
Specify the host and file system location where the capture data should be stored. Note that this includes not only the capture files themselves, but also the storage of the RUEI files from which they are derived, as well as any data synchronization information.
Important:
Capture files can require large amounts of disk space. Therefore, it is recommended that you perform a short capture, and then use that as the basis for calculating the required disk space for the planned capture. In addition, be aware that the generated capture files are in a proprietary format, and should not be modified.Click the Select Target icon. A new window opens that allows you to view the available targets. Click a target to select it. Note that only one host target can be selected. You can use the Target Type menu to restrict the listing of targets to specific types. Note that it is also recommended that you review the status of the selected targets, and ensure that they will be available throughout the planned capture. Specify the credentials of the selected storage host. When ready, click Next. The page shown in Figure 4-9 appears.
Figure 4-9 Create Capture (Schedule) Page
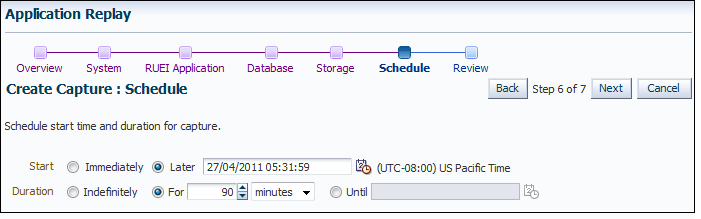
Specify the start and stop times for the planned capture. By default, capture starts immediately. Note that, by default, the capture will run for the next 15 minutes. It is strongly recommended that you carefully consider the capture's duration and, if scheduled to run indefinitely, regularly review the capture process to prevent the creation of excessively large capture files. When ready, click Next. The page shown in Figure 4-10 appears.
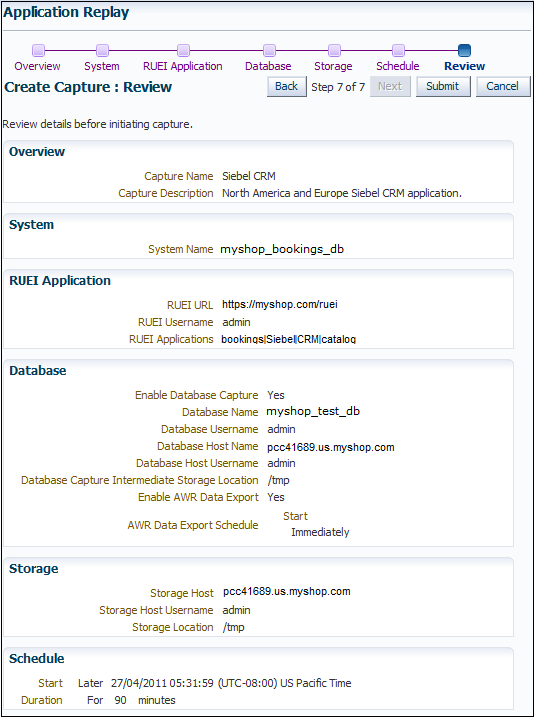
Important:
If the capture is configured to run indefinitely, it must be stopped manually from the Capture Page. It is strongly recommended you regularly check the size of the created capture to prevent running out of storage space.Review the planned capture's properties before launching it. If necessary, use the Back and Next buttons to amend the capture's properties. When ready to launch the new capture, click Submit.
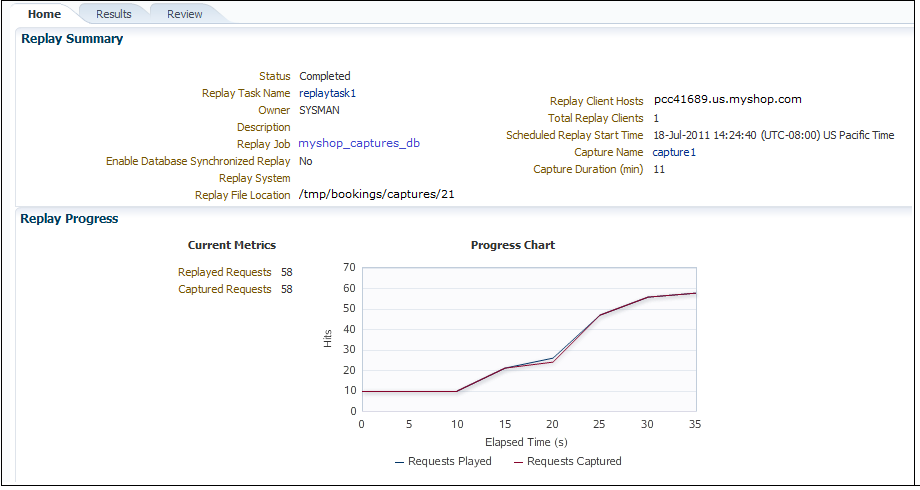
Once a capture has been started, you can monitor the capture process to ensure that the intended traffic is being correctly captured, and that the application system is working under normal conditions. An example of a capture progress report is shown in Figure 4-11.
Be aware that there is a lead time of appropriately 10 minutes after the start of a capture before progress information about it becomes available. This is available from the Application Replay page (Figure 4-3). In either case, the characteristics of the capture is detailed in terms of its volume, performance, and errors. In this way, you can assess the quality of the capture, and its usefulness for testing purposes.
Note that the number of requests monitored during the capture process is particularly useful for assessing the capture's progress. In the event of an unusually high level of errors, you can use the Job page (available by clicking the RUEI Capture Job setting) to drill-down into specific errors.
You can replay a workload capture against a test system. Besides issuing identical HTTP requests, the replay mechanism also mimics the characteristics of the capture in terms of concurrency and timing. This section provides information about the following parts of the replay process:
Proper planning of the workload replay ensures that the replay will be accurate. Replaying a workload capture requires the following steps:
Ensure that the application data state on the test system is logically equivalent to that of the capture system at the start time of workload capture. This is described in Section 4.5.4, "Setting up the Test System Database".
All references to external systems have been resolved. This is explained in Section 4.9.3, "Resolving References to External Systems".
It is important to understand that a replay is an execution (playback) of a workload capture. A replay task is a group of replays based on the same capture. After a replay is completed, you can view a replay report and compare the replay with the initial capture, or create another replay within the same replay task. Typically, the replays within a replay task perform the same purposes. For example, a database or host system configuration with multiple parameter changes.
It is recommended that replays are grouped into the same replay task in order to facilitate comparison. For example, those that relate to the testing of the same database upgrade patch.
A captured workload may contain references to external systems, such as database links or external tables. It is critical that you reconfigure these external interactions to avoid impacting other production systems during replay. Typical external references that need to be resolved before replaying a workload are shown in Table 4-1.
Table 4-1 References to External Systems
| Type | Description |
|---|---|
|
Database links |
Typically, it is not desirable for the replay system to interact with other databases. Therefore, you should reconfigure all database links to point to an appropriate database that contains the data needed for replay. |
|
External tables |
All external files specified using directory objects referenced by external tables need to be available to the database and application server during replay. The content of these files should be the same as during capture, and the filenames and directory objects used to define external tables should also be valid. |
|
Directory objects |
You should reconfigure any references to directories on the production system by appropriately redefining the directory objects present in the replay system after restoring the database. |
|
URLs |
URLs/URIs that are stored in the database and application server need to be configured so that Web services accessed during the capture will point to the appropriate URLs during replay. If the workload refers to URLs that are stored in the production system, you should isolate the test system network during replay. |
|
E-mails |
To avoid resending E-mail notifications during replay, any E-mail server accessible to the replay system should be configured to ignore requests for outgoing E-mails. |
Important:
To avoid impacting other production systems during replay, it is strongly recommended that you run the replay within an isolated private network that does not have access to the production environment hosts.URLs in the workload capture files need to be remapped to different values before replay within the test environment. For example, the Web application URL in every request needs to be remapped to that of the test system.
Note that wildcard characters are not supported within remapped URLs. All required domain and port numbers must be fully specified.
The RUEI installation monitoring your network traffic can be configured to omit the logging of sensitive information. This is called masking, and prevents passwords and other sensitive information from being recorded on disk. Further information on the use of this facility is available from the Oracle Real User Experience Insight User's Guide.
It is important to understand that Application Replay only supports the substitution of one value for each masked field. For example, if an application logon password field is masked, you will need to set up one common alternative logon password for all user accounts in the test system.
To replay a workload capture using Enterprise Manager:
From the Enterprise menu, select Quality Management, then select Application Replay. The page shown in Figure 4-3 appears.
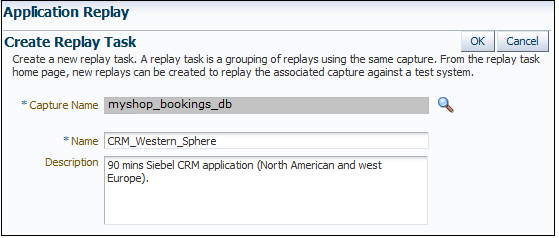
From the Replay Tasks section, click Create or Create Like. The page shown in Figure 4-12 appears.
Click the Select Capture icon. A new window opens that allows you to select the capture upon which the replay task should be based. Specify a unique name for the new replay task. Optionally, specify a brief description. It is recommended that you include an indication of the replay task's purpose and scope. When ready, click OK. You are returned to the page shown in Figure 4-3.
Click the newly created replay task. The page shown in Figure 4-13 appears.
Figure 4-13 Create Replay (Overview) Page
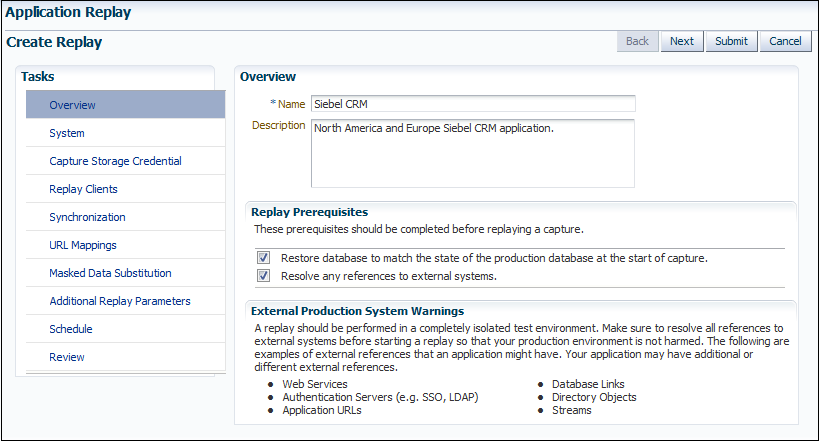
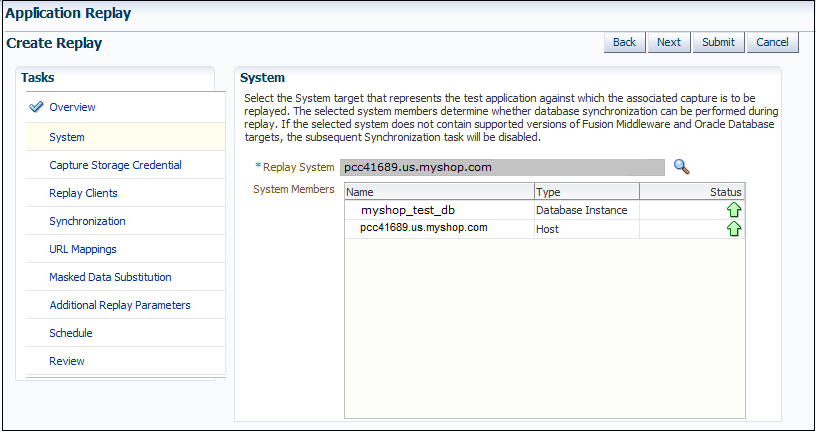
Specify a name for the replay. It must be unique among the selected replay task. Optionally, specify a brief description for the traffic to be replayed. It is recommended that you include an indication of the purpose and scope of the replay. Carefully review the perquisite information, and click the acknowledgement check boxes to indicate that they have been met. When ready, click System. The page shown in Figure 4-14 appears.
Click the Select System icon, and select the targets that represent the test environment against which the capture should be replayed. It is recommended that you review the status of the selected components, and ensure that they will be available throughout the planned replay. When ready, click Capture Storage Credential. The page shown in Figure 4-15 appears.
Figure 4-15 Create Replay (Capture Storage Credential) Page
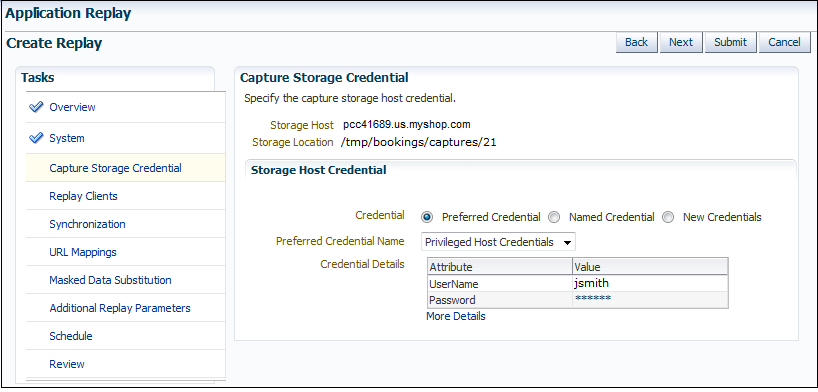
Specify the credentials of the selected storage host. When ready, click Replay Clients. The page shown in Figure 4-16 appears.
Figure 4-16 Create Replay (Replay Clients) Page
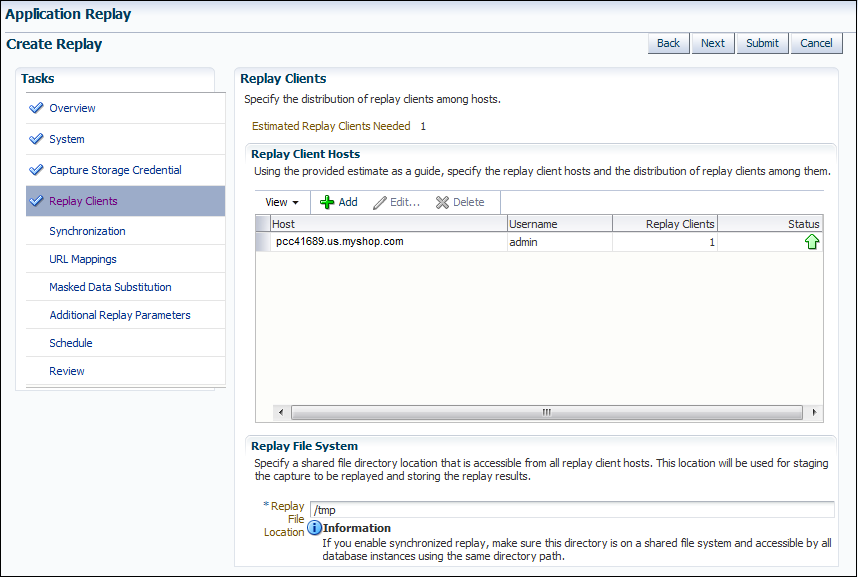
Specify the Replay Clients that will be used to generate the workload on the test system. Note that the provided estimate should be used as a basis for scaling the planned replay. Specify the file system location to be used for storing the capture files and replay results. This location must be on a shared file system and accessible from the Replay Client hosts and database hosts (if synchronization is enabled) via exactly the same file directory path. When ready, click Synchronization. The page shown in Figure 4-17 appears.
Figure 4-17 Create Replay (Synchronization) Page
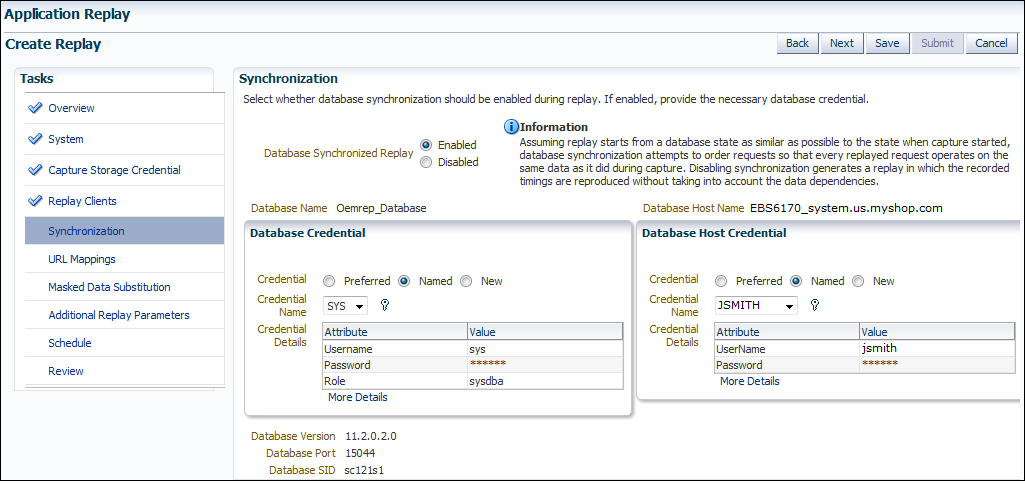
Specify whether database synchronization should be enabled during the replay. Note that, if enabled, you will need to provide relevant database and host credentials. When ready, click URL Mappings. The page shown in Figure 4-18 appears.
Figure 4-18 Create Replay (URL Mappings) Page
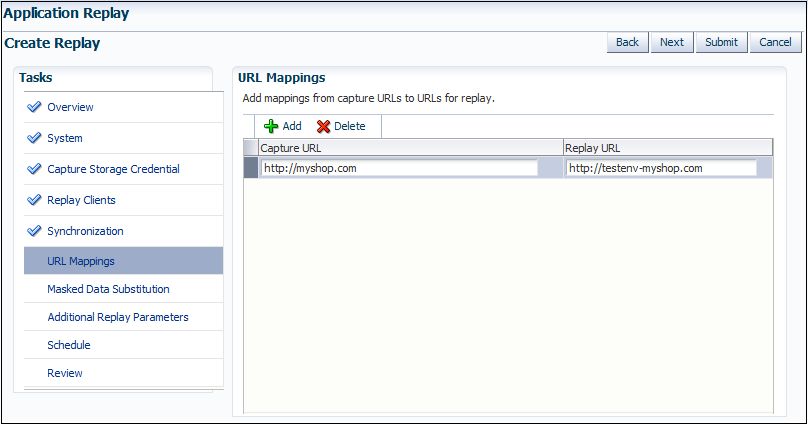
Specify the URL mappings that should be used during the replay. That is, how the URLs encountered during capture should be substituted when replayed within the test environment. When ready, click Masked Data Substitution. The page shown in Figure 4-19 appears.
Figure 4-19 Create Replay (Masked Data Substitution) Page
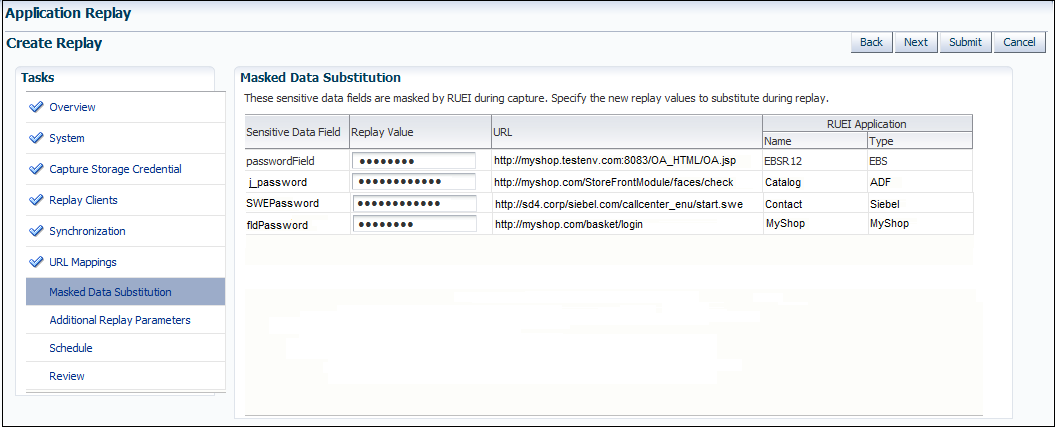
RUEI can be configured to omit the logging of sensitive information (such as passwords, credit card details, and so on) from being recorded on disk. Because the values of these fields is not recorded, they need to be explicitly specified for replay. When ready, click Additional Replay Parameters. The page shown in Figure 4-20 appears.
Figure 4-20 Create Replay (Additional Replay Parameters) Page
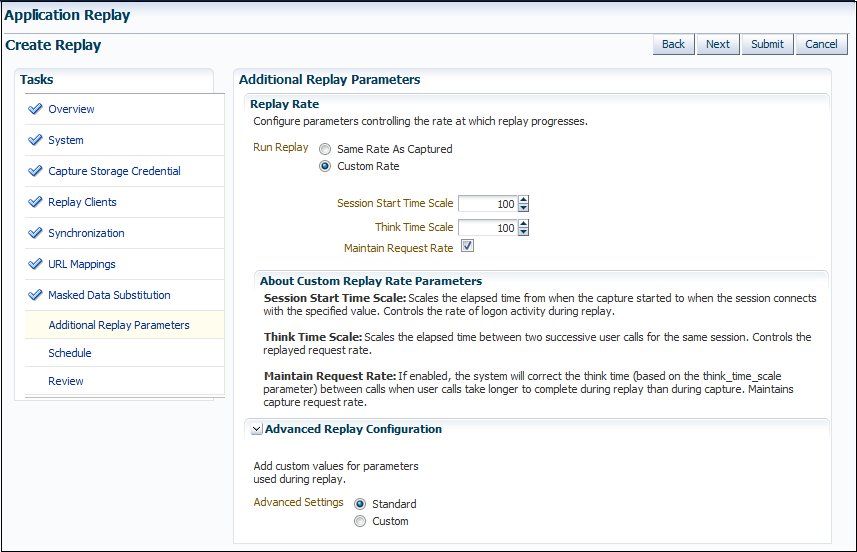
Specify whether the replay should progress at the same rate as in the original capture or at an alternative rate. In the case of the latter, you need to specify the appropriate session start time scale, think time scale, and whether the request rate should be maintained at the original rate. Expand the Advanced Replay Parameters section to specify whether the standard advanced settings should have their standard values or custom values. When ready, click Schedule. The page shown in Figure 4-21 appears.
Figure 4-21 Create Replay (Schedule) Page
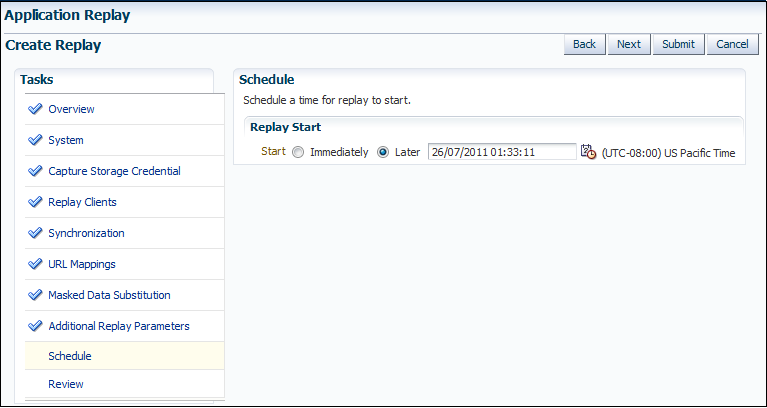
Specify when the replay should start. When ready, click Review.
A summary of the planned replay is displayed. If necessary, use the Back and Next buttons to move between sections. When ready, click Submit to launch the replay.
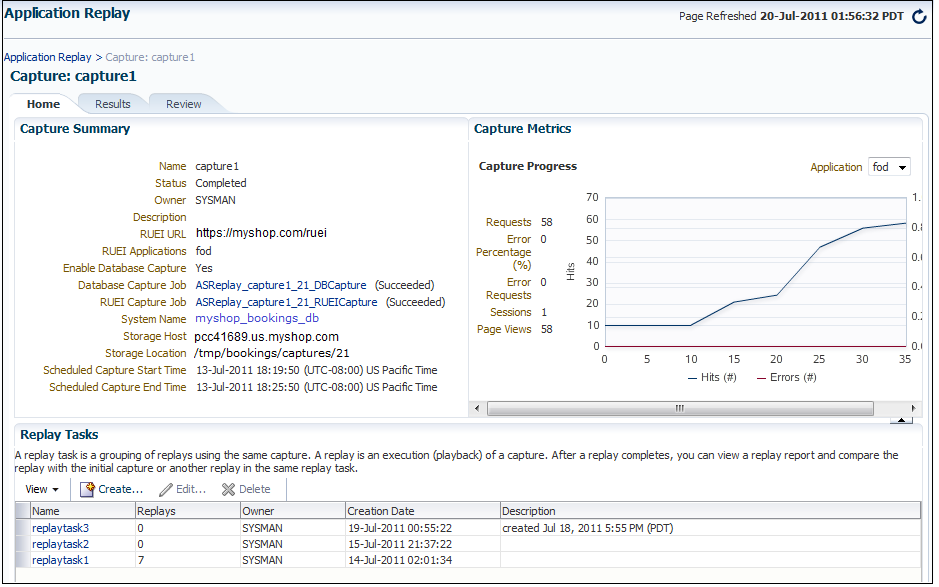
Detailed information about a selected replay is available by clicking it within the Application Replay Page. An example of a replay overview is shown in Figure 4-22.
It consists of three parts:
Home: provides a overview of the replay, its associated replay task, and the capture upon which it based. The progress of the replay, and a comparison with the original capture, is also provided.
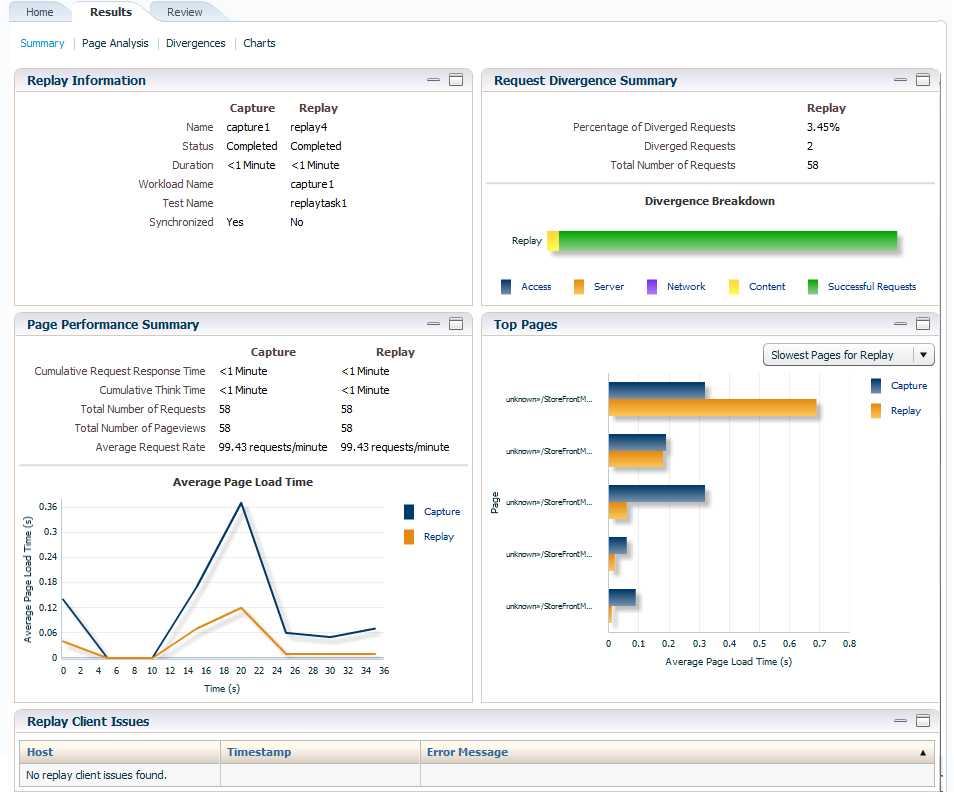
Results: provides more detailed information about the request divergence. This includes a comparison of page performance during the original capture and the replay, and the application pages that experienced the highest level of divergence. An example is shown in Figure 4-23.
Within this section, the Page Analysis section allows you to an analysis of each application page across selected metrics. The Divergences section allows you to view information restricted to specific divergence types (such as access, content, and so on). The Charts section allows you to view detailed replay information across specific metrics (such as average page load time).
Review: provides information about the replay environment (such as the credentials, host, and replay clients), as well as the URL mappings and masked data substitutions used during the replay.
Figure 4-23 Example Replay Results Summary
This section provides guidance on dealing with the most common problems encountered when capturing and replaying workloads. In addition, it is recommended that you review the Oracle Support Web site for information about known issues and workarounds. It is available at the following location:
https://support.oracle.com
RUEI Installation
Ensure that the RUEI installation used to monitor the applications in the workload capture meets the following requirements:
Check the Oracle Support Web site for information about supported versions and required hot fixes.
RUEI has been configured to monitor the required applications. Information about deployment options and requirements is available from the Oracle Real User Experience Insight Installation Guide.
You have a valid user name and password combination. If necessary, contact your RUEI Administrator. Note that the user account must have Security Officer permission. For further information about roles and permissions, see the Oracle Real User Experience Insight User's Guide.
Full-Session Replay (FSR) has been enabled, and sufficient storage has been assigned, for each application that is planned to be captured. In addition, you should ensure that each application's data replay logging and masking settings are compatible with the use of FSR. For information, see the Oracle Real User Experience Insight User's Guide.
Ensure that your Web server has been configured to use static SSL certificates. This is necessary because RUEI does not support dynamic SSL certificates.
If your application make use of jumbo frames, increase the RUEI capture length from its default 2kb to 64kb by issuing the following command on the RUEI Reporter system as the root user:
execsql config_set_profile_value wg System config CaptureLength replace 65536
Synchronization
If you are using synchronization replay, ensure that your capture and replay environments meet the requirements described in Section 4.5.3, "Using Synchronization".
Capture Checklist
In addition to the requirements indicated above, you should also ensure that:
RUEI is correctly capturing all required traffic using the appropriate logging and masking policies. For information on verifying its configuration, see the Oracle Real User Experience Insight User's Guide available at the following location:
http://www.oracle.com/technetwork/documentation/realuserei-091455.html
The database host user ID belongs to the same group as the Enterprise Manager Agent user account.
Replay Checklist
In addition to the requirements indicated above, you should also ensure that:
All required URLs have been correctly remapped, as described in Section 4.9.4, "Remapping URLs". Check whether the test system has been configured as HTTP or HTTPS, the domain name of the Web server, and the relevant port number. In addition, verify that the full domain name is specified in the URL, and not just the host name.
It is strongly recommended that you do not replay a captured workload in a production environment.
Ensure that you have provided a substitute value for all sensitive data fields that were masked during capture. This is described in Section 4.9.5, "Substituting Sensitive Data".
|
Copyright © 2011, 2012, Oracle and/or its affiliates. All rights reserved. Legal Notices |
|