17 Externalized Objects Management
This chapter describes the extensions that are available to basic Oracle RTD elements, how they are defined and used in the composite decision process, and how they are integrated with the external applications that they serve.
Oracle RTD produces adaptive enterprise software solutions by a process of continuously learning in real time from business process transactions as those transactions are executing. By continuously learning in real time, the adaptive solutions can optimize the outcome of each transaction and of the associated business process.The basic framework of the Oracle RTD decisioning process is as follows:
-
Oracle RTD makes analytic decisions for each interaction.
-
Based on rules and predictive models, Oracle RTD decisions use real-time and historical data to make optimal recommendations from a variety of choices.
-
In making the best recommendations, Oracle RTD optimizes across potentially conflicting business goals.
As described in Chapter 13, "About Decision Studio Elements and APIs," all components of an Oracle RTD Inline Service are configured through Decision Studio. Once in production, changes can be made either through Decision Studio or Decision Center depending on the task. In addition, the Oracle RTD platform exposes several key components as external objects that users can integrate to through an outside application, enabling them to manage Oracle RTD tasks and objects through existing applications. Oracle RTD can then continue to be the decisioning engine, but administration is performed through other existing business tools.
The following image shows the standard elements that form the framework for the Oracle RTD decision process, together with a significant set of inputs that enable external applications together with Oracle RTD to provide a composite decision service for their end users.
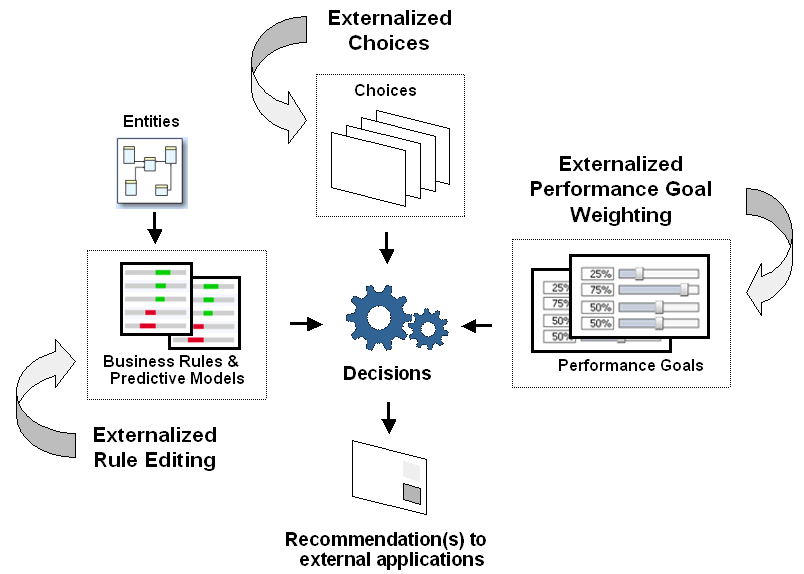
The standard elements of the Oracle RTD decision process - decisions, entities, choices, rules, models, and performance goals - are defined within Decision Studio. For general information about these elements, see Chapter 12, "About Decision Studio" and Chapter 13, "About Decision Studio Elements and APIs."
Oracle RTD can adapt to real-time changes to objects in external data systems, such as choices maintained in external content management systems.
Applications using Oracle RTD can also enable their users to make significant on-the-spot modifications to the decision process by creating and modifying the rules and by altering the performance goals that drive and control the overall decision process.
This chapter describes how these extensions to basic Oracle RTD elements are defined and used in the composite decision process, and how they are integrated with the external applications that they serve.
This chapter contains the following topics:
17.1 Dynamic Choices
In Oracle RTD, Choices represent the universe of alternatives, from which Oracle RTD can select its recommendations, such as the best offer in a cross selling application.
Choices can be either Static or Dynamic.
With Static Choices, the Choices to present to the requesting application or self-learning model are completely defined within Oracle RTD. Static Choices are useful in cases where the Choices are known in advance, and are constant over a period of time.
Dynamic Choices are Choices that are built dynamically at runtime. These Choices typically reside in external data sources. This allows for the management of Choices to be done at the source system, such as Choices based on offers defined in an offer management system.
Note:
Although the main sources of Dynamic Choices are external data sources, you can also create Dynamic Choices with customized Java code.
The Dynamic Choices to be presented to an application may vary over time, but always reflect the up-to-date state of the application data. It is not necessary to redeploy the Oracle RTD Inline Service when dynamic choice content is updated.
Note:
While this section focuses on Dynamic Choices, a Choice Group can contain a combination of Static and Dynamic Choices.
A Decision can be associated with one or more Choice Groups, no matter what type of Choice they contain.
This section contains the following topics:
-
Section 17.1.3, "Multiple Category Dynamic Choices from a Single Data Source"
-
Section 17.1.4, "Prerequisite External Data Source for Dynamic Choices"
-
Section 17.1.5, "Overview of Setting up Dynamic Choices in Decision Studio"
-
Section 17.1.9, "Creating the Dynamic Choice Data Retrieval Function"
17.1.1 Simple Example of Dynamic Choices
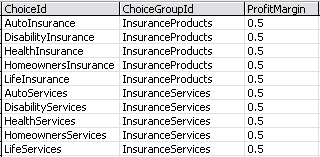
As a simple example, take the case of an Insurance_Proposals table, as shown in Figure 17-1. This table is defined outside of the Oracle RTD environment, and holds data about the Choices that Oracle RTD will evaluate and prioritize.
The Insurance_Proposals table contains rows for different insurance products, as identified by the common value InsuranceProducts in the ChoiceGroupId column. The column that categorizes or groups the Dynamic Choices is an important required key identifier for setting up Dynamic Choices.
Each row in the group shows a different type of insurance product being offered, such as AutoInsurance, and DisabilityInsurance. Each row represents a Dynamic Choice.
One column serves to identify the particular Dynamic Choice within the group. In this example, the ChoiceID column is the Dynamic Choice identifier column.
Other columns in the table, such as ProfitMargin, can be used by Oracle RTD in the evaluation process. These columns can also be sent back to the application as part of the Dynamic Choice recommendation, as a value for a defined Choice attribute.
In short, the setup process is that, in Oracle RTD, you set up a Choice Group for Dynamic Choices, and associate this Choice Group with the required external Data Source or Sources. The Dynamic Choices are then available to be recommended by Oracle RTD.
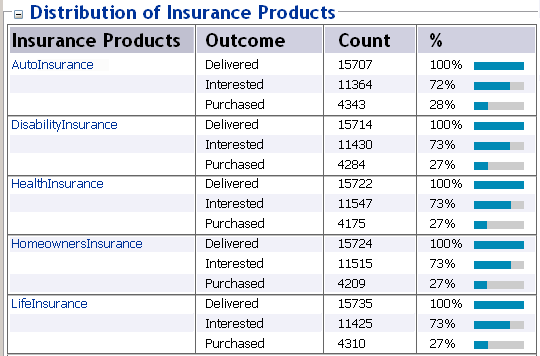
After sufficient recommendations have been made and models have been updated for the corresponding Choice Group, you can analyze the performance of the various Dynamic Choices through Decision Center, as shown in Figure 17-2.
17.1.2 Basic Dynamic Choice Design Implications
The basic design process for Dynamic Choices is similar to that for Static Choices. You must first set up a Choice Group, then define the required elements and parameters for Dynamic Choices in the Choice Group. For more detailed information on how to perform the setups, see Section 17.1.5, "Overview of Setting up Dynamic Choices in Decision Studio."
Using the Insurance_Proposals example, this section acts as an overview of the design process. It also introduces key terms used in the design process, as follows:
-
The set of all the Dynamic Choices is identified as all the rows that have a common value in a "grouping" or categorizing column. In the Insurance_Proposals example, the categorizing column (or set identifier) is the ChoiceGroupId column.
-
Each row in the database set represents a single Dynamic Choice. In the Insurance_Proposals example, the Dynamic Choice itself is identified by the unique value in the ChoiceId column.
-
When you define the Choice Group for Dynamic Choices in Oracle RTD, you must link the Group to the set of rows that contain the Dynamic Choices.
-
When you define the Dynamic Choices in the Choice Group in Oracle RTD, you must link each Dynamic Choice in the Group to the corresponding single Dynamic Choice row in the Data Source.
17.1.3 Multiple Category Dynamic Choices from a Single Data Source
In the simplest Dynamic Choice case, all the rows of the database table belong to the same category, that is, have the same value in a categorizing column.
You can provide different Dynamic Choices from either the same database table or a variety of data sources. The following example, as illustrated in Figure 17-3, shows the case where the Insurance_Proposals table is extended to provide Choices for both Insurance Products and Insurance Services.
For this situation, you set up two Choice Groups in Oracle RTD, making both sets of data available for recommendations in the application.
After sufficient recommendations have been made and models have been updated for the corresponding Choice Group, you can analyze the performance of either or both of the Insurance Products and Insurance Services Dynamic Choices.
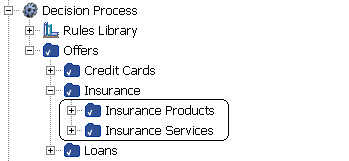
For example, the Choice Groups could have been set up as two groups in a group hierarchy, and available for analysis in Decision Center as shown in Figure 17-4.
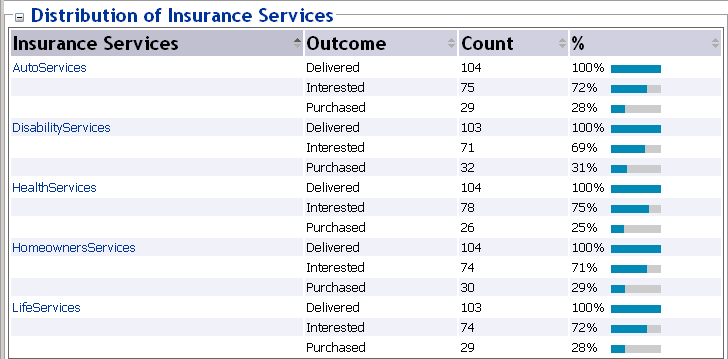
Analyzing the Insurance Products provides the same results as shown in Figure 17-2. Figure 17-5 shows an equivalent analysis report for Insurance Services.
17.1.3.1 Different Dynamic Choice Categories in the Same Data Source
Choice Groups, unlike Choices, must be pre-defined. In effect, Choice Groups are static. You can group Dynamic Choices in separate Choice Groups if necessary to support reporting or decisioning requirements.
The design considerations for and components of each Choice Group are the same as described in Section 17.1.2, "Basic Dynamic Choice Design Implications."
For general information on how to set up Choice Groups, see Section 17.1.5, "Overview of Setting up Dynamic Choices in Decision Studio."
For specific information on how to set up different Choice Groups from the same Data Source, see Section 17.1.12, "Creating a Multi-Category Choice Group."
17.1.4 Prerequisite External Data Source for Dynamic Choices
The data required for Dynamic Choices exists in an external Data Source.
For the sake of simplicity, the following description assumes that the external Data Source is a database table or view in the calling application.
To be useful for Dynamic Choices, the data must include:
-
One column to be used for categorizing and extracting the data.
For a single Dynamic Choice, the rows to be extracted will all have the same value in the categorizing column, and this column is used to control the extraction.
For example:
-
The database table Special_Events has a column Event_Type.
-
There are three distinct values of Event_Type across all the rows, namely Promotion, Product_Launch, and Mailshot.
In this example, Event_Type is the categorizing column, and for a single Dynamic Choice, Oracle RTD will extract all the rows of one event type, such as all the Promotion rows.
-
-
One column that uniquely identifies the rows extracted for a particular Dynamic Choice.
The column does not need to have unique values across all the rows, just within the extracted data set.
Any column that provides a unique identifier within the extracted data is sufficient. Oracle recommends that the column values include some textual component. These values appear as headers for some Decision Center reports, and an identifier that is meaningful in the real world sense is more useful than a strictly numeric identifier.
Note:
The identifier column should contain alphanumeric values and spaces only, that is, no special characters.
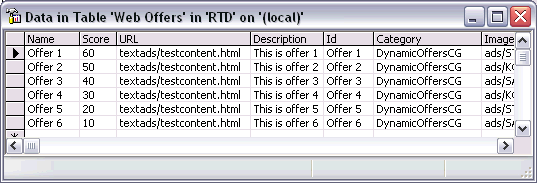
Figure 17-6 is an example of a database table Web Offers, that could be used as the external data source for a Dynamic Choice data source.
The table illustrates the following features:
-
The categorizing column is Category, and the common value in all the Category columns is DynamicOffersCG.
-
You could select either Name or ID as the Dynamic Choice identifier column for the DynamicOffersCG category.
17.1.5 Overview of Setting up Dynamic Choices in Decision Studio
Note:
The diagrams and Decision Studio screen captures illustrating the setup process, which appear later in these sections on dynamic choices, are based on the DC_Demo Inline Service that is released with Oracle RTD.
The process of setting up of Dynamic Choices in Decision Studio consists of the following topics:
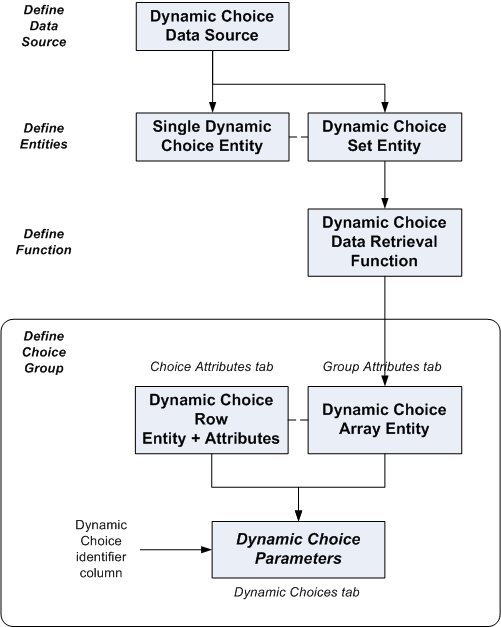
Figure 17-7 shows an overview of setting up a simple, single category Choice Group for Dynamic Choices. The elements in the diagram are referred to in the more detailed process descriptions that appear later in this chapter.
17.1.6 Creating the Dynamic Choice Data Source
To create the Dynamic Choice Data Source:
-
Create a new Data Source that maps to the table described in Section 17.1.4, "Prerequisite External Data Source for Dynamic Choices," using the Import button to point to the external data source.
-
In the Output column area, check Allow multiple rows, and select all the columns that you require for a Dynamic Choice.
In the Input column area, select the column that contains the common value that categorizes and groups the Dynamic Choice rows.
Note:
You do not have to select the Dynamic Choice identifier column from among the Output columns at this stage.
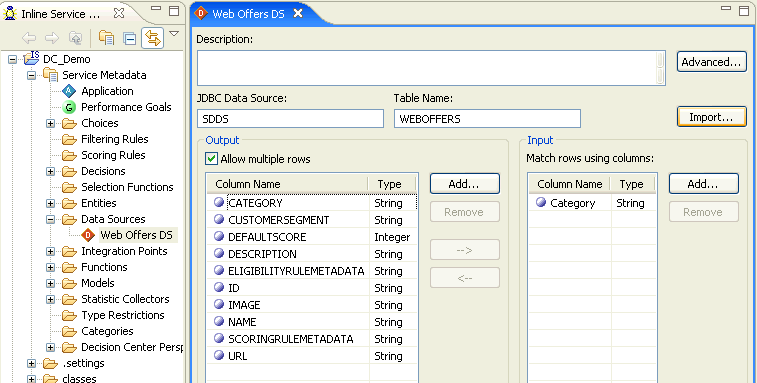
Figure 17-8 shows how the Data Source Web Offers DS is set up from the table SDDS.WEBOFFERS, with Category as the Input identifier, and a number of other columns that represent attributes of the Dynamic Choice itself.
17.1.7 Creating the Single Dynamic Choice Entity
The Dynamic Choice data exists in the Data Source. You must create a Single Dynamic Choice Entity in Oracle RTD that consists of all the information associated with a particular category, but not the category itself.
In terms of the Data Source that you created, the Entity attributes for the Single Dynamic Choice Entity are the Output attributes of the Data Source.
To create the Single Dynamic Choice Entity:
-
Create an Entity for the Dynamic Choice data, using the Import functionality to bring in all the Output columns from the Data Source described in Section 17.1.4, "Prerequisite External Data Source for Dynamic Choices."
-
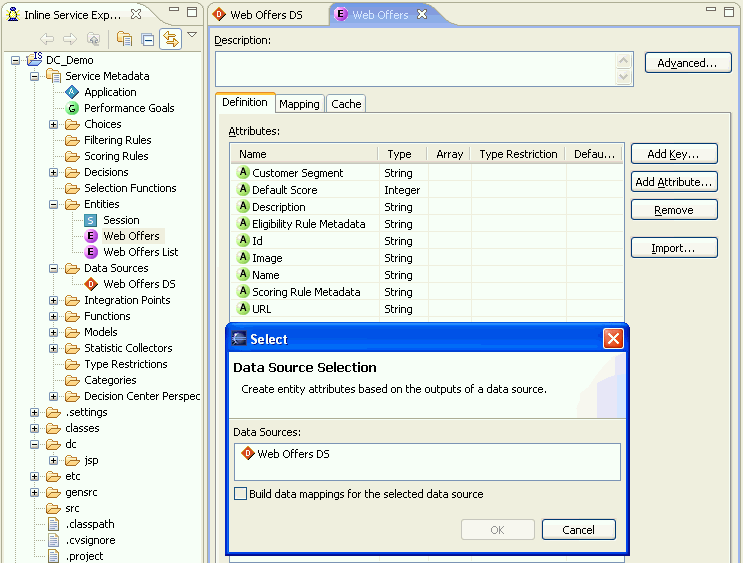
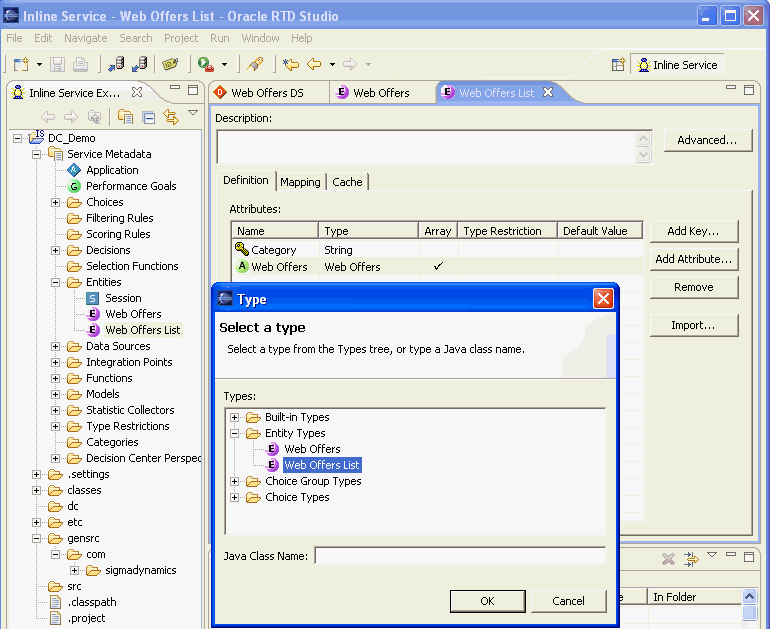
When selecting the Data Source, be sure to uncheck the Build data mappings for the selected data source option found in the Select window that appears when you import.
Figure 17-9 shows the Definition tab for the setup of the Single Dynamic Choice Entity Web Offers. The attributes are the Output columns of the Data Source Web Offers DS.
17.1.8 Creating the Dynamic Choice Set Entity
In addition to the Single Dynamic Choice Entity, you must create a Dynamic Choice Set Entity, that includes the following Attributes:
-
A Key Attribute, which is the input, categorizing column of the Data Source that contains the Dynamic Choice data
-
An array Attribute that stores the Single Dynamic Choice Entity data
This array Attribute must be of the same Entity type as the Entity that you created in Section 17.1.7, "Creating the Single Dynamic Choice Entity." This array is the container for all the Attributes of the data to be extracted from the Data Source required for the Dynamic Choice except for the categorizing Attribute.
To create the Dynamic Choice Set Entity:
-
Create an Entity in Oracle RTD.
-
For the key Attribute, click Add Key, and select the Dynamic Choice categorizing Attribute from the Data Source.
-
Create an Attribute whose type is the name of the Entity created in Section 17.1.7, "Creating the Single Dynamic Choice Entity."
-
Mark this entity-type Attribute as an Array.
Figure 17-10 shows the Definition tab for the setup of the Dynamic Choice Set Entity Web Offers List. The Key Attribute is the Input column Category of the Data Source Web Offers DS, and the second Attribute is an array Attribute of type Web Offers.
-
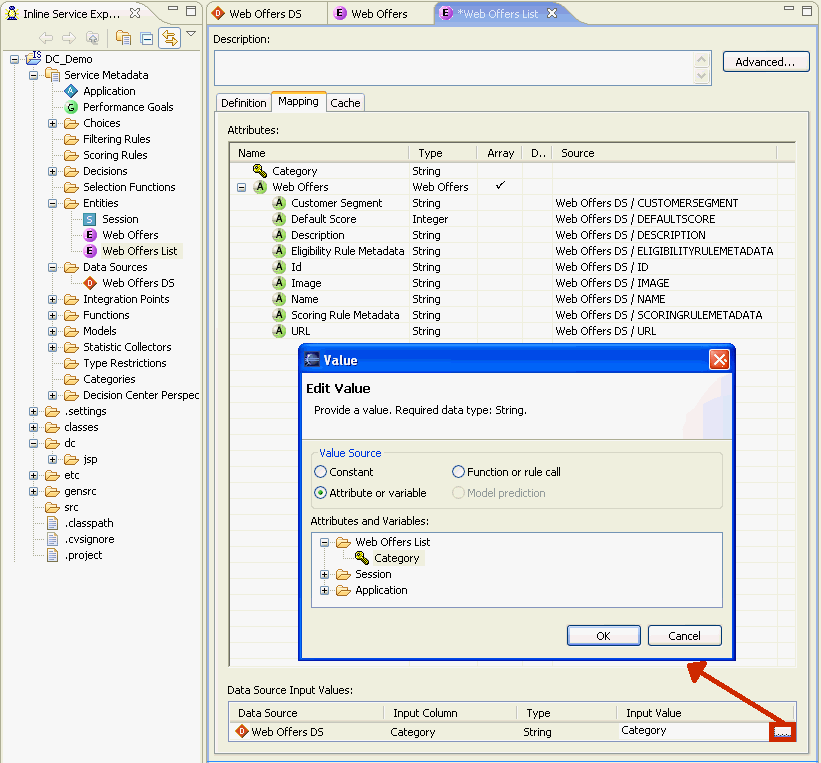
Click the Mapping tab, and map each Attribute within the entity-type Attribute to the appropriate column in the original Data Source.
-
In the Data Source Input Values region, for the Input Value of the Data Source, select the Dynamic Choice categorizing Attribute that you created in step 2.
Figure 17-11 shows the Mapping tab for the setup of the Dynamic Choice Set Entity Web Offers List. Each of the Attributes within the array Attribute is mapped to the corresponding column in the Web Offers DS Data Source. In the Data Source Input Values region, the Attribute selected for the Input Value is the key Attribute Category.
-
Click the Cache tab.
-
Select the check box to Enable caching for this entity type.
Note:
It is important to enable caching on the Dynamic Choice Set Entity. Enabling caching will keep the Real-Time Decision Server from repeatedly pulling the Dynamic Choices from the data source with each new session.
17.1.9 Creating the Dynamic Choice Data Retrieval Function
To extract the Dynamic Choice data from the database, you must create a Function that will perform the data retrieval. This function will be called by the Choice Group that you will create in the steps that follow. The properties of the Function are as follows:
-
The Function returns a value.
-
The return value is of type Array.
-
The Data Type of the array elements is the Single Dynamic Choice entity that you created previously
-
The Function has a Parameter that is the same as the Data Source Input Value of the Dynamic Choice Set Entity that you created previously.
-
The logic of the Function instantiates a new occurrence of the Dynamic Choice Set Entity, and uses the Parameter to retrieve the Dynamic Choice data into the array.
To create the Dynamic Choice Data Retrieval Function:
-
Create the Function, and select the Return value check box.
-
Select the Array option, to ensure that the return value is of type Array.
-
For the Data Type, select the name of the entity that you created in Section 17.1.7, "Creating the Single Dynamic Choice Entity."
-
In the Parameters area, add the Name and Type of the Key attribute that you created in step 2 of Section 17.1.8, "Creating the Dynamic Choice Set Entity."
-
In the Logic field, enter code similar to the following, adapting it as required for the names of your entities and attributes:
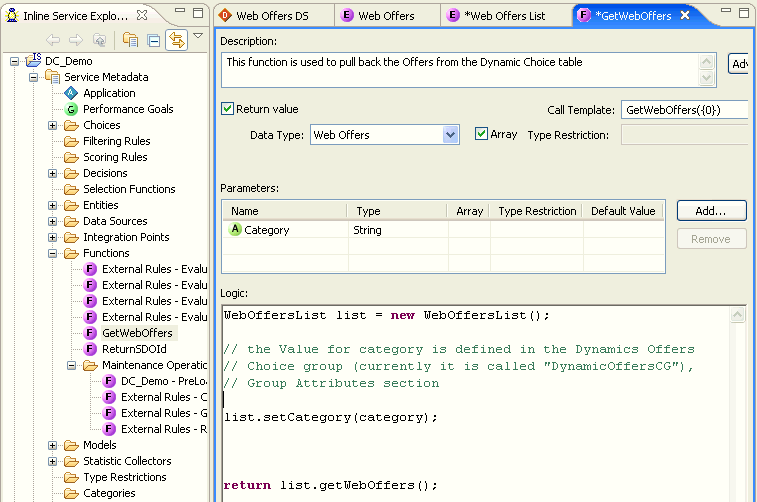
WebOffersList list = new WebOffersList();
list.setCategory(category);
return list.getWebOffers();
where:
-
WebOffersList is the object name, with internal spaces deleted, for the Entity created in Section 17.1.8, "Creating the Dynamic Choice Set Entity."
-
list.setCategory references the Entity key that you created in Section 17.1.8, "Creating the Dynamic Choice Set Entity," step 2.
-
getWebOffers() refers to the Entity created in Section 17.1.7, "Creating the Single Dynamic Choice Entity," that is mapped inside the Dynamic Choice Set Entity.
Figure 17-12 shows the definition of the GetWebOffers Function.
-
17.1.10 Considerations for Choice Group Design
Dynamic Choices enable application data administrators to control the choices that Oracle RTD recommends to the application. Unlike Static Choices, Dynamic Choices may be added, edited, and deleted in the application tables without requiring any changes in the interfacing Oracle RTD Inline Service.
If there is a requirement to have both type of Choice in a single Inline Service, Oracle recommends that Static Choices and Dynamic Choices are clearly separated in the designing of the Choice Groups. This section concentrates on the design of Choice Groups for Dynamic Choices.
You can design Dynamic Choices as follows:
-
In a single Choice Group
-
In completely separate Choice Groups - in effect, multiple independent single Choice Groups
-
In a Choice Group hierarchy
There can be many factors that influence your design, for example:
-
You may have a reporting requirement that a customer must have Choice Group reports for an explicit set of Dynamic Choices
-
You may have decisioning requirements that some shared eligibility rules must apply for one set of Dynamic Choices as opposed to another set
This section outlines the high level design steps required for a single Choice Group and a Choice Group hierarchy.
Where all Dynamic Choices are required to be in one Choice Group, then the recommended design strategy is:
-
Design a single Choice Group.
-
Enter and select the required parameters in each of the following tabs for the Choice Group: Group Attributes tab, Choice Attributes tab, Dynamic Choices tab.
In Decision Studio, this Choice Group has no subgroups.
Your design factors may lead you to group Dynamic Choices within a Choice Group hierarchy. The following steps describe in outline form the setup of a two-level hierarchy:
-
For the top-level Choice Group, enter and select the required parameters in the Choice Attributes tab, but not the Group Attributes tab, nor the Dynamic Choices tab.
-
For each separate Dynamic Choice category, specify one lower-level Choice Group. In each of the lower-level Choice Groups, enter and select the required parameters in the Group Attributes tab and the Dynamic Choices tab, but not in the Choice Attributes tab.
Note:
You only need to fill in Dynamic Choices tab parameters in the lowest-level Choice Groups of a multi-level Choice Group hierarchy.
In Decision Studio, the lower-level Choice Groups have no subgroups.
17.1.11 Creating a Single Category Choice Group
To use Dynamic Choices, you must create one or more Choice Groups. Where the Dynamic Choices refer to data that belongs to one type or category, create a single category Choice Group.
Note:
In Decision Studio, when you create a Choice Group for Dynamic Choices, the individual Dynamic Choices do not appear in any of the Decision Studio windows.
In Decision Center reports, you can see all the Dynamic Choices which satisfy the following conditions:
-
They have been returned by Decisions called by the front-end applications.
-
They have had RTD models updated for those Choices.
In Decision Studio, the Choice Group is configured to be able to extract the Choices dynamically at runtime through options that you set up in the following tabs:
These are the main tabs where you configure Dynamic Choices.
Note:
You can also use the Choice Eligibility tab, to filter the Dynamic Choice data as it is extracted from the Data Source.
Eligibility rules created for a Dynamic Choice are shared across all Choices retrieved for the same Dynamic Choice Group.
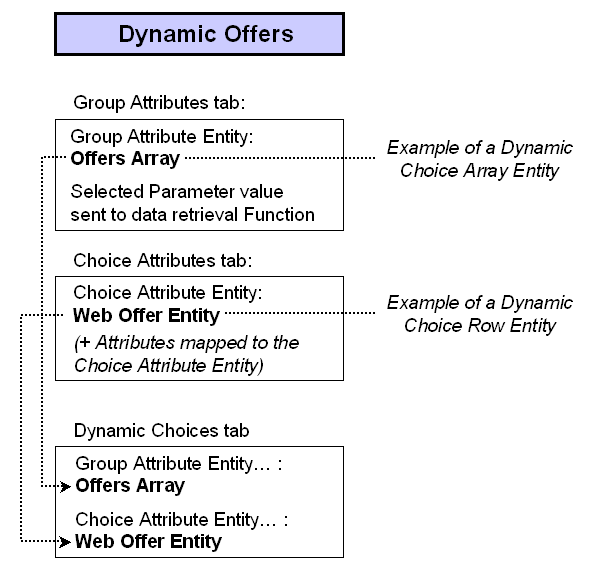
Figure 17-13 shows an example of the main elements required to set up a single category Choice Group, Dynamic Offers.
The Group Attribute setup indicates that all the data to be retrieved for the Dynamic Choices will be of one category only, and you must specify the exact category here.
The Choice Attribute setup describes the individual attributes that will be retrieved.
The Group and Choice Attributes are then referenced in the Dynamic Choices tab for this single category Choice Group.
17.1.11.1 Group Attributes Tab
In the Group Attributes tab, you specify an array Attribute of the same Entity type as that which you created in Section 17.1.7, "Creating the Single Dynamic Choice Entity." This Attribute is referred to as the Dynamic Choice Array Entity in Figure 17-7, which shows an overview of the single category Dynamic Choice setup process.
At this level, you also specify the Function that retrieves the Dynamic Choice data. You must choose a value for the Function parameter. This enables the function to retrieve just the Dynamic Choice data relevant for one particular real world type or category.
To create a Choice Group and specify the Group Attributes:
-
Create a Choice Group.
-
Click the Group Attributes tab.
-
Create a new entity-type Group Attribute (the Dynamic Choice Array entity), whose type is the name of the entity that you created in Section 17.1.7, "Creating the Single Dynamic Choice Entity."
-
Specify that this Attribute is an Array.
-
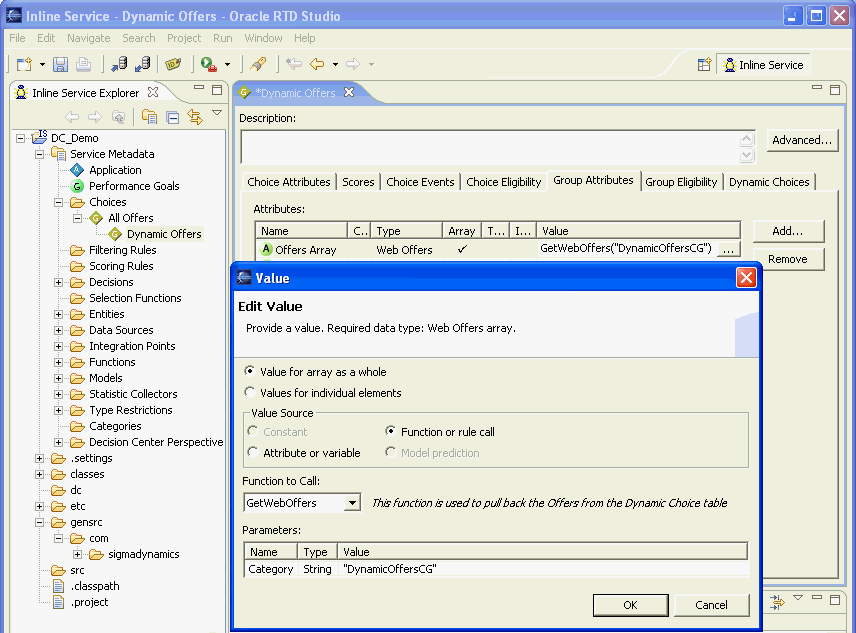
Click the right-hand end of the Value box to expose the ellipsis (...) button, then click the ellipsis button to open the Value window.
-
In the Value window, select the option Value for array as a whole.
-
For Value Source, select Function or rule call, then select the Function that you created in Section 17.1.9, "Creating the Dynamic Choice Data Retrieval Function."
-
In the Parameters area, choose the Value of the parameter that will retrieve the corresponding rows in the Data Source whose Input Attribute contains that value.
Note:
This string Value is the exact value in the database that categorizes all the Dynamic Choice rows for a Choice Group.
For example, for a Choice Group set up for the Insurance_Proposals table as described in Section 17.1.1, "Simple Example of Dynamic Choices," the Value is InsuranceProducts.
Figure 17-14 shows the Group Attributes tab for the Choice Group Dynamic Offers. The Function to call is GetWebOffers. The Value in the Parameters area is the string DynamicOffersCG.
17.1.11.2 Choice Attributes Tab
In the Choice Attributes tab, you must:
-
Specify an entity-type Attribute of the same type as the Entity that you created in Section 17.1.7, "Creating the Single Dynamic Choice Entity."
This Attribute is referred to as the Dynamic Choice Row entity in Figure 17-7, which shows an overview of the single category Dynamic Choice setup process.
-
For each of the component attributes within this Dynamic Choice Row Entity, create a separate Choice Attribute, which you must then map to the corresponding attribute within the Dynamic Choice Row entity that you just created.
To specify the Choice Attributes of the Choice Group:
-
Click the Choice Attributes tab.
-
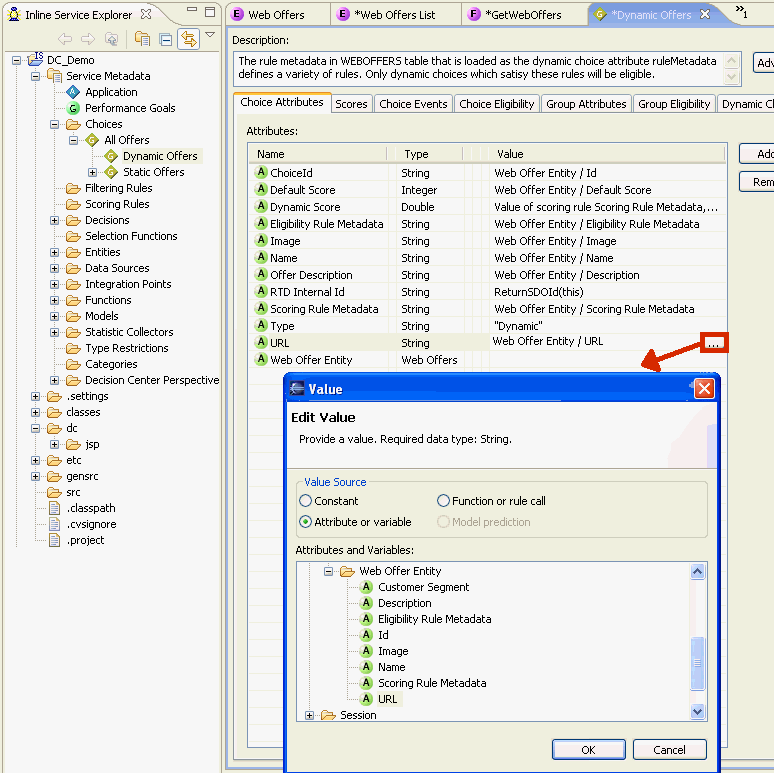
Create a new entity-type Attribute (the Dynamic Choice Row entity), whose type is the name of the entity that you created in Section 17.1.7, "Creating the Single Dynamic Choice Entity."
-
Ensure that the Array check box is not selected.
-
For each attribute of the new Dynamic Choice Row entity, create a corresponding Choice Attribute.
-
For each Choice Attribute created in the previous step, map its Value to the corresponding attribute within the Dynamic Choice Row entity that you created in step 2.
Figure 17-15 shows the Choice Attributes tab for the Choice Group Dynamic Offers. The Choice Attributes are the following:
-
One Dynamic Choice Row Entity Web Offer Entity
-
Several other Attributes, each of whose Values derives from the corresponding Attribute of the Dynamic Choice Row Entity Web Offer Entity
-
17.1.11.3 Dynamic Choices Tab
In the Dynamic Choices tab, you provide the following information:
-
You explicitly select this Choice Group to be for Dynamic Choices.
-
You specify the Group and Choice Attributes that you set up in the corresponding Group Attributes and Choice Attributes tabs.
-
You select the Attribute that identifies each Dynamic Choice.
-
You describe how you wish the Dynamic Choices to appear in Decision Center reports. Because the number of Dynamic Choices could be considerable, you can choose to break up a potentially long list of Dynamic Choices into smaller units or "folders," and you indicate how you want the data grouped in the folders.
To specify the Dynamic Choice parameters:
-
Click the Dynamic Choices tab.
-
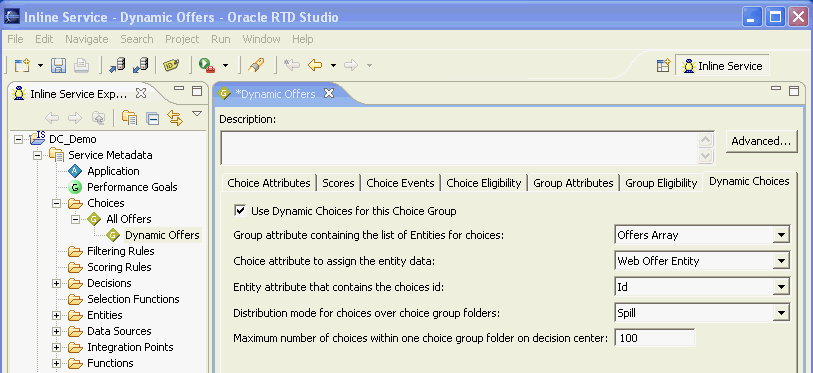
Select the check box option to Use Dynamic Choices for this Choice Group.
-
For the Group attribute containing the list of Entities for choices, select the Dynamic Choice Array attribute that you created in Section 17.1.11.1, "Group Attributes Tab."
-
For the Choice attribute to assign the entity data, select the Dynamic Choice Row attribute that you created in Section 17.1.11.2, "Choice Attributes Tab."
-
For the Entity attribute that contains the choices id, select the Attribute that serves as the unique identifier for each of the extracted Dynamic Choice rows.
Note:
The identifier column should contain alphanumeric values and spaces only, that is, no special characters.
-
For the Distribution mode for choices over choice group folders, select Spill or Even.
Note:
For more information about this parameter, and the parameter in the following step, see Section 17.1.13.4, "Distribution of Choices Across Decision Center Folders."
-
Select the Maximum number of choices within one choice group folder on decision center.
17.1.12 Creating a Multi-Category Choice Group
To use Dynamic Choices, you must create one or more Choice Groups. Where you want to be able to select different groups of data from the same data source, create a multi-category Choice Group. This section describes the standard way to set up a multi-category Choice Group.
Note:
In Decision Studio, when you create a Choice Group for Dynamic Choices, the individual Dynamic Choices do not appear.
In Decision Center reports, you can see all the Dynamic Choices which satisfy the following conditions:
-
They have been returned by Decisions called by the front-end applications.
-
They have had Oracle RTD models updated for those Choices.
In Decision Studio, a Choice Group is configured to be able to extract the Choices dynamically at run time through options that you set up in the following tabs:
-
Group Attributes tab
-
Choice Attributes tab
-
Dynamic Choices tab
These are the main tabs where you configure Dynamic Choices.
Note:
You can also use the Choice Eligibility tab, to filter the Dynamic Choice data as it is extracted from the data source.
Eligibility rules created for a Dynamic Choice are shared across all Choices retrieved for the same Dynamic Choice Group.
To allow for multiple Dynamic Choice categories, you must create a hierarchy of Choice Groups, and set up the Choice Group elements at different levels.
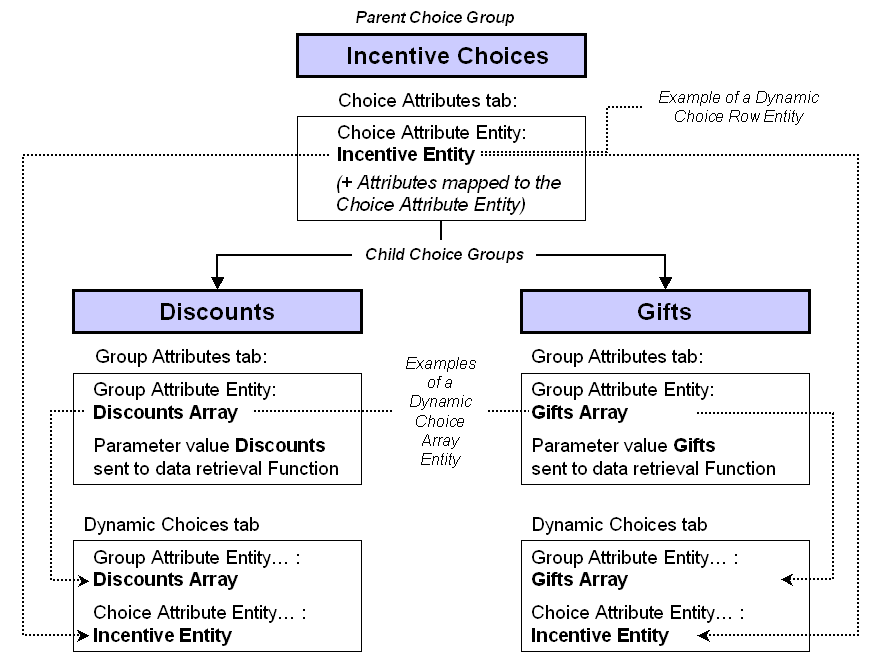
Figure 17-17 shows an example of the main elements required to set up a two-category Choice Group, Incentive Choices.
The Choice Group Incentive Choices is the parent Choice Group, with two child Choice Groups, Discounts and Gifts.
You specify the Choice Attributes at the top level, in the parent Choice Group. These Choice Attributes are then inherited by the two child Choice Groups.
Note:
In the parent Choice Group, or in any higher level Groups of a multi-level Choice Group hierarchy, you do not enter or select any values in the Dynamic Choices tab. Dynamic Choice parameters are only specified in the lowest level Group of any Choice Group hierarchy.
Each child Choice Group enables a different category set of data to be retrieved, through the Group Attributes setup. The Group and Choice Attributes are then referenced in the Dynamic Choices tab for both of the child Choice Groups.
To compare this process with the equivalent single category Choice Group setup, see Figure 17-7.
17.1.12.1 Choice Attributes Tab in the Parent Choice Group
In the Choice Attributes tab, you specify an entity-type Choice Attribute of the same type as that which you created in Section 17.1.7, "Creating the Single Dynamic Choice Entity."
This Choice Attribute is also known as the Dynamic Choice Row Entity, as in the equivalent single category Dynamic Choice setup process shown in Figure 17-7.
For each of the attributes within this Dynamic Choice Row entity, create a separate Choice Attribute, which you must map to the corresponding attribute in the Dynamic Choice Row entity that you just created.
To create the Parent Choice Group and Choice Attributes:
-
Create the parent Choice Group.
-
Create a new entity-type Choice Attribute, whose type is the name of the entity that you created in Section 17.1.7, "Creating the Single Dynamic Choice Entity."
-
Ensure that you do not specify that this is an Array.
-
For each of the attributes of the new entity-type Choice Attribute, create a corresponding Choice Attribute.
-
For each of the attributes created in the previous step, map its Value to the corresponding attribute within the Choice Attribute that you created in step 2.
17.1.12.2 Group Attributes Tab in the Child Choice Groups
For each child Choice Group, in the Group Attributes tab, you specify an entity-type array Attribute of the same type as that which you created in Section 17.1.7, "Creating the Single Dynamic Choice Entity."
This Group Attribute is also known as the Dynamic Choice Array Entity, as in the equivalent single category Dynamic Choice setup process shown in Figure 17-7.
At this level, you also specify the function that retrieves the Dynamic Choice data. You must choose a value for the Function parameter. This enables the Function to retrieve just the Dynamic Choice data relevant for one particular real world type or category.
First, you need to create the child Choice Groups under the previously created parent Choice Group, then enter the required elements in the Group Attributes tab.
To create the Child Choice Groups and Group Attributes:
-
Create the first child Choice Group.
-
Create extra child Choice Groups as required, one for each separate Dynamic Choice category.
Within each child Choice Group, you must now set up the required elements and parameters in the Group Attributes tab and the Dynamic Choices tab.
The steps following in this section describe the actions required in the Group Attributes tab for each child Choice Group. Section 17.1.12.3 describes the actions required in the Dynamic Choices tab for each child Choice Group.
-
Click the Group Attributes tab of the child Choice Group.
-
Create a new entity-type Group Attribute, whose type is the name of the Entity that you created in Section 17.1.7, "Creating the Single Dynamic Choice Entity."
-
Specify that this Attribute is an Array.
-
Click the right-hand end of the Value box to expose the ellipsis (...) button, then click the ellipsis button to open the Value window.
-
In the Value window, select the option Value for array as a whole.
-
For Value Source, select Function or rule call, then select the Function that you created in Section 17.1.9, "Creating the Dynamic Choice Data Retrieval Function."
-
In the Parameters area, choose the Value of the parameter that will retrieve the corresponding rows in the Data Source whose Input attribute contains that value.
17.1.12.3 Dynamic Choices Tab in the Child Choice Groups
For each child Choice Group, in the Dynamic Choices tab, you must provide the following information:
-
You explicitly select this Choice Group to be a Choice Group for Dynamic Choices.
-
You specify the Group and Choice Attributes that you set up in the corresponding Group Attributes and Choice Attributes tabs.
-
You select the Attribute that identifies each Dynamic Choice.
-
You describe how you wish the Dynamic Choices to appear in Decision Center reports. Because the number of Dynamic Choices could be considerable, you can choose to break up a potentially long list of Dynamic Choices into smaller units or "folders," and you indicate how you want the data grouped in the folders.
To specify the Dynamic Choice parameters:
-
Click the Dynamic Choices tab.
-
Select the check box option to Use Dynamic Choices for this Choice Group.
-
For the Group attribute containing the list of Entities for choices, select the attribute that you created in Section 17.1.12.2, "Group Attributes Tab in the Child Choice Groups."
-
For the Choice attribute to assign the entity data select the attribute that you created in Section 17.1.12.1, "Choice Attributes Tab in the Parent Choice Group."
-
For the Entity attribute that contains the choices id, select the Attribute that serves as the unique identifier for each of the extracted Dynamic Choice rows.
Note:
The identifier column should contain alphanumeric values and spaces only, that is, no special characters.
-
For the Distribution mode for choices over choice group folders, select Spill or Even.
Note:
For more information about this parameter, and the parameter in the following step, see Section 17.1.13.4, "Distribution of Choices Across Decision Center Folders."
-
Select the Maximum number of choices within one choice group folder on decision center.
17.1.13 Dynamic Choice Reporting Overview
This section consists of the following topics:
-
Section 17.1.13.4, "Distribution of Choices Across Decision Center Folders"
-
Section 17.1.13.5, "Example of a Decision Center Report with Dynamic Choices"
17.1.13.1 Applications with Static Choices Only
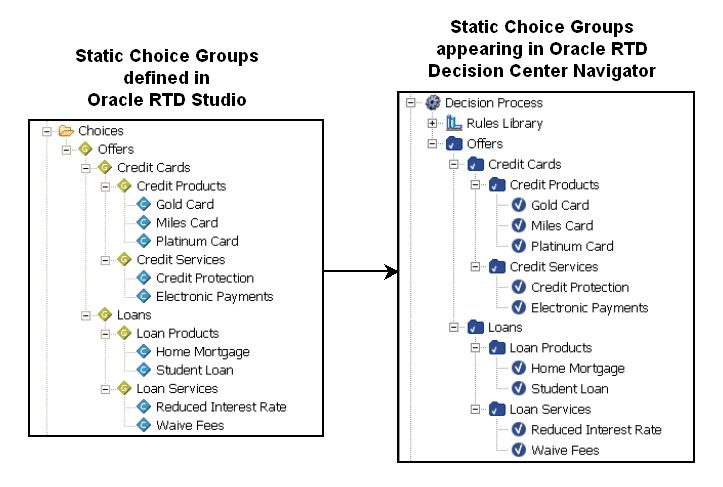
If your application has been configured to use only Static Choices, there is no impact on Decision Center reporting. The Choice Groups, subgroups, and Static Choices that you defined in Decision Studio will appear in the same hierarchical layout in the Decision Center Navigator, as shown in the example in Figure 17-18.
17.1.13.2 Dynamic Choice Visibility
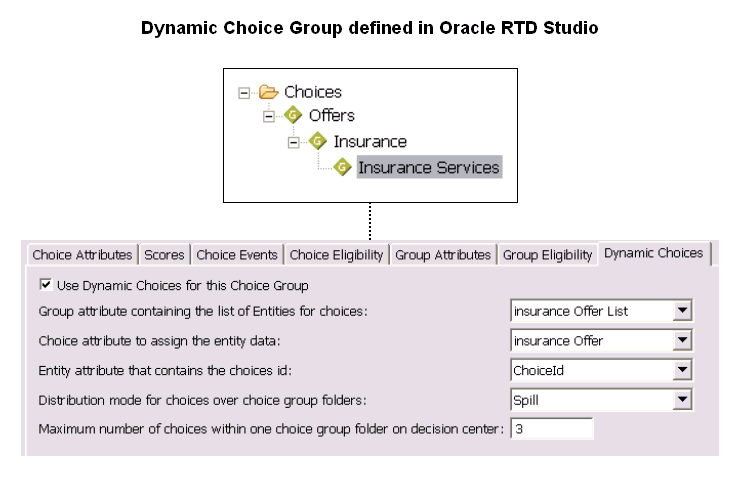
Dynamic Choices, by their very nature, cannot be predefined in Decision Studio. A Choice Group can be configured to hold dynamically-extracted external data, from which Dynamic Choices can be recommended. Figure 17-19 shows an example of a Choice Group set up to display Dynamic Choices for insurance services.
In Decision Center, only those Dynamic Choices that have actually been recommended and added to model learning data appear in the Decision Center Navigator, and have Performance and Analysis reports.
The other factor that influences how the Dynamic Choices appear in the Decision Center is the parameter Maximum number of choices within one choice group folder on decision center, which you specify when you define the Dynamic Choice Group. If the number of choices exceeds this maximum, the choices appear under system-created range folders, otherwise they appear directly under the Choice Group name.
For more information on range folders, see Section 17.1.13.3, "System-Created Range Folders."
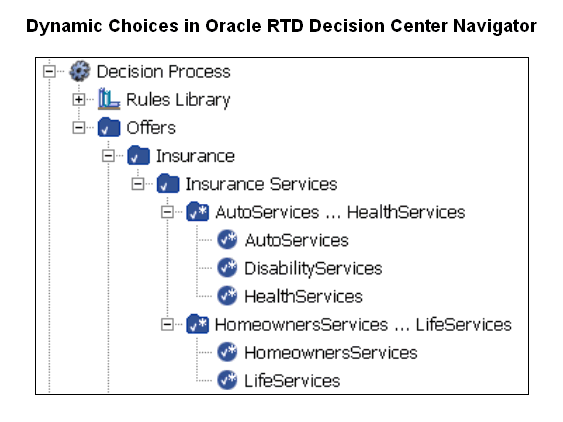
The example Decision Support Navigator menu in Figure 17-20 shows the following:
-
Five Dynamic Choices were recommended and added to model learning data.
-
The maximum number of choices per choice group is 3.
-
Each Dynamic Choice appears under one of the two system-created folder names.
17.1.13.3 System-Created Range Folders
The name of each system-created folder is made up of the names of the first and last Choices in the folder, with the string "..." separating the two Choices. System-created folders are also known as range folders.
Note:
The Choices within a range folder can be a mixture of Static and Dynamic Choices. Both components of the range folder name can therefore be either a Static or a Dynamic Choice.
In general, Oracle recommends that applications keep Static and Dynamic Choices in separate Choice Groups or separate Choice Group hierarchies.
If the total number of (Static choices + Dynamic Choices recommended and added to model learning data) exceeds the maximum defined for the Choice Group folder, the choices appear in system-created "groups" or subfolders, otherwise they appear directly under the Choice Group name.
17.1.13.4 Distribution of Choices Across Decision Center Folders
When configuring a Choice Group for Dynamic Choices in Decision Studio, there are two parameters that affect how choices appear in Decision Center.
Both parameters are in the Dynamic Choices tab, and they are only enabled if the Choice Group is selected to be used for Dynamic Choices. The parameters are:
-
Distribution mode for choices over choice group folders
-
Maximum number of choices within one choice group folder on decision center
For simplicity, these parameters are referred to as Distribution mode and Maximum number of choices in this section.
The Maximum number of choices parameter determines how choices appear in the Decision Center directly under the Choice Group name or under a system-created range folder. For more information on range folders, see Section 17.1.13.3, "System-Created Range Folders."
Note:
In Decision Center reports, range folders are not dedicated to Static or Dynamic Choices, that is, both Static and Dynamic Choices may appear together in the same range folder.
The Maximum number of choices parameter limits the number of Choices, regardless of whether they are Static or Dynamic, in each range folder.
The Distribution mode parameter specifies how the range folders are populated:
-
In Spill mode, each range folder is filled up to the maximum, and the final range folder typically has less values than the maximum.
-
In Even mode, the aim is to distribute the Choices evenly across the range folders.
For example, if there is a total of 106 Static or Dynamic Choices to display in the Decision Center, and the maximum per range folder is 25:
-
In Spill Mode, the distribution across the range folders is 25,25,25,25,6.
-
In Even Mode, the distribution across the range folders is 22,21,21,21,21.
17.1.13.5 Example of a Decision Center Report with Dynamic Choices
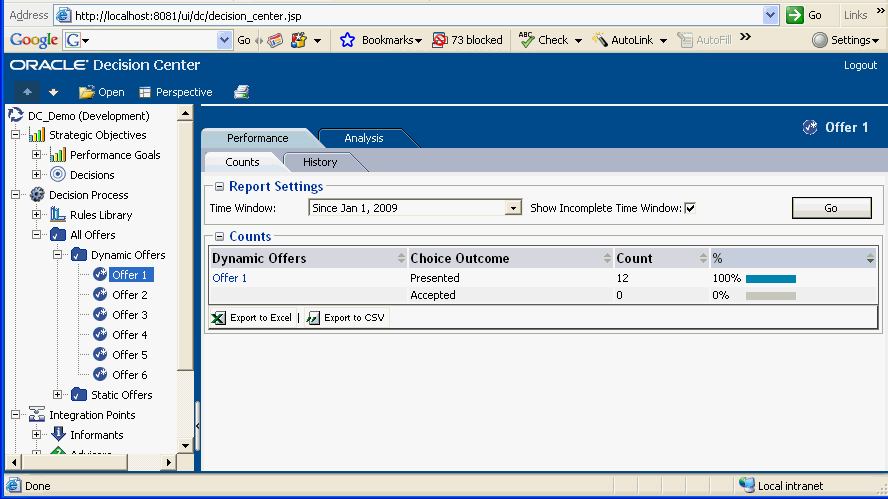
Decision Center can be used to view reports for each Dynamic Choice defined in a content database, which were actually recommended and added to model learning data. This is done by logging into a Decision Center Inline Service and opening the Decision Process section in the Decision Center navigator.
From here, any defined Dynamic Choice groups will be listed and will contain all dynamic offers defined in database tables for each Dynamic Choice group, that were recommended and added to model learning data. Choices in the database tables that were not added to model learning data do not appear in Decision Center reports.
The following is an image of a Decision Center report, with the navigator tree showing the DC_Demo Dynamic Choices:
17.2 External Rules
External rules enable end users running an application integrated with Oracle RTD to modify rule logic at run-time without the need to recompile the Inline Service. This allows users to manage Oracle RTD rules in existing systems where their content resides, and exposes attributes only available to Oracle RTD in the rules management process.
A typical use would be where specific rules, such as choice eligibility rules and choice group eligibility rules, are attached to dynamic choices, and need to be modified at run-time without Inline Service recompilation.
External rules can also be attached to static choices.
This section contains the following topics:
-
Section 17.2.3, "External Rule Editor Deployment Topologies"
-
Section 17.2.4, "Steps to Create and Deploy the External Rule Editor"
-
Section 17.2.5, "External Rule Editor Interface Requirements"
-
Section 17.2.7, "Setting Up External Rules in Decision Studio"
-
Section 17.2.8, "Setting Up the External Interface and Embedded Rule Editor"
17.2.1 Introduction to External Rules
The main components of the External Rules feature are:
-
External Rules Editor
Oracle RTD provides an embeddable Rule Editor widget that can be plugged in to customer front-end Web based applications, for example through an ADF widget or HTML and Javascript code .
-
External Rules Framework
The external rules framework consists of:
-
External Rule Functions
Users specify rule evaluation functions in Decision Studio that can be called to evaluate external rules. There are four functions: one to evaluate choice rules, one to evaluate choice group rules, one to evaluate filtering rules, and one to evaluate scoring rules.
-
External Rule Caching
External rules caching is provided to improve the performance of external rule evaluation.
If a newer version of a cached rule is submitted for evaluation, Oracle RTD does not execute the stale version. To avoid the whole request timing out in the event of a rule cache miss, Oracle RTD provides the Inline Service developer a mechanism for specifying a default response to return immediately.
-
External Rule APIs
Oracle RTD provides a set of Java APIs related to external rules, which can be used in Decision Studio Java functions and logic sections.
-
Overview of the External Rules Process
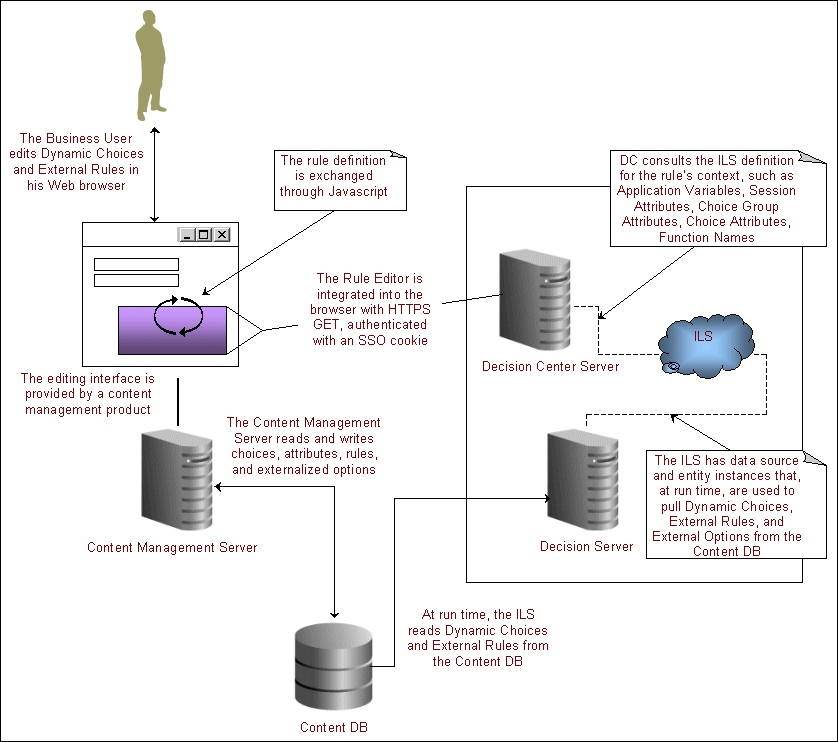
Figure 17-21 shows the external rule process flow during editing and rule evaluation.
The external rules are stored in metadata form in an external content repository, which can be any external data system, but is typically a database. The content management server controls read and write access to the rules stored in the external content repository.
Business users edit rules through an Oracle RTD Rule Editor embedded in a third party external interface provided by a content management product.
The external interface dynamically sets the context in which the rule needs to be edited in the embedded Rule Editor. For example a rule can be attached to a specific group's choice, a choice group or a filtering rule.
In the Rule Editor, the business user creates and edits rules, which can reference any of the objects defined in the Inline Service, such as any of the dynamic choices, functions, and session attributes.
After the user has finished editing the rule in the Rule Editor, the rule metadata is passed to the external interface, which saves the rule metadata to the external content repository.
At run time, the Inline Service accesses the edited external rule from the external content repository.
Example of External Interface in DC_Demo Inline Service Helper File
To serve as a starting-point for a third party external interface, Oracle RTD provides an External Rules Deployment Helper JSP file with the DC_Demo Inline Service.
For more information about how to set up and use this helper, see Section 17.3, "Example of End to End Development Using Dynamic Choices and External Rules."
17.2.2 External Rule Editor Components
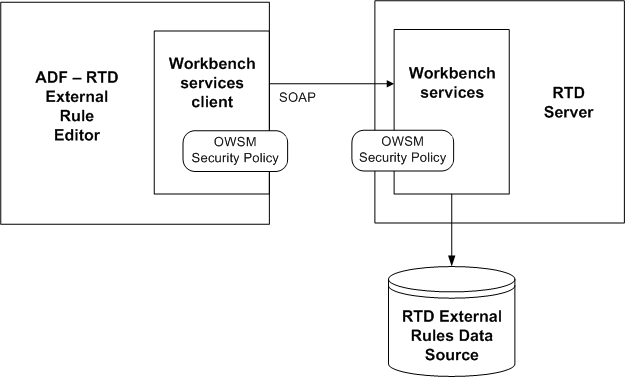
This section list the major components of the External Rule Editor and the external (non-Oracle RTD) components required for its deployment, as shown in Figure 17-22.
The following topics provide an introduction to the components and their key features:
17.2.2.1 External Rule Editor and External Rule Editor Client
The main features of the External Rule Editor and External Rule Editor Client are as follows:
-
The External Rule Editor is wrapped as an ADF component, that can be used in building applications with Oracle Application Development Framework. It is available as a JDeveloper extension which simplifies incorporating the External Rule Editor into the Oracle ADF application.
-
The External Rule Editor Client renders external rules.
-
Users can update rules in the External Rule Editor Client.
-
Rules are validated during update.
It is the responsibility of the containing application to prevent a user from saving an invalid rule.
This means, a user can save an invalid rule. Upon loading an external rule, the RTD Server must ensure it is valid.
The external rule editor client will allow the user to save an invalid rule (into a database table row). When the RTD Server loads the rule for the first time, it will try to validate the rule and fail. It will then mark the rule as invalid. Any Inline Service referencing the rule will handle the invalid rule according to how it handles an invalid rule exception.
-
The External Rule Editor Client supports same functionality as the static rule editor in earlier releases of Oracle RTD.
-
Users can customize labels by manually updating a resource file. The application developer needs to provide the resource bundle's base name as an attribute value.
17.2.2.2 Oracle Web Service Manager (OWSM)
Oracle Web Services Manager (OWSM) is responsible for setting security policy and verifying credentials or the SAML token.
For more information, see Oracle Fusion Middleware Introducing Web Services and Oracle Fusion Middleware Security and Administrator's Guide for Web Services.
17.2.2.3 Security
Two main elements of security are authentication and authorization.
Authentication is the responsibility of the containing UI, which can use container based authentication or application level authentication.
Authorization is implemented through roles and permissions. In JDeveloper, an application developer can define an application role having access to the External Rule Editor. Roles having access to the External Rule Editor can also be defined after and during its deployment.
At run-time, after a user logs into the encompassing application's UI, the External Rule Editor is only rendered if the user has a permission granting access to the External Rule Editor.
17.2.2.4 Workbench Web Services
The Workbench is responsible for fetching all the elements from the Inline Service that an external rule can reference, such as entities, session objects, choices, choice groups, and functions.
The interaction between the External Rules Editor Client and the RTD Server is through web services. Depending on the technology stack of the client application, the web service call can either be based on the JRF technology stack or use SAAJ.
Endpoints can be secured via Oracle Web Services Manager. This is not optional for Workbench Services.
For the server side endpoint, two types of security policy can be defined, username token and SAML. Security administrators can apply a security policy to the Oracle RTD Workbench web service endpoint using Oracle Web Services Manager.
The client side policy is defined in client code, and must match the policy supported by the Workbench endpoint. The application developer specifies the policy during deployment.
For the two types of supported policy:
-
Username_token requires users to provide a username and password. Credentials need to be provided in the call to the External Rule Editor (the credentials can be provided with ValueBinding Language).
Note:
Property files are beyond the scope of the External Rule Editor. Application developers who want to use property files are responsible for managing and accessing them.
-
For SAML, the container is responsible for propagating the SAML token automatically between the Fusion client and the Fusion web service endpoint.
A non-Fusion Oracle RTD client can support authentication only through Username token, not SAML.
Oracle recommends that you do not disable the security policy that protects Workbench web service.
Web service calls use SOAP over HTTP or SOAP over HTTPS.
17.2.3 External Rule Editor Deployment Topologies
In general, the Oracle RTD External Rule Editor is deployable across several application servers, both within and outside Oracle Fusion Middleware.
Note:
This section concentrates on the WebLogic application server, as supported by Oracle Fusion Middleware.
This section describes a sample set of topologies supported by the Oracle RTD External Rule Editor.
A WebLogic domain is a logical grouping of resources and services that are managed by an Administration Server. These resources may run on a Managed Server, and can be configured in a clustered topology.
Unless otherwise stated, all domains shown and described in this section are WebLogic domains deployed under Oracle Fusion Middleware.
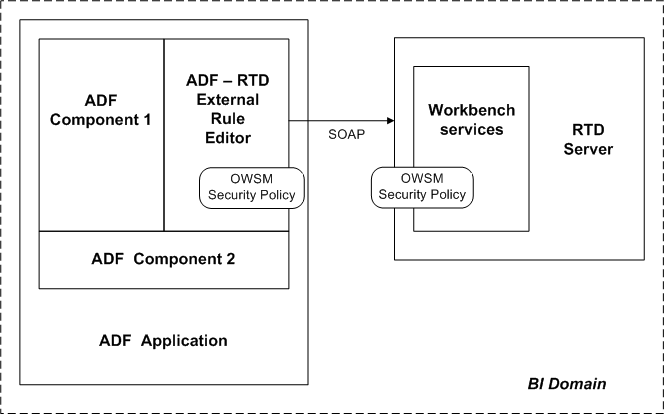
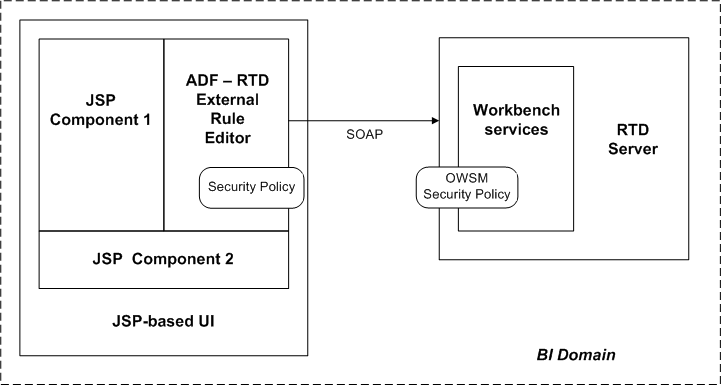
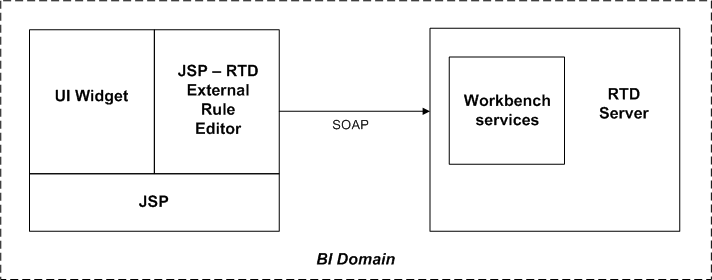
ADF Component - Simple Single Domain Deployment
In the simplest deployment topology, as shown in Figure 17-23, the Oracle RTD External Rule Editor is deployed in the BI Domain, together with the RTD Server.
The External Rule Editor is made available as an ADF component. This allows it be embedded into any ADF UI. The Workbench services endpoint is protected by a security policy set using OWSM. For more information, see Appendix B, "Oracle RTD Web Services and Clients."
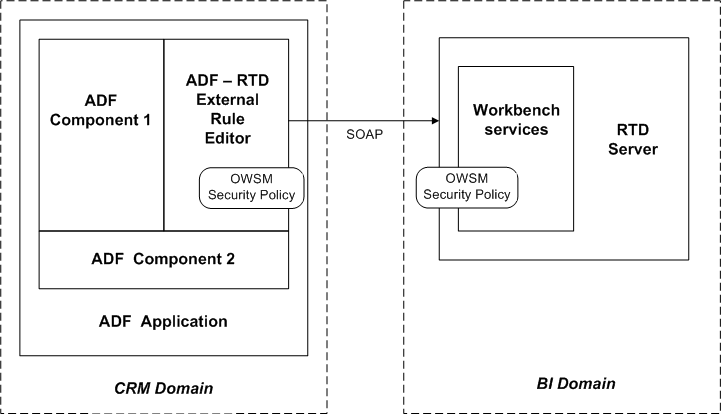
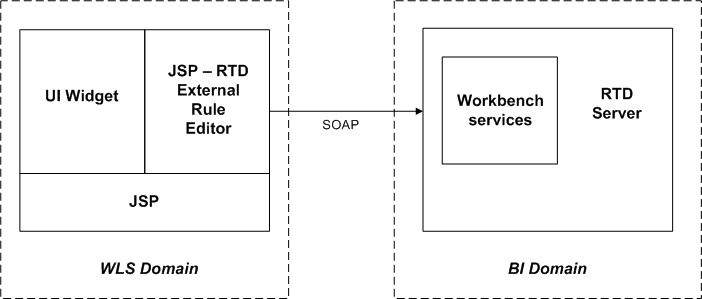
ADF Component - Multiple Domain Scenario
Applications may be resident in different domains from the RTD Server domain, as shown in Figure 17-24.
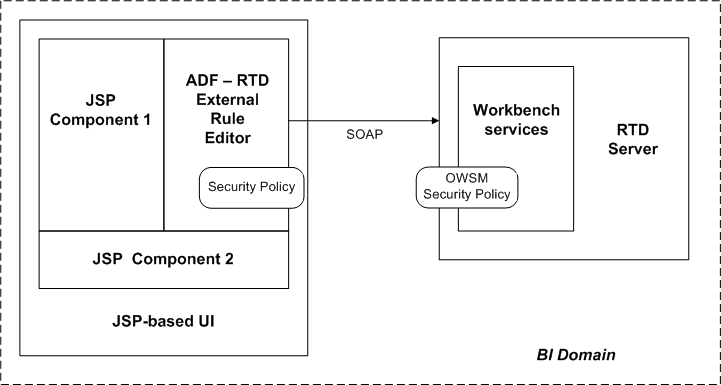
ADF Component - Single Domain Deployment with JSP Application
In Figure 17-25, an ADF based External Rule Editor is incorporated into an consuming JSP based application UI. The ADF External Rule Editor can be integrated in the same way that a JSP application integrates a standard JSF component. The consuming UI requires ADF to be installed and configured correctly as well as the inclusion of rtd-adf-rt.jar. The sole security policy available in this topology is Username token. This deployment topology requires no cross-site scripting.
ADF Component - Multiple Domains with JSP Application
Figure 17-26 shows a similar topology to Figure 17-25, but with the consuming application and ADF External Rule Editor being deployed in a separate domain. The only security policy available in this topology is Username token.
External Rule Editor in Decision Center - Single Domain Deployment
In Figure 17-27, a consuming application includes the Oracle RTD Decision Center version of the External Rule Editor within an HTML DIV tag. No OWSM security policy is supported in this topology.
Since both the consuming application and the Oracle RTD Decision Center are within the same domain, there is no cross-site scripting.
External Rule Editor in Decision Center - Multiple Domains
Figure 17-28 shows a topology similar to that in Figure 17-27, but with multiple domains. This topology includes cross-site scripting unless all requests to the consuming application and the Oracle RTD Decision Center are fronted with a proxy server.
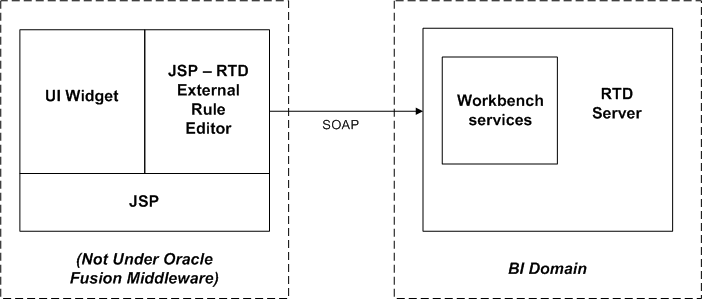
External Rule Editor under Application Server Not Supported by Oracle Fusion Middleware
In Figure 17-29, the Oracle RTD External Rule Editor is consumed by an application and resident on an application server, where neither the application nor the application server are supported by Oracle Fusion Middleware. The Workbench web service endpoint is deployed in a WebLogic domain, under Oracle Fusion Middleware. Similar to the topology shown in Figure 17-28, cross-site scripting will occur unless fronted with a proxy server.
17.2.4 Steps to Create and Deploy the External Rule Editor
In order to utilize the External Rule Editor, a user will typically follow the following steps:
-
Construct
Create a UI which incorporates the External Rule Editor.
-
Integrate
Create callbacks and pass parameters (value language binding) from and into the External Rule Editor.
-
Package
Package the application, which includes the External Rule Editor, together with any requisite class jars from JDeveloper or a non-JDeveloper environment.
-
Deploy
Deploy onto the same server or a server remote from RTD Server and in the same WebLogic domain or a different WebLogic domain.
-
Secure
Secure both the calling External Rule Editor Client and the Workbench Services endpoint (where applicable).
These steps are described in more detail in the sections that follow.
17.2.4.1 Construct
In JDeveloper, you can drag and drop the Rule Editor component to a JSF page in a JDeveloper project.
A typical set of steps to enable the Rule Editor ADF component to be added to a JSF page in a JDeveloper project is as follows:
-
In Oracle JDeveloper, in the Application Navigator pulldown box, select New Application.
-
Name the application, select Fusion Web Application (ADF), then click Next.
This creates two projects, with default names Model and View Controller, which you can retain or alter. The description that follows uses the default project names.
-
Click Next twice to move to the View Controller setup screen.
-
In the Project Technologies tab, move RTD ADF to the Selected column, then click Next.
-
Click Finish.
This creates an empty project.
The Rule Editor ADF component must reside on a JSF page.
-
Right-click the View Controller project, and select New.
-
In the New Gallery window, in the Categories pane, under Web Tier, select JSF.
-
In the Items pane, select JSF page, then click OK.
-
Enter a File Name for the JSF page, for example,
ruledit.jspx, then click OK.This creates an empty page, with Component Palette and Resource Palette tabs visible in the right-hand pane.
-
Right-click any entry in the Component Palette list of components, and select Edit Tag Libraries.
-
Move RTD ADF Components 11 to the Selected Libraries column, then click OK.
The pulldown list in the Component Palette tab now includes the entry RTD ADF components.
-
Select RTD ADF components in the pulldown list of the Component Palette.
In the Component Palette, the Rule Editor component appears, which you can drag and drop into the JSF page.
Note:
After you drag and drop the Rule Editor on to the JSF page, the page will remain blank. To complete the integration of the Rule Editor with your other application objects, enter code into the Source for the JSF page. For more details, see Section 17.2.4.2, "Integrate."
For more information about enterprise development using Oracle ADF, see Oracle Fusion Middleware Fusion Developer's Guide for Oracle Application Development Framework.
For non-JDeveloper users, there are several steps to perform, as follows:
-
Add servlet mapping into web.xml
<servlet-mapping> <servlet-name>resources</servlet-name> <url-pattern>/rtd/*</url-pattern </servlet-mapping> -
Add jstl namespace to JSP header
xmlns:rtd="http://xmlns.oracle.com/rtd/faces/adf"
-
Add rule editor tag to JSP page
<rtd:ruleEditor …
17.2.4.2 Integrate
Table 17-1 shows the parameters to be set up for the Rule Editor. In JDeveloper, when you select the External Rules Editor ADF component in the Source view, the Property Inspector window shows all of these parameters.
Table 17-1 Parameters for External Rule Editor Integration
| Name | Description |
|---|---|
|
inlineService |
Target Inline Service name |
|
sdoId |
Editing Oracle RTD object id |
|
sdoType |
Editing Oracle RTD object type |
|
editingAspect |
Editing Oracle RTD object editing aspect |
|
rule |
The rule xml |
|
inlineStyle |
Inline css style of the rule editor |
|
rtdUrl |
Oracle RTD server url |
|
idPropagation |
Indicate whether to turn on or turn off ID propagation |
|
username |
Oracle RTD user id who has authority to access workbench and Inline Service, used exclusively with ID propagation |
|
password |
User password, used exclusively with ID propagation |
|
overrideMessages |
Base name of resource bundle to override Oracle RTD rule editor default messages |
|
partialTriggers |
ADF attribute to support Partial Page Rendering |
|
rendered |
Setup conditions to control the rendering of the rule editor |
|
workbenchClientType |
Either JRF (default), SAAJ, or RTD3 (Select RTD3 only if your server is a RTD 3.x server) |
Also, a callback JS function must be designed to notify the event of the rule editor.
Example
<rtd:ruleEditor id="rule1" inlineService="DC_DEMO" sdoId="AllOffersCG"
             sdoType="choiceGroup" editingAspect="choiceRule"
             rule="#{backbean.rule}"
             inlineStyle="width:100%;height:280px;border:0;"
             rtdUrl="http://localhost:8081/" idPropagation="true"
             partialTriggers="clFiltering clGroup cbLoadRuleXml"
             overrideMessages="override_rtd_resources">
   <af:clientListener method="callbackFunction" type="callback"/>
</rtd:ruleEditor>
17.2.4.3 Package
For a JDeveloper project, the project needs to import "RTD ADF Components 11" into jstl tag libraries. For a non-JDeveloper project, the runtime library rtd-adf-rt.jar must be packaged into the WEB-INF/lib folder.
17.2.4.4 Deploy
The project can be deployed to Fusion or non-Fusion targets. For Fusion targets ADF Faces run-time libraries and configuration should be included with the package.
17.2.4.5 Security
The attribute rendered can be used to protect the rule editor for authorized users only.
The attribute idPropagation is set up to use SAML token policy accessing the Oracle RTD workbench server.
The attributes username and password are used to access the Oracle RTD workbench server with the given credential.
17.2.5 External Rule Editor Interface Requirements
Oracle RTD provides a browser embeddable user interface for editing external rules. This Rule Editor widget contains functionality comparable to the rule editors contained in Decision Studio.
A third party user interface together with an embedded Oracle RTD Rule Editor must be able to perform the following actions:
-
Load external rule metadata into the embedded Rule Editor
-
Edit loaded external rule metadata in the embedded Rule Editor
-
Export the new rule metadata with a unique ID and timestamp for the rule loaded into the embedded Rule Editor
-
Dynamically sets the context in which the rule needs to be edited. For example a rule can be attached to a specific group's choice, a choice group or a filtering rule.
-
Set a user-defined callback Javascript function that will be called after every action submitted by the embedded Rule Editor
-
Provide Javascript methods to determine whether an edited external rule is valid or has been modified
17.2.6 External Rule Framework
The external rule framework consists of three rule evaluation functions, external rule caching, and a set of Java APIs.
This section consists of the following topics:
17.2.6.1 External Rule Evaluation Functions
Decision Studio provides four rule evaluation functions that can be used to evaluate external rule metadata. Each function evaluates the passed-in external rule metadata against either a choice, a choice group, a filtering rule, or a scoring rule
When an external rule evaluates successfully, the associated function returns either a boolean value (for eligibility and filtering rules) or a double (for scoring rules).
The four functions are:
-
External Rules - Evaluate Choice Eligibility Rule
-
External Rules - Evaluate Choice Group Eligibility Rule
-
External Rules - Evaluate Filtering Rule
-
External Rules - Evaluate Scoring Rule
Table 17-2 shows the parameters for these functions.
Note:
For the eligibility rule functions, one of the parameters sets the context for rule evaluation. For example, the parameter choice in the function External Rules - Evaluate Choice Eligibility Rule specifies the particular choice name where the external rule will be evaluated.
Table 17-2 External Rule Function Parameters
| Function | Parameter | Description |
|---|---|---|
|
External Rules - Evaluate Choice Eligibility Rule |
Rule Metadata |
Attribute containing metadata form of the external rule |
|
choice |
Choice where the external rule will be evaluated. |
|
|
return value |
Status if rule is invalid |
|
|
External Rules - Evaluate Choice Group Eligibility Rule |
Rule Metadata |
Attribute containing metadata form of the external rule |
|
choice group |
Choice group where the external rule will be evaluated. |
|
|
return value |
Status if rule is invalid |
|
|
External Rules - Evaluate Filtering Rule |
Rule Metadata |
Attribute containing metadata form of the external rule |
|
return value |
Status if rule is invalid |
|
|
External Rules - Evaluate Scoring Rule |
Scoring Rule Metadata |
Attribute containing metadata form of the external rule |
|
Default Score |
Default score if rule is invalid. Default return value is 0. |
The call templates for both External Rules - Evaluate Choice Eligibility Rule and External Rules - Evaluate Choice Group Eligibility Rule are released as:
-
Value of rule {0} evaluated in context of Choice {1}, {2} if rule is invalid
The call template for External Rules - Evaluate Filtering Rule is released as:
-
Value of rule {0}, {1} if rule is invalid
The call template for External Rules - Evaluate Scoring Rule is released as:
-
Value of rule {0}, {1} if scoring rule is invalid
Each function allows for the setting of evaluation options.
One of the options controls blocking and non-blocking evaluation. Setting the blocking evaluation option forces the rule evaluator caller to wait for the Real-Time Decision Server to return with the evaluation result. Non-blocking evaluation returns a default value back to the rule evaluation caller.
By default, each of the external rule evaluation functions will evaluate the passed-in external rule metadata in a non-blocking manner. Decision Studio users can change this behavior by editing the Java code of the selected function to evaluate rules with the blocking option set.
Modifying the External Rules Functions
The External Rules functions can be altered to suit individual Inline Services. One possible change is to alter the blocking behavior of the rule evaluation. Each function evaluates the passed-in rule metadata in a non-blocking manner by default. The API that controls blocking behavior, default return value, and whether exceptions are thrown is as follows:
public class EvaluationOptions  {
     public static EvaluationOptions getEvaluationOptions(
          boolean defaultReturnValue,
          boolean blockEvaluationUntilCached,
          boolean propagateExceptions);
     public static EvaluationOptions getEvaluationOptions(
          double defaultReturnValue,
          boolean blockEvaluationUntilCached,
          boolean propagateExceptions);
}
The External Rules functions are similar to one another, in that each function creates a rule definition, obtains a rule evaluator and rule cache, defines evaluation options, and then evaluates the rule. The difference between the functions is in their scope and return value:
-
Scope - the functions evaluate as a scoring or filtering rule or for a choice or choice group
-
Return value - the eligibility and filtering functions return a boolean value, the scoring functions return a double value
Note:
In previous versions, the RuleEvaluator interface provided an evaluate() method with a boolean return value, as follows:
interface RuleEvaluator {
  boolean evaluate( Object context,
    RuleDefinition def,
    RuleCache cache,
    EvaluationOptions opts)
  throws ValidationException, EvaluationException;
}
The following method replaces evaluate(), but evaluate() is retained in the API to preserve backward compatibility.
interface RuleEvaluator {
  boolean evaluateEligiblityRule(Object context,
    RuleDefinition def,
    RuleCache cache,
    EvaluationOptions opts)
  throws ValidationException, EvaluationException;}
To accommodate scoring rules, the RuleEvaluator interface has been extended to include an evaluateScoringRule() method that returns a double.
interface RuleEvaluator {
  boolean evaluateScoringRule(Object context,
    RuleDefinition def,
    RuleCache cache,
    EvaluationOptions opts)
  throws ValidationException, EvaluationException;}
The following example shows a choice eligibility evaluation function (from the DC_Demo Inline Service) in more detail.
//compile, cache and evaluate the eligibility rule and return a boolean
if (ruleMetadata == null || ruleMetadata.trim().equals(""))
        return true;
RuleDefinition def      = new RuleDefinitionImpl(ruleMetadata);
RuleEvaluator evaluator = Application.getRuleEvaluator();
RuleCache cache         = Application.getRuleCache();

// public static EvaluationOptions getEvaluationOptions(
//                  boolean defaultReturnValue,
//                  boolean blockEvaluationUntilCached,
//                  boolean propagateExceptions)
// boolean defaultReturnValue: Return this value when rule evaluation fails
//                  with an exception or while the rule is being compiled
//                  during non-blocking evaluation
// boolean blockEvaluationUntilCached: Wait for the rule to be compiled before
//                  returning a value. (May cause integration point timeout)
// boolean propagateExceptions: Set to true if ILS developer decides to
//                  handle ValidationException and EvalutionException thrown by
//                  RuleEvaluator.evaluate() instead of returning defaultReturnVal

EvaluationOptions opts = EvaluationOptions.getEvaluationOptions(
    returnValue, false, true);
/*
The evaluate method attempts to retrieve the compiled bytecode for the rule definition from the cache. If the bytecode for the rule is found in the cache, the rule is evaluated and the resulting boolean is returned. Otherwise, the rule is queued for compilation. Until the rule is compiled and cached, evaluate function behaves as specified by the EvaluationOptions.
*/
return evaluator.evaluateEligibilityRule(choice, def, cache, opts);
// parameters: ruleMetadata, choice
// return: boolean
The following example shows the equivalent active (that is, non-commented) lines of the scoring evaluation function (from the DC_Demo Inline Service) in more detail.
if (ruleMetadata == null || ruleMetadata.trim().equals(""))
     return defaultValue;
RuleDefinition def      = new RuleDefinitionImpl(ruleMetadata);
RuleEvaluator evaluator = Application.getRuleEvaluator();
RuleCache cache         = Application.getRuleCache();

EvaluationOptions opts = EvaluationOptions.getEvaluationOptions(
       defaultValue, false, true);

return evaluator.evaluateScoringRule(def, cache, opts);
You can change the blockEvaluationUntilCached and propagateExceptions parameters on the getEvaluationOptions call in any or all of the External Rules functions.
Note:
Each External Rules function change operates at the Inline Service level.
17.2.6.2 External Rule Caching
The Real-Time Decision Server includes an external rule cache in order to improve rule evaluation performance. Each Inline Service application will maintain its own rule cache and each application rule cache will be replicated on each Real-Time Decision Server in a cluster. The external rules caching functionality provides the following additional features:
-
Rule Cache Maintenance Operations
Decision Studio provides maintenance operation functions that can be used to determine rule cache size and to clear the cache. These functions are:
-
External Rules - Clear Cache
-
External Rules - Get Cache Size
-
External Rules - Remove Inactive Cached Rules
These operations can be triggered externally by an MBean client such as the Oracle Fusion Middleware Enterprise Manager to clear the cache of an Inline Service deployed on a Real-Time Decision Server. Each operation uses the external rule caching Java APIs for clearing an Inline Service rule cache and obtaining the current size in bytes of the rule cache.
-
-
Non-Blocking Rule Evaluation
This feature guarantees that the evaluation of a rule will be non-blocking if the rule is not found in the cache. During the very short time that it takes to compile a single rule, Oracle RTD returns a default true/false value for an uncached eligibility or filtering rule (or a default score of zero for an uncached scoring rule) while the rule is being compiled in the background.
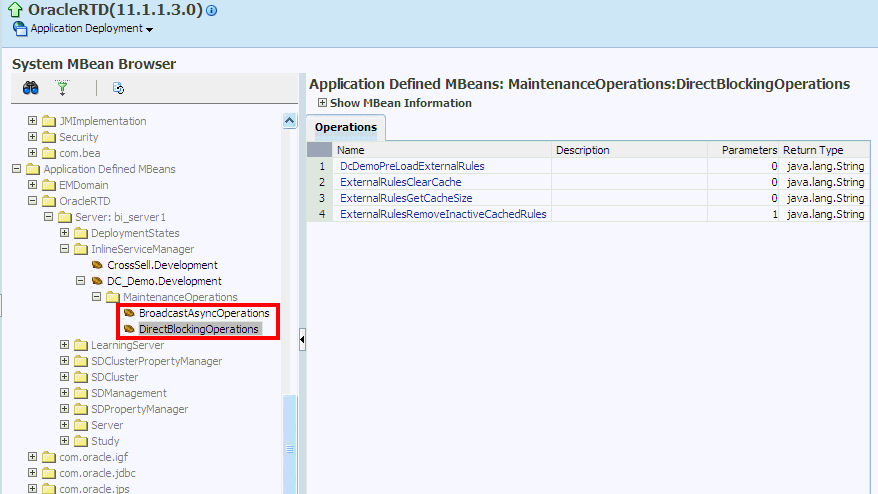
Maintenance Operations in Enterprise Manager
External rule caching maintenance operations are accessible as MBean operations in Enterprise Manager. These maintenance operations are created for each deployed Inline Service and can be found in the MBean OracleRTD - InlineServiceManager tree path for the Inline Service. The following image shows the MBean operations for DC_Demo.Development:
17.2.6.3 External Rule APIs
The external rules framework provides a set of Java APIs introduced with the external rule caching feature. The APIs are provided by the following Java interfaces and available for use in Decision Studio Java functions and logic sections:
-
Rule - A rule instance returned.
-
RuleDefinition - A rule definition created by the user and passed in to an application rule evaluator.
-
RuleCache - A rule cache maintained by a deployed Inline Service and exposed through the Inline Service application interface.
-
RuleEvaluator - A rule evaluator maintained by a deployed inline server and exposed through the Inline Service application interface.
-
EvaluationOptions - A collection of user defined options that can be passed in to a rule evaluator. These options include the runtime exception policy options and the evaluator options.
In addition, two new external rules exceptions can be caught while using these API interfaces:
-
ValidationException - Thrown when a rule fails to compile because of problems in rule metadata
-
EvaluationException - Thrown when rule execution fails with a RuntimeException
17.2.6.4 External Rule Error Handling and Logging
The external rule errors and the corresponding Oracle RTD behavior are listed in the following table. Note that the behavior can be tuned through modifying external rule evaluation functions.
Table 17-3 External Rule Errors and Oracle RTD Behavior
| Error Event | Oracle RTD Action |
|---|---|
|
Rule compilation error - Unparseable rule metadata - Rule metadata does not conform to schema - Missing/misspelled Inline Service attribute reference- Java compilation error |
if (RuleCache.get(rule) == null) if (propagateExceptions && blockEvaluationUntilCached) throw underlying exception wrapped in ValidationException, do not log else log.ERROR rule metadata, underlying cause and full stack trace else if (propagateExceptions) throw generic ValidationException else log.ERROR one line generic error message |
|
Rule execution error - Referenced Inline Service attribute not initialized by execution time - Other exception thrown by a callee of Rule.execute() |
if (propagateExceptions) throw underlying exception wrapped in EvaluationException, do not log else log.WARN one line underlying cause |
|
Rule uuid error - Unparseable uuid - Unparseable timestamp - Missing uuid and/or timestamp |
if (propagateExceptions) throw ValidationException with underlying cause, do not log else log.ERROR one line underlying cause |
17.2.7 Setting Up External Rules in Decision Studio
You can set up the following types of external rule:
-
Choice Group Eligibility Rule
-
Choice Eligibility Rule
-
Filtering Rule
-
Scoring Rule
The eligibility rules are defined as part of a choice or choice group definition. Filtering and scoring rules are standalone rules, in that they are created independently of any other Oracle RTD object. After creation, filtering rules can be attached to one or more decisions, and scoring rules can be attached to choice and choice group attributes.
This section describes the process of setting up external rules.
The examples in this section are based on the DC_Demo Inline Service, which is released with Oracle RTD.
This section contains the following topics:
-
Section 17.2.7.1, "Prerequisite - Setting Up Objects in an External Content Repository"
-
Section 17.2.7.2, "Defining the Inline Service Objects for the Rules"
-
Section 17.2.7.3, "Defining External Rules for Inline Service Objects"
17.2.7.1 Prerequisite - Setting Up Objects in an External Content Repository
The metadata version of an external rule is stored in an external data source, typically in a column in a database table, for example, the column EligibilityRuleMetadata in table WEBOFFERS.
Note:
The definition of the table WEBOFFERS in previous releases did not include the columns EligibilityRuleMetadata and ScoringRuleMetadata.
If you have the table WEBOFFERS without these columns, you must run initAppDB to ensure that you have the correct definition and data for WEBOFFERS.
For details, see the section "Populating the DC_Demo Example Data" in Oracle Fusion Middleware Administrator's Guide for Oracle Real-Time Decisions.
When a rule is related to a dynamic choice, it is customary to store the associated dynamic choice as another column in the same external data source. For more details related to dynamic choices, see Section 17.1.4, "Prerequisite External Data Source for Dynamic Choices."
For example, in the table SDDS.WEBOFFERS, the columns EligibilityRuleMetadata and ScoringRuleMetadata contain the metadata for external rules, and the columns Category and Id are used to identify dynamic choices.
17.2.7.2 Defining the Inline Service Objects for the Rules
In the Inline Service, you define the data source that contains the external object or objects, then define an entity based on the data source.
Choice groups and choices that require external rules must define choice attributes that are derived from the appropriate entity attributes.
For rule set up, the data source Web Offers DS is based on the table SDDS.WEBOFFERS, and the entity Web Offers, derived from Web Offers DS, includes the two attributes Eligibility Rule Metadata and Scoring Rule Metadata.
For dynamic choice setup, the entity Web Offers contains Id, and the entity Web Offers List (also derived from Web Offers DS) contains the attribute Category.
The choice group Dynamic Offers includes Eligibility Rule Metadata and Scoring Rule Metadata among its choice attributes, as well as the attributes required for dynamic choice definition.
For more details, see Section 17.3, "Example of End to End Development Using Dynamic Choices and External Rules."
17.2.7.3 Defining External Rules for Inline Service Objects
In contrast to rules completely defined and created in Decision Studio, external rules by their very nature are created outside of Decision Studio. However, you must define an external rule for an object by launching the appropriate rule editor within Decision Studio for the object, as follows:
-
For external filtering rules, create or edit the filtering rule. For general information, see Section 13.9, "Filtering Rules."
-
For external rules for choices and choice groups, select the Choice Eligibility tab or the Group Eligibility tab. For general information, see Section 13.8.5, "About Eligibility Rules."
-
For external scoring rules, create or edit the scoring rule. For general information, see Section 13.10, "Scoring Rules."
In each case, as you edit the Boolean statement of the rule, first select the external rule evaluation function that you require:
-
External Rules - Evaluate Choice Eligibility Rule
-
External Rules - Evaluate Choice Group Eligibility Rule
-
External Rules - Evaluate Filtering Rule
-
External Rules - Evaluate Scoring Rule
Then select or fill in values for the function parameters.
Note:
Externalized filtering and scoring rules, when created or edited in the external Rule Editor, cannot refer directly to choice attributes. They can refer to session attributes whose value is obtained from choice attributes.
As a choice eligibility example, in the DC_Demo Inline Service, the external rule for choice group Dynamic Offers is defined in the Choice Eligibility tab as follows:

DC_Demo Inline Service also contains an example of an external scoring rule, for the choice group Dynamic Offers.
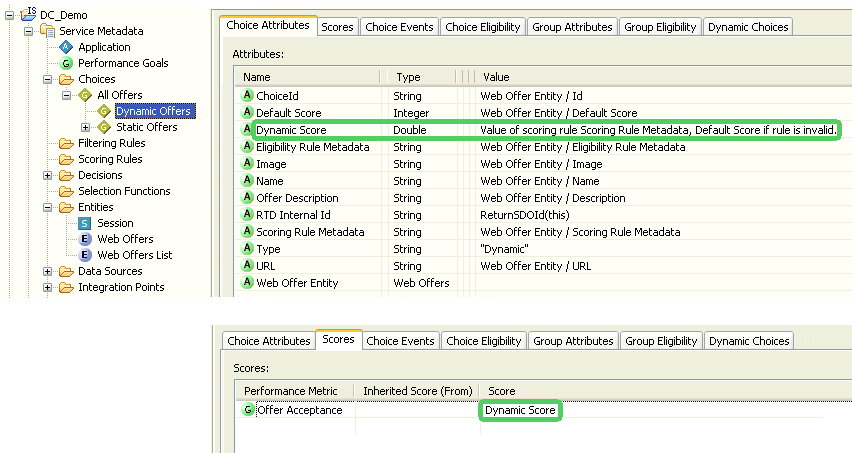
In the Choice Attributes tab, the value for the choice attribute Dynamic Score is derived from the function External Rules - Evaluate Scoring Rule. The parameters for the function are the choice attributes Scoring Rule Metadata and Default Score.
In the Scores tab, the Score for the performance metric Offer Acceptance is derived from the choice attribute Dynamic Score.
For more information on External Rules functions and parameters, see Section 17.2.6.1, "External Rule Evaluation Functions."
17.2.8 Setting Up the External Interface and Embedded Rule Editor
The external third party interface editor is responsible for connecting to Oracle RTD and passing sufficient information for Oracle RTD to launch the Rule Editor within the third party interface. For more information, see Section 17.2.5, "External Rule Editor Interface Requirements."
The examples used to illustrate the setup of the external interface and embedded Rule Editor are based on the External Rules Development Helper released with the DC_Demo Inline Service. The files to generate this helper are located in the DC_Demo dc/jsp folder.
This section contains the following topics:
17.2.8.1 Defining the Rule Editor Widget
The Rule Editor can be embedded in a third party interface by creating an HTML form inside the third party editor HTML for use with the Rule Editor widget.
The form should set the action to /ui/workbench and create a form within an HTML DIV tag to house the embedded editor.
Note:
For cross-domain actions, Web browsers have security mechanisms that prevent Javascript from interacting with a frame or widget whose content is from another domain.
To resolve the cross-domain problem:
-
Disable the browser security that prevents this cross-site-scripting communication channel
-
Host the external editor and widget on the same server
-
Use a proxy in front of the two servers that rewrites their URLs such that the browser thinks they came from one server
Table 17-4 shows the parameters for each type of rule. The HTML form must create form inputs with values for each of the parameters listed in Table 17-4.
Table 17-4 Parameters for Embedded Rule Editors
| Parameter | Description |
|---|---|
|
app |
Inline Service identifier. |
|
url |
sdo/editor.jsp This is the url of the editor jsp file. DO NOT CHANGE! |
|
object |
Identifier of the object containing the rule. See Table 17-5 for details. |
|
type |
Type of the object containing the rule. See Table 17-5 for details. |
|
editingAspect |
Editing aspect. See Table 17-5 for details. |
|
hideInheritedRules |
Hides inherited rules in the Embedded Rule Editor. |
|
callback |
Name of the Javascript callback function. This function is called whenever editor events are returned. |
Table 17-5 shows the options for the rule-specific parameters.
Table 17-5 Rule-Specific Parameter Options
| Rule Type | object | type | editingAspect |
|---|---|---|---|
|
Group Eligibility Rule |
Group identifier |
choiceGroup |
rule |
|
Group's Choice Eligibility Rule |
Group identifier |
choiceGroup |
choiceRule |
|
Choice Eligibility Rule |
Choice identifier |
choice |
rule |
|
Filtering Rule |
<Omit this parameter> |
"" or eligibilityRule |
whole |
|
Scoring Rule |
<Omit this parameter> |
valueRule |
rule |
The form inputs help to create an initial context and scope for the embedded Rule Editor.
For an example, see Defining the Rule Editor in the DC_Demo External Rules Helper.
17.2.8.2 Changing the Rule Editor Context and Scope
The embedded Rule Editor context and scope can also be dynamically changed with Javascript functions.
For an example, see Changing Rule Editor Context and Scope in the DC_Demo External Rules Helper.
17.2.8.3 Defining the Callback Function
The Javascript callback function must be created to respond to events returned by the embedded Rule Editor. The embedded Rule Editor will call the callback function with a single object parameter. This object will always have a type property that specifies the event type that is occurring. Each event type may use the data property to provide additional information.
The events that represent the current state of the embedded Rule Editor are the following:
-
editorReady
After the embedded Rule Editor has completed the required rule processing, it fires the editorReady event.
There are three functions available as properties of the data object to stow away for calling in the future:
-
isValid(), which returns a boolean value
-
isModified(), which returns a boolean value
-
getXml(), which returns a string value
-
-
modified
The modified event is called upon every modification of the rule. It does not make use of the data property.
For an example, see Defining the Callback Function in the DC_Demo External Rules Helper.
17.3 Example of End to End Development Using Dynamic Choices and External Rules
DC_Demo is an Inline Service released with Oracle RTD that demonstrates the setup and use of dynamic choices and external rules.
The following section provides an overview of how DC_Demo utilizes dynamic choices external rules in Oracle RTD, and how this fits into the complete application development process.
As a summary, the main development procedures described in this section are the following:
-
Using the standard external rule evaluation functions in dynamic choice eligibility evaluation
-
Embedding the external rules editor in an Inline Service Web page
-
Integrating with a dynamic choice content database
-
Editing an external rule
-
Reviewing dynamic choice reports in Decision Center
This section contains the following topics:
-
Section 17.3.3, "Embedding an External Rule Editor in a Third Party Interface"
-
Section 17.3.5, "Pushing External Rules To a Production Environment"
17.3.1 Database Driven Dynamic Choices
Dynamic choices can be managed by a content management server and stored in a content database.
The Inline Service DC_Demo derives its dynamic choice Web offers from a table called WEBOFFERS. This table contains the following columns:
-
ELIGIBILITYRULEMETADATA, which stores the external rule metadata used in choice eligibility evaluation
-
SCORINGRULEMETADATA, which stores the external rule metadata used in scoring rule evaluation
-
CATEGORY, which specifies the ID of the parent dynamic choice
Note:
The definition of the table WEBOFFERS in previous releases did not include the columns EligibilityRuleMetadata and ScoringRuleMetadata.
If you have the table WEBOFFERS without these columns, you must run initAppDB to ensure that you have the correct definition and data for WEBOFFERS.
For details, see the section "Populating the DC_Demo Example Data" in Oracle Fusion Middleware Administrator's Guide for Oracle Real-Time Decisions.
The database columns are mapped to Oracle RTD entity object attributes through the data source Web Offers DS, as in the following image:
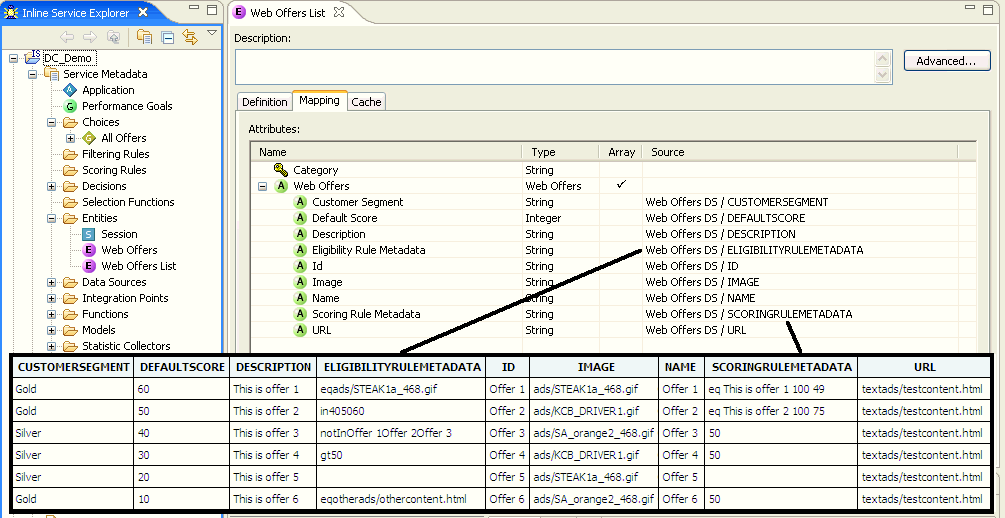
Dynamic choices are set up by creating two entity objects, as follows:
-
The entity called Web Offers contains the attribute information for one dynamic choice.
-
The entity Web Offers List contains a set of dynamic offers obtained by the database and is mapped to a datasource that describes the dynamic choice table information.
A choice group called Dynamic Offers is created whose dynamic choice configuration is enabled and set to use the Web Offers entity for assigning choice attribute data.
The following image shows dynamic choice definition for the Dynamic Offers choice group.

The following image shows dynamic choice attributes mapped to the Web Offers entity attributes. Note the two choice attributes Eligibility Rule Metadata and Scoring Rule Metadata, which are used to store the external rule metadata, and will be used to evaluate choice eligibility and scoring.
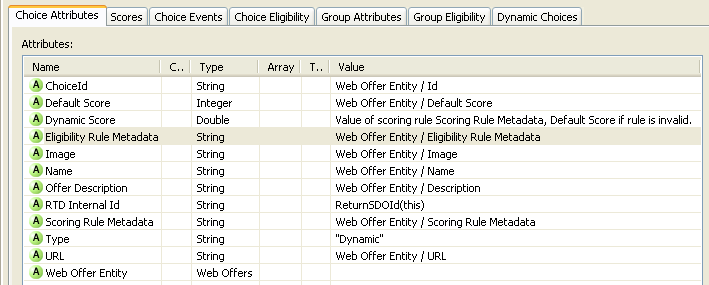
For general information about setting up dynamic choices, see Section 17.1.5, "Overview of Setting up Dynamic Choices in Decision Studio."
17.3.2 Evaluating External Rules
Dynamic choice eligibility evaluation rules can reference external rules stored as rule metadata in a dynamic choice attribute by using the external rule evaluation functions provided in Decision Studio. For example, the dynamic choice group Dynamic Offers uses the external rule function External Rules - Evaluate Choice Eligibility Rule function as shown in the following image:

17.3.3 Embedding an External Rule Editor in a Third Party Interface
The Oracle RTD external Rule Editor provides a graphical user interface that can be used to create and edit external rules for dynamic choices.
For general information about embedding the Rule Editor in an external interface, see Section 17.2.8.1, "Defining the Rule Editor Widget."
As a summary, the form that sets up the Rule Editor must define the following form inputs:
-
app - the name of the Inline Service, for example, DC_Demo.
-
url - sdo/editor.jsp (the url of the editor jsp file)
-
object - the default parent Inline Service choice type, for example, AllOffersCG.
-
type - the default scope of the editor (values: choiceGroup, choice, "" - for filtering rules)
-
editingAspect - the default editing aspect (values: choiceRule, rule, whole)
-
hideInheritedRules - hides inherited rules in the external Rule Editor
-
callback - the Javascript callback function; function called whenever editor events are returned
The form inputs help to create the initial context and scope for the embedded rule editor.
Defining the Rule Editor in the DC_Demo External Rules Helper
The following is an example of how the embedded rule editor is integrated into the DC_Demo external Rule Editor helper:
<!--
  form attributes:

  name:   form name (i.e. editorViewForm)
  target:   form iframe target name (i.e. editorViewIFrame)
  method:   post (required)
  action:   /ui/workbench (editor servlet url; required)

-->

<form name="editorViewForm" target="editorViewIFrame"
  method="post" action="/ui/workbench">

  <iframe frameborder="0" name="editorViewIFrame"/>

  <!--
   form inputs:

   app:           inline service name (for example, DC_Demo)
   url:           embedded editor url (a constant)
   object:        parent dynamic choice group ID (for example, AllOffersCG)
   type:          rule evaluation scope or context (for example, choiceGroup)
   editingAspect: editor aspect view (for example, choiceRule)
   callback:      javascript callback function (for example, callbackFunction)
  -->

  <input type=hidden name=app value=DC_Demo>
  <input type=hidden name=url value=sdo/editor.jsp>
  <input type=hidden name=object value=AllOffersCG>
  <input type=hidden name=type value=choiceGroup>
  <input type=hidden name=editingAspect value=choiceRule>
  <input type=hidden name=hideInheritedRules value="true">
  <input type=hidden name=callback value=callbackFunction>

</form>
Changing Rule Editor Context and Scope in the DC_Demo External Rules Helper
The embedded Rule Editor context and scope can also be dynamically changed with Javascript functions.
The following is an example of how DC_Demo dynamically changes the context and scope of the Rule Editor using defined Javascript functions to change the form input values:
<!--
  editorViewForm:                 name of the form containing the rule editor
  editorViewForm.object:          ID of the choice or choice group context
  editorViewForm.type:            scope or context type (for example, choiceGroup)
  editorViewForm.editingAspect:   editor aspect view (for example, choiceRule)
-->

<script>
groupChoiceScope: function() {
  editorViewForm.object.value = "DynamicOfferCG";
  editorViewForm.type.value = "choiceGroup";
  editorViewForn.editingAspect.value = "choiceRule";
  loadRule();
}

</script>
Defining the Callback Function in the DC_Demo External Rules Helper
The Javascript callback function responds to events returned by the embedded Rule Editor. The events returned include editorReady and modified which represent the current state of the embedded Rule Editor.
The following is an example of DC_Demo's editor helper Javascript callback function callbackFunction, which obtains the isValid and isModified booleans and the rule metadata data from the editor after it fires an editorReady event:
<!--
  event.type:               the event type name (for example, editorReady)
  event.data.isValid:       the is valid rule return boolean
  event.data.isModified:    the is modified rule return boolean
  event.data.getXml:         returns the metadata of the rule in the editor
-->
<script>
callbackFunction: function(event) {
  switch(event.type) {
    case "editorReady":
      isValid = event.data.isValid;
      isModified = event.data.isModified;
      getXml = event.data.getXml;
      break;
    case "modified":
      log("is modified");
      break;
    default:
      throw "unexpected callback event type: " + event.type;
  }
}

</script>
17.3.4 DC_Demo External Rules Deployment Helper
Oracle RTD supplies an external rules editor helper, in the Inline Service DC_Demo, in the form of two files, external_rules_deployment_helper.jsp and database.jsp, visible in Decision Studio under the folder path dc > jsp.
This editor helper interface is provided as an example of how to integrate the external rules editor widget into a third party interface. Through this interface, users can edit external rules for dynamic choices defined in the database table WEBOFFERS.
The DC_Demo editor helper is broken into four sections:
-
The Graphical View contains the actual external rules editor and can be used to edit the rule.
-
The Metadata View stores the metadata version of the external rule which can be saved back into a dynamic choice table row.
-
The Tabular View is a database management section which allows user to search for, edit, and save dynamic choice external rules stored in the database table WEBOFFERS.
-
The Log section displays actions performed in the editor helper.
The following image shows an example of the helper window, showing a rule that has been edited in the Graphical View, with the edited rule metadata visible in the Metadata View.
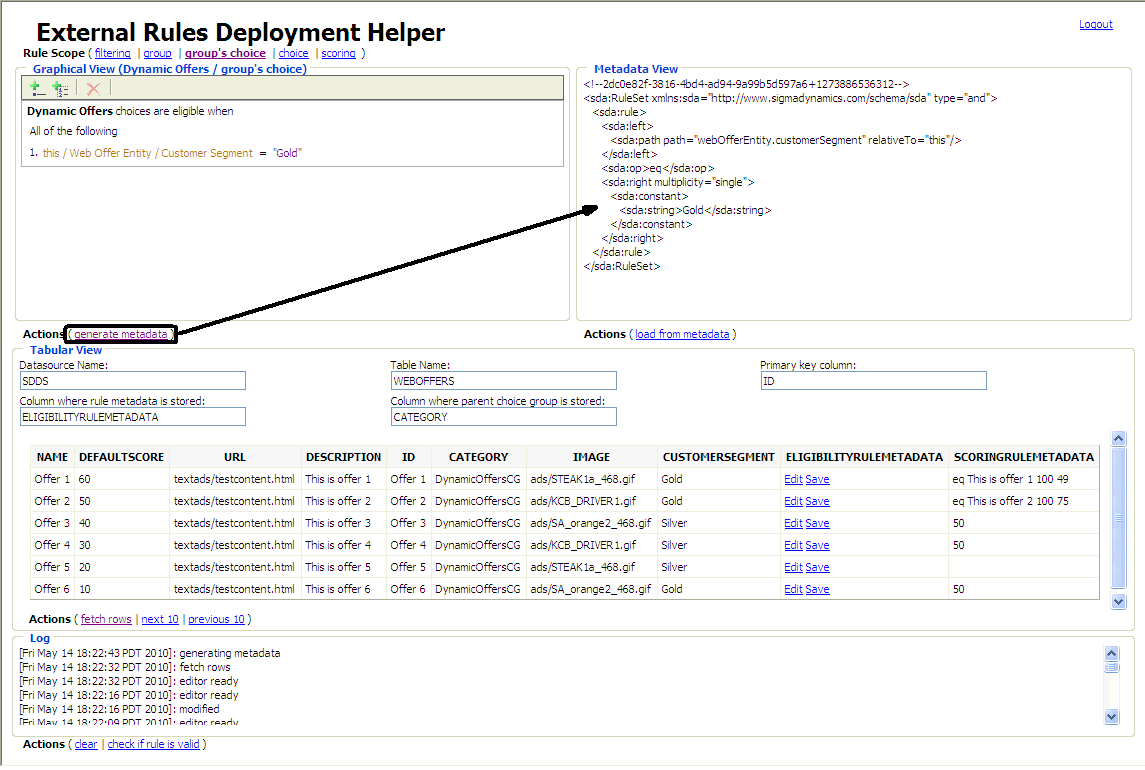
The Tabular View displays the rows of the database table WEBOFFERS, where the significant columns are:
-
CATEGORY, which stores the Id of the dynamic choice group
-
ELIGIBILITYRULEMETADATA
-
SCORINGRULEMETADATA
After editing the rule in the Graphical View rule editor, a user clicks the generate metadata link, and the generated metadata then appears in the Metadata View.
17.3.5 Pushing External Rules To a Production Environment
One of the main purposes of the external Rule Editor is to push updated dynamic choice external rules back into a production environment. Typically, a third party content database is used to store dynamic choices and their external rules.In DC_Demo, dynamic choices are stored in a table called WEBOFFERS, which contains columns ELIGIBILTYRULEMETADATA and SCORINGRULEMETADATA. These columns are used to store the external rule metadata. Another column called CATEGORY is used to store the ID of the parent dynamic choice group.
The DC_Demo external rule editor helper saves an external rule back to the database when a user selects a dynamic choice table row and clicks the Save link in the row.
17.3.6 Viewing Reports for Dynamic Choices
Note:
Decision Center does not by default display any rules of a Dynamic Choice, even when the rule was edited with an external Rule Editor.
Decision Center can be used to view reports for each dynamic choice defined in a content database, which were actually recommended and added to model learning data. This is done by logging into a Decision Center Inline Service and opening the Decision Process section in the Decision Center navigator.
From here, any defined dynamic choice groups will be listed and will contain all dynamic offers defined in database tables for each dynamic choice group, that were recommended and added to model learning data. Choices in the database tables that were not added to model learning data do not appear in Decision Center reports.
The following is an image of a Decision Center report, with the navigator tree showing the DC_Demo dynamic choices:

17.4 Externalized Performance Goal Weighting
In the Oracle RTD decisioning process, decisions can target segments of the population and weight the performance metrics attached to that decision for each segment.
You can set up your decision in two ways, depending on what kind of weights you want for your performance goals:
-
Pre-defined weights, whose values are specified in the Inline Service
-
Custom weights, whose values can be calculated or changed at run time
By selecting custom weights for performance goals in the Inline Service, end users can influence the decisioning process with on-the-spot decision process modifications, which effectively segment different population segments at run time.
For details of how to define and use custom performance goal weights in an Inline Service, see the following topics:

