A Reference for Administrators
This appendix contains information for administrators who set up and maintain Oracle BI Mobile App Designer.
It includes the following topics:
-
Section A.3, "Sharing Access to the Apps Library with App Consumers"
-
Section A.5, "Required Permissions to Use Oracle BI Mobile App Designer and Run Apps"
A.1 About the Apps Library
This section describes the Apps Library. It includes the following sections:
A.1.1 What Is the Apps Library?
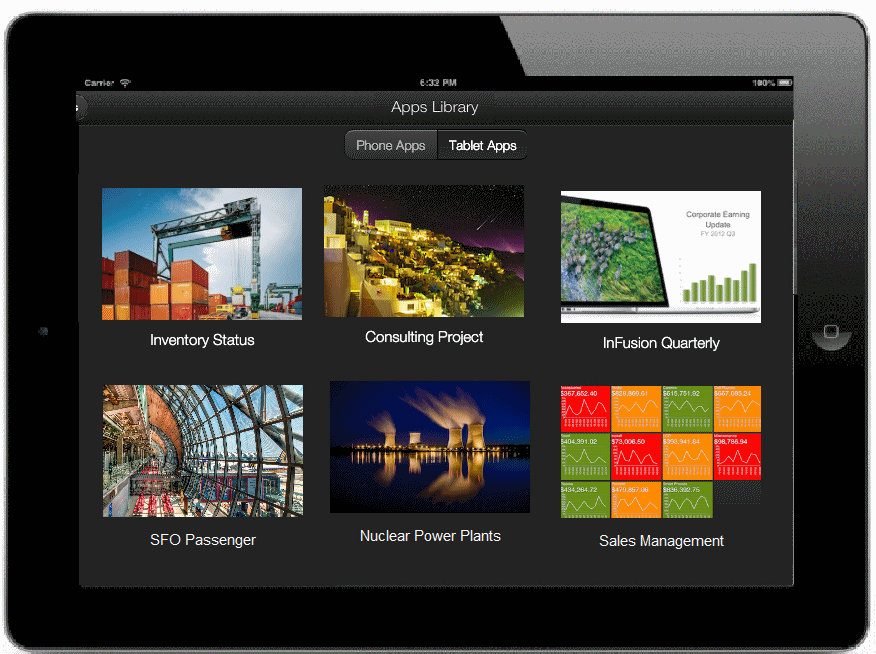
The Apps Library is where users view, manage, and subscribe to published apps from their mobile devices. When users navigate to the Apps Library URL from a browser they can choose to subscribe to the apps they have permission to access.
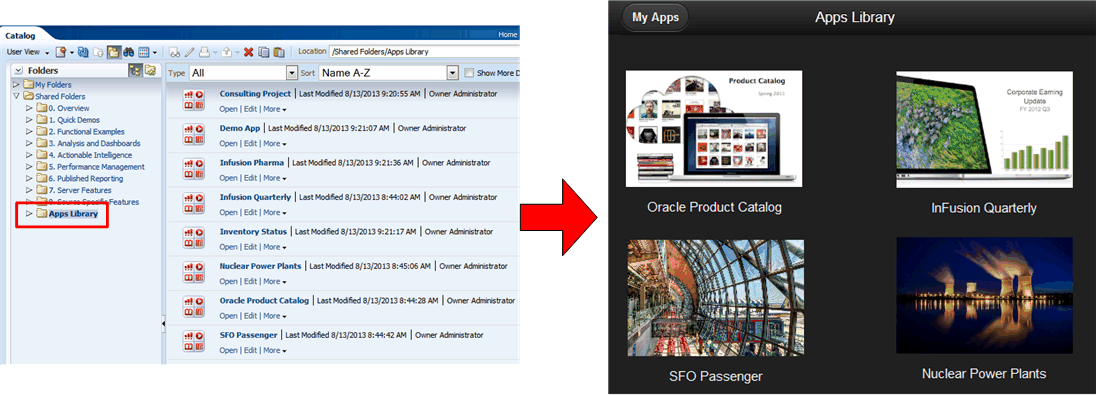
From the administrator's perspective, the Apps Library is a folder in the catalog configured to act as the library. When app designers publish an app it is copied to the Apps Library folder. When consumers open the Apps Library URL in their browsers they can interact with the apps that have been published to the folder.
A.1.2 What Happens When a User Subscribes to an App?
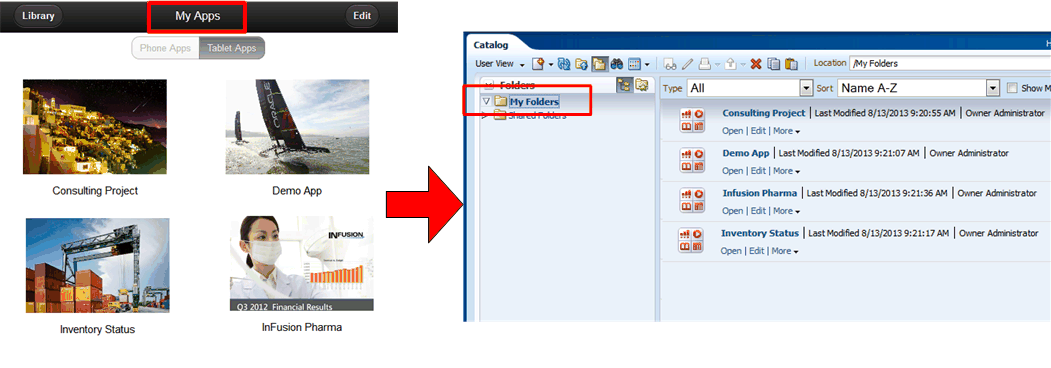
Subscribing to an app copies the app from the Apps Library to the user's My Folders folder in the catalog. This exposes the app in the user's My Apps library.
A.1.3 About Local and Remote Apps Libraries
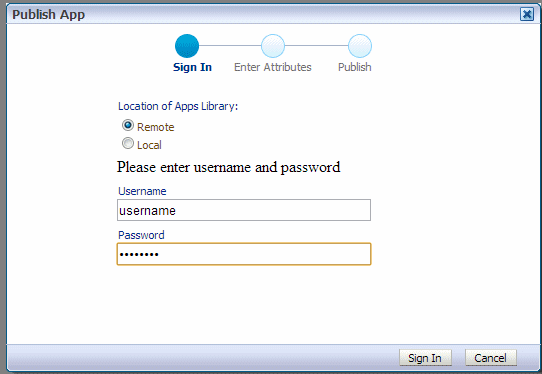
You can configure a folder on the local instance to be the Apps Library where app designers publish their apps. You can also configure an instance to connect and publish to the Apps Library on another (remote) instance.
For example, suppose you have a development instance and a production instance. Both instances have a local Apps Library defined. The development instance has the production instance configured as a remote library. App designers using the development instance publish their apps to the local (development) instance during design time to test and review. When apps are ready for production you can use the Publish option from the development instance to publish the app to the production instance using the remote Apps Library option.
Figure A-4 shows the Remote and Local options available to select the location of the Apps Library that you publish to.
A.2 Setting Up the Apps Library Locations
The following sections describe setting up an Apps Library and enabling connection to publish to a remote server.
A.2.1 Setting Up a Local Apps Library
To set up a local Apps Library to create an Apps Library on the same instance, perform the following:
A.2.1.1 Create the Apps Library Folder in the Catalog
To create a folder in the catalog:
-
On the Catalog page, select Shared Folders.
-
In the catalog toolbar, click New and select Folder.
-
Enter the folder name and click OK, as shown in Figure A-5.
-
Set Permissions on the Apps Library folder. App designers that will be publishing apps to the folder must have Write permissions. App consumers that will be viewing apps in the library must have Read permissions.
A.2.1.2 Set Up the Configuration File
To register the folder in the catalog designated as the Apps Library you add a property entry to the xmlp-server-config.xml configuration file.
To set up the configuration file:
-
Open the
xmlp-server-config.xmlfile. It is located under<DOMAIN_HOME>/config/bipublisher/repository/Admin/Configuration. -
Add the following property to
xmlp-server-config.xml:Property:
APPS_LIBRARY_FOLDER_LOCALDescription: Specifies the folder in the catalog to act as the Apps Library. Enter the path to the folder under Shared Folders that you created in the previous step (do not include "Shared Folders" in the path).
Sample Configuration File Entry:
<property name="APPS_LIBRARY_FOLDER_LOCAL" value="/Apps Library"/>
-
Restart the
bimad(BI Mobile App Designer) application in the WebLogic Server Administration Console.
A.2.2 Enabling Remote Connection to an Apps Library on Another Instance
Set up a remote Apps Library connection when you want to Publish apps that reside on one instance to the Apps Library that resides in the catalog of another instance. To enable connection to a remote Apps Library, register the connection information in the configuration file of the instance from which you want to connect.
To enable connection to a remote Apps Library:
-
Open the
xmlp-server-config.xmlfile. It is located under<DOMAIN_HOME>/config/bipublisher/repository/Admin/Configuration. -
Add the following properties to
xmlp-server-config.xml:Table A-1 Configuration File Settings to Enable Connection to a Remote Apps Library
Property Description Sample Configuration File Entry APPS_LIBRARY_FOLDER_REMOTESpecifies the Apps Library folder in the catalog on the remote server.
<property name="APPS_LIBRARY_FOLDER_REMOTE" value="/Apps Library"/>MOBILE_APP_REMOTE_SERVERSpecifies the remote server where the
APPS_LIBRARY_FOLDER_REMOTEresides. Setting this property enables connection to Publish apps to the remote Apps Library.<property name="MOBILE_APP_REMOTE_SERVER" value="http://example.com:7001/mobile/"/>The following sample shows example entries when both a local and remote Apps Library are defined:
<property name="APPS_LIBRARY_FOLDER_REMOTE" value="/Apps Library"/>
<property name="MOBILE_APP_REMOTE_SERVER" value="http://example.com:7001/mobile/"/>
<property name="APPS_LIBRARY_FOLDER_LOCAL" value="/Apps Library Test"/>
-
Restart the
bimad(BI Mobile App Designer) application from the WebLogic Server Administration Console.
A.3 Sharing Access to the Apps Library with App Consumers
The URL for the Apps Library is of the form:
http://<hostname>:<port>/mobile/appstore/
After you configure the Apps Library, you can provide users with this URL to open in the device browser and bookmark for later use.
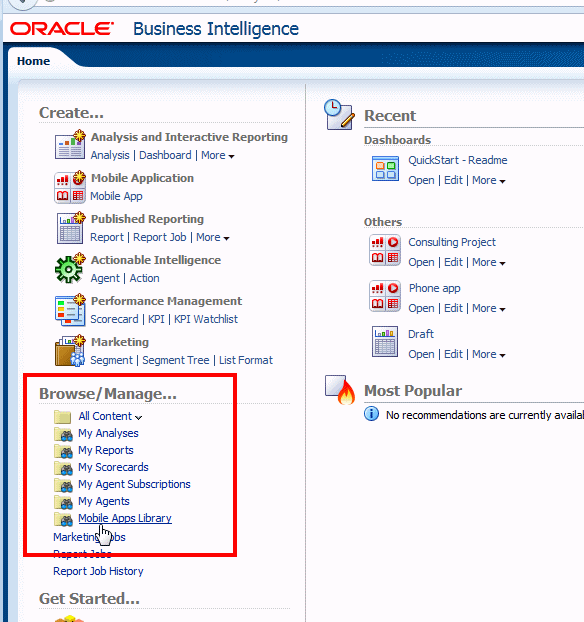
Users can also access the Apps Library URL from the Oracle Business Intelligence home page under the Browse/Manage region.
A.4 Securing Apps in the Apps Library
Typically you configure the Apps Library to be accessible to all users who will be running apps. To ensure that users can only run apps appropriate for their roles, apply permissions specifically to each app. When using the Publish feature to promote apps to the Apps Library, Oracle recommends applying the permissions to the app before Publish. When the app is promoted to the Apps Library it maintains the original permission settings.
For information on setting permissions in the catalog, see "Managing Objects in the Oracle BI Presentation Catalog" in the Oracle Fusion Middleware User's Guide for Oracle Business Intelligence Enterprise Edition.
A.5 Required Permissions to Use Oracle BI Mobile App Designer and Run Apps
The default permissions assigned to the BI Author role enable the use of the Mobile App Designer. To save apps to a specific folder the user's role must also have write permissions on the target folder.
The default permissions assigned to the BI Consumer role enable viewing apps.
If you create custom roles, the following are required:
-
To access the Mobile App Designer to create apps a role must include the permission: oracle.bi.publisher.developReport
-
To run apps a role must include the permission: oracle.bi.publisher.runReportOnline
App consumers must also have appropriate permissions on the app data sources.
A.6 Moving Apps Between Environments
To move apps between development, test, and production environments, use the archive and unarchive feature available from the BI Presentation catalog. For more information about this feature, see the Oracle Fusion Middleware User's Guide for Oracle Business Intelligence Enterprise Edition.
Archiving enables you to bundle the entire catalog, specific folders, or multi-component objects as a .catalog file and upload the .catalog file to unarchive the data to another location in the catalog. This process enables you to transfer specific data across environments.
To create an archive file:
-
In the Catalog navigate to the folder or app to archive.
-
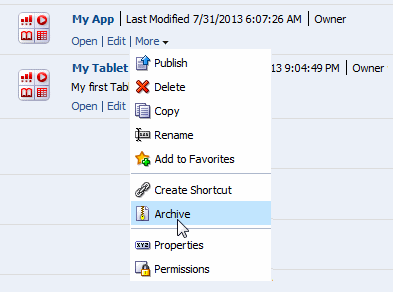
Select More, then Archive.
-
In the Archive dialog, specify to maintain or omit the permissions and timestamps for the folder or object.
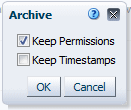
Keep Permissions: Use this option to maintain the object or folder's existing permissions. If you do not select this option, then the archiving process does not include any permissions. Upon unarchiving, the system assigns the parent folder's permissions to all of the objects and folders.
Keep Timestamps: Use this option to maintain the CreationTime, LastModified, and LastAccessed timestamps assigned to the object or folder. Upon unarchiving, the LastModified timestamp is updated to indicate the time at which the object or folder is unarchived. If you select this option, the Old option in the Paste Overview area of the Preferences dialog is available when unarchiving. You use the Old option to overwrite existing catalog items that are older than the catalog items in the archive.
If you do not select this option, then the archiving process does not include timestamp information and the Old option in the Paste Overview area of the Preferences dialog is not available.
-
Click OK to save the archive file.
To unarchive an archive file:
-
In the catalog, select the folder location where you want to upload the archive file.
-
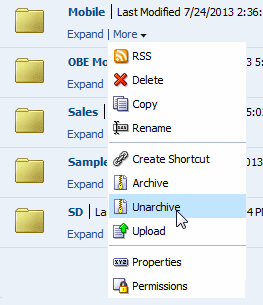
Select More, then Unarchive.
-
In the Unarchive dialog, browse for and select the archive file.
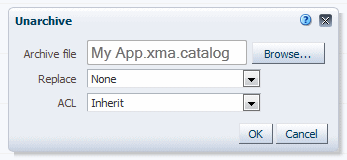
Replace: Use to specify if and how to replace an existing folder or object with the same name. Note the following options:
-
All — Select this option to replace any existing folders or objects with the same names as folders or objects included in the archive file that you are uploading.
-
Old — Select this option to replace folders or objects except those folders or objects that exist, unless they are older than the source.
-
None — Select this option to add any new folders or objects, but preserve any existing folders or objects.
-
Force — Select this option to add and replace all folders or objects.
ACL: Use to specify how the folders or objects are assigned permissions using Access Control Lists (ACLs) when unarchived. Note the following options:
-
Inherit — Inherits the folder or object's permissions (ACL) from its new parent folder.
-
Preserve — Preserves the folder or object's permissions (ACL) as it was in the original, mapping accounts as necessary.
-
Create — Preserves the folder or object's permissions (ACL) as it was in the original, creating and mapping accounts as necessary.
-
-
Click OK.
A.7 Configuring Single Sign-On
If your Oracle BI Enterprise Edition is configured for single sign-on, you must register BI Mobile App Designer as a partner application with your single sign-on provider.
For example, for Oracle Single Sign-On implementations add the following location directive to the $ORACLE_HOME/instances/instance1/config/OHS/ohs1/mod_wl_oh.conf file settings:
<Location /mobile>
SetHandler weblogic-handler
</Location>
See your single sign-on provider documentation for specific requirements for your single sign-on provider. See also the Oracle Fusion Middleware Security Guide for Oracle Business Intelligence Enterprise Edition.
