3 Creating Custom Authentication Plug-ins
The OAM Server uses both authentication and authorization controls to limit access to the resources that it protects. Authentication is governed by specific authenticating schemes, which rely on one or more plug-ins that test the credentials provided by a user when he or she tries to access a resource. The plug-ins can be taken from a standard set provided with OAM Server installation, or custom plug-ins created by your own Java developers.
This chapter provides the following sections:
-
Section 3.3, "Sample Code: Custom Database User Authentication Plug-in"
-
Section 3.6, "Creating a Custom Authentication Module for Custom Plug-ins"
-
Section 3.7, "Creating Authentication Schemes with Custom Authentication Modules"
3.1 Introduction to Authentication Plug-ins
Oracle Access Manager 11g provides authentication modules for immediate use out-of-the-box, as well as the following:
-
Provides authentication plug-in interfaces and SDK tooling to build customized authentication modules (plug-ins) to bridge the out-of-the-box features with individual requirements. The new interfaces and SDK tooling:
-
Provide backward compatibility to support custom Oracle Access Manager 10g plug-ins.
-
Include a deterministic method to orchestrate custom plug-ins within an authentication module.
-
-
Provides a mechanism that enables quick deployment of customized authentication plug-ins into Oracle Access Manager 11g
-
Maintains the complete plug-in "State" lifecycle of Managed Server and the same to be propagated to AdminServer
The creation of custom plug-ins for credential collection is supported for authentication (steps you can orchestrate).
See Also:
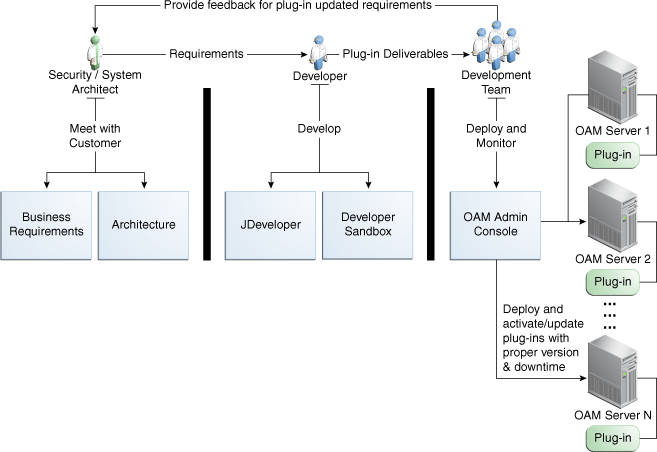
About the Plug-in InterfacesFigure 3-1 provides an overview of the tasks involved in custom plug-in deployment.
Figure 3-1 Custom Plug-in Deployment Workflow
Description of "Figure 3-1 Custom Plug-in Deployment Workflow"
The following overview identifies the tasks involved in custom plug-in deployment.
Task overview: Deploying a custom plug-in requirements
-
Planning: Identify the business requirements for this plug-in and consider the authentication flow when a user requests a resource, as described in Section 3.1.2, "About Planning, the Authentication Model, and Plug-ins".
The security architect knows how Oracle Access Manager 11g is used and knows the customer's user base. System architects can identify points of improvement in a customer's implementation.
-
Development:
The developer translates what a security architect has designed into the actual plug-in using common libraries to interface custom authentication modules.
-
Write the plug-in.
-
Write the metadata XML for the custom module.
-
Prepare the manifest.
-
Add the following jar files to the class path: felix.jar, identitystore.jar, oam-plugin.jar, utilities.jar.
-
-
Deployment:
Oracle Access Manager administrators deploy and orchestrate multiple plug-ins to work together in an authentication module and also tests and monitors plug-ins.
-
Adding Custom Plug-ins, which includes configuring the plug-in data source or domain, distributing, and activating the plug-in.
-
Creating a Custom Authentication Module for Custom Plug-ins, which includes adding and orchestrating steps and outcomes OnSuccess, OnFailure, and OnError.
-
Creating Authentication Schemes with Custom Authentication Modules.
-
Test the plug-in using the Oracle Access Manager Access Tester as described in Oracle Fusion Middleware Administrator's Guide for Oracle Access Manager with Oracle Security Token Service
-
Monitor the plug in and provide feedback to the security or system architects to allow for any revisions to the business requirements and architecture.
-
3.1.1 About the Custom Plug-in Life Cycle
The life cycle of a plug-in centers around the ability to add plug-ins to the OAM Server and use the plug-in to create more features. This allows users to build features and work flows based on the standard (out-of-the-box) plug-ins and user-added plug-ins that act as extension features to the server.
The following list outlines a typical plug-in life cycle:
-
Planning
-
Plug-in development time, includes generating the plug-in metadata artifact
-
Load and lifecycle of the plug-in
-
Import: Upload the plug-in into Oracle Access Manager and use it without restarting servers
-
Distribute: Propagate the plug-in jar from one local AdminServer file system to all manage servers in a cluster, without server downtime
-
Activate: Load the plug-in implementation at run time when this plug-in is used in any Authentication module flow
-
Use the start-up parameters or configuration for the Plug-in
-
"Push" and "pull" plug-in configuration data into oam-config.xml
-
Maintain complete "State" life-cycle of Managed Server and the same to be propagated to AdminServer
-
-
State of the deployed plug-in
-
Monitoring and auditing the plug-in
-
Collect the matrix data of time taken to execute a plug-in and the number of times the plug-in is executed
-
Collect the matrix data of plug-in input and output
-
Collect the matrix data of plug-in execution start time and end time
-
Audit the plug-in life-cycle methods code
-
When a new plug-in JAR is available, the deployer can import it to AdminServer DOMAIN_HOME/oam/plugins from the Oracle Access Suite "Import" action.
Table 3-1 describes the states of a plug-in life cycle that are controlled by Oracle Access Manager administrators. For more information, see Section 3.5, "Adding Custom Plug-ins".
Table 3-1 Plug-in Life Cycle States
| State | Description |
|---|---|
|
Import |
Adds the plug-in JAR file to the AdminServer DOMAIN_HOME/oam/plugins and begins plug-in validation. |
|
Distribute |
Propagates the plug-in to all registered OAM Servers. |
|
Activate |
After successful distribution the plug-in can be activated on all registered OAM Servers. |
|
Deactivate |
Deactivation checks the plug-in entry flag in oam-config.xml. If any OAM Server fails during the de-activation process, the "De-activation failed" message is propagated. |
|
Remove |
Removes the given plug-in (JAR) from DOMAIN_HOME/config/fmwconfig/oam/plugins directory on AdminServer, which notifies all OAM Servers. |
3.1.2 About Planning, the Authentication Model, and Plug-ins
Plug-ins on the OAM Server are part of a custom authentication scheme. Different types of plug-ins can be used for:
-
User Identity Mapping
Plug-ins can add functionality to deal with forms of user input not in the form of a log-in username. Fingerprints, a series of security questions, and other methods can be used. The plug-in translates these inputs and checks them against the database.
-
User Authentication
Responses (not provided out-of-the-box) might be needed when authenticating the user. Custom plug-ins can fulfill this need.
-
Custom Responses
Custom plug-ins can be used for responses and how these responses interact with the rest of the system.
-
Other types of plug-ins are also supported
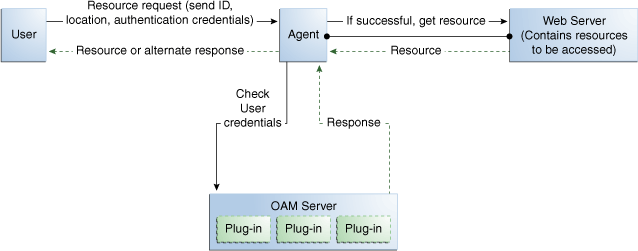
Figure 3-2 illustrates the authentication flow when a user requests a protected resource. Remember that authentication is a process and not a protocol. The green arrows are custom responses generated by plug-ins that are deployed on the OAM Server.
Figure 3-2 Authentication Model and Plug-ins
Description of "Figure 3-2 Authentication Model and Plug-ins"
Before designing and developing custom authentication plug-ins, Oracle recommends that developers analyze the Oracle Access Manager authentication decision process closely to determine how a user should be authenticated.
When a certain request comes in, there are two possible ways to deal with it. One is to have specific schemes be run depending on the attributes of the request, using a decision engine to run one or multiple schemes to properly authenticate the user. This requires less code within each scheme and allows for more modularity. The other option is to have every scheme be hard-coded to deal with various attributes of requests for specific purposes, not using a decision engine to piece together which schemes need to be run (only one scheme is run).
Example: Decision Engine versus Hard-Coded Authentication
Suppose a user wants to log in to his online bank account using his home computer, at midnight. Following overviews outline the processing differences between the decision engine approach and the hard-coded approach. Developers must decide with what approach best meets their requirements.
Process overview: Decision Engine Approach
The differences between the two approaches are simple but important.
-
The request comes from the user with a certain IP address at midnight.
-
The decision engine determines it has previously dealt with this IP address. It also determines that a user trying to authenticate at midnight is suspicious and requires the user to answer a security question, in addition to a username and password.
-
The security question scheme is run for the specified user, and is successful. This is the first of two authentication schemes selected by the decision engine.
-
The user-password scheme is run, and the user authenticates successfully. This is the second authentication scheme selected by the decision engine.
Process overview: Hard-Coded Approach
-
The request comes from the user with a certain IP address at midnight.
-
The online bank account access scheme is chosen from among other authentication schemes (credit card access scheme, new account creation and verification, and so on).
-
The scheme first checks the IP address to determine if the user has previously made attempts to connect from the computer. It determines the user has.
-
The scheme checks the time. It requires a security question to be answered, which is answered successfully.
-
The scheme requires the user to enter his login credentials, and he authenticates successfully.
Each approach has its own advantages and disadvantages. For the decision-engine model, code re-use is the primary advantage, while the hard-coded approach may result in more security. Developers will have to decide with what approach to go with.
| Approach | Description |
|---|---|
|
Decision Engine |
Divides authentication schemes into smaller sequential modules that can orchestrated to work together as needed. Advantages:
|
|
Hard-coded |
Leaves nothing to be decided; resembles a complete set of If-Else statements that the user must pass to authenticate. Advantages: Could result in greater security. |
3.2 Introduction to Plug-in Interfaces
This section provides the following topics:
3.2.1 About the Plug-in Interfaces
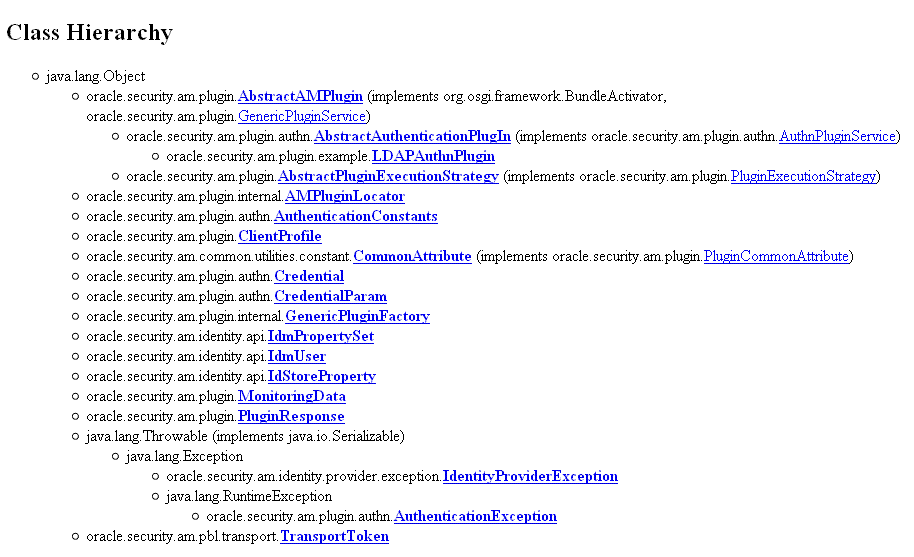
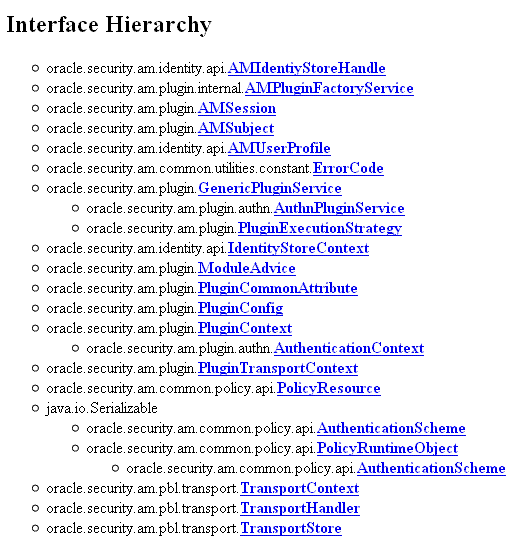
This topic introduces the hierarchy for packages, classes, interfaces, and annotations.
Custom plug-in implementation includes writing plug-in implementation class artifacts. The plug-in implementation class must extend the AbstractAuthenticationPlugIn class and implement initialize and process methods. Custom plug-in implementers must implement actual custom authentication processing logic in this method and return the final authentication execution status.
A plug-in's configuration requirements must be given in XML format. This configuration data (metadata) includes plug-in name, author, creation date, version, interface class, implementation class, and configuration data in the form of Attribute / Value pairs.
Oracle Access Manager 11g provides a generic plug-in interface and a more specific authentication interface as described in:
3.2.1.1 GenericPluginService
oracle.security.am.plugin
The public interface, oracle.security.am.plugin, is a generic plug-in interface that provides methods to get plug-in name, plug-in implementation class name, plug-in version, plug-in execution status, plug-in monitoring data, plug-in configuration data, start and stop the plain.
AbstractAMPlugin
The public abstract class oracle.security.am.plugin.AbstractAMPlugin extends java.lang.Object implements GenericPluginService, org.osgi.framework.BundleActivator.
oracle.security.am.plugin.AbstractAMPlugin
This is a Abstract plug-in class that needs to be extended by all Access Management plug-ins. This provides base implementations for plug-ins start and stop methods
See Also:
Oracle Fusion Middleware Oracle Access Manager Java API Reference3.2.1.2 AuthnPluginService
oracle.security.am.plugin.authn.AuthnPluginService
The public interface oracle.security.am.plugin.authn.AuthnPluginService extends GenericPluginService.
This is a authentication plug-in interface that provides an additional authentication specific method to access and process all the data available in the AuthenticationContext object and return the process execution status. Plug-in can then set response that will be added to SESSION, request and redirect contexts.
AbstractAuthenticationPlugIn
The public abstract class oracle.security.am.plugin.authn.AbstractAuthenticationPlugIn extends AbstractAMPlugin implements AuthnPluginService.
oracle.security.am.plugin.authn.AbstractAuthenticationPlugIn
This is an authentication Abstract plug-in class that will be exposed to the plug-in developers. All the custom plug-in implementations should extend this AbstractPlugInService class. Plug-ins that needs to handle the resource cleanup should override shutdown(Map < String, Object > OAMEnvironmentContext) method. This will also provide an instance of java.util.Logger to plug-ins.
3.2.2 About Plug-in Hierarchies
This topic provides a look at the hierarchies:
See Also:
Oracle Fusion Middleware Oracle Access Manager Java API Reference3.3 Sample Code: Custom Database User Authentication Plug-in
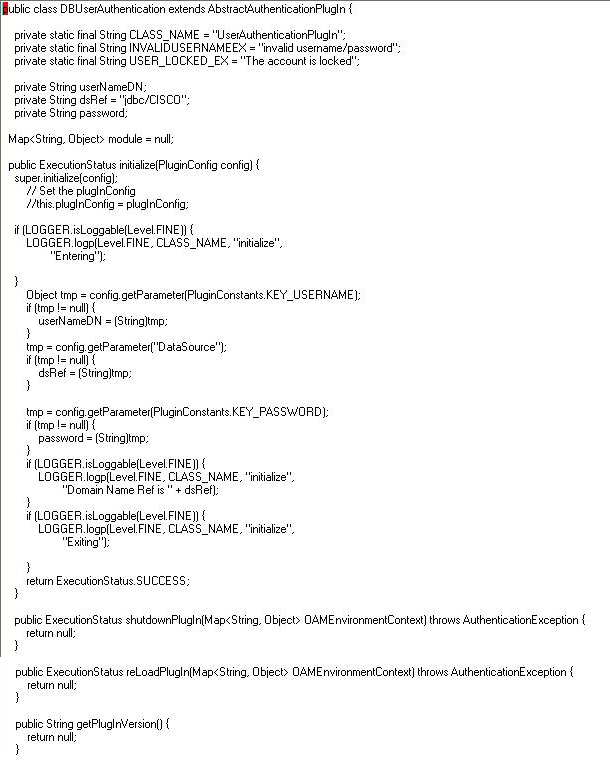
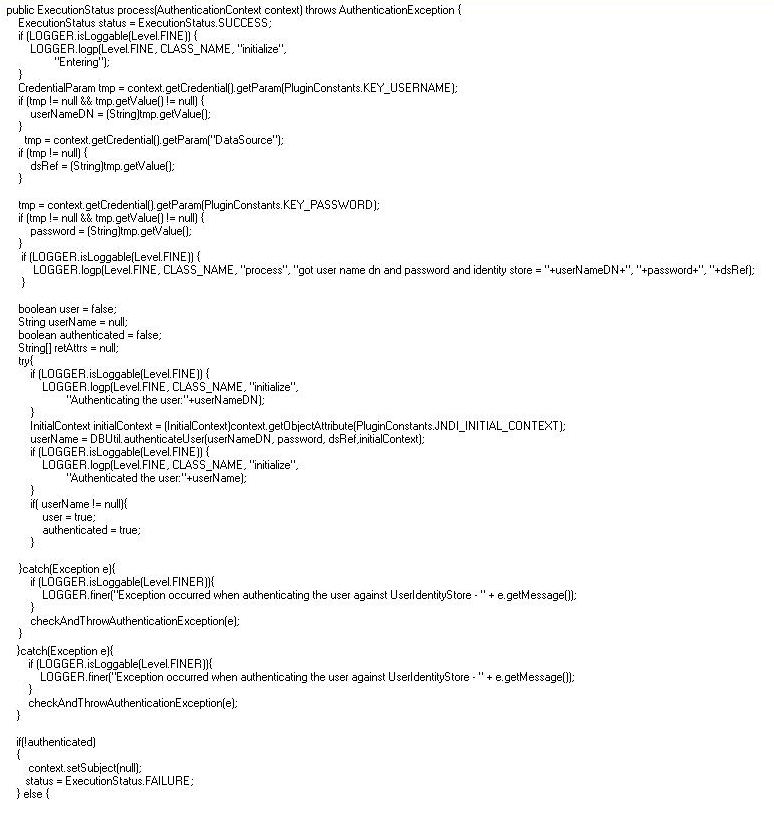
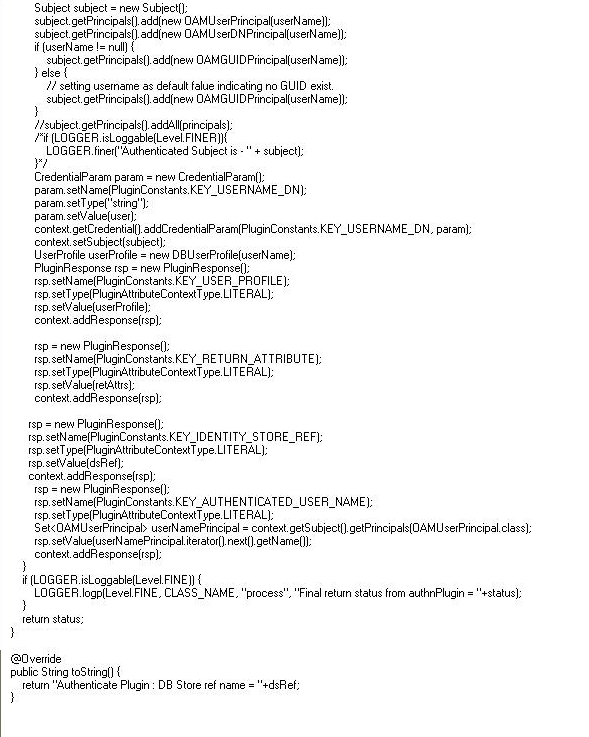
This section provides snapshots of a sample implementation for a database user authentication plug-in to illustrate developer tasks. The following topics are provided:
3.3.1 Sample Code: Database User Authentication Plug-in
Following figures illustrate a sample implementation for a Database user authentication plug-in, which is presented in three parts:
See Also:
Oracle Fusion Middleware Oracle Access Manager Java API ReferenceContinued ..
Continued...
3.3.2 Sample Plug-in Configuration Metadata Requirements
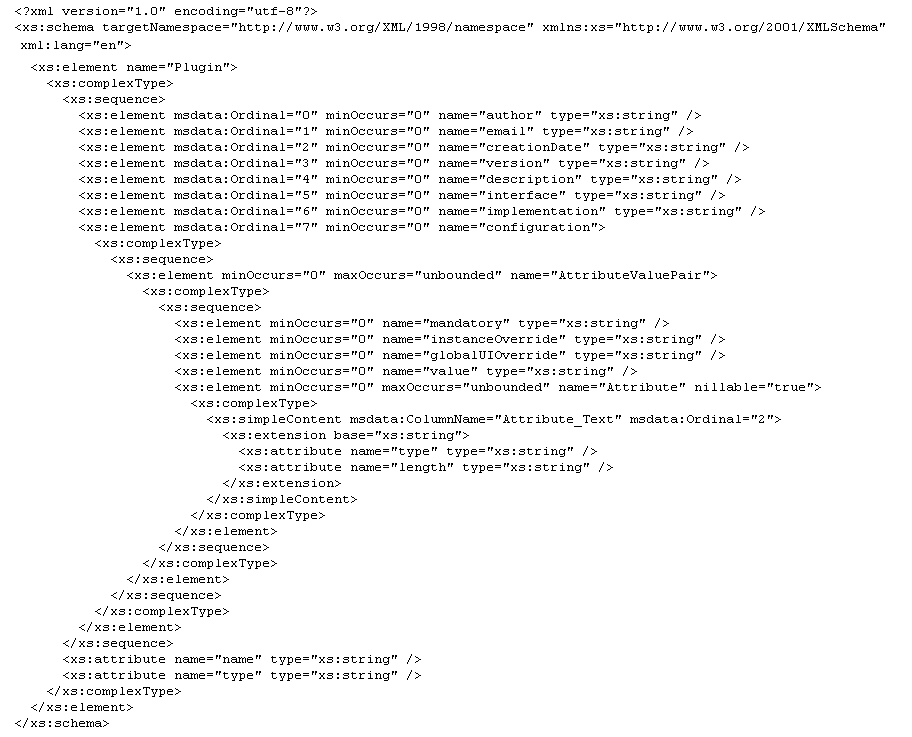
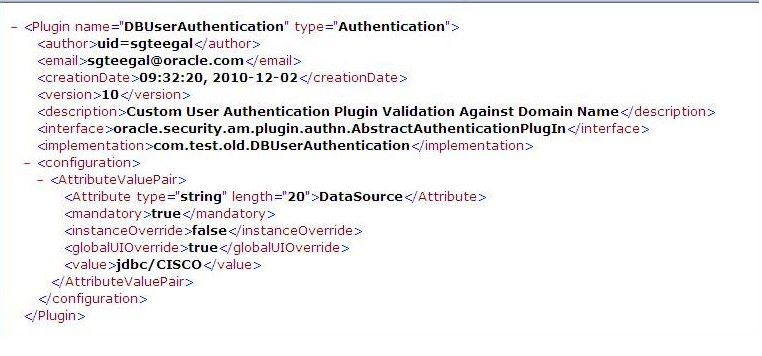
The plug-in's configuration requirements must be given in XML format.
This configuration data (metadata) includes plug-in name, plug-in author, creation date, plug-in version, plug-in interface class, plug-in implementation class, and plug-in configuration data in the form of Attribute / Value pairs.
Figure 3-11 shows the XML Schema Definition (XSD) file containing metadata for the sample: Database User Authentication Plug-in implementation.
Figure 3-12 shows the XML metadata for the sample: Database User Authentication Plug-in.
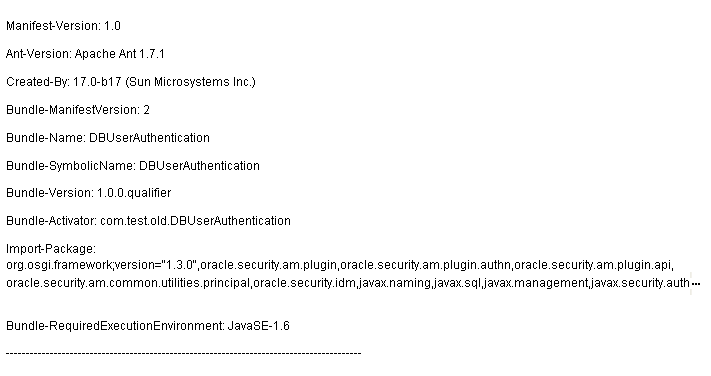
3.3.3 Sample Manifest for the Plug-in
Figure 3-13 illustrates the MANIFEST.MF file for the sample: Database User Authentication Plug-in.
3.3.4 Plug-in JAR File Structure
The JAR file structure for the sample (Database User Authentication Plug-in) is listed here:
-
<plugin>.xml
-
<plugin>.class (per the package structure, as shown in Section 3.2, "Introduction to Plug-in Interfaces")
-
META-INF (MANIFEST.MF)
3.4 Developing an Authentication Plug-in
The developer translates what a security architect has designed into the actual plug-in using common libraries to interface custom authentication modules.
This section guides as you develop an authentication plug-in for use with Oracle Access Manager 11g authentication schemes. The following topics are discussed:
3.4.1 About Writing a Custom Authentication Plug-in
Writing the custom plug-in implementation includes writing the plug-in implementation class to:
-
Extend
AbstractAuthenticationPlugInclass (see Section 3.2.1, "About the Plug-in Interfaces") -
Implement
initializemethod -
Implement
processmethod
Table 3-3 describes the methods required for the plug-in's functionality.
Table 3-3 Required Plug-in Methods
| Required Method | Description |
|---|---|
|
initialize |
Gives a handle to the The |
|
process |
Gives a handle to the
The
In addition, the
|
Note:
Custom plug-in developers must implement actual custom authentication processing logic in this method and return the final authentication execution status.3.4.2 Writing a Custom Authentication Plug-in
This section provides steps to write a custom authentication plug-in.
The following overview describes the actions a developer must take after the system architect identifies the business requirements for this plug-in and considers the authentication flow when a user requests a resource. For more information, see Section 3.1.2, "About Planning, the Authentication Model, and Plug-ins".
Introduction to Authentication Plug-ins
Sample Code: Custom Database User Authentication Plug-in
Task overview: Developers write a custom authentication plug-in
-
Extend
AbstractAuthenticationPlugInclass and implement the following methods (see also Section 3.4.1, "About Writing a Custom Authentication Plug-in"):-
Implement
initializemethod -
Implement
processmethod
-
-
Develop plug-in code using appropriate Oracle Access Manager 11g interfaces and packages. See:
-
Prepare Metadata for the Custom Plug-in. See:
-
Prepare the Plug-in Jar file and manifest and turn these over to your deployment team. See:
-
Proceed to:
3.4.3 JARs Required for Compiling a Custom Authentication Plug-in
Several JAR files are required to compile a custom authentication plug-in. Those jars can be found under:
-
extensibility_lifecycle.jar
-
. felix.jar
-
.felix-service.jar
-
oam-plugin.jar
These JAR files are located in the following path:
DOMAIN_HOME/servers/MANAGED_INSTANCE_NAME/tmp/_WL_user/oam_server/RANDOM_STRING
/APP-INF/lib
3.5 Adding Custom Plug-ins
This section provides the following topics:
3.5.1 About Managing Custom Plug-ins
Custom authentication plug-ins can be created and used in custom authentication modules, and, in turn, used in authentication schemes.
After development, the plug-in must be deployed on the admin server, as a JAR file, which is validated automatically. After validation, an administrator can configure and distribute the plug-in using the Oracle Access Suite.
The server processes the XML configuration file within the plug-in JAR file to extract data about the plug-in. After the plug-in is imported, an administrator can see and modify the various plug-in states based on information available from the AdminServer.
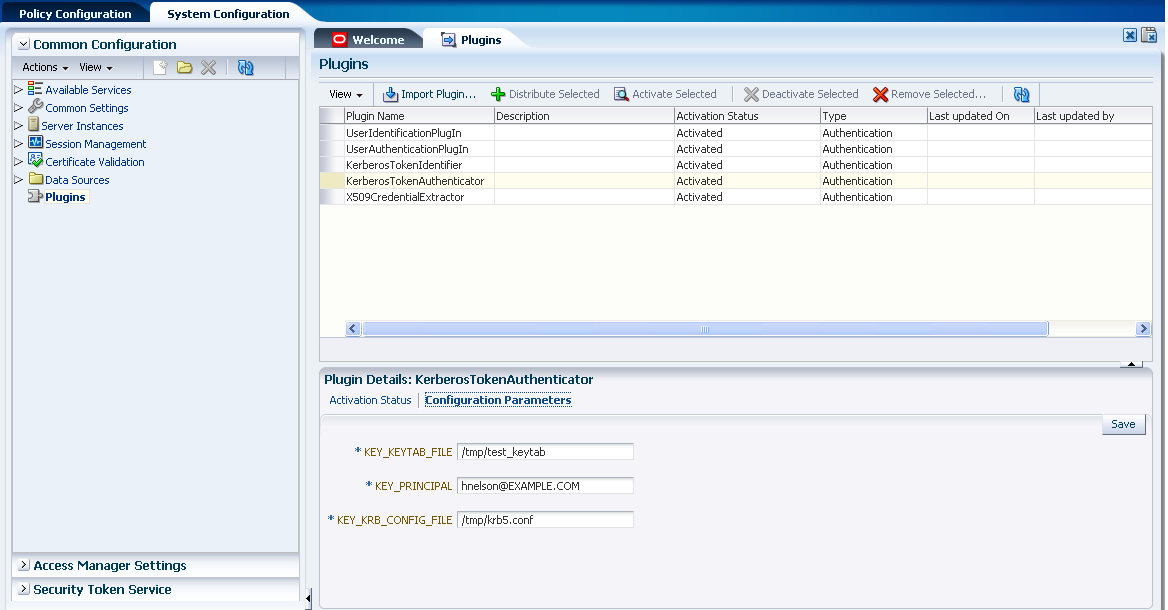
Figure 3-14 illustrates the Plug-ins Node under the Common Configuration section of the System Configuration tab, and the Plugins page. This page includes a tool bar with command buttons, most of which operate on the plug-in that is selected in the table. The table provides information about the existing custom plug-ins and their state. The Plugin Details section at the bottom of the page reflects configuration details for the selected plug-in the table.
Administrators control plug-in states using the command buttons across the table at the top of the Plugins page, as described in Table 3-4.
Table 3-4 Managing Custom Plug-ins Actions
| Action | Description |
|---|---|
|
Import Plugin... |
Adds the plug-in JAR file to the AdminServer DOMAIN_HOME/oam/plugins and begins plug-in validation.
On Success: Status is reported as "Uploaded" (even if an OAM Server is down). If all registered OAM Servers report "Uploaded", then the status on AdminServer is also "Uploaded". On Failure: Status is reported as "Upload Failed" See Also: "About the Custom Plug-in Life Cycle" in the Oracle Fusion Middleware Developer's Guide for Oracle Access Manager and Oracle Security Token Service |
|
Distribute Selected ... |
On Success: Status is reported as "Distributed" (even if an OAM Server is down). If all registered OAM Servers report "Distributed", then the status on AdminServer is also "Distributed". On Failure: Status is reported as "Distribution Failed" |
|
Activate Selected ... |
After successful distribution the plug-in can be activated on all registered OAM Servers. Activation:
On Success: Status is reported as "Activated" (even if an OAM Server is down). If all registered OAM Servers report "Activated", then the status on AdminServer is also "Activated". On Failure: Status is reported as "Activation Failed" Following activation on all OAM Servers, the plug-in can be used and executed in any authentication module construction or orchestration. |
|
Deactivate Selected ... |
Following plug-in activation, an administrator can choose to deactivate the plug-in: if the plug-in is not used in any authentication module or scheme, for example. The selected plug-in from all registered OAM Servers. Deactivate:
On Success: Status is reported as "De-activation" (even if an OAM Server is down). If all registered OAM Servers report "De-activation", then the status on AdminServer is also "De-activation". Plug-in configuration is removed from oam-config.xml. Note: After deactivation, the plug-in cannot be used or executed in any authentication module or orchestration. On Failure: Status is reported as "De-activation Failed" |
|
Remove Selected ... |
Following plug-in deactivation, an administrator can delete the selected plug-in. During this process, Oracle Access Manager: Delete:
On Success: Status is reported as "Removed" (even if an OAM Server is down). If all registered OAM Servers report "Removed", then the status on AdminServer is also "Removed". Plug-in configuration is removed from oam-config.xml. On Failure: Status is reported as "Removal Failed" |
Table 3-4 describes elements in the Plugins status table.
Table 3-5 Elements in the Plugins Status Table
| Element | Description |
|---|---|
|
Plugin Name |
Extracted from the Plugin name element of the XML metadata file. |
|
Description |
Extracted from the description element of the XML metadata file. |
|
Activation Status |
Reported activation status based on information from AdminServer. |
|
Type |
Extracted from the type element of the XML metadata file. |
|
Last Updated on |
Extracted from the creation date element of the XML metadata file. |
|
Last Updated by |
Extracted from the author element of the XML metadata file. |
In the Plugin Details section of the page, the Activation Status is maintained by the AdminServer, as shown in Table 3-6.
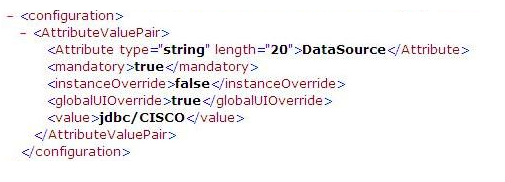
Depending on your plug-in, various configuration details are extracted from the configuration element of the XML metadata file to populate Configuration Parameters in the Plugin Details section. Examples are shown in Table 3-6.
Table 3-6 Example of Plugin Details Extracted from XML Metadata File
| Configuration Element | Description |
|---|---|
|
DataSource |
  |
|
Kerberos Details |
Defines Kerberos details for his plug-in to use.  |
|
User Identification Details |
Defines the User Identity Store and filter details for this plug-in to use.  |
|
User Authentication Details |
Defines the User Identity Store for this plug-in to use.  |
|
X.509 Details |
Defines the certificate details for this plug-in to use.  |
3.5.2 Adding Custom Plug-ins
Users with valid administrator credentials can perform the following task to add, validate, distribute, and activate a custom plug-in.
Developing an Authentication Plug-in
To add the custom authentication plug-in
-
Import the Plug-in:
-
Go to the Oracle Access Suite and log in, as usual. For example:
https://hostname:port/oamconsole/
-
From the System Configuration tab, Common Configuration section, click Plugins and then click Open from the Actions menu.
-
Click the Import Plugin button.
-
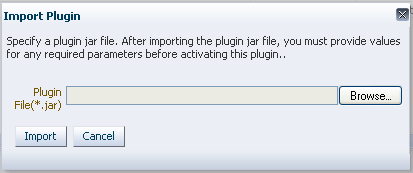
In the Import Plugin dialog box, click Browse and select the name of your plug-in JAR file.
-
Review the message in the dialog box, then click Import.
The JAR file is validated as described in Oracle Fusion Middleware Administrator's Guide for Oracle Access Manager with Oracle Security Token Service.
-
-
Configure Parameters: Expand the Plugin Details section, click Configuration Parameters, and enter appropriate information as needed. For example:

-
Distribute the Plug-in to OAM Servers:
-
In the Plugins table, click your plug-in name to select it.
-
Click the Distribute Selected button, then check its Activation Status.

-
-
Activate the Plug-in (and the custom plugin implementation class) so it is ready to be used by OAM Server:
-
In the Plugins table, click your plug-in name to select it.
-
Click the Activate Selected button, then check its Activation Status.

-
-
Perform the following tasks as needed:
3.5.3 Checking a Plug-in's Activation Status
Users with valid administrator credentials can perform the following task to add, validate, distribute, and activate a custom plug-in.
Developing an Authentication Plug-in
To check the activation status of a custom authentication plug-i
-
From the System Configuration tab, Common Configuration section, click Plugins and then click Open from the Actions menu.
-
In the Plugins table, click the desired plug-in name to select it.
-
Server Instance Name: Expand the Plugin Details section and click Activation Status to display the location and status of the plug-in. For example:

-
Perform the following tasks as needed:
3.5.4 Deleting Custom Authentication Plug-ins
Users with valid administrator credentials can use the following procedure to deactivate and then delete a custom plug-in.
When an administrator deletes a custom authentication plug-in, its name is not removed from the list of plug-ins. To delete the plug-in (for the purpose of re-importing the same plug-in later), the Administration must stop the WebLogic Server and edit the oam-config.xml manually.
To delete a custom authentication plug-in
-
Go to the Oracle Access Suite and log in, as usual. For example:
https://hostname:port/oamconsole/
-
From the System Configuration tab, Common Configuration section, click Plugins and then click Open from the Actions menu.
-
Deactivate the Plug-in: You must perform this before removing a plug-in.
-
In the Plugins table, click your plug-in name to select it.
-
Click the Deactivate Selected button, then check the plug-ins Activation Status.
-
-
Delete a Deactivated Plug-in:
-
In the Plugins table, click your plug-in name to select it.
-
Click the Delete Selected button.
-
Stop the WebLogic Administration Server, locate and edit oam-config.xml manually to remove the deactivated plug-in, and then restart the WebLogic Administration Server.
-
-
Perform the following tasks as needed:
3.6 Creating a Custom Authentication Module for Custom Plug-ins
This section provides the following topics:
3.6.1 About Creating Custom Authentication Modules
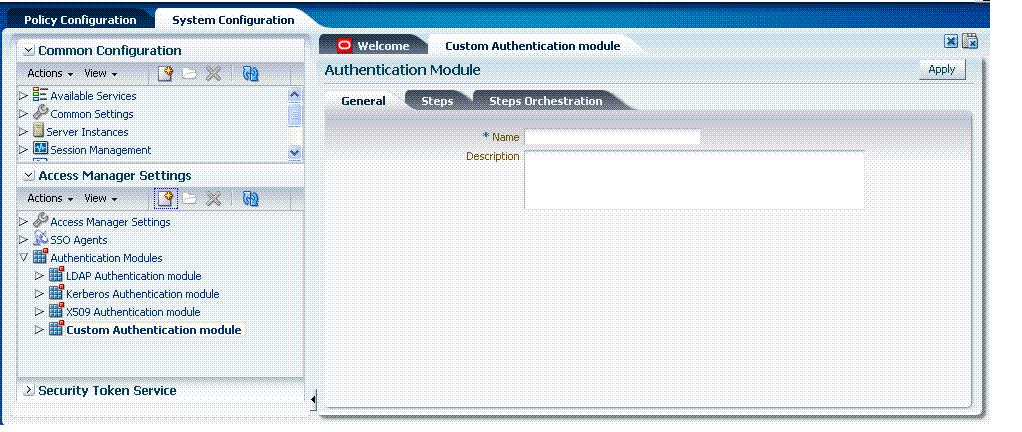
The Access Manager Settings section of the System Configuration navigation tree includes the Authentication Modules node. When you create a custom authentication module, you are presented with subtabs for each type of information required for the module:
-
General
-
Steps
-
Step Orchestration
Figure 3-16 shows the Authentication Modules node in the Access Manager Settings section of the System Configuration navigation tree, as well as the three subtabs where you enter information for the module.
The General subtab provides space for the module Name and an optional description. The name can be up to 60 characters. The optional description can be up to 250 characters.
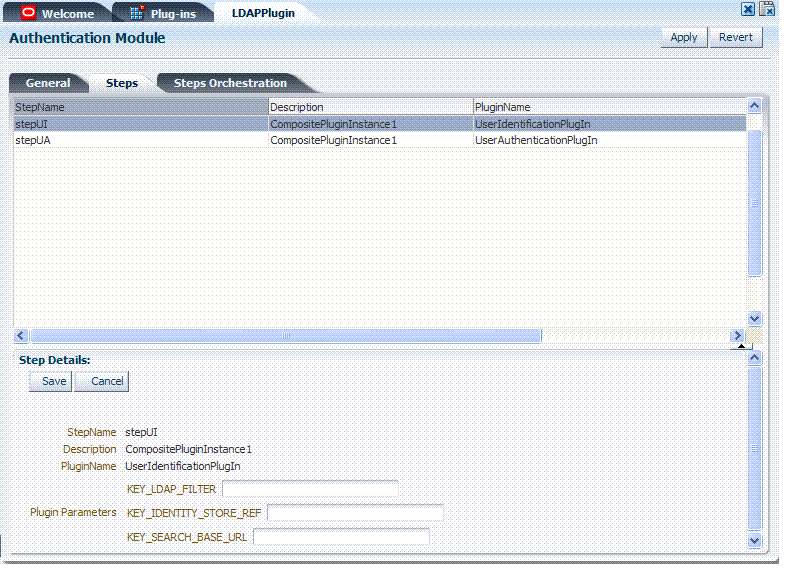
Figure 3-17 illustrates the Steps subtab and Details section for a custom authentication module. Only valid values are accepted for each step as Plugin Parameters under Step Details. Invalid values result in an error when you attempt to save the custom authentication module. When adding Steps, there is no data to display in the table. However, once there are one or more Steps the table and Details sections are populated.
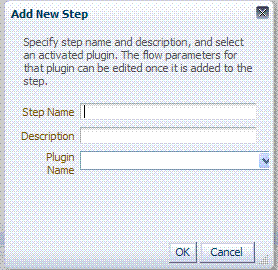
When you add a new Step, the following dialog box appears. Information that you enter is used to populate the table and Details sections of the page, as described in Table 3-7.
Table 3-7 describes the information required for adding a new step.
Table 3-7 Add New Step Entries, Steps Results Table, and Details Section
| Element | Description |
|---|---|
|
Step Name |
The name that was entered when this step was added. |
|
Description |
The optional description for this step, entered when this step was added. |
|
Plugin Name |
The plug-in name that was selected when this step was added. |
|
Step Details |
Details of the selected step in the results table, and Plugin configuration details that were set when the plug-in was added and activated. See Also: Table 3-6, "Example of Plugin Details Extracted from XML Metadata File". |
Figure 3-19 illustrates the Steps Orchestration subtab of a custom authentication module, which is populated by information for each defined step (and the action you choose for each operational condition).
Table 3-8 describes the elements on the Steps Orchestration subtab. The lists available for OnSuccess, OnFailure, and OnError include the following choices:
-
success
-
failure
-
StepName (any step in the module can be selected as the action for an operational condition)
Table 3-8 Steps Orchestration Subtab
| Element | Description |
|---|---|
|
Step Name |
The name that was entered when this step was added. |
|
Description |
The optional description for this step, entered when this step was added. |
|
OnSuccess |
The action selected for successful operation of this step. |
|
OnFailure |
The action selected for failure of this step. |
|
OnError |
The action selected for an error when executing this step. |
3.6.2 Creating a Custom Authentication Module
Users with valid administrator credentials can use the following procedure to create an authentication module that uses one or more custom authentication plug-ins that were imported and activated in the Oracle Access Suite.
Note:
You cannot duplicate an existing custom module to use as a template.Developing an Authentication Plug-in
To create a custom authentication module to use custom plug-ins
-
From System Configuration tab, Access Manager Settings section, expand the Authentication Modules node.
-
From the navigation tree, click Custom Authentication Module.
-
Click the Create button in the tool bar.
-
Add General Information: Name and optional Description.
-
Add a Step to The Module:
-
Click the Steps subtab.
-
Click the Add button above the Steps table.
-
In the Add New Step dialog box, enter the Step Name and optional Description.
-
Browse for and select the desired custom plug-in name and click OK.
-
Confirm information in the results table.
-
Repeat b through e to add other steps until you have listed all required plug-ins for this module.
-
-
Configure Each Step: Use appropriate values for requested parameters:
-
Click a StepName in the table to reveal required details.
-
Enter valid values for the requested parameters.
-
Click the Save button.
-
Repeat a through c to configure each step appropriately.
-
-
Orchestrate Step Usage:
-
Click the Steps Orchestration subtab.
-
From the InitialStep list, choose the name of the first step to use.
-
Select a StepName in the table.
-
From the OnSuccess List, choose a condition (success or failure) or a step name name.
-
From the OnFailure List, choose the desired condition or a StepName.
-
From the OnError List, choose the desired condition or a StepName.
-
Repeat c through e to orchestrate operations for each plug-in this module.
-
Review your orchestration.
-
-
Initiate Strategy Validation: Click Apply to initiate validation of your orchestration strategy:
-
Successful Strategy: The orchestration strategy is applied and the module is ready to include in an authentication scheme. Continue with Steps 9 and 10.
-
Invalid Strategy: Click OK in the Error box, then edit your OnSuccess, OnFailure, OnError strategies (or add or remove plug-ins) to correct the problem. Repeat this step until your strategy is successful.
-
-
In the navigation tree, confirm the new Custom Authentication Module is listed, and then close the page when you finish.
-
"Creating Authentication Schemes with Custom Authentication Modules".
3.7 Creating Authentication Schemes with Custom Authentication Modules
Users with valid administrator credentials can use the following procedure to create a new authentication scheme that includes a custom authentication module.
This is essentially the same procedure that you would use when creating an authentication scheme with a standard authentication module. The only difference is that you can choose authentication modules with orchestrated steps that are defined to use custom plug-ins.
See Also:
Oracle Fusion Middleware Administrator's Guide for Oracle Access Manager with Oracle Security Token Service for details about authentication schemesCreating a Custom Authentication Module for Custom Plug-ins
To create a custom authentication scheme
-
From the Policy Configuration tab, navigation tree, expand the Shared Components node.
-
Click the Authentication Schemes node, then click the Create button in the tool bar.
-
Fill in the fresh Authentication Scheme page:
-
Name
-
Description
-
Authentication Level
-
Default
-
Challenge Method
-
Challenge Redirect
-
Authentication Module (includes those with custom plug-ins)
-
-
Click Apply to submit the new scheme (or close the page without applying changes).
-
Dismiss the Confirmation window.
-
Optional: Click the Set as Default button to automatically use this with new application domains, then close the Confirmation window.
-
In the navigation tree, confirm the new scheme is listed, and then close the page
3.8 Configuring Logging for Custom Plug-ins
Oracle Access Manager with Oracle Security Token Service uses the WebLogic Server container's logging defaults. To designate a custom Oracle Access Manager-specific logger and log handler with required attributes for custom plug-ins, you can use WLST commands as described here.
To modify the logger and handler for a custom plug-in
-
Confirm that the OAM Server is running.
-
Acquire the custom WLST script for Oracle Access Manager. For example:
<ORACLE_HOME>/common/bin/wlst.sh
-
Connect to the WebLogic Server and log in as the WebLogic administrator. For example:
sh wlst.sh wls:/offline> connect ('adminID','password','adminURL') -
List available loggers for the custom plug-in. For example:
wls:/base_domain/serverConfig> listLoggers(pattern="oracle.oam.*",target="oam_
server1")
Here pattern= represents the oam.controller component and target= represents the desired OAM Server as it was specified during registration.
-
View the list of Oracle Access Manager loggers associated with this OAM Server. For example:
Logger                                      | Level
--------------------------------------------+-----------------
oracle.oam                                  | <Inherited>
oracle.oam.commonutil                       | <Inherited>
oracle.oam.config                           | <Inherited>
oracle.oam.controller                       | <Inherited>
...
-
Modify the oracle.oam.controller log level based on your requirements. For example, TRACE:32 with no persistence:
wls:/base_domain/serverConfig> domainRuntime()
wls:/base_domain/domainRuntime> setLogLevel(logger="oracle.oam.controller",
level="TRACE:32", persist="0", target="oam_server1")
-
Repeat step 4 to list the loggers again and verify the log level change. For example:
wls:/base_domain/serverConfig> listLoggers(pattern="oracle.oam.*",target="oam_
server1")
Logger                                      | Level
--------------------------------------------+-----------------
oracle.oam                                  | <Inherited>
oracle.oam.commonutil                       | <Inherited>
oracle.oam.config                           | <Inherited>
oracle.oam.controller                       | TRACE:32
...
-
Verify the generated log file to confirm the controller is logged at the designated level:
DOMAIN_HOME/server/SERVER_INSTNCE_NAME/logs/
-
Add a custom Oracle Access Manager-specific logger and log handler to specify a log file path and required attributes, as follows:
-
Add oam logger, as follows:
wls:/base_domain/serverConfig> domainRuntime>
wls:/base_domain/domainRuntime> setLogLevel(logger="oracle.oam",level="WAR
NING", persist="0", target="oam_server1")
-
Add a custom log handler and associate it with oam logger, as shown here:
wls:/base_domain/domainRuntime> configureLogHandler(name="oam-log-handler", target="oam_server1", rotationFrequency="daily", retentionPeriod="week", path="${domain.home}/oamlogs", maxFileSize ="10485760", maxLogSize = "104857600",addHandler="true", handlerType="oracle.core.ojdl.logging.ODLHan dlerFactory", addToLogger="oracle.oam") wls:/base_domain/domainRuntime>configureLogHandler(name="oam-log-handler", addProperty="true", propertyName="supplementalAttributes", propertyValue="OAM.USER, OAM.COMPONENT", target="oam_server1") -
Verify that all the OAM logs appear in the DOMAIN_HOME/oamlogs folder.
-
-
Verify the generated log file to confirm the controller is logged at the TRACE:32 level:
DOMAIN_HOME/server/SERVER_INSTNCE_NAME/logs/

