27 Using Segregation of Duties (SoD)
The concept of Segregation of Duties (SoD) is aimed at applying checks and balances on business processes. Each stage of a business process may require the involvement of more than one individual. An organization can convert this possibility into a requirement for all IT-enabled business processes by implementing SoD as part of its user provisioning solution. The overall benefit of SoD is the mitigation of risk arising from intentional or accidental misuse of an organization's resources. This chapter contains the following sections:
27.1 Understanding the SoD Validation Process
Oracle Identity Manager is a user provisioning solution with which entitlement requests can also be validated and managed. In the Oracle Identity Manager implementation of SoD, user requests for IT privileges (entitlements) are checked and approved by an SoD engine and other users. Multiple levels of system and human checks ensure that even changes to the original request are vetted before the request is cleared. This preventive approach helps identify and correct potentially conflicting entitlement assignments before the requested entitlements are assigned.
The SoD validation process in Oracle Identity Manager occurs when a user creates a request for an entitlement on a particular target system. The request is funneled through a resource approval workflow and, if it passes that initial workflow, a resource provisioning workflow.
-
The resource approval workflow is configured to validate requests in real time using an SoD engine. The SoD engine has predefined rules that are used to determine if the entitlement assignment would lead to SoD violations. The determination, once made, is returned to Oracle Identity Manager.
-
The resource provisioning workflow provisions an entitlement request that has passed the resource approval workflow on the target system.
If the user's request passes SoD validation (and an approver approves the request), the resource provisioning workflow is initiated. If the request fails SoD validation, the resource approval workflow can be configured to take remediation steps.
Note:
The resource provisioning workflow can be configured to perform the SoD validation again - immediately before the entitlement assignment is provisioned to the target system - to ensure SoD compliance.
Oracle Identity Manager communicates with both the SoD engine and the target system. In addition, the target system and SoD engine communicate with each other to enable the synchronization of entitlement data. Figure 27-1 shows the flow of data during the SoD validation process.
Figure 27-1 SoD Validation Process in Oracle Identity Manager
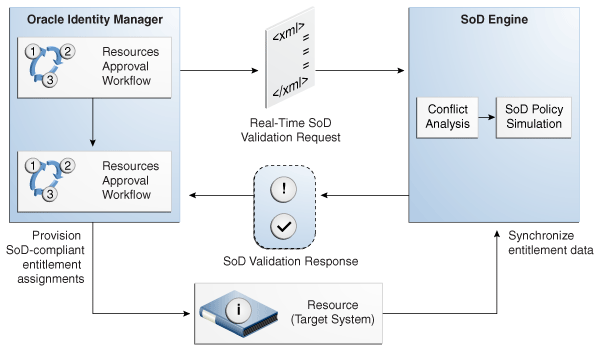
Description of "Figure 27-1 SoD Validation Process in Oracle Identity Manager"
27.2 Introducing the SoD Invocation Library
The SoD Invocation Library (SIL) forms the basis of the SoD implementation in Oracle Identity Manager. The SIL is a collection of Java-based adapters that enable integration with predefined Oracle Identity Manager connectors. The connectors, in turn, link Oracle Identity Manager with the target systems. The following Oracle Identity Manager connectors are preconfigured with adapters for SoD validation:
The SIL also acts as the base for specialized adapters that integrate the SIL with SoD engines. These adapters are called SIL providers. A SIL provider acts as the interface between the SIL and a specific SoD engine. There are predefined SIL providers for the following SoD engines:
-
SIL Provider for SAP GRC
This provider is also known as the SAP GRC SIL Provider. The certified versions of SAP GRC are versions 5.2 SP4 or later and 5.3 SP5 or later.
-
SIL Provider for Oracle Application Access Controls Governor (OAACG) release 8.2.1 or later
This provider is also known as the OAACG SIL Provider.
Note:
Install the latest patch set for OAACG before implementing and using SoD in Oracle Identity Manager. Contact Oracle Support for more information.
-
SIL Provider for Oracle Identity Analytics (OIA) release 11.1.1.3. or higher
Figure 27-2 shows the architecture of SoD implementation in Oracle Identity Manager.
Figure 27-2 Architecture of SoD Implementation in Oracle Identity Manager
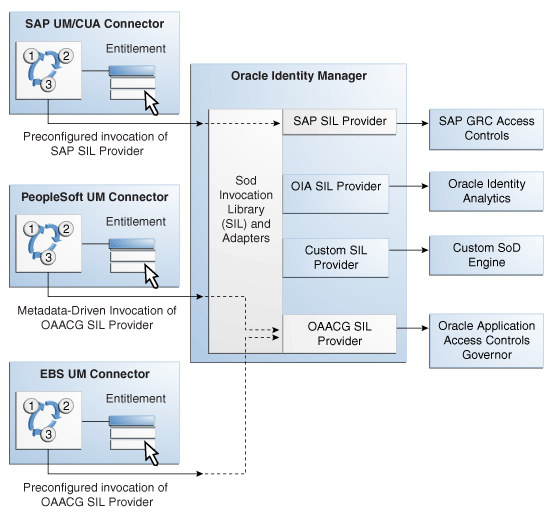
Description of "Figure 27-2 Architecture of SoD Implementation in Oracle Identity Manager"
If required, you can configure any Oracle Identity Manager connector with either the SAP GRC SIL Provider, the OAACG SIL Provider or the OIA SIL Provider. For example, you can use the PeopleSoft User Management connector and the OAACG SIL Provider to automate SoD validation of requests for entitlements on PeopleSoft Enterprise Applications.
You can also create and use a SIL provider for a custom SoD engine, along with either one of the preconfigured Oracle Identity Manager connectors or an Oracle Identity Manager connector that you configure for SoD validation.
27.3 Installing the SoD-enabled Connectors
Instructions to install the SoD-enabled connectors listed below can be found in the specific connector documentation. The Oracle Identity Manager Connectors Documentation page is located at the following UR:
https://download.oracle.com/docs/cd/E11223_01/index.htm
-
Oracle e-Business User Management release 9.1.0 and later
-
SAP User Management release 9.1.0 and later
27.4 Deploying the SIL and SIL Providers
SIL registration is provided by default for the some target systems and SoD engines. No deployment steps are required for these default combinations of target systems and SoD engines. Target systems for which SIL registration is provided include:
-
EBS and OAACG
-
PSFT and OAACG
-
SAP and SAP-GRC
-
OIA
OIA SoD Engine synchronizes data with Oracle Identity Manager rather than any target system so the topology registered for OIA can be used with any connector configured with Oracle Identity Manager. OIA imports all data from Oracle Identity Manager. Therefore, from OIA perspective, Oracle Identity Manager is the target system.
You must perform the SIL registration process if you want to use any other combination of target systems or SoD engines. For more information, see Section 27.10, "Custom Combination of Target Systems and SoD Engines."
27.5 Configuring the SoD Engine
You must import entitlement data from the target system to the SoD engine. If required, you must also configure SoD validation rules on the SoD engine. The following sections provide these instructions for the preconfigured SoD engines.
27.5.1 Configuring Oracle Application Access Controls Governor
Configuring Oracle Application Access Controls Governor (OAACG) involves the following procedures:
-
Creating an Oracle Application Access Controls Governor Account for SoD Operations
-
Defining Access Policies in Oracle Application Access Controls Governor
Installing Oracle Application Access Controls Governor
OAACG 8.6.x is supported with Oracle Identity Manager 11g Release 1 (11.1.1.4) onward. OAACG 8.6.0.203 is the recommended version that must be installed. Further, this must be upgraded to OAACG 8.6.0.219 or OAACG 8.6.0.240.
To install OAACG 8.6.0.203:
-
Logon to My Oracle Support.
-
Click the Patches & Updates tab.
-
Click Advanced Search.
-
Select Product Family as Oracle Application Access Controls Governor and release as AACG 8.6.0. Select the appropriate platform, and click Search.
-
Select latest patch. See the Oracle Identity Manager Bundle Patch Readme to confirm if this is 8.6.0.219 or 8.6.0.240.
Note:
Oracle Identity Manager SoD has been certified against OAACG 8.6.0.219 and OAACG 8.6.0.240.
-
Download the patch or update.
-
Perform the OAACG upgrade by referring to the OAACG upgrade guide.
OAACG 8.6.0.203 must be upgraded to OAACG 8.6.0.219 or OAACG 8.6.0.240. To do so:
-
Logon to My Oracle Support.
-
Click the Patches & Updates tab.
-
Search for the Patch ID.
-
Select the Patch ID.
-
Download the patch or update.
-
Perform the OAACG upgrade by referring to the OAACG upgrade guide.
Creating an Oracle Application Access Controls Governor Account for SoD Operations
Create an account of the Basic type for SoD validation operations. While performing the procedure described in "Creating an IT Resource to Hold Information about the SoD Engine", provide the user name and password of this account.
See Oracle Application Access Controls Governor documentation for information about creating the account.
Synchronizing Role and Responsibility Data from Oracle e-Business Suite to Oracle Application Access Controls Governor
You must import (synchronize) role and responsibility data from Oracle e-Business Suite into Oracle Application Access Controls Governor. After first-time synchronization, you must schedule periodic synchronization of data.
See Oracle Application Access Controls Governor documentation for more information.
Defining Access Policies in Oracle Application Access Controls Governor
After you import role and responsibility data, set up access policies in Oracle Application Access Controls Governor. These access policies are based on various combinations of roles and responsibilities.
See Oracle Application Access Controls Governor documentation for more information.
27.5.2 Configuring SAP GRC
SAP GRC uses user, role, and profile data from SAP R/3 to validate requests for accounts, roles, and responsibilities. Configuring SAP GRC involves the following procedures:
Creating an SAP GRC Account for SoD Operations
You must create an SAP GRC account for SoD operations. During SoD operations, this account is used to call the SAP GRC Web service.
When you create this user account, you must assign it to the following groups:
-
Everyone
-
Authenticated Users
You must not assign any roles to this account.
To generate the keystore:
-
In a Web browser, open the Web Services Navigator page of SAP GRC Access Control. The URL is similar to the following:
https://SAP_GRC_HOST:PORT_NUMBER/VirsaCCRiskAnalysisService/Config1?wsdl
-
Export the certificate.
-
Copy the certificate into the bin directory inside the JDK installation directory of SAP GRC.
-
Run the following command to create the keystore from the certificate file that you download:
keytool -import -v -trustcacerts -alias sapgrc -file CERTIFICATE_FILENAME -keystore sgil.keystore -keypass changeit -storepass changeitNote:
In this sample command, the keystore file name is sgil.keystore.
-
When prompted for the keystore password, specify
changeit. This is the default keystore password. -
When prompted to specify whether you want to trust the certificate, enter
yes. -
The sgil.keystore file is created in the bin directory. Copy the file to the OIM_HOME/config directory.
Configuring the Risk Terminator
The Risk Terminator is a feature of GRC Access Control. It is the main component of the SoD validation functionality of SAP GRC. Whenever a role is created in the profile generator or assigned to a user, the Risk Terminator verifies if this role creation or assignment would result in an SoD violation.
See the Risk Terminator Configuration document for detailed information.
Synchronizing User, Role, and Profile Data from SAP ERP to SAP GRC
User, role, and profile data must be imported (synchronized) from SAP ERP into SAP GRC. After first-time synchronization, you must schedule periodic synchronization of data.
Defining Risk Policies in SAP GRC
After you import role and responsibility data, use the Risk Analysis and Remediation feature of SAP GRC to define risk policies of type Segregation of Duty.
See SAP GRC documentation for more information.
27.5.3 Configuring Oracle Identity Analytics
Configuring Oracle Identity Analytics involves the following procedures:
-
Creating an Oracle Identity Analytics Account for SoD Operations
-
Synchronizing Oracle Identity Manager Metadata With Oracle Identity Analytics
-
Defining Identity Audit Policies in Oracle Identity Analytics
Creating an Oracle Identity Analytics Account for SoD Operations
Create an account on Oracle Identity Analytics and assign to it the SRM Admin role for SoD validation operations. When performing the procedure described in "Creating an IT Resource to Hold Information about the SoD Engine", provide the user name and password of this account.
See the Oracle Identity Analytics documentation for information about creating the account.
Note:
The Oracle Identity Analytics Admin account with username rbacxadmin can also used.
Synchronizing Oracle Identity Manager Metadata With Oracle Identity Analytics
Import the resource metadata and resources from Oracle Identity Manager to Oracle Identity Analytics.
See the Oracle Identity Analytics documentation for more information.
Defining Identity Audit Policies in Oracle Identity Analytics
Set up identity audit rules and policies using Oracle Identity Analytics. Rules are created on the resource attributes. For entitlement SoD Check, give encoded values for roles and responsibilities as in Oracle Identity Manager.
See the Oracle Identity Analytics documentation for more information.
27.6 Enabling and Disabling SoD
The following sections contain information on enabling and disabling SoD.
27.6.1 Enabling SoD
To enable the SoD feature:
-
Set the Segregation of Duties (SOD) Check Required system property to
true. See "Administering System Properties" in the Oracle Fusion Middleware Administrator's Guide for Oracle Identity Manager for information about system properties. -
Set the
topologyNameparameter in the Connector IT Resource instance to the value present inSILConfig.xml. If you are using default SIL registration, set thetopologyNameparameter in connector IT Resource to one of the following:-
sodoaacgif you are using the EBS connector and OAACG as the SoD engine -
oaacgpsftif you are using the PSFT connector and OAACG as the SoD engine -
sodgrcif you are using GRC as the SoD engine -
sodoiaif you are using OIA as the SoD engine
Note:
Connector IT resource must have the ALL USERS role so that any user is able to access the IT Resource information. This is required for SOD requests raised by users.
-
-
Deploying SIL and SIL Providers
To deploy SIL and SIL providers for default combination of target systems and SoD engines:
-
Create a new IT Resource for Sod Engine with the name (type) as follows:
-
For EBS-OAACG: OAACG-ITRes (eBusiness Suite OAACG)
-
For SAP-GRC: GRC-ITRes (SoD Provider)
-
For OIA: IT resource with name OIA-ITRes (OIA) is predefined.
-
For PSFT-OAACG: IT resource with name PSFT-OAACG-ITRes(OAACG) is predefined.
-
-
Edit the created IT Resource as described in "Creating an IT Resource to Hold Information about the SoD Engine".
Note:
-
To configure with OAACG8.5, add a new field to this IT resource with name as
sodServerURLand value http(s)://HOST_NAME:PORT/URI, where URL isgrcc/services/GrccService. For OAACG8.2.1, the value of URL isags/services/AGService. -
See "Administering System Properties" in the Oracle Fusion Middleware Administrator's Guide for Oracle Identity Manager for information about how to set system property values.
-
-
-
Enabling SoD in Direct Provisioning and Access Policy Based Provisioning:
SoD is enabled only if Holder and SODChecker tasks are present in the provisioning workflow.
Enabling SoD in Request Provisioning:
Steps 1 and 2 enables default SoD check in approval. The default SoD check is performed before the request goes for approval. If the SoD check is required after one level of approval, then default SoD check approval workflow, which is DefaultSODApproval, must be attached by creating an approval policy. SoD check can also be performed in any approval workflow on demand. This can be done by calling the SoD check Web service from BPEL. For more information, see "Modifying the Approval Workflow for SoD".
Note:
If DefaultSODApproval workflow is attached to operational level of approval, then the system administrator first needs to approve, and then only SoD Check is performed. After SoD Check is performed, approval is required by SoD Administrators role. According to this workflow, first approval task is generated that is assigned to the system administrator, then SoD Check is performed, and then an approval task is generated. Any user who is a member of the SoD Administrators role can approve the second approval task after viewing the SoD Check results.
-
Adding CSF Credentials for SoD Check:
-
Login to the Enterprise Manager console and on the left tab, expand Weblogic Domain.
-
Open base_domain.
-
On top of the right pane, from the WebLogic Domain list, select Security, and then open Credentials.
-
Select the Create Key option, and then select Map 'oim'.
-
Provide the key as sodcheck.credentials, and select Type as Password.
-
Provide Username as oiminternal and password as not used. Click OK to save the key.
-
27.6.2 Disabling SoD
You can disable SoD by performing any one of the following:
-
Set the Segregation of Duties (SOD) Check Required system property to
false. -
Remove the value of the topologyName parameter for the connector IT Resource so that its value is set to blank. If the topologyName parameter in ITResource is set to None, then SoD check is not performed.
Disabling SoD in Direct Provisioning and Access Policy Based Provisioning
Disable the Holder and SODChecker process tasks.
See Also:
The connector guide for detailed information about disabling these process tasks.
Disabling SoD in Request Provisioning
For disabling the default SoD check in approval, you can perform any one of the steps to disable SoD. If you want to perform the default SoD check in approval and only disable the SoD check in BPEL, then remove approval policy for SoD or remove call to SoD Check Web service from the approval workflow.
27.7 Enabling SSL Communication
The following sections contain information on enabling Secure Sockets Layer (SSL) communication for various SoD purposes.
27.7.1 Enabling SSL Between Oracle Application Access Controls Governor and Oracle Identity Manager
To enable SSL communication between Oracle Application Access Controls Governor and Oracle Identity Manager:
Note:
It is assumed that you have set sslEnable to true during the registration process.
-
Export the certificate on the Oracle Application Access Controls Governor host computer as follows:
Note:
In Step 1, JAVA_HOME refers to the directory on the Oracle Application Access Controls Governor host computer.
-
Run the following commands from the JAVA_HOME/bin directory:
keytool -genkey -alias tomcat -keyalg RSA -keystore JAVA_HOME/lib/security/.keystore
keytool -certreq -alias tomcat -file JAVA_HOME/lib/security/xell.cvs -keystore JAVA_HOME/lib/security/.keystore
keytool -export -alias tomcat -file JAVA_HOME/lib/security/server.cert -keystore JAVA_HOME/lib/security/.keystore
After you run these commands, the server certificate (server.cert) is created in the JAVA_HOME/lib/security directory.
-
In the TOMCAT_HOME/conf/server.xml file, enter the details of the keystore as attributes of the Connector element. See the following example:
<Connector port="8443" maxHttpHeaderSize="8192" maxThreads="150" minSpareThreads="25" maxSpareThreads="75" enableLookups="false" disableUploadTimeout="true" acceptCount="100" scheme="https" secure="true" clientAuth="false" sslProtocol="TLS" keystoreFile="JAVA_HOME/lib/security/.keystore"> -
Restart Oracle Application Access Controls Governor.
-
-
Import the certificate on the Oracle Identity Manager host computer as follows:
Note:
In Step 2, JAVA_HOME refers to the directory on the Oracle Identity Manager host computer.
-
Copy the server certificate created on the Oracle Application Access Controls Governor host computer to the JAVA_HOME/lib/security directory of the Oracle Identity Manager host computer.
-
Run the following command from the JAVA_HOME/bin directory:
keytool -import -alias oaacg_trusted_cert -file JAVA_HOME/lib/security/server.cert -trustcacerts -keystore JAVA_HOME/lib/security/cacerts -storepass changeit
-
27.7.2 Enabling SSL Between SAP GRC and Oracle Identity Manager
To enable SSL communication between SAP GRC and Oracle Identity Manager export the certificate on the SAP GRC host computer as follows:
Note:
In this section, JAVA_HOME refers to the directory on the Oracle Identity Manager host computer that is used to run the application server.
-
In a Web browser, open the Web Services Navigator page of SAP GRC Access Control. The URL is similar to the following:
https://mysapserver01:50001/VirsaCCRiskAnalysisService/Config1?wsdl
-
The next step depends on the browser that you are using:
-
On Microsoft Internet Explorer: In the Security Alert dialog box, click View Certificate. On the Details tab of the dialog box, use the Copy to file button to export the certificate.
-
On Mozilla Firefox: Export the certificate as a
.pemfile. To be able to perform this step, you might need to download and install the Certificate Viewer enhancement from the Mozilla Web site.
-
-
Copy the certificate into the JAVA_HOME/lib/security directory used by the application server hosting Oracle Identity Manager.
-
In a terminal window, change to the JAVA_HOME/bin directory.
-
Run the following command to import the GRC certificate to cacerts:
keytool -import -alias sapgrc_trusted_cert -file JAVA_HOME/lib/security/CERTIFICATE_FILENAME -trustcacerts -keystore JAVA_HOME/lib/security/cacerts -storepass changeit
In this command:
-
CERTIFICATE_FILENAME is the name of certificate that has been exported from the SAP GRC host computer
-
The
-storepass changeitclause specifies the password for the cacerts keystore.
-
-
When prompted to specify whether or not you want to trust the certificate, enter
yes.The "Certificate was added to keystore" message is displayed.
27.7.3 Calling SoD Check Web Service Over SSL
SOA calls the Oracle Identity Manager Web service over the URL given as the oimFrontEndURL, which is the URL used to access the Oracle Identity Manager UI, in the oim-config.xml file. By default, this is a HTTP URL. You can change this to HTTPS so that communication takes place over SSL. The SSL port for Oracle Identity Manager can be viewed on the WebLogic Administrative Console.
To call SoD check Web service over SSL:
-
Locate the Oracle Identity Manager SSL port. To do so:
-
Login to the WebLogic Administrative Console.
-
Go to servers, oim_server1. You can see that SSL Listen Port is enabled.
-
-
Change the oimFrontEndURL through the MBeans browser in Enterprise Manager. To do so:
-
Login to Enterprise Manager.
-
Go to oim_server1.
-
From the list on the top of the page, select System Mbeans Browser.
-
Go to Application Defined Mbeans, oracle.iam, Server: oim_server1, Application: oim, XMLConfig, Config, XMLConfig.DiscoveryConfig, and Discovery. The attributes are displayed to the right.
-
Click oimFrontEndURL, and change its value, as shown:
https://HOST_NAME:SSL_PORT
Note:
The value of oimFrontEndURL can also be set at the time of installing Oracle Identity Manager.
-
-
Restart Oracle Identity Manager.
-
Create a request for SoD-enabled resource. You can view the new workflow instance in Enterprise Manager. The Web service will be called on SSL port.
Note:
It is assumed that Oracle Identity Manager and SOA are running on the same Java Runtime Environment (JRE). If SOA and Oracle Identity Manager are running on different JREs, then WebLogic certificate exchange is required for SSL communication. For details, see Oracle WebLogic Server 10g Release 3 (10.3) documentation in the Oracle Technology Network (OTN) Web site by using the following URL:
http://www.oracle.com/technetwork/middleware/weblogic/documentation/index.html
27.8 Configuring Workflows on Non SoD-enabled Connectors
Perform the procedures described in this section only if you are not using one of the preconfigured SoD-compatible connectors (Oracle e-Business User Management, SAP User Management, and SAP CUA). This section discusses the following procedures:
27.8.1 Modifying the Approval Workflow for SoD
To modify the approval workflow for SoD validation:
-
Instead of object forms in earlier releases of Oracle Identity Manager, the data to be entered while creating a request in 11g Release 1 (11.1.1) is entered in request datasets. If the request datasets are not already present for the target system resource to be provisioned, then create new parent and child datasets and import them to MDS by using the MDS Import Utility.
Note:
-
No SoD Check fields must be added in the request dataset. These fields are part of common dataset and is available by default irrespective of the connector being used. The SoD fields in the common dataset are
<!-- Common SoD check attributes used for Provision Resource -->
<AttributeReference name="SoDCheckStatus" attr-ref="SoDCheckStatus" length="50" type="String" widget="text" read-only="true" available-in-bulk="false" system-type="true"/>
<AttributeReference name="SoDCheckTrackingID" attr-ref="SoDCheckTrackingID" length="50" type="String" widget="text" read-only="true" available-in-bulk="false" system-type="true"/>
<AttributeReference name="SoDCheckResult" attr-ref="SoDCheckResult" length="4000" type="String" widget="text" read-only="true" available-in-bulk="false" system-type="true"/>
<AttributeReference name="SoDCheckTimestamp" attr-ref="SoDCheckTimestamp" length="50" type="Date" widget="text" read-only="true" available-in-bulk="false" system-type="true"/>
<AttributeReference name="SoDCheckEntitlementViolation" attr-ref="SoDCheckEntitlementViolation" length="4000" type="String" widget="text" read-only="true" available-in-bulk="false" system-type="true"/>
Here, the <attr-ref> tag values represent mapping to process form fields. Therefore, any connector enabled for SoD must have these specific form field labels in the parent process form. For example, SoDCheckStatus attribute value is mapped to parent process form field with label as SoDCheckStatus.
-
For detailed information about request datasets, see "Step 1: Creating a Request Dataset for the Resources".
-
For information about MDS Import/Export Utility, see Chapter 33, "MDS Utilities and User Modifiable Metadata Files".
-
Object forms in earlier releases of Oracle Identity Manager have been replaced by request datasets in 11g Release 1 (11.1.1). Therefore, although the object forms may be present in the connector, they are not used.
The following is a sample request dataset for the eBusiness Suite User TCA Foundation resource. Create an appropriate request dataset for the resource being used.
<request-data-set xmlns="http://www.oracle.com/schema/oim/request/"
       xmlns:xsi="http://www.w3.org/2001/XMLSchema-instance"
       xsi:schemaLocation="http://www.oracle.com/schema/oim/request/"
       name="eBusiness Suite User TCA Foundation"    entity="eBusiness Suite User TCA Foundation" operation="PROVISION">

        <!-- Parent form having fields -->

        <AttributeReference name="Effective Date From" attr-ref="Effective Date From" type="Date" length="50" widget="date" required="true" available-in-bulk="true"/>
        <AttributeReference name="SSO GUID" attr-ref="SSO GUID" type="String" length="256" widget="text" required="false" available-in-bulk="true"/>
        <AttributeReference name="Last Name" attr-ref="Last Name" type="String" length="150" widget="text" required="false" available-in-bulk="true"/>
        <AttributeReference name="EBS Server" attr-ref="EBS Server" type="String" length="50" widget="itresource-lookup" available-in-bulk="true" itresource-type="eBusiness Suite UM" required="true"/>
        <AttributeReference name="Password Expiration Interval" attr-ref="Password Expiration Interval" type="Long" length="50" widget="text" required="false" available-in-bulk="true"/>
        <AttributeReference name="Fax" attr-ref="Fax" type="String" length="80" widget="text" required="false" available-in-bulk="true"/>
        <AttributeReference name="Password" attr-ref="Password" type="String" length="30" widget="text" masked="true" required="true" available-in-bulk="true"/>
        <AttributeReference name="Effective Date To" attr-ref="Effective Date To" type="Date" widget="date" length="50" required="false" available-in-bulk="true"/>
        <AttributeReference name="Description" attr-ref="Description" type="String" length="240" widget="text" required="false" available-in-bulk="true"/>
        <AttributeReference name="Password Expiration Type" attr-ref="Password Expiration Type" type="String" length="30" widget="lookup" required="false" available-in-bulk="true" lookup-code="Lookup.EBS.PasswordExpirationType"/>
        <AttributeReference name="SSO User ID" attr-ref="SSO User ID" type="String" length="256" widget="text" required="false" available-in-bulk="true"/>
        <AttributeReference name="User Name" attr-ref="User Name" type="String" length="100" widget="text" required="true" available-in-bulk="true"/>
        <AttributeReference name="First Name" attr-ref="First Name" type="String" length="150" widget="text" required="false" available-in-bulk="true"/>
                <AttributeReference name="Party ID" attr-ref="Party ID" type="Long" widget="text" length="50" required="false" available-in-bulk="true"/>
        <AttributeReference name="User ID" attr-ref="User ID" type="Long" widget="text" length="50" required="false" available-in-bulk="true"/>
        <AttributeReference name="Email" attr-ref="Email" type="String" length="240" widget="text" required="false" available-in-bulk="true"/>


            <!--  Child form EBS -->
        <AttributeReference name="UD_EBST_RSP" attr-ref="UD_EBST_RSP" type="String" length="20" widget="text" available-in-bulk="true">
        <AttributeReference name="Effective Start Date" attr-ref="Effective Start Date" type="Date" length="50" widget="date" required="false" available-in-bulk="true"/>
        <AttributeReference name="Effective End Date" attr-ref="Effective End Date" type="Date" length="50" widget="date" required="false" available-in-bulk="true"/>
        <AttributeReference name="Application Name" attr-ref="Application Name" type="String" length="256" widget="lookup" required="false" available-in-bulk="true" lookup-code="Lookup.EBS.Application"/>
        <AttributeReference name="Responsibility Name" attr-ref="Responsibility Name" type="String" length="256" widget="lookup-query" available-in-bulk="true" required="true">
        <lookupQuery lookup-query="select lkv_encoded as lkv_encoded,lkv_decoded as lkv_decoded from lkv lkv,lku lku where lkv.lku_key=lku.lku_key and
lku_type_string_key='Lookup.EBS.Responsibility' and instr(lkv_encoded,concat('$Form data.Application Name','~'))>0" display-field="lkv_decoded" save-field="lkv_encoded"/>
            </AttributeReference>

        </AttributeReference>

        <AttributeReference name="UD_EBST_RLS" attr-ref="UD_EBST_RLS" type="String" length="20" widget="text" available-in-bulk="true">
        <AttributeReference name="Start Date" attr-ref="Start Date" type="Date" widget="date" length="50"  required="false" available-in-bulk="true"/>
        <AttributeReference name="Expiration Date" attr-ref="Expiration Date" type="Date" widget="date" length="50" required="false" available-in-bulk="true"/>

        <AttributeReference name="Application Name" attr-ref="Application Name" type="String" length="256" widget="lookup" required="false" available-in-bulk="true" lookup-code="Lookup.EBS.Application"/>
        <AttributeReference name="Role Name" attr-ref="Role Name" type="String" length="256" widget="lookup-query" available-in-bulk="true" required="true">
<lookupQuery lookup-query="select lkv_encoded as lkv_encoded,lkv_decoded as lkv_decoded from lkv lkv,lku lku where lkv.lku_key=lku.lku_key and
lku_type_string_key='Lookup.EBS.UMX.Roles' and instr(lkv_encoded,concat('$Form data.Application Name','~'))>0" display-field="lkv_decoded" save-field="lkv_encoded"/>
          </AttributeReference>
     </AttributeReference>
</request-data-set>
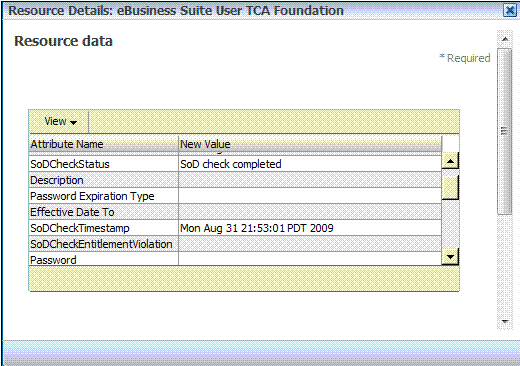
Figure 27-3 shows the SoD Check attributes system attributes as displayed in the request details page after SoD Check is completed:
Figure 27-3 The SoDCheckAttributes System Attributes
Description of "Figure 27-3 The SoDCheckAttributes System Attributes"
-
-
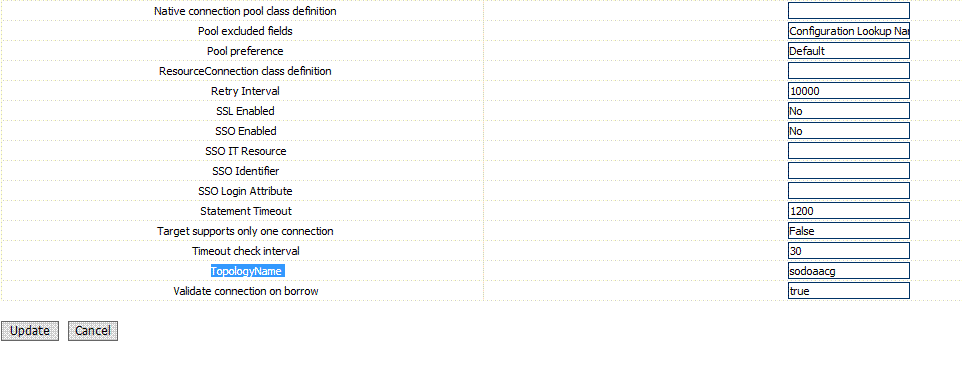
In the IT resource of the connector, create the TopologyName parameter if it does not already exist. Figure 27-4 shows a sample IT resource in which this parameter has been added:
If SoD Check property is set to
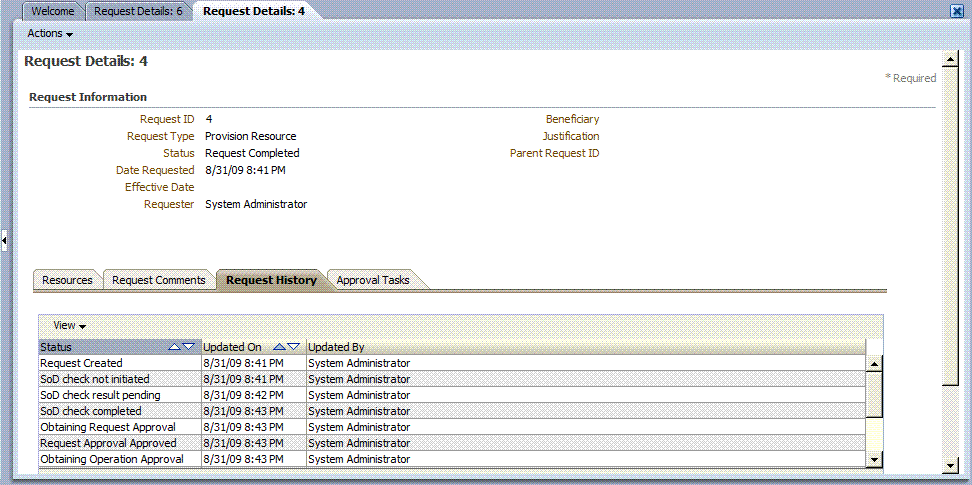
trueand topologyName parameter is set to the appropriate value in the connector IT Resource, then default SoD Check is performed in the preprocess stage of the approval workflow. After the request is created, the request status is changed toSoD check result pendingfor asynchronous SoD check andSoD check completedstatus for synchronous SoD check. For asynchronous SoD check, the Get SOD Check Results Approval scheduled job must be run to complete the SoD check.Note:
If there is an error while performing SoD check, then the SoD Check Status attribute in the request dataset is set to
SoD check completed with errorand the request moves for approval. Final decision is on the approver whether or not to approve the request although SoD check is not performed successfully.Figure 27-5 shows the request history for asynchronous SOD check:
Figure 27-5 Request History for Asynchronous SoD Check
Description of "Figure 27-5 Request History for Asynchronous SoD Check"
-
In addition to the SoD check being triggered by default before any level of approval, it can be triggered by attaching the predefined DefaultSODApproval workflow. The workflow can be attached to the operational level of approval by creating an approval policy.
Note:
In Oracle Identity Manager 11g, patches were required on SOA and WebLogic Server to allow the SoD workflow to work. No patch is required with the release of Oracle Identity Manager 11g PS1.
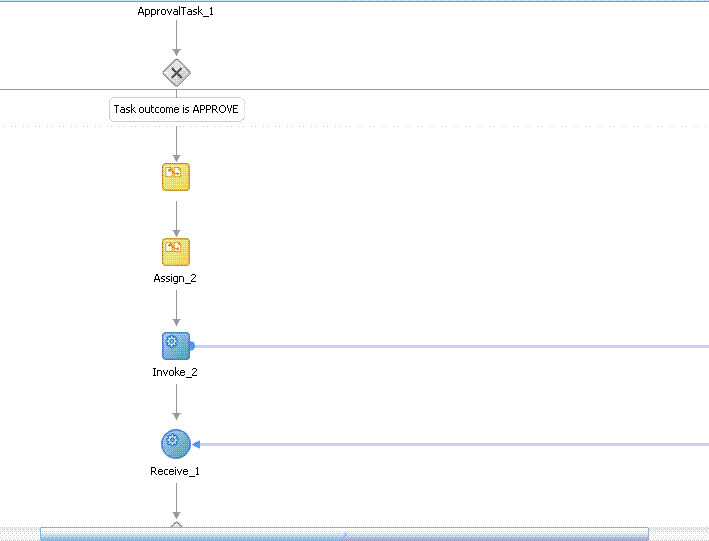
For using the default workflow, see "Appying the Workflow By Using Approval Policy". This workflow contains an approval task that is assigned to the system administrator. After this approval task, a call is made to the asynchronous SoDCheck Web service to start SoD check. To complete and callback the SoDCheck Web service, you must run the 'Get SOD Check Results Approval scheduled job. The workflow with SoDCheck Web service call is shown in Figure 27-6.
Note:
There are three levels of approval for any request: template-level approval, request-level approval, and operational-level approval. DefaultSODApproval workflow must only be attached at the operational level. For bulk requests, the request-level approval is common for all resources and users. After this level of approval, separate requests are created for each combination of resource and user. The workflow performs SoD check separately for each resource and user at a time.
The workflow is useful when SoD Check is required after request-level approval. One such instance is when the connector IT resource information is entered by the approver. Here, the IT Resource field in the request dataset is made approver-only, as shown below:
<AttributeReference name="EBS Server" attr-ref="EBS Server" type="String" length="50" widget="itresource-lookup" available-in-bulk="true" itresource-type="eBusiness Suite UM" required="true" approver-only="true"/>
In this example, the IT resource information is not available when the request is raised. It is available only after the approver enters it. If it is entered during request-level approval, then the DefaultSODApproval workflow can be used at operational level.
Figure 27-6 Workflow with SoDCheck Web Service Call
Description of "Figure 27-6 Workflow with SoDCheck Web Service Call"
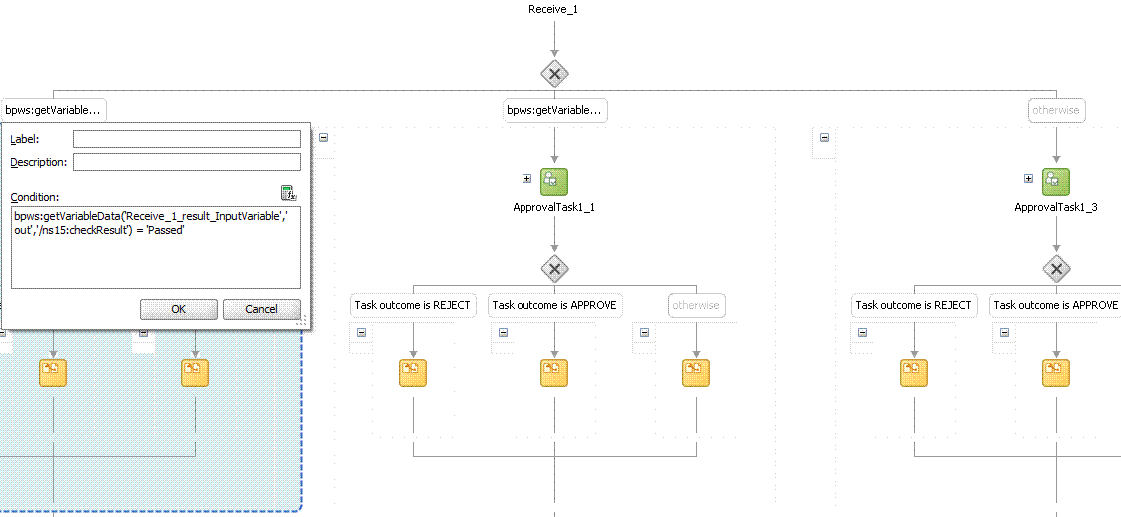
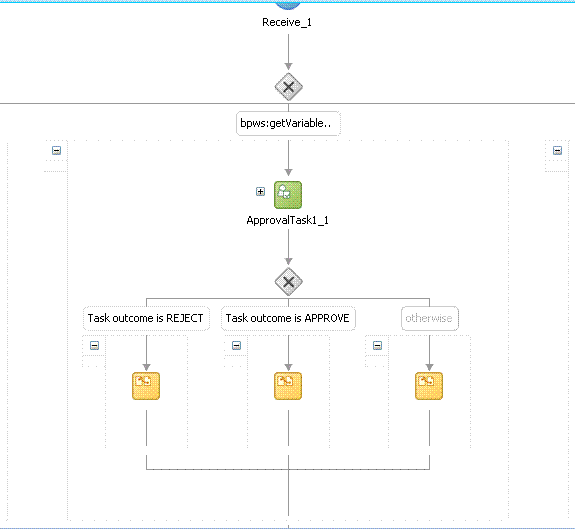
After this, a switch case with approval tasks are assigned to the SoD Administrators role. Any user that has this role can claim the task and approve it. The switch is based on whether the SoD check result has passed or failed, as shown in Figure 27-7:
Figure 27-7 Switch Case With Approval Tasks
Description of "Figure 27-7 Switch Case With Approval Tasks"
Figure 27-8 shows the assignment of the approval task.
Figure 27-8 Assignment of the Approval Task
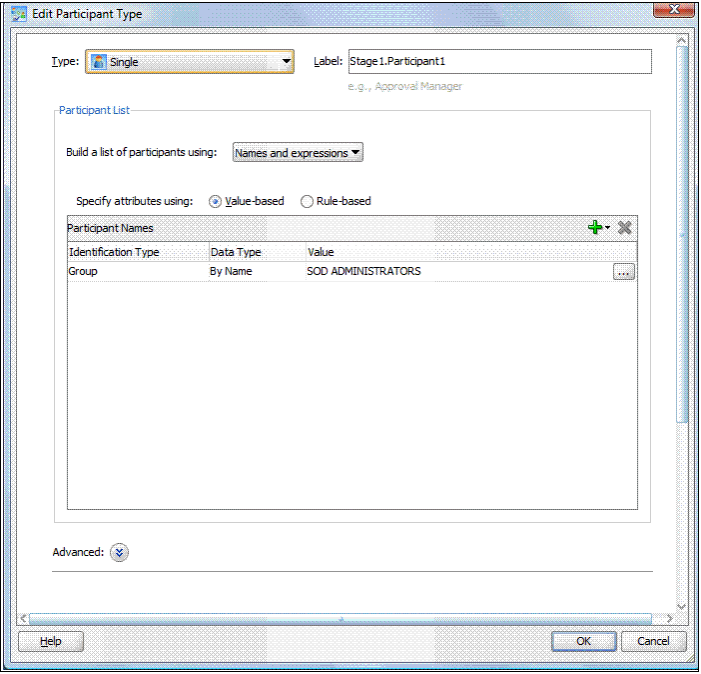
Description of "Figure 27-8 Assignment of the Approval Task"
Approval workflow has migrated to BPEL in Oracle Identity Manager 11g Release 1 (11.1.1), and therefore, you must use JDeveloper to view or modify the default workflows. The default SoD workflow is available in the OIM_HOME/workflows/composites/DefaultSODApproval.zip file. You can unzip this file and open the DefaultSODApproval.jpr in JDeveloper. In addition, you can create a new workflow by modifying any of the default approval workflows to call the SoD Check Web service and start SoD check on demand. To do so:
Creating and Deploying Workflows on SOA
-
Create a new workflow project by running OIM_HOME/workflows/new-workflow/new_project.xml.
Here:
-
WEBLOGIC_HOME is the directory on which Oracle WebLogic Server is installed.
-
NEW_PROJECT is the name of the new project that you want to create.
To create the new workflow project, run the following command:
ant -f new_project.xmlThis prompts for Project Name, Application Name, and Service Name for the new workflow name. Provide any name, such as SODWorkflow for all three. This creates a new project with the provided name in the workflows/new-workflow/process-template/ directory.
-
-
Navigate to process-template/APPLICATION_NAME/PROJECT_NAME/ and open PROJECT_NAME.jpr from JDevepoler, where APPLICATION_NAME and PROJECT_NAME are the names of the application and project respectively.
The PROJECT_NAME.jpr workflow is same as the DefaultRequestApproval workflow. You can modify this workflow to call the SoDCheck Web Service. Figure 27-9 shows the default workflow modified to perform SoD Check after human approval:
Figure 27-9 Modified Workflow To Perform SoD Check
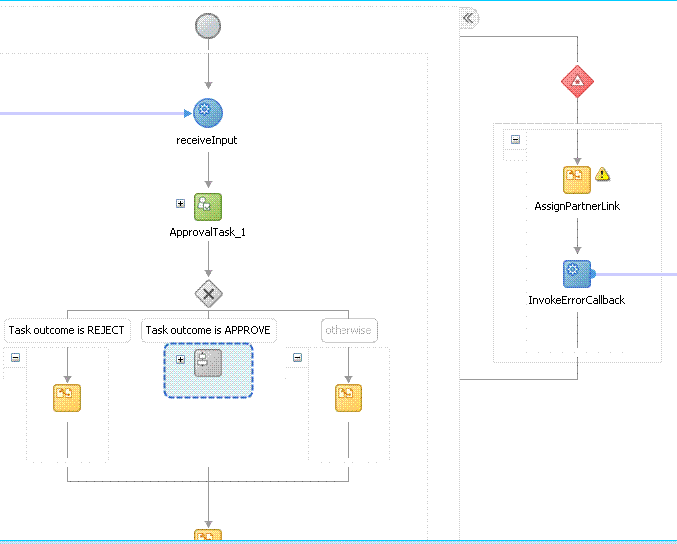
Description of "Figure 27-9 Modified Workflow To Perform SoD Check"
-
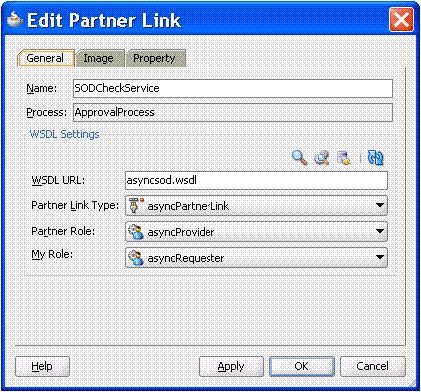
Extract OIM_HOME/workflows/composites/DefaultSODApproval.zip and copy asyncsod.wsdl from the extracted directory to OIM_HOME/workflows/ process-template/APPLICATION_NAME/PROJECT_NAME/. Add a Web service, such as SODCheckService1, in the composite.xml and provide the asyncsod.wsdl as the WSDL file. The SoDCheck partner link is as shown in Figure 27-10:
Note:
BPEL connects to all external entities through a partner link.
-
In the ApprovalProcess.bpel design, include the following BPEL activities:
-
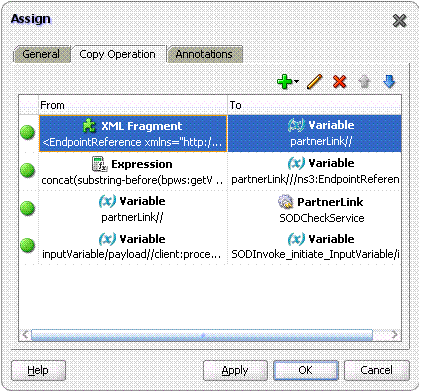
ASSIGN: An assign activity must be added before calling the SoD Check Web Service. This activity initializes the parameters required to call the Web Service. To create an assign activity:
i) Drag and drop the activity in the BPEL process opened in JDeveloper.
ii) After the activity is created, double-click the activity, and click the Copy Operation tab.
iii) Click Add, and then select Copy Operation. Provide the values for the variables, as shown in Table 27-1:
Table 27-1 Variables to Assign
Copy From Copy To XML Fragment
<EndpointReference xmlns="http://www.w3.org/2005/08/addressing">
    <Address/>
</EndpointReference>
Variable
partnerlink
Expression
concat(substring-before(bpws:getVariableData('inputVariable','payload','/client:process/ns1:url'), "/workflowservice/CallbackService"), '/sodcheck/SoDCheckInitiateService')
Partnerlink, EndpointReference, Address
Variable
partnerlink
Partner Link
SODCheckService1
Variable
Payload, RequestId
Variable
SODInvoke_initiate_InputVariable, where SODInvoke_initiate_InputVariable is the variable defined in Invoke BPEL Activity
The following figures show the values to be added:
Figure 27-11 shows the final assign activity:
-
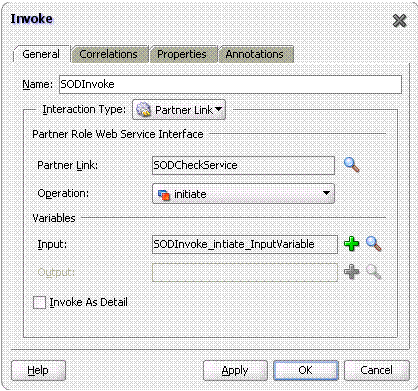
INVOKE: The details for this activity are:
Interaction Type: Partnerlink
Partnerlink: SODCheckService
Operation: Initiate
Input Variable: SODInvoke_initiate_InputVariable
Figure 27-12 shows the Invoke dialog box with sample values in the fields:
-
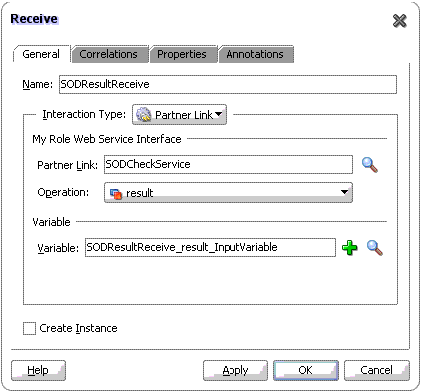
RECEIVE: The details for this activity are:
Interaction Type: Partnerlink
Partnerlink: SODCheckService
Operation: Result
Variable: SODResultReceive_result_InputVariable
Figure 27-13 shows the Receive dialog box with sample values in the fields:
-
SWITCH: This activity is to switch between workflows based on SODCheck Result. The switch case is as shown in Figure 27-14:
-
New Human Tasks: A new human task may be created and assigned to an approver other then the system administrator. The new approval task is same as the old one already present in the workflow, except that the approver is different. This human task is used in the switch case. For example, if the SoD check passes, then the approval task can be assigned to a role. If the SoD check fails, then the approval task can be assigned to the SOD administrators role. DefaultSODApproval always assigns approval task to the SoD administrators role.
Note:
The SoDCheck Web service can be called multiple times.
-
-
Applying SAML policy for request and callback for the AsyncSoD Web service:
OWSM SAML token with Message Protection Policy, which is based on Security Assertion Markup Language (SAML), is used as security policy for message protection in asynchronous calls for SoD checks from the SOA composite to Oracle Identity Manager. In asynchronous SoD check Web service, it is mandatory to use SAML token with Message Protection Client Policy for Request and SAML token with Message Protection Service Policy for Callback, as described in this section.
To apply SAML token with Message Protection Client policy for request:
i) Right-click AsynchSoD Web service, and select Configure WS Policies, and then select For Request, as shown in Figure 27-15:
Figure 27-15 Configuring WS Policies for Request
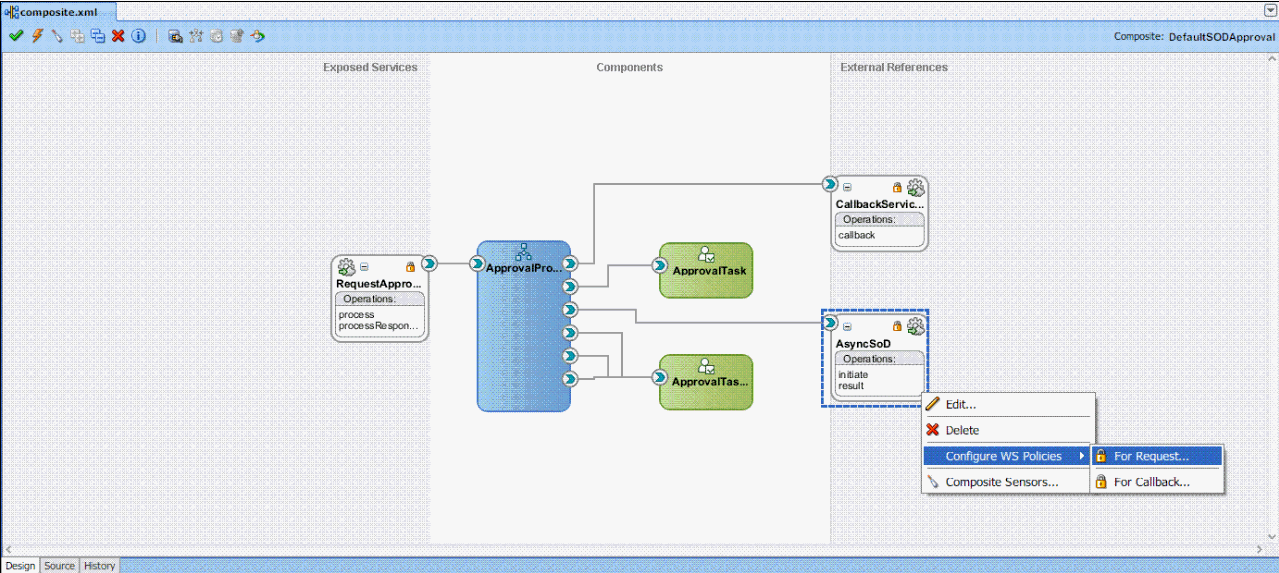
Description of "Figure 27-15 Configuring WS Policies for Request"
ii) In the Configure SOA WS Policies dialog box, in the Security section, click the plus (+) icon to add a security policy.
iii) In the Select Client Security Policies dialog box, select wss11_saml _token_with_message_protection_client_policy as shown in Figure 27-16, and then click OK.
Figure 27-16 Select Client Security Policies
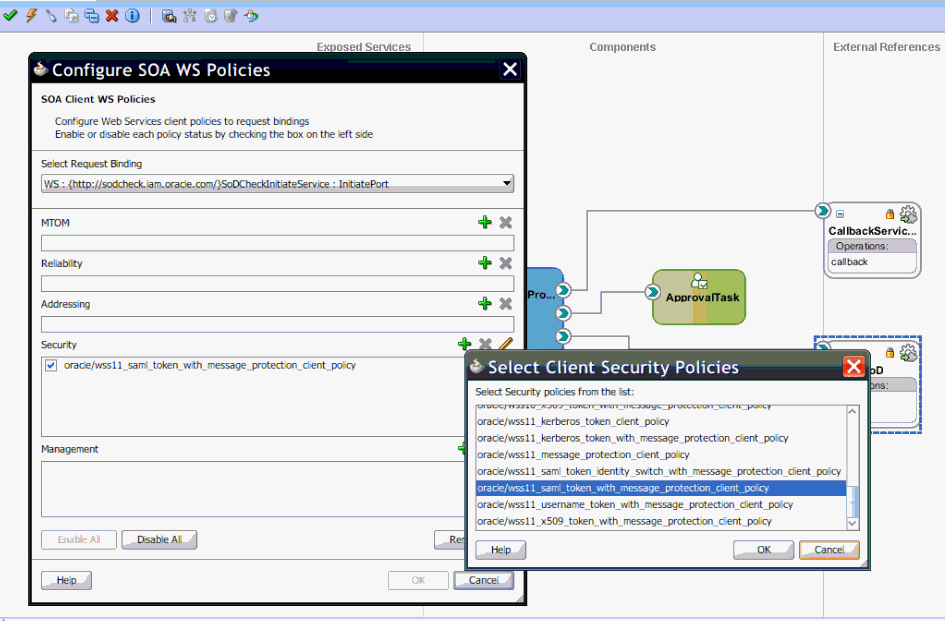
Description of "Figure 27-16 Select Client Security Policies"
To apply SAML or Username token with Message Protection Service Policy for callback:
i) Right-click AsynchSoD Web service, and select Configure WS Policies, and then select For Callback.
ii) In the Configure SOA WS Policies dialog box, in the Security section, click the plus (+) icon to add a security policy.
iii) In the Select Server Security Policies dialog box, select wss11_saml _or_username_token_with_message_protection_service_policy as shown in Figure 27-17, and then click OK.
Figure 27-17 Select Server Security Policies
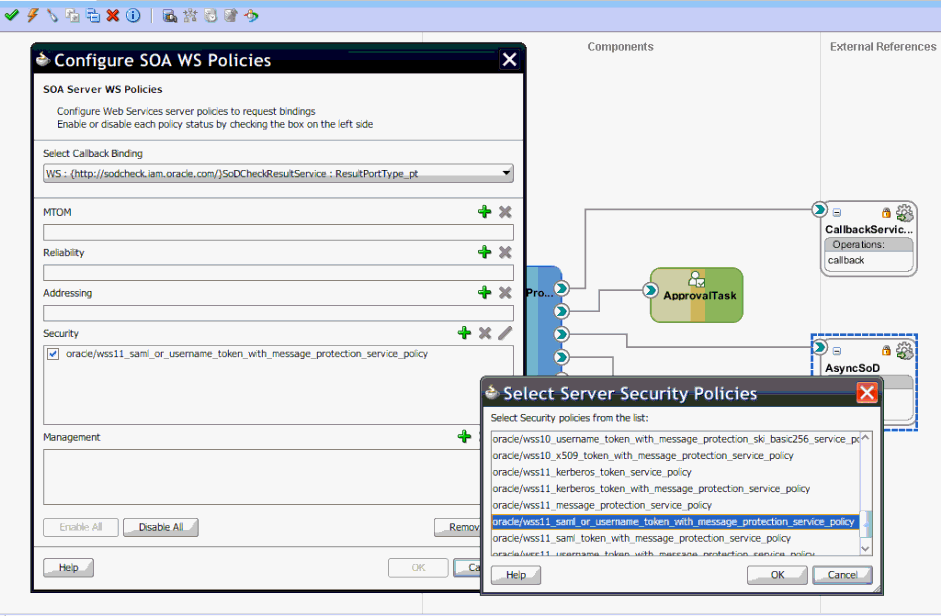
Description of "Figure 27-17 Select Server Security Policies"
-
Compile the project to see if there are any errors. If there are no errors, then right-click the project, and select Deploy. In the dialog box that is displayed, select any one of the following options:
-
Deploy to Application Server: Select this option and then select the appropriate server. The workflow is directly deployed to the application server.
-
Deploy to JAR: A JAR file is created under the JDeveloper deploy directory with the name sca_PROJECT_NAME_rev1.0.jar, where PROJECT_NAME is the name of the project.
-
-
From the SOA_HOME/bin/ directory, deploy the workflow on SOA server by running the following command:
Note:
-
In this guide, SOA_HOME refers to the directory on which SOA server is installed.
-
Before running this command, ensure that the SOA server is running.
ant -f ant-sca-deploy.xml -DserverURL=http://SOA_SERVER_HOSTNAME:SOA_PORT
-DsarLocation=JDeveloper/deploy/sca_PROJECT_NAME_rev1.0.jar -Duser=SOA_USER -Dpassword=SOA_PASSWORD
Note:
You must replace the following with valid values:
-
SOA_SERVER_HOSTNAME
-
SOA_PORT
-
PROJECT_NAME
-
SOA_USER
-
SOA_PASSWORD
This deploys a new composite on SOA server. You can check if the composite is deployed by navigating to the following URL:
http://SOA_SERVER_HOSTNAME:SOA_PORT/soa-infra
In the URL, replace SOA_SERVER_HOSTNAME with the host name of the SOA server, and SOA_PORT with the port on which the SOA server is installed.
-
-
Restart the SOA server.
See Also:
Chapter 25, "Developing SOA Composites" for general procedure for creating a new workflow and registering it with Oracle Identity Manager
Registering the Workflow
-
In the OIM_HOME/workflows/registration/ directory, create a NEW_PROJECT_NAME.props file by copying the DefaultRequestApproval.props. Modify the NEW_PROJECT_NAME.props by changing the name attribute.
Here, NEW_PROJECT_NAME is the name of the new project that you created.
The NEW_PROJECT_NAME.props file has the following contents:
#This is is the input file for registering the default workflow
# <new project name>
name=NEW_PROJECT_NAME
category=Approval
providerType=BPEL
serviceName=RequestApprovalService
domainName=default
version=1.0
payLoadID=payload
operationID=process
listOfTasks=ApprovalTask
Here,
-
The
versionparameter is the version of the workflow deployed on BPEL. -
The
listOfTasksparameter is the colon-seperated list of approval tasks. For example, if you add a new approval task as Approval_Task1, then you must provideApprovalTask:ApprovalTask1as the value for this parameter.
-
-
Run OIM_HOME/workflows/registration /registerworkflows-mp.xml as shown:
ant -f registerworkflows-mp.xml registerThis commands prompts for the following:
UserName: Enter Oracle Identity Manager administrator user name.
Password: Enter Oracle Identity Manager administrator Password
oim server t3 URL: Enter t3://OIM_HOST_NAME/OIM_MANAGED_SERVER_PORT. Here, replace OIM_HOST_NAME with the host name of the computer on which Oracle Identity Manager is installed, and OIM_MANAGED_SERVER_PORT with the port on which Oracle Identity Manager is installed.
inputpath (complete file name) of the property file: OIM_HOME/workflows/registration/NEW_PROJECT_NAME.props. Here, replace NEW_PROJECT_NAME with the name of the project that you created.
Appying the Workflow By Using Approval Policy
-
Create approval policy for the request model to which you want to apply the SoD workflow. For example, if you want to perform SoD check while provisioning a resource, then create a policy for the Provision Resource request model. See "Creating Approval Policies" in the Oracle Fusion Middleware User's Guide for Oracle Identity Manager for information about creating approval policies.
Note:
-
Always attach SoD workflow at the operational level of approval because SoD is triggered separately for each resource.
-
Whether SoD Engine is asynchronous or synchronous, the SoD Check Web Service is always asynchronous and workflow modification remains the same for both.
-
-
27.8.2 Modifying the Provisioning Workflow for SoD
Each process definition has a process task attached to provision entitlements to a user. The SoD validation process must be performed before triggering this task and immediately after inserting all data in the child table that holds entitlements on the target system. Therefore, you must hold this process task until the SoD validation process is completed after inserting the data in child tables. To achieve this, you create a Holder task that precedes the provisioning of an entitlement to a user.
The Holder task is added to prevent provisioning of a resource to a user before the SoD validation process is completed. User entitlements are provisioned only if this task is complete. The task is completed when the SoD engine validates that SoD policies or rules are not violated by the assignment of the entitlements.
If an SoD validation process has been performed in approval workflow, then the SoD validation process need not be performed again even if the SoD validation process is enabled at the provisioning level. Whether the SoD validation process needs to be performed or not can be assessed by checking the following before the SoD validation process at the provisioning level:
-
Is the provisioning related to a request?
-
If yes, is the SoDCheckStatus field set to
SoDCheckCompleted? -
If yes, then do not perform the SoD validation process during entitlement provisioning.
Note:
The SoD validation process will be performed again only when the process child form is edited to add, update, or remove entitlements.
To modify the provisioning workflow for SoD validation:
-
Add a Holder task to the provisioning workflow. This task must be made conditional and the Allow Multiple instances option must be selected.
The following figure shows this Holder task:
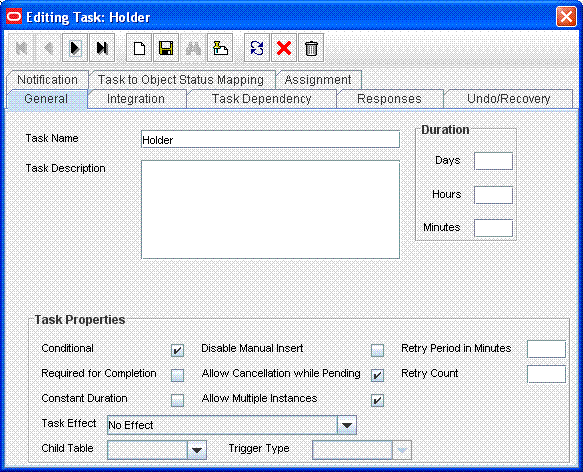
Description of the illustration holder1.gif
-
Make the connector insert, update, and revoke entitlement tasks dependent on the Holder task.
The following figure shows all entitlement tasks of the Oracle e-Business User Management connector dependent on the Holder task:
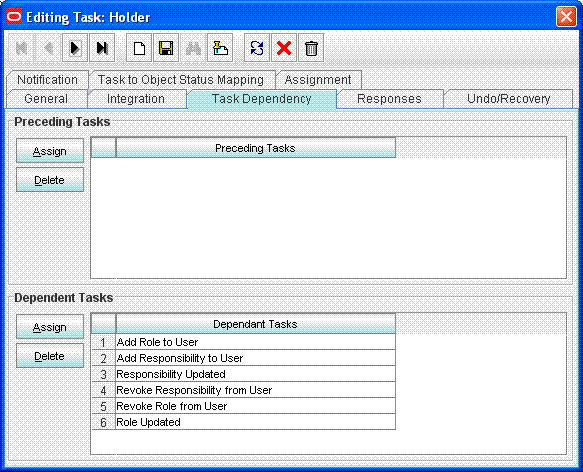
Description of the illustration holder2.gif
The following figure shows the Holder task as a preceding task of the Add Responsibility to User task:
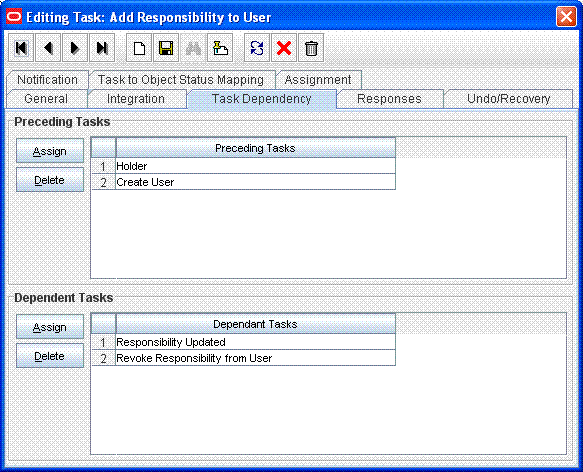
Description of the illustration holder3.gif
-
Add the SODChecker task (any task whose name starts with SODChecker). This task must be made conditional.
The following figure shows the SODChecker task:
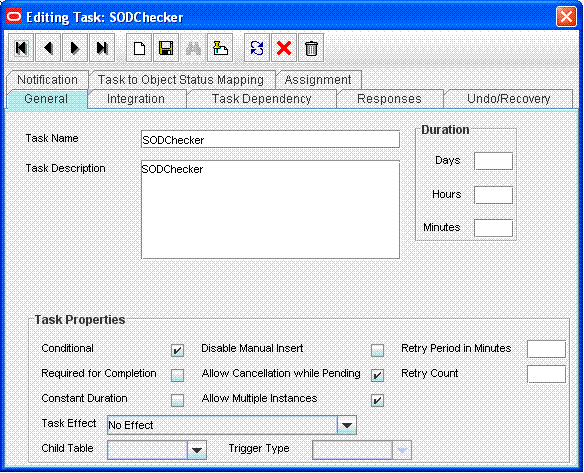
Description of the illustration sodchecker_prov1.gif
-
Attach the InitiateSODCheck process task adapter to the SoDChecker task.
Attach the following response codes to the SODChecker task:
The following figure shows these response codes:
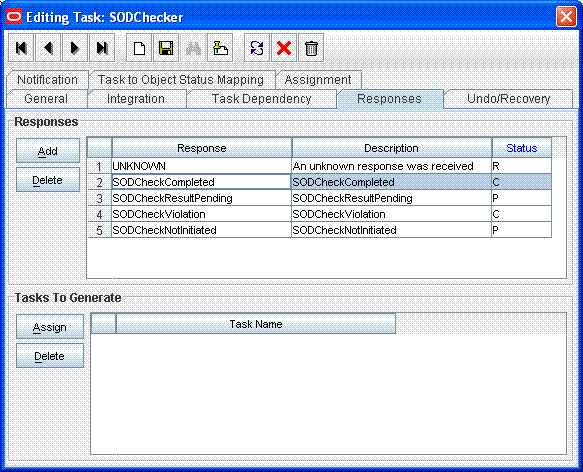
Description of the illustration sodchecker_prov2_.gif
27.9 Marking Fields as Entitlements
This section contains the following topics:
-
Marking Request Dataset Attributes That Hold Entitlement Data
-
Marking Child Process Form Tables That Hold Entitlement Data
27.9.1 Marking Request Dataset Attributes That Hold Entitlement Data
The request dataset attribute that holds the entitlement shall be marked with entitlement property set to true. Below is an example:
<AttributeReference name="Responsibility Name" attr-ref="Responsibility Name" type="String" length="256" widget="lookup-query" available-in-bulk="true" required="true" entitlement="true">
                                        <lookupQuery lookup-query="select lkv_encoded as lkv_encoded,lkv_decoded as lkv_decoded from lkv lkv,lku lku where lkv.lku_key=lku.lku_key and
                        lku_type_string_key='Lookup.EBS.Responsibility' and instr(lkv_encoded,concat('$Form data.Application Name','~'))>0" display-field="lkv_decoded" save-field="lkv_encoded"/>
                                </AttributeReference>
See Also:
"Step 1: Creating a Request Dataset for the Resources" for information about creating the request dataset
27.9.2 Marking Child Process Form Tables That Hold Entitlement Data
Child process form tables can hold different types of multivalued data, for example, role data, profile data, and address information. You must mark the child process form tables holding entitlement data that you want to use for SoD operations. See "Marking Entitlement Attributes on Child Process Forms" for information.
27.10 Custom Combination of Target Systems and SoD Engines
This section contains the following topics:
27.10.1 Using a Custom Target System
Note:
Perform the procedure described in this section only if you want to use a target system other than Oracle e-Business Suite, SAP CUA, and SAP R3. You must also perform the procedures given in "Adding Custom SoD Engine" if you are using an SoD engine other than Oracle Application Access Controls Governor and SAP GRC.
You can perform this procedure either before or at any time after first-time implementation of SoD in Oracle Identity Manager.
The following is a summary of the procedure to configure the SIL for a new target system:
-
Follow instructions given in the section "Addressing Prerequisites".
-
Create Java class implementations of the IdMvsSoDDataTransformationOper interface for the connector. See "Creating the Transformation Layer" for instructions.
-
Deploy the transformation service component. See "Deploying the Transformation Layer".
-
Add entries in the registration XML file for the new target system. See "Modifying the Registration XML File" for instructions.
-
Perform the procedure described in "Configuring Workflows on Non SoD-enabled Connectors".
-
Mark child process forms that hold entitlement data. See "Marking Fields as Entitlements" for instructions.
-
Register the new target system. See "Registering the New Target System" for instructions.
27.10.1.1 Addressing Prerequisites
Ensure that the following prerequisites are addressed:
-
Load entitlement data from the target system to the SoD engine.
For details, see vendor documentation for the SoD engine.
-
Deploy the Oracle Identity Manager connector for the target system. See the connector documentation for more information.
27.10.1.2 Creating the Transformation Layer
The transformation layer is used to transform target system attribute values into values that can be used by the SoD engine. The transformation layer is required to be created for any new SoD engine or target system type.
You must create the transformation layer as an implementation of the IdMvsSoDDataTransformationOper interface. Create implementations of the transformInput and transformSoDAnalysisInput methods in the implementation class of the IdMvsSoDDataTransformationOper interface.
See Also:
Oracle Fusion Middleware Java API Reference for Oracle Identity Manager for information about the implementation methods
In earlier releases of Oracle Identity Manager, the approval workflow data is read from the object forms. In Oracle Identity Manager 11g Release 1 (11.1.1), object forms are replaced by request datasets in the approval processes. As a result, the transformation layer must be changed so that entitlement data is read from the request dataset instead of object forms.
Transformation layer must also check the request model. If the request model is Provision Resource, then data must be read only from the request dataset. But if the request model is Modify Provisioned Resource, then data must be read both from the request dataset and process form.
27.10.1.3 Deploying the Transformation Layer
Transformation Service component is deployed as follows:
-
Create a JAR file for the Java classes that you created for implementation of the IdMvsSoDDataTransformationOper service component type.
-
Use the UploadJar utility to upload the JAR file as ThirdParty.
Note:
The UploadJar.sh or UploadJar.bat utility is in the OIM_HOME/bin/ directory. Run the utility from this location to upload the created JAR file to MDS.
27.10.1.4 Modifying the Registration XML File
Enter the details of the transformation layer in the registration.xml file as follows:
-
Import the Registration.xml file from the MDS. The Registration.xml file is present with namespace /metadata/iam-features-sil/db/Registration.xml in MDS.
-
Open the Registration.xml file in a text editor.
-
Add the SystemType and ServiceComponent elements as shown in this block of XML lines:
Note:
Values that you must set are highlighted in bold. Guidelines and sample values are given after this block of XML.
        <SystemType name="SYSTEM_TYPE_NAME" type="Sod Source DataStore"></SystemType>

        <ServiceComponent type="IdMvsSoDDataTransformationOper" name="NAME_FOR_IMPLEMENTATION"
                <Impl-Class>NAME_OF_IPMLEMENTATION_CLASS</Impl-Class>
                <IdMSystemType>OIM</IdMSystemType>
                <SoDEngineType>SoD_ENGINE</SoDEngineType>
                <srcSystemType>SYSTEM_TYPE_NAME</srcSystemType>

              <DataTransformation>
                     <AttrSoD type="user" name="NAME_OF_ATTRIBUTE_ON_TARGET_SYSTEM"  sourceIdMAttrName="NAME_OF_ATTRIBUTE_ON_SOD_ENGINE" isSourceKey="true"/>
                     <AttrSoD type="user" name="firstname"  sourceIdMAttrName="firstname" isSourceKey="false"/>
                     <AttrSoD type="user" name="lastname"  sourceIdMAttrName="lastname" isSourceKey="false"/>
                     <AttrSoD type="duty" dutyType="ENTITLEMENT_TYPE"  name="accessorigid"  sourceIdMAttrName="ENTITLEMENT_NAME" isSourceKey="true"/>
              </DataTransformation>

              <DataTransformation>
               . . .
              </DataTransformation>

              <DataTransformation>
               . . .
              </DataTransformation>
        </ServiceComponent>
Apply the following guidelines while adding the SystemType and ServiceComponent elements in the registration.xml file:
-
Replace the placeholders with the following values:
-
SYSTEM_TYPE_NAME: Specify a name for the system type.
-
In the <SystemType> tag, type can have the
SoD Source DataStorevalue for a custom target system, orSoD Engineas value for a custom SoD engine. -
NAME_FOR_IMPLEMENTATION: Specify a name for the service component. For example:
DBToOAACG -
NAME_OF_IPMLEMENTATION_CLASS: Specify the name that you have set for the class that you create by performing the procedure described in "Creating the Transformation Layer". For example:
oracle.iam.grc.sod.scomp.impl.oaacg.transformation.IdMvsSoDDataTransformationOperDBvsOAACG -
SoD_ENGINE: Enter
OAACGif you are using Oracle Application Access Controls Governor as the SoD engine. EnterGRCif you are using SAP GRC as the SoD engine. If you are using a custom SIL provider, then enter the name that you set for that SoD engine.See Also:
-
SYSTEM_TYPE_NAME: Specify the system type name that you entered earlier.
-
NAME_OF_ATTRIBUTE_ON_TARGET_SYSTEM: Specify the name of the attribute on the target system.
-
NAME_OF_ATTRIBUTE_ON_SOD_ENGINE: Specify the name of the corresponding attribute on the SoD engine.
-
ENTITLEMENT_TYPE: Enter the type of entitlement. For example:
ROLE -
ENTITLEMENT_NAME: Enter the name of one instance of the entitlement. For example:
Resource Manager
-
-
Add one DataTransformation element for each attribute mapping that you want to create.
-
-
Save and close the Registration.xml file.
-
Export the Registration.xml file back to MDS.
27.10.1.5 Registering the New Target System
To register the new target system, perform the procedure described in the following sections:
27.10.1.5.1 Running the Registration Script and Providing Registration Information
The registration script (registration.sh and registration.bat) drives the registration process. When you run this script, it prompts you for the required information. The initial set of prompts displayed by the script are read from the registration.xml file. The registration script is in the OIM_HOME/bin directory. The registration.xml file is in the MDS.
Note:
You can run the registration script multiple times, at any time during the lifecycle of the Oracle Identity Manager installation. For example, you might want to register a new SoD engine. When you run the script, use the prompts to guide you to the section (set of prompts) in which you want provide input. You can skip the remaining sections.
See Example 27-1 for a sample run of the registration script. In that example, it is assumed that an IT resource has been created to provide information about the SoD engine.
To run the script and provide registration information for the Oracle Identity Manager installation, SoD engine, and target system:
-
Export the SILConfig.xml file from MDS. The SILConfig.xml file is present in MDS with namespace /metadata/iam-features-sil/db/SILConfig.xml.
-
Open the SILConfig.xml file in a text editor and provide values for the DOMBuilderFactoryImpl element.
The value of the DOMBuilderFactoryImpl element depends on the JRE that you are using:
-
If you are using the Sun JRE or Oracle JRockit JRE, then uncomment the DOMBuilderFactoryImpl element containing the following value:
com.sun.org.apache.xerces.internal.jaxp.DocumentBuilderFactoryImpl
-
If you are using the IBM JRE, then uncomment the DOMBuilderFactoryImpl element containing the following value:
org.apache.xerces.jaxp.DocumentBuilderFactoryImpl
-
-
In a command window, switch to the OIM_HOME/bin directory and run the registration script.
Enter login information for Oracle Identity Manager. You are prompted to provide the values for Username, Password, and URL. The sample run segment is given below:
[Enter the admin username:]OIM_ADMINISTRATOR_LOGIN
[Enter the admin password:]OIM_ADMINISTRATOR_PASSWORD
[Enter the service url:]t3://OIM_HOST_NAME:OIM_PORT_NO
Specify valid values for:
-
OIM_ADMINISTRATOR_LOGIN
-
OIM_ADMINISTRATOR_PASSWORD
-
OIM_HOST_NAME
-
OIM_PORT_NO
An example of the T3 URL is:
t3://localhost:14000
You are prompted to specify whether or not you want to proceed with registration:
Do you want to proceed with registration? (y/n)
Note:
From this point onward, an explanation of each prompt displayed by the script is followed by the actual message of the prompt. The actual message is shown in monospace font in this document.
-
-
Enter
yto proceed with the registration. You are prompted to specify whether or not you want to register an Oracle Identity Manager installation:Register System Instance for type OIM?(y/n)
-
Enter
n. -
You are prompted to specify whether or not you want to register an Oracle e-Business Suite installation:
Register System Instance for type EBS? (y/n)
-
Enter
nif you want to use the existing Oracle e-Business Suite, which is registered by default. Enteryif you want to register a new EBS instance with another IT resource in Oracle Identity Manager. -
If you enter
y, then you are prompted to enter an instance name for the Oracle e-Business Suite installation:Provide instance name
Enter a name for the Oracle e-Business Suite installation. For example:
ebs2
-
You are prompted to specify whether or not you want to register an Oracle Application Access Controls Governor installation:
Register System Instance for type OAACG? (y/n)
Enter
nif you want to use the existing OAACG, which is registered by default. Enteryif you want to register a new OAACG instance with another IT resource in Oracle Identity Manager. -
If you enter
y, then you are prompted to enter an instance name for the Oracle Application Access Controls Governor installation:Provide instance name
Enter a name for the Oracle Application Access Controls Governor installation. For example:
oaacg01
-
You are prompted to enter the name of the IT resource that you have created:
OIM ITResource Instance Name:
Enter the name of the IT resource that you created:
OAACG ITR2 -
If there are no more SoD components (system instances) to register, then enter
nin response to the remaining prompts. Otherwise, similar steps to be followed for SAP and GRC instances. After this, you are prompted for custom System Type that you added in Registration.xml, say NEW.Register System Instance for type NEW? (y/n)
-
Enter
y. You are prompted to enter an instance name for the custom type, as shown:Provide instance name
-
Enter a name for the installation, for example,
new1. If the added system type is SoD Engine, then you are prompted to enter the name of the IT resource that you have created:OIM ITResource Instance Name:
-
Enter the name of the IT resource that you created:
ITR_NEW. -
Open the SILConfig.xml file in a text editor and provide values for the Topologies element. For information about topology values, refer to "Recording the Names of the System Types".
The following block of XML shows the Topologies element and its child elements:
Note:
If you have multiple target system and SoD engine combinations, then you can add multiple Topology elements inside the Topologies element.
<Topologies>
  <Topology>
   <name>@topologyName</name>
   <IdmId>@Idm RegistrationId</IdmId>
   <SodId>@Sod RegistrationId</SodId>
   <SDSId>@Sds RegistrationId</SDSId>
  </Topology>
</Topologies>
Enter values for the following child elements of the Topologies element:
-
@topologyName: Enter a name for the topology.Note:
Set the same name for the Topology element as the value of the TopologyName IT resource parameter.
-
@Idm RegistrationId: Enter the registration ID of the Oracle Identity Manager installation. -
@Sod RegistrationId: Enter the registration ID of the SoD engine. -
@Sds RegistrationId: Enter the registration ID of the target system.See Also:
Step 2 in "Recording the Names of the System Types" for information about the child elements of the Topologies element.
-
-
Export SILConfig.xml back to MDS.
Example 27-1 shows the output of a sample run of the registration script. Here, it is assumed that an IT resource has been created to provide information about the SoD engine.
Example 27-1 Sample Run of the Registration Script
sh registration.sh
Enter data related to login to OIM Server
[Enter the admin username:]OIM_ADMINISTRATOR_LOGIN
[Enter the admin password:]OIM_ADMINISTRATOR_PASSWORD
[Enter the service url:]t3://localhost:14000
Do you want to proceed with registration? (y/n)
y
Register System Instance for type OIM ?(y/n)
n
Register System Instance for type EBS ?(y/n)
n
Register System Instance for type OAACG ?(y/n)
n
Register System Instance for type SAP ?(y/n)
n
Register System Instance for type GRC ?(y/n)
n
Register System Instance for type NEW ?(y/n)
y
Provide instance name
new1
OIM ITResource Instance Name:
ITR_NEW
27.10.1.5.2 Recording the Names of the System Types
At the end of the registration process, the names of the system types are set in the Oracle Identity Manager database. You can retrieve these names from the database by using the registration script. After you retrieve these names, you must enter them in the SILConfig.xml file.
To retrieve and record the names of the service components:
-
In a command window, switch to the following directory:
OIM_HOME/bin/
-
Run one the following commands:
For Microsoft Windows:
registration.bat printRegistrationIDs
For UNIX:
registration.sh printRegistrationIDs
The following is sample output of this command:
-----------------------------------------------
System Type     Instance Name  Registration ID
-----------------------------------------------
OIM                 oim                     1
EBS                 Ebs                     2
OAACG               oaacg                   3
-
Copy these instance names for your reference.
27.10.2 Adding Custom SoD Engine
Note:
Perform the procedure described in this section only if you want to use an SoD engine other than Oracle Application Access Controls Governor and SAP GRC. You must also perform the procedures given in "Using a Custom Target System" if you are using a target system other than Oracle e-Business Suite, SAP CUA, and SAP R3.
You must install the SoD engine before you begin creating the SIL provider.
You can perform this procedure either before or at any time after first-time implementation of SoD in Oracle Identity Manager.
The following is a summary of the procedure to create a SIL provider:
-
Follow instructions given in the section "Addressing Prerequisites".
-
Create an IT resource to hold information about the SoD engine. See "Creating an IT Resource to Hold Information about the SoD Engine".
-
Create Java class implementations of the interfaces for the SIL provider. See "Implementing the Service Components for the Provider" for instructions.
-
Deploy the service components. See "Deploying the Service Components".
-
Add entries in the registration XML file for the new SoD engine. See "Modifying the Registration XML File for the New SoD Engine" for instructions.
-
Register the new SoD engine. See "Registering the New SIL Provider" for instructions.
27.10.2.1 Addressing Prerequisites
Ensure that the following prerequisites are addressed:
-
Load entitlement data from the target system to the SOD engine. You can use any ETL utility to perform this step. For details, see vendor documentation for the SoD engine.
-
On the SoD engine, create policy definitions or risk definitions by using the data loaded from the target system.
-
Deploy the Oracle Identity Manager connector for the target system. See the connector documentation for more information.
27.10.2.2 Creating an IT Resource to Hold Information about the SoD Engine
You must create an IT resource to hold information about the SoD engine.
See Chapter 11, "Developing Resource Objects" for detailed information about creating an IT resource type (if it does not already exist) and IT resource. You can specify any name for the IT resource type and IT resource. The following table specifies the names of the parameters that the IT resource must contain:
| Parameter | Description | Sample Value |
|---|---|---|
|
Source Datastore Name |
Enter the name of the source data store (the target system) that you defined in the SoD engine. You specify a source data store name while performing the procedure described in the "Configuring Oracle Application Access Controls Governor" section. |
|
|
dbuser |
Enter the user name of the schema owner on the database used by the SoD engine. This account is used to access the Application Access Controls Governor database during SoD operations. Note: This parameter is specific to Oracle Application Access Controls Governor. |
|
|
dbpassword |
Enter the password of the schema owner on the database used by the SoD engine. Note: This parameter is specific to Oracle Application Access Controls Governor. |
|
|
jdbcURL |
Enter the JDBC URL for connecting to the database used by the SoD engine. Note: This parameter is specific to Oracle Application Access Controls Governor. |
|
|
password |
Enter the password of the account created on the SoD engine for API calls. |
|
|
port |
Enter the number of the port at which the SoD engine is listening. |
|
|
server |
Enter the IP address of the host computer on which the SoD engine is running. |
|
|
sslEnable |
Enter |
|
|
username |
Enter the user name of an account created on the SoD engine. This account is used to call the SoD engine APIs that are used during SoD validation. |
|
|
sodServerURL |
Enter the URL of the SoD server, in the following format: http(s)://HOST_NAME:PORT_NUMBER/URL |
|
Note:
If you want to use multiple SoD engines, then create multiple IT resources with the same IT resource type.
27.10.2.3 Implementing the Service Components for the Provider
Create Java implementations of the following service components:
-
SoDAnalysisExecutionOper: The SoD analysis layer must be implemented for any custom SoD engine, which is not provided by default.
-
IdMvsSoDDataTransformationOper: Used to transform target system attribute values into values that can be used by the SoD engine. The transformation layer is required to be created for any new SoD engine or target system type.
-
CallBackIdMOper (optional): To be implemented if any callback is required from SoD Analysis Layer to access Oracle Identity Manager.
-
SoDDataValidationOper (optional): To be implemented to provide any validation on the attributes given in SoD Analysis layer.
27.10.2.4 Deploying the Service Components
Service components created in "Implementing the Service Components for the Provider" are deployed as follows:
-
Create a JAR file for the Java classes that you created for Service Component implementation.
-
Use the UploadJar utility to upload the JAR file as ThirdParty.
Note:
The UploadJar.sh or UploadJar.bat utility is in OIM_HOME/bin. Run the utility from this location to upload the created JAR file to MDS.
27.10.2.5 Modifying the Registration XML File for the New SoD Engine
Enter the details of the transformation layer in the Registration.xml file as follows:
-
Import the Registration.xml file from the MDS. The Registration.xml file is present with namespace \metadata\iam-features-sil\db\Registration.xml in MDS.
-
Open the Registration.xml file in a text editor.
-
Add the SystemType element for the SoD engine, as shown:
<SystemType name="SYSTEM_TYPE_NAME" type="SYSTEM_TYPE" isSynch="IS_SYNCH">
<!-- The Parameters which are required to connect the Sod Engine. -->
<Parameter name="PARAM_NAME1" required="true" />
<Parameter name="PARAM_NAME2" required="true" />
...
</SystemType>
Here, replace:
-
SYSTEM_TYPE_NAME with a name for the system type.
-
SYSTEM_TYPE with SoD Engine.
-
IS_SYNCH with
trueorfalse, depending on whether the SoD engine is synchronous or asynchronous. -
PARAM_NAME with the name of the parameter used to connect the SoD engine. These parameter values must be provided while registering the SoD engine. These are read in service component implementation classes to connect to the SoD engine.
-
-
Add all implemented service components, as shown:
<ServiceComponent type="SERVICECOMPONENT_TYPE" name="NAME_FOR_IMPLEMENTATION"
              <Impl-Class>NAME_OF_IPMLEMENTATION_CLASS</Impl-Class>
              <IdMSystemType>SYSTEM_TYPE_NAME_FOR_IDM</IdMSystemType>
              <SoDEngineType>SYSTEM_TYPE_NAME_FOR_SOD_ENGINE</SoDEngineType>
              <srcSystemType>SYSTEM_TYPE_NAME_FOR_TARGET_SYSTEM</srcSystemType>

<!-- AttrSoD tag is only required for Sod Analysis Service Component-->
<AttrSoD type="user" isKey="true" name="NAME_OF_ATTRIBUTE_ON_SOD_ENGINE">
<!-- "name" attribute of the "Validation" element should be same as the "name" of one of the registered "ServiceComponent" of type "SoDDataValidationOper" -->
<Validation name="NAME_FOR_VALIDATION_ON_ATTRIBUTE"/>
</AttrSoD>

<AttrSoD type="duty" isKey="true" dutyType="ENTITLEMENT_TYPE" name="NAME_OF_ENTITLEMENT_ON_SOD_ENGINE"><Validation name="isNotNullOAACG"/>
</AttrSoD>

<AttrSoD...>
...
</AttrSoD>

<!-- DataTransformation tag is only required for transformation Service component-->
      <DataTransformation>
          <AttrSoD type="user" name="NAME_OF_ATTRIBUTE_ON_TARGET_SYSTEM"  sourceIdMAttrName="NAME_OF_ATTRIBUTE_ON_SOD_ENGINE" isSourceKey="true"/>
          <AttrSoD type="user" name="firstname"  sourceIdMAttrName="firstname" isSourceKey="false"/>
          <AttrSoD type="user" name="lastname"  sourceIdMAttrName="lastname" isSourceKey="false"/>
          <AttrSoD type="duty" dutyType="ENTITLEMENT_TYPE"  name="accessorigid"  sourceIdMAttrName="ENTITLEMENT_NAME" isSourceKey="true"/>
      </DataTransformation>

</ServiceComponent>
Here, replace:
-
SERVICECOMPONENT_TYPE: Can have values such as CallBackIdMOper, SoDAnalysisExecutionOper, SoDDataValidationOper, or IdMvsSoDDataTransformationOper depending upon the type of service component.
-
NAME_FOR_IMPLEMENTATION: Specify a name for the service component, for example,
DBToOAACG. -
NAME_OF_IPMLEMENTATION_CLASS: Specify the name that you have set for the class that you create by performing the procedure described in "Creating the Transformation Layer". For example:
oracle.iam.grc.sod.scomp.impl.oaacg.transformation.IdMvsSoDDataTransformationOperDBvsOAACG. -
SOD_ENGINE: Enter
OAACGif you are using Oracle Application Access Controls Governor as the SoD engine. EnterGRCif you are using SAP GRC as the SoD engine. If you are using a custom SIL provider, then enter the name that you set for that SoD engine.See Also:
-
SYSTEM_TYPE_NAME: Specify the system type name that you entered earlier.
-
NAME_OF_ATTRIBUTE_ON_TARGET_SYSTEM: Specify the name of the attribute on the target system.
-
NAME_OF_ATTRIBUTE_ON_SOD_ENGINE: Specify the name of the corresponding attribute on the SoD engine.
-
ENTITLEMENT_TYPE: Enter the type of entitlement, for example,
ROLE. -
ENTITLEMENT_NAME: Enter the name of one instance of the entitlement, for example,
Resource Manager.
-
-
Save and close the Registration.xml file.
-
Export the Registration.xml file back to MDS.
27.10.2.6 Registering the New SIL Provider
To register the new SIL provider, perform the procedure described in the following sections:
-
See "Running the Registration Script and Providing Registration Information" for information on rerunning the registration script. In this run of the script, do not enter values for service components that have already been registered.
-
See "Recording the Names of the System Types" for information on entering data about the new target system in the SILConfig.xml file.
27.11 Performing Role SoD Check with Oracle Identity Analytics
Role SoD Check is performed when a request to assign roles to, or revoke roles from, a user is raised. Role SoD Check with Oracle Identity Analytics is performed only when the request is raised; when roles are directly assigned or revoked, an SoD Check is not performed.
Note:
Integration between Oracle Identity Manager and Oracle Identity Analytics is a pre-requisite for performing an SoD Check with Oracle Identity Analytics.
27.11.1 Enabling Role SoD Check
To enable Role SoD Check with Oracle Identity Analytics, you need to do the following.
-
Set the value of the XL.SoDCheckSystemProperty system property to TRUE. See "Administering System Properties" in the Oracle Fusion Middleware Administrator's Guide for Oracle Identity Manager for information about system properties.
-
Set the value of the RoleSoDCheckTopologyName system property to
sodoia. This topology is predefined and registered. -
Set OIA Connection Details in the 'OIA-ITRes' IT resource, as shown in the following figure:
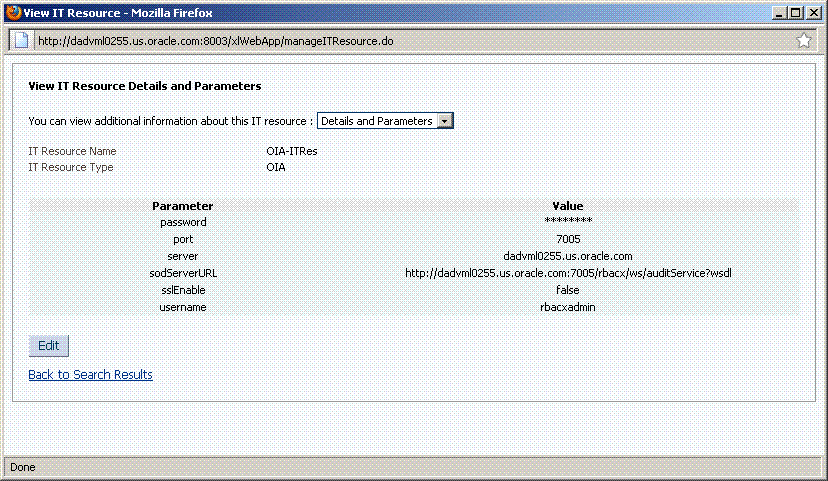
Description of the illustration oia_it_res.gif
27.11.2 Using Role SoD Check
The following sections describe how to implement the Role SoD functionality:
27.11.2.1 SoD Check When A User Requests a Role
The following steps are performed when a user raises a request for roles. SoD Check will be done if it has been enabled. This example procedure assumes that the user has already been assigned role1.
Perform the following steps:
-
Login to the Administrative and User Console as the user.
-
In the Self Service, click the Create Request tab, select the Request for Me option, and click Next.
-
From the Request Template list, select Self Assign Roles, and then click Next.
-
Select a role that conflicts with the role already assigned to the user, and click Next.
-
Add a justification and click Finish to submit the request.
-
Logout from the Administrative and User Console.
-
Login to the Administrative and User Console as the administrator to see the following:
-
View the request details, as shown in the following figure:
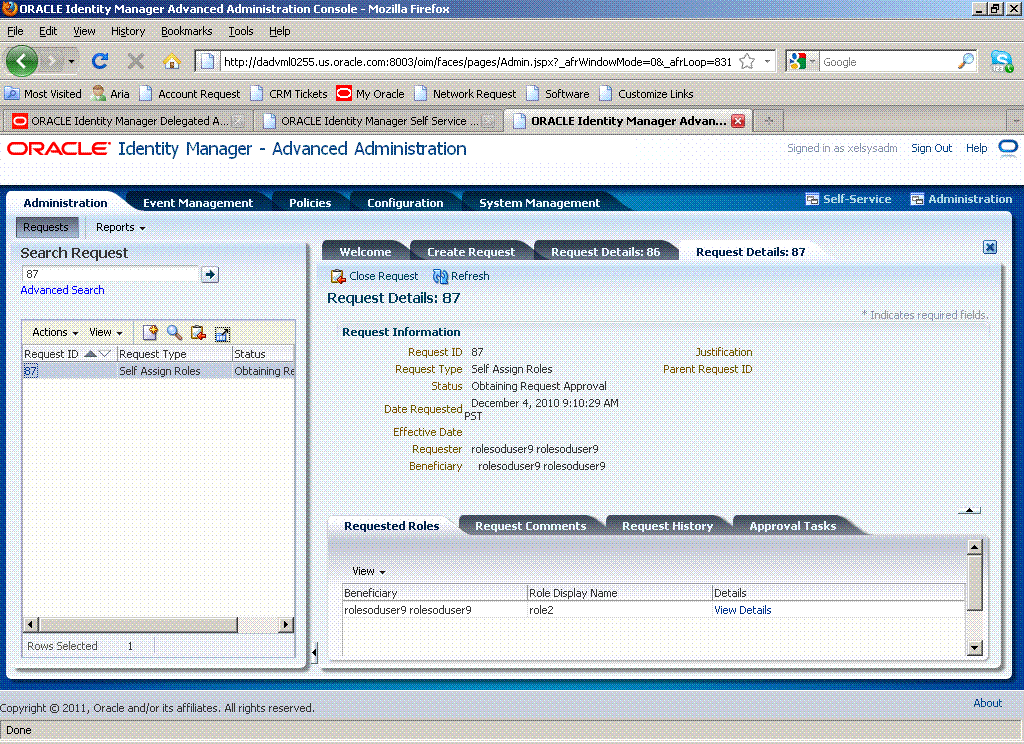
Description of the illustration role-usecase1-6.gif
-
View the SoD check results in the request details, as shown in the following figure:
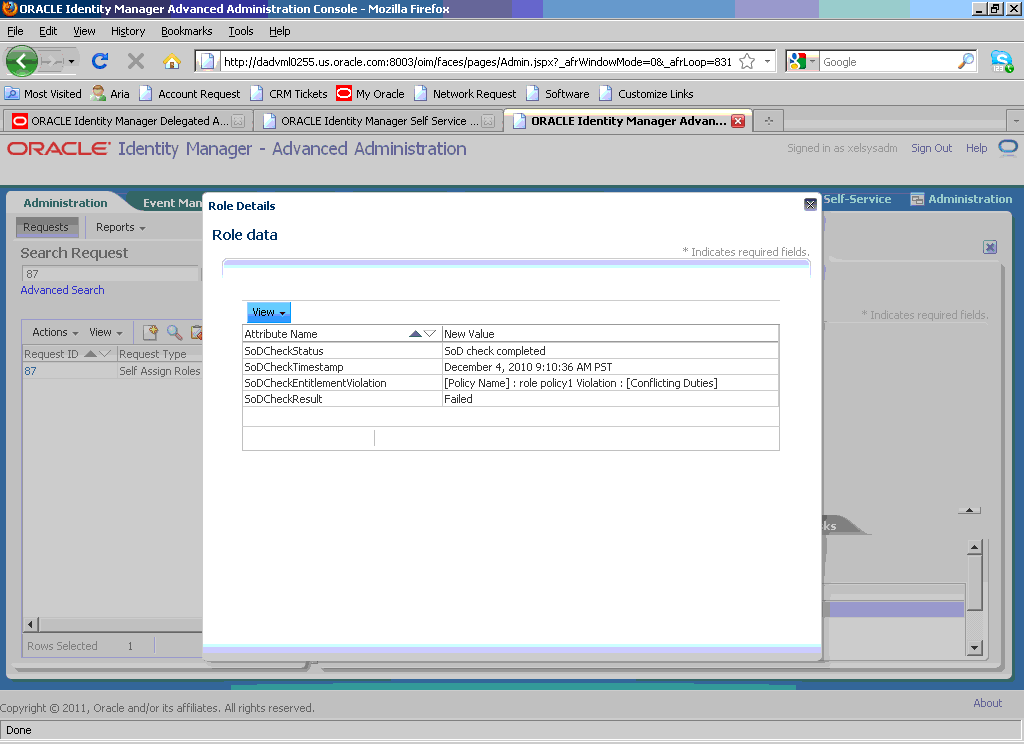
Description of the illustration role-usecase1-7.gif
-
27.11.2.2 SoD Check When A User Revokes a Role
This procedure assumes that the user has already been assigned the role being revoked.
Perform the following steps:
-
Login to the Administrative and User Console as the user.
-
In the Self Service, click the Create Request tab, select the Request for Me option, and click Next.
-
From the Request Template list, select Self Remove Roles, and then click Next.
-
Select the role to be revoked, and click Next.
-
Click Finish to submit the request.
-
Logout from the Administrative and User Console.
-
Login to the Administrative and User Console as the administrator to see the following:
-
View the request details, as shown in the following figure:
Description of the illustration role-usecase2-4.gif
-
View the SoD check results in the request details. SoD Check passes because one of the conflicting roles has been removed. The following figure shows the SoD check results:
Description of the illustration role-usecase2-5.gif
-
27.11.2.3 SoD Check When an Administrator Requests To Assign Roles
This procedure allows the system administrator to assign a role to the user.
-
Login to the Administrative and User Console as the system administrator.
-
In the Advanced Administration, click the Create Request tab, select Assign Roles from the Request Template list, and click Next.
-
Select the user for whom you want to raise the request, and click Next.
-
Select the roles to be assigned to the user, and click Next.
-
Click Finish to submit the request.
-
The next step is dependent on how many roles are involved with the request.
-
If a request is raised for more than two roles, a bulk request will be created. In this case, SoD Check will be performed for individual child requests. First, a request level approval must be done by logging in to the Self Service, selecting the request to be approved, and clicking Approve Task.
-
If the request is raised for two roles, then two child requests will be created and an SoD Check will be done for each. The following figure shows the two child requests:
Description of the illustration role-usecase3-6.gif
-
Click the first child request to view the SoD Check results.
-
The results show that the SoD Check has failed because the request has been raised for two conflicting roles, as shown:
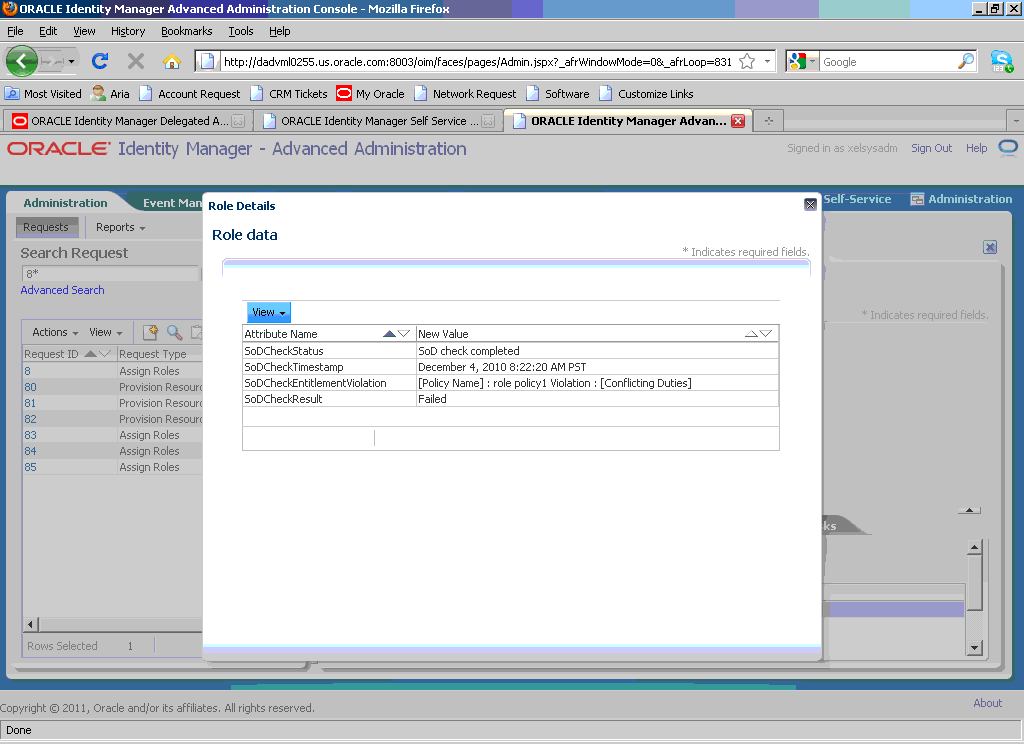
Description of the illustration role-usecase3-8.gif
-
Click the second request to view its details, as shown:
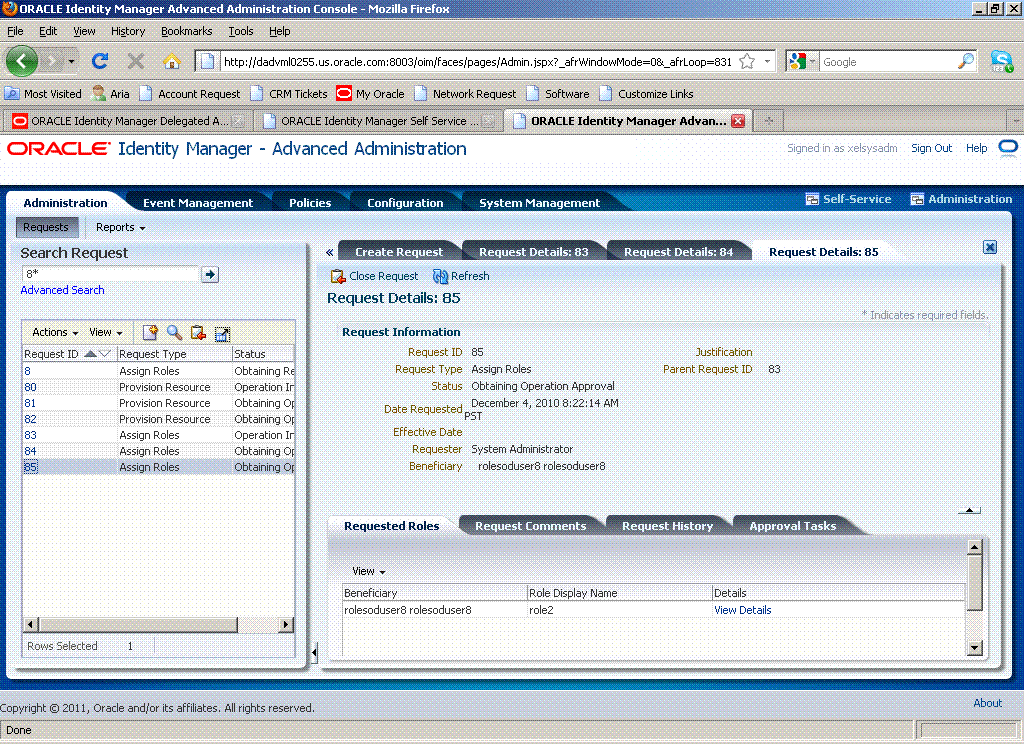
Description of the illustration role-usecase3-9.gif
-
-
27.11.2.4 SoD Check When an Administrator Requests To Revoke Roles
This procedure allows the system administrator to revoke a role from the user.In t
-
Log in to the Administrative and User Console as the system administrator.
-
In the Advanced Administration, click the Create Request tab, select Remove from Roles from the Request Template list, and click Next.
-
Select the user for whom you want to raise the request, and click Next.
-
Select the roles to be revoked, and click Next.
-
Click Finish to submit the request.
-
View the request details, as shown:
Description of the illustration role-usecase4-5.gif
-
View the SoD check results in the request details. SoD Check now passes as one of the conflicting roles has been removed, as shown:
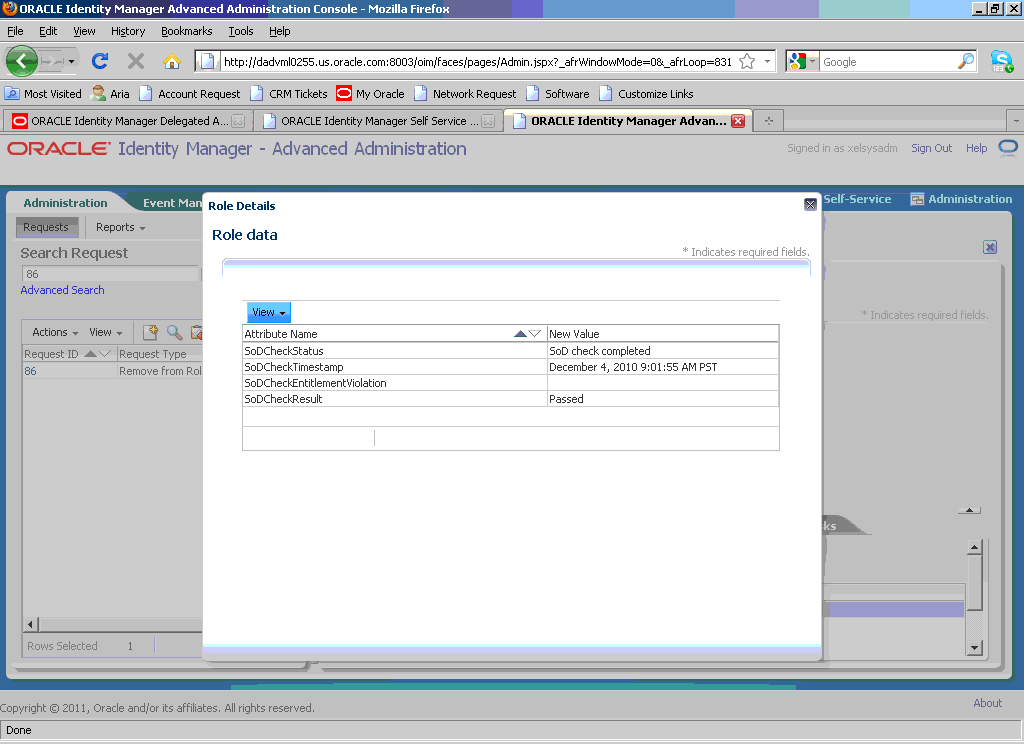
Description of the illustration role-usecase4-6.gif
27.11.2.5 SoD Check for Assigning/Revoking Roles with Callback Policy Request
This type of request is automatically approved. The request can be raised as detailed in the previous use cases. The Request Template selected is Assign Roles with callback policy or Revoke Roles with callback policy. SoD Check is performed as detailed in the previous use cases.
27.12 Using SoD in Provisioning Workflow
This section describes various use cases related to SoD:
Note:
The procedures in this section are for Asynchronous SoD Engine, for example OAACG, for which you must run the scheduled job to complete the SoD check.
-
Request Provisioning with Approver-Only Field and With the DefaultSODApproval Workflow
-
Updating Entitlements By Using Provisioning Based on Access Policies
27.12.1 Direct Provisioning
SoD check can be enabled in direct provisioning by performing the following steps:
-
Enable the SoD check system property. See "Enabling SoD" for information about the SoD check system property.
-
Set the Topology Name parameter in the connector IT resource. See step 2 of "Enabling SoD" for information about setting the Topology Name parameter.
-
Modify the connector provisioning workflow as described in "Modifying the Provisioning Workflow for SoD".
To directly provision a SoD-enabled resource:
-
Create a user whose account is to be created on the target system.
-
In the user details page of Oracle Identity Administration, go to the Resources tab, and click Add.
-
Select the SoD-enabled resource from the available options.
-
Enter the process form details. Parent process form must contain SoD check fields, such as SoDCheckStatus, SoDCheckTrackingID, SoDCheckResult, SoDCheckTimestamp, and SoDCheckEntitlementViolation. These fields are populated with values for SoD check.
-
Make sure that you provide entitlement in the child forms. Otherwise, SoD check will not be performed because SoD is required only to check for conflicting entitlements.
-
After provisioning has been initiated, you can see the account created on target system but no entitlement is provisioned. This is because entitlement tasks are kept in the Waiting status until the SoD check completes.
In the resource profile, the Holder and SoDChecker tasks are in the Pending status and the SoDCheckStatus field in parent process form displays
SoD Check Result Pending. The SoDCheckTrackingID field displays the tracking ID for the simulation started on the SoD engine. -
Run the Get SOD Check Results Provisioning schedule job to get back results from the SoD engine and complete the SoD check.
-
If SoDCheckResult in the parent process form is in the Passed status, then there is no conflict and the entitlements are provisioned on the target system. The SoDCheckStatus field in the form displays
SoD Check Completed, and the Holder and SoDChecker tasks are completed. -
If SoDCheckResult in the parent process form is in the Failed status, then there is a conflict and the entitlements are not provisioned on the target system. The SoDCheckEntitlementViolation field in the form displays the conflicting policy on the SoD Engine, and the Holder task is canceled.
27.12.2 Updating Entitlements
Whenever you open the resource profile and try to add, update, or delete an entitlement in the child form, SoD check is triggered and the new Holder and SoDChecker tasks are generated. To complete SoD check, you must run the Get SOD Check Results Provisioning schedule job. If the new entitlement conflicts with the old ones, the new entitlement is not provisioned. Otherwise, the new entitlement is provisioned on the target system.
The addition, updation, and deletion of entitlements is done on a row by row basis. Therefore, for each modification, separate SoD check is triggered. If you make two modifications, then you can see two new SoDChecker tasks, one for each modification.
27.12.3 Request Provisioning
Default SoD check can be enabled in request provisioning by:
-
Enabling the SoD Check system property
-
Setting the Topology name parameter in the connector IT resource
-
Request dataset must have an attribute of type IT Resource whose value is to be provided during request creation. A valid value must exist in its Topology Name parameter.
To create a request to provision a SoD-enabled resource:
-
In Oracle Identity Manager Advanced Administration, go to the Requests section, and click Create Request on the toolbar of the left pane. Select the Provision Resource request model.
-
Specify values for the attributes defined in the request dataset. The SoD check fields are part of the common dataset and is not displayed while creating the request. The fields can be viewed in the Request Details page after the request has been created.
-
Provide entitlement data as attribute values in the Create Request wizard, which displays the attribute names based on the request dataset. If no entitlements are provided, then SoD check will not start.
-
If SoD is successfully initiated, then the request is in
Sod check result pendingstatus. Check the SoD check field values in the request dataset. If SoD is not initiated successfully because of an error, then the request moves forward directly to the Obtaining Request Approval status. The SoDCheckStatus field in the dataset displays that Sod check is not initiated. -
If the request is in
Sod check result pendingstatus, then run the Get SOD Check Results Approval schedule job to complete the SoD check, and move the request for approvals. If there is a conflict, then the SoDCheckResult field displays Failed status, and the SoDCheckEntitlementViolation field displays the violating duty. -
Approve or reject the request-level approval from Oracle Identity Manager Self Service. For request-level approval, the default workflow is DefaultRequestApproval. Per this workflow, the approval task is assigned to the System Administrator role. If the administrator approves the request, then it goes for operational-level approval. By default, this level of approval is also assigned to the System Administrator role.
The approver can approve or reject the request based on the SoD check result, as displayed in the request detail fields.
After all approvals are obtained, the resource is provisioned on the target system.
27.12.4 Creating a Request to Modify Provisioned Resource
To request for modification of account on the target system:
-
In Oracle Identity Manager Advanced Administration, go to the Requests section, and click Create Request on the toolbar of the left pane. Select the Modify Provisioned Resource request model.
-
Select the resource to be modified and the user for which modification is required.
The values for the attributes predefined in the request dataset are displayed. The SoD check fields are part of the common dataset and are not displayed while creating the request. The fields can be viewed in the Request Details page after the request has been created.
-
Add, update, or delete entitlement data as attribute values in the Create Request wizard, which displays the attribute names based on the request dataset.
-
If SoD is successfully initiated, then the request is in the
SoD check result pendingstatus. Check the SoD check field values in the request dataset. If SoD is not initiated successfully because of an error, then the request moves forward directly to the Obtaining Request Approval status. The SoDCheckStatus field in displays that SoD check is not initiated. -
If the request is in the
SoD check result pendingstatus, then run the Get SOD Check Results Approval schedule job to complete the SoD check, and move the request for approvals. If there is a conflict, then the SoDCheckResult field displays Failed status, and the SoDCheckEntitlementViolation field displays the violating duty. -
Approve or reject the request-level approval from the Self Service. For request-level approval, DefaultRequestApproval is the default workflow. Per this workflow, the approval task is assigned to the System Administrator role. If the administrator approves the request, then it goes for operational-level approval. By default, this level of approval is also assigned to System Administrator. The approver can approve or reject based on the SoD check result as displayed in the request detail fields.
After all approvals are obtained, the new entitlements are provisioned, updated, or deleted on the target system.
27.12.5 Request Provisioning With the DefaultSODApproval Workflow
When the DefaultSODApproval workflow has been specified by using an approval policy, perform the following steps to request for provisioning:
-
Specify the DefaultSODApproval workflow at the operational level. Therefore, the steps before the operational level of approval remain the same.
-
When the request moves to operational level of approval, per the DefaultSODApproval workflow, the approval task is assigned to the System Administrators role. If the administrator approves this task, then the SoD check Web service is loaded, and SoD check is initiated.
This can be confirmed by checking the request status, which must be
SoD check result pending. Run the Get SOD Check Results Approval scheduled job to complete the SoD check. -
An approval task is generated that is assigned to the SOD Administrators role. Any user having this role can claim the task and approve it.
-
Before approving the task, verify the SoD check results in the request details. If the task is approved, then the account and/or entitlement provisioning continues.
In this use case, SoD check is performed two times. First is the default SoD check before any level of approval, and the second one is initiated by the DefaultSODApproval workflow.
27.12.6 Request Provisioning with Approver-Only Field and With the DefaultSODApproval Workflow
If the IT resource field in the request dataset is made approver-only, then its value is not set when the request is created and can only be set by an approver. SoD check takes the SIL topology information from the connector IT resource. Therefore, if no resource has been selected, then SoD check is not triggered. Here, SoD check is not performed before any level of approval and only performed by using the DefaultSODApproval workflow after the approver has provided the IT resource information.
To request provisioning with approver-only field and with the DefaultSODApproval workflow:
-
When the request is submitted, it directly goes for request-level approval. There is no SoD check before this. Approver approves the request after providing the IT resource information.
-
When the request moves to the operational level of approval, per the DefaultSODApproval workflow, the approval task is assigned to the System Administrators role. If the administrator approves this task, then the SoD check Web service is invoked and SoD check is initiated. This can be confirmed by checking the request status, which must be
Sod check result pending. You must run the Get SOD Check Results Approval schedule job to complete the SoD check. -
An approval task is generated that is assigned to the SoD Administrators role. Any user having this role can claim the task and approve it.
-
Before approving the task, verify the SoD results in the request details. If task is approved, then the account and/or entitlement provisioning continues.
27.12.7 Requesting for Self
The user can raise a request for a resource or for modifying a resource from the Self Service. The steps for SoD check are similar for other resource provisioning use cases.
27.12.8 Provisioning Based on Access Policies
To perform provisioning based on access policies:
-
Create a new role.
-
Create an access policy to provision SoD-enabled resource to the new role. Make sure that you provide entitlements in the child form.
-
Assign this role to a newly created user. This provisions the account on the target system, but entitlement provisioning waits for SoD check.
-
Check the process form to verify the SoDCheckStatus field value. If the SoD check is successfully initiated, then the value of the SoDCheckStatus field is
SoD Check Result Pending, and the Holder and SoDChecker tasks are generated, which are in the Pending status. -
Run the Get SOD Check Results Provisioning scheduled job to complete the SoD check.
-
If the SoD check passes, then the Holder and SoDChecker tasks are completed and entitlements get provisioned. Otherwise, the Holder task is canceled and no entitlement provisioning takes place.
27.12.9 Updating Entitlements By Using Provisioning Based on Access Policies
To update entitlements by using provisioning based on access policies:
-
Create a new role.
-
Create an access policy to provision SoD-enabled resource to the new role. Make sure that you provide entitlements in the child form.
-
Assign this role to a user who already have SoD-enabled resource provisioned. Access policy only updates the entitlements for this account.
-
Check the new entitlement rows in the child process form. Check the parent process form to verify the SoDCheckStatus field value. If the SoD check is successfully initiated, then the value of the SoDCheckStatus field is
SoD Check Result Pending, and the Holder and SoDChecker tasks are generated, which are in the Pending status. -
Run the Get SOD Check Results Provisioning scheduled job to complete the SoD check.
-
If the SoD check passes, then the Holder and SoDChecker tasks are completed and entitlements get provisioned. Otherwise, the Holder task is canceled and no entitlement provisioning takes place.
27.13 Enabling Logging for SoD-Related Events
If you want to enable logging for all SoD-related events
-
In a text editor, open the DOMAIN_HOME/config/fmwconfig/servers/oim_server1/logging.xml file.
-
Search for the <loggers> element. The following is a sample <loggers> element:
<loggers>
<logger name="" level="WARNING:1">
<handler name="odl-handler"/>
<handler name="wls-domain"/>
<handler name="console-handler"/>
</logger>
You can change the logging level to INCIDENT_ERROR:1, ERROR:1, NOTIFICATION:1, NOTIFICATION:16, TRACE:1, TRACE:16, or TRACE:32. The default logging level prints the error and warning messages.
27.14 Troubleshooting SoD Check
Table 27-2 lists the troubleshooting steps that you can perform if you encounter errors while performing SoD check.
Table 27-2 Troubleshooting SoD Check
| Problem | Solution |
|---|---|
|
The SoDCheckStatus field in the process form displays no value or default value. For the field in EBS connector, |
This means that SoD configuration is incorrect. Check if the Segregation of Duties (SOD) Check Required system property is set to If default registration is used, then the value of the topologyName parameter is |
|
The SoDCheckStatus field in the process form or request dataset displays The SoDCheckResult field displays |
SoD configuration is correct but SoD engine connection information might be incorrect, or there is an error from the SoD engine. Errors from the SoD engine can occur because of the following reasons:
Check the SoD engine log for further errors. If no tracking ID is returned by the SoD engine, then simulation is not started successfully. |
|
The SoDCheckStatus field in the process form is in the |
Make sure that you run the Get SoD Check Results Provisioning scheduled job and not the scheduled job for approval. Make sure that the scheduled job is triggered. You may enable logging at DEBUG level to confirm this. If the scheduled job is run and the SoD check is still not completing, then there must be an error from the SoD engine. Check the SoD engine log for details. |
|
When requesting for SoD-enabled resource, no SoD fields are displayed in the dataset after creating the request, and the request directly moves to the request-level approval. |
This error means that SoD configuration is incorrect. Check if the Segregation of Duties (SOD) Check Required system property is set to If default registration is used, then the value of the topologyName parameter must be If registration is performed manually, then check if the corresponding topology is defined in the SILConfig.xml file and this file is seeded into MDS after the change. |
|
The SoDCheckStatus field in the request dataset stays in the |
Make sure that you run the Get SoD Check Results Approval scheduled job and not the scheduled job for approval. Make sure that the scheduled job is triggered. You may enable logging at DEBUG level to confirm this. If the scheduled job is run and the SoD check is still not completing, then there must be an error from the SoD engine. Check the SoD engine log for details. |
|
The SoD check is successfully performed during request provisioning, but the resource state in the user profile does not display as |
Check the process tasks in the resource history. If only the System Validation task is displayed, then the required data might not have been saved in the form. You can try saving the form manually by opening the form in edit mode and clicking Save. Enable the Auto-save option in the process definition for future requests. If other tasks, such as the task to create an account on the target system, are displayed in the resource history, then check the task details to verify if there is an error from the target system. For example, the account being created already exists on the target system. |
|
The SoD check is successfully performed during direct provisioning, but the resource state in the user profile is not Provisioned. |
Check the process tasks in the resource history. If only the System Validation task is displayed, then the required data might not have been saved in the form. This can happen if the Auto-Save option is on in the process definition, and therefore, the form is not displayed during direct provisioning. You can try saving the form manually by opening the form in edit mode and clicking Save. Disable the Auto-save option in the process definition for future requests. If other tasks, such as the task to create an account on the target system, are displayed in the resource history, then check the task details to verify if there is an error from the target system. For example, the account being created already exists on the target system. |
|
Request provisioning has been successfully done and appropriate values are displayed in the request dataset, but the SoD status and result are not reflected to the process form. |
Check the SoD field labels in the process form. They must be SoDCheckStatus, SoDCheckTrackingID, SoDCheckResult, SoDCheckTimestamp, and SoDCheckEntitlementViolation. If you change these field labels, then SoD field will not be mapped from the request dataset to the process form. |
|
A particular SoD request is being tried several times and generating error. |
There may be a problem with the SoD configuration or error in data submitted in a particular request. If you see that the traces of error for a request though SoD configuration is correct and you want to ignore the particular request, then you can prevent the JMS message related to the request from being tried multiple times by changing the Redelivery Limit for the OIMSODQueue from the WebLogic Administrative Console. To do so:
|
|
Error in task assignment rules evaluation. Error in task assignment rules evaluation for user null. The error is Error in getting owners for "{0}" in configuration "{1}". Error occurred in getting owners for "SOD ADMINISTRATORS" in configuration "jazn.com". Ensure that the group name is valid and has associated owners. Contact Oracle Support if error is not fixable. Make sure that the rules specified for user null are valid. |
Ignore this error. The reason for this error is that the OIMDBProvider does not support getting owners for a role. Therefore, SOA logs this error. |
|
When trying to perform SoD check by using the DefaultSODApproval workflow, the following error message is displayed: Unknown Credential type to find the password for the given map : oim key : sodcheck.credentials |
Add |
|
The following error is displayed: [exec] Caused By: Thor.API.Exceptions.tcITResourceNotFoundException [exec] at com.thortech.xl.ejb.beansimpl.tcITResourceInstanceOperationsBean.getITResourceInstanceParametersData |
The SoD Engine IT resource has not been created. Therefore, according to the SoD Engine that is to be used, the corresponding IT resource must be created. For example, for OAACG, create OAACG-ITRes. |
|
If SoD is enabled for more than one SoD Engine, for example OAACG and OIA, and you try to start SoD check with OIA, then errors might be logged from OAACG files. |
This problem occurs if the topology entries in the SILConfig.xml file are incorrect. To see these entries, export the SILConfig.xml file from MDS. For default providers, the SILConfig.xml file has the SIL registeration IDs corresponding to the topology names. The IDs in SILConfig.xml and the IDs that SIL registration script returns must be same. For example, the IDs for sodoia topology in SILConfig.xml are: <IdmId>1</IdmId> <SodId>7</SodId> <SDSId>6</SDSId> Then the IDs returned by the registration script are: 1 oimInstance 6 oimSDSInstance 7 oiaInstance If these are different, then change the IDs in the SILConfig.xml file and reimport it by using the MDS utility. |
