4 Managing Oracle SOA Suite on IBM WebSphere
This chapter contains information about managing Oracle SOA Suite applications and components on IBM WebSphere.
This chapter contains the following sections:
-
Configuring Oracle SOA Suite and Oracle BAM Against an External LDAP Server on IBM WebSphere
-
Differences and Restrictions When Managing Oracle SOA Suite Components on IBM WebSphere
-
Differences and Restrictions When Managing Oracle BAM on IBM WebSphere
In this chapter, IBM WebSphere is used to reference both IBM WebSphere Application Server (AS) and IBM WebSphere Application Server Network Deployment (ND). The specific product names are used when appropriate.
4.1 Configuring Oracle SOA Suite and Oracle BAM Against an External LDAP Server on IBM WebSphere
If you are installing and configuring Oracle SOA Suite on IBM WebSphere, then you must install and configure a supported LDAP server before you can configure the Oracle SOA Suite components in a new IBM WebSphere cell. For more information, see Section 4.1.1, "Configuring SOA Suite Users and Groups in an External LDAP Server."
If you are installing Oracle BAM on IBM WebSphere, then you must perform additional configuration steps for Oracle SOA Suite and Oracle BAM against the external LDAP server. For more information, see Section 4.1.2, "Configuring Oracle SOA Suite and Oracle BAM in an External LDAP Server."
4.1.1 Configuring SOA Suite Users and Groups in an External LDAP Server
When you install Oracle SOA Suite with IBM WebSphere, an internal LDAP server is not automatically configured with SOA users and groups. You must manually perform these configuration tasks in an external LDAP server, such as Oracle Internet Directory, after installation.
For information on the LDAP servers that are supported by Oracle Fusion Middleware, refer to the certification information on the Oracle Technology Network:
http://www.oracle.com/technology/software/products/ias/files/fusion_certification.html
The following provides an overview of the tasks to perform when configuring your supported LDAP server for use with Oracle SOA Suite:
-
Use your LDAP management tool to create two groups (Operator group and Monitor group) and two users (Operator user and Monitor user).
Note that the management tool you use to create the users and groups will vary, depending up on the LDAP server you are using. For example, if you are using Oracle Internet Directory, refer to information about using the Oracle Directory Services Manager in the Oracle Fusion Middleware Administrator's Guide for Oracle Internet Directory.
-
In the IBM WebSphere Administrative Console, create the following mappings:
-
User roles for operator and monitor
-
Group roles for operator and monitor
For example, the following page shows the Administrative user roles section with the monitor user ashish (second check box) and the operator user opuser (fourth check box) available for selection. You perform similar mappings for group roles on a separate page.
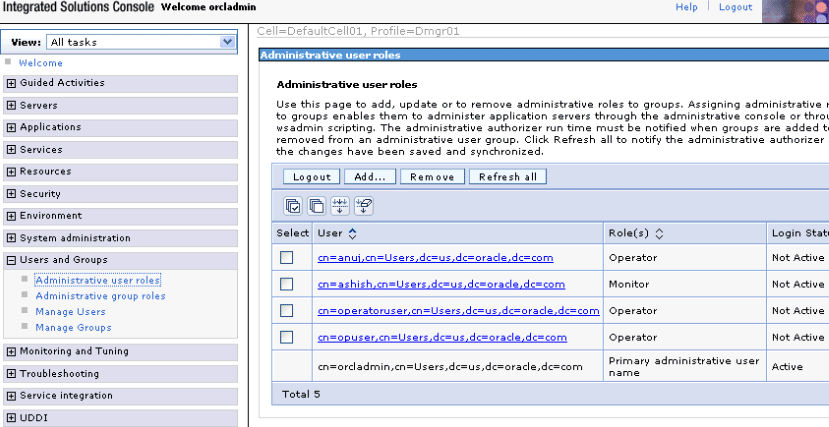
Description of the illustration soa_ldap3.gif
-
-
Log in to Oracle Enterprise Manager Fusion Middleware Control with administrator access.
-
In the navigator, right-click soa-infra, and select Security > Application Roles.
-
Map the SOA roles to the Operator and Monitor roles.
-
For SOAOperator role, add the Operator group as a member.
-
For SOAMonitor role, add the Monitor group as a member.
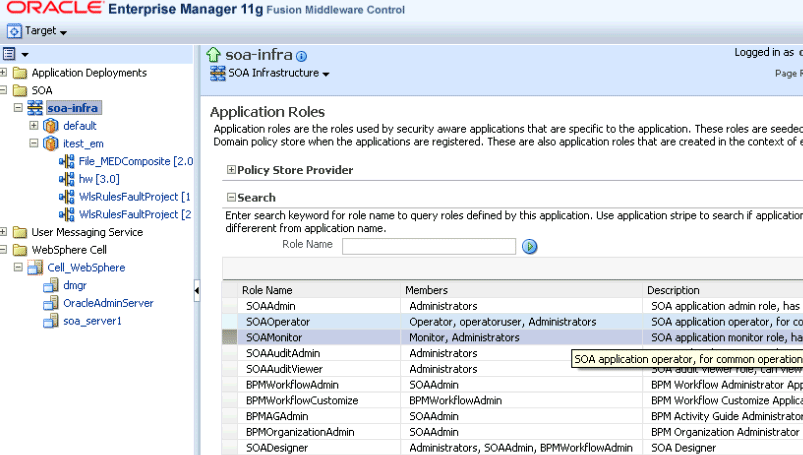
Description of the illustration soa_ldap4.gif
-
For additional information about switching LDAP authentication providers, see the following documentation:
-
To switch LDAP authentication providers if the corresponding LDAP server contains the user or users who start the domain, see Section "Requirements for Using an LDAP Authentication Provider" in Oracle Fusion Middleware Securing Oracle WebLogic Server.
-
To add an Oracle Internet Directory, Oracle Virtual Directory, or other authentication provider using WLST commands, see Section "Configuring Additional Authentication Providers" in Oracle Fusion Middleware Oracle WebLogic Scripting Tool.
4.1.2 Configuring Oracle SOA Suite and Oracle BAM in an External LDAP Server
To use the external LDAP server with Oracle BAM on IBM WebSphere, the user OracleSystemUser must be added to the external LDAP server.
In addition, the following post-installation steps must be executed on IBM WebSphere:
-
Create the properties file to use as the input for configuring the identity store. For example, the Oracle Internet Directory properties file could look like this:
user.search.bases=dc=com
group.search.bases=dc=com
subscriber.name=dc=com
ldap.host=mymachine.example.com
ldap.port=17234
admin.id=cn=orcladmin
admin.pass=orcladmin1
user.filter=(&(cn=%v)(objectclass=person))
group.filter=(&(cn=%v)(objectclass=groupofuniquenames))
user.id.map=*:cn
group.id.map=*:cn
group.member.id.map=groupofuniquenames:uniquemember
ssl=false
-
Go to the
MW_HOME/oracle_common/common/bindirectory, whereMW_HOMEis the directory in which Oracle SOA Suite is installed. Then run:./wsadmin.sh -conntype SOAP -user <username> -password <password>
Replace
<username>and<password>with the WebSphere user and password for your IBM WebSphere installation. -
Run the following command to configure the identity store:
Opss.configureIdentityStore(propsFileLoc="(<complete_path_LDAP.properties>")
For example:
Opss.configureIdentityStore(propsFileLoc="C:\oid.properties")
-
Then run the following command to reassociate the identity store:
Opss.reassociateSecurityStore(domain="WAS_policy_store",admin="<LDAPAdminUser>",
password="<LDAPAdminpassword>", ldapurl="ldap://<LDAPHost>:<LDAPPort>",
servertype="<LDAPSERVERTYPE>", jpsroot="cn=jpsroot")
For example:
Opss.reassociateSecurityStore(domain="WAS_policy_store",admin="cn=orcladmin", password="orcladmin1",
ldapurl="ldap://mymachine.example.com:17234", servertype="OID", jpsroot="cn=jpsroot")
4.2 Differences and Restrictions When Developing and Deploying Oracle SOA Suite Applications on IBM WebSphere
The following sections describe differences and restrictions when developing and deploying Oracle SOA Suite applications on IBM WebSphere:
-
Section 4.2.1, "Oracle SOA Suite wsadmin and WLST Command Differences"
-
Section 4.2.2, "Configuring the WebSphere Application Client for Use with Oracle JDeveloper"
-
Section 4.2.3, "Configuring the Proxy on IBM WebSphere Server"
4.2.1 Oracle SOA Suite wsadmin and WLST Command Differences
All Oracle SOA Suite wsadmin commands supported by IBM WebSphere have equivalent WebLogic Scripting Tool (WLST) commands.
Note:
Project Lifecycle commands are not supported on IBM WebSphere AS and ND. This means there are no wsadmin commands in IBM WebSphere AS or ND that are equivalent to the WLST project lifecycle commands.
Table 4-1 describes differences between wsadmin and WLST.
Table 4-1 Differences Between wsadmin and WLST
| Issue | WLST | wsadmin |
|---|---|---|
|
|
WLST commands are prefixed with
sca_deployComposite('http://
 adc10:9080','/tmp/sca_HelloWorld_
rev1.0.jar')
|
All
soa.sca_deployComposite('http://
adc10:9080', '/tmp/sca_
HelloWorld_rev1.0.jar')
|
|
Boolean type |
You use true/false or 1/0. |
You must use 1/0. |
|
Composite management commands |
You run WLST commands in offline mode. |
You run
To start a composite: soa.sca_startCompositeMb(compositeName, revision, label, partition) To stop a composite: soa.sca_stopCompositeMb(compositeName, revision, label, partition) To activate a composite: soa.sca_activateCompositeMb(compositeName, revision, label, partition) To retire a composite: soa.sca_retireCompositeMb(compositeName, revision, label, partition) To assign a default composite: soa.sca_assignDefaultCompositeMb(compositeName, revision, partition) To get a default composite revision: soa.sca_getDefaultCompositeRevisionMb(composite Name, partition) To list deployed composites: soa.sca_listDeployedCompositesMb() To list all composites in the given partition: soa.sca_listCompositesInPartitionMb(partition) |
Note:
wsadmin online commands using MBeans may not provide specific error details. Instead, you may see just an MBeanException.
Execute Oracle SOA Suite wsadmin commands from the SOA_ORACLE_HOME/common/bin directory:
cd SOA_ORACLE_HOME/common/bin
./wsadmin.sh
To invoke online help for Oracle SOA Suite commands, enter the following:
wsadmin> print OracleHelp.help('soa')
To invoke online help for a specific command, enter the following:
wsadmin> print OracleHelp.help('soa.sca_deployComposite')
For more information about wsadmin commands, see Section 3.1.3, "Using the Oracle Fusion Middleware wsadmin Commands".
For information about the equivalent Oracle SOA Suite WLST commands, see Oracle Fusion Middleware WebLogic Scripting Tool Command Reference.
4.2.2 Configuring the WebSphere Application Client for Use with Oracle JDeveloper
This section contains these topics:
4.2.2.1 How to Configure the WebSphere Application Client for Use with Oracle JDeveloper on the Same Computer
This section describes how to configure the WebSphere Application Client for use with Oracle JDeveloper when the two are on the same computer.
-
copy the
sas.client.propsfile from:WEBSPHERE_HOME/profiles/DmgrXX/properties/to:
WEBSPHERE_HOME/properties/. -
Edit the
sas.client.propsfile as follows:com.ibm.CORBA.securityServerHost=<Server Host Name> com.ibm.CORBA.securityServerPort=<JMX/BOOTSTRAP Port> (BOOTSTRAP ADDRESS of SOA SERVER) com.ibm.CORBA.loginSource=properties com.ibm.CORBA.loginUserid=<Admin UserName> (weblogic/wasadmin) com.ibm.CORBA.loginPassword=<PlainText or Encoded Password> (weblogic1/wasadmin1) # Does this client support/require SSL connections? com.ibm.CSI.performTransportAssocSSLTLSRequired=false com.ibm.CSI.performTransportAssocSSLTLSSupported=false
-
Restart the WebSphere servers.
-
Log in to Oracle JDeveloper and navigate to New, then to Connections, then to Application Server Connections.
-
Create an application server connection and enter the necessary information. To do this:
-
Navigate to File, then New, then Connections, then Application Server Connection. This starts a Create Application Server Connection wizard. Enter the connection name and for the connection type choose WebSphere Server 7.x. Click Next.
-
Specify the username; the default is
wasadmin. Specify the password; the default iswelcome1. Click Next. -
Enter server details as shown in Figure 4-1.
Figure 4-1 Configuring Server Details for an Application Server Connection
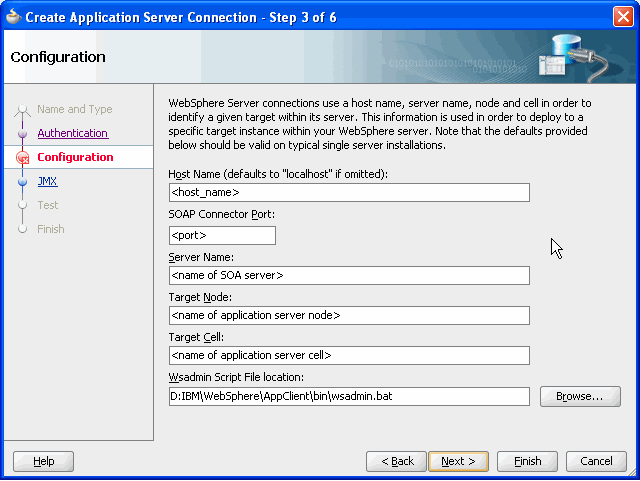
Description of "Figure 4-1 Configuring Server Details for an Application Server Connection"
Note the following:
-
For an ND installation, enter the server details for the Deployment Manager. To find these values, refer to Section 4.2.2.1.1, "IBM WebSphere ND: Finding Server Information from the IBM Console."
-
There should be no spaces in the path to
wsadmin.sh/bat. If you are on Windows, use the DOS equivalent path; for example, instead ofC:\Program Files\useC:\Progra~1\. -
If you have an IBM WebSphere server installed locally, then enter the path to
wsadmin.batfile in the "Wsadmin Script File location"; otherwise, specify the location to this file from the IBM WebSphere client installation. -
On the server configuration page, for the 'Server Name' enter
SOA SERVER—not the deployment manager server name. -
For the target cell and target node names, enter the application server node name and cell name—not the deployment manager node and cell name.
-
On the JMX configuration page, for the 'RMI Port' enter
BOOTSTRAP ADDRESS of SOA SERVER.
Click Next.
-
-
If you are planning to browse (SOA) server over JMX, then select Enable JMX for this connection.
To find the RMI Port value, refer to Section 4.2.2.1.2, "IBM WebSphere AS: Finding Server Information from the IBM Console."
If you have an IBM WebSphere server installed locally, then enter the path to
wsadmin.batfile in the "Wsadmin Script File location"; otherwise, specify the location to this file from the IBM WebSphere client installation.Click Next.
-
You might see the SSL Signer Exchange Prompt. If so, click
Yto continue. This dialog appears only once for each host and server. -
Test your connection and make sure that all tests are successful. To do this, on the Test tab click Test Connection. All tests should pass as follows:
Testing WsAdmin ... success.
Testing JSR-160 ... success.
Testing DeploymentConfig ... success.
Testing JSR-160 for SOA ... success.
If any of the tests fail, then deployment and browsing may not work.
4.2.2.1.1 IBM WebSphere ND: Finding Server Information from the IBM Console
In the Create Application Server Connection wizard, on the Configuration page, enter the following:
SOAP Connector Port =  System administration -> Deployment Manager -> Configuration -> Ports -> SOAP_CONNECTOR_ADDRESS

Server Name = System administration -> Deployment Manager -> Configuration -> Name

Target Node = System administration -> Deployment Manager -> Runtime -> Node name

Target Cell =  System administration -> Deployment Manager -> Runtime-> Cell name
In the Create Application Server Connection wizard, on the JMX page, enter the following:
RMI Port = System administration -> Deployment Manager -> Configuration -> Ports -> BOOTSTRAP_ADDRESS
4.2.2.1.2 IBM WebSphere AS: Finding Server Information from the IBM Console
In the Create Application Server Connection wizard, on the Configuration page, enter the following:
SOAP Connector Port = Servers -> Server Types -> Websphere Application Servers -> <YourServerName> -> Configuration -> Ports -> SOAP_CONNECTOR_ADDRESS

Server Name = Servers -> Server Types -> Websphere Application Servers -> <YourServerName> -> Configuration -> Name

Target Node = Servers -> Server Types -> Websphere Application Servers -> <YourServerName> -> Runtime -> Node name

Target Cell = Servers -> Server Types -> Websphere Application Servers -> <YourServerName> -> Runtime-> Cell name
In the Create Application Server Connection wizard, on the JMX page, enter the following:
RMI Port = Servers -> Server Types -> Websphere Application Servers -> <YourServerName> -> Configuration -> Ports -> BOOTSTRAP_ADDRESS
4.2.2.2 How to Configure the WebSphere Application Client for Use with Oracle JDeveloper on Different Computers
This section describes how to configure the WebSphere Application Client for use with Oracle JDeveloper when the two are on different computers. Once the WebSphere Application Client is properly configured, Oracle JDeveloper can remotely connect to an IBM WebSphere Server. This enables you to perform actions such as the following in Oracle JDeveloper:
-
Remote deployment of SOA composite applications and J2EE applications
-
Browsing of SOA composite applications on a remote server
4.2.2.2.1 Installing the WebSphere Application Client
-
Follow the WebSphere Application Client installation steps provided in the IBM documentation.
-
When selecting WebSphere Application Client features for installation, ensure that you select the following components when prompted:
-
IBM Developer Kit
-
Standalone thin clients and resource adapters
-
-
Apply the latest fix packs through the IBM Update Installer.
For more information, see Section 1.3.1, "Supported IBM WebSphere Application Servers".
4.2.2.2.2 Creating the wsadmin.sh/bat File
-
Make a copy of the example file provided in the instructions at the WebSphere Application Server Information Center that describe how to run the
wsadmintool remotely in a Java 2 Platform, Standard Edition environment. -
Edit the
wsadmin.shfile (for Linux) or thewsadmin.batfile (for Windows) as follows:-
Set the
WAS_HOMEvariable to your WebSphere Application Client home directory:On... Set... Linux
WAS_HOME=/home/user/IBM/WebSphere/AppClientWindows
set WAS_HOME=C:\IBM\WebSphere\AppClient -
Set the
USER_INSTALL_ROOTvariable toWAS_HOME:On... Set... Linux
USER_INSTALL_ROOT=${WAS_HOME}Windows
set USER_INSTALL_ROOT=%WAS_HOME% -
Set the
wsadminHostvariable to your remote IBM WebSphere Application Server host name:On... Set... Linux
wsadminHost=-Dcom.ibm.ws.scripting.host=www.example.comWindows
set wsadminHost=-Dcom.ibm.ws.scripting.host=www.example.com -
Set the
wsadminPortvariable to your remote IBM WebSphere Server SOAP connector port:On... Set... Linux
wsadminPort=-Dcom.ibm.ws.scripting.port=8879Windows
set wsadminPort=-Dcom.ibm.ws.scripting.port=8879 -
Edit the
C_PATHvariable to use the WebSphere Application Client JAR files:On... Set... Linux
C_PATH="${WAS_HOME}/properties:${WAS_HOME}/runtimes/com.ibm.ws.admin.client_7.0.0.jar:${WAS_HOME}/plugins/com.ibm.ws.security.crypto.jar"Windows
set C_PATH="%WAS_HOME%\properties;%WAS_HOME%\runtimes\com.ibm.ws.admin.client_7.0.0.jar;%WAS_HOME%\plugins\com.ibm.ws.security.crypto.jar" -
If installing on Windows, perform the following modifications to the
wsadmin.batfile.-
Add
@setlocalto the beginning of the file. -
Replace the following code:
if exist "%JAVA_HOME%\bin\java.exe" (
    set JAVA_EXE="%JAVA_HOME%\bin\java" )
 else (
    set JAVA_EXE="%JAVA_HOME%\jre\bin\java" )
with the following code:
set JAVA_EXE="%JAVA_HOME%\jre\bin\java"
-
Remove all quotations from the following Java system properties:.
set CLIENTSOAP=-Dcom.ibm.SOAP.ConfigURL=file:%USER_INSTALL_
ROOT%\properties\soap.client.props
set CLIENTSAS=-Dcom.ibm.CORBA.ConfigURL=file:%USER_INSTALL_
ROOT%\properties\sas.client.props
set CLIENTSSL=-Dcom.ibm.SSL.ConfigURL=file:%USER_INSTALL_
ROOT%\properties\ssl.client.props
set CLIENTIPC=-Dcom.ibm.IPC.ConfigURL=file:%USER_INSTALL_
ROOT%\properties\ipc.client.props
-
Remove all trailing white space characters from the entire file.
-
-
4.2.2.2.3 Running wsadmin.sh or wsadmin.bat from the Command Line
Ensure that the script works by running wsadmin.sh or wsadmin.bat from the command line. Note the following:
-
You may need to enter the user name and password at the login prompt.
-
You may need to accept the server certificate by clicking Y at the signer exchange prompt.
4.2.2.2.4 Editing the sas.client.props File
See Step 20 of Section 4.2.4, "Creating an Application Server Connection" for instructions.
4.2.2.2.5 Creating an Application Server Connection in Oracle JDeveloper
Follow the instructions in Section 4.2.4, "Creating an Application Server Connection" to create an application server connection, and enter the following information when prompted:
-
Use the
wsadmin.shorwsadmin.batfile you created in this section (for example,/home/user/IBM/AppClient/wsadmin.sh). -
Use the runtimes directory of the WebSphere Application Client (for example,
/home/user/IBM/AppClient/runtimes). -
Use the properties directory that contains
sas.client.props(for example,/home/user/IBM/AppClient/properties).
4.2.3 Configuring the Proxy on IBM WebSphere Server
-
Log in to the IBM WebSphere Administrative Console:
host:port/ibm/console
-
Go to Application servers > ServerName > Process definition > Java Virtual Machine > Custom properties.
-
Define the following properties and values.
Property Value http.proxyHostproxyhost.example.comhttp.proxyPort80http.proxySettrue -
Restart the server.
4.2.4 Creating an Application Server Connection
You must create a connection to the IBM WebSphere Server to which to deploy a SOA composite application. During application server connection creation, you are prompted for configuration information on several wizard pages. Table 4-2 describes where to find this information on IBM WebSphere Administrative Console for which you are prompted. The locations differ based on the type of IBM WebSphere Server you are using, and the server where the application is being deployed.
Table 4-2 Location of Application Server Connection Configuration Details
| Connection Wizard Fields | For IBM WebSphere Application Server - Network Deployment (ND), Select... | For IBM WebSphere Application Server 7.0, Select... |
|---|---|---|
|
Configuration Page |
||
|
System administration > Deployment manager > Configuration > Ports > SOAP_CONNECTOR_ADDRESS |
Servers > Server Types > WebSphere Application Servers > Your_Server_Name > Configuration > Ports > SOAP_CONNECTOR_ADDRESS |
|
System administration > Deployment manager > Configuration > Name |
Servers > Server Types > WebSphere Application Servers > Your_Server_Name > Configuration > Name |
|
System administration > Deployment manager > Runtime > Node name |
Servers > Server Types > WebSphere Application Servers > Your_Server_Name > Runtime > Node name |
|
System administration > Deployment manager > Runtime > Cell name |
Servers > Server Types > WebSphere Application Servers > Your_Server_Name > Runtime > Cell name |
|
JMX Page |
||
|
System administration > Deployment manager -> Configuration > Ports > BOOTSTRAP_ADDRESS |
Servers > Server Types > WebSphere Application Servers > Your_Server_Name > Configuration > Ports > BOOTSTRAP_ADDRESS |
Note:
If you are using IBM WebSphere ND as the server type and you are deploying the application to the deployment manager server, then use the second column in the table to locate the configuration information you need.
To create an application server connection:
-
From the File main menu, select New.
-
In the General list, select Connections.
-
Select Application Server Connection, and click OK.
The Name and Type page appears.
-
In the Connection Name field, enter a name for the connection.
-
In the Connection Type list, select WebSphere Server 7.x to create a connection to IBM WebSphere Server.
-
Click Next.
The Authentication page appears.
-
In the Username field, enter the user authorized for access to the application server.
-
In the Password field, enter the password for this user.
-
Click Next.
The Configuration page appears. If you are not sure about the information to enter on this page, see Table 4-2.
-
In the Host Name field, enter the host on which the IBM WebSphere Server is installed. If no name is entered, the name defaults to
localhost. -
In the SOAP Connector Port field, enter the port number of the server on which IBM WebSphere Server is installed. The default SOAP connector port is
8879. -
In the Server Name field, enter the name assigned to the target application server for this application.
-
In the Target Node field, enter the name of the target node for this connection. A node is a grouping of managed servers (for example,
hostNode01, wherehostis the name of the host on which the node resides). -
In the Target Cell field, enter the name of the target cell for this connection. A cell is a group of processes that host runtime components (for example,
hostNode01Cell, wherehostis the name of the host on which the node resides). -
In the Wsadmin script location field, enter or browse for the location of the
wsadminscript file to use for defining the system login configuration for this application server connection (for example,WAS_HOME\bin\wsadmin.batfor Windows orWAS_HOME/bin/wsadmin.shfor Unix).Note:
Do not enter spaces in the path to the
wsadmin.shorwsadmin.batfile. For example, if on Windows, use the DOS equivalent path ofC:\Progra~1\instead ofC:\Program Files\. -
Click Next.
The JMX page appears.
-
If you want to browse the SOA Infrastructure and deploy over JMX, select Enable JMX for this connection.
-
In the RMI Port field, enter the port number for the IBM WebSphere Server's RMI connector port. If you are not sure about the information to enter on this page, see Table 4-2.
-
In the WebSphere Runtime Jars Location field, enter or browse for the IBM WebSphere Server's runtime JAR files (for example,
WAS_HOME/runtimes). -
In the WebSphere Properties Location (for secure MBean access) field, enter or browse for the location of the file that contains the properties for the security configuration and MBeans that are enabled (for example,
WAS_HOME/profiles/profile_name/properties). This field is optional (for some Oracle JDeveloper use cases), but is required for SOA browsing and deployment. The location you specify must contain thesas.client.propsfile. Details about the contents of thesas.client.propsfile are as follows:-
Authentication:
The
sas.client.propsfile is required for authentication, and must be edited as follows:com.ibm.CORBA.securityServerHost=Server_Host_Name com.ibm.CORBA.securityServerPort=RMI/BOOTSTRAP_Port com.ibm.CORBA.loginSource=properties com.ibm.CORBA.loginUserid=User_Name com.ibm.CORBA.loginPassword=Plain_Text_or_Encoded_Password
-
Encode password:
To encode the password in the
sas.client.propsfile, save this file with a clear text password and then run the following utility:On Windows:
WAS_HOME\bin\PropFilePasswordEncoder.bat
..\properties\sas.client.props com.ibm.CORBA.loginPassword
On UNIX:
WAS_HOME/bin/PropFilePasswordEncoder.sh ../properties/sas.client.props com.ibm.CORBA.loginPassword -
SSL (If not required):
In most cases, SSL is not required for JMX. You must explicitly disable SSL as follows:
# Does this client support/require SSL connections?
com.ibm.CSI.performTransportAssocSSLTLSRequired=false
com.ibm.CSI.performTransportAssocSSLTLSSupported=false
-
SSL (If required):
If you require SSL for JMX, do not configure
ssl.client.props. Instead, you must append the necessary SSL configuration details tosas.client.propsfor Sun JRE clients, since Oracle JDeveloper runs in the Sun JRE.Edit the following two sections in
sas.client.props:-
Edit the section on SSL connection requirements.
# Does this client support/require SSL connections?
com.ibm.CSI.performTransportAssocSSLTLSRequired=false
com.ibm.CSI.performTransportAssocSSLTLSSupported=true
-
Append the following syntax to the end of
sas.client.props. For thecom.ibm.ssl.trustStoreproperty, you can use the path to any*.jkstruststore.#-------------------------------------------------------------- # SSL configuration alias referenced in ssl.client.props #-------------------------------------------------------------- com.ibm.ssl.alias=JDeveloperSSLSettings com.ibm.ssl.protocol=SSL com.ibm.ssl.securityLevel=HIGH com.ibm.ssl.trustManager=SunX509 com.ibm.ssl.keyManager=SunX509 com.ibm.ssl.contextProvider=SunJSSE com.ibm.ssl.enableSignerExchangePrompt=gui com.ibm.ssl.trustStoreName=DemoTrustStore com.ibm.ssl.trustStore=c:/YOUR_JDEVHOME/your_server/ lib/DemoTrust.jks com.ibm.ssl.trustStorePassword=DemoTrustKeyStorePassPhrase com.ibm.ssl.trustStoreType=JKS com.ibm.ssl.trustStoreProvider=SUN com.ibm.ssl.trustStoreFileBased=true com.ibm.ssl.trustStoreReadOnly=false -
Upon the first invocation of JMX (typically when you click Test Connection on the Test page of this wizard), the SSL Signer Exchange dialog can appear. Click y to accept the server certificate. Note that a
ThreadDeatherror is displayed that can safely be ignored. -
Provide the keystore location through the system properties in either of the following ways:
Note:
When configuring the truststore location through the system properties on Windows operating systems, you must enter a forward slash (
/) in the path. For example,c:/to/path/truststore.From the command prompt:
$JDEV_INSTALL_DIR/jdev/bin/jdev
-J-Djavax.net.ssl.trustStore=c:/path/to/truststore
-J-Djavax.net.ssl.trustStorePassword=DemoTrustKeyStorePassPhrase
In the
jdev.conffile:AddVMOption -Djavax.net.ssl.trustStore=c:/path/to/truststore AddVMOption -Djavax.net.ssl.trustStorePassword=DemoTrust KeyStorePassPhrase
-
-
Multiple WAS connections
Since one
sas.client.propsfile is required for each application server connection, Oracle recommends that you create a directory for each application server, copysas.client.propsto that directory, and edit the file as necessary.
-
-
Click Next.
-
Click Test Connection to test your server connection.
-
If the connection is successful, click Finish. Otherwise, click Back to make corrections in the previous dialogs. Even if the connection test is unsuccessful, a connection is created.
4.2.5 Deploying SOA Composite Applications
Deployment of SOA Composite Applications from Oracle JDeveloper to IBM WebSphere Server is largely the same as described in Oracle Fusion Middleware Developer's Guide for Oracle SOA Suite.
The only exception is the appearance of the Deploy using SSL check box on the SOA Servers page of the deployment wizard. This differs from Oracle WebLogic Server, where the Deploy using SSL check box instead appears on the Configuration page of the Create Application Server Connection wizard page.
Table 4-3 describes what occurs when you select this check box during IBM WebSphere Server deployment.
Table 4-3 Deployment to HTTPS and HTTP Servers
| If This Checkbox Is... | Then... |
|---|---|
|
Selected |
An HTTPS server URL must exist to deploy the composite with SSL. Otherwise, deployment fails. If the server has only an HTTP URL, deployment also fails. This enables you to ensure that SSL deployment must not go through a non-SSL HTTP URL, and must only go through an HTTPS URL |
|
Not selected |
An HTTP server URL must exist to deploy to a non-SSL environment. Otherwise, deployment fails. If the server has both HTTPS and HTTP URLs, deployment occurs through a non-SSL connection. This enables you to force a non-SSL deployment from Oracle JDeveloper, even though the server is SSL-enabled. |
4.2.6 Using EJB Bindings
If a SOA composite application includes an EJB service, you must perform the following configuration procedures for the EJB service binding to work properly:
4.2.6.1 EJB Service Binding
You must set up credentials for EJB JNDI binding before deploying a composite that contains an EJB service binding.
-
Create an entry for Oracle Platform Security Services (OPSS) (for example, with
SOAas the name andDeployeras the key.-
Go to the
MW_HOME/oracle_common/common/bindirectory.where
MW_HOMEis the directory in which Oracle SOA Suite is installed. -
Make the
wsadmin.shfile executable (if it is not already):chmod +x wsadmin.sh
-
Execute the following command, and enter the password when prompted:
./wsadmin.sh -host localhost -port 8880 -conntype SOAP -user adminusername
-lang jython
The port number is the
SOAP_CONNECTOR_ADDRESSof the host used to connect to the server for deployment. In the IBM Administrative Console, navigate to the Ports table via Deployment Manager > Ports to locate the value. -
Enter the following command to create the credentials:
Opss.createCred(map="SOA",key="Deployer",user="adminusername",password="password
")
-
-
Assign the JNDI reading, writing, and binding roles to the administrator user.
Note:
The JNDI binding role does not need to be granted to the Administrator. However, it must match the user you specified with the
Opsscommand in Step d.-
Log in to the WebSphere Administrative Console.
-
Click and expand Environment > Naming.
-
Click CORBA naming service groups.
-
Click the Add button.
-
Select all the roles in the selection box at the top.
-
Search for groups using the wildcard ("
*") -
Select the Administrators group (to which the
adminusernameuser belongs). -
Click OK.
-
Click the Save link.
-
Restart the server.
-
4.2.6.2 EJB Client
Generate stubs for the EJB interfaces using the createEJBStubs.sh utility and ensure that the stubs are in the client classpath.
4.2.6.3 EJB Reference Binding
You must include the EJB stubs for the external EJB interface in the composite SCA-INF/classes or SCA-INF/lib directory.
4.2.7 AQ Technology Adapter and WebSphere 7.0
For the AQ Adapter to work correctly on the WebSphere 7.0 platform, you need to use the IBM WebSphere Administrative Console to provide specific connection factory and data source properties.
For the connection factory, you need to set the following custom property for the connection pool: defaultConnectionTypeOverride = unshared
For the AQ adapter dataSource, ensure that validate existing pooled connections is checked. The associated interval can be set to 0. See the following screen shot.
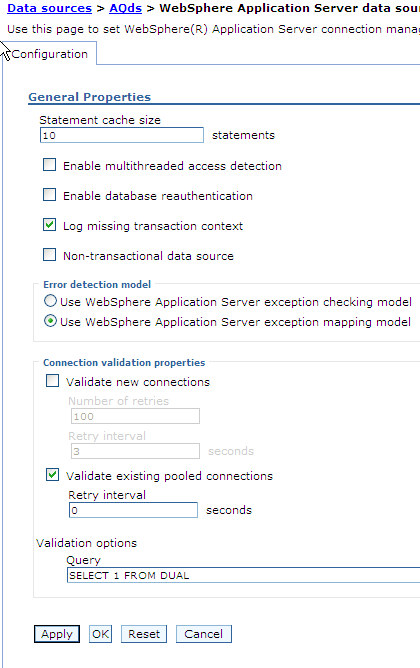
Description of the illustration aqds4.gif
Also for the AQ adapter dataSource, you must define the same property as a custom property for the connection pool by setting the following: defaultConnectionTypeOverride = unshared
See the following screen shot.
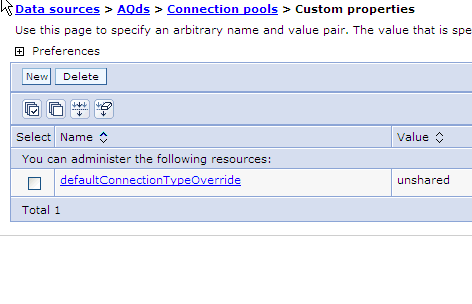
Description of the illustration aqds3.gif
You also need to set the maximum connections value of AQAdapter J2C connection factories to a higher value than the default of 10. You can find this entry in the WebSphere Application Server J2C connection factories -> <Name of AQAdapter> -> Connection pools panel.
4.2.8 JMS Technology Adapter on WebSphere 7.0
If you are developing composite applications to run on WebSphere 7.0, you need to use the Third Party option when modelling the JMS adapter with the Default Messaging JMS provider. You can specify that the adapter uses a third-party JMS Provider, by supplying a value to the FactoryProperties parameter in the weblogic-ra.xml file. Specifically, you can provide the ThirdPartyJMSProvider value to the FactoryProperties parameter.
When deployed on WebSphere 7.0, the JMS Adapter will not work with an AQJMS provider, unless you use the Adapter Configuration Wizard to set defaultConnectionTypeOverride as unshared for both the adapter connection factory pool and for the queue/topic connection factory pool. See the following screen shot.
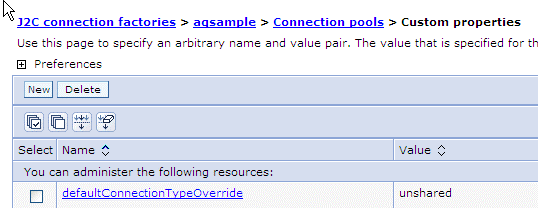
Description of the illustration j2c3_1.gif
You also need to set the maximum connections value of JMS Adapter J2C factories to a higher value than the default of 10. You can find this entry in the WebSphere Application Server J2C connection factories > Name of JMS Adapter > Connection pools panel.
4.2.8.1 Avoiding JMS Adapter Connection Leaks
While running JMS Adapter use cases on WebSphere 7.0, you might encounter the following error from a connection leak:.
java.lang.IllegalStateException: ConnectionManager is null
To avoid connection leaks, update the maximum and minimum connection value for the JMS Adapter to the same value at Queue connection factories > Connection_factory_name > Connection pools and J2C connection factories > J2C_Connection_Factoryname > Connection Point.
4.2.9 Oracle Database Adapter on WebSphere 7.0
For the Oracle Database Adapter to work properly, you need to the set the maximum connections value of the DB adapter J2C connection factories, using the WebSphere Admin Server. This value needs to be set to a higher value than the default of 10. You can find this entry under J2C connection factories > Name of DB-Adapter > Connection pools. The preferred value is 100.
4.3 Differences and Restrictions When Managing Oracle SOA Suite Components on IBM WebSphere
The following sections describe differences and restrictions when managing Oracle SOA Suite components on IBM WebSphere:
-
Section 4.3.1, "Configuring the Deployment Manager to Detect the Remote Node Agent"
-
Section 4.3.3, "Oracle Enterprise Manager Fusion Middleware Control Console Shortcut Links"
-
Section 4.3.4, "DefaultToDo Task Flow is Configured to Use HTTPS"
-
Section 4.3.5, "Configuring the current-dateTime Function to Display Output in Seconds"
-
Section 4.3.7, "Running the Facade API Client on IBM WebSphere"
4.3.1 Configuring the Deployment Manager to Detect the Remote Node Agent
When configuring Oracle SOA Suite in an IBM WebSphere high availability environment, ensure that you stop and restart the Deployment Manager before configuration of the second node. If you do not perform these steps, the Deployment Manager does not detect the remote node agent.
-
Run the Configuration Wizard on host1:
MW_HOME/ORACLE_HOME/common/bin/was_config.sh
-
Create and configure an IBM WebSphere cell.
-
Install Oracle SOA Suite components into the cell.
-
-
Start the Deployment Manager by navigating to the following directory in the IBM WebSphere home and entering the following command:
profiles/deployment_mgr_name/bin/startManager.sh
         -profileName dmgr_profileName
For example:
/disk01/IBM/WebSphere/AppServer/profiles
/Dmgr01/bin/startManager.sh -profileName Dmgr01
-
Stop node agent1. (It starts automatically after configuration completion.)
MW_HOME/user_projects/domains/bifoundation_cell/bifoundation_cell
node0/bin/stopNode.sh -username user_name -password password
-
For Oracle WebCenter Content, synchronize the node:
WAS_HOME/bin/syncNode.sh localhost SOAP_CONNECTOR_ADDRESS -profileName
profile_name -username was_admin_user -password was_password
-
Restart the Deployment Manager.
If you do not perform Steps 5 and 6, after you finish configuration of host2 and restart node agent2, when you go to the IBM WebSphere Administrative Console, the node agent on host2 (remote node) is shown as down when it is actually running. This is because the Deployment Manager fails to detect the remote node agent.
-
Run the Configuration Wizard on host2 (remote host), as described in Step 1.
-
Federate the host. For information, see Section 5.2.19.4, "Federate WCPHOST2 and Configure Cell."
-
Configure an IBM WebSphere cell.
-
-
Stop node agent2, as described in Step 3.
-
For Oracle WebCenter Content, synchronize node2, as described in Step 4.
-
MW_HOME/user_projects/domains/bifoundation_cell/bifoundation_cell_
node0/bin/startNode.sh -username user_name -password password
-
Start the administration server by navigating to the following directory in the IBM WebSphere home and entering the following command:
profiles/profile_name/bin/startServer.sh OracleAdminServer
-profileName profileName
For example:
/disk01/IBM/WebSphere/AppServer/profiles/Custom01/bin/startServer.sh
 OracleAdminSErver
-profileName Custom01
-
Start SOA server1 by navigating to the following directory in the IBM WebSphere home and entering the following command:
profiles/profile_name/bin/startServer.sh server_name-profileName profileName
For example:
/disk01/IBM/WebSphere/AppServer/profiles
/Custom01/bin/startServer.sh soa_server1
-profileName Custom01
-
Start node agent2, as described in Step 10.
-
Start SOA server2, as described in Step 12.
4.3.2 Publishing Services to a UDDI Registry
You cannot publish service binding components to the Universal Description, Discovery, and Integration (UDDI) registry from Oracle Enterprise Manager Fusion Middleware Control on IBM WebSphere.
4.3.3 Oracle Enterprise Manager Fusion Middleware Control Console Shortcut Links
Oracle Enterprise Manager Fusion Middleware Control does not include shortcut links to the WebSphere Administrative Console from the following locations:
-
The Server Data Source JNDI and Server Transaction Data Source JNDI fields of the Data Sources section of the SOA Infrastructure Common Properties page
-
The Related Links menu available on service engine pages.
To log in to IBM WebSphere, you must go directly to the WebSphere Administrative Console.
4.3.4 DefaultToDo Task Flow is Configured to Use HTTPS
Oracle SOA Suite on IBM WebSphere is configured to use HTTPS. This means the DefaultToDo task flow also uses HTTPS because the DefaultToDo task flow host name, port, and protocol are based on the SOA Server URL.
If a valid certificate is not available on the server, then DefaultToDo would not be accessible in Microsoft Internet Explorer and Google Chrome, while Mozilla Firefox would issue a warning and then allow the user to proceed. If necessary, use Oracle Enterprise Manager Fusion Middleware Control to change the SOA Server URL.
4.3.5 Configuring the current-dateTime Function to Display Output in Seconds
The current-dateTime function returns the current datetime value in the ISO format of CCYY-MM-DDThh:mm:ss.sTZD (where s denotes the time in milliseconds). If you want to display the output in seconds, perform the following steps:
-
Log in to the IBM WebSphere Administrative Console.
-
Click Servers > Server Types > WebSphere application servers.
-
Click the name of the server on which you want this function to display output in seconds (for example, server1).
-
Under Server Infrastructure, click Java and Process Management > Process definition.
-
Under Additional Properties, click Java Virtual Machine.
-
In the Generic JVM arguments field, append the following to the end:
-Dcom.oracle.soa.xpath.datetimeWithoutMillis=true
-
Click OK and save your changes to the master configuration.
-
Restart the server.
4.3.6 Obtaining the Locator Object
The following system property is required for Java client code to successfully obtain the Locator object when run against an IBM WebSphere Application Server-based SOA installation:
static
 {
    System.setProperty("oracle.fabric.config.platform", "websphere");
 }
After setting this property, the Locator object is obtained. If you instead attempt to obtain the Locator object with the following code:
LocatorFactory.createLocator(jndiProps);
The following exception error occurs:
Exception in thread "main" java.lang.NoClassDefFoundError:
weblogic/security/Security
        at
oracle.soa.management.internal.ejb.WLSPrivilegedExecutionContext.
getCurrentSubject(WLSPrivilegedExecutionContext.java:30)
        at oracle.soa.management.internal.ejb.EJBLocatorImpl.lookupBean
(EJBLocatorImpl.java:817)
        at oracle.soa.management.internal.ejb.EJBLocatorImpl.
          lookupFinderBean
(EJBLocatorImpl.java:803)
        at oracle.soa.management.internal.ejb.EJBLocatorImpl.<init>
(EJBLocatorImpl.java:170)
        at oracle.soa.management.facade.LocatorFactory.createLocator
(LocatorFactory.java:35)
4.3.7 Running the Facade API Client on IBM WebSphere
Note:
You must use the IBM JDK.
-
Set the
JAVA_HOMEandPATHvariables appropriately to point to the IBM Java location. -
Include the following code in the IBM WebSphere client runtime classpath:
<path id="clientclasspath.was"> <pathelement location="${WAS_HOME}/runtimes/com.ibm.ws.ejb.thinclient_7.0.0.jar"/> <pathelement location="${WAS_HOME}/runtimes/com.ibm.ws.orb_7.0.0.jar"/> <pathelement location="${WAS_HOME}/plugins/com.ibm.ws.wccm.jar"/> <pathelement location="${WAS_HOME}/deploytool/itp/plugins/com.ibm.websphere. v7_7.0.3.v20110824_2356/wasJars/sas.jar"/> <pathelement location="${WAS_HOME}/deploytool/itp/plugins/com.ibm.websphere.v7_ 7.0.3.v20110824_2356/wasJars/ibmjceprovider.jar"/> <pathelement location="${WAS_HOME}/java/jre/lib/ibmjsseprovider2.jar"/> <!-- Other class path entries --> </path> -
Pass the following system properties while running the Facade API client. In the following segment of code,
"${full_path}"points to the directory location in whichsas.client.propsandssl.client.propsare present.These files are present in the IBM WebSphere installation directory in the following location. However, before passing them as the above system properties, you must modify them as follows:
-
Copy the following files to an appropriate directory, which is represented as
${full_path}.cp ${WAS_HOME}/profiles/DefaultTopology/DefaultServer/properties/ sas.client.props ${full_path} cp ${WAS_HOME}/profiles/DefaultTopology/DefaultServer/properties/ ssl.client.props ${full_path} -
Modify the following entries in
sas.client.props:com.ibm.CORBA.securityServerHost=localhost #your host name com.ibm.CORBA.securityServerPort=2800 #this should point to the bootstrap port # RMI/IIOP user identity com.ibm.CORBA.loginUserid=wasadmin #was user com.ibm.CORBA.loginPassword=password #was password -
Ensure the
user.rootproperty is correct inssl.client.props:user.root=/${WAS_HOME}/profiles/DefaultTopology/DefaultServer -
Pass the following code as system properties:
<sysproperty key="com.ibm.SSL.ConfigURL"
value="file:${full_path}/ssl.client.props"/>

<sysproperty key="com.ibm.CORBA.ConfigURL"
value="file:${full_path}/sas.client.props"/>

<sysproperty key="java.security.auth.login.config"
value="${WAS_HOME}/profiles/DefaultTopology/DefaultServer/properties
/wsjaas_client.conf"/>

 <!-- The below three properties are optional and required if you want to
     capture logs for debugging. Detailed failure can be found in
     the client.log using the above setup -->

<sysproperty key="com.ibm.CORBA.CommTrace" value="true"/>
<sysproperty key="com.ibm.CORBA.Debug" value="true"/>
<sysproperty key="com.ibm.CORBA.Debug.Output" value="/tmp/client.log"/>

<!-- Optional properties end -->
-
-
Ensure that you pass the security credentials when creating the
Locator.For example:
Hashtable<String, Object> h = new Hashtable<String, Object>(); h.put(Context.INITIAL_CONTEXT_FACTORY, "com.ibm.websphere.naming.WsnInitialContextFactory"); h.put(Context.PROVIDER_URL, "iiop://localhost:2800"); h.put(Context.SECURITY_PRINCIPAL, "wasadmin"); h.put(Context.SECURITY_CREDENTIALS, "password"); final Locator loc = LocatorFactory.createLocator(h); -
Set the following property in your client code:
static {
     System.setProperty("oracle.fabric.config.platform", "websphere");
  }
After performing these steps, the following segment of code runs successfully:
CompositeInstanceFilter filter = new CompositeInstanceFilter();
filter.setCompositeDN("default/HelloWorld!1.0");
List<CompositeInstance> lCompositeInstance =
loc.getCompositeInstances(filter);
If you skip or incorrectly run any of Steps 1 through 5, the above-mentioned code that uses the Facade API such as
loc.getCompositeInstances(filter);does not work and can throw the following exception:java.lang.RuntimeException: Caller doesn't have enough permission to call this method.
4.4 Differences and Restrictions When Managing Oracle BAM on IBM WebSphere
The following sections describe differences and restrictions when using Oracle BAM on IBM WebSphere:
-
Section 4.4.2, "Using Oracle Data Integrator with Oracle BAM"
-
Section 4.4.4, "Configuring Logging for Oracle BAM on IBM WebSphere"
-
Section 4.4.7, "Using Oracle Internet Directory with Oracle BAM"
-
Section 4.4.8, "Configuring Enterprise Message Sources to Connect to Remote JMS Queue/Topics"
-
Section 4.4.10, "Configuring the LTPA Timeout for Active Data Reports"
4.4.1 Configuring Oracle BAM Adapter
Configuration of Oracle BAM Adapter on IBM WebSphere is largely the same as described in Oracle Fusion Middleware Administrator's Guide for Oracle SOA Suite and Oracle Business Process Management Suite. The exception is that you use the IBM WebSphere Administrative Console (instead of the Oracle WebLogic Server Administration Console) to configure Oracle BAM Adapter.
Refer to Oracle Fusion Middleware Administrator's Guide for Oracle SOA Suite and Oracle Business Process Management Suite for complete information. The information provided in this section simply highlights the selections you make when using the IBM WebSphere Administrative Console to configure Oracle BAM Adapter properties, connection factories and trusted domains.
Note:
When updating property values in the IBM WebSphere Administrative Console, click the property to open a page, enter the values as needed, and click OK. To commit the changes, click Save. Then restart Oracle SOA Server.
4.4.1.1 Configuring Oracle BAM Adapter Properties
In the IBM WebSphere Administrative Console, you navigate to Resources > Resource Adapters (Figure 4-2) to locate the Oracle BAM Adapter resource.
Figure 4-2 Resources and Resource Adapters Panels in Administrative Console
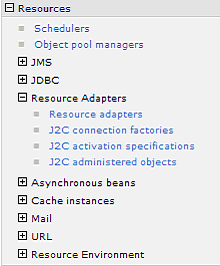
Description of "Figure 4-2 Resources and Resource Adapters Panels in Administrative Console"
In the Resource Adapter summary table, you click the Oracle BAM Adapter resource name to configure the properties (for example, OracleBAMAdapter or BAM ADC Adapter as shown Figure 4-3. The name varies depending on how it was deployed).
Figure 4-3 Resource Adapter Summary Table

Description of "Figure 4-3 Resource Adapter Summary Table"
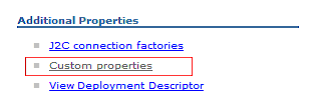
On the Configuration page, you click Custom properties in the Additional Properties section on the right (Figure 4-4) to display all the properties you can configure for the selected Oracle BAM Adapter, as shown in Figure 4-5.
Figure 4-5 Custom Properties Page of Oracle BAM Adapter
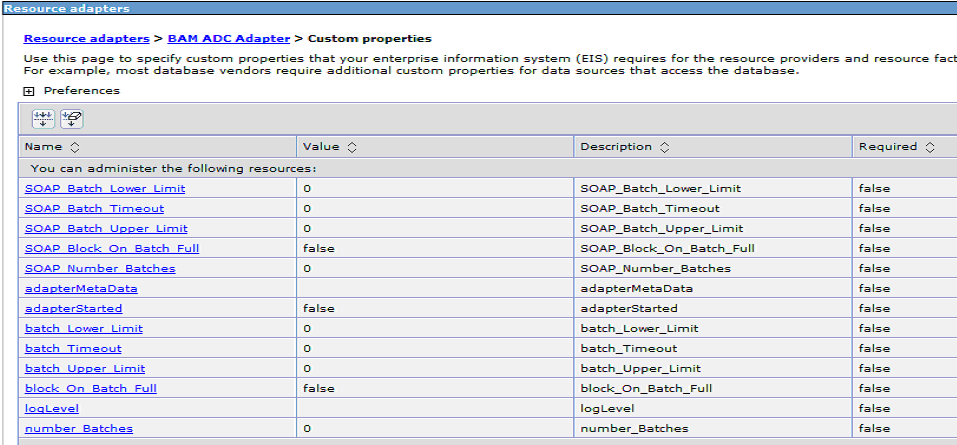
Description of "Figure 4-5 Custom Properties Page of Oracle BAM Adapter"
4.4.1.2 Configuring Oracle BAM Connection Factories
Before deploying applications that use Oracle BAM Adapter, a connection factory to Oracle BAM Server must be configured. You can configure both Remote Method Invocation (RMI) and Simple Object Access Protocol (SOAP) connection factories.
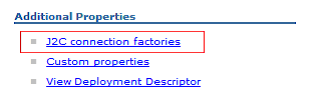
After clicking an Oracle BAM Adapter resource name as shown in Figure 4-3, on the Configuration page, you click J2C connection factories in the Additional Properties section on the right (Figure 4-6) to display a list of configured connection factories that you can use with the resource adapter.
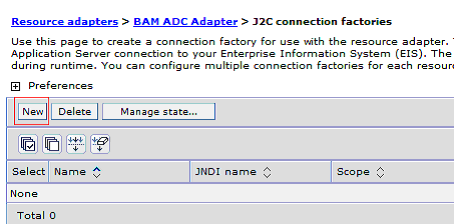
If there are no connection factories listed on the J2C Connection Factories page, click New to create and configure an Oracle BAM connection factory to Oracle BAM Server (Figure 4-7). You can create connection factories for RMI-based calls and SOAP-based calls.
When creating RMI-based and SOAP-based connection factories, provide a connection factory name, a JNDI name, and the Connection factory interface for each type (Figure 4-8 and Figure 4-9).
Figure 4-8 New J2C Connection Factory Configuration
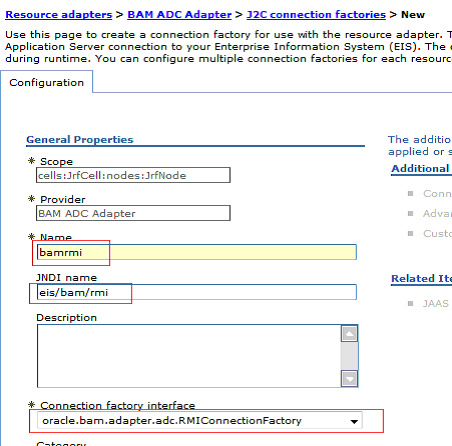
Description of "Figure 4-8 New J2C Connection Factory Configuration"
Figure 4-9 SOAP Connection Factory Configuration
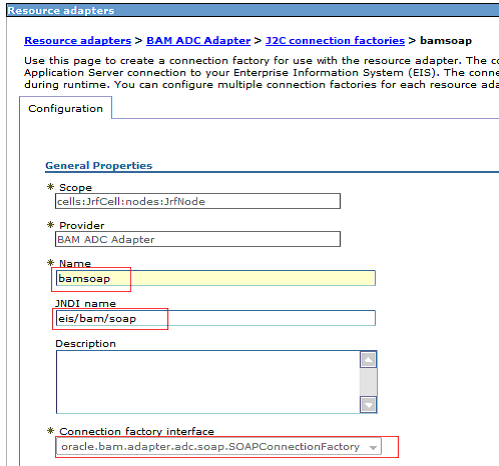
Description of "Figure 4-9 SOAP Connection Factory Configuration"
Figure 4-10 shows the J2C Connection Factories page with two connection factories created and listed in the table. Note that the node and cell names will vary depending on the deployment.
Figure 4-10 J2C Connection Factories Page

Description of "Figure 4-10 J2C Connection Factories Page"
To configure the properties for a connection factory, click the connection factory name (for example, bamrmi or bamsoap), then on the Configuration page click Custom properties on the right. Figure 4-11 and Figure 4-12 show the custom properties you can configure for a RMI-based connection factory and a SOAP-based connection factory, respectively. Note that with RMI-based connection factories, InstanceName is the connection name for Oracle BAM Adapter (for example, ADCAdapter1), and PortNumber is the BOOTSTRAP_ADDRESS of the Oracle BAM Server. With SOAP-base connection factories, PortNumber is the WC_defaulthost of Oracle BAM Server.
Figure 4-11 Connection Factory Custom Properties for RMI-Based Calls
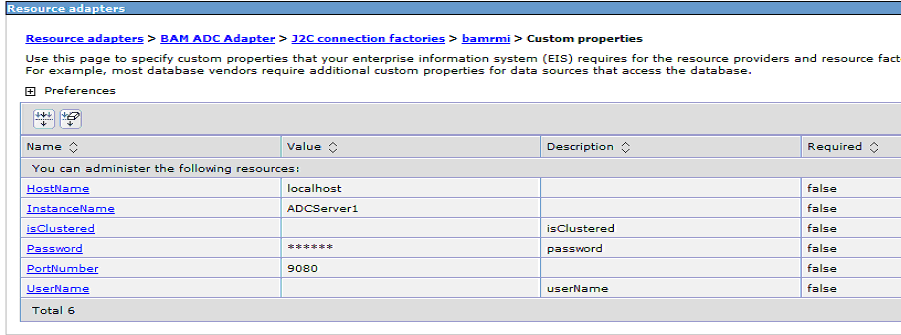
Description of "Figure 4-11 Connection Factory Custom Properties for RMI-Based Calls"
Figure 4-12 Connection Factory Custom Properties for SOAP-Based Calls
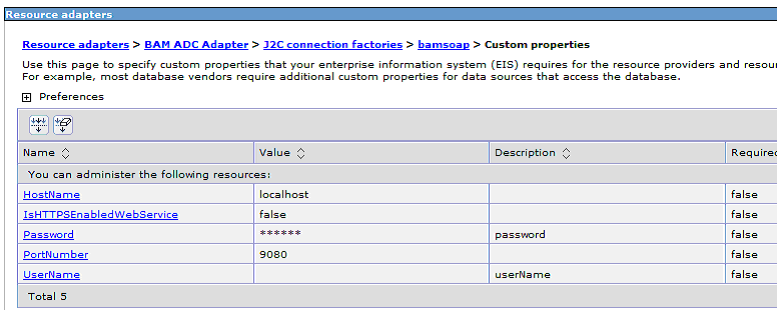
Description of "Figure 4-12 Connection Factory Custom Properties for SOAP-Based Calls"
Figure 4-12 also shows a SOAP-based connection factory configured for HTTP. To configure an HTTPS SOAP-based connection factory, create a new connection factory and specify the IsHTTPSEnabledWebService property value as true.
4.4.1.3 Configuring Trusted Domains
When using the RMI connection between a SOA composite application and Oracle BAM Server, that is when they are deployed in different cells, trusted domain configuration must be done in the IBM WebLogic Administrative Console. For more information, see Section 4.4.5, "Configuring Trusted Domains."
4.4.2 Using Oracle Data Integrator with Oracle BAM
Setting up the Oracle BAM and Oracle Data Integrator integration with Oracle BAM Server running on IBM WebSphere is largely the same as described in Oracle Fusion Middleware Developer's Guide for Oracle SOA Suite, with a few exceptions. The exceptions are:
-
If you already have an installation of Oracle Data Integrator 10g working with an older version of Oracle BAM, you must have another installation of Oracle Data Integrator 10g to work with the current release of Oracle BAM. You cannot use the same Oracle Data Integrator 10g installation to work with multiple versions of Oracle BAM.
-
Apache Ant is required to run the installation script. Set the environment variable
ANT_HOMEto the location where ANT is installed before you run thebam_odi_configuration.sh(bam_odi_configuration.bat) script. -
Set the following environment variables before you run the installation script:
-
JAVA_HOME: Root directory of the supported version of Java Development Kit (see the Oracle BAM support matrix on Oracle Technology Network web site for supported JDK versions). -
WAS_HOME: The location of the IBM WebSphere Application Server installation directory. -
WAS_CLIENT_PROPS: Directory where thesas.client.propsfile that the user wants to use resides.
-
-
Before you run the installation script, make sure login security values in
sas.client.propsand the server port value inBAMICommandConfig.xmlare configured properly. For information, see Section 4.4.3, "Using ICommand." -
After running the installation script and before using Oracle Data Integrator with Oracle BAM Server running on IBM WebSphere, make sure the server port value in
BAMODIConfig.xmlis configured to the same server port value as in step 4 above. To change the value, locateBAMODIConfig.xmlin$ODI_HOME/oracledi/lib/config, then uncomment the line for the server port value.
4.4.3 Using ICommand
When a standalone Oracle BAM client (such as ICommand, Oracle Data Integrator, and Oracle BAM Data Control) connects to Oracle BAM Server, the configuration file (for example BAMICommandConfig.xml), which is read when the Oracle BAM client code is invoked, must point to the server on which the Oracle BAM Server instance is running.
In addition, login security must be configured before standalone Oracle BAM clients can connect to Oracle BAM Server.
4.4.3.1 Configuring Oracle BAM Server Port
By default ICommand looks for Oracle BAM Server on port 2809. If the Oracle BAM Server port number is changed from the default during the setup and configuration of Oracle BAM on IBM WebSphere, then you must manually change the port number from 2809 to the new port number in the BAMICommandConfig.xml file.
Locate the BAMICommandConfig.xml file in SOA_ORACLE_HOME/bam/config.
The property to change is:
<ServerPort>2809</ServerPort>
To determine the correct port value to use:
-
On IBM WebSphere ND: Use the IBM WebSphere Administrative Console to navigate to Servers > Server Types > WebSphere Application Servers > [bam_server_name] > Ports to locate the
BOOTSTRAP_ADDRESSvalue of the Oracle BAM Server. -
On IBM WebSphere AS: Look at the
BOOTSTRAP_ADDRESSvalue in the fileportdef.props, which is located inWAS_HOME/was_profiles/DefaultTopology/was_as/ServerName/properties.
The BAMICommandConfig.xml file should also have the following ServerPlatform property:
<ServerPlatform>websphere</ServerPlatform>
4.4.3.2 Configuring Login Security
For information, see Section 4.4.6.1, "Configuring Login Security for Standalone Oracle BAM Components on IBM WebSphere."
4.4.4 Configuring Logging for Oracle BAM on IBM WebSphere
To configure logging for Oracle BAM on IBM WebSphere, you have to use either the IBM WebSphere Administrative Console or execute wsadmin scripts.
To use the IBM WebSphere Administrative Console to configure logging:
-
Log in to the IBM WebSphere Administrative Console.
-
In the navigation panel, expand Servers > Server Types.
-
Select WebSphere application servers, then select the server that is hosting the Oracle BAM application (for example, bam-server1 on IBM WebSphere ND or ServerName on IBM WebSphere AS).
-
On the Configuration tab, Troubleshooting section, select Change Log Detail Levels, then expand [All Components].
You will see a list of known loggers.
-
Scroll down and select the desired oracle.bam logger.
-
Select Message And Trace Levels and set the desired level.
You can set levels at any point in the package hierarchy right down to the individual class. This mechanism is analogous to modifying the
logging.xmlfile. -
Click Apply or OK, then click Save to the master configuration.
This saves the changes permanently so they are in effect even if you restart IBM WebSphere.
The log files are located at
WAS_HOME/was_profiles/DefaultTopology/was_as/ServerName/logs/ServerName, (for example,ServerName-diagnostic.log), whereServerNameis the name of the server that is hosting Oracle BAM.
Alternatively, you can execute wsadmin scripts to set the level for all the current descendants of a logger. For example:
wsadmin> myLoggers = OracleODL.listLoggers(pattern="oracle.bam.common.*")
wsadmin> for loggerName in myLoggers.keys():
wsadmin>   OracleODL.setLogLevel(target="ServerName", logger=loggerName,level="FINE")
4.4.5 Configuring Trusted Domains
When Oracle BAM Server components require a connection to a remote server, trusted domain configuration must be done in the IBM WebSphere Administrative Console. For example, when Enterprise Message Sources (EMS) in Oracle BAM needs to connect to a topic/queue on a JMS server that is installed on a different IBM WebSphere instance, you have to set up the domain trust between the IBM WebSphere instances.
To perform communication with another server, IBM WebSphere has to retrieve a signer certificate from a secure remote SSL port during the handshake. The signer exchange process for setting up SSL to external servers such as Lightweight Directory Access Protocol (LDAP) is greatly simplified on IBM WebSphere. Instead of manually obtaining the remote server's signer certificate and then importing it into the appropriate trust store each time, the signer certificate retrieved from the remote port can be stored in an existing local trust store. Oracle BAM Server components that require a connection to the remote server can then use the validated signer certificate from the keystore.
To configure a trusted domain by obtaining and validating a signer certificate from a remote port:
-
Log in to the IBM WebSphere Administrative Console.
-
In the navigation panel, expand Security, then click SSL certificate and key management.
-
Click Key stores and certificates.
The Keystore usages dropdown should show SSL keystores as the value.
-
Select a trust store (for example, NodeDefaultTrustStore).
-
Click Signer certificates, then click Retrieve from port.
This option opens an SSL connection to retrieve the certificate.
-
Enter the host name of the machine on which the signer resides.
-
Enter the SSL port on the host machine.
-
Enter an alias.
-
Click Retrieve signer information.
-
Verify the signer certificate information and the SHA digest of the certificate, which is used to ensure the information has not been modified in transit.
-
Click Apply or OK to add the signer certificate to the selected trust store.
4.4.6 Configuring Security
Login security must be configured before standalone Oracle BAM clients (such as Oracle Data Integrator, Oracle BAM Data Control and ICommand) can connect to Oracle BAM Server on IBM WebSphere.
Oracle BAM web applications by default use FORM as the authentication security method. To use the CLIENT_CERT authentication security method on IBM WebSphere, you must configure it manually.
To provide secure access to Oracle BAM web applications on IBM WebSphere, you must assign users to roles that provide the necessary permissions.
See the following for more information:
-
Section 4.4.6.1, "Configuring Login Security for Standalone Oracle BAM Components on IBM WebSphere"
-
Section 4.4.6.2, "Configuring Oracle BAM to Use CLIENT_CERT Authentication on IBM WebSphere"
-
Section 4.4.6.3, "Creating User/Group Mappings for Oracle BAM on IBM WebSphere"
4.4.6.1 Configuring Login Security for Standalone Oracle BAM Components on IBM WebSphere
For standalone clients like Oracle Data Integrator, Oracle BAM Data Control and ICommand to connect to Oracle BAM Server on IBM WebSphere, certain property values must be set in the sas.client.props file, which is required for initial authentication of the standalone client by IBM WebSphere.
Edit the sas.client.props file to include the following properties:
com.ibm.CORBA.securityEnabled=true
com.ibm.CORBA.loginSource=properties
com.ibm.CORBA.securityServerHost=localhost
com.ibm.CORBA.securityServerPort=2809
com.ibm.CORBA.loginUserid=username
com.ibm.CORBA.loginPassword=password
com.ibm.CSI.performTransportAssocSSLTLSRequired=false
com.ibm.CSI.performTransportAssocSSLTLSSupported=false
...where securityServerPort is the deployment manager server BOOTSTRAP_ADDRESS value.
Using WAS_HOME as the root folder for the IBM WebSphere installation, the location of the sas.client.props file is:
-
WAS_HOME/profiles/<deployment_manager_profile_name>/propertieson IBM WebSphere ND -
WAS_HOME/was_profiles/DefaultTopology/was_as/ServerName/propertieson IBM WebSphere AS
Details about the properties to configure in sas.client.props are found in Table 4-4, "Login Security Properties for the sas.client.props File".
Table 4-4 Login Security Properties for the sas.client.props File
| Property to add... | Value to use... | Additional note about the property... |
|---|---|---|
|
|
true |
Must be set to this value |
|
|
properties |
Must be set to this value |
|
|
<hostname> |
Use localhost or the host name |
|
|
<serverport> |
Default port is 2809 The correct value can be determined by looking at the
|
|
|
<userid> |
For example, |
|
c |
<password> |
For example, The
where
Instructions on how to use the utility are also provided in |
|
|
false |
SSL is not required |
|
|
false |
SSL is not required |
4.4.6.2 Configuring Oracle BAM to Use CLIENT_CERT Authentication on IBM WebSphere
On IBM WebSphere, Oracle BAM web applications must use FORM as the authentication security method and Oracle BAM web services must use BASIC as the authentication security method. Unlike Oracle WebLogic Server, IBM WebSphere does not provide a fallback mechanism for authentication methods, which means you cannot specify more than one authentication method. If you wish to use the CLIENT_CERT authentication security method for Oracle BAM web applications, you must configure it manually by following these steps:
-
Extract the existing
oracle-bam-was.ear, located inMW_HOME/Oracle_SOA1/bam/applications, for example. -
Modify the deployment descriptor
web.xmlinbam-web.warby replacing "FORM" with "CLIENT_CERT". For example:<login-config> <auth-method>CLIENT-CERT</auth-method> </login-config>
-
Repackage
bam-web.warwith the edited deployment descriptor. -
Deploy the modified
oracle-bam-was.ear.
4.4.6.3 Creating User/Group Mappings for Oracle BAM on IBM WebSphere
After installing Oracle BAM on IBM WebSphere AS or IBM WebSphere ND, you must specify the users and groups that are mapped to the security roles for Oracle BAM.
To create user/group mappings for Oracle BAM on IBM WebSphere:
-
Log in to the IBM WebSphere Administrative Console:
host:port/ibm/console -
On IBM WebSphere ND, navigate to the Console Preferences page in System administration. Select Synchronize changes with Nodes and click Apply.
This ensures that all changes saved to the master configuration are propagated across the nodes.
-
In the navigation panel, expand Applications > Application Types.
-
Select WebSphere enterprise applications, then select oracle-bam.
-
On the Configuration tab, Detail Properties section, select Security role to user/group mapping.
-
Select the bamuser checkbox, then click Map Users.
-
Click Search to display a list of available users.
-
Select cn=adminusername,dc=com and move it to the Selected list, then click OK twice.
-
Save the change and restart Oracle BAM Server.
Alternatively, you can use the wsadmin command-line utility to configure the mapping. For example:
wsadmin> AdminApp.edit('oracle-bam','[-MapRolesToUsers
  ["bamuser" "No" "Yes" "cn=OracleSystemUser,dc=com" """bamuser" "No" "Yes" "cn=adminusername,dc=com"""]')
wsadmin> AdminConfig.save()
4.4.7 Using Oracle Internet Directory with Oracle BAM
Using Oracle Internet Directory with Oracle BAM on IBM WebSphere is largely the same as described in Oracle Fusion Middleware Administrator's Guide for Oracle SOA Suite and Oracle Business Process Management Suite. The user OracleSystemUser must exist in the LDAP server. In addition, you must create user/group mappings for Oracle BAM on IBM WebSphere.
For instructions, see Section 4.4.6.3, "Creating User/Group Mappings for Oracle BAM on IBM WebSphere."
4.4.8 Configuring Enterprise Message Sources to Connect to Remote JMS Queue/Topics
For Enterprise Message Sources (EMS) on Oracle BAM Server to look up JMS resources hosted on a remote provider, you must first set up the trust between the local IBM WebSphere server (where Oracle BAM is deployed) and the remote IBM WebSphere server (where the JMS provider is configured). Then you set up the JMS resource on the remote server by creating a service integration bus, a JMS topic connection factory, and a JMS topic.
To connect to a remote JMS queue/topic from EMS:
-
Set up the trust between the remote IBM WebSphere instance and the local IBM WebSphere instance. For instructions, see Section 4.4.5, "Configuring Trusted Domains."
-
On the remote IBM WebSphere instance, log in to the IBM WebSphere Administrative Console.
-
To create a service integration bus, follow these steps:
-
In the navigator panel, expand Service integration. Click Buses, then click New.
-
Enter a name for your new bus (for example,
MyBus).Note that this name should be different from the bus name in your local IBM WebSphere instance.
-
Deselect Bus security.
-
Click Next, then click Finish.
-
On the Buses page, click the bus name you just created.
-
On the Configuration tab, Topology section, click Bus members then click Add.
-
Choose the server to add to the bus from the dropdown list (for example, JrfNode:JrfServer).
-
Click Next, accepting all default values until you get to the Summary page, then click Finish.
-
-
To create a JMS topic connection factory, follow these steps:
-
In the navigation panel, expand Resources > JMS.
-
Click Topic connection factories.
-
Expand Scope, then select the node and server as the scope from the dropdown list (for example, Node=JrfNode,Server=JrfServer).
The scope identifies the level to which the resource (JMS topic connection factory) is visible.
-
Click New, then select Default messaging provider as the provider that supports the topic connection factory instance, and click OK.
-
In the Administration section of the Configuration page, enter a display name for the resource (for example,
myNewTopicCF) and the JNDI name for the resource (for example,jms/myNewTopicCF).In the Connection section, from the Bus name dropdown list, select the bus to connect to (for example, MyBus).This is the service integration bus that the connection factory is used to create connections to.
-
Enter the name of the target that is used to determine the messaging engine (for example,
JrfNode.JrfServer).This is the bus member (server) you added in step 3g above.
-
Select Bus member name as the type from the Target Type dropdown list.
-
In the Provider endpoints box, enter
<yourhostname>:7277:as the endpoint used to connect to a bootstrap server, then click OK.
-
-
To create a JMS topic, follow these steps:
-
In the navigator panel, expand Resources > JMS.
-
Click Topics.
-
Expand Scope, then select the node and server as the scope from the dropdown list (for example, Node=JrfNode,Server=JrfServer).
-
Click New, then select Default messaging provider as the provider that supports the topic destination instance, and click OK.
-
In the Administration section of the Configuration page, enter a display name for the resource (for example,
myNewTopic) and the JNDI name for the resource (for example,jms/myNewTopic).In the Connection section, from the Bus name dropdown list, select the bus hosting the topic (for example, MyBus). -
From the Topic space dropdown list, select Create Service Integration Bus destination.
-
Enter a name for the topic space and click Next, then click Finish.
The topic space name you created should now be listed in the Topic space dropdown list.
-
Click OK.
-
-
Save to the master configuration. Restart the server.
-
In Oracle BAM Architect on the local IBM WebSphere instance, create a new EMS definition using the remote provider URL, the remote connection factory (for example,
jms/myNewTopicCF) and the remote topic (for example,jms/MyNewTopic) you created.
4.4.9 Using Oracle BAM Data Controls
Creating and using Oracle BAM data controls in Oracle JDeveloper is largely the same as described in Oracle Fusion Middleware Developer's Guide for Oracle SOA Suite. Note, however, the exceptions described in Section 4.4.9.1, "Exceptions in JDeveloper."
When deploying an Oracle ADF application that uses Oracle BAM data controls, make sure you deploy the application to an IBM WebSphere application server where ADF shared libraries are available. Before deploying, the properties of the application server connection to IBM WebSphere created in JDeveloper must include the parameters as described in Section 4.4.9.2, "Application Server Connection Parameters."
4.4.9.1 Exceptions in JDeveloper
A few exceptions must be noted before using Oracle BAM data controls in JDeveloper. They are:
-
Copy the JAR files in Table 4-5 from IBM WebSphere to the following Oracle JDeveloper directory:
JDEV_HOME/jdeveloper/wasTable 4-5 IBM WebSphere JAR Files to Copy and their Locations
JAR File to Copy Location of JAR File on IBM WebSphere com.ibm.ws.admin.client_7.0.0.0.jarWAS_HOME/runtimescom.ibm.ws.ejb.thinclient_7.0.0.jarWAS_HOME/runtimescom.ibm.ws.jpa.thinclient_7.0.0.jarWAS_HOME/runtimescom.ibm.ws.orb_7.0.0.jarWAS_HOME/runtimesejb3exceptions.jarWAS_HOME/runtimesibmorb.jarWAS_HOME/java/jre/liboracle.webservices.standalone.client.jarMW_HOME/oracle_common/modules/oracle.webservices_11.1.1tools.jarWAS_HOME/java/libwsclient_extended.jarMW_HOME/oracle_common/webservices -
Add the
BAMCommonConfig.xmlfile toJDEV_HOME/jdeveloper/jdev/extensions/oracle.bam.jar.Note that
oracle.bam.jaris available only after you have installedsoa-jdev-extension.zip.BAMCommonConfig.xmlshould be added to theconfigdirectory in the root directory of the JAR file.The
BAMCommonConfig.xmlfile should contain the following properties:<ServerPlatform>websphere</ServerPlatform> <ServerName>HOSTNAME</ServerName> <ServerPort>BAMSERVERBOOTSTRAPADDRESS</ServerPort>
For example:
<ServerPlatform>websphere</ServerPlatform>
<ServerName>myserver</ServerName>
<ServerPort>2801</ServerPort>
4.4.9.2 Application Server Connection Parameters
At runtime, Oracle BAM data controls in an Oracle ADF application use the Oracle BAM connection to connect to Oracle BAM Server on IBM WebSphere. Deploying an Oracle ADF application to IBM WebSphere is largely the same as deploying an ADF application to Oracle WebLogic Server. Note, however, that you must deploy the application to an IBM WebSphere application server where ADF shared libraries are available (for example, OracleAdminServer on IBM WebSphere ND). To enable this, certain parameters must be correctly set in the JDeveloper deployment profile for the application.
When you create the application server connection to IBM WebSphere in JDeveloper, on the Configuration page of the Create Application Server Connection wizard, make sure the parameters are properly set as shown in Table 4-6.
Table 4-6 Configuration Parameters for Server Connection
| Parameter | Description |
|---|---|
|
SOAP Connector Port |
Port number of the host used to connect to the server for deployment, as defined in |
|
Server Name |
Name of server (as defined in IBM WebSphere) where the application is deployed. |
|
Target Node |
Name of the node (as defined in IBM WebSphere) where the application is deployed. |
|
Target Cell |
Name of the cell (as defined in IBM WebSphere) where the application is deployed. |
Then on the JMX page of the Create Application Server Connection wizard, make sure the RMI port parameter is properly set as shown in Table 4-7.
Table 4-7 JMX Parameters for Server Connection
| Parameter | Description |
|---|---|
|
RMI Port |
Port number of the IBM WebSphere application server's RMI connector port, as defined in |
Note:
In the IBM WebSphere Administrative Console, the locations where you can find the values of <SOAP_CONNECTOR_ADDRESS> and <BOOTSTRAP_ADDRESS>, and the runtime node and cell names, differ based on the type of IBM WebSphere Server you are using and the server where the application is being deployed (for example, soa_server1 or the deployment manager server dmgr). For more information, see Table 4-2, "Location of Application Server Connection Configuration Details", which describes where to find the information in the IBM WebSphere Administrative Console.
4.4.10 Configuring the LTPA Timeout for Active Data Reports
On IBM WebSphere, the Lightweight Third Party Authentication (LTPA) timeout value specifies the period of time during which the server credentials from another server are valid. After the timeout period expires, the server credential from the other server must be revalidated.
The default LTPA timeout value is 120 minutes, which means the user is logged out after 120 minutes. The LTPA token and associated sessions are terminated and reauthentication is needed. This would affect, for example, users who have Oracle BAM applications and active data reports open in the browser for longer than 120 minutes.
To allow users to remain logged in for more than 120 minutes without having to log in again to reauthenticate credentials, set the LTPA timeout value to a higher number.
To change the LTPA timeout value:
-
Log in to the IBM WebSphere Administrative Console.
-
In the navigation panel, expand Security and click Global Security.
-
In the Authentication section on the right, click LTPA.
-
In the LTPA timeout field, enter a value in minutes.
For example, to allow users to remain logged in for two days, enter 2880 minutes.
