6 Upgrading Oracle Virtual Directory Environments
This chapter describes how to upgrade your existing Oracle Virtual Directory 10g (10.1.4.3) to Oracle Virtual Directory 11g.
This chapter contains the following sections:
-
Task 3: Use Upgrade Assistant to Upgrade Oracle Virtual Directory
-
Task 4: Complete Any Required Oracle Virtual Directory Post-Upgrade Tasks
6.1 Task 1: Decide Upon an Oracle Virtual Directory Topology
Before you install Oracle Virtual Directory 11g, consider the topology you currently have in Oracle Application Server 10g (10.1.4.3), as well as any requirements for your Oracle Fusion Middleware 11g environment.
Note that you can configure Oracle Virtual Directory with Oracle WebLogic Server domain or you can configure it without a domain.
For more information, refer to Chapter 4, "Oracle Virtual Directory Topologies".
6.2 Task 2: Install and Configure Oracle Fusion Middleware 11g
The following sections describes how to install and configure new Oracle Fusion Middleware 11g middle tier instances in preparation for an upgrade to Oracle Fusion Middleware 11g:
-
Installing Oracle WebLogic Server Software and Creating the Middleware Home
-
Installing Oracle Virtual Directory 11g Release 1 (11.1.1.7.0)
6.2.1 Installing Oracle WebLogic Server Software and Creating the Middleware Home
For information on installing the Oracle WebLogic Server, see "Preparing for Installation" and "Running the Installation Program in Graphical Mode" in the Oracle Fusion Middleware Installation Guide for Oracle WebLogic Server.
For more information about the Middleware home, see "Understanding Oracle Fusion Middleware Concepts" in the Oracle Fusion Middleware Administrator's Guide.
6.2.2 Installing Oracle Virtual Directory 11g Release 1 (11.1.1.7.0)
For complete instructions for installing the Oracle Virtual Directory 11g, including all the prerequisites and system requirements, refer to the Oracle Fusion Middleware Installation Guide for Oracle Identity Management.
6.3 Task 3: Use Upgrade Assistant to Upgrade Oracle Virtual Directory
The Oracle Fusion Middleware Upgrade Assistant automates the upgrade of many aspects of your Oracle Application Server 10g environment.
The Upgrade Assistant is installed into the bin directory of your Oracle Fusion Middleware Oracle home.
The following sections provide more information:
6.3.1 Task 3a: Stop the Oracle Virtual Directory Instances
Before you start the Upgrade Assistant, you must stop the Oracle Virtual Directory 10g instances that you are about to upgrade.
To stop the Oracle Virtual Directory 10g instances, do the following:
On UNIX:
Run the following command:
<OVD_Home>/vde.sh stop
For example:
/opt/OViD/vde.sh stop
In the above example, /opt/OViD is the location where OVD is installed.
On Windows:
If you have started the Oracle Virtual Directory 10g instance using the command line (console mode) by running the VDEServer.exe command from the installation directory, you must stop the instance using CTRL/C, or by closing the command line window which is running the instance.
If you have started Oracle Virtual Directory 10g instance by executing the Start VDE (Console Mode) shortcut from Start > Programs > Oracle > OViD folder, you must stop the instance by closing the window which is running the instance, or by logging out.
6.3.2 Task 3b: Start the Upgrade Assistant for an Oracle Virtual Directory Upgrade
To start the Upgrade Assistant using the graphical user interface:
Note:
You can also use the Upgrade Assistant command-line interface to upgrade your Oracle Application Server 10g Oracle homes. For more information, see "Using the Upgrade Assistant Command-Line Interface" in the Oracle Fusion Middleware Upgrade Planning Guide.
-
Change directory the
ORACLE_HOME/bindirectory of the Oracle Fusion Middleware installation. -
Enter the following command to start the Upgrade Assistant.
On UNIX system:
./ua
On Windows systems:
ua.bat
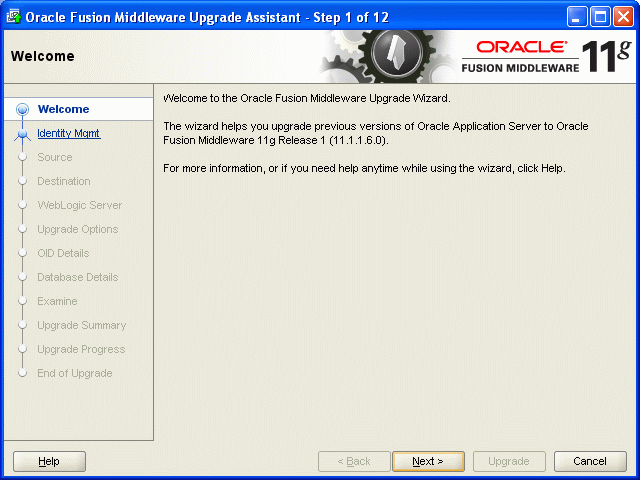
The Upgrade Assistant displays the Welcome screen as shown in Figure 6-1
Figure 6-1 Upgrade Assistant Welcome Screen

Description of "Figure 6-1 Upgrade Assistant Welcome Screen"
-
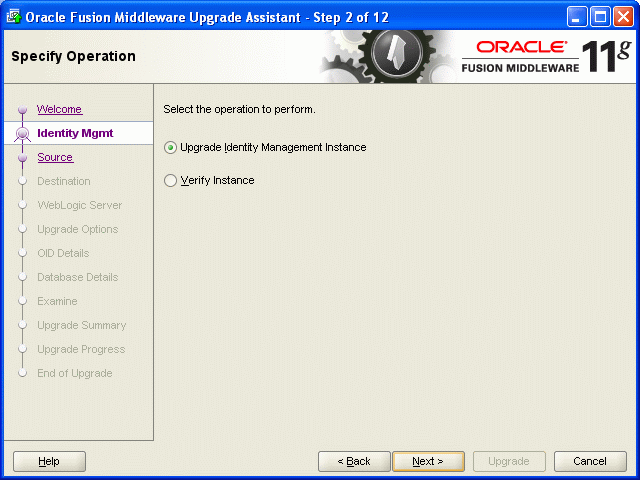
Click Next to display the Specify Operation screen (Figure 6-2).
The options available in the Upgrade Assistant are specific to the Oracle home from which it started. When you start Upgrade Assistant from an Oracle Application Server Identity Management Oracle home, the options shown on the Specify Operation screen are the valid options for an Oracle Application Server Identity Management Oracle home.
Figure 6-2 Upgrade Assistant Specify Operation Screen for an Oracle Virtual Directory Upgrade

Description of "Figure 6-2 Upgrade Assistant Specify Operation Screen for an Oracle Virtual Directory Upgrade"
6.3.3 Task 3c: Upgrade Oracle Virtual Directory
To upgrade Oracle Virtual Directory:
-
Start the Upgrade Assistant as described in Task 3b: Start the Upgrade Assistant for an Oracle Virtual Directory Upgrade.
-
Select Upgrade Identity Management Instance on the Specify Operation screen (Figure 6-2).
-
Refer to Table 6-1 for a description of the Upgrade Assistant screens that require input from you during an Oracle Virtual Directory upgrade.
-
After you provide all required input, the Upgrade Assistant performs the following tasks:
-
Examines the components and schemas to be upgraded and verifies that they can be upgraded successfully.
-
Provides a summary of the components to be upgraded so you can verify that Upgrade Assistant is upgrading the components and schemas you expect.
-
Provides a progress screen so you can see the status of the upgrade as it proceeds.
-
Alerts you of any errors or problems that occur during the upgrade.
See Also:
"Troubleshooting Your Upgrade" in the Oracle Fusion Middleware Upgrade Planning Guide for specific instructions for troubleshooting problems that occur while running the Upgrade Assistant
-
Displays the End of Upgrade screen, which confirms that the upgrade was complete.
-
Table 6-1 Upgrade Assistant Screens That Require Input During an Oracle Virtual Directory Upgrade
| Upgrade Assistant Screen | Description |
|---|---|
|
Specify Source Home |
Select the 10g (10.1.4.3) source Oracle home. If the Oracle home you want to upgrade does not appear in the drop-down lists, see "Source Oracle Home Not Listed by OracleAS Upgrade Assistant" in the Oracle Fusion Middleware Upgrade Planning Guide. |
|
Specify Destination Instance |
Enter the complete path to the destination 11g Oracle instance that you installed inside the middleware home. This is the Oracle instance that contains the Oracle Virtual Directory software. Alternatively, click Browse to select the Oracle instance. |
|
Specify WebLogic Server |
Enter the host, Administration Server port, and administration user credentials for the Oracle WebLogic Server domain you configured in Section 6.2.1, "Installing Oracle WebLogic Server Software and Creating the Middleware Home". This screen appears only if you chose to associate the Oracle Virtual Directory 11g instance with Oracle WebLogic Server during the Oracle Virtual Directory installation. It does not appear if you selected to install Oracle Virtual Directory without an Oracle WebLogic Server domain. |
|
Warning Dialog Box |
The Upgrade Assistant displays this warning dialog box if the source Oracle home contains Oracle Application Server components that are not installed and configured in the destination Oracle instance. This warning appears, for example, if the source Oracle home contains an instance of Oracle HTTP Server, which is not available in the 11g Oracle home. If the information in the dialog box is accurate and you understand which components will be upgraded, click Yes to continue. Otherwise, click No and verify which components are installed and configured in each 11g Oracle instance. |
|
Specify Upgrade Options |
This screen offers these upgrade options:
Click Help to display more information about the upgrade options on this screen. |
6.4 Task 4: Complete Any Required Oracle Virtual Directory Post-Upgrade Tasks
After you upgrade Oracle Virtual Directory by running the Upgrade Assistant, you must perform the following post-upgrade tasks:
-
Configuring Anonymous Ciphers for Oracle Virtual Directory SSL Listeners
-
Starting Oracle Virtual Directory After Upgrade When Using Privileged Ports
-
Upgrading Oracle Virtual Directory Logging Configuration Settings
6.4.1 Configuring Anonymous Ciphers for Oracle Virtual Directory SSL Listeners
Oracle Virtual Directory 10g (10.1.4.3) and later LDAP SSL listeners supports anonymous ciphers (in no-auth SSL mode) by default. The list of enabled cipher suites are set in Oracle Virtual Directory start-up scripts:
-
vde_start.shon UNIX systems -
OViDServer.laxon Windows systems
The list of ciphers can be modified by editing the -D Java system property vde.ldap.ciphers in these start-up scripts. This list is applicable across all LDAP SSL listeners. There was no option to enable different cipher suites for each LDAP listener.
In Oracle Virtual Directory 11g, the vde.ldap.ciphers Java system property is no longer supported. Instead, you can enable different cipher suites for each Oracle Virtual Directory listener when configuring SSL with Oracle Enterprise Manager Fusion Middleware Control or with the WLST command-line tool.
Anonymous cipher suites are disabled on Oracle Virtual Directory SSL listeners for security, by default. For information on enabling anonymous ciphers as part of configuring SSL security for your Oracle Virtual Directory environment, see "SSL Configuration in Oracle Fusion Middleware" in the Oracle Fusion Middleware Administrator's Guide.
6.4.2 Starting Oracle Virtual Directory After Upgrade When Using Privileged Ports
If you select the Use source Oracle home ports in destination option when upgrading an Oracle Virtual Directory 10g instance that is configured to listen on privileged ports, then the Upgrade Assistant cannot start Oracle Virtual Directory 11g after the upgrade.
Instead, the following error message appears in the Oracle Virtual Directory log file:
Cannot start Oracle Virtual Directory server: Permission denied.
To start an Oracle Virtual Directory 11g instance that is listening on privileged ports, perform the following steps:
-
Stop Oracle Process Manager and Notification Server (OPMN) and its managed processes, by using the following command in the Oracle instance directory where Oracle Virtual Directory 11g is configured:
ORACLE_INSTANCE/bin/opmnctl stopall -
Execute following commands as root:
To start OPMN:
ORACLE_INSTANCE/bin/opmnctl startStart Oracle Virtual Directory 11g:
ORACLE_INSTANCE/bin/opmnctl startproc ias-component=OVDCompName
In this example, replace OVDCompName with the name of the Oracle Virtual Directory instance.
For more information, see "Managing Oracle Virtual Directory Server Processes" in the Oracle Fusion Middleware Administrator's Guide for Oracle Virtual Directory.
6.4.3 Upgrading Oracle Virtual Directory Logging Configuration Settings
When you upgrade Oracle Virtual Directory, the logging settings you configured in Oracle Virtual Directory 10g are not upgraded.
Instead you will find that after upgrade:
-
The log levels in the upgraded Oracle Virtual Directory 11g instance are set to "Notification", and the access log is enabled by default after upgrade, irrespective of its configuration in Oracle Virtual Directory 10g.
To disable the access log, modify log level of logger name
com.octetstring.accesslogto "ERROR:1".For more information, see "Managing Oracle Virtual Directory Logging and Auditing" in the Oracle Fusion Middleware Administrator's Guide for Oracle Virtual Directory.
-
If the Oracle Virtual Directory Dump Transactions plug-in is configured, then the log level for the plug-in must be changed to one of the following values: SEVERE, WARNING, INFO, FINE, FINER, or FINEST.
For more information, see "Using the Dump Transactions Plug-In to Gather Information About Data Transformation Errors" in the Oracle Fusion Middleware Administrator's Guide for Oracle Virtual Directory.
6.5 Task 5: Verify the Oracle Virtual Directory Upgrade
To verify that your Oracle Virtual Directory upgrade was successful:
-
Run the Upgrade Assistant again and select Verify Instance on the Specify Operation page.
Follow the instructions on the screen for information on how to verify that specific Oracle Fusion Middleware components are up and running.
-
Use the Fusion Middleware Control to verify that the Oracle Virtual Directory components are up and running.
For more information, see "Getting Started Using Oracle Enterprise Manager Fusion Middleware Control" in the Oracle Fusion Middleware Administrator's Guide.