8 Adaptive Case Management in Process Workspace
Process Workspace supports the processing of cases implemented using Oracle Business Process Management's Adaptive Case Management. This chapter explains how to work with cases in Process Workspace.
To help you get started working with cases, this chapter contains these topics:
8.1 About Adaptive Case Management
Adaptive Case Management supports the modeling and running of very flexible and data-intensive business processes.
A case is a business process that is not rigidly predefined in the way a typical Business Process Management process is. Cases are less structured ad-hoc processes that include information, tasks, rules and services. The tasks you perform while working on a case change as information and activities related to the case are processed. Decisions you make while managing a case can change which processes and tasks are executed.
Some examples of cases that are suitable to be modeled and run using Adaptive Case Management include:
-
Insurance claims
-
Incident investigations
-
Customer complaints
For additional information on Adaptive Case Management, see Oracle Fusion Middleware Modeling and Implementation Guide for Oracle Business Process Management.
8.2 Navigating Cases
Cases are accessed through the Case page in the Process Workspace GUI. To access the Case page, click the Case link at the top of the GUI page.
8.2.1 About the Case Page
The Case page displays information for the currently selected case.
Use the Case page to:
-
View a list of cases and select one to view or work on.
-
View case details for open or closed cases.
-
Add comments or raise events on a case.
-
View case activities and their details, create new case activities, and filter the display of case activities by their status.
-
View an Audit Trail of case events. Filter the display of case events by event type. View and add new documents to a case. View and modify case data.
-
View or add documents to the case.
-
View case milestones and mark them completed.
-
View case stakeholders. Add stakeholders. Add or edit users attached to stakeholders.
-
View user information for case details.
-
Close cases.
-
Reopen cases.
8.2.2 About the Navigation Bar
Use the Navigation bar (shown in Figure 8-1) to identify the current case, to move between cases, to close and reopen cases, and to get information about cases.

The Navigation bar provides the following elements:
| Element | Description |
|---|---|
|
Case Listing |
Click the down arrow on the Case Listing control to see a list of current cases. Click on a case to navigate to it. |
|
Status Icon |
The Status icon indicates the case's status. Hover over the icon to see a text display of the case's status, for example, ACTIVE. |
|
Case Number and Name |
The case number and name are displayed in the Navigation bar. |
|
Information Icon |
Click the Information icon to display a pop-up window containing high-level details about the case.
Fields displayed include:
|
|
Add Comment |
Click to add a comment to the case. Fields enabling you to add the comment are displayed directly on the Case page, above the Audit Trail panel. |
|
Raise Event |
Click to initiate an event for the case. Fields enabling you to add the event are displayed directly on the Case page, above the Audit Trail panel.
The specific events available to be raised change depending on the composite used to create the case instance. |
|
Refresh |
Click the Refresh icon to update the case details displayed in the Case page.
When you select an action from Actions, a comment window appears. You must enter a comment and click OK to update the task and refresh the task list table. Click Cancel to cancel the action. |
|
Navigation arrows |
Click the left and right arrows to navigate to the previous and next case, respectively. |
|
Close Case |
Click Close Case to mark the case instance as closed. |
8.2.3 Using the Navigation Bar
Use the Navigation bar to move between cases, to close and reopen cases, and to get information about cases. You can also add comments and events to cases.
8.2.3.1 Selecting a Case
Use the controls in the Navigation bar (as well as those in the Case List panel) to select a case to work on. You can select a case by:
-
Choosing it from the Case Listing drop-down list
-
Choosing it from the Case List panel (visible when the Case Listing is pinned to the Case page)
-
Navigating to it using the Previous Case and Next Case buttons (visible when the Case Listing is not pinned to the Case page)
See "Viewing Hidden Panels" for more information about pinning and unpinning the Case List panel.
8.2.3.2 Closing a Case
Close cases using the Close Case button on the Navigation bar.
-
Navigate to the case.
-
Click Close Case. The Close Case details dialog box is displayed.
-
Select an outcome from the Outcome drop-down list.
-
Optionally enter a comment.
-
Click Close Case. An information dialog box is displayed indicating the results of the close action.
-
Click OK.
8.2.3.3 Viewing a Closed Case
You can view closed cases.
-
If the Case List panel is not displayed, pin the Case Listing drop-down list to display it.
-
Click Advanced Search. The Advanced Search dialog box is displayed.
-
Ensure that Closed is selected in the State section of the search criteria.
-
Click Search. The Case List panel is updated with a list of closed cases matching the other search criteria you used in the Advanced Search dialog box.
-
Click the case to view. The Case page is updated with the information for the selected case.
8.2.3.4 Adding a Comment to a Case
Add comments to a case using the Add Comment link in the Navigation bar.
-
Click Add Comment. The comment entry controls appear at the top of the Case page.
-
Enter the text for your comment.
-
Select a permission level from the Permission drop-down list. This determines the user permission level needed to be able to view the comment.
-
Click Post to add the comment to the case. (Note: to close the comment controls without posting the comment, click Close.
Comments can be viewed in the Audit Trail panel. See "Viewing the Audit Trail".
8.2.3.5 Raising an Event on a Case
Raise events on a case using the Raise Event link in the Navigation bar. The events that are available to be raised on a case are preconfigured using Oracle Business Process Management Studio JDeveloper.
-
Click Raise Event. The raise event controls appear at the top of the Case page.
-
Select an event name from the Event Name drop-down list to specify the type of event.
-
Enter a comment.
-
Select a permission level from the Permission drop-down list. This determines the user permission level needed to be able to view the event.
-
Click Raise Event to add the event to the case. (Note: to close the Raise Event controls without posting the event, click Close.
Events can be viewed in the Audit Trail panel. See "Viewing the Audit Trail".
8.3 Viewing Case Information
This section describes the panels available on the Case page and the kinds of information displayed on it, how to filter the displayed information, and how to find and view cases.
You interact with cases using the information provided on the Case page, and using the controls and links on the page to perform work related to the case, such as adding comments or events, reviewing and modifying milestones, creating new case activities and so on.
8.3.1 Viewing Case Instances
To view the details for a case, navigate to it using the Navigation bar. Select the case in the Case Listing control, or use the Previous Case and Next Case icons to navigate between cases.
See "Navigating Cases" for more information.
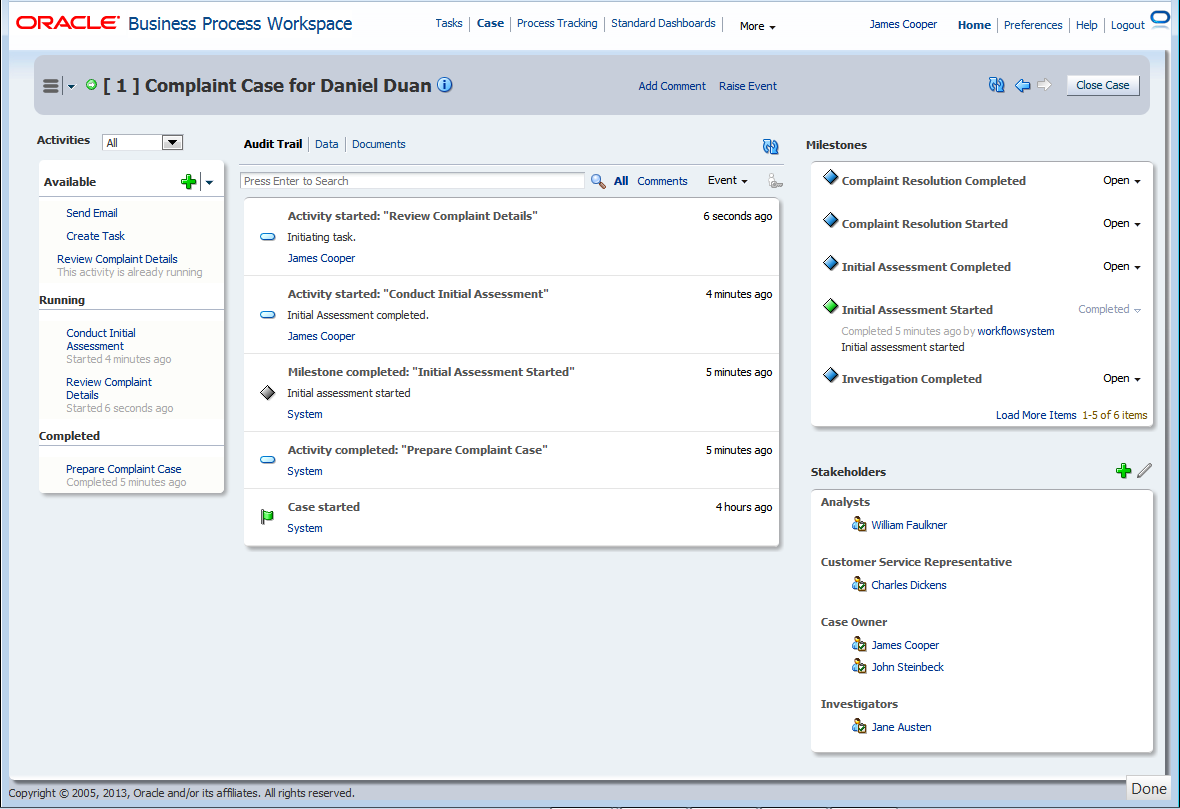
Figure 8-3 shows the Case page, which is divided into the following sections:
-
Navigation bar
-
Activities
-
Details (which can display Audit Trail, Data, or Comments information)
-
Milestones
-
Stakeholders
8.3.2 Viewing the Case List
You can view (and select) cases in two ways:
-
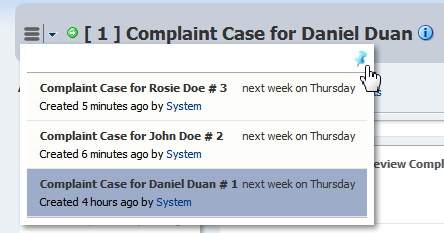
Click the Case Listing drop-down list in the Navigation bar to display a list of cases. (See Figure 8-2.)
-
When it is pinned to the Case page, use the Case List panel to view and select cases.
To display the Case List panel, click the Pin icon in the Case Listing window. The Case List panel includes more case details than the Case Listing control. When the Case List panel is pinned to the Case page, the Case Listing control does not appear on the Navigation bar.
To hide the Case List panel, click the Pin icon in the upper right-hand corner to un-pin it from the Case page. When the Case List panel is unpinned, the Case Listing control appears on the Navigation bar.
8.3.2.1 Viewing Hidden Panels
When the Case List panel is pinned to the page, other panels are hidden. When the Activities panel is hidden, click Show Activities to display it. When the Milestones and Stakeholders panels are hidden, click Show Milestones and Stakeholders to display them.
8.3.2.2 Case List Panel
Use the Case List panel of the Case page to locate, display and select cases. Cases are displayed in a series of sections in the panel.
| Element | Description |
|---|---|
|
Search Criteria |
Enter the search text. The text is searched for in the following case elements:
|
|
Search |
Click the Search icon to search for cases using the Search Criteria. |
|
Advanced Search |
Click the Advanced Search control to display the Advanced Search dialog. The controls on the Advanced Search dialog are shown below: |
|
Match |
Use the match control to control how the criteria are used in the search.
Choices include:
|
|
Search |
Click Search to search on the selected criteria. Cases matching the criteria are displayed in the Case List panel. |
|
Title |
Case title to search on. |
|
Identification Key |
Identification Key to search on. |
|
Creator |
User that created the case. |
|
Updated by |
User(s) that updated the case. |
|
State |
Select the case state(s) to search on using the check boxes. Choices include:
|
|
Updated |
Select an update day to search on. Choices include:
|
|
Due |
Select a due date to search on. Choices include:
|
|
Created |
Select a creation date to search on. Choices include:
|
|
Sort By |
Sorts the cases displayed in the Case List. Choose from:
|
|
Load More Items |
This link appears when there are more items than will fit in the default panel size. Click to display additional items. |
8.3.2.3 Sorting the Case List
Sort the cases displayed in the Case List by selecting a sort criteria from the Sort By drop-down list. When you make a selection, the cases are re-displayed in the selected order. Choose from the following sort criteria:
-
Created Date
-
Case Number
-
Creator
-
Due Date
8.3.2.4 Searching for Cases
You can search for cases using a simple search, or a more comprehensive advanced search.
-
Enter the search criteria in the Search Criteria entry box.
-
Press Enter or click the Search icon.
To Perform an Advanced Search For a Case:
-
Click the Advanced Search arrow. The Advanced Search dialog box appears.
-
Specify your search criteria in the text fields, check boxes, and selection fields in the Advanced Search dialog box as shown in Figure 8-4.
-
Click Search. The Case List is updated with the results of your search.
Figure 8-4 Case List Panel Advanced Search
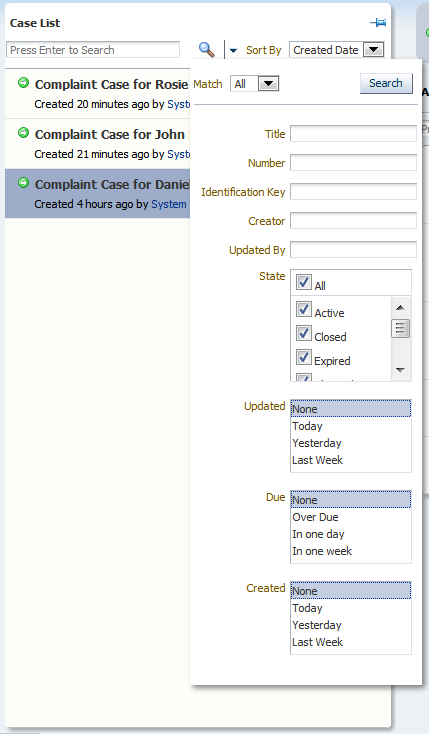
Description of "Figure 8-4 Case List Panel Advanced Search"
8.3.3 Working With Case Activities
Activities for the selected case are displayed in the Activities panel.
When the Activities panel is hidden, click Show Activities to display it.
8.3.3.1 Activities Panel
Use the Activities panel of the Case page to view activities and their details, and to initiate new activities. Activities are displayed in a series of sections in the panel.
| Element | Description |
|---|---|
|
Activities Filter |
Select the type of activities to display. Choices are:
|
|
Activities List |
Activities are displayed in sections, grouped by type. If no activities of a particular type exist, the section is not displayed. Section types include:
|
|
Add Activities |
Click to select an activity to add to the case. The choices available in the drop-down list depend on the case configuration, and whether the activity has already been added. |
|
Load More Items |
This link appears when there are more items than will fit in the default panel size. Click to display additional items. |
8.3.3.2 Filtering the Activities Displayed
Use the Activities drop-down list to select which activities are displayed. Choose from:
-
All
-
Available
-
Running
-
Completed
-
Errored
Activities for the case are displayed in their own section.
To see the details for an activity, click it.
8.3.3.3 Initiating an Activity
Activities that can be initiated are displayed in the Available section of the Activities panel. Activities that are required for a case are marked with an asterisk.
To initiate an activity, click its link in the Activities panel. Provide any required information in the dialog box that is displayed and click Initiate.
8.3.3.4 Viewing Activity Details
Activities that can be viewed are displayed in the Available, Running, Completed and Errored sections of the Activities panel.
To view details for an activity, hover the mouse over its link in the Activities panel. Click More Details... in the pop-up window that is displayed.
8.3.4 Viewing the Audit Trail
The Audit Trail panel is displayed by default when viewing a case. If it is not visible, click the Audit Trail link below the Navigation bar to display it.
You can view only one of the following panels at a time:
-
Audit Trail panel
-
Data panel: see "Data Panel"
-
Documents panel: see "Documents Panel"
8.3.4.1 Audit Trail Panel
Use the Audit Trail panel to view case events, details on the users who executed the events, and to set permissions for events. Events are displayed in a series of sections in the panel.
| Element | Description |
|---|---|
|
Search Criteria |
Enter the text to search for events by title. |
|
Search |
Click the Search icon to search for events using the Search Criteria. |
|
All |
Click to display all events. |
|
Comments |
Click to display only events that are comments. |
|
Event |
Use the event drop-down list to filter which event types are displayed in the Audit Trail panel.
Choices include:
|
|
Update Permission |
Click to change the user permissions for the currently selected event. If no event is selected, the Update Permission icon is disabled. |
|
Audit Trail Details |
Audit trail events are displayed as a series of sections in the Audit trail panel. Each event includes:
|
|
Load More Items |
This link appears when there are more items than will fit in the default panel size. Click to display additional items. |
8.3.4.2 Viewing Events in the Audit Trail
Case events are displayed in the Audit Trail panel. Each event is displayed in a section of the panel and includes the following information:
-
Event type icon
-
Event name
-
Event timestamp
-
Event detail summary (optionally)
-
User who performed the event
To see additional information about the user associated with an event, hover your mouse over the user name.
8.3.4.3 Updating Event Permissions
You can change the user permissions for an event.
To update user permissions for an event
-
Select the event from the Audit Trail panel.
-
Click the Update Permissions icon. The Permission dialog box displays.
-
Select the desired permission for the event from the drop-down list.
-
Click Apply.
8.3.5 Data Panel
Use the Data panel to view and modify the data associated with a case.
To view the Data panel, click the Data link on the Case page.
You can view only one of the following panels at a time:
-
Audit Trail panel: see "Viewing the Audit Trail"
-
Data panel
-
Documents panel: see "Documents Panel"
8.3.6 Documents Panel
Use the Documents panel to view and add documents attached to a case.
To view the Documents panel, click the Documents link on the Case page.
You can view only one of the following panels at a time:
-
Audit Trail panel: see "Viewing the Audit Trail"
-
Data panel: see "Data Panel"
-
Documents panel
8.3.6.1 Documents Panel
Use the Documents panel to view documents attached to the case and details on the users who uploaded them. You can also upload additional documents, and set permissions for the documents.
Documents are displayed in a series of sections in the panel.
| Element | Description |
|---|---|
|
Upload File |
Click to upload a new document to the case. The Upload File dialog box is displayed. |
|
Document Details |
Documents are displayed as a series of sections in the Documents panel. Each document includes:
|
|
Action List |
Use the Action List to choose an action to perform on the document, such as Delete. |
|
Load More Items |
This link appears when there are more items than will fit in the default panel size. Click to display additional items. |
8.3.6.2 Viewing Documents in the Documents Panel
Documents attached to the case are displayed in the Documents panel. Each document is displayed in a section of the Documents panel and includes the following:
-
Document icon
-
Document title
-
Document comment
-
Creator name
-
Timestamp
To download the document, click the Document title. A pop-up window is displayed containing the contents of the document.
8.3.6.3 Performing Actions on a Document
You can perform actions on a document attached to a case. For example, you can delete a document if you have the permissions required to do so.
To perform an action on a document
-
Select the document from the Documents panel.
-
Click the Action List drop-down list. A list of actions available to your user account displays.
-
Select the desired action for the document from the drop-down list. The action is taken immediately.
8.3.7 Viewing Milestones
Milestones are checkpoints that indicate the progress of the case.
8.3.7.1 Milestones Panel
Use the Milestones panel on the Case page to view case milestones, and to change the status of milestones. Milestones are displayed in a series of sections in the panel.
| Element | Description |
|---|---|
|
Milestone Details |
Each milestone section includes:
|
|
Status icon |
Color-coded icons indicate the status of the milestone:
|
|
Milestone Status |
Change the status of a milestone by selecting a value from the milestone status drop-down list.
Milestones with status:
|
|
Load More Items |
This link appears when there are more items than will fit in the default panel size. Click to display additional items. |
8.3.7.2 Changing a Milestone's Status
You can change the status of a milestone. For example, a milestone with status Completed can be changed to Reopened.
Note that in most cases, milestone status changes occur automatically when certain case activities happen.
To change a milestone's status
-
Select the desired status from the Milestone Status drop-down list. The Comment entry dialog box is displayed.
-
Enter an appropriate comment for the action you are taking.
-
Click OK. The milestone is updated with the new status.
8.3.8 Working with Stakeholders
Stakeholders represent interested parties in the case. Stakeholders have users, groups or roles associated with them that are involved in the processing of a case. Case elements such as activities can be restricted to certain stakeholders, and therefore, to particular users, groups or roles.
8.3.8.1 Stakeholders Panel
Use the Stakeholders panel on the Case page to view and modify case stakeholders. Stakeholders are displayed in a series of sections in the panel.
| Element | Description |
|---|---|
|
Add Stakeholder |
Click to add a new stakeholder definition to the case. When you click Add Stakeholder, the Add Stakeholder dialog is displayed.
The new stakeholder specifies at least one associated user, role, or group. |
|
Edit Stakeholder |
Click to edit the currently selected stakeholder in order to add a new user, role, or group. When you click Edit Stakeholder, the Edit Stakeholder dialog is displayed. |
|
Stakeholders Details |
Each section in the Stakeholders details panel includes:
|
|
Load More Items |
This link appears when there are more items than will fit in the default panel size. Click to display additional items. |
8.4 Working on Cases
When a new case is created in the system, a task is added to your Worklist, visible in the Tasks page. When you claim a task associated with a new case, you can then work on the case in the Case page.
Tasks are still performed in the Tasks page of Process Workspace. The Case page is used more as a point of reference to see information about a case, add or view documentation, comments and activities, and to move the case process forward.