6 Using the WebLogic Server Message Editor
The following sections describe how to use the Message Editor:
About the Message Editor
The Message Editor is a graphical interface tool that lets you create, read, and write XML message catalogs. The Message Editor is installed when you install WebLogic Server. Optionally, you can edit the XML catalogs in a text editor or with any XML editing tool.
Note:
WebLogic Server provides its own message catalogs which contain all the messages relating to WebLogic Server subsystems and functionality. You cannot edit these catalogs. For descriptions of WebLogic Server catalogs, see the "Index of Messages by Message Range" in Oracle Fusion Middleware Oracle WebLogic Server Message Catalog.You use the Message Editor to perform the following tasks:
-
Create XML message catalogs
-
Create and edit messages
-
View all the messages in one catalog
-
View the messages in several catalogs simultaneously
-
Search for messages
-
Validate the XML in catalog entries
-
Retire and unretire messages
Note:
The Message Editor does not support the editing of localized catalogs.
Starting the Message Editor
Before you start the Message Editor, install and configure your WebLogic Server system and set the environment variables, SAMPLES_HOME\domains\wl_server\setExamplesEnv.cmd, where SAMPLES_HOME represents the WebLogic Server examples home directory at WL_HOME\samples). Make sure that your classpath is set correctly. For more information on these topics, see the Oracle WebLogic Server Installation Guide.
Sample message catalog files are located in your SAMPLES_HOME/server/examples/src/examples/i18n/msgcat directory.
Note:
The location of yourSAMPLES_HOME directory might be different, depending on where you installed WebLogic Server.You can use the sample message catalogs as templates to create your own messages. You simply modify the provided information, such as the package name and class name. Then translate the message text and save the catalog. For more information on this topic, see Chapter 5, "Writing Messages to the WebLogic Server Log."
To start the Message Editor, type:
java weblogic.MsgEditor
or
java weblogic.i18ntools.gui.MessageEditor
To access basic command line help, type:
java weblogic.MsgEditor -help
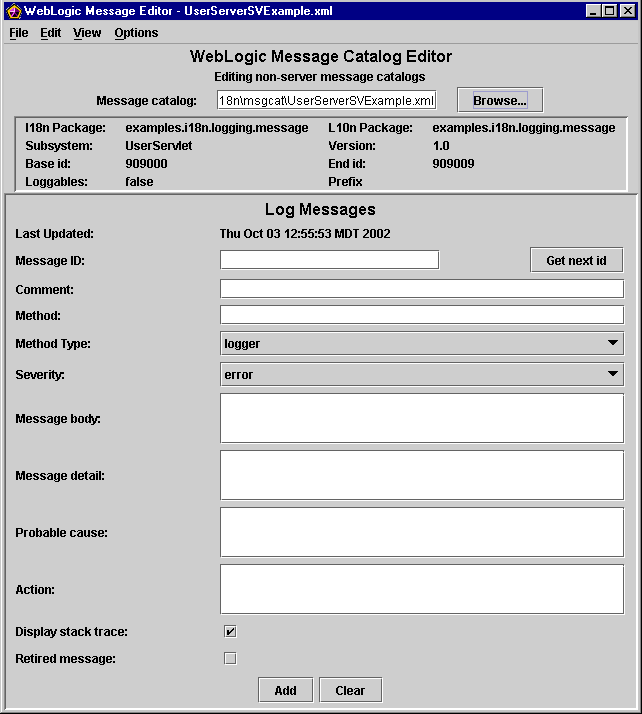
The main WebLogic Message Editor window for Log Messages appears, as shown in Figure 6-1.
Figure 6-1 WebLogic Message Editor for Log Messages
Description of "Figure 6-1 WebLogic Message Editor for Log Messages"
Working with Catalogs
The following sections describe how to use the Message Editor to manage catalogs:
Browsing to an Existing Catalog
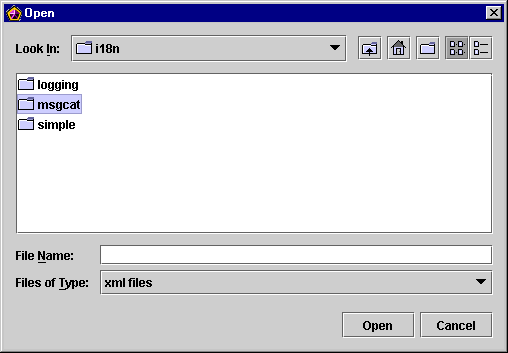
To find an existing catalog from the main WebLogic Message Editor window, enter the full pathname in the Message Catalog field, or click Browse and navigate to the existing catalog from the Open dialog.
The sample catalogs included with your WebLogic Server installation are in the SAMPLES_HOME/server/examples/src/examples/i18n/msgcat directory.
Note:
Your directory path might be different, depending on where you installed WebLogic Server.You can place your user-defined catalogs in any directory you designate.
Once you locate the catalog, Packages, Subsystem, Version, Base ID, and End ID (if any) are displayed, and the displayed catalog is the context catalog in which all other actions are performed.
You are now ready to enter new messages, edit existing messages, search for a message, or view all messages in the catalog.
If you select a log message catalog in the Message catalog field, the WebLogic Message Editor window for Log Messages appears, as shown in Figure 6-3.
Figure 6-3 WebLogic Message Editor for Log Messages

Description of "Figure 6-3 WebLogic Message Editor for Log Messages"
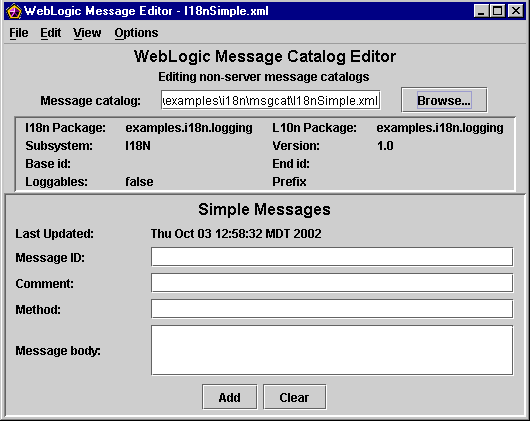
If you select a simple messages catalog in the Message catalog field, the WebLogic Message Editor window for Simple Messages appears, as shown in Figure 6-4.
Figure 6-4 WebLogic Message Editor for Simple Messages
Description of "Figure 6-4 WebLogic Message Editor for Simple Messages"
Creating a New Catalog
To create a new catalog, complete the following procedure:
-
From the main menu bar of the WebLogic Message Editor window, choose File > New Catalog.
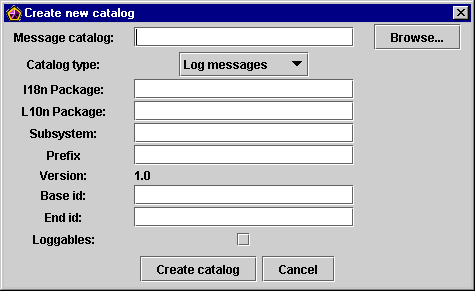
The Create New Catalog dialog appears, as shown in Figure 6-5.
-
In the Message Catalog field, enter the full pathname and the name of the new catalog, which must include the
xmlextension. Or, click Browse and navigate to the appropriate catalog directory. (This would be themsgcatdirectory, if you are using WebLogic Server example messages.) -
Use the drop-down Catalog type list to indicate whether your catalog is a Log messages or a Simple messages catalog.
If you select a log message catalog, the Base ID and End ID fields are displayed. These fields indicate the range of ID numbers for messages in the catalog. If you select a simple text message catalog, these fields are not present.
-
Enter the name of the package in which you want to place the generated Logger classes in the I18n Package field.
The default is
weblogic.i18n. If you want to place the logger classes in another package with your application, specify the package name here. -
Enter the name of the package where you want to place the catalog data in the L10n Package field.
The default is
weblogic.l10n. If you want to place your catalog data in another package with your application, specify the package name here.Note:
In most cases, the recommended practice is to include the message class files and properties files in the same package hierarchy as your application.However, if you do not include the message classes and properties in the application's package hierarchy, you must make sure the classes are in the application's classpath.
-
Enter a name in the Subsystem field to indicate which part of the system will log the message.
This name is logged with the message. For applications, the application name is typically entered in the Subsystem field.
-
In the Prefix field, enter a prefix to be prepended to the message ID when logged.
The default server message prefix is BEA. You can enter any prefix for user messages. (Oracle recommends that the prefix be less that 10 characters in length. Also, make sure you use standard java naming conventions.)
-
Click Create Catalog.
The Create New Catalog dialog closes, and the catalog you just created is displayed as the context catalog in the Message Editor window.
Adding Messages to Catalogs
The following sections describe how to use the Message Editor to add messages to catalogs:
Entering a New Log Message
To enter a new message into a log catalog:
-
In the WebLogic Message Editor main dialog (Figure 6-6), enter the full pathname in the Message Catalog field or click Browse and navigate to an existing catalog.
-
Click Get next ID to generate the next unique numerical ID in the context catalog.
The ID appears in the Message ID field.
-
Enter any relevant comments about the message in the Comment field.
-
Enter the appropriate Method for your log message, including parentheses and any arguments. For example,
logErrorSavingTimestamps(Exception ioExcep) -
Set the Method Type for the log message.
Your options are
loggerandgetter. The default method type islogger, which is used for messages that will be logged. Thegetteroption is for messages that are used for non-logging purposes, such as exceptions. -
Choose a Severity from the list of possible levels.
-
Enter text for the Message body.
Parameters are denoted by
{n}. For example,"Exception occurred while loading _WL_TIMESTAMP FILE." -
Enter text for the Message detail.
Parameters are denoted by
{n}. For example,"Exception occurred while loading _WL_TIMESTAMP FILE. Forcing recompilation: {0}." -
Enter text for the Probable Cause.
Parameters are denoted by
{n}. For example,"There was an error reading this file." -
Enter text for the Action.
Parameters are denoted by
{n}. For example,"No action required." -
Toggle the Display stacktrace option by selecting or clearing the check box.
Use this option to print a stacktrace along with the message when a Logger method takes an exception as one of its arguments.
-
Toggle the Retired message option by selecting or clearing the check box.
Use this option to retire (hide) obsolete messages. Retired messages are deleted in the sense that they are not represented in the generated classes. However, the message data does remain in the
.xmlfile. -
Click Add.
The message is added and the entire catalog is immediately written to disk.
Entering a New Simple Text Message
To enter a simple text message into a simple messages catalog:
-
In the WebLogic Message Editor main dialog, enter the full pathname in the Message Catalog field or click Browse and navigate to the existing catalog.
The WebLogic Message Editor for Simple Messages dialog appears, as shown in Figure 6-7.
-
Enter a unique alphanumeric Message ID.
-
Enter a Comment if required.
-
Enter the appropriate Method for your simple message, including parentheses and any arguments. For example,
startingClusterService() -
Enter the Message body text. For example,
startingClusterService -
Click Add.
The message is added and the entire catalog is immediately written to disk.
Finding Messages
The following sections describe how to use the Message Editor to find messages:
Finding a Log Message
To find a log message:
-
Make sure that the context catalog is a log message catalog and the WebLogic Message Editor Log Messages window appears, as shown in Figure 6-3.
-
Choose Edit from the main menu bar.
-
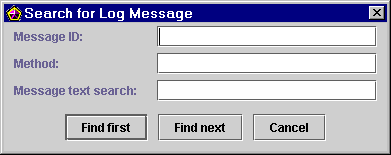
Choose Search to display the Search for Log Message dialog, as shown in Figure 6-8.
-
Enter the Message ID and the Method name.
-
Enter as much information as needed in the Message text search field to find the correct message.
The search for text does a partial match in any of the text fields.
-
Click Find first or Find next.
The fields are strung together to find the message. If a matching message is found, it is displayed in the Message Editor window, as shown in Figure 6-1.
Finding a Simple Text Message
To find a simple text message, complete the following procedure:
-
Make sure that the context catalog is a simple text message catalog and the WebLogic Message Editor Simple Messages window appears, as shown in Figure 6-4 window appears.
-
Choose Edit from the main menu bar.
-
Choose Search to display the Search for Simple Message dialog, as shown in Figure 6-9.
-
Enter the Message ID.
-
Enter as much information as needed in the Message text search field to find the correct message.
The search for text does a partial match in any of the text fields.
-
Click Find first or Find next.
The fields are strung together to find the message. If a matching message is found, it is displayed in the Message Editor window, as shown in Figure 6-4.
Using the Message Viewer
The WebLogic Message Editor contains a Message Viewer that lets you view all messages in a catalog, view all messages in multiple catalogs, and select any message to edit.
The following sections describe how to use the Message Viewer to view and select messages to edit:
Viewing All Messages in a Catalog
To view all the messages in a catalog:
-
Open the WebLogic Message Editor.
The WebLogic Message Editor window displays the catalog for the last message viewed as the current context catalog.
-
Choose View from the menu bar.
-
Choose All messages.
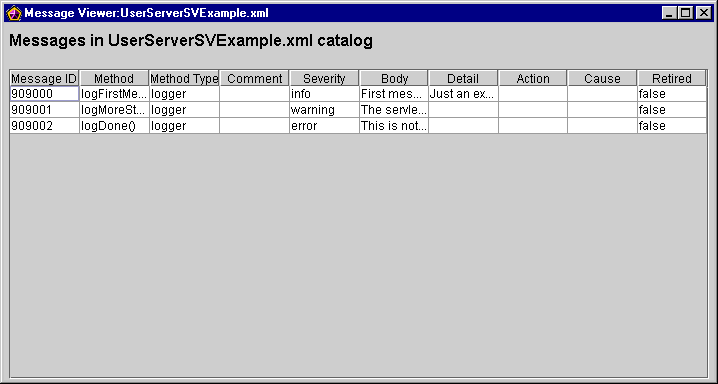
All the messages for the current context catalog are displayed in the Message Viewer window, as shown in Figure 6-10. The Message Editor window remains open.
Viewing All Messages in Several Catalogs
If you view the messages from the current context catalog and then change the context by navigating to a new catalog, a second Message Viewer window opens displaying the new catalog. You can view messages for as many catalogs as you require (or can reasonably fit on your screen). Each catalog is displayed in a separate Message Viewer window. See Browsing to an Existing Catalog, for information about browsing to a new catalog.
Selecting a Message to Edit from the Message Viewer
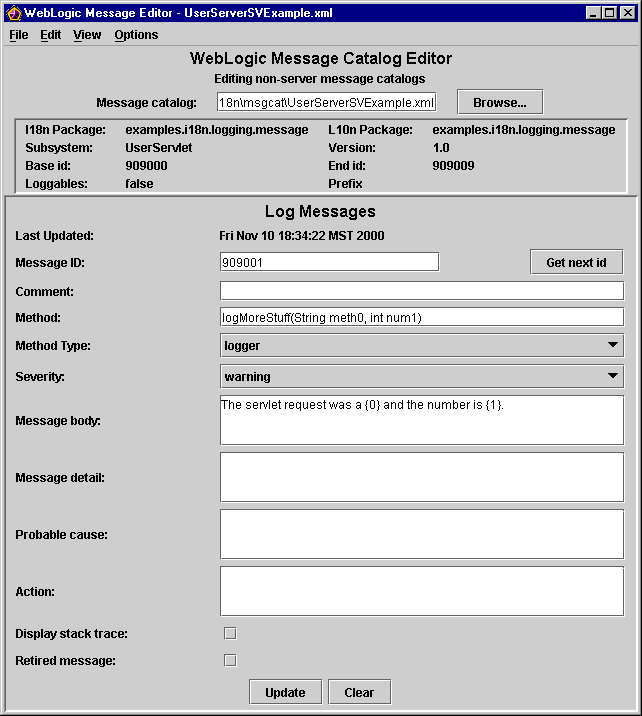
You can select any message displayed in the Message Viewer and the selected message becomes the context catalog. The message is displayed in the Message Editor window.
Figure 6-11 Message Viewer and Message Editor for Message 909001
Description of "Figure 6-11 Message Viewer and Message Editor for Message 909001"
Editing an Existing Message
To edit an existing message:
-
Find the message you want to edit.
You can use the Search dialog, described in Finding a Log Message, and Finding a Simple Text Message, or select the message in the message viewer, described in Selecting a Message to Edit from the Message Viewer.
The message appears in the Message Editor window.
-
Edit the fields you want to change.
-
Click Update.
The message is updated and the entire catalog is immediately written to disk.
Retiring and Unretiring Messages
You can retire and unretire messages in the Message Editor window. Retiring a message does not mean that the message is deleted from the master catalog; it is simply hidden from user view. This feature is useful for removing obsolete messages. If you need to bring a retired message back into view, you can unretire it.
To retire or unretire a message, complete the following procedure:
-
Find the message you want to retire or unretire.
-
In the Message Editor window, toggle the Retired message option by selecting or clearing the check box.
-
Click Update.
