4 Creating a New Page Template with a New Portal Skin
In this lesson, working as a developer at design time, you will enhance the WebCenter portal application you constructed in the previous lesson and learn how to create a new JSF page template and register that template as a portal resource.
To achieve this goal, you will need to create a new page template, then extract the setup files provided with this Tutorial on your hard drive. The setup contains a batch of files with graphic images, skins and templates. You will then replace the new page template created by you in the application with the page template provided in the setup.
In the last step, you will register the new template and customize the site template, adding new images and a new skin to your portal application. When you run the application in a web browser, you will see a new home page with a new skin applied at runtime.
Introduction
This lesson contains the following steps:
-
Step 2: Extract Setup Files and Replace the Existing Template
-
Step 3: Create Portal Resources and Apply the New Template and Skin
Note:
Before you begin the steps in this lesson, ensure you have followed the steps up to this point in the Tutorial.
Step 1: Create a New Page Template
To extend the capabilities of our portal application, we need to create a new page template.
Note that in this step, we won't build a new JSF page template from scratch. But rather, we'll rely on a pre-configured, ready-made template which, following the steps in this lesson, you will extract into your application. To ensure that the template artifacts are correctly registered inside the application, we will create an empty template and then replace it with the one provided in the Tutorial Setup file.
You can use page templates to control the layout of your portal. A page template is a JSPX file that specifies the look and feel of your portal's pages. The template defines header, footer, content, and navigation regions within the page. You can apply the template to any number of pages, resulting in a consistent look and feel.
Tip:
The template is linked or referenced from the pages, so if you change the template, those changes are reflected on all the pages in your portal application.
For more information about page templates, see “Understanding Pages, Page Templates, and the Portal Page Hierarchy” in Oracle Fusion Middleware Developer's Guide for Oracle WebCenter Portal.
To create a new page template in our portal application:
-
In the Application Navigator of your portal application project, navigate to the page templates folder (
/oracle/webcenter/portalapp/pagetemplates) and right-click the folder and choose New.A New Gallery dialog appears, as shown in Figure 4-1.
-
In the New Gallery, expand Web Tier, select JSF and then JSF Page Template, and click OK.
Figure 4-1 The JSF Page Template Selected in the New Gallery
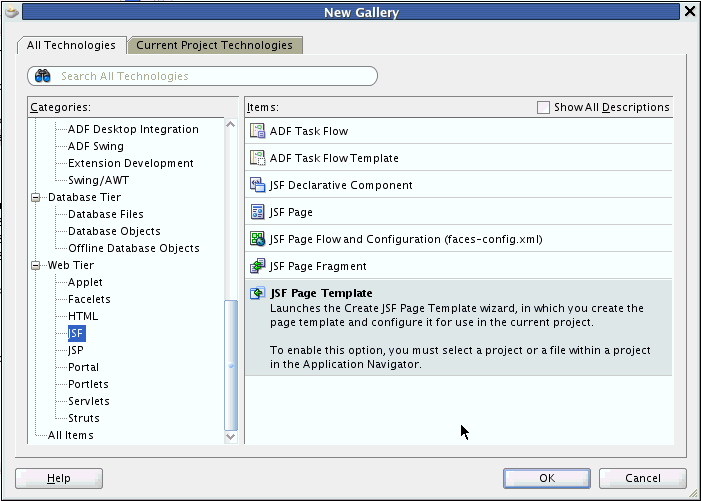
Description of "Figure 4-1 The JSF Page Template Selected in the New Gallery"
-
In the Create JSF Page Template dialog (Figure 4-2), in the File Name field, enter the name for the JSPX file that represents the page template, in this case
myTemplate.jspx.The file name identifies the page template in the Application Navigator.
-
In the Directory field (Figure 4-2), enter the full directory path of the location under which to create the page template.
-
In the Page Template Name field (Figure 4-2), enter the display name for the page template, in this case
MyTemplate. -
Click OK to create the template.
-
Navigate in the Application Navigator to the
pagetemplatesfolder, selectmyTemplate.jspx, then right-click the Go to Page Definition menu item, as shown in Figure 4-3.Figure 4-3 Creating a New Page Definition for the myTemplate.jspx File
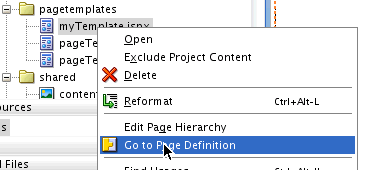
Description of "Figure 4-3 Creating a New Page Definition for the myTemplate.jspx File"
-
When the dialog Confirm Create New Page Definition appears (Figure 4-4), click Yes.
Figure 4-4 The Confirm Create New Page Definition Dialog
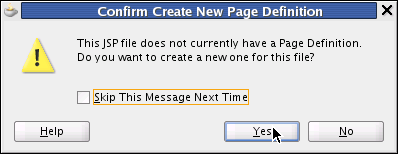
Description of "Figure 4-4 The Confirm Create New Page Definition Dialog"
Tip:
A page definition file is an
XMLfile that specifies ADF bindings, page parameters, and permission settings. Various mappings and bindings used by pages and page templates are also specified. In this case, themyTemplatePageDef.xmlfile specifies the task flow for navigation rendering of the site, as well as parameters defining site structure paths.The
Application Sourcesfolder is primarily a repository for page definition files, like themyTemplatePageDef.xmlfile, as well as for source code in a project. -
Verify that the
myTemplatePageDef.xmlfile now resides in the Application Sources sub folderpagetemplates, as shown in Figure 4-5.Figure 4-5 The myTemplatePageDef xml File in the Portal Application Sources Directory
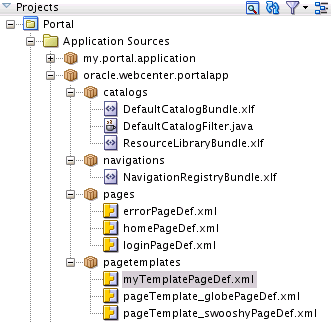
Description of "Figure 4-5 The myTemplatePageDef xml File in the Portal Application Sources Directory"
By associating a page definition with the page template, you will be able to include model objects, such as task flows and portlets, in the page template. Users can also switch to a different page template at runtime, if they choose.
It's important to note that within your portal application, page templates must either all have associated page definitions or none have associated page definitions. The reason for this is that if you have a combination of page templates with and without associated page definitions, users won't be able to switch templates at runtime.
For more information about templates and skins, see the chapter “Designing the Look and Feel of Your Portal” in Oracle Fusion Middleware Developer's Guide for Oracle WebCenter Portal.
Step 2: Extract Setup Files and Replace the Existing Template
Now you want to extract the provided Tutorial setup files from a folder (owcs-r11ps3-devtutsetup-254761.zip) that resides on your local hard drive and then move those files to the appropriate folders in the WebCenter Portal application.
If you have not yet downloaded these setup files, as described in "Step 6: Download the Sample Tutorial Files" in Chapter 2, then do so now. You can download the files from your web browser. The files are available at this URL address:
http://www.oracle.com/technetwork/middleware/webcenter/owcs-r11ps3-devtutsetup-254761.zip
To extract the setup files and place them in the correct location in your newly created application in JDeveloper:
-
To begin with, you need to copy the
owcs-r11ps3-devtutsetup-254761.zipfile onto your hard drive in the directory of your choosing, and then proceed to unzip the files and extract their contents, as described in the following steps. -
On your local drive navigate to, for example,
C:\...\USERS\Desktop\TutorialSetup\owcs-r11ps3-devtutsetup-254761.zip\.Four folders reside in that directory: images, skins, templates, and UCM Content, as shown in Figure 4-6. Note that the UCM Content folder contains content that you need to upload to a UCM content repository, as discussed in Step 6: Download the Sample Tutorial Files.
Figure 4-6 Images, Skins, Templates, and Content Folders for Setup on Local Hard Drive

Description of "Figure 4-6 Images, Skins, Templates, and Content Folders for Setup on Local Hard Drive"
-
Extract the contents of the
imagesfolder (Figure 4-7) and move those contents to theMyApplication/Portal/public_html/imagesfolder in your portal application.Figure 4-7 The Expanded Images Folder in the Tutorial Setup Directory

Description of "Figure 4-7 The Expanded Images Folder in the Tutorial Setup Directory"
-
Repeat the same procedure for contents of the
skinsfolder (Figure 4-8), moving those contents to theMyPortalApplication/Portal/public_html/oracle/webcenter/portalapp/skins/folder in your portal application. Note that the extracted skin is a Cascading Style Sheet (CSS) document.Figure 4-8 Expanded Skins Folder in the Tutorial Setup Directory

Description of "Figure 4-8 Expanded Skins Folder in the Tutorial Setup Directory"
-
Repeat again the same procedure for the contents of the
templatesfolder (Figure 4-9), moving those contents to two separate locations, in this case moving themyTemplate.jspxtemplate to theMyPortalApplication/Portal/public_html/oracle/webcenter/portalapp/pagetemplates/folder and themyTemplatePageDef.xmlto theMyPortalApplication/Portal/adfmsrc/oracle/webcenter/portalapp/pagetemplatesfolder.Figure 4-9 Expanded Templates Folder in the Tutorial Setup Directory

Description of "Figure 4-9 Expanded Templates Folder in the Tutorial Setup Directory"
-
Now select the Portal folder at the top level of your Project and click the Refresh icon in JDeveloper (not your web browser). This will refresh and save each of the folders whose contents you have extracted and copied to your portal application in JDeveloper, as shown in Figure 4-10.
The
myTemplatePageDef.xmlfile now resides in thepagetemplatesfolder.Figure 4-10 The Portal Hierarchy Refreshed to Include the Extracted Files for Setup
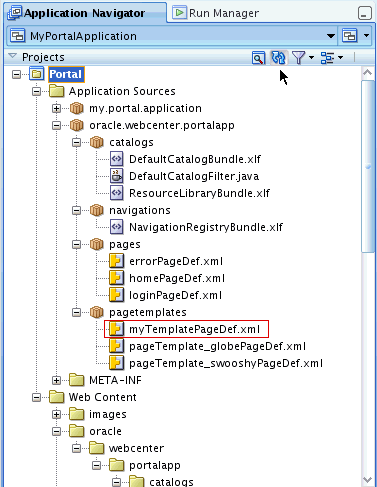
Description of "Figure 4-10 The Portal Hierarchy Refreshed to Include the Extracted Files for Setup"
-
Once you refresh the page templates and skins folders in your portal application, the copied files,
myTemplate.jspxandtutorial-skin.css, appear in their respective folders, as shown in Figure 4-11.Figure 4-11 myTemplate.jspx file and tutorial-skin.css File in the Portal Project Folders
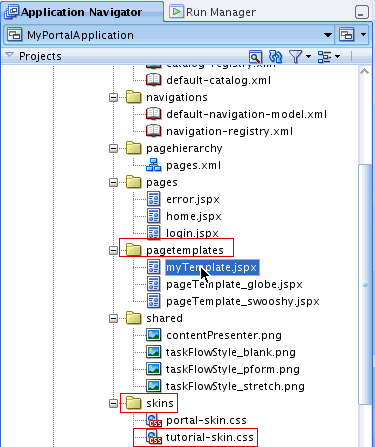
Description of "Figure 4-11 myTemplate.jspx file and tutorial-skin.css File in the Portal Project Folders"
-
Close the Portal
Application Sourcesfolders and navigate to thewebcenterfolder in your project directory.
Step 3: Create Portal Resources and Apply the New Template and Skin
In this next sequence of steps, you will create a portal resource at design time to customize both the site template and apply the newly provided tutorial skin.
-
Open the
webcenterfolder in your portal project and navigate to thepagetemplatesfolder in the directory. -
Select the
myTemplate.jspxfile and right-click the file. -
Select the Create Portal Resource menu item, shown in Figure 4-12.
Figure 4-12 The Create Portal Resource Menu Item for the myTemplate.jspx File
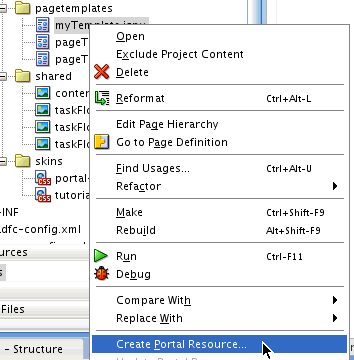
Description of "Figure 4-12 The Create Portal Resource Menu Item for the myTemplate.jspx File"
-
In the Create Portal Resource dialog, enter in the Display Name field
My Site Template(Figure 4-13) and click OK.Figure 4-13 The Create Portal Resource Dialog with the Display Name Specified as My Site Template
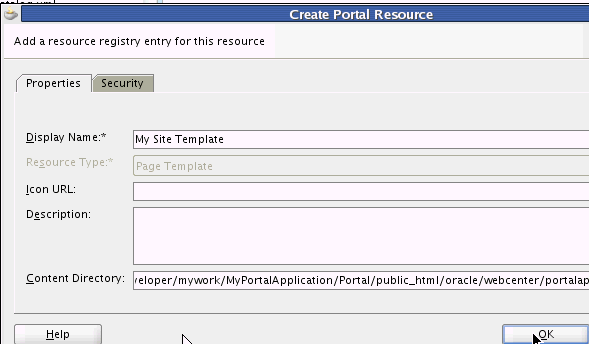
Description of "Figure 4-13 The Create Portal Resource Dialog with the Display Name Specified as My Site Template"
-
Navigate to the
skinsfolder and open it. Select thetutorial-skinfile and right-click the Create Portal Resource menu item, as performed in the previous step. -
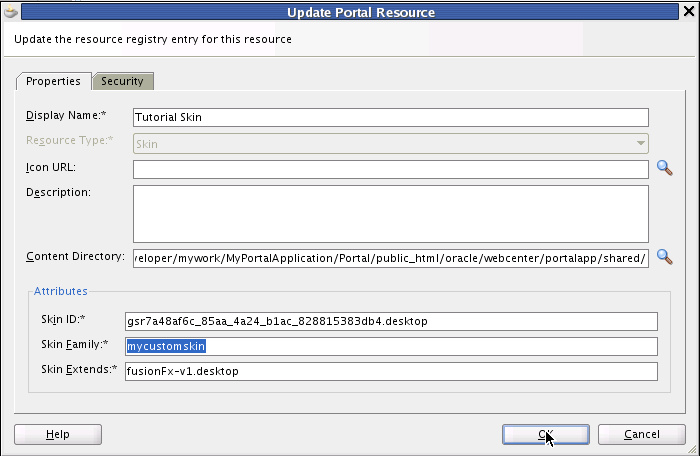
Change the Display Name to
Tutorial Skin, and in the Skin Family field, entermycustomskin, as shown in Figure 4-14.Figure 4-14 The Update Portal Resource Dialog with mycustomskin Specified as Skin Family Attribute
Description of "Figure 4-14 The Update Portal Resource Dialog with mycustomskin Specified as Skin Family Attribute"
-
Click OK.
-
Now select the Portal project in Application Navigator and right-click Run to run the portal application in JDeveloper. The portal displayed in the web browser shows the original template, with its default skin and standard portal application look-and-feel.
-
In the default Home portal page in the web browser, log in as
weblogic(which enables you to have administrative privileges) and enterweblogic1as your password.Note that as discussed in Chapter 3, "Creating a WebCenter Portal Application," you must log in as a user with administrative privileges. In the Tutorial, the user “weblogic” has administrative privileges.
-
After logging in, click the Administration link in the upper right corner of the browser window.
-
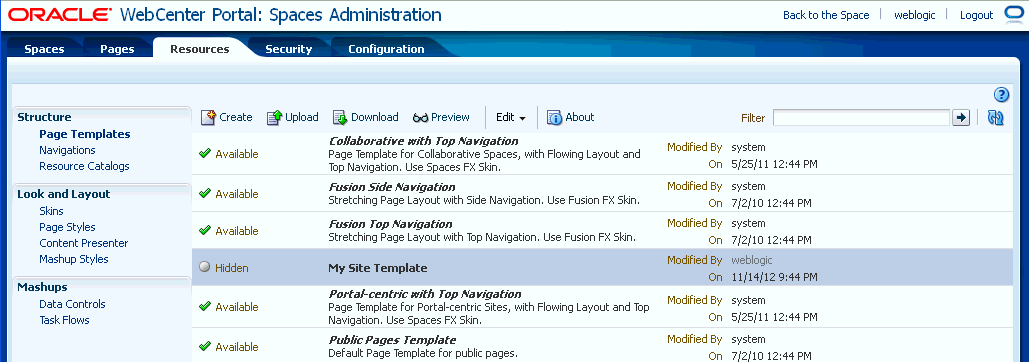
When the Administration Console opens, select the Resources tab, and navigate to Page Templates in the Structure menu, as shown in Figure 4-15.
Figure 4-15 The My Site Template as a Designated Resource in the Administration Console
Description of "Figure 4-15 The My Site Template as a Designated Resource in the Administration Console"
-
By default,
My Site Templateis hidden. With that row selected, from the Edit menu, choose Show to change its state to Available. A green checkmark and the word "Available" appear next to it now, and it is available for use in the application. -
Similarly, under the Look and Layout heading, choose Skins. With
Tutorial Skinselected, from the Edit menu, choose Show to change its state to Available. -
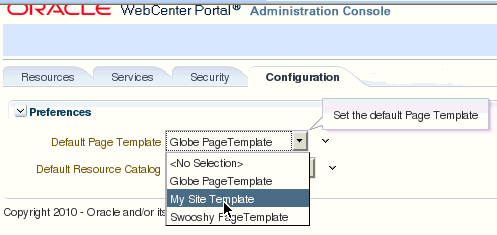
On the Administration Console, navigate to the Configuration tab. For Default Page Template menu, select
My Site Templateas the default page template, as shown in Figure 4-16.Figure 4-16 The Default Template Changed to My Site Template
Description of "Figure 4-16 The Default Template Changed to My Site Template"
-
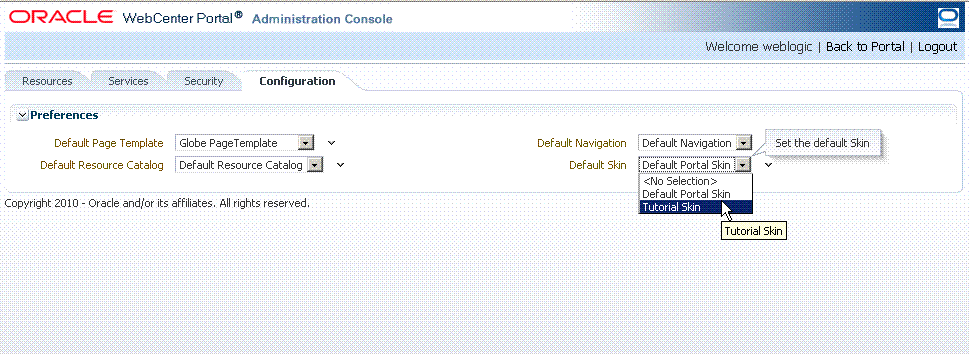
For Default Skin, select
Tutorial Skinfrom the list. Now set the default portal skin toTutorial Skin(Figure 4-17).Figure 4-17 The Default Portal Skin Changed to Tutorial Skin
Description of "Figure 4-17 The Default Portal Skin Changed to Tutorial Skin"
-
Click the Back to Portal link in the Administration Console.
In this lesson, you have learned how to enhance your portal application by creating a new page template, setting that template as a portal resource and applying a new skin (extracted from the Tutorial Setup files and copied into the skins folder in your project) to your portal to change its look and feel at runtime.
In the next lesson, you move ahead to further customize your application portal by changing the default settings of your template at design time in JDeveloper.
