7 Tour a Social Site
When you install Spaces, you get a host of WebCenter Portal: Services to provide the support you need to build both internal and external facing portals. For example, the Analytics service provides metrics to keep track of user traffic, while other services such as People Connections and Discussions help people keep in close contact with each other. In the next few steps, you'll take a closer look at some of the services that help you communicate with others on your team.
To introduce you to some of the most commonly used social site features based on Oracle WebCenter Portal: Services, in this chapter we will do the following:
7.1 Step 1: Create a Space
Communities with common interests, as well as teams with a common business goal or project, need to exchange information in the form of ideas, opinions, and organized content (such as, processes, policies, information about new services and facilities, and so on). To help these groups get and stay connected, Spaces provides different types of space templates that support the specific needs of project teams and communities. While the El Piju site you created in the last scenario helped you explore ways to build a customer-facing portal, in this scenario you'll build a team site (internal portal) through which you'll experiment with Spaces' social networking capabilities.
-
Log in to Spaces.
-
Click Spaces in the banner, then choose Create a Space.
-
In the Name your Space field, type
Get Connected. -
In the Write a description field, enter a description if you like, and click Next.
-
In the Access step, in the Enter the URL for your Space field, type
getconnectedto complete the URL. -
Under Choose an access level for your Space, choose Public, then click Next.
-
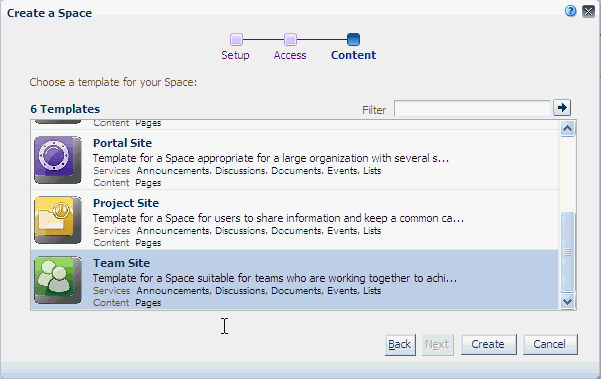
In the Content step, highlight the Team Site template, as shown in Figure 7-1, then click Create.
While the Portal Site template, which we used in the previous scenario, is more appropriate for a portal site, the Team Site template has everything you need for teams who need to stay in close contact. Specifically, the Team Site template comes pre-seeded with a discussions forum, document library, wiki, blog, and more, all of which can be used to foster communication between and among disparate groups.
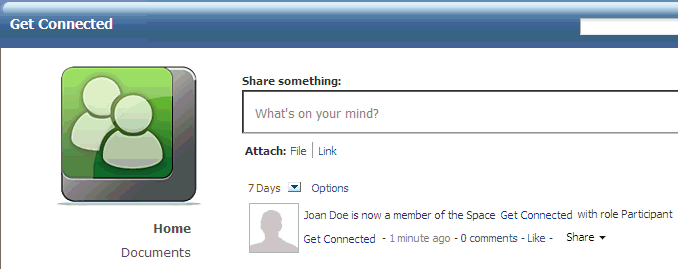
Your screen should look something like Figure 7-2.
Figure 7-2 Newly Created Get Connected Space
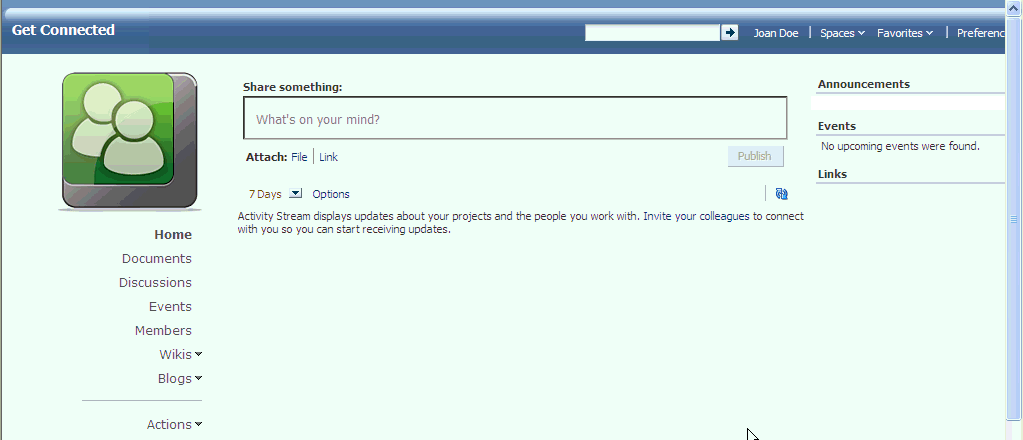
Description of "Figure 7-2 Newly Created Get Connected Space"
Let's add a colleague as a member of the Get Connected space. You'll need your colleague to explore some of the features you'll experiment within this scenario.
7.1.1 Add a Colleague As a Member
Note: To experiment with Activity Stream, you'll need the name of a colleague at your site, preferably one with a Spaces account. If you don't have one, you can just follow along with the steps described here.
In this step, you'll add a colleague to the Get Connected space as a participant.
-
While you are in the Get Connected space, click Members in the left navigation panel, then click Add at the top of your screen.
This displays the Members tab in the Settings tab set. As the creator of this space, you are a moderator and can therefore control all aspects of the space, including membership.
-
Click the first icon, Add People, as shown in Figure 7-3.
-
In the Add People field, type in your colleague's user ID, then click the arrow to search the directory.
-
In the table below the Add People field, select the row with your colleague's user ID.
-
From the Select Role dropdown list, select Participant.
-
Click Add, then Done.
Notice that your colleague's name moves to the Members list as a participant.
-
Click Back to the Space in the banner.
Take a look at the Home page, as shown in Figure 7-5, and notice that your colleague has been added to the space.
You'll find that many of your activities, as well as those of other space participants and moderators, are reflected on the Activity Stream, providing an easy way for team members to scan through and see what changes have occurred since their last visit. We're now going to explore the Activity Stream feature a bit more.
7.2 Step 2: Explore the Activity Stream
In this step, you will work with Activity Stream to experience how it provides a streaming view of the actions you'll perform in the Get Connected space. For example, Activity Stream can note when you or a connection posts feedback, uploads a document, and creates or contributes to a discussion forum. You can also share a streamed activity and its attachments using the Share option, available on each streamed item.
Let's do the following:
7.2.1 Share Ideas and Thoughts
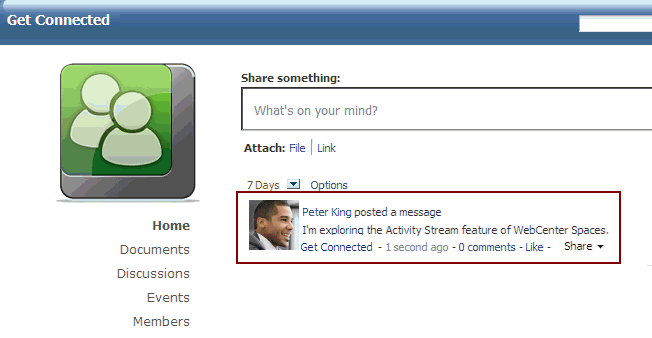
You may already be quite used to sharing your ideas and thoughts through social networking sites such as Facebook, Twitter, MySpace, or Orkut. Let's explore a similar feature in Spaces by adding a quick note to let your colleague know that you're exploring Activity Stream features. Type a message in the Share something box, then click Publish.
Your message appears on the Home page immediately:
Figure 7-6 Share Something - Post a Message
Description of "Figure 7-6 Share Something - Post a Message"
Next, share a document or a link with your colleague using the links provided for this purpose:

Description of the illustration wcutu_actstrm_filelink.gif
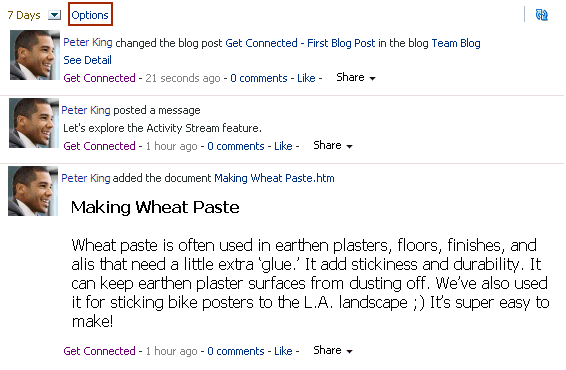
Notice that the Hide and Share dropdown menus appear next to what you've posted to allow you to email space members directly, or to hide the activity from their view.
Click the Options link that appears on top of the Activity Stream.
Description of the illustration wcutu_actstrm_optinslink.gif
-
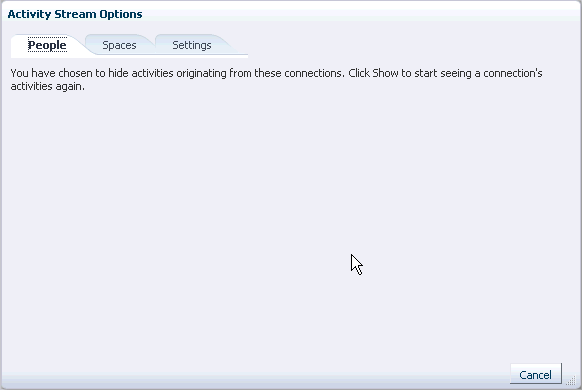
The People tab displays the connections whose activities you choose not to display in your Activity Stream. A Show button displays against each connection listed on this tab, which you can click if you change your mind. (This tab doesn't display any connections at this point, as shown in Figure 7-7, because you don't have a proper list of connections.)
Figure 7-7 Activity Stream Options - People Tab
Description of "Figure 7-7 Activity Stream Options - People Tab"
-
The Spaces tab shows the spaces whose activities you are not interested in. Once you have spaces listed on this tab, a Show button displays against each one so you can change your preference anytime you like.
-
On the Settings tab, you can choose People, spaces, and WebCenter Portal services from which to stream activities in your own view of the Activity Stream. These settings follow you, in effect, so you'll see the same set of activities regardless of whether you're in your Home space or another space.
Click Cancel to exit the Options tab set.
7.2.2 Create an Announcement
Announcements are an effective way to notify all LOBs about upcoming events, such as product releases, training sessions, workshops, and so on. Let's announce the launch of the Get Connected space. Your colleague will see this announcement, as she is a member of this space.
-
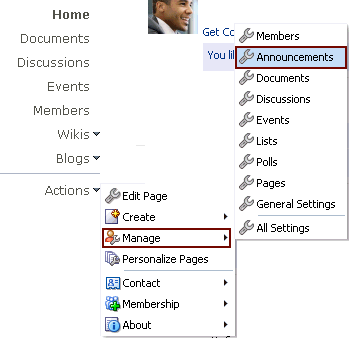
From the Actions menu, choose Manage, then Announcements, as shown in Figure 7-8.
Figure 7-8 Actions - Manage - Announcements
Description of "Figure 7-8 Actions - Manage - Announcements"
This displays the Announcements page.
-
Click Create.
This displays the Create Announcement dialog.
-
In the Subject field, type what you plan to announce. For example, type
Announcing the new Get Connected Space!. -
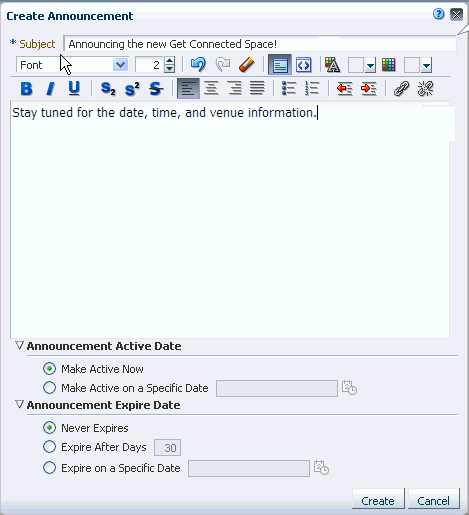
In the Rich Text Editor, type a line or two about the announcement, as shown in Figure 7-9.
Notice that you can determine when this announcement becomes active, as well as set an expiration date if the material is time-sensitive.
-
Click Create.
The announcement is created and displays on the Announcements page, as shown in Figure 7-10:
Figure 7-10 Announcements Page - New Announcement

Description of "Figure 7-10 Announcements Page - New Announcement"
-
Click Home on the left navigation panel.
Notice that the new announcement you just posted appears in your Activity Stream. In addition, the Home page for a Team Site contains the Announcements task flow in the upper right corner, so all announcements are published there as well for easy access. A task flow is a set of re-usable rules and controls that allow a user to complete a task. You can think of task flows as the building blocks that help construct your Spaces pages.
7.2.3 Schedule an Event
The Events task flow is useful for scheduling meetings, appointments, and any other type of occasion in your space's calendar so all the space members know about the event. Let's schedule a meeting with the Get Connected space members--in this case just your colleague--to discuss how we can make the Get Connected space more productive.
-
From the Actions menu, choose Manage, then Events.
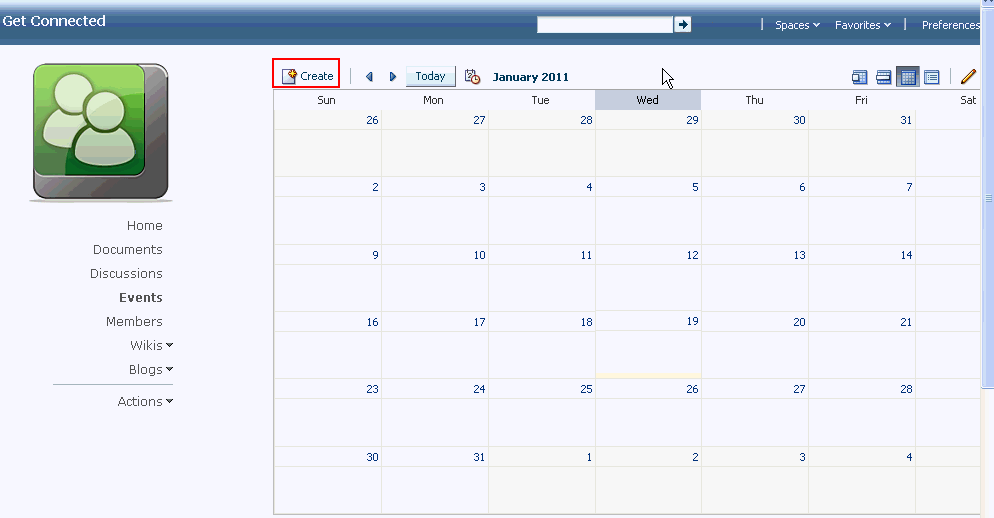
Your screen should now look like Figure 7-11.
-
Click Create, located just above the calender.
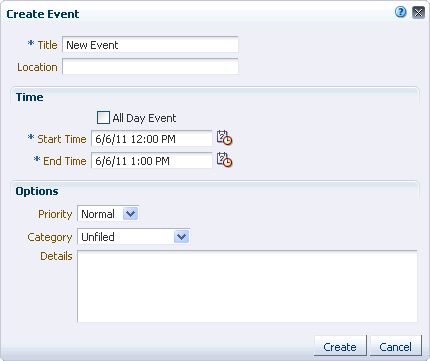
This displays the Create Event dialog (Figure 7-12).
-
In the Title field, type the title of the event you want to schedule. For instance,
Brainstorming Meeting. -
In the Location field, specify the location of this event.
-
In the Time section, select the start and end time of the event.
Notice that in the Options section you can set the priority of the event and allocate it to a suitable category. These options are quite useful in an environment where several events take place every day, so space members can sort the events based on importance and context.
-
Click Create.
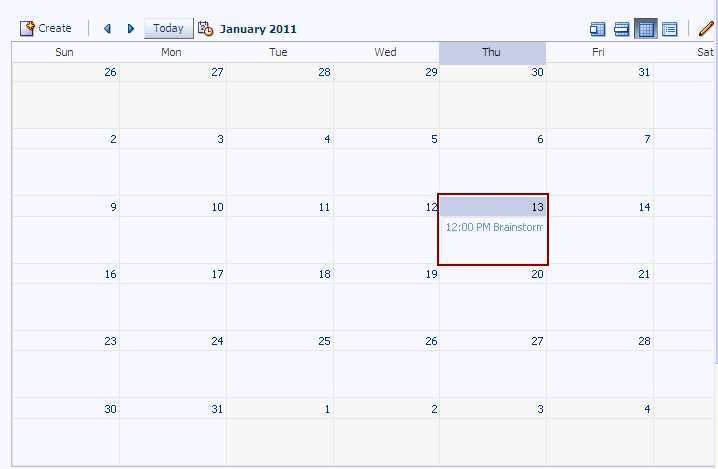
The event is created and displayed in the calendar for the specified date and time, as shown in Figure 7-10.
7.3 Step 3: Make a Document Available
Each space has its own documents folder provided by the Documents service. This folder is intended as a collaborative area in which all space members can keep content in the form of .doc, .html, .ppt, .xls, and so on, as well as a place in which users can edit certain content in place. Versioning controls make it easy to keep track of a document's history.
Let's explore this feature a bit.
-
Click Home to go back to the Get Connected Home page, if you are not already there.
-
In the left navigation panel, click Documents.
-
Click Upload and upload any document to which you have access, using the same steps you used while building the El Piju space (for example, see Step 5: Upload Content to the Advice Subspace).
-
Click the document to display its content.
Notice that you can not only edit the document, but also comment on it, add tags, see the document's history, and so forth.
-
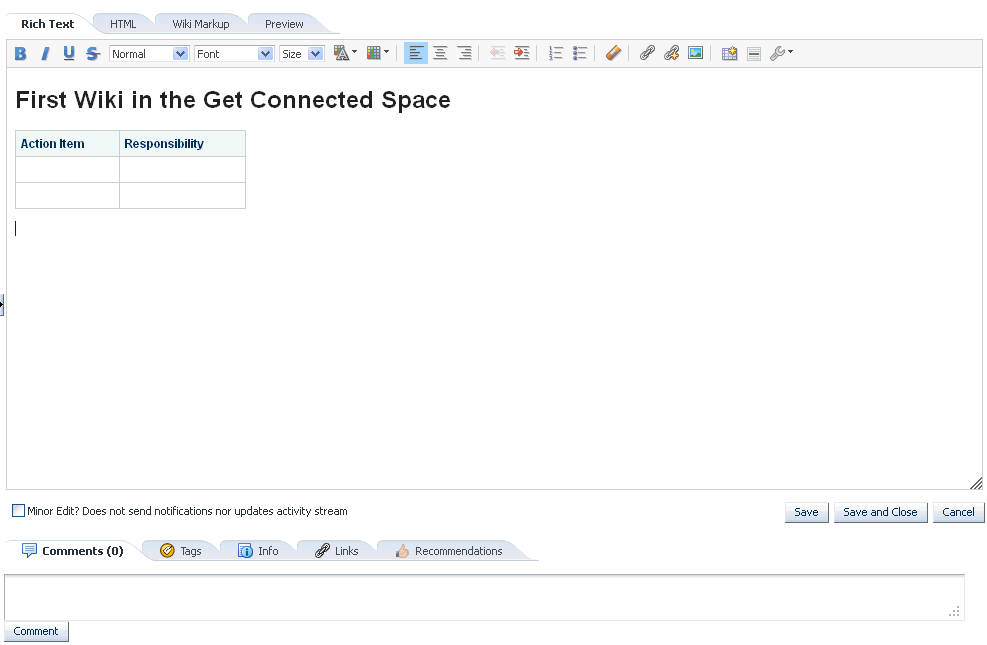
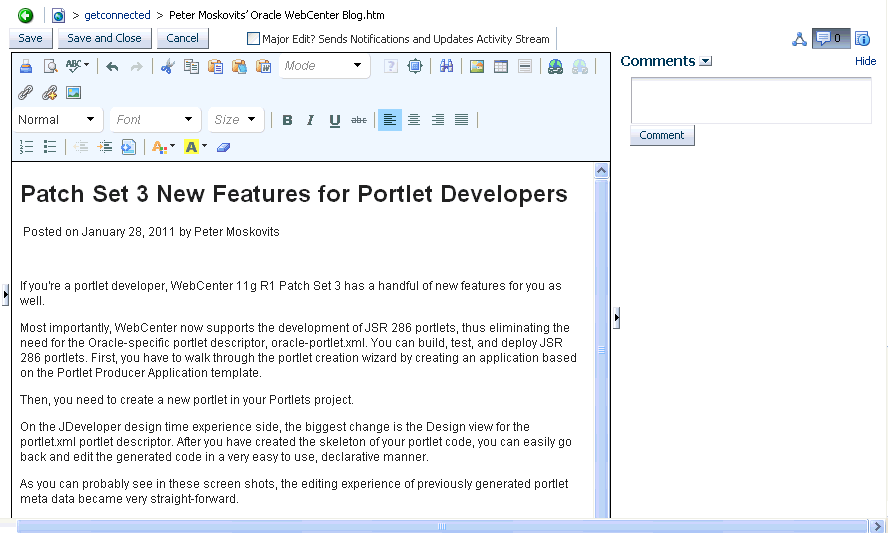
Click Edit on the toolbar to open the document in the Rich Text Editor, as shown in Figure 7-14. (Note: For .txt documents, the Edit on the toolbar is not enabled.)
Figure 7-14 Document Open in the Rich Text Editor
Description of "Figure 7-14 Document Open in the Rich Text Editor"
Notice the checkbox for major or minor edits. You can select this to ensure that this document update is reflected in the Activity Stream. You can also use this feature to notify the subscribers about the changes you make to this document.
-
Click the Back arrow to return to the Documents page.
-
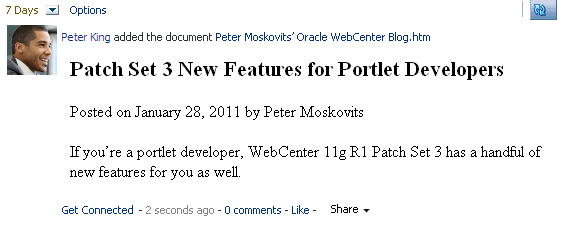
In the left navigation panel, click Home, and notice that the document upload is reflected in the space's Activity Stream, as shown in Figure 7-15.
Figure 7-15 Activity Stream for a Newly Added Document
Description of "Figure 7-15 Activity Stream for a Newly Added Document"
Notice that you can Like a document that you or someone uploads.
7.4 Step 4: Assign a Workflow to a Document Folder
Let's try out the Workflow feature of the Documents service by setting up a workflow on a folder.
-
From the Documents page for Get Connected, choose File > New Folder to create a new folder.
-
In the Folder Name column, type a name, then click Create.
The new folder displays in the getconnected root directory. Don't upload any documents to it yet, because we haven't yet assigned a workflow to this folder.
-
Select the row with the folder name.
-
From the View menu, choose Containing Folder Info. This displays the Basic properties page of your folder.
-
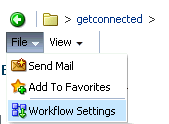
From the File menu, choose Workflow Settings:
This displays the Workflow Settings dialog.
-
Choose webcenterWCAllReviewer from the Workflow Name dropdown list, as shown in Figure 7-17.
This workflow type lets approvers edit the content of the documents they are assigned to approve.
-
In the Select Approvers section, click Add Approvers.
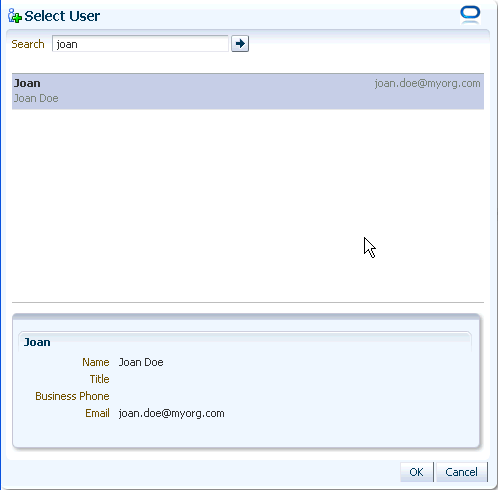
The Select User page opens in a new browser.
-
In the Search field, type your colleague's user ID, then click the Search button.
Your colleague's user ID displays in the box below the Search field.
Description of the illustration wcutu_workflow2.gif
-
Select your colleague's record, then click OK.
Your colleague is now assigned to this workflow.(You can add one approver at a time.)
-
In the Workflow Settings dialog, click OK to save the workflow.
Your colleague will receive an email notification that she has been assigned this workflow as a document approver.
-
Click the back (left Green arrow) button to go to the root directory.
-
Click the name of the folder you created.
-
Upload a document to your folder.
Now let's check the workflow status of the document you uploaded. The Workflow Status icon next to the document name confirms that a workflow is assigned to this document:
Figure 7-18 Team Wiki - Workflow Status Column

Description of "Figure 7-18 Team Wiki - Workflow Status Column"
Note:
You do not see this icon if the file was in the folder before you assigned the workflow to the folder. With a workflow established on a folder in a space, Spaces automatically enters every file that is subsequently checked in or uploaded to the folder into workflow.To assign the workflow to a file that was already in the folder prior to the workflow being defined, save the file to your local file system, delete the file from the space, then reupload the file into the folder so that the file can inherit the workflow properties of the folder.
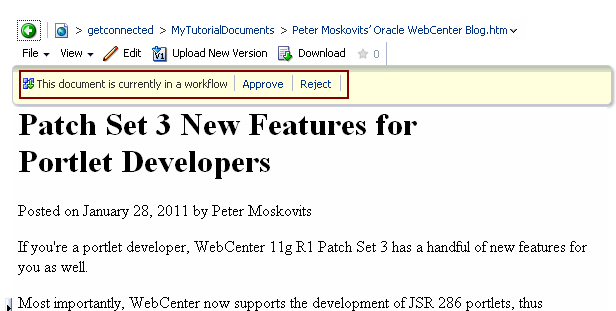
Ask your colleague to visit her documents in the Get Connected space by clicking Documents in the left navigation panel. The folder you created will display for her too. When she clicks the document you uploaded, a message will display asking her to approve or reject it because the document is now in her workflow. She will be able to edit the content of your document before approving or rejecting it.
Description of the illustration wcutu_workflow4.gif
Let's spend a few minutes on the team wiki document to get a feel for how wikis work in Spaces.
7.5 Step 5: Create a Wiki Document
Wikis have become popular within companies large and small as a means of sharing knowledge within organizations and with the world outside. Let's take a glance at how this powerful collaborative authoring tool works in Spaces.
-
On the left navigation panel, from the Wikis dropdown menu, choose Team Wiki.
This displays the default wiki page with the Welcome text. You can edit this wiki page to add whatever content you like.
-
Click Edit.
The wiki page opens in the Rich Text Editor.
-
Replace the default text with something about the Get Connected space, add a table if you like, and experiment with other options.
-
Activity Stream will reflect that this wiki has been updated (unless you select the Minor Edit? Does not send notifications nor updates the activity stream checkbox). You can also use this feature to notify wiki subscribers about the changes you make to the wiki content.
-
Click Save and Close.
Notice the Comments section and Comment, Tags, History, Info, Links, and Recommendations icons.
These icons lets you create:
-
Comments - Feedback on the wiki. Ask your colleague to add a comment to this wiki. The number of comments is reflected next to the Comments icon.
-
Tags - Add keywords related to the content of the wiki. You can use tags to make your wiki easily discoverable in search results.
-
History - Versions of the wiki.
-
Info - Wiki information, including size, creation date, creator, and last modified date.
-
Links - Create links to a discussion topic, announcement, document, event, note, or URL. Experiment with this feature by creating some links using the Link to New menu. Or, just create a link to the announcement you posted earlier: from the Link to Existing menu, choose Announcement. In the Link to Existing Announcement dialog, select your announcement, then click Link.
-
Recommendations - Suggests content for others to view, based on where wiki contributors have also contributed.
-
-
On the left navigation panel, click Home to see that the wiki update is reflected in the Activity Stream, as shown in Figure 7-21:
Figure 7-21 Wiki Update in Activity Stream

Description of "Figure 7-21 Wiki Update in Activity Stream"
Let's move on to another widely used Web tool, blogs.
7.6 Step 6: Create a Blog Post
Through blogs you can promote new technologies, logistical changes, or organizational shifts. Like wikis, blogs are another widely used authoring tool for sharing information and receiving feedback. Let's create a simple blog post.
-
On the left navigation panel, click Blogs, then select Team Blog.
This displays the Team Blog page.
-
Create a new post by clicking New Post.
This opens a page in the Rich Text Editor.
-
Enter a title, some text, then click Create.
The new post should look something like Figure 7-22.
Notice Archives on the right side. Under Archives, posts are sorted by the year and month in which they were created.
Now let's explore another powerful information tool called discussions.
7.7 Step 7: Post a Discussion Topic
Creating a discussion topic is a great choice for people to discuss a feature or ideas, or for those who want to work together to resolve a problem.
Let's create a discussion topic now.
-
On the left navigation panel, click Discussions.
-
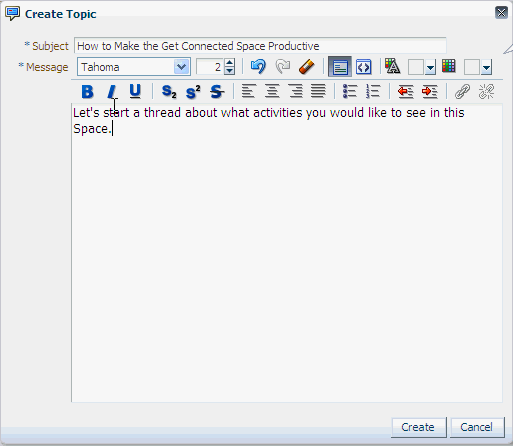
Click Create Topic.
This displays the Create Topic dialog.
-
In the Subject field, type a subject of your choice.
-
In the Rich Text Editor, type a topic on which you would like to start a discussion thread, as shown in Figure 7-23:
-
Click Create.
The topic is created and displays on the topic page, as shown in Figure 7-24:
You want to be notified each time someone posts a comment on this topic, so click Watch Forum on the toolbar. (How you'll be notified is another story, and something you'll learn about in Step 9.) Notice the RSS feed icon for subscribing to this topic's RSS feed. Just like all other activities, this activity also reflects in Activity Stream on the Home page, as shown in Figure 7-25:
Figure 7-25 New Discussion Topic in the Activity Stream

Description of "Figure 7-25 New Discussion Topic in the Activity Stream"
If you like, ask your colleague to respond to this topic so you can explore this functionality a bit more.
7.8 Step 8: Explore Your Profile
A profile makes it easy for other space members to know who you are; your role in the organization, how they can reach you, and so on. Let's take a look at each tab on the WebCenter Portal: Spaces profile page and see how you can customize it to reflect your position within the organization.
-
Click your name in the banner, as shown in Figure 7-26.
This displays the Activities tab, which reflects all the actions you've performed so far. This provides an easy way for you to isolate your own activities from the space's Home page, which reflects the actions of all space members.
-
Click the Connections tab.
This tab displays a list of people you're connected to. You can invite other WebCenter Portal users to become your connection by clicking Invite People. If your list of connections grows unwieldy, use the Organize link to create logical categories and group your connections beneath them. You can also use the Show and Filter fields to control which connections appear on the Connections tab.
-
Click the Documents tab.
The Documents tab is your personal document library. It contains all the files you have uploaded or created within the entire WebCenter Portal instance.
-
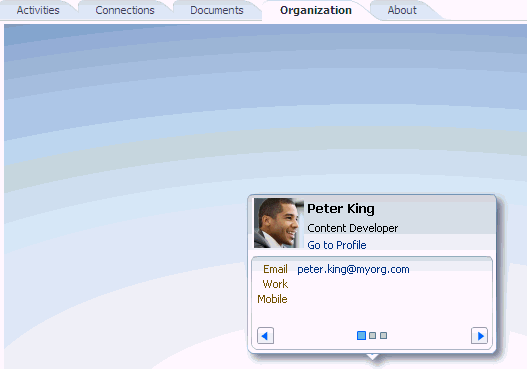
Click the Organization tab.
The Organization tab displays a virtual business card, as shown in Figure 7-27, with information such as your email, mobile, company, and so on. This card includes previous and next buttons so you can view all the information you've entered on the tabs. If you want, click these buttons to view how your details appear in the card.
Notice the Go to Profile link, which takes you back to the Activities tab.
-
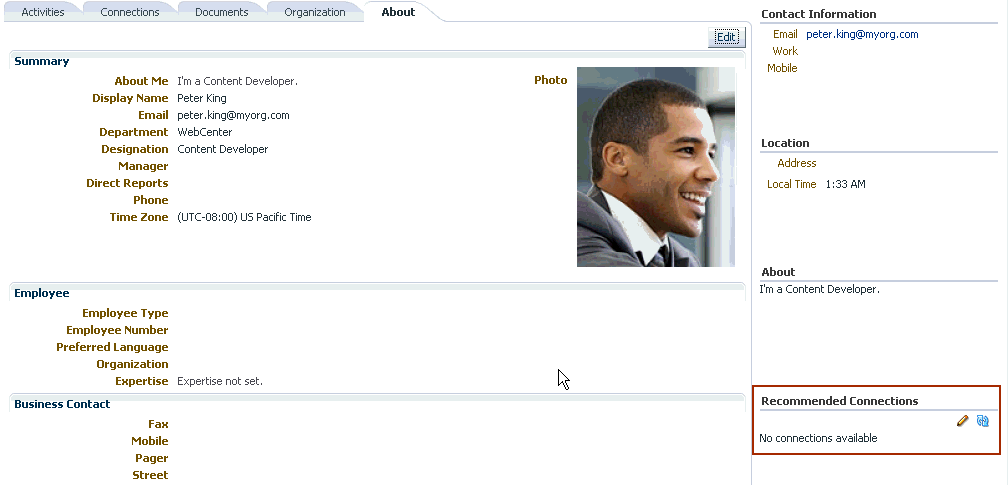
Click the About tab.
All the information along the right side of your profile is drawn from what you enter on the About tab. Take a few moments and add some details, if you wish.
Click Edit on top of the photo placeholder, then click Change Photo in the Photo section to add your picture, if you have one on your system.
The right margin of your display, as shown in Figure 7-28, is fairly self-explanatory, with one exception: Recommended Connections. You may have a Recommendations task flow available to you in one of the many pages with which you interact, but if you don't, remember that your Profile always contains a list of recommended contacts, as well as a means of connecting with them.
Although the examples in this tutorial are fairly simple, in a real business environment you're likely to be active in many different spaces and have dozens, if not hundreds, of contacts. With so many people contributing content virtually non-stop within your WebCenter Portal instance, discovering new contacts and information that may be of value to you can be difficult. To help address this problem, the Activity Graph service analyzes metadata about your Spaces activities and, based on the results, actually suggests people, objects, and spaces you may want to connect to.
-
Once you've updated your profile, click Save.
Now that you've provided some information to help others understand your role within the organization, let's see how you can tailor the Spaces environment to suit your individual needs.
7.9 Step 9: Examine Your Preferences
In addition to changing your preferred language, account password, and configuring your IM details, there's a lot more you can do with the Preferences feature. For example, you can control your own Spaces experience by choosing who should or shouldn't be able to track your activities, as well as choose whose activities you would like to track. You can even decide how much access certain connections (users) should have to your posts, messages, and feedback. You can also subscribe to spaces that interest you so you can keep abreast of their activities. Although we'll take a quick look at this functionality in the context of this tutorial, you'll find it's much more useful when you start using it in an actual business environment, where there are multiple spaces and connections from which to choose.
-
On the banner, click Preferences.
This displays the Preferences dialog - General Preferences page through which you can change your language preference, time and date formats, and so on.
-
Click the Messaging icon.
Spaces allows you to subscribe to application objects and spaces so that you can be notified anytime, anywhere, when changes occur. For example, you may want to know when a change is made to a hot topic in a discussion forum, or when a new version of a vital document is uploaded. Your mail address is your default messaging channel, so you'll receive an email each time a change occurs to something you've subscribed to. However, if you want to receive notifications over your phone, through your Worklist, or via an alternate mail address, the Message Preferences page is the place to make that happen. (However, you'll be able to set your preferences on this page only if you're authorized to do so.)
Tip: It's easy to subscribe to a space; just click Actions, choose Contact, then Subscribe in the space's navigation area. After you do, you'll receive notifications based on the filters you defined through your Messaging preferences--all space activities or just a subset.
Figure 7-29 Actions Menu - Subscribe Option
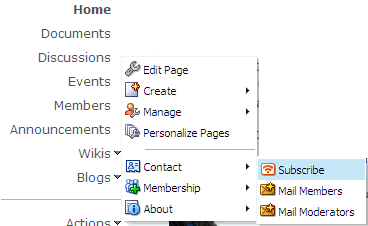
Description of "Figure 7-29 Actions Menu - Subscribe Option"
We won't take the time to go through the rest of the Preference icons here, so for now, just keep in mind that the Preference options help you fine-tune your Spaces experience. For more help setting your preferences, see the chapter, "Setting Your Personal Preferences" in Oracle Fusion Middleware User's Guide for Oracle WebCenter Portal: Spaces.
