 Understanding Banking
This chapter provides an overview of banking and discusses how to:
Define banks and branches.
Set up funding.
Define deposit schedules.
Define recipients.
Assign recipients to deductions and payees.
Define payee net pay elections.
(CHE, DEU, ESP, FRA, NLD) Set up SEPA processing.
Run the banking process.
Review banking results by calendar group.
Use banking information with local country processes.
Use retroactive calculations in banking.
(CHE, DEU, ESP, FRA, NLD) Send SEPA payments to PeopleSoft Financial Gateway.
Understanding Banking
This section discusses:
The banking process
Setup requirements
Batch processing
Banking process flow
(CHE, DEU, ESP, FRA, NLD) SEPA processing.
 The Banking Process
In Global Payroll, the banking process includes:
Setup.
Batch processing.
Tasks for local country extensions.
This chapter discusses setup and batch processing. For more information about how banking works with local country extensions, see the banking section in the corresponding Global Payroll country extension documentation.
Note. If your organization doesn't have direct deposit or electronic transfer for payees, you may not need to use the banking feature.
Setup Requirements
This section discusses:
Bank setup requirements
Funding setup requirements
Disbursement setup requirements
Bank Setup Requirements
Banks and branches are financial institutions that fund payroll or receive payroll calculations.
To set up banks:
Define bank information on the Bank Table page.
Set up banks on the Bank Table page, including basic information for all financial institutions involved in the payroll funding and disbursement process. You must complete this page before a bank can be identified as a source bank account or as a recipient.
Specify branch information on the Branch Table page (optional).
Define which branches apply to the banks. A bank can have one or more branches.
Note. Not all countries require bank branch information.
See Defining Banks and Branches.
Funding Setup Requirements
Funding refers to the source of payroll money.
To set up funding:
Define electronic funds transfer (EFT) formats, by country, on the Electronic Transfer Formats page.
Specify source banks for payroll on the Source Bank Accounts page.
Source banks are where payroll disbursements come from. For each source bank, you identify the appropriate bank/branch, account number, and EFT format.
Define the level of funding on the Pay Entities - Source Bank Link page.
Each organization can have various levels of funding sources (source banks). One organization might fund its entire payroll from a single bank; another might define funding at a lower level, such as by company.
See Setting Up Funding.
Disbursement Setup Requirements
Disbursement refers to payroll amount destinations. Net pay disbursements can go to payees, and deduction amounts can be disbursed to recipients, such as a healthcare provider or a government agency.
To set up disbursements:
Define deposit schedules on the Deposit Schedules page.
Define recipients on the Deduction Recipients page.
Recipients can be entities (general recipients) or individuals (individual recipients).
Assign recipients to deductions.
This procedure varies with recipient type.
Identify an individual's bank account information and disbursement details on the Bank Account Information page and the Net Distribution page.
This is necessary for disbursing an individual's net pay electronically.
See Defining Deposit Schedules, Defining Recipients, Assigning Recipients to Deductions and Payees, Defining Payee Net Pay Elections.
Batch Processing
Batch processing for banking occurs in the Global Payroll core application and in the country extension.
To process bank payment information:
Finalize the pay run on the Payroll/Absence Run Control page.
Before running the banking process, you must finalize the payroll run or approve the items to pay.
Run the banking process, using the Payment Preparation page.
The banking process is a batch job that takes the results of payroll calculations and populates the payment table (GP_PAYMENT), which includes details on each recipient. It identifies the recipient, the amount owed, the source bank, and the account number.
Note. You must run the banking process in the same order in which you run your payrolls. For example, if you have finalized a payroll for both November and December and try to run the banking process on the December payroll before running it on the November payroll, the process will result in an error.
Run the local country batch process.
Each country has unique file format requirements for transmitting data electronically. Individual processes have been developed for each country that extract data from the payment file and format it appropriately.
Note. For more information about local country batch processing, see the banking section in the corresponding Global Payroll country extension documentation.
You can view the results of the banking process (step 2) and the results of the local country batch process (step 3) using the Review Payments by Cal Group component.
See Also
Reviewing Banking Results by Calendar Group
Banking Process Flow
This diagram illustrates the flow of the banking process:
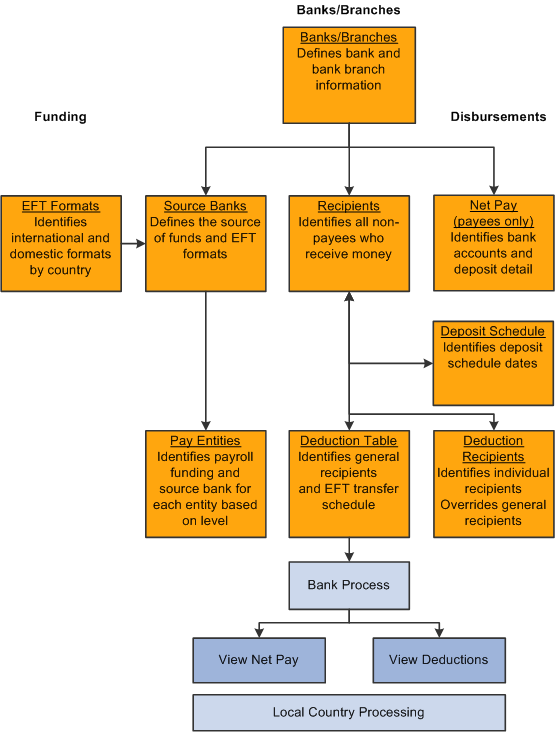
The banking process in Global Payroll
(CHE, DEU, ESP, FRA, NLD) SEPA Processing
The European Commission (EC), and the European Central Bank (ECB) working with the Eurosystem created the Single Euro Payment Area (SEPA). The Eurosystem is supported by the European Payments Council (EPC), which is charged with bringing together the European payments industry. SEPA enables citizens, companies and other economic actors to make and receive payments in Euros (EUR) between and within national boundaries in Europe with the same basic conditions, rights, and obligations regardless of their location.
PeopleSoft Global Payroll enables customers to manage their payroll systems in compliance with SEPA formats and standards. This section discusses:
SEPA data process flow.
SEPA setup requirements.
SEPA batch processing.
Integration with PeopleSoft Financial Gateway.
The process flow for SEPA payments is slightly different than the regular banking process flow. The following diagram illustrates the process flow for SEPA data:

SEPA Data Process Flow
In addition to the normal banking setup requirements, to process SEPA payments you must also:
Define SEPA application packages for a country on the Banking Country Setup page.
Generate a SEPA SQL statement on the Banking Preparation Definition page.
Define payment process settings on the Installation Settings page.
Set up Integration Broker for both Global Payroll and Financial Gateway.
Set up banks for SEPA countries in your PeopleSoft Financials system.
You process payments for SEPA using the same Global Payroll Banking Process (GP_PMT_PREP) that you use for non-SEPA banking. When a row of data exists for a country on the Banking Country Setup component, however, GP_PMT_PREP executes SEPA logic.
If the country uses the delivered CORE_BANK:SQL application package, then the system references the banking preparation definition for that country and for each defined sequence processes the SEPA SQL statement using the country, calendar run ID, and employee ID range selected on the Run Payment Prep Process run control page. The system loads the results into the GP_PAYMENT_FG record.
If the country does not use the delivered CORE_BANK:SQL application package, then the system uses the application package defined for the country in the Banking Country Setup component to load results into the GP_PAYMENT_FG record for the country, calendar run ID, and employee ID range selected on the Run Payment Prep Process run control page.
Integration with PeopleSoft Financial Gateway
PeopleSoft Global Payroll enables you to send generated SEPA payment details from PeopleSoft Global Payroll to PeopleSoft Financial Gateway. Financial Gateway then dispatches the payments to banks in compliance with SEPA rules and standards.
See Also
(CHE, DEU, ESP, FRA, NLD) Setting Up SEPA Processing
(CHE, DEU, ESP, FRA, NLD) Sending SEPA Payments to PeopleSoft Financial Gateway
Defining Banks and Branches
To define banks and bank branches, use the Banks (BANK_EC) component.
This section provides an overview of bank and branch definition and lists the pages used to define banks and branches.
Understanding Bank and Branch DefinitionYou set up bank and bank branch information on the Bank Table page and the Branch Table page.
The pages for defining banks and bank branches are common to all PeopleSoft HR applications and are documented in the PeopleSoft Application Fundamentals for HCM PeopleBook.
For a summary of the function of each page, see the overview of setup requirements in the previous section.
See Also
Setting Up Banks and Bank Branches
Pages Used to Define Banks and Bank Branches|
Page Name |
Definition Name |
Navigation |
Usage |
|
BANK_EC |
Set Up HRMS, Common Definitions, Banking, Banks, Bank Table |
Set up basic information for all financial institutions. |
|
|
BANK_BRANCH_EC |
Set Up HRMS, Common Definitions, Banking, Banks, Branch Table |
Define branch information for a bank. Not all countries require bank branch information. |
See Also
Setting Up Banks and Bank Branches
Setting Up Funding
To define electronic transfer formats, use the Electronic Transfer Formats (EFT_NAME) component. To define source banks, use the Source Bank Accounts (SRC_BANK) component. To define the default source bank for a pay entity and to link a source bank to a pay entity, use the Pay Entities (GP_PYENT) component.
This section discusses how to:
Define electronic funds transfer formats.
Define source banks.
Define the default source bank for pay entities.
Link source banks to pay entities.
Pages Used to Set Up Funding|
Page Name |
Definition Name |
Navigation |
Usage |
|
EFT_NAME |
Set Up HRMS, Product Related, Global Payroll & Absence Mgmt, Banking, Electronic Transfer Formats, Electronic Transfer Formats |
Define a country's electronic funds transfer (EFT) formats. An EFT is a standard interbank file format. |
|
|
SRC_BANK |
Set Up HRMS, Common Definitions, Banking, Source Bank Accounts, Source Bank Accounts |
Define the source of funds and EFT formats. |
|
|
GP_PYENT_PRCS_DTL |
Set Up HRMS, Product Related, Global Payroll & Absence Mgmt, Framework, Organizational, Pay Entities, Processing Details |
Define the default source bank for the pay entity. |
|
|
GP_PE_SBANK_LNK |
Set Up HRMS, Product Related, Global Payroll & Absence Mgmt, Framework, Organizational, Pay Entities, Source Bank Link |
Define source banks for the companies, department, establishments, or pay groups within the pay entity. Note. This is an optional setup task. If you leave the Source Bank Link page blank, the system uses the default source bank defined at the pay entity level on the Processing Details page. |
Defining Electronic Funds Transfer Formats
Access the Electronic Transfer Formats page (Set Up HRMS, Product Related, Global Payroll & Absence Mgmt, Banking, Electronic Transfer Formats, Electronic Transfer Formats).
|
Country Code |
Displays the country code you selected to access this page. |
|
EFT Format Name |
Enter a name. An EFT format is a country-specific value that's understood by locally run Structured Query Reports (SQRs). After defining the EFT format name, use this information on the Source Bank Accounts page to indicate the EFT format from which the money is coming. Note. For more information about EFT formats for local countries, see the banking section in the corresponding Global Payroll country extension documentation. |
Defining Source Banks
The page for defining source banks is common to all HR applications and is documented in the PeopleSoft Application Fundamentals PeopleBook.
For a summary of the function of the Source Bank Account page, see the overview of funding setup requirements in this chapter.
See Also
Defining the Default Source Bank for Pay Entities
Use the Source Bank ID field on the Source Bank Link page to define the default bank for the pay entity. If you don't define source banks on the Source Bank Link page, the system uses the default bank you have set up on the Pay Entities - Processing Details page.
The Processing Details page is described in another chapter in this PeopleBook.
See Also
Entering Processing Details for a Pay Entity
Linking Source Banks to Pay Entities
Access the Source Bank Link page (Set Up HRMS, Product Related, Global Payroll & Absence Mgmt, Framework, Organizational, Pay Entities, Source Bank Link).
Payroll can be funded from more than one source bank. Use this page to define all the source banks used to fund payroll for a pay entity. Leave this page blank if you want to fund payroll from the pay entity's default source bank that you defined on the Processing Details page.
|
Organization Link Option |
Select the level of organization at which you're funding payroll. Options are: Company, Department, Establishment, and Pay Group. See Entering Processing Details for a Pay Entity. Note. If a value in this field changes, the system clears all entries in the Organization Link List group box. |
|
Load All Organization Units |
Click this button to populate the Organization Link List group box. The system populates a list of all active organization units, based on the effective date. |
Organization Link List
In this group box, select a source bank ID for each organization unit that you selected in the Organization Link Option field.
|
Organization Unit |
Select an organization unit for the Organization Link Option level that you defined. |
|
Source Bank ID |
Enter a source bank ID for each organization unit. |
Example
A pay entity has 10 pay groups. Only 2 of those pay groups use unique source banks; the other 8 use the same source bank.
To set up source banks for this pay entity, you select Pay Group in the Organization Link Option field.
There are two ways to set up the Organization Link List group box:
List all 10 pay groups in the Organization Link List.
For the 8 pay groups with the same source bank, list the same source bank ID. For the 2 pay groups with unique source banks, list the unique values for those source bank IDs.
Define the default source bank ID for the 8 pay groups on the Processing Details page, and enter only two rows for the 2 unique pay groups on this page.
Note. If you leave the Organization Link List group box blank, the system assumes that you're using the default source bank ID that is defined on the Processing Details page.
See Also
Defining Deposit Schedules
To define deposit schedules, use the Deposit Schedules (DEP_SCHED) component.
This section provides an overview of deposit schedules and discusses how to identify dates when payments are debited.
Understanding Deposit SchedulesWhen you run the banking process, the system assigns a deposit date based on the time of the run and the deposit schedule that's associated with the deduction.
For deductions that are assigned a deposit schedule, the system looks up the date that comes the soonest after the run date.
For deductions without an assigned deposit schedule and net pay, the deposit date is the run date.
Example
Run February payroll on the 25th of the month.
|
Deduction |
Deposit Schedule |
Deposit Date |
|
Net pay |
No deposit schedule assigned |
The date that the banking process is run. |
|
Income tax |
Quarterly on the last day of the quarter |
March 31 |
|
Union dues |
Monthly on the first day of the month |
March 1 |
This example illustrates that the deposit date can filter which transactions are transmitted to the bank in a subsequent process.
Managing Deposits
You have flexibility in defining deposit schedules. So if many deposits are due at month's end, you can create a deposit schedule with a debit date of the last day of the month. Associate these dates with payees and recipients. Run the payment process, telling the system to create a report that includes all the information in the deposit schedule.
Page Used to Define Deposit Schedules|
Page Name |
Definition Name |
Navigation |
Usage |
|
DEP_SCHED |
Set Up HRMS, Product Related, Global Payroll & Absence Mgmt, Banking, Deposit Schedules, Deposit Schedules |
Identify dates when payments are debited from the source bank account. |
Identifying Dates When Payments Are Debited
Access the Deposit Schedules page (Set Up HRMS, Product Related, Global Payroll & Absence Mgmt, Banking, Deposit Schedules, Deposit Schedules).
Schedule Generation Parameters
Use this group box to define details for generating deposits.
|
Day Unit of Measure |
Define the type of schedule that you're building. Options are Day, Month, Quarter, Week, and Year. Your selection affects time increments for the debit dates. So if you select Month, the time increment between debit dates is one month. |
|
Units in Period |
Define the frequency for the Day Unit of Measure field. If you indicate Month there and enter 1 here, this schedule occurs once a month. If you enter 2, this schedule occurs once every two months. |
|
Begin Date and End Date |
Enter the approximate schedule dates. When the system builds schedules, it builds them in this date range. |
|
Relative Start |
Select the relative start of the deposit schedule dates. Options are First Day (of the month) and Last Day (of the month). Specifies the day that the deposit date intervals start. For example, if you select Month in the Day Unit of Measure field and Last Day in the Relative Start field, the schedules have deposit dates at the end of the month. |
|
Days Adjustment |
Specify how many days to adjust between the relative start date and the deposit date. Say you select Month in the Day Unit of Measurefield, Last Day in the Relative Start field, a frequency of 1, and +10 in the Days Adjustment field. The system, on the 10th of each month, generates monthly schedule dates that start the 10th of the following month. Note. The Relative Start and Days Adjustment fields are unavailable for entry if the Day Unit of Measure field is set to Day or Week. |
|
Generate Dates |
Click this button to generate a list of debit dates in the Deposit Dates group box. |
Deposit Dates
This group box is populated based on what you defined in the Schedule Generation Parameters group box. It displays the generated dates when deposits are due, based on those parameters.
Defining Recipients
To define deduction recipients and to select recipients' deposit schedules, use the Deduction Recipients (RECIPIENT) component.
This section provides an overview of recipient definition and discusses how to:
Define recipients.
Select recipients' deposit schedules.
Understanding Recipient DefinitionRecipients are entities or individuals who receive voluntary and statutory deductions that are withheld from payees. Global Payroll recognizes two types of recipients:
General recipient, such as a government agency.
Receives the amount that's withheld from all payees who have a specific deduction.
Individual recipient, such as a spouse who receives child support payments.
Receives the amount that's withheld from one or more payees.
Note. A general recipient is often an entity and an individual recipient is often a person, but this isn't a requirement.
Each recipient has a disbursement schedule. You can create unique deposit schedules to identify deposit dates.
Note. Before you can define a recipient, you must first define general bank information on the Bank Table page.
See Also
Pages Used to Define Recipients|
Page Name |
Definition Name |
Navigation |
Usage |
|
RECIPIENT |
Set Up HRMS, Product Related, Global Payroll & Absence Mgmt, Banking, Deduction Recipients, Define Deduction Recipients |
Define general and individual recipients for deductions. |
|
|
RECIPIENT_ADR_SP |
Click the Address Information link to access the Recipient Address page. |
Define recipients' address information. |
|
|
RECIPIENT_DEP_INFO |
Set Up HRMS, Product Related, Global Payroll & Absence Mgmt, Banking, Deduction Recipients, Recipient Deposit Schedule |
Select recipients' deposit schedule. |
See Also
Defining Recipients
Access the Define Deduction Recipients page (Set Up HRMS, Product Related, Global Payroll & Absence Mgmt, Banking, Deduction Recipients, Define Deduction Recipients).
|
Address Information |
Click the Address Information link to access the Recipient Address page, where you'll define country and address information for the recipient. |
|
Payment Method |
Select the payment method. Options are Bank Transfer, Cash, Check, Postal Order and Wire Transfer. Note. Bank account information only becomes available when Bank and Wire Transfer are selected. |
Recipient Category
|
Individual |
Select if the recipient receives an amount, such as a court order deduction, that is withheld from one or more payees. |
|
General |
Select if the recipient receives the amount withheld from all payees who have a particular deduction. General recipients, such as local and national governments for taxes, insurance companies for insurance benefits, and unions for union dues, are entities that receive an amount that might include many payee values. |
Bank Details
|
Country Code |
Select the country for the payee's bank account. |
|
Already have an IBAN Number |
Select to indicate that the payee has an IBAN. When you select this check box, the Bank ID, Bank Branch ID, and Account Number fields become display-only and the IBAN field and Validate button become available. If you deselect this check box for a payee who already has an IBAN entered and validated in the IBAN field, the system alerts you that this action will result in clearing the IBAN and bank account detail fields. You can click OK to continue, or Cancel to leave the check box selected. Note. This check box appears on this page only when the IBAN Enabled check box is selected and the IBAN Required check box is deselected on the IBAN Country Setup page. |
|
IBAN (International Bank Account Number) |
Enter the IBAN for the payee. This field is editable only if you select the Already have an IBAN Number check box or if the IBAN Required check box is selected on the IBAN Country Setup page. |
|
Validate |
Click to validate the number entered in the IBAN field. The validation process alerts you if there is an error in the entered IBAN. In addition, the validation process populates the Bank ID, Bank Branch ID, and Account Number fields based on the entered IBAN. This button is available only if you select the Already have an IBAN Number check box or if the IBAN Required check box is selected on the IBAN Country Setup page. |
|
Bank ID, Bank Branch ID, and Account Number |
When the Already have an IBAN Number check box is selected or if the IBAN Required check box is selected on the IBAN Country Setup page, these fields are not editable. The system populates them based on the entered IBAN when you click the Validate button. Note. For German accounts with an IBAN, the Bank Branch ID field remains editable. For accounts without an IBAN, manually enter values in the Bank ID, Bank Branch ID, and Account Number fields. Note. Not all countries require branch ID information. |
|
Account Name |
Enter the account name for the person. |
|
Currency Code |
Select the code of the currency in which the account is maintained. The code you enter in this field is for informational purposes only and is not used by the banking process. |
See Also
Selecting Recipients' Deposit Schedule
Access the Recipient Deposit Schedule page (Set Up HRMS, Product Related, Global Payroll & Absence Mgmt, Banking, Deduction Recipients, Recipient Deposit Schedule).
|
Deposit Schedule |
Select the deposit schedule that specifies the recipient's payment frequency. Define deposit schedules on the Deposit Schedules page. |
|
Purpose 1 and Purpose 2 |
Enter information that's included on the bank transfer file, such as bank routing numbers or names. |
Assigning Recipients to Deductions and Payees
This section provides an overview of recipient assignments and discusses how to:
Link individual recipients to a deduction and a payee.
Define recipients' account information.
Link general recipients to deductions.
Understanding Recipient Assignments
After defining recipients, you assign them to deductions and payees. Where to assign recipients depends on the type of deduction.
When assigning recipients, you'll do the following:
Link individual recipients to deductions and payees through the payee-level Deduction Recipients page.
Link general recipients to deductions through the Recipient page of the Deduction component.
The sections below discuss each recipient type in detail.
If you have a deduction whose recipient is unique by payee, such as a garnishment deduction that goes to an individual, you assign a recipient on the payee-level Deduction Recipients page.
Note. The payee-level Deduction Recipients page is found under Global Payroll & Absence Mgmt, Payee Data, Net Pay/Recipient Elections, Add Deduction Recipients and is discussed in this section.
See Linking Individual Recipients to a Deduction and a Payee.
If you have a deduction whose recipient is a general entity, such as an insurance payment that goes to an insurance carrier, you establish the recipient information on the deduction definition, telling the system to sum up the amounts from all payees who have this deduction and send the total to one recipient.
When you link a general recipient to a deduction, you choose between:
Selecting the recipient by recipient ID.
Selecting a formula that determines which general recipient receives the deduction.
The formula is resolved during the Calculate phase of the batch process, when the deduction is resolved. The result is stored in the Earnings and Deductions results table. When you run the banking process, the system retrieves the recipient ID from the results table.
Note. You can override the general recipient of a deduction for a particular payee, on the payee-level Deduction Recipients page.
The Recipient page in the Deduction component is discussed in another chapter in this PeopleBook.
See Defining Deduction Elements.
Pages Used to Assign Recipients to Deductions and Payees|
Page Name |
Definition Name |
Navigation |
Usage |
|
GP_RCP_PYE |
|
Link an individual recipient to a deduction and a payee. Override the general recipient of a deduction for a specific payee. |
|
|
GP_RCP_PYE_SP |
Click the Bank Account Information link on the Add Deduction Recipients page. |
Define a new recipient's bank account information. |
|
|
GP_RCP_DED |
Set Up HRMS, Product Related, Global Payroll & Absence Mgmt, Elements, Payroll Elements, Deductions, Recipient |
Link a general recipient to a deduction. |
See Also
Selecting a General Recipient for a Deduction
Linking Individual Recipients to a Deduction and a Payee
Access the Add Deduction Recipients page (Global Payroll & Absence Mgmt, Payee Data, Net Pay/Recipient Elections, Add Deduction Recipients, Add Deduction Recipients).
|
Element Name |
Select the deduction for which to define recipient information. |
|
Recipient Tag |
Enter the recipient tag. Tags are used for multiple resolution of deductions and single resolutions of deductions for Individual Recipients. A given payee could have one or more recipient tags and the tags are associated either with a recipient ID or with a recipient name. Tags are numeric. A Recipient Tag that is associated with an 'Individual' Deduction Recipient must have a value greater than zero. This will ensure the zero Recipient Tag is available if the General Deduction Recipient needs to be assigned to this employee along with individual recipients. The system will add the amount that resolves when there is no earning or deduction assignment. |
|
Recipient ID |
Select the recipient ID for a predefined recipient (recipients are set up using the Deduction Recipients component). To define a new recipient, leave this field blank and complete the Recipient Name field. When you select an existing recipient, the system displays the recipient name next to the Recipient ID field. Click the recipient name link to access the Define Deduction Recipients component (RECIPIENT) where you can view and update the recipient's details. |
|
Recipient Name and Bank Account Information |
If you want define a new recipient, enter the name of the recipient. When you complete this field, the system displays the Bank Account Information link. Click this link to access the Information for Recipient page where you enter the payment method and the recipient's bank account information. |
|
Deposit Schedule |
Select a deposit schedule for the recipient. |
|
Purpose 1 and Purpose 2 |
Enter information that's included on the bank transfer file, such as bank routing numbers or names. |
|
Deduction Assignment |
Click the Deduction Assignment link to access the Earning/Deduction Assignment page. |
Defining Recipients' Account Information
Access the Information for Recipient page (click the Bank Account Information link on the Add Deduction Recipients page).
The fields on this page are identical to those on the Define Deduction Recipients page.
See Also
Linking General Recipients to Deductions
To link a general recipient to a deduction, access the Recipient page in the Deductions component and select the deduction recipient. The Recipient page is discussed in another chapter in this PeopleBook.
See Also
Selecting a General Recipient for a Deduction
Defining Payee Net Pay Elections
This section provides an overview of payee net pay elections and discusses how to:
Enter payees' bank account information.
Specify net pay elections.
(ESP) Specify the inter-bank payment code.
Understanding Payee Net Pay ElectionsAfter setting up banking information for your organization, you can define bank account and net pay election information for each payee.
Note. Payees can manage their own personal payroll information, such as updating personal bank account information and payroll payment distribution instructions, on self-service pages in PeopleSoft ePay. These pages are discussed in the ePay PeopleBook.
See Managing Pay Information for Global Payroll.
Pages Used to Define Payee Net Pay Election Information|
Page Name |
Definition Name |
Navigation |
Usage |
|
PYE_BANKACCT |
Global Payroll & Absence Mgmt, Payee Data, Net Pay/Recipient Elections, Maintain Bank Accounts, Maintain Bank Accounts |
Enter bank account information for a payee. Use this information to track worker direct deposit information. |
|
|
BANKACCT_IBAN_SEC |
Click the Edit IBAN link. |
(GBR, FRA, BEL, ESP, CHE, DEU, ITA, and NLD) Generate and edit the International Bank Account Number (IBAN). |
|
|
GP_NET_DIST |
Global Payroll & Absence Mgmt, Payee Data, Net Pay/Recipient Elections, Specify Net Pay Elections, Specify Net Pay Elections |
Define how a payee's net pay is distributed between the payee's bank accounts. |
|
|
Inter-bank Payment Scheme |
GPMX_PYE_BANKACCT |
Global Payroll & Absence Mgmt, Payee Data, Net Pay / Recipient Elections, Maintain Bank Accounts, Maintain Bank Accounts. Click the Other Required Information link. |
(MEX) Enter the Clave Bancaria Estandarizada (CLABE) number associated with the payee's bank account. |
|
Bank Prenote Information USA |
GPUS_PRENOTE |
Click the Prenote Information link on the Maintain Bank Accounts page. This link is available only if you select the Prenote Process Allowed check box on the Installation Settings USA page. |
Indicate whether prenotification files (used in Federal Schedule Reconciliation) need to be generated. |
Entering Payees' Bank Account Information
Access the Maintain Bank Accounts page (Global Payroll & Absence Mgmt, Payee Data, Net Pay/Recipient Elections, Maintain Bank Accounts, Maintain Bank Accounts).
|
Account ID |
Populated by the system with a number assigned to the bank account information. |
|
Type |
Select the bank account type for the payee. Options are Building Society Roll Number, Checking, Current Account, Giro Account, Regular, and Savings. |
|
Country Code |
Select the country for the payee's bank account. |
|
International ACH Bank Account (international automatic clearing house bank) |
Select to indicate that the bank is located outside the territorial jurisdiction of the United States. Note. This field appears only if you have PeopleSoft Payroll for North America or PeopleSoft Global Payroll for United States installed. |
|
Already have an IBAN Number |
Select to indicate that the payee has an IBAN. When you select this check box, the Bank ID, Bank Branch ID, and Account Number fields become display-only and the IBAN field and Validate button become available. If you deselect this check box for a payee who already has an IBAN entered and validated in the IBAN field, the system alerts you that this action will result in clearing the IBAN and bank account detail fields. You can click OK to continue, or Cancel to leave the check box selected. Note. This check box appears on this page only when the IBAN Enabled check box is selected and the IBAN Required check box is deselected on the IBAN Country Setup page. |
|
IBAN (International Bank Account Number) |
Enter the IBAN for the payee. This field is editable only if you select the Already have an IBAN Number check box or if the IBAN Required check box is selected on the IBAN Country Setup page. |
|
Validate |
Click to validate the number entered in the IBAN field. The validation process alerts you if there is an error in the entered IBAN. In addition, the validation process populates the Bank ID, Bank Branch ID, and Account Number fields based on the entered IBAN. This button is available only if you select the Already have an IBAN Number check box or if the IBAN Required check box is selected on the IBAN Country Setup page. |
|
Bank ID, Bank Branch ID, Account Number and Check Digit |
When the Already have an IBAN Number check box is selected or if the IBAN Required check box is selected on the IBAN Country Setup page, these fields are not editable. The system populates them based on the entered IBAN when you click the Validate button. Note. For German accounts with an IBAN, the Bank Branch ID field remains editable. For accounts without an IBAN, manually enter values in the Bank ID, Bank Branch ID, and Account Number fields. The Check Digit field does not appear for these accounts. |
|
Account Name |
Enter the account name for the person. |
|
Prenote Information |
(USA) Click this link to access the Bank Prenote Information USA page. |
|
Currency Code |
Select the code of the currency in which the account is maintained. The code you enter in this field is for informational purposes only and is not used by the banking process. |
|
Other Required Information |
(MEX) Click this link to access the Inter-bank Payment Scheme page, where you can enter the Clave Bancaria Estandarizada (CLABE) number. This link is available only if you select MEX in the Country Code field. |
|
AC Account Name (alternate character account name) |
Appears if you enabled alternate character (AC) functionality on the Primary Permission List Preferences page. |
|
Specify Net Pay Elections |
Click to go to the Specify Net Pay Elections page where you can view and update net pay details for the payee. |
(MEX) Specifying the Inter-bank Payment Code
Access the Inter-bank Payment Scheme page (click the Other Required Information link on the Maintain Bank Accounts page).
|
CLABE |
Enter the Clave Bancaria Estandarizada (CLABE) number associated with the payee's bank account. The CLABE number is a numeric 18-digit standardized bank code for domestic Inter-bank fund transfers. |
Specifying Net Pay Elections
Access the Specify Net Pay Elections page (Global Payroll & Absence Mgmt, Payee Data, Net Pay/Recipient Elections, Specify Net Pay Elections, Specify Net Pay Elections).
|
Run Type Name |
Select for the net pay elections. You can define distributions by run type, such as one distribution for a regular run and another for expenses. |
|
Default Election |
Select to indicate the default run type. When the banking process runs, the system checks the run type defined on the pay calendar and seeks a match on the net distribution for the payee. If it finds none, it uses the distribution of the row marked Default Election. |
|
Order Number |
Enter an order number. This refers to distribution order priorities. Prioritize if a payee has distribution amounts indicated for an account type. Let's say that a payee wants 100 distributed to a savings account every month and everything else distributed to a checking account. The distribution to the savings account gets higher priority. |
|
Payment Method |
Select the payment method for the payee. Options are Bank Transfer, Cash, Check, Postal Order, and Wire Transfer. Note. You can create only one row with payment method Check or Cash. The system does not allow multiple checks or cash amounts per payee for a pay period. |
|
Account ID |
Select the bank account ID for the payee if you selected Bank Transfer or Wire Transfer as the Payment Method field. Your choices come from definitions for the Account ID field on the Maintain Bank Accounts page. Note. No Account ID is needed if the Payment Method is Cash, Check, or Postal Order. |
|
Primary Account |
Select if this is a payee's primary account. If a payee has set up distribution amounts for allocation to several accounts and a net pay amount remains after allocation, the extra amount goes to the primary account. Note. If the net pay becomes a negative amount, it will go into the primary account. |
|
Partial Allowed |
Select to have partial amounts distributed from a net pay distribution. Let's say a payee distributes 1200 monthly as follows:
One month, the payee's net pay is only 1050. The system still distributes 500 to the checking account and 400 to the savings account, but it cannot distribute the full 300 to the retirement account. If Partial Allowed is selected, the system distributes the partial amount, which is 150 in this case. If Partial Allowed isn't selected, the system allocates 150 to the payee's primary account. Nothing is deposited in the retirement account. |
|
Percent |
If the distribution to an account is calculated by a percentage of the net payment, enter that percentage. |
|
Amount |
If the distribution to an account is to be calculated by an amount, specify that amount. Note. You can define a net distribution in percentages, amounts, or both. The total cannot exceed 100 percent. Any amount remaining after percentage allocation is allocated to the primary account, unless otherwise specified. |
|
Maintain Bank Accounts |
Click to go to the Maintain Bank Accounts page where you can view and update bank account information for the payee. |
Overriding Payment Method
You can override the payment defined for a payee, run type, or calendar group using the system element PAYMENT MTHD. This element is resolved during the payroll process and its value is stored in the GP_PYE_SEG_STAT results table. The banking process checks the value stored in this table and if it has a value for payment method, this means that an override payment method is defined for the segment. If there is no value, the normal payment method defined for the payee is used. The payment methods available as overrides are Check, Cash, Postal Order or Primary Account.
There are no rules delivered in the Global Payroll core application to update the system element PAYMENT MTHD. Refer to your Global Payroll country extension PeopleBook for information about how this system element is used.
(CHE, DEU, ESP, FRA, NLD) Setting Up SEPA Processing
Processing SEPA payments requires specific additional setup steps. This section discusses how to:
Define a SEPA application package for a country.
Generate and update SEPA SQL.
Review SEPA SQL statements.
Define payment process settings.
Pages Used to Set Up SEPA Processing|
Page Name |
Definition Name |
Navigation |
Usage |
|
GP_APP_PKG_SETUP |
Set Up HRMS, Product Related, Global Payroll & Absence Mgmt, Banking, Banking Country Setup |
Define a SEPA application package for a country. |
|
|
GP_SQL_SETUP |
Set Up HRMS, Product Related, Global Payroll & Absence Mgmt, Banking, Banking Preparation Definition |
Generate and update SEPA SQL. |
|
|
SEPA SQL Statement |
GP_SQL_STATEMENT |
Click the View SQL button on the Banking Preparation Definition page. |
Review SEPA SQL statements. |
|
GP_INSTALLATION |
Set Up HRMS, Product Related, Global Payroll & Absence Mgmt, System Settings, Installation Settings, Installation Settings |
Define payment process settings. |
Defining a SEPA Application Package for a Country
Access the Banking Country Setup page (Set Up HRMS, Product Related, Global Payroll & Absence Mgmt, Banking, Banking Country Setup).
Use this page to define the additional SEPA-specific application package that the system runs during payment preparation processing to populate the GP_PAYMENT_FG record. If no entry exists on this page for a country, or if the Status field is set to Inactive for a country, the system processes payment preparation for that country normally, with no SEPA-specific application package.
PS Delivered/Maintained (PeopleSoft delivered/maintained)
This group box is not available to edit and displays the definition for either the default CORE_BANK:SQL application package or the application package that the associated country extension has developed as the default.
Customer Maintained
Use the fields in this group box to define the components of the SEPA application package that you want the system to use to load the GP_PAYMENT_FG record for the country. If you leave the fields in this group box blank, the system uses the default application package defined in the PS Delivered/Maintained group box to load the GP_PAYMENT_FG record.
|
Root Package ID |
Enter the root package ID component of the SEPA application package. |
|
Qualified Package/Class Path |
Enter the qualified package or class path component of the application package. |
|
Application Class ID |
Enter the application class ID component of the application package. |
Note. If you use the delivered default CORE_BANK:SQL application package on this page, you must define the SQL for the country on the Banking Preparation Definition page.
See Also
PeopleTools: PeopleCode Developer's Guide PeopleBook, "Creating Application Packages and Classes", Creating Application Package Definitions
Generating and Updating SEPA SQL
Access the Banking Preparation Definition page (Set Up HRMS, Product Related, Global Payroll & Absence Mgmt, Banking, Banking Preparation Definition).
Use this page to generate and store the SQL that the system uses during the payment preparation process for SEPA countries to populate the GP_PAYMENT_FG record.
Note. If you selected an application package for a country other than the default, CORE_BANK:SQL on the Banking Country Setup page, you do not need to generate SQL for the country on this page.
|
Sequence |
It is possible to create several sequences of SQL for your country. For example, you might want to generate SEPA data separately for different payment types. You can do this by creating multiple rows in the Definition scroll area. Enter a number in the Sequence field for each row. The system processes these rows in ascending order by sequence number. |
|
Owner |
Indicate whether the owner of the sequence is Customer or Oracle. |
|
Description |
Enter a description for the sequence. |
|
Generate SQL |
Click to save the page and generate a SQL statement based on field definitions of the grid. |
|
SQL has been generated |
The system selects this check box to indicate that the SQL has been successfully generated. |
|
View SQL |
Click to access the SQL SEPA Statement page where you can review the generated SQL statement and make adjustments to it. |
|
Generated SQL has been changed |
The system selects this check box if the SQL statement has been modified on the SQL SEPA Statement page after it was originally generated. Note. If you click the Generate SQL button after making changes to the SQL statement, the changes will be overwritten by the SQL generation process. |
|
Insert into GP_PAYMENT_FG |
This column includes a row for every field in the GP_PAYMENT_FG record to which the SQL inserts a value. There are no rows for the following fields, which are controlled by the Global Payroll Banking Process (GP_PMT_PREP) application engine process:
|
|
Input Type |
Select the input type to determine what the system uses to populate the associated field of the GP_PAYMENT_FG. Valid values are: Character: Select to enter a character value for the field. The Character Value becomes available to edit when you select this value. Date: Select to enter a date value for the field. The Date Value field becomes available to edit when you select this value. GP_PAYMENT Record: When you select this value, the system populates the GP_PAYMENT_FG field with the value from a field in the GP_PAYMENT record. The Select from GP_PAYMENT, Aggregate Function, and Group By fields become available to edit when you select this value. Number: Select to enter a numeric value for the field. The Numeric Value field becomes available to edit when you select this value. Other Record.Field: Select to assign a value to the field based on a field from a record in the database other than GP_PAYMENT. The Other Record Label.Field, Aggregate Function, and Group By fields become available to edit when you select this value. Note. If you leave the input type for a field blank, then the system will load the GP_PAYMENT_FG field with a blank or zero value depending on the field type. |
|
Select from GP_PAYMENT |
Enter the GP_PAYMENT field from which the system loads the GP_PAYMENT_FG field. If there is an equivalent field in the GP_PAYMENT record, the default value of this field is the same as the value of the Insert into GP_PAYMENT_FG field. |
|
Character Value |
Enter the character value with which the system loads the GP_PAYMENT_FG field. |
|
Date Value |
Enter the date value with which the system loads the GP_PAYMENT_FG field. |
|
Numeric Value |
Enter the numeric value with which the system loads the GP_PAYMENT_FG field. |
|
Other Record Label.Field |
Enter the record and field from which the system loads the GP_PAYMENT_FG field. For example, if you wanted the value of a GP_PAYMENT_FG field to be the employee’s birthplace you would enter PERS.BIRTHPLACE in this field. In addition, you would also need to adjust the value in the From/Where Clause field to the following:
Note. It is your responsibility to set up the From/Where Clause field so that all keys for the Other Record Label.Field are appropriately tied to GP_PAYMENT. |
|
Aggregate Function |
This field is available only if the input type is GP_PAYMENT Record or Other Record.Field. Valid values are: AVG (average), COUNT, MAX (maximum), MIN (minimum), and SUM. When you select a value in this field, the system wraps the corresponding GP_PAYMENT field value or other record field value with the selected aggregate function in the generated SQL. For example, if you select the aggregate function of SUM for GP_PMT_AMT, then GP_PMT_AMT is listed in the select list from GP_PAYMENT as SUM(PMT.GP_PMT_AMT). |
|
Group By |
This field is available only if the input type is GP_PAYMENT Record or Other Record.Field. Select to include the corresponding field value in the GROUP BY list of the generated SQL statement. Note. When grouping fields, keep in mind that the fields that appear in your SELECT list that are not aggregated using an aggregate function must also be included in the GROUP BY list. Otherwise, your SQL statement will be invalid and the Global Payroll Banking Process (GP_PMT_PREP) that uses it will result in a “Not a GROUP BY expression” error. |
|
From/Where Clause |
The default statement in this field is:
You do not need to modify this default statement unless you define one or more fields with an input type of Other Record.Field. Refer to the Other Record Label.Field field definition for more information on modifying the From/Where Clause field. |
|
Having Clause |
Use this field in conjunction with the Group By field to filter the results that the Group By SELECT statement returns. Note. Because this field is always used in conjunction with the Group By field, it is subject to the same constraints regarding the fields that must be included in the GROUP BY list. |
Reviewing SEPA SQL Statements
Access the SEPA SQL Statement page (click the View SQL button on the Banking Preparation Definition page).
This page enables you to view and edit the SQL statement generated when you click the Generate SQL button on the Banking Preparation Definition page. If you make changes to the SQL statement and click OK, the system selects the Generated SQL has been changed check box.
Defining Payment Processing Settings
Access the Installation Settings page (Set Up HRMS, Product Related, Global Payroll & Absence Mgmt, System Settings, Installation Settings, Installation Settings).
Payment Processing
Use this group box to define database-specific payment processing settings.
|
Database Identifier |
Enter a unique alphanumeric identifier that the system adds to payment messages sent to Financial Gateway. This enables the system to distinguish messages sent from multiple HCM nodes to a single Financial Gateway node. |
|
Payment Count |
Enter the number of payments that you want the system to chunk together with each payment message. For example, if you enter 3000 here, the system will create and publish a separate payment message for every 3000 rows of payment data. |
See Also
Defining Global Payroll Installation Settings
Running the Banking Process
This section provides an overview of the banking processing and discusses how to create payments for net payments and deductions in a calendar run.
Understanding the Banking Process
To prepare payments, the system uses the Payroll Results table that is created when you run payroll. The Global Payroll Banking Application Engine process (GP_PMT_PREP) populates a table, GP_PAYMENT, that contains payment information . The process creates payments for each segment and stores net pay by calendar period ID for each employee ID, employee record, and run type. The system does not store net pay if the value is zero, except for manual payments.
Note. The GP_PMT_PREP process extracts data as of the current system date, not as of the period end date.
Note. The process that creates payment files is a local function documented in the corresponding local country documentation.
Example 1: Payment Processing for Employee with Pay Increase
This table shows the net pay elections for an employee:
|
Payment Method |
Bank Account |
Primary Account |
Partial Amount |
Percent |
Amount |
|
Transfer |
DEF |
100 |
|||
|
Transfer |
ABC |
Y |
Y |
100% |
The employee has a pay increase effective December 15 and a net pay of 3500 for the month. This table shows the payroll results for December:
|
Segment |
Period |
Pay Entity |
Cal Prd ID |
Amount |
|
1 |
December 1–15 |
AP |
Monthly |
1500 |
|
2 |
December 15 — 31 |
AP |
Monthly |
2000 |
This table shows the results of running the banking process for this employee:
|
Payment Method |
Segment |
Amount |
Cal Prd ID |
Source Bank |
Bank Account |
|
Transfer |
1 |
100 |
Monthly |
Bank 1 |
DEF |
|
Transfer |
1 |
1400 |
Monthly |
Bank 1 |
ABC |
|
Transfer |
2 |
2000 |
Monthly |
Bank 1 |
ABC |
Example 2: Payment Processing for Employee with Multiple Jobs
This table shows the net pay elections for the same employee with multiple jobs, but only one net pay election defined:
|
Empl Rcd |
Payment Method |
Bank Account |
Primary Account |
Partial Amount |
Percent |
Amount |
|
0 |
Transfer |
DEF |
100 |
|||
|
0 |
Transfer |
ABC |
Y |
Y |
100% |
The employee works for different departments with different source banks, with a total net pay of 4100. This table shows the payroll results for December:
|
Empl Rcd |
Segment |
Period |
Pay Entity |
Cal Prd ID |
Amount |
|
0 |
1 |
December 1–15 |
AP |
Monthly |
1500 |
|
0 |
2 |
December 15 — 31 |
AP |
Monthly |
2000 |
|
1 |
1 |
December 1 —31 |
AP |
Monthly |
600 |
This table shows the results of running the banking process for this employee:
|
Empl Rcd |
Payment Method |
Segment |
Amount |
Cal Prd ID |
Source Bank |
Bank Account |
|
0 |
Transfer |
1 |
100 |
Monthly |
Bank 1 |
DEF |
|
0 |
Transfer |
1 |
1400 |
Monthly |
Bank 1 |
ABC |
|
0 |
Transfer |
2 |
2000 |
Monthly |
Bank 2 |
ABC |
|
1 |
Check |
1 |
600 |
Monthly |
Bank 3 |
No alloc |
In this example the amount for the employee's second job (empl rcd 1) is not allocated because no net pay election is defined for this job.
Page Used to Run the Banking Process|
Page Name |
Definition Name |
Navigation |
Usage |
|
GP_PMT_PREPARE |
Global Payroll & Absence Mgmt, Payment Processing, Run Payment Prep Process, Run Payment Prep Process |
Run a process that creates payments for net pay, individual recipient, and general recipient deductions for a calendar run. |
Creating Payments for Net Payments and Deductions in a Calendar Run
Access the Run Payment Prep Process page (Global Payroll & Absence Mgmt, Payment Processing, Run Payment Prep Process, Run Payment Prep Process).
|
Calendar Group |
Select the calendar group on which to run the process. The system processes any items (segments) that are approved or finalized by the payroll process. |
|
Stream Number |
If the Process Streams check box is selected and you select Calculate in the Processing Phases and Options group box, you must select the stream number to process. Each stream number represents a predefined range of payees. |
|
Process Streams |
The Process Streams check box is selected automatically if you selected the stream processing option when defining the calendar group. |
Processing Phases and Options
|
Calculate |
Select to have the system create the payment file by matching the finalized results from the payroll process with information you defined in banking setup. You can run the Calculate step repeatedly until you finalize the banking process. |
|
Update Statistics |
Select to have the banking system generate statistics to help the data administrator fine-tune system performance. |
|
Finalize |
After everything is calculated, select Finalize. (If you used stream processing for the Calculate phase, the system finalizes all streams for the calendar group simultaneously.) Note. If you're not using streams, you can select Calculate and Finalize at the same time. |
Calendar List
After you run the Calculate phase, this group box displays information for each calendar in the calendar run.
Streams
This group box displays all streams associated with the calendar group.
See Also
Reviewing Banking Results by Calendar Group
This section provides an overview of banking results and discusses how to:
View net pay
View deductions
View SEPA payment details.
Understanding Banking ResultsAfter you run the banking process, you can view net pay and deductions for a payee. For calendar run IDs associated with SEPA countries, you can also view details about SEPA payment transactions.
Note. See your local country documentation for more information about local country bank processing.
Pages Used to Review Banking Results|
Page Name |
Definition Name |
Navigation |
Usage |
|
GP_PMT_NP_VIEW |
Global Payroll & Absence Mgmt, Payment Processing, Review Payments by Cal Group, View Net Pay |
View payee net pay by calendar group. |
|
|
GP_PMT_DED_VIEW |
Global Payroll & Absence Mgmt, Payment Processing, Review Payments by Cal Group, View Deductions |
View deductions for recipients by calendar group. |
|
|
Payment Transactions |
GP_PMT_FG_VIEW |
Global Payroll & Absence Mgmt, Payment Processing, Review Payments by Cal Group, Payment Transactions |
Displays the SEPA payment results loaded to the GP_PAYMENT_FG record. |
Viewing Net Pay
Access the View Net Pay page (Global Payroll & Absence Mgmt, Payment Processing, Review Payments by Cal Group, View Net Pay).
Note. If there are more than 300 rows of data, a message will appear indicating that if you want to view more records for the calendar group, you need to enter specific criteria.
Selection Criteria
Use the fields in this group box to select the employees you want to view. When you click the Select Matching Payments button, the system populates the Net Pay group box.
|
EmplID From and EmplID To |
Select the range of employees whose net pay you want to view. |
|
Pay Group |
Select the pay group for which you want to view net pay results. |
|
Payment Method |
Select the payment method for which you want to view net pay. Options are Bank Transfer, Cash, Check, Postal Order, and Wire Transfer. |
|
Payment Number |
Enter a payment number for the net pay. Note. For the Global Payroll core product, payment numbers are used for off-cycle manual payments. |
|
Payment Status |
Select the payment status for the banking results. Options are Finalized, Hold, Manually Paid, No Active Allocations, Prepared, Payment Transferred, and Void. |
|
Summarized (by Employee) |
Select this check box to view a summary of employee payments for each calendar period, payment method, and source bank. If you leave this check box deselected, the system lists the payments for each segment in the pay period. However, if you select this check box, the system lists the total amount for all segments with the same payment method and source bank. |
|
Select Matching Payments |
Click this button to populate the Net Pay group box with payments that match the criteria you have defined. |
|
Clear |
Click this button if you want to clear the data in the Net Pay group box. |
Payee Information
Select the Payee Information tab.
This tab displays the payment status, employee ID, name, record number, instance number, amount, currency code, payment method, and source bank ID that is associated with each payment.
|
Payment Status |
Displays the payment status. You can change the payment status only when the banking process has been finalized and you have not selected the Summarize (by Employee) check box. Options are: Hold: Use this status to stop a payment from being transferred to the bank. When you want to make the payment, change the status from Hold to Finalized. You cannot change the status to Hold after a payment has been transferred. Manually Paid: You cannot change the status of manual payments. Prepared: The system sets this status when you run the banking process and payments are first allocated. Payment Transferred: Indicates that the payment has been transferred to the bank. During local country processing, the system changes the status from Prepared to Payment Transferred. No Active Allocations: Indicates that no net pay elections are defined for the payee on the Net Pay Elections page. Finalized: The payment has been created and finalized. You can change the status of finalized payments to Void, or Hold. Void: Use this status to cancel a payment. Once you void a payment, you cannot unvoid it. Note. When you void a payment, the system voids the net pay and deductions that make up the payment. Note. If you are voiding a payment because you are using an off-cycle to correct or reverse a payment, setting it to void doesn't automatically create a recalculation of the payroll. You need to run the off-cycle for this to occur. |
Select the Calendar Information tab.
This tab displays the segment number, calendar ID, and pay group that is associated with each payment.
Select the Payment Information tab.
This tab displays the payment number and payment identification that is associated with each payment. These fields are blank except for manual payments entered in an off-cycle payroll for the core process.
Note. Some country extensions use payment numbers and payment identification for their regular banking processes and not only for manual payments.
See Also
Viewing Deductions
Access the View Deductions page (Global Payroll & Absence Mgmt, Payment Processing, Review Payments by Cal Group, View Deductions).
Note. If there are more than 300 rows of data, a message will appear indicating that if you want to view more records for the calendar group, you need to enter specific criteria.
Note. Many of the fields on the Selection Criteria group box on the View Deductions page are similar to the fields on the View Net Pay page. These common fields are documented with the View Net Pay page. Fields unique to the View Deductions page are documented below.
See Viewing Net Pay.
|
Registered Recipient |
Select the recipient ID to view deductions for recipients defined on the Define Deduction Recipients page. |
|
Adhoc Recipient |
Select a recipient in this field if you want to view deductions for recipients defined on the Assign Deduction Recipients page. |
|
Recipient Type |
Select General Recipient Deduction or Individual Recipient Deduction. |
|
Summarized (by Recipient Info) |
Select this check box to display the total amounts paid to recipients. If you leave this check box deselected, the system lists the amounts paid to recipients for each payee. |
Select the Payee Information tab.
This tab displays information about the payee.
Select the Calendar Information tab.
This tab displays information about the calendar.
(CHE, DEU, ESP, FRA, NLD) Viewing SEPA Payment Details
Access the Payment Transactions page (Global Payroll & Absence Mgmt, Payment Processing, Review Payments by Cal Group, Payment Transactions).
This page displays the payment processing results loaded to the GP_PAYMENT_FG record for a specific calendar group.
Note. This page appears in the Review Payments by Cal Group component only for calendar run IDs associated with SEPA countries that have an application package defined on the Banking Country Setup page with a status of Active.
Selection Criteria
Use this group box to filter the results displayed in the Payment Gateway Details scroll area. You can filter by Empl ID (employee ID), Pay Group, Payment Method, Payment Number, and Transaction Status.
|
Select Matching Payments |
Click to display the SEPA payment details that match your selection criteria. |
|
Clear |
Click to clear the results displayed in the Payment Gateway Details scroll area. |
Payment Gateway Details: Payee Information Tab
This tab displays the values of the standard SEPA field values.
Note. This tab also displays the Transaction Status for each row. This status indicates where the payment is in the process of sending it to Financial Gateway and dispatching it to external banks. It is updated by both the Payment for FG (GP_PMT_FG) process and the PAYMENT_RESPONSE message received from Financial Gateway.
See (CHE, DEU, ESP, FRA, NLD) Sending SEPA Payments to PeopleSoft Financial Gateway.
Payment Gateway Details: Configurable Fields Tab
This tab displays the values of the configurable SEPA field values.
Using Banking Information with Local Country Processes
After setting up information in the Global Payroll core application, you can use this information when running local country processes to create payment files and payment reports.
Each country extension has its own SQRs and formats. You can write your own SQRs, extracting data from the output file that the system created in the core application in the banking process.
To prepare payments:
Finalize your payroll.
Run the banking process.
View payments on the View Net Pay page and the View Deductions page.
Print a report of payments after payment processing.
Refer to your country extension PeopleBook for information about the reports available.
Prepare recipient payments to generate payments for general recipients.
After the core banking process is finalized, an SQR process populates a table that country-specific processes use to generate payment files and reports for general recipients.
Prepare payee payments to generate payments for individual recipients.
After the core banking process is finalized, an SQR process populates a table that country-specific processes use to generate payment files and reports for individual recipients.
Note. In steps 4 and 5, the process isn't necessarily run by local SQRs. Whether you run the process with SQRs or not, the result is an interface file to banks or another medium for automated transfers.
Note. To see which local processes need to be run, refer to the banking chapter in your local country documentation.
Using Retroactive Calculations in Banking
This section provides an overview of the retroactive process in banking and discusses how to:
Select the corrective method for default retro processing.
Select the forwarding method for default retro processing.
Review deduction processing details.
Review an example of using the Use Current Results + Adjustment without selecting the To Process Banking check box.
Select the Use Current Results + Adjustment for banking.
Review an example of selecting the To Process Banking check box when forwarding is the default retro method.
Understanding the Retroactive Process in Banking
In the banking process, making sure that the appropriate source bank funds transactions and the right recipients or net pay accounts are debited and credited can require retroactive calculations to correct previous calculations. To determine how to handle transactions, banking must recognize retro processing and the method used.
Define your payroll retroactivity defaults on the Countries page (Set Up HRMS, Product Related, Global Payroll & Absence Mgmt, System Settings, Countries). This page is discussed in other chapters in this PeopleBook.
See Defining Country-Level Setup, Setting Up Retroactive Processing.
Selecting the Corrective Method for Default Retro ProcessingIf you select Corrective as the Default Retro Method on the Countries page, the system completes the following steps when retroactive processing occurs:
Recalculates the elements of the pay run that are defined to be recalculated during retro.
Replaces previous calculations with the recalculated values for the elements of the pay run.
Updates balance and segment accumulators in the recalculated period.
Computes retro deltas and stores them in the recalculated period.
Computes the retro adjustment for elements of the pay run that are defined as forwarding element overrides (on the Retro Process Overrides page).
Determines if any differences exist between the net pay from the prior calculation and the recalculation.
Banking processes the differences. Reverses all segments for net pay entries from the prior calculation where the net pay isn't being forwarded.
Inserts new segment net pay entries from the recalculation where the net pay isn't being forwarded.
Distributes all net payments according to the net distribution sets matching the run type, the EmplID/Empl Record (employee ID and employee record), and period ID combination.
Deletes all entries where the sum is zero.
Note. If the net difference is negative, the system takes the amount and assigns it to the primary account.
Note. In the case of a payroll reversal, the banking process posts the reversal of the prior period and posts new calculated values in addition to the difference.
Selecting the Forwarding Method for Default Retro ProcessingIf you select Forwarding as the Default Retro Method on the Countries page, the system completes the following steps when retroactive processing occurs:
The system recalculates the elements of the pay run that are defined to be recalculated during retro.
Recalculated values for the elements are used to compute the retro deltas for the recalculated period, but do not replace the previous calculations.
The system updates segment accumulators only. (Although you can define balance accumulators to behave in a corrective manner at the accumulator definition level and on the Earnings/Deductions Accumulators pages even when the retro method is forwarding).
The system computes retro deltas and stores them in the recalculated period.
The system computes the retro adjustment for elements of the pay run that are defined to be forwarded (on the Retro Process Overrides page).
The banking process picks up only the net pay from the current period calculation because differences from the prior recalculated periods are included in the current period.
Reviewing Deduction Processing DetailsThe deduction process completes the following, regardless of retro method:
Reverse deductions from all prior retro period calculations in the calendar group.
Reinstate reversed deductions where the payroll method is forwarding, because the purpose is to reassign the correct recipient.
Insert the new transactions for any recalculated deductions where the method is corrective.
This involves two steps, first for general recipients and then for individual recipients.
Remove entries resulting in 0 that have the same recipient ID.
Example of Banking without the "To Process Banking" Check Box Selected
This is what happens when the "To Process Banking" option is not selected.
This example illustrates the interaction between source bank, recipient, and payee accounts for net pay. February (February 1, 2004 − February 28, 2004) represents the current period, with retro processing going back to January (January 1, 2004 − January 31, 2004).
Company ABC uses Source Bank 123. Company DEF uses Source Bank 789.
Payee changes from Company ABC to Company DEF, effective February 1.
Company ABC changes from Source Bank 123 to Source Bank 456, effective February 15.
Earning 1 rate changes from 100 to 150, effective January 1.
Deduction 1 rate changes from 20 to 25, effective January 1; no recipient change.
Deduction 1 recipient changes from Recipient X to Recipient Y, effective February 1.
Deduction 2 recipient changes from Recipient A to Recipient B, effective January 1; no rate change.
Payee account distribution changes from Account 1 to Account 2, effective February 1.
|
Version/ Revision Number |
January 2004 Company ABC |
Distribution Information |
February 2004 Company DEF |
Distribution Information |
|
V1R1 |
Source Bank 123 |
Source Bank 789 |
||
|
Earning 1 = 100 |
Earning 1 = 150 |
|
||
|
Deduction 1 = 20 |
Recipient X |
Deduction 1 = 30 |
Recipient Y |
|
|
Deduction 2 = 15 |
Recipient A |
Deduction 2 = 15 |
Recipient B |
|
|
Net Pay = 65 |
Payee Account 1 |
Net Pay = 105 |
Payee Account 2 |
|
|
V2R1 |
Source Bank 456 |
|||
|
Earning 1 = 150 |
Difference of 50.00 |
|||
|
Deduction 1 = 25 |
Difference of 5 to Recipient X |
|||
|
Deduction 2 = 15 |
<15> Recipient A 15 Recipient B |
|||
|
Net Pay = 110 |
Difference of 45 to Payee Account 2 |
Explanation of January recalculation (V2R1):
Deduction 1
The difference between V1R1 and V2R1 results in 5.
The recipient is determined based on where the payee was when the deduction was first calculated (January V1R1). In this case, because there was no change in recipient for Deduction 1, the difference of 5 goes to Recipient X, funded by Source Bank 456.
Deduction 2
No difference exists.
There's a recipient change retroactive to January. From Recipient A, 15 is reversed and inserted to Recipient B. Each transaction is "charged" to Source Bank 456.
Net Pay
The difference between V1R1 and V2R1 results in 50.
The payee account distribution is determined based on the pay date of the current calendar (February). The difference, 50, goes to Payee Account 2 and is funded by Source Bank 456.
This example illustrates that net pay and deductions are allocated to Company (payment keys) and recipients are based on pay period, whereas source bank and payee accounts are selected based on when transactions are created.
Selecting the Use Current Results + Adjustment for BankingMost organizations that implement Global Payroll choose the default method that the application uses to process banking in relation to retro. These organizations need only specify, on the Countries page, the retro method, either forwarding or corrective, that is used by their organization or is most appropriate for their country extension of Global Payroll.
Other organizations prefer to post only V1R1 results to banking. The To Process Banking check box on the Countries page is an additional option that addresses this business requirement, and permanently changes the way that the system handles banking in relation to retro. The default setting for the To Process Banking check box is deselected. When you select it, you are telling the system not to reverse old payments in banking and to skip all sections and steps responsible for retro calculation (reversing) and instead implement results from V1R1 and adjustments only.
If you select the To Process Banking check box on the Countries page, the effect is different depending on the default retroactive method:
If the Default Retroactive Method is Corrective, the enhancement does not change the behavior of corrective retro in banking.
If the Default Retroactive Method is Forwarding, retroactivity changes as follows:
The system does not reverse prior amounts or post recalculated amounts during retroactive processing. Instead, the system implements current results (V1R1) plus adjustments in banking.
You may have to manually correct any discrepancies you identify in banking payments because retroactive changes to recipients or accounts cannot be reflected by the current results plus adjustment method.
In case of segmentation mismatch, the system always uses current results plus adjustments and posts results to the last available segment, regardless of the default retro method defined on the Countries page, or the check boxes you select in the Use Current Results + Adjustment group box.
Segmentation mismatch occurs when a segmented period is recalculated retroactively, and the segmentation dates of the original calculation don't coincide with those of the recalculation.
Note. Do not enable either setting in the Use Current Results + Adjustment group box if you are satisfied with the way the system currently handles retroactive processing in relation to banking and GL. These settings are not backward compatible.
Note. Once you enable one or both of the Use Current Results + Adjustment settings, you cannot change them back to the default setting. The check boxes become read-only and remain so.
Note. The tables used by and modified in banking and GL are independent. Consequently, you can select the To Process Banking and the To Process General Ledger check boxes independently of one another.
Note. The settings for Use Current Results + Adjustments are country-specific. The selections you make on the Countries page apply to that country only.
Example: Selecting the To Process Banking Check Box When Forwarding
is the Default Retro MethodIn this example a deduction with a payment of 100 is made to Recipient 1 in January. In February the recipient is changed to Recipient 2, effectively dated in January, thus triggering retroactive processing. When the To Process Bankingcheck box is selected for banking, and forwarding is the default retro method, the system posts this recipient and amount information to banking results:
|
Month |
Version/Revision |
Amount |
Recipient |
Action |
|
January |
V1R1 |
100 |
1 |
Resolution (last period) |
|
February |
V1R1 |
100 + 0 |
2 |
Resolution (current period + adjustment) |
In this example, the system does not process the reversal and reinstatement. It processes only the current period plus adjustment. (The adjustment in this case is 0 because the amount of the deduction does not change.)
(CHE, DEU, ESP, FRA, NLD) Sending SEPA Payments to PeopleSoft Financial
Gateway
You send generated SEPA payment details from PeopleSoft Global Payroll to PeopleSoft Financial Gateway. Financial Gateway then dispatches the payments to banks in compliance with SEPA rules and standards.
This section lists setup prerequisites and discusses how to send SEPA payments.
Setup PrerequisitesBefore you can send SEPA payment requests to Financial Gateway, there are some setup steps you must complete outside of Global Payroll. You must:
Set up Integration Broker.
Set up banks for SEPA countries in your PeopleSoft Financials system.
Setting Up Integration Broker
Global Payroll publishes SEPA data to and from Financial Gateway via Integration Broker. It is necessary to set up Integration Broker in both the Global Payroll and Financial Gateway environments.
To set up Integration Broker in your Global Payroll environment:
On the Gateways page, configure the Gateway URL and ping it to confirm that it connects.
On the PeopleSoft Node Configuration page of the Gateways component, configure your nodes and ping them to confirm that they connect.
Access the Service Configuration page and confirm that the Target Location field is set up correctly.
Using the Nodes component, configure the local and remote nodes. Use your HCM system as the local node and your Financials system as the remote node.
For the remote node, be sure to define the Content URL and Portal URL fields on the Portal page of the Nodes component. The system uses the URL you enter in these fields for related content.
Create a routing for the PAYMENT_REQUEST service operation using the HCM node as the sender node and the Financials node as the receiver node.
Ensure that the PAYMENT_REQUEST service operation and its routing are active using the Service Operations component.
Create a routing for the PAYMENT_RESPONSE_OUT_ASYNC service operation using the HCM node as the receiver node and the Financials node as the sender node.
Ensure that the PAYMENT_RESPONSE_OUT_ASYNC service operation and its routing are active using the Service Operations component.
Configure the nodes for single signon using the Single Signon page.
Use the Queue Status component to confirm that the PAYMENT_REQUEST queue is running.
To set up Integration Broker in your Financial Gateway environment:
On the Gateways page, configure the Gateway URL and ping it to confirm that it connects.
On the PeopleSoft Node Configuration page of the Gateways component, configure your nodes and ping them to confirm that they connect.
Access the Service Configuration page and confirm that the Target Location field is set up correctly.
Using the Nodes component, configure the local and remote nodes. Use your Financials system as the local node and your HCM system as the remote node.
Ensure that the PAYMENT_REQUEST service operation and routing are active using the Service Operations component.
Create a routing for the PAYMENT_REQUEST service operation that uses the HCM node as the sender node and the Financials node as the receiver node.
Create a PAYMENT_REQUEST queue using the Queues component.
Create a routing for the PAYMENT_RESPONSE_OUT_ASYNC service operation using the HCM node as the receiver node and the Financials node as the sender node.
Ensure that the PAYMENT_RESPONSE_OUT_ASYNC service operation and its routing are active using the Service Operations component.
Ensure that the PAYMENT_DISPATCH service operation and its routings are active using the Service Operations component.
Configure the nodes for single signon using the Single Signon page.
Use the Queue Status component to confirm that the PAYMENT_REQUEST queue is running.
See Also
PeopleTools: PeopleSoft Integration Broker PeopleBook
PeopleSoft Financial Gateway PeopleBook, “Defining Financial Gateway Integration Options,” Registering a Source Application with Financial Gateway
Setting Up Banks for SEPA Countries
For each SEPA country for which you intend to send SEPA data to Financial Gateway, you must set up a bank in your PeopleSoft Financials system that matches the source bank information for your pay entity in your Global Payroll system. For each bank:
Create a bank using the Bank Information (BANK_PNL1) page.
Create a bank branch using the Bank Branch Information (BANK_BRNCHPNL) page.
Set up a bank integration layout on the Bank Integration Layouts (BANK_INTEGRATION) page.
Create an external account on the External Accounts (BANK_PNL2) page.
Page Used to Send SEPA Payments to Financial Gateway|
Page Name |
Definition Name |
Navigation |
Usage |
|
GP_FG_RUNCTRL |
Global Payroll & Absence Mgmt, Payment Processing, Payment File Generation |
Send SEPA payments to Financial Gateway. |
Sending SEPA Payments
Access the Payment File Generation page (Global Payroll & Absence Mgmt, Payment Processing, Payment File Generation).
Use this page to initiate payment requests that send SEPA payment data to Financial Gateway.
Selection Criteria
Use the fields in this group box to filter the SEPA payments that you want to send to Financial Gateway. You can filter the payments by Country, Payment Generation ID, Pay Entity, Calendar Group ID, Recipient ID, Source Bank ID, and File ID.
|
Validate Send |
Click to ensure that the payments that meet your selection criteria have been finalized before you send them to Financial Gateway. If the selected rows are invalid, the Reason field appears on the page. |
|
Reason |
This field appears when you click the Validate Send button to display the reason that the selected payment rows are invalid. If the selected payments are valid, this field does not appear. |
|
Prepare Bank Advice |
When you select this check box, the Payment for FG (GP_PMT_FG) process identifies the rows of GP_PAYMENT_FG that meet your selection criteria and prepares them to be sent to Financial Gateway. Also, when you select this check box, the Debit Date field becomes available. Note. Subsequent runs of the Prepare Bank Advice process pick up any new rows that meet the selection criteria, but they do not affect rows that were already prepared during the first run. |
|
Debit Date |
Enter the date on which you want the banks to dispatch the selected payments. By default, the value of this field is the current date.
Note. Make sure this date is correct before preparing the
bank advice. Once the bank advice is prepared, the only way to change the
debit date is to cancel the payments and prepare them again. |
|
Send Bank Advice |
This check box becomes available to select only after you run the Payment for FG (GP_PMT_FG) process with the Prepare Bank Advice check box selected and successfully validate the payments using the Validate Send button. When you select the Send Bank Advice check box, the Payment for FG (GP_PMT_FG) process inserts the prepared payment rows into staging tables and publishes them to Financial Gateway through Integration Broker using the PAYMENT_REQUEST message. Note. Once you run the Payment for FG (GP_PMT_FG) process with the Send Bank Advice check box selected, you cannot cancel or resend the bank advice. |
|
Generate Reports |
When you select this check box, the Payment for FG (GP_PMT_FG) process generates Oracle Business Intelligent Publisher (BI Publisher or BIP) reports using the templates defined in the Report Definition group box. Note. If you select the Generate Reports check box when the Prepare Bank Advice check box is deselected, you receive a message reminding you that you cannot generate reports for payments for which you have not yet prepared the bank advice. You can, however, run the Payment for FG (GP_PMT_FG) process with both the Prepare Bank Advice and Generate Reports selected. |
Report Definition
Use this group box to define which BI Publisher reports generated when you select the Generate Reports check box.
|
Report Name |
Enter the name of the report you want to generate. The system populates the Template ID and Description columns for all templates associated with the selected report. |
|
Selected Flag |
Select this check box next to the report template you want to use. By default, the system selects this check box for the default template associated with the selected report. |
Transaction Status Changes
When you run the Payment for FG (GP_PMT_FG) process, it affects the transaction status of each SEPA transaction included in the selection criteria. In addition, Financial Gateway affects the status of SEPA transactions through the PAYMENT_RESPONSE message. The following table lists all possible transaction statuses along with how they are updated:
|
Transaction Status |
Results From |
|
Pay Prep Run |
GP_PMT_PREP This is the status that all SEPA transactions begin with after undergoing the GP_PMT_PREP process. |
|
Prepare Bank Advice Run |
GP_PMT_FG with the Prepare Bank Advice check box selected. |
|
Processing |
The GP_PMT_FG currently running. |
|
Payment Sent to FG |
GP_PMT_FG with the Send Bank Advice check box selected. |
|
Canceled |
PAYMENT_RESPONSE message when transactions are canceled in Financial Gateway. |
|
Error |
PAYMENT_RESPONSE message when transactions are not received successfully by Financial Gateway. |
|
Awaiting Dispatch |
PAYMENT_RESPONSE message when transactions are received successfully by Financial Gateway. |
|
Paid |
PAYMENT_RESPONSE message when transactions are paid to the recipient. |
|
Received by Bank |
PAYMENT_RESPONSE message when the external bank successfully receives dispatched transactions from Financial Gateway. |
|
Dispatched to Bank |
PAYMENT_RESPONSE message when Financial Gateway dispatches the transactions to the external bank. |
Note. You must manually correct any payments with a status of Error.
You can view the status of your payments using the Payment Transactions page.
See (CHE, DEU, ESP, FRA, NLD) Viewing SEPA Payment Details.
Negative Payments
While current SEPA legislation does not allow for negative payments, Global Payroll Core by default does not prevent you from sending negative payments to Financial Gateway. Likewise, Financial Gateway by default does not prevent you from sending negative payments to banks. Therefore, to prevent negative payments from being sent to banks, country extensions can:
Prevent negative payments from being created in the first place during payment processing. Global Payroll for France and Global Payroll for Switzerland are examples of country extensions that do this.
Prevent the system from sending negative payments to Financial Gateway by using the Having Clause field on the Banking Preparation Definition page to modify the CORE_BANK:SQL application package so that it filters out any negative payments. Global Payroll for Spain is an example of a country extension that does this.
Configure Financial Gateway so that it does not dispatch any negative payments received from Global Payroll to the banks. Global Payroll for Germany and Global Payroll for the Netherlands are examples of country extensions that do this.
Customers who want to process negative payments despite the current SEPA legislation can configure their systems to do so if they have contracts with their banks to allow it.