 Understanding Integration with Clairvia
Clairvia automates staffing deployment based on specific care and workload demands to attain the best clinical and financial result. Clairvia capabilities include web-based employee self service dashboard, productivity measurement, scheduling and staffing, and real-time decision for complete control over staffing resources for an organization.
PeopleSoft Time and Labor facilitates the management of time reporting and time approval, as well as the creation and use of schedules. The scheduling module enables customers to create and maintain schedules and to communicate work expectations, track adherence, and reconcile the actual work completed.
This chapter provides an overview of the integration with Clairvia and discusses how to:
Administer Integration Broker and Enterprise Components with Clairvia.
Set up PeopleSoft integration with Clairvia.
Administer PeopleSoft Human Resources integration with Clairvia.
Administer Time and Labor integration with Clairvia.
Understanding Integration with Clairvia
PeopleSoft HCM integrates with Clairvia through the PeopleSoft Integration Broker (IB), which is a messaging system that enables you to synchronize data from one application or system with another. PeopleSoft Integration Broker facilitates synchronous and asynchronous messaging among internal systems and trading partners, while managing message structure, message format, and transport disparities.
The following diagram illustrates the flow of information between PeopleSoft HCM applications and Clairvia:
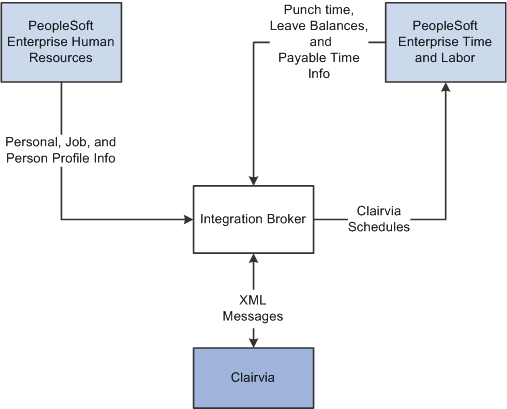
Information flow between PeopleSoft HCM, Time and Labor, and Clairvia
When PeopleSoft HCM products and Clairvia are integrated, the following information is exchanged asynchronously between the applications:
PeopleSoft Human Resources sends employee personal, job, and person profile information to Clairvia.
PeopleSoft Time and Labor sends employee reported punch time, leave balances, and payable time to Clairvia.
Clairvia sends employee work schedule and scheduled leave information back to Time and Labor.
Note. The reported leave time and leave balance information is obtained from Time and Labor though integration with HR Base Benefits. Absence Management is not required for this integration.
The system publishes PeopleSoft Human Resources messages in real-time to Clairvia when any of the following transactions occur:
Add a person and job (New Hire).
Add an employment instance to an existing person.
Add an employment instance to an existing employee (multiple jobs).
Add or update a person profile for competencies, licenses, etc.
End an employment instance for an existing Person (Termination).
Update an employment instance for an existing Person (Transfer).
Important! The PeopleSoft system supports scheduling integration with Clairvia and Oracle Workforce Scheduling. However, the system supports the integration with only one external scheduling application at a time. You cannot integrate your PeopleSoft system with Clairvia and Oracle Workforce Scheduling simultaneously.
Administering Integration Broker and Enterprise Components with Clairvia
PeopleSoft Integration Broker facilitates integrations with PeopleSoft and third-party systems. It features a services-oriented architecture that enables you to expose PeopleSoft business logic to PeopleSoft and third-party systems as services. It also allows you to consume and invoke services from other PeopleSoft and third-party systems. The PeopleSoft Integration Broker manages message structure, message content, and transport disparities between systems.
This section only discusses the configuration necessary to enable Integration Broker to send messages between the PeopleSoft applications and Clairvia.
See PeopleTools PeopleBook: Integration Broker Administration
This section discusses how to:
Activate full table publish rules.
Run the full data publish process.
 Pages Used to Administer Integration Broker and Enterprise Components
with Clairvia
Pages Used to Administer Integration Broker and Enterprise Components
with Clairvia|
Page Name |
Definition Name |
Navigation |
Usage |
|
EOIU_SOPUBFULL |
Enterprise Components, Integration Definitions, Full Data Publish Rules |
Associate a rule to a message and characterize the rule. |
|
|
EO_FULLDATAPUB |
Enterprise Components, Integration Definitions, Initiate Processes, Full Data Publish |
Create the run control for the Full Data Publish utility. |
Activating Full Table Publish Rules in Enterprise Components
Access the Full Table Publish Rules page (Enterprise Components, Integration Definitions, Full Data Publish Rules.)
All PeopleSoft applications use common, centralized tables and pages to define how to publish full table messages. The Publish utility uses full table publish rules to process the data. For integration with Clairvia, you must set the Publish Rule Definition Status to Active for the following messages:
PERSON_BASIC_CV_FULLSYNC_EFF
JPM_JP_CV_FULLSYNC_EFF
WORKFORCE_CV_FULLSYNC
See Also
“Portal Solutions PeopleBook: Integration Interfaces”, Using the Publish Utility
Running the Full Data Publish Process
Access the Full Data Publish page (Enterprise Components, Integration Definitions, Initiate Processes, Full Data Publish.)
You must run the Full Data Publish process two times when you initially integrate with Clairvia:
Run this process for the DEPT_FULLSYNC, JOBCODE_FULLSYNC, JPM_CAT_FULLSYNC, and POSITION_FULLSYNC messages.
After you enter employee data and indicate which employees are integrated with Clairvia, run this process again for the PERSON_BASIC_CV_FULLSYNC_EFF, WORKFORCE_CV_FULLSYNC, and JPM_JP_CV_FULLSYNC_EFF messages.
See Administering PeopleSoft Human Resources Integration with Clairvia.
Setting Up PeopleSoft Integration with Clairvia
In order to share PeopleSoft Human Resources information with Clairvia, you must specify that Clairvia is installed and that an employee and employee record combination are enrolled in Clairvia. Time and Labor requires that you specify whether a manager can override Clairvia schedules and select default values.
This section discusses how to:
Set up installed integrations.
Define the published content types.
Update job data.
Add options and default values for Clairvia.
Pages Used to Set Up PeopleSoft Integration with Clairvia|
Page Name |
Definition Name |
Navigation |
Usage |
|
INSTALL_PIP_SEC |
Set Up HRMS, Install, Installation Table, Installed Integration Products |
Specify that Clairvia is installed. |
|
|
INSTALL_CATTYP_SEC |
Click the JPM Content Catalog Details link on the Installed Integration Products page. |
Defines which content types to publish to Clairvia |
|
|
EMPLOYMENT_DTA1 |
Click the Employment Data link at the bottom of any page in the Job Data or Current Job Data component: Workforce Administration, Job Information, Job Data Workforce Administration, Job Information, Current Job |
Enroll the selected employee in Clairvia. |
|
|
TL_INSTL_PUNCH |
Set Up HRMS, Install, Product and Country Specific, Time and Labor Installation, Configurations |
Set up schedule total options, schedule resolution options, and punch pattern defaults for your Time and Labor application. |
Setting Up Installed Integrations
Access the Installed Integration Products page (Set Up HRMS, Install, Installation Table, Installed Integration Products).
|
Application Type |
Select the type of application that is being integrated. Scheduling is the default value. |
|
Product |
Select the product you want to use for integration. Clairvia is the default value. |
|
Installed |
Select to indicate the installation of an application type and product combination. The default value is deselected. |
Defining the Published Content Types
The system enables you to control the content types published to Clairvia, based on the primary person profile type defined on the Assign Profile Type Defaults page. Use the JPM Catalog Details page to select the content types published to Clairvia.
Access the JPM Catalog Details page (Click the JPM Content Catalog Details link on the Installed Integration Products page).
|
Content Type |
Select the Profile Management content type to publish to Clairvia. |
Updating Job Data
In order to send information to Clairvia, you must select the Clairvia field in the Product Integration Information region of the Job Data component for each Clairvia employee.
Access the Employment Information page (Click the Employment Data link at the bottom of any page in the Job Data or Current Job Data component).
|
Clairvia |
Select to enroll the employee in Clarvia. |
Since basic HCM data flows only from PeopleSoft to Clairvia, you must add new employees to PeopleSoft before adding them to Clairvia.
Adding Options and Default Values for Clairvia
You can specify whether a manager can override the schedules sent from Clairvia. Enabling schedule overrides allows a manager to make ad hoc changes to schedules and create personal schedules for specific employees.
Access the Configurations page (Set Up HRMS, Install, Product and Country Specific, Time and Labor Installation, Configurations).
|
Allow Override to Schedule |
Select to enable a manager to change or override a Clairvia schedule for the employee and employee record combination on the Manage Schedules page. Deselect this field to prevent manager overrides of Clairvia schedules on the Manage Schedules page. |
Administering PeopleSoft Human Resources Integration with Clairvia
PeopleSoft Human Resources publishes an employee's personal, job, and person profile information to Clairvia. The system uses application messaging to publish the information to Clairvia via PeopleSoft Integration Broker messaging.
Initial Set Up Synchronization
When you establish the integration between your PeopleSoft system and Clairvia, Oracle recommends that you perform the following steps:
Run the Full Data Publish process for the following messages:
DEPT_FULLSYNC
JOBCODE_FULLSYNC
JPM_CAT_FULLSYNC
POSITION_FULLSYNC
Enroll the existing employees in your PeopleSoft system into Clairvia via the Job Data page or using the ADD_CLAIRVIA_EMPLOYEES DataMover script provided by Oracle.
The ADD_CLAIRVIA_EMPLOYEES PeopleTools DataMover script enables you to add the initial employee and employee record instances that you want to integrate with Clairvia at one time. You modify the DataMover script to include the employee information for the desired employees, and then initiate the DataMover process to insert the employee information into the PS_PER_ORG_ASG_INT integration table.
For example, assume your hospital has 3,000 nurses that you wish to enroll in Clairvia. Rather than manually updating the Job Data for each of those employees, use the ADD_CLAIRVIA_EMPLOYEES DataMover script to complete a mass enrollment of the employees.
Run the Full Data Publish process again, to send any enrolled employee data from your PeopleSoft system to Clairvia.
Run the process for the following messages:
PERSON_BASIC_CV_FULLSYNC_EFF
WORKFORCE_CV_FULLSYNC
JPM_JP_CV_FULLSYNC_EFF
Data Published to Clairvia
When any of the fields required by Clairvia in the Personal, Job, and Profile contributing components are updated, the following messages are published to Clairvia:
PERSON_BASIC_CV_SYNC_EFF
WORKFORCE_CV_SYNC
JPM_JP_CV_SYNC_EFF
The system publishes the messages to the Clairvia node after removing any future-dated and history rows using the Enterprise Components method Process Effdt Msg, for Person and HR Manage Profiles data. Clairvia only accepts current effective-dated information for these messages. Future-dated rows are published using the Enterprise Components Effective Dated Publish utility.
Clairvia accepts all historic, current and future dated messages for job related information
Clairvia does not integrate with organizational-related setup tables such as Business Unit, and Location, as well as other setup tables for Job Profile Management such as Rating Model, School, School Type and Major. If no integration point exists between PeopleSoft and Clairvia, you must manually map any desired setup table data. For subsequent change to a PeopleSoft table value, you must manually update the information in the Clairvia system. For example: adding a new location.
The following table describes the Clairvia fields and the corresponding Human Resources field data that is sent to Clairvia:
|
Clairvia Field Name |
Clairvia Description |
PeopleSoft Field Name |
|
ProfileID/CostCenter |
Links Employee to a Profile |
DEPTID (External Dept ID) |
|
EmployeeID |
Employee's ID |
EmplID |
|
FirstName |
Employee's first name |
First Name |
|
LastName |
Employee's last name |
Last Name |
|
Initial/MI |
Employee's middle initial |
Middle Name |
|
|
Employee's email address |
Email_Addr |
|
HireDate |
The date on which the employee was hired. For example: 19960702 for July 2, 1996 |
Orig Start Date, Last Start Date |
|
BirthDate |
The date on which the employee was born. For example: 19730202 for February 2, 1973 |
Birth Date |
|
Street/Address |
Employee's street address |
Address Line 1 |
|
Apt |
Employee's apartment address |
Address Line 2 |
|
City |
City in which the employee lives |
City |
|
State/Province/Region |
State in which the employee lives |
State |
|
ZIP/Postal Code |
Employee's ZIP code |
Postal Code |
|
Country |
Country in which the employee lives |
Country |
|
Period* |
The type of period for employee hours, shifts, point and pay limits 0 - None, 1 - Day, 2 - Week, 3 - Month, 4 - Years, 5 - Bi Weekly |
Work Period |
|
HoursPerPeriod |
The max. no. of hours to be worked per period |
Standard Hours |
|
MinPeriod |
Type of period for Employee minimum limit. 0 - None, 1 - Day, 2 - Week, 3 - Month, 4 - Years, 5 - Bi Weekly |
Work Period |
|
Skill/JobCode |
Maps Job code to skill code |
Job Code |
|
HourRate |
Rate per hour |
Hourly Rate |
|
DeptID |
Employee Department ID |
DEPTID (External Dept ID) |
|
FTE |
Employee FTE status |
FTE |
|
EmpAction |
Employee action: 1-Transfer; 2 - Terminate; 3 - Change in Job |
Action Action_Descr |
|
ActionStartDate |
The date on which the employee action starts. For example: 19730202 for February 2, 1973 |
Effective Date Termination Date |
|
PhoneType |
Employee phone type: 1-HomeNum, 2-WorkNum, 3-PageNum, 4-OtherNum |
Phone Type |
|
PhoneNumber |
Employee phone number. Uses format: 1234567890 |
Phone |
|
CompetencyName |
Competency name |
Content Type |
|
CompetencyValue |
Competency value |
Content Items |
|
CompetencyExpDate |
Date on which the competency expires |
Expiration Date |
|
Years of Experience |
Years of Exp |
|
|
Seniority Date |
Company Seniority Date or Union Seniority Date |
|
|
Start Date |
Start Date LST_ASGN_START_DT |
|
|
Job Type |
Primary, Secondary |
Job Indicator |
Human Resources Messages Design Overview
This section provides an overview of the message design for many of the sync and fullsync Integration Broker messages generated for Human Resources.
PERSON_BASIC_CV_FULLSYNC_EFF Message Design
For the Person Basic Clairvia FullSync Current Effective dated message (PERSON_BASIC_CV_FULLSYNC_EFF) the system uses the Enterprise Components Full Data Publish Utility. The system uses the mapping views on the Full Publish Rule to override the actual message records with views that extract only current effective dated rows for Clairvia employees.
The standard PERSON_BASIC_FULLSYNC message publishes information for all employees, regardless of their enrollment in Clairvia, as well as all past, present and future dated rows of information that is not relevant to Clairvia. Using the mapping views publishes only the current effective-dated information needed by Clairvia to the PERSON_BASIC_CV_FULLSYNC_EFF message immediately. The Full Data Publish Utility ignores historical data and writes future-dated rows to the EO_EFFDELAY delay record. The Enterprise Components Effective Date Publish utility picks up any records from the delay table that are now current and generates PERSON_BASIC_CV_SYNC_EFF messages.
The full data publish utility publishes a data message with all of the PERSON_DATA information for all Clairvia integrated employees.
WORKFORCE_CV_FULLSYNC Message Design
For the Workforce Clairvia FullSync message (WORKFORCE_CV_FULLSYNC) the system uses the Enterprise Components Full Data Publish Utility. The system uses the mapping views on the Full Publish Rule to override the actual message records with views that extract all historical, current and future dated rows for Clairvia employees.
Using the mapping views publishes only the information needed by Clairvia to the WORKFORCE_CV_FULLSYNC message immediately. This message does not use ‘_EFF’ in the message name, so it does not use current effective dating logic and passes all rows over to the new Clairvia message.
The full data publish utility publishes a data message with the workforce information for all Clairvia integrated employees.
JPM_JP_CV_FULLSYNC_EFF Message Design
For the HR Manage Profiles JP Clairvia FullSync Current Effective dated message (JPM_JP_CV_FULLSYN_EFF), the system uses the Enterprise Components Full Data Publish Utility. The system uses the mapping views on the Full Publish Rule to override the actual message records with views that extract only current effective dated rows for Clairvia employees for the desired HR Manage Profiles content type, using the highest ranking qualifier instance content items.
The standard JPM_JP_FULLSYNC message publishes information for all employees, regardless of their enrollment in Clairvia, as well as all qualifier instances and all past, present and future dated rows of information that is not relevant to Clairvia. Using the mapping views publishes only the current effective-dated information needed by Clairvia to the JPM_JP_CV_FULLSYNC_EFF message immediately. The Full Data Publish Utility ignores historical data and writes future dated rows to the EO_EFFDELAY Delay record. The Enterprise Components Effective Date Publish utility picks up any records from the delay table that are now current and generates JPM_JP_CV_SYNC_EFF messages.
The full data publish utility publishes a data message with all of the Profile information for all Clairvia integrated employees.
PERSON_BASIC_CV_SYNC_EFF Message Design
For the Person Basic Clairvia Sync Current Effective-dated message (PERSON_BASIC_CV_SYNC_EFF), the system makes two passes to place the generic data into a format that Clairvia can use. A handler was added to PERSON_BASIC_SYNC for the first pass and a handler added to PERSON_BASIC_CV_SYNC for the second pass.
In the first pass, the data in the PERSON_BASIC_SYNC message is copied to an interim PERSON_BASIC_CV_SYNC message that contains all data except for the PERS_ORG_REL_WK work record, which is not required by Clairvia.
In the second pass, an Enterprise Components routine reads the PERSON_BASIC_CV_SYNC message and determines if the message contains the current effective-dated row. Current effective-dated rows are copied to the PERSON_BASIC_CV_SYNC_EFF message for publishing. Future-dated rows are copied to the EO_EFFDELAY Delay record. The EC Effective Dating utility compares the future dated row to the date on the utility and if the date is now current, generates the PERSON_BASIC_CV_SYNC_EFF message. Historical rows are ignored and not copied to PERSON_BASIC_CV_SYNC_EFF. The Effective Dating utility creates three messages: a header message where PSCAMA. MSG_SEQ_FLG = H, a data message containing the actual data needed by Clairvia and a trailer message where PSCAMA. MSG_SEQ_FLG = T.
JPM_JP_CV_SYNC_EFF Message Design
For the HR Manage Profiles Profile Clairvia Sync Current Effective-dated message (JPM_JP_CV_SYNC_EFF), the system makes two passes to place the generic data into a format that Clairvia can use. A handler was added to JPM_JP_SYNC for the first pass and a handler added to JPM_JP_CV_SYNC for the second pass.
In the first pass, the data in the JPM_JP_SYNC message is copied to an interim JPM_JP_CV_SYNC message after the system removes any content types that are not one of the Clairvia installation table content types.
In the second pass, an Enterprise Components routine reads the JPM_JP_CV_SYNC message and determines if the message contains the current effective-dated row. Current effective-dated rows are copied to the JPM_JP_CV_SYNC_EFF message for publishing. Future-dated rows are copied to the EO_EFFDELAY Delay record. The Effective Dating utility compares the future dated row to the date on the utility and if the date is now current, generates the JPM_JP_CV_SYNC_EFF messages. Historical rows are ignored and not copied to JPM_JP_CV_SYNC_EFF. The Effective Dating utility creates three messages: a header message where PSCAMA. MSG_SEQ_FLG = H, a data message containing the actual data needed by Clairvia and a trailer message where PSCAMA. MSG_SEQ_FLG = T.
WORKFORCE_CV_SYNC Message Design
For the Workforce Sync Clairvia message (WORKFORCE_CV_SYNC), a handler for the message reads the generic WORKFORCE_SYNC message and copies all rows over to WORKFORCE_CV_SYNC that are for Clairvia Employees. All past, present and future data is copied to the WORKFORCE_CV_SYNC message.
Administering Time and Labor Integration with Clairvia
This section provides an overview of the Time and Labor integration with Clairvia, and discusses how to:
Publish reported punch time and reported leave time to Clairvia.
Publish leave balances to Clairvia.
Receive schedule and leave information from Clairvia.
Understanding Time and Labor Integration with Clairvia
In order for Time and Labor to send and receive information from Clairvia, your system must meet the following criteria:
PeopleSoft Human Resources and PeopleSoft Time and Labor are installed.
Clairvia is installed.
Time reporting codes and leave plans are manually entered in Clairvia.
In addition, employees must meet the following criteria:
The employee must be enrolled in Clairvia.
The PeopleSoft employee must exist in Clairvia – using the messages from PeopleSoft HR.
The employee must be enrolled in Time and Labor.
Pages Used to Administer Time and Labor Integration with Clairvia|
Page Name |
Definition Name |
Navigation |
Usage |
|
TL_TIME_DATA |
Time and Labor, Process Time, Publish Time and Labor Data |
Send reported punch and approved time to Clairvia. Run the TL_PUB_TLDAT process. |
|
|
TL_TIME_DATA |
Time and Labor, Process Time, Publish Leave Balances |
Send the Base Benefits leave balances for subscribed employees to Clairvia. |
Publishing Time and Labor Data to Clairvia
Access the Publish Time and Labor Data page (Time and Labor, Process Time, Publish Time and Labor Data).
|
Time Option |
Select the time frame for the published data. The values are: Current Date and Start Date and End Date. Select Current Date to use the system date as the reporting period to collect the data for publishing. Select Start Date and End Date to specify a reporting period. |
|
Start Date and End Date |
Enter the range of dates to process. These fields are available if you select Start Date and End Date in the Time Option field. |
|
Prior Date Grace Days |
Enter the number of days before the current date you want to include in the data published to Clairvia. The system uses a reporting period start date equal to the system date minus the value in this field. This field is only available if you select Current Date in the Time Option field. |
|
Future Date Grace Days |
Enter the number of days in the future you want to include in the data published to Clairvia. The system uses a reporting period end date equal to the system date plus the value in this field. This field is only available if you select Current Date in the Time Option field. |
|
Verify Presence |
Select to publish the punch time for all employees, or any employees specified in the Employees to Process grid. For employees that have punch time when the process initiates, the system publishes the punch time so that Clairvia can track employees that are present at work. The system publishes any punch times that are available at publishing time, with a status of SV- Saved, NA - Needs Approval, AP – Approved, and SB – Submitted. Leave data is not included when you select this option. |
|
Reported Time |
Select to publish reported punch time, reported leave, and leave balances to Clairvia. Only reported time with a status of SB-Submitted, or AP-Approved, is published. |
|
Payable Time |
Select to publish employee payable time to Clairvia. The system publishes payable time with any status other than DN, CL, IG, OE, NP, PB, and RV. In addition, payable time with a negative quantity that is not offset, is published to Clairvia. If you specify a TRC List, the system only publishes payable time with those TRC’s in the TRC List to Clairvia. Note. Payable Offsets are not published to Clairvia. The system identifies offset rows where the ORIG_SEQ_NBR is not zero. |
|
TRC List |
Select which TRCs the system uses when publishing payable time within the reported period to Clairvia. Leave this field empty to publish all payable time within the reported period. This field is only available when you select the Payable Time option. |
|
Select All Employees |
Select to publish the leave balance for all enrolled employees for the selected date range. Deselect this field to specify employees to include or exclude from processing. |
Publishing Payable Time Scenarios
The following examples illustrate the payable time published to Clairvia by Time and Labor in different situations:
Scenario 1: For EMPLID KU0015, EMPL_RCD=0, the original and offset rows of payable time result in a zero quantity for the DUR.
|
DUR |
SEQ_NBR |
TRC |
TL_QUANTITY |
PAYABLE_STATUS |
RECORD_ONLY_ADJ |
ORIG_SEQ_NBR |
|
10/10/2010 0:00 |
543210001 |
KUREG |
7.5 |
RP |
N |
543210001 |
|
10/10/2010 0:00 |
543210002 |
KUREG |
-7.5 |
RP |
N |
543210001 |
Time and Labor publishes the following information to Clairvia:
|
DUR |
SEQ_NBR |
TRC |
TL_QUANTITY |
PAYABLE_STATUS |
RECORD_ONLY_ADJ |
ORIG_SEQ_NBR |
|
10/10/2010 0:00 |
543210001 |
KUREG |
0 |
RP |
N |
543210001 |
Scenario 2: For EMPLID KU0015, EMPL_RCD=0, the original, offset, and new rows of payable time result in a positive quantity for the DUR.
|
DUR |
SEQ_NBR |
TRC |
TL_QUANTITY |
PAYABLE_STATUS |
RECORD_ONLY_ADJ |
ORIG_SEQ_NBR |
|
10/10/2010 0:00 |
543210001 |
KUREG |
6 |
TP |
N |
543210001 |
|
10/10/2010 0:00 |
543210002 |
KUREG |
2 |
TP |
N |
543210002 |
|
10/10/2010 0:00 |
543210011 |
KUREG |
-6 |
ES |
N |
543210001 |
|
10/10/2010 0:00 |
543210012 |
KUREG |
–2 |
ES |
N |
543210002 |
|
10/10/2010 0:00 |
543210013 |
KUREG |
3 |
ES |
N |
0 |
|
10/10/2010 0:00 |
543210014 |
KUREG |
1 |
ES |
N |
0 |
Note. There are two KUREG for the same DUR in this scenario because there is a split in the task. For example, the system allocates 80% to Department A and 20% to Department B.
Time and Labor publishes the following information to Clairvia:
|
DUR |
SEQ_NBR |
TRC |
TL_QUANTITY |
PAYABLE_STATUS |
RECORD_ONLY_ADJ |
ORIG_SEQ_NBR |
|
10/10/2010 0:00 |
543210013 |
KUREG |
3 |
ES |
N |
0 |
|
10/10/2010 0:00 |
543210014 |
KUREG |
1 |
ES |
N |
0 |
Scenario 3: For EMPLID KU0015, EMPL_RCD=0, the user reports a negative quantity for regular time (KUREG).
|
DUR |
SEQ_NBR |
TRC |
TL_QUANTITY |
PAYABLE_STATUS |
RECORD_ONLY_ADJ |
ORIG_SEQ_NBR |
|
10/10/2010 0:00 |
543210001 |
KUREG |
–3.75 |
ES |
N |
0 |
|
10/10/2010 0:00 |
543210002 |
KUREG |
–1.25 |
ES |
N |
0 |
Time and Labor publishes the following information to Clairvia:
|
DUR |
SEQ_NBR |
TRC |
TL_QUANTITY |
PAYABLE_STATUS |
RECORD_ONLY_ADJ |
ORIG_SEQ_NBR |
|
10/10/2010 0:00 |
543210001 |
KUREG |
–3.75 |
ES |
N |
0 |
|
10/10/2010 0:00 |
543210002 |
KUREG |
–1.25 |
ES |
N |
0 |
Scenario 4: For EMPLID KU0015, EMPL_RCD=0, the original row has a status of Ignored. The payable time row never made it to payroll. This can be because the time reporting code is not mapped to an earning or the time rejected by payroll is intentionally closed out and is never paid.
|
DUR |
SEQ_NBR |
TRC |
TL_QUANTITY |
PAYABLE_STATUS |
TL_PYBL_ REASON_CD |
ORIG_SEQ_NBR |
|
10/10/2010 0:00 |
543210001 |
KUREG |
6 |
IG |
MRJ |
0 |
|
10/10/2010 0:00 |
543210002 |
KUREG |
2 |
RP |
PNP |
543210002 |
|
10/10/2010 0:00 |
543210011 |
KUREG |
-2 |
ES |
543210002 |
|
|
10/10/2010 0:00 |
543210012 |
KUREG |
6 |
ES |
0 |
|
|
10/10/2010 0:00 |
543210013 |
KUREG |
2 |
ES |
0 |
|
|
10/10/2010 0:00 |
543210014 |
KUOVT |
1.9125 |
ES |
0 |
|
|
10/10/2010 0:00 |
543210015 |
KUOVT |
.6375 |
ES |
0 |
For this scenario, SEQ_NBR 543210001 is rejected by payroll, and then closed by the user. The user intentionally did not want this row paid. SEQ_NBR 5643210002 (TL_QUANTITY=2) is in rejected status, but this row could still be picked up for payroll. Then there is a change in reported time that causes the system to create offsets. The offset row is SEQ_NBR 543210011, and new time is generated for 543210012 through 543210015.
Time and Labor publishes the following information to Clairvia:
|
DUR |
SEQ_NBR |
TRC |
TL_QUANTITY |
PAYABLE_STATUS |
TL_PYBL_ REASON_CD |
ORIG_SEQ_NBR |
|
10/10/2010 0:00 |
543210012 |
KUREG |
6 |
ES |
0 |
|
|
10/10/2010 0:00 |
543210013 |
KUREG |
2 |
ES |
0 |
|
|
10/10/2010 0:00 |
543210014 |
KUOVT |
1.9125 |
ES |
0 |
|
|
10/10/2010 0:00 |
543210015 |
KUOVT |
.6375 |
ES |
0 |
Scenario 5: For EMPLID KU0015, EMPL_RCD=0, Adjust Paid Time added a row (SEQ_NBR starts with ‘99999’ and RECORD_ONLY_ADJ = Y).
|
DUR |
SEQ_NBR |
TRC |
TL_QUANTITY |
PAYABLE_STATUS |
RECORD_ONLY_ADJ |
ORIG_SEQ_NBR |
|
10/10/2010 0:00 |
999990001 |
KUMLO |
1.5 |
CL |
Y |
0 |
|
10/10/2010 0:00 |
999990002 |
KDSAD |
–1.75 |
CL |
Y |
0 |
For this scenario, Time and Labor does not publish any information to Clairvia.
Scenario 6: For EMPLID KU0015, EMPL_RCD=0, the employee has been paid and a check reversal has been created.
|
DUR |
SEQ_NBR |
TRC |
TL_QUANTITY |
PAYABLE_STATUS |
ORIG_SEQ_NBR |
TL_PYBL_ REASON_CD |
INITIAL_SEQ_NBR |
|
10/10/2010 0:00 |
543210001 |
KUREG |
8 |
DL |
0 |
543210001 |
|
|
10/10/2010 0:00 |
543210002 |
KUOVT |
2 |
DL |
0 |
543210002 |
|
|
10/10/2010 0:00 |
543210011 |
KUREG |
-8 |
RV |
543210001 |
CRV |
543210001 |
|
10/10/2010 0:00 |
543210012 |
KUOVT |
–2 |
RV |
543210002 |
CRV |
543210002 |
For this scenario, Time and Labor publishes the following information to Clairvia:
|
DUR |
SEQ_NBR |
TRC |
TL_QUANTITY |
PAYABLE_STATUS |
ORIG_SEQ_NBR |
TL_PYBL_ REASON_CD |
ORIG_SEQ_NBR |
|
10/10/2010 0:00 |
543210011 |
KUREG |
0 |
RV |
543210001 |
CRV |
543210001 |
|
10/10/2010 0:00 |
543210012 |
KUOVT |
0 |
RV |
543210002 |
CRV |
543210002 |
Scenario 7: For EMPLID KU0015, EMPL_RCD=0, the employee has been paid and a check reversal has been created. However, the user wants the new estimated rows to be generated for future payment.
|
DUR |
SEQ_NBR |
TRC |
TL_QUANTITY |
PAYABLE_STATUS |
ORIG_SEQ_NBR |
TL_PYBL_ REASON_CD |
INITIAL_SEQ_NBR |
|
10/10/2010 0:00 |
543210001 |
KUREG |
8.5 |
RV |
543210001 |
CRV |
543210001 |
|
10/10/2010 0:00 |
543210010 |
KUREG |
-8.5 |
RV |
543210001 |
CRV |
543210001 |
|
10/10/2010 0:00 |
543210011 |
KUREG |
8.5 |
ES |
0 |
543210001 |
For this scenario, Time and Labor publishes the following information to Clairvia:
|
DUR |
SEQ_NBR |
TRC |
TL_QUANTITY |
PAYABLE_STATUS |
ORIG_SEQ_NBR |
TL_PYBL_ REASON_CD |
INITIAL_SEQ_NBR |
|
10/10/2010 0:00 |
543210011 |
KUREG |
8.5 |
ES |
0 |
543210001 |
When you run the TL_PUB_TLDAT process from the Publish Time and Labor Data page, the system publishes the TL_TIME_DATA Integration Broker message to Clairvia.
The TL_TIME_DATA message is a container with 3 parts:
TL_VP_MSG contains punch time data only. This is the information specified by the Verify Presence option on the Publish Time and Labor Data page.
TL_RT_MSG contains reported time data including all punch time, reported leave, and leave balances. This is the information specified by the Reported Time option on the Publish Time and Labor Data page.
TL_PT_MSG contains the payable time data. This is the information specified by the Payable Time option on the Publish Time and Labor Data page.
Publishing Leave Balances to Clairvia
After integrating Time and Labor and Clairvia for the first time, send all of the leave balances for the subscribed employees to Clairvia using the Publish Leave Balances process (TL_PUB_LVBL.)
Access the Publish Balance page (Time and Labor, Process Time, Publish Leave Balances).
|
Select All Employees |
Select to publish the leave balance, as of the current date, for all enrolled employees. Deselecting this field enables you to specify employees to include or exclude from processing. |
When you run the TL_PUB_LVBL process from the Publish Leave Balance page, the system publishes the TL_LB_MSGC Integration Broker message to Clairvia.
The TL_LB_MSGC message is a container with one part. The message, TL_LB_MSG, contains data from the TL_OWSSR_RUNCTL, TL_RUN_CTRL_GRP, TL_COMPLEAV_TBL, and JOB tables.
Receiving Schedule and Leave Information from Clairvia
Time and Labor uses the SCH_OWS_INTEGRATION App Class and the SCH_OWSVALID Application Engine to handle inbound messages from Clairvia.
Clairvia publishes finalized schedules and leave to Time and Labor using the SCH_OWS_SCHEDULE message. The system performs the following steps after receiving the message:
Time and Labor validates the schedule punch time and leave time. The system performs basic leave validations including validating the reporting code and the employee’s leave balance.
The system inserts valid schedules into the PS_SCH_ADHOC_DTL table, and inserts a summary of schedules into the PS_SCH_MNG_SCH_TBL table.
Valid leave is inserted into the PS_TL_RPTD_TIME table with a REPORTED_STATUS of AP. The leave plan balance is updated in the TL_COMPLEAV_TBL table.
Invalid schedule and leave data is inserted into the SCH_INTEG_ERROR table.
The system sends a response message (SCH_OWS_MESSAGE) to Clairvia.
When all rows are processed successfully, the system sends a success response message to Clairvia.
Information in error is returned to Clairvia for correction. The message includes the employee’s information a rejection reason code. You can review the error data with the SCH_INTEGRATION_ERROR query.
The following table lists the rejection reason codes:
|
Error Code |
Description |
|
1 |
Invalid Employee and Employee Record Number |
|
2 |
Invalid Schedule Source |
|
3 |
Invalid Schedule Category |
|
4 |
Invalid Punch Type |
|
5 |
Invalid Activity |
|
6 |
Invalid Activity Type |
|
7 |
Invalid Event |
|
8 |
Invalid Time Zone |
|
9 |
Transaction already exists |
|
10 |
Cannot add, transaction exists |
|
11 |
Cannot change or delete, transaction exists |
|
12 |
Employee not enrolled with Integration Product |
|
13 |
Employee not enrolled in Clairvia |
|
14 |
Leave balance is not sufficient |
|
15 |
TRC is blank (Type=0 and TRC=blank) |
|
16 |
TRC is not active |
The following graphic shows an example of the results of the SCH_INTEGRATION_ERROR query in the Query Viewer: