 Tracking Claeys Formula Calculations
This chapter discusses how to:
Track Claeys formula calculations.
Prepare for severance calculations.
Perform the Claeys calculation.
Set up and generate Déclaration Immédiate - Onmiddelijke Aangifte (DIMONA) notifications.
Run the Social Report.
Tracking Claeys Formula Calculations
To track Claeys formula calculations, use the Define Contract End BEL (END_CONT_TBL_BEL), Define Contract End Reason BEL (REAS_END_TBL_BEL), Statute Table (STATUTE_TBL_BEL), Reduced Charged Table (RED_CHRG_TBL_BEL), RSZ Categories (CONTR_RSZS_BEL), Terminate Contract BEL (CONTRACT_END_BEL), and Replace Contract BEL (CONTRACT_REPL_BEL) components.
If you're administering a Belgian workforce, you need to set up codes for events or conditions that may play a role in the termination of a Belgian worker's employment contract, and for the special reasons that are associated with those conditions. You also specify employment contract statutes and substatutes, and track special jobs that allow for lower premiums than are normally required by Belgian labor regulations.
Many of the tables that you set up for these purposes contain information that you use when performing Claeys formula calculations. Employers use the Claeys formula to calculate the cost of terminating a worker's contract based on number of service years, salary, age, seniority, type of employment contract, and so on.
This section discusses how to:
Enter codes for events and conditions that result in terminating employment contracts.
Define reason codes for ending employment contracts.
Set up Belgian employment contract statutes for Claeys calculations.
Link contract statutes to Rijksdienst Sociale Zekerheid (RSZ) categories.
Record information that is necessary for terminating a Belgian worker.
Enter a replacement worker for the employment contract.
 Pages Used to Track Claeys Formula Calculations
|
Page Name |
Definition Name |
Navigation |
Usage |
|
CNT_END_TBL_BEL |
|
Enter or update codes for events and conditions that could result in the termination of employment contracts. |
|
|
CNT_ENDRSN_TBL_BEL |
|
Define the reasons that are associated with event codes by adding or updating employment termination reason codes. First define contract termination event types. |
|
|
STATUTE_TBL_BEL |
Set Up HRMS, Product Related, Workforce Administration, Workforce Data BEL, Statutes, Statutes |
Set up and maintain Belgian employment contract statutes and substatutes, and associate contract types with statutes. |
|
|
RED_CHRG_TBL_BEL |
Set Up HRMS, Product Related, Workforce Administration, Workforce Data BEL, Reduced Charges, Reduced Charges |
Set up the page that you use to update or add reduced charges job categories. Under Belgian employment law, these are job categories that enable you to pay reduced taxes and premiums on the compensation to workers who hold those jobs. |
|
|
CNT_RSZS_TBL_BEL |
Set Up HRMS, Product Related, Workforce Administration, Workforce Data BEL, RSZ Categories, RSZ Categories |
Link contract statutes to Rijksdienst Sociale Zekerheid (RSZ) categories. |
|
|
CONTRACT_END_BEL |
Workforce Administration, Job Information, Contract Administration, Terminate Contract BEL, Terminate Contract BEL |
Record information that is necessary for terminating a Belgian worker. |
|
|
CONTRACT_REPL_BEL |
Workforce Administration, Job Information, Contract Administration, Replace Contract BEL, Replace Contract BEL |
Enter the person who replaces the worker in the employment contract. |
Entering Codes for Events and Conditions that Result in Terminating
Employment Contracts
Access the Define Contract End BEL page (Set Up HRMS, Product Related, Workforce Administration, Workforce Data BEL, Contract End Types, Define Contract End BEL).
The end contract type codes can cover a wide range of events, including the employee's death, a voluntary or involuntary separation from your organization caused by retirement or relocation, or promotion into another job that has a different employment contract associated with it.
|
Mandatory Replacement |
Select if the reason for ending an employment contract with one employee requires mandatory replacement of the former worker with another worker in the same employment contract. |
|
Number of months |
If you selected Mandatory Replacement, enter the period of time (in months) required to position the replacement. Note. Belgian employment law mandates these requirements. |
Defining Reason Codes for Ending Employment Contracts
Access the Define Contract End Reason BEL page (Set Up HRMS, Product Related, Workforce Administration, Workforce Data BEL, Contract End Reasons, Define Contract End Reason BEL).
|
End Type |
Select an end type from the list of end contract type codes that were entered on the Define Contract End BEL page. Note. If you move out of the End Type field and then decide to change the end type code, deselect and reenter the Mandatory Replacement and Number of months fields. |
|
Mandatory Replacement and Number of months |
If you selected an end type that requires mandatory replacement, when you move out of the End Type field, the system automatically selects this check box. The system then enters the number of months that you have to replace the current employee with another employee in this contract. If you didn't select an end type associated with mandatory replacement information, indicate if the reason for ending an employment contract with one employee requires mandatory replacement of the former worker with another worker in the same employment contract. Then enter the number of months that can pass before you have to find the replacement employee. Note. Belgian employment law mandates these requirements. |
Setting Up Belgian Employment Contract Statutes for Claeys Calculations
Access the Statutes page (Set Up HRMS, Product Related, Workforce Administration, Workforce Data BEL, Statutes, Statutes).
|
Contract Type |
Select a contract type for the statute. Values are Employment, Member of the professions, Non applicable, and Self Employed. |
|
Substatute |
Select the statute code with which the system should associate this substatute code. |
Linking Contract Statutes to RSZ Categories
Access the RSZ Categories page (Set Up HRMS, Product Related, Workforce Administration, Workforce Data BEL, RSZ Categories, RSZ Categories).
Use the government-defined RSZ categories to maintain social security records for your Belgian employees. Associate each combination of contract type, statute, and substatute with an RSZ category for Claeys formula calculations.
|
RSZ-Submitted |
Select to indicate that the contract is subject to RSZ. Before selecting this check box, determine whether RSZ premiums have to be paid to the Belgian social security system for the pay (wage or reimbursement) that is associated with this contract. |
|
RSZ-Category |
Select an RSZ category from the list. |
Recording Information that Is Necessary for Terminating a Belgian Worker
Access the Terminate Contract BEL page (Workforce Administration, Job Information, Contract Administration, Terminate Contract BEL, Terminate Contract BEL).
Use this page to:
Specify that the worker's employment contract has ended, and the reason that your organization has chosen to end the contract.
Set up and track the worker's termination notification period.
Track the worker's replacement if a replacement is mandatory based on the contract type.
|
End Contract Type |
Select a valid end contract type (such as death, disability, or early retirement with mandatory replacement). |
|
End Contract Reason |
Select an end contract reason (such as disrupted employee relations, family reasons, a company specific program, or contract expiration). |
|
Notification Period Months |
Enter the number of months of notice that the employee must be given prior to the contract end date. The notification period that you enter here affects Claeys calculations in the Create Notification component. If you enter an amount here and move out of the field, the Notification Period Weeks option becomes display-only. |
|
Notification Period Weeks |
Enter the number of weeks of notice that the employee must be given before the contract end date. The notification period that you enter here affects Claeys calculations in the Create Notification component. If you enter an amount here and move out of the field, the system makes the Notification Period Months option display-only. |
|
Start Date and End Date |
Enter the date that the notification period begins, and the date on which the notification period ends and the employment contract terminates. |
|
Start Date Worked |
Record the employee's start date for this job contract, which should be the same as the date that you record for a job change in the worker's job record. |
|
End Date Worked |
Enter the employee's last working day on this job contract, which should be the same as the date that you record for a job change in the worker's job record—whether the worker is terminating with your company or leaving one job contract to move into another. |
|
Start Date Payment and End Date Payment |
Track the start and end payment dates, which the system stores and uses for payroll. |
|
Mandatory Replacement |
If the end contract type that you selected requires mandatory replacement, the system automatically selects this check box and makes it display-only. Specify whether an end contract type requires replacement on the Define Contract End BEL page. |
|
End Date Mandatory Replacement |
If the end contract type requires mandatory replacement, the system calculates the end date of the mandatory replacement period based on the end date on which the employee is terminated. It also calculates the number of months that you specified on the End Employment Terms table (CNT_END_TBL_BEL) as the length of the replacement period. |
See Also
Defining Reason Codes for Ending Employment Contracts
Entering a Replacement Worker for the Employment Contract
Access the Replace Contract BEL page (Workforce Administration, Job Information, Contract Administration, Replace Contract BEL, Replace Contract BEL).
|
Replacing ID |
Select the ID of the employee who replaces the terminated employee in this contract. The system displays all employees who have been tagged as replacement employees for Belgian employment contracts in your human resources system. Select any applicant or employee with employment terms. If you want to start someone's employment as a replacing employee, you must create employment terms for that person first. |
|
Replacing Contract Nbr (replacing contract number) |
Select the number for this contract, based on the replacing employee ID that you selected. |
|
Mandatory Replacement |
Select to indicate that mandatory replacement is required. |
|
End Replacement |
If you selected Mandatory Replacement, enter the date for the end replacement. You may want to track this date if you have an earlier than expected end date for a fixed term employment contract. |
|
End Date Mandatory Replacement |
Enter the end date for mandatory replacement. |
Preparing for Severance Calculations
Employers in Belgium and organizations that employ a Belgian workforce are required to track worker information that is used in the Claeys formula calculation. This calculation determines the amount of severance compensation that your organization must pay a worker if you terminate employment. The formula considers factors such as the employee's seniority, age, and annual compensation (including salary, vacation pay, and so on) to determine your organization's liability to the employee.
This section provides overviews of how Claeys calculates severance and of how to prepare for the Claeys calculation, and discusses how to:
Track additional seniority.
Enter protected job leave information.
See Also
Performing the Claeys Calculation
Understanding How Claeys Calculates Severance
The Claeys formula calculates months of severance salary that are owed to an employee as follows:
0.89 × (seniority) + 0.08 × (employee's age) + 0.0013 × [yearly compensation in EUR divided by 1000 × (reference index divided by actual index)] − 2 = notification period, or months of severance salary that is owed to the employee.
For example, an employee with 13 years of seniority with a company, who is 38 years of age, and who is making 82.500 EUR is entitled to 13 months of severance pay. The calculation works as follows:
0.89 × 13 = 11.57 (seniority factor)
0.08 × 38 = 3.04 (age factor)
0.0013 × (82,500 / 1000) × (125.30 / 126.00) = .1066 (compensation factor)
11.57 (seniority factor) + 3.04 (age factor) + .1066 (compensation factor) 2 = 13 months of severance
Note. The value for compensation is the employee's yearly compensation. This amount is based on the employee's monthly wage multiplied by the factor that is designated in the company table for your organization. The Belgian regulated factor amount is approximately 13.9.
Understanding How to Prepare for the Claeys Calculation
Preparing for the Claeys employment compensation calculation in PeopleSoft Human Resources involves:
Establishing default company level information that is used for Claeys formula employee compensation calculations on the Company table (COMPANY_TBL), including factoring information defaults for calculating worker seniority, age, compensation, and so on.
You can override this data at the employee level in the Create Notification component, where you perform the Claeys calculation for a specific worker.
Entering and maintaining information about the employee's:
Seniority with your organization (stored in the PER_ORG_ASGN table).
Age (stored in the PERSON table).
Compensation (stored in the JOB table).
Entering and maintaining employment contract information for the employee on the Contract Data pages (stored in the CONTRACT_DATA table).
Entering and maintaining end employment terms information about required notification periods for workers your company may terminate (stored in the CNT_END_TBL_BEL table).
Maintaining additional information that is used to record Belgian seniority, including protected job leave information (stored in the SENIORITY_BEL table).
See Also
Performing the Claeys Calculation
Pages Used to Prepare for Severance Calculations|
Page Name |
Definition Name |
Navigation |
Usage |
|
SENIORITY_BEL |
Workforce Administration, Collective Processes, Administration BEL, Identify Seniority, Identify Seniority |
Track additional seniority for an employee. Seniority affects the Claeys calculation that you perform in the Create Notification component. |
|
|
PROTECT_BEL |
Workforce Administration, Collective Processes, Administration BEL, Create Protection, Create Protection |
Enter protected job leave information for a Belgian employee. You can assign protection to employees who are union delegates, who take part in elections, or who have other qualifying characteristics. |
Tracking Additional Seniority
Access the Identify Seniority page (Workforce Administration, Collective Processes, Administration BEL, Identify Seniority, Identify Seniority).
The system uses the seniority information for the employee recorded on this page when performing Claeys formula processing to determine the employee's months of service. If no information about service months is available on the Seniority page for an employee, the system references the employee's service months calculation on the Job Data - Job Information page.
For example, seniority in another organization may or may not count towards an employee's company seniority, depending on your own organization's business rules, but it does count towards legal seniority, which affects the Claeys calculation. This distinction is particularly important in the case of mergers between organizations, where you decide if the seniority of employees from one organization is recognized by the other organization and, if so, to what extent. Using this page, you can specify the number of months of seniority that workers can carry over to your organization from their former companies.
|
Seniority Type |
Select the seniority type method that you want to use to determine this employee's seniority in your organization. Values are: Company Seniority: When figuring seniority, this method doesn't account for periods of leave time that employees may use while remaining in a job, pension calculation issues, recognized service time, and so on. The system does not take into account company seniority months when performing the Claeys calculation for an employee. If you enter a period for company seniority, the Claeys calculation uses only the months of seniority based on the employee's service time on their Job Data record. Legal Seniority: The system accounts for this seniority amount when calculating the Claeys formula, which is used to calculate base pay for Belgian employees. If you enter a period for legal seniority, the Claeys calculation takes the number of service months displayed in the Nbr Months field and adds it to the months of service from the employee's Job Data record, and displays the sum of the two amounts on the Create Notification - Base page. |
|
Eff Date (effective date) |
Enter the effective date to record the beginning of the employee's additional seniority period. The system supplies a default date, usually today's date, which you can modify to reflect the additional seniority period. |
|
End Date |
Enter the end date for the seniority period. |
|
Nbr Months (number of months) |
When you move out of the End Date field, the system calculates the number of months of seniority. The system doesn't calculate partial months. If an employee's seniority period is 100 months and 16 days, the system calculates 100 months of seniority. |
|
Included |
Select to ensure that the system adds the months of seniority that you entered here to the employee's seniority based on their Job record (JOB) when it performs the Claeys calculation. If you deselect this check box and enter Legal Seniority months, the system subtracts the seniority period from the employee's seniority when it calculates the Claeys formula. |
|
Remark |
Enter relevant remarks about the additional seniority that you are tracking. |
Entering Protected Job Leave Information
Access the Create Protection page (Workforce Administration, Collective Processes, Administration BEL, Create Protection, Create Protection).
|
Protection Type |
Select a protection type to indicate why this leave of absence is protected. Note. Belgian employment law mandates these protection types. |
|
End Date |
Enter the date on which the employee will return to work. |
|
Nbr Months (number of months) |
When you move out of the End Date field, the system calculates the duration of the protected absence. Note. The system calculates the absence period only to the nearest month and doesn't allow for partial months. If the protected leave duration period is 45 days, the system indicates that the employee's absence covers one month only. |
Note. The system does not take into account protection months when it calculates Claeys formula seniority, in part because protection isn't limited to absences from work that might affect seniority months.
Performing the Claeys Calculation
After you've hired a Belgian employee into your human resources system and established employment contract terms, end employment terms, seniority, and protected leave (protection) information, you can perform the Claeys calculation to determine your potential severance pay liability if you were to terminate the employee.
This section discusses how to:
Review Claeys calculation variables.
Calculate the severance amount.
Run the Notification report.
Pages Used to Perform the Claeys Calculation|
Page Name |
Definition Name |
Navigation |
Usage |
|
NOTIF_CALC_BEL |
Workforce Administration, Collective Processes, Administration BEL, Create Notification, Base |
Review and set Claeys calculation variables, including the employee's compensation, default factor information, and months of service. |
|
|
NOTIF_CALC2_BEL |
Workforce Administration, Collective Processes, Administration BEL, Create Notification, Results |
Calculate the severance amount. |
|
|
RUNCTL_PER066_BEL |
Workforce Administration, Collective Processes, Administration BEL, Create Notification, Report |
Run the Notifications report (PER066BE). |
Reviewing Claeys Calculation Variables
Access the Create Notification - Base page (Workforce Administration, Collective Processes, Administration BEL, Create Notification, Base).
The system displays the employee's name, employee ID, and the employment record number for your reference. This information comes from the person's personal data record.
The system displays employment and end employment contract terms information for the employee that you entered on the Contract Data and Terminate Contract BEL pages. The system displays the person's hire date from the Job Data record and indicates whether, according to the end employment terms for the worker, the contract requires mandatory replacement.
Determining the Employee's Base Compensation Amount (Jaarloon)
|
Comp Rate (compensation rate) |
The system calculates the employee's monthly compensation rate based on the employee's compensation rate information on the Job Data - Compensation page and displays it here. Adjust the rate information as necessary. The system uses this amount when determining the employee's monthly pay variable for the Claeys calculation. |
|
M/Yr Factor (month/year factor) |
The system multiplies the month base amount by the month/year factor of 13.85000 to calculate a value for the employee's Annual Rt (annual rate) income amount field. The default factor displayed here comes from the default employee compensation factors that you entered on the Company table. The Belgian government determines this factor amount, but you can override the default here if the factor amount changes. |
|
Commissions |
Enter any commissions amount that the system should add to the employee's month base as part of the Claeys calculation income amount. |
|
Value extra benefits |
Add value extra benefits amounts, including other components of nonbase pay, such as any benefits that the employee receives (for example, salary, vacation pay, 13th month, meal checks, and so on). The system multiplies the value extra benefits amount by the value extra month/year factor of 13.85000 to calculate the employee's yearly extra income amount. |
|
Total |
The system displays the total compensation amount (jaarloon) based on the year base, the commission, and extra benefit results. Adjust the system calculated total as necessary. |
Understanding the Above Salary Limit Setting
|
Above sal. limit (above salary limit) |
The system indicates if the employee's compensation total is above salary limit by accounting for the contract type. Select this check box to override the factor values on the Create Notification - Results page. To change the salary limit setting, ensure that the notification period start date falls after the effective end probation date that appears with the employee's contract information at the top of the page. In this case, the system fixes the salary limit for a longer period (the system uses the factors in the Claeys Defaults group box on the Create Notification - Results page to calculate the notification period, and makes the factors available for entry). If the date isbefore the effective end probation date, you can't change the salary limit setting. |
Note. The compensation currency on the Create Notification - Base and Create Notification - Results pages is the same as the employee's job currency that is set on the employee's Job record (JOB).
Determining the Employee's Seniority
|
Months service time |
The system calculates and displays the employee's number of months service time. The system determines service month information by considering both the employee's service months information on the Job Information page (JOB_DATA) and the number of months service time on the Seniority page (SENIORITY_BEL) if the seniority type is set to Legal Seniority. The system adds the two seniority amounts and displays them as the months service time amount. The system doesn't consider partial months in this calculation and doesn't round up. If the employee's service time is 9 months, 16 days, the system displays 9 as the employee's months service time. Adjust the months service time as necessary. Note. If you enter seniority information on the Seniority page for an employee and the seniority type is set to Company Seniority, the system uses the months of seniority calculation on the Job Information page to set the number of months service time on the Create Notification - Base page. |
|
Start date notification period |
Set the start date notification period for the employee's termination notification to the first day of the next month if you're not performing the Claeys calculation for this employee on the first day of the current month. The default value is the first day of the month following the effective date that appears with the contract information at the top of the page. For example, if you start your Claeys calculation for an employee on April 14, the system enters a start date for the notification period of May 1. Override this date as necessary. Note. The start date notification period that appears on the Base page affects the way the system performs the Claeys calculation on the Results page. If the start date notification period begins before the effective end probation date on the Base page, the system uses a notification period of Days on the Results page when you click the Calculation button. If you enter a start date notification period that begins after the employee's effective end probation date, the system uses a notification period of Days, Weeks, or Months, depending on the statute information for that employee on the Contract Data - Contract Type/Clauses page, as follows. If the employee is classified as a Worker on the Employment Terms Type page, the notification period appears in Weeks. The classification of Employee results in a notification period of Months. The classification of Not Applicable results in a notification period of Days. |
|
Act. Index (actual index) |
The actual index if one is assigned for this company in the Company table. The actual index is a monthly reference number to be held against the reference index number. The actual index is used in the Claeys calculation to calculate the notification period term that is related to the yearly base on the Create Notification - Results page: (Yearly base salary / 1000) × (factor yearly base / actual index) × correction factor) |
|
Date |
The last day of the year preceding the year in which you're performing the Claeys calculation for an employee. This date is for your reference only, and isn't saved when you save the page. |
|
Ref. Index (reference index) |
You can also update the reference index or accept the system default that is based on the factor yearly base index that is set up on the Company Table- Default Settings, Claeys Defaults for this company. The reference index is a yearly reference amount to be compared against the actual index amount. |
|
Date |
The system also displays the reference index date. The system sets this date to the beginning of the last half of the year prior to the year in which you're performing the Claeys calculation. This date is for your reference only, and isn't saved when you save the page. The system doesn't use the reference index as part of the Claeys calculation. |
Calculating the Severance Amount
Access the Create Notification - Results page (Workforce Administration, Collective Processes, Administration BEL, Create Notification, Results).
The system displays the Claeys defaults for Factor Seniority, Factor Age, Correction Factor, Term Correction, and Factor Yearly Base from the Company table for this employee's company. You assigned the company on the Job Data - Work Location page. Change these factors at the employee level on this page only if you selected the Above sal. limit check box on the Create Notification - Base page.
Note. The system uses these Claeys default factors as part of the Claeys calculation only when the Above sal. limit check box is selected on the Create Notification - Base page.
When you first open this page, the Notification Period and Calculation group boxes are empty. This is where the system displays the results of the Claeys calculation for this employee after you perform the calculation by selecting the Calculation link.
The system displays the calculated notification period for this employee in the Calculation group box and shows how it calculated the notification period in the Notification period group box.
How the System Calculates the Notification Period
The system calculates the notification period in one of two ways depending on whether the employee's yearly base salary is above the salary limit:
If the employee's yearly base salary is above the salary limit (Sal limit check box selected), the notification period that appears in the Calculation group box is based on the calculations that appear in the Notification Period group box.
The system calculates the notification period based on the employee's seniority, age, and compensation:
Seniority term = (months service time / 12) × factor seniority
Note. For the Seniority Term amount, the system rounds the division by 12 differently for each month.
Age term = employee's age on notification start date × factor age.
Compensation term = (base total / 1000) × (factor yearly base / actual index) × correction factor.
Total notification period = seniority term + age term + compensation term - term correction.
You can tell if you're using the above salary limit method by the way the page looks when you perform the calculation. If the system used the above salary limit method to determine the notification period, it displays the notification period calculation in the Notification Period group box. The Claeys defaults that appear on the page are also available for entry, though these come from the company defaults for the employee's company and probably shouldn't be changed.
If the employee's base isn't above the salary limit (the Above sal. limit check box is deselected), the notification period amount is based on the statute, service time, probation end date, and notification start date—without accounting for any of the Claeys defaults factors that appear on the page. In this case, the system calculates the employee's notification period as follows:
If the Statute is "Worker"

if Notification Start Date <= Effective Probation End Date, then Period is "0"

if the Service Time is lower than 240 Months (20 years) the Period is "4"

else the Period is "8"

If the Statute is "Employee"

if Notification Start Date <= Effective Probation End Date, then Period is "7"

else the Period is (((Service Time / 12) / 5) +1) ×3 ⇒
(each division is truncated with zero decimals)

Else the Period is "0"
The unit of time for the notification period information is based on the employee's statute type that you established on the Contract Data - Contract Type/Clauses page (CONTRACT2) as defined on the Statute Table page (STATUTE_TBL_BEL). When the statute type is set to Worker, the period unit is in Weeks. When the statute is for an Employee, then the period unit is in Months. If the statute is anything other than worker or employee, the period unit is Days. Whenever the notification start date falls within the probation period, the unit of time is always Days.
Understanding Protection Period Information
The system compares the end date for any of this employee's qualifying protection periods that you recorded on the Create Protection table (PROTECTION_BEL) to the notification start date recorded on the Belgian Notification Calculation table (NOTIF_CALC_BEL) to determine the value for the Protection period field. This method of comparison ensures that the employer respects the employee's protection rights.
Note. The protection period isn't included in the Claeys calculation process.
The system also displays the Protection End Date field, which is the actual end date of the protection period if any protected leave time is entered for this employee on the Create Protection page. This is the date that you set as the end date for any qualifying protection period that you specified on the Create Protection page.
Working with the End Compensation Amount
The End compensation field displays the resulting Claeys calculation amount that you owe this employee as severance pay, as calculated by the system.
Depending on the notification period unit of time, the system calculates the end compensation by dividing the yearly base total (displayed on the Create Notification, Base page) by 12 if the notification period is months, 52 if weeks, or 365 if days. The result is then multiplied by the notification period amount to arrive at the end compensation amount. For example, the end compensation amount calculation for Guido Peeters is:
(31576.25 / 12) * 11 = 28944.89
Any amount that you enter in the Revenue compensation field is added to the total severance amount for the employee.
If you need to change the notification data and rerun the calculation, make your changes and click the Calculation link again. The system deselects the old results and calculates the Claeys amount based on your changes.
Warning! The system does not save this data. You must run the Notification report to maintain records for each calculation.
Running the Notification Report
Access the Create Notification - Report page (Workforce Administration, Collective Processes, Administration BEL, Create Notification, Report).
After completing the Claeys calculation, run the termination notification report. The report page displays the employee's ID and record number together with the notification period that is calculated by the Claeys formula.
See Also
(BEL) Entering Default Information and Salary Factors
Setting Up and Generating DIMONA Notifications
To set up DIMONA Notification data, use the Online Processing Setup BEL (HR_PRCS_SETUP_BEL), DIMONA Sender Setup BEL (HR_DI_SENDER_BEL), and DIMONA Event Type BEL (HR_DI_EVT_TYP_BEL) components.
This section provides an overview of DIMONA notifications and discusses how to:
Set up properties for HR Belgium processes.
Identify sender IDs and addresses for the DIMONA declaration process.
Define event types for DIMONA declarations.
Create new DIMONA notifications as XML files.
Review new DIMONA results.
View DIMONA result details.
Load DIMONA notifications.
View loading errors.
Understanding DIMONA Notifications
The Belgian E-government Social Security plan requires companies to report social insurance data for workers employed under Belgium regulations. DIMONA notifications contain the required data.
The DIMONA Declaration process (HR_DI_BEL) creates the mandatory xml format file and is initiated from the New DIMONA Notification page. The PeopleSoft system supports employee start and end of employment DIMONA notifications, which are based on the actions and action reasons selected in the setup, including corresponding updates and cancellations. You can also create you own DIMONA notifications based off of the actions or action reasons selected in the setup. You can generate notifications for a single employee, for a company, or for a business unit.
Note. A previous version of the DIMONA notification generation, the Create DIMONA Notification process (HRBEL_DIM_AE), generates DIMONA notifications as flat files and uses hardcoded actions.
After you have generated files containing the notifications, you can transfer the files to the National Office for Social Security (NOSS), known as RSZ or ONSS in Belgium, using the NOSS file transfer protocol server. After you transfer data to the NOSS, you can consult and update employee data by using the NOSS database system.
Pages Used to Generate DIMONA Notifications|
Page Name |
Definition Name |
Navigation |
Usage |
|
HR_PRCS_SETUP_BEL |
Set Up HRMS, Product Related, Workforce Administration, Workforce Data BEL, Online Processing Setup, Online Processing Setup |
Set up properties for HR Belgium processes. |
|
|
HR Belgium Process Setup |
HR_PROP_LONG_BEL |
Click the Details link on the Online Processing Setup page. |
Create, modify, or view long property values. This page enables you to give an explanation of the property or assign a long value as property to a process parameter, like a URL for example. |
|
HR_DI_SENDER_BEL |
Set Up HRMS, Product Related, Workforce Administration, Workforce Data BEL, DIMONA Sender Setup, DIMONA Sender Setup |
Identify sender IDs and addresses for the DIMONA declaration process. |
|
|
HR_DI_EVT_TYP_BEL |
Set Up HRMS, Product Related, Workforce Administration, Workforce Data BEL, DIMONA Event Type BEL, DIMONA Event Type BEL |
Define event types for the HR Belgium DIMONA declaration. |
|
|
HR_DIMONA_CNTL_BEL |
Workforce Administration, Collective Processes, Administration BEL, Create DIMONA Notification, Create DIMONA Notification |
Create DIMONA notifications as a flat file. This is an older version of the notification process. |
|
|
HR_DIMONA_RVW_BEL |
Workforce Administration, Collective Processes, Administration BEL, Review DIMONA Notification, Review DIMONA Notification |
Review DIMONA notifications that were created as a flat file using the older Create DIMONA Notifications process. This is an older version of the DIMONA notification review. |
|
|
HR_DI_RUNCTL_BEL |
Workforce Administration, Collective Processes, Administration BEL, New DIMONA Notification, New DIMONA Notification |
Create new DIMONA XML notifications. |
|
|
HR_DI_RVW1_BEL |
Workforce Administration, Collective Processes, Administration BEL, Review New DIMONA Results, Review New DIMONA Results |
Review new DIMONA results. |
|
|
HR_DI_RSLT_SEC_BEL |
Click the Details button on the DIMONA Result page. |
View additional data regarding the DIMONA process. |
|
|
HR_DI_LOAD_BEL |
Workforce Administration, Collective Processes, Administration BEL, Load DIMONA Notification, Load DIMONA Notification |
Load DIMONA notification. |
|
|
HR_DI_LOAD_SEC_BEL |
Click the Details link on the Load DIMONA Notification page. |
View error details from the DIMONA load process. |
Setting Up Properties for HR Belgium Processes
Access the Online Processing Setup page (Set Up HRMS, Product Related, Workforce Administration, Workforce Data BEL, Online Processing Setup BEL, Online Processing Setup).
Add, modify, or view variables for DIMONA or other Belgium processes.
The PeopleSoft HR application delivers the DIMONA process name to set your system as a test environment. This enables you to set the system environment to be in test or final production mode while running DIMONA notifications.
|
Property Value |
Enter values pertaining to the process. For the DIMONA process, specify whether your environment is in test or final production mode. Valid values are Y (Test mode) and N (Production mode). Test environments set as N are for final generation and will be sent to social security. The DIMONA Declaration process will place either a T = Test (data) or an R = Real (data) in position 31 of the DIMONA filename based on the production mode. |
|
Details |
This check box displays whether there is additional information regarding this process name. Click the Details link to open the HR Belgium Process Setup page and manage long property value information. |
Identifying Sender IDs and Addresses for the DIMONA Declaration Process
Access the DIMONA Sender Setup page(Set Up HRMS, Product Related, Workforce Administration, Workforce Data BEL, DIMONA Sender Setup, DIMONA Sender Setup).
Use this page to maintain sender address information. When an user enters a sender number on the New DIMONA Notification run control page the page will display the associated address for this sender.
See DIMONA Sender.
Defining Event Types for DIMONA Declarations
Access the DIMONA Event Type BEL page (Set Up HRMS, Product Related, Workforce Administration, Workforce Data BEL, DIMONA Event Type BEL, DIMONA Event Type BEL).
Use this page to define and maintain HR actions and reasons that the New DIMONA Notification process should select from HR Job Data. For example, if you indicate a Hire Action value with the Reason Code value of First Job, the process will select only employee job data that have an action of Hire and a reason of First Job. If the Reason Code field is left blank, the process will select all employee job data with the action Hire, regardless of the reason code.
The PeopleSoft HR system delivers this event types:
|
Event Type |
Action |
Reason Code |
HR Status |
|
Start (start of employment) |
Hire (HIR) |
N/A |
Active |
|
Start |
Rehire (REH) |
N/A |
Active |
|
End (end of employment) |
Termination (TER) |
N/A |
Inactive |
|
End |
Terminated with Benefits (TWB) |
N/A |
Inactive |
|
End |
Terminated with Pay (TWP) |
N/A |
Inactive |
Note. N/A indicates that there is now action reason associated with the action.
See Reviewing New DIMONA Results.
Creating New DIMONA Notifications
as XML Files
Access the New DIMONA Notification page (Workforce Administration, Collective Processes, Administration BEL, New DIMONA Notification, New DIMONA Notification).
Report Request Parameter(s)
|
From Date and To Date |
Enter a date range for the period you want to include in the DIMONA notification. The process will select the data between these dates. The From Date field displays by default a date 10 days prior to the system's date. The To Date field displays by default the system date. |
|
Company |
Enter the company or business unit for which to create a DIMONA notification. Only companies with the BEL regulatory region are available for selection. If you leave this field blank, the process will select all companies which have a regulatory region of BEL (Belgium). |
Preliminary Runs
Use this section to execute preliminary runs. The system selects and stores the data in the DIMONA result table and a test file. You can then review the data online before creating the official file or review and validate the xml file using xml schema validator software.
|
Generate Data |
Select this check box to have the process select data from Job and insert it into the DIMONA result table. Do not select this check box if you have performed changes since the last run, otherwise the changes will be overwritten by the process. Note. Any existing data that has not yet been reported will be overwritten. If you have performed manual changes, such as set an action to update or cancel, these changes will be overwritten as well. |
|
Generate Preliminary File |
Select this check box to have the system create a temporary file that you can review. The file name will have a T in position 31. |
Official Run
Use this section after you have reviewed the data online or through the temporary file, performed any necessary manual changes, and consider the file ready to be sent to the social security office.
|
Generate Final File |
Select this check box to have the system create a final file to be sent to the social security office. The file name will have an R in position 31. This check box is available in production mode only. In test mode, the check box is unavailable. The mode is determined on the Online Processing Setup page for process name DIMONA. - TESTENVIRONMENT The system uses the following Property Value field values to determine the mode:
|
|
Version |
Enter the DIMONA version (from the first page of the Glossarium) used when creating the DIMONA file. The system provides by default the last version number + 1 of the file sent by this sender. This value can be overwritten. The first time this DIMONA process is run, the user should set the version to 1. |
DIMONA Sender
Enter information about the person who is sending the notification.
|
Sender Nr (sender number), Sender Name, Country, and Address |
Enter the number that the NOSS assigned to the person who is sending the notification. After you enter the sender number, the page displays the address information defined on the DIMONA Sender Setup page. See Identifying Sender IDs and Addresses for the DIMONA Declaration Process. |
|
Country Code |
Enter the sender's country code. |
|
Edit Address |
Click this button to access the Edit Address page and update the address, if necessary. |
Contact
|
Name, Phone, and Function |
Enter the name, telephone number, and function of the person whom the NOSS can contact in case a problem occurs with the file. |
Understanding the XML DIMONA File Naming Convention
When running the DIMONA Declaration process (HR_DI_BEL) using the New DIMONA Notification page, the system will create an eight segment file name, 33 to 35 characters, using the following format:
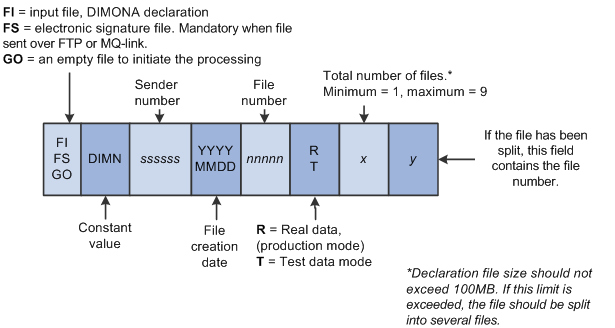
DIMONA file naming convention
An example of a DIMONA declaration input file created on July 16, 2011 in final mode might have the following file name:
FI.DIMN.998033.20110716.00044.R.2.1
The sender ID is 998033 and this would be the first of 2 files.
Note. The New DIMONA Notification process creates files starting with FI only
Reviewing New DIMONA Results
Access the Review New DIMONA Results page (Workforce Administration, Collective Processes, Administration BEL, Review New DIMONA Results, Review New DIMONA Result).
|
Event Date |
Displays the date of the DIMONA event from Job Data, such as a start or end of employment. |
|
Event Sequence |
Displays the effective sequence of the Job Data transaction associated with the DIMONA event. The sequence number tracks the order of multiple administrative actions that occur on the same day. |
|
Event Type |
Displays the type of DIMONA event Start or End, as determined by the process. |
|
Action |
View or select the notification action. Valid values are:
|
|
Status |
View or select the status of the notification. Valid values are:
|
|
Start Date |
Displays the event start date from Job Data. |
|
End Date |
Displays the event end date from Job Data. |
|
DIMONA Nbr (DIMONA number) |
The DIMONA Nbr is provided by the social security and loaded in the system with the load notification process. |
|
Reporting Dt (reporting date) |
Displays the date the process was finalized. |
|
Details |
Click this button to open the DIMONA Result Details page to view additional information about the notification. |
|
Run |
Increments by one each time the process is run. |
Viewing DIMONA Result Details
Access the DIMONA Result Details page (click the Details button on the Review New DIMONA Results page).
Displays additional information about the DIMONA notification.
|
Reference Number |
Displays the number that the social security will reference when sending back the notification. It is the link between the employee data (in the xml) and the handling result in the notification. Note. The reference number is generated by the process: EmplID followed by a sequence number |
|
Dimona Declaration File Name |
Displays the DIMONA file name the process created in final production mode. |
Loading DIMONA Notifications
Access the Load DIMONA Notification page (Workforce Administration, Collective Processes, Administration BEL, Load DIMONA Notification, Load DIMONA Notification)..
In case of a successful submission of a new hire, or start of employment, a return file will be provided with the newly assigned DIMONA number, which will be stored in the tables for future reference. In cases of an unsuccessful submission, the error(s) will be uploaded and viewable in the next transaction.
|
Details |
Click this button to open the DIMONA Error Details page and view error details. |
Viewing Loading Errors
Access the DIMONA Error Details page (click the Details button on the .
Running the Social Report
This section lists the page used to run the Belgian Social report.
Page Used to Run the Social Report|
Page Name |
Definition Name |
Navigation |
Usage |
|
RUNCTL_PER067_BEL |
Workforce Administration, Workforce Reports, Social Report BEL, Social Report BEL |
Run the Social Report (PER067BEL), which reports a variety of employer and employee information that is required by the government. |