 Understanding Mass Organization Change
This chapter provides an overview of mass transfers in Japan and discusses how to:
Change plans for restructuring an organization.
Align employee placement plans with the new organization structure.
Finalize organization and employee placement plans.
Understanding Mass Organization ChangeJapanese companies change organizational structure periodically. Consequently, employees are transferred to new roles and departments within the revised structure. This change is referred to as mass period transfers (teiki ido). With rapid changes in the business environment, organizational changes and mass transfers play an integral part for businesses in Japan and take place in short cycles.
Job rotation is viewed as an integral part of employee development in Japan. Human resources (HR) departments intentionally transfer some employees to multiple departments over a period of time. This practice is aimed at developing generalists who are knowledgeable about several jobs within the company. It also provides employees more experience and a broader vision of the company. The period of service in a department is often the selection criterion for job rotation. Employees who are identified as transferable are called transfer candidate employees.
Many companies in Japan employ a split HR organizational structure made up of division HR and corporate HR. Corporate HR is an HR department located in the main company headquarters of a large company or group of companies. Division HR departments are HR departments within a business unit or division. The division HR departments report to the corporate HR department (and the general manager of the business unit, subsidiary companies, and so on).
The division HR department formulates and implements activities related to changes in organizational strategy and employee placement at the departmental level. When division HR finishes its work, it reports to corporate HR. Corporate HR then coordinates and adjusts activities and placements among departments based on company strategy.
Tamatsuki Placement
The Japanese word tamatsuki combines the words ball (tama) and hit (tsuku) and means billiards in Japanese. Tamatsuki placement begins when an employee is assigned to a newly created post. The existing post is vacated and is available to be filled.
Note. A post is equivalent to a supervisory level role (yakushoku) in a department. It is different from a position, which is maintained in the Position Management feature.
When restructuring an organization, Tamatsuki placement is usually conducted along the same job level. Tamatsuki placement can also occur when an employee has requested a transfer. Job rotation for higher level management positions are also done across the same job level, which starts a job transfer chain of events.
For example, Bunji is assigned a new post, Corporate HR Division Director, and his previous post becomes available. Other employees are then assigned to similar posts at the same level by the cascading effect of a person moving from one post to another and leaving the existing post vacant. Daisuke is assigned to Bunji's previous post, Fusako is assigned to Daisuke's previous post, and Fusako's previous post is closed.
This example of tamatsuki placement is pictured in the following diagram:
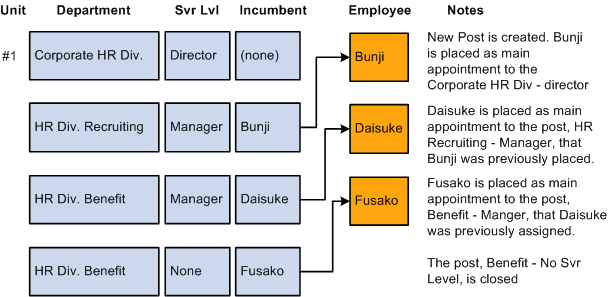
Example of Tamatsuki placement
Note. This feature does not support transfer between business units as table sets may differ from one business unit to the next.
Changing Plans for Restructuring an OrganizationThis section provides an overview of change plans for restructuring an organization and discusses how to:
Create an Organization Plan.
Specify Headcount Plan by department.
View the Headcount Plan listing.
 Understanding Change Plans for Restructuring An Organization
To plan a new organizational structure, you enter information about the new structure in the system. This information includes the department hierarchy and size by supervisor level, job code, and grade. You can store multiple structures under different names. After entering the information for a new plan, you verify the information using a visual chart.
Organizational Structure
You build the existing and planned organizational structures using PeopleSoft Tree Manager. Tree Manager provides a graphical user interface that enables you to create organizational structures visually using drag-and-drop functionality. To create a new organizational structure using Tree Manager, copy the existing tree for the current organizational structure and save it by a different name.
Note. When using an initial tree structure, Oracle recommends that customers create a tree based on the DEPT_SECURITY tree but with a different name. Then, after the tree is approved, rename the tree DEPT_SECURITY with a new effective date.
Pages Used to Change Plans for Restructuring an Organization|
Page Name |
Definition Name |
Navigation |
Usage |
|
PSTREEMGR |
Tree Manager, Tree Manager |
Base the new tree on the existing organization structure's tree and copy it or create a tree for the new organization structure. Add departments using Tree Manager functionality. |
|
|
IDO_ORG_PLAN_JPN |
Workforce Administration, Collective Processes, Mass Organization Change JPN, Organization Plan, Organization Plan |
Set up Ido organization plans. |
|
|
IDO_HC_DEPT_JPN |
Workforce Administration, Collective Processes, Mass Organization Change JPN, Headcount Plan by Department, Headcount Plan by Department |
Specify head count targets by department. |
|
|
RC_IDO_HC_RPT_JPN |
Workforce Administration, Collective Processes, Mass Organization Change JPN, Headcount Plan Listing, Headcount Plan Listing |
Use this page to run a report that compares the head count goals established for departments with the simulated result of the organization plan. |
Creating an Organization Plan
Access the Organization Plan page (Workforce Administration, Collective Processes, Mass Organization Change JPN, Organization Plan).
An Organization Plan enables you to track several different ways of reorganizing the company. After running reports modeling the different options, you can select one of the Organization Plans as the official plan and insert it into the Job record.
|
Organization Date |
Enter the date from which the new organization plan will be effective. |
|
Headcount Type |
Select Job Code, Sal Admin Plan/Grade, or Supervisor Level. |
Specify Headcount Plan by Department
Access the Headcount Plan by Department page (Workforce Administration, Collective Processes, Mass Organization Change JPN, Headcount Plan by Department).
Use this page to track goals by department. For example, if you have two people in department 100 and you want four people after the reorganization is completed, you enter the number 4 for department 100 on this page. You then perform your transfers. After your reorganization is finished (but before you insert it into the Job record), run the Headcount Plan Listing (PER071JP.SQR) report to see if your transfers have increased the headcount in the department from two to four.
|
Default by Active Departments |
Click the Default by Active Departments button to populate the Headcount Plan Information grid with data about the active departments. |
As well as using the Default by Active Departments button, you can enter the head count for each department.
Note. This page provides a lower level of detail than the Headcount by Department page. It also breaks down this information by supervisor level, job code, and grade. If you currently had a head count of two in department 100, one with a supervisor level of S10 and one with a supervisor level of S20, you could change the settings to two for S10 and two for S20, resulting in a projected total head count of four for the department.
Note. If you do not want to use headcount planning, then do not enter any data on the Headcount Plan by Department page for that organization plan.
View the Headcount Plan Listing
Access the Headcount Plan Listing page (Workforce Administration, Collective Processes, Mass Organization Change JPN, Headcount Plan Listing).
Enter values on this page that will be used to compare the head count goals established for departments with the simulated result of the organization plan.
Aligning Employee Placement Plans with the New Organization StructureThis section provides an overview of employee placement plans and discusses how to:
List Ido.
Transfer entries by department.
Transfer entries by using trees.
Select tamatsuki transfer candidates.
Enter tamatsuki transfers.
List tamatsuki placements.
Transfer tamatsuki data to the job record.
Delete and maintain transfer data.
Understanding Employee Placement PlansMultiple ways exist to create employee placement plans. The first way is to use the Transfer Entry by Dept page. With this method, you enter the placement by department. The second method is to use the Transfer Entry with Trees page. You see the current organization structure and placement, and you enter plans.
These methods are similar in that you create an Ido candidate listing, use the Transfer Entry by Dept or Transfer Entry with Trees pages, and then use the Transfer Data Maintenance page, if required. You can then check, undo, and adjust placements using the Transfer Data Maintenance page.
The third method is the Tamatsuki Transfer method to enter placements. The Tamatsuki Transfer is an optional step. Using this method, you create an Ido candidate listing, use the Transfer Entry by Dept or Transfer Entry with Trees pages, use the Tamatsuki Transfer Candidate Entry, Tamatsuki Transfer Entry, Tamatsuki Placement Check List, and Tamatsuki to Transfer Record pages, and then you use the Transfer Data Maintenance page, if required.
Security setup does not prevent users from transferring employees. Consequently, limit access to the Mass Employee Transfer page to trusted users only. Security access is invoked whenever a user clicks the View links on the Transfer Entry by Dept and Transfer Entry by Tree pages.
Pages Used For Employee Placement Plans|
Page Name |
Definition Name |
Navigation |
Usage |
|
RC_IDO_EE_LIST_JPN |
Workforce Administration, Collective Processes, Mass Organization Change JPN, Ido Candidate Listing, Ido Candidate Listing |
Run a report that lists current information for employees. Use it to help plan future organizational changes. |
|
|
IDO_MASS_TRANS_JPN |
Workforce Administration, Collective Processes, Mass Organization Change JPN, Transfer Entry by Dept, Transfer Entry by Dept |
Transfer multiple employees from one department to another. |
|
|
IDO_XFR_TREE_JPN |
Workforce Administration, Collective Processes, Mass Organization Change JPN, Transfer Entry with Trees, Transfer Entry with Trees |
Transfer employees between departments using trees. |
|
|
IDO_CANDIDATE_JPN |
Workforce Administration, Collective Processes, Mass Organization Change JPN, Tamatsuki Transfer Candidates, Tamatsuki Transfer Candidates |
Specify a list of tamatsuki candidates. |
|
|
IDO_TAMATSUKI_JPN |
Workforce Administration, Collective Processes, Mass Organization Change JPN, Tamatsuki Transfer Entry, Tamatsuki Transfer Entry |
Assign tamatsuki candidates to posts. |
|
|
RC_IDO_TAM_CL_JPN |
Workforce Administration, Collective Processes, Mass Organization Change JPN, Tamatsuki Placement Check List, Tamatsuki Placement Check List |
Summarize the tamatsuki transfers that are planned. |
|
|
RC_IDO_TAM_JPN |
Workforce Administration, Collective Processes, Mass Organization Change JPN, Tamatsuki to Transfer Record, Tamatsuki to Transfer Record |
Copy data from the record IDO_TAMATSU_JPN to the record IDO_FUT_UPD_JPN. |
|
|
IDO_MAINT_JPN |
Workforce Administration, Collective Processes, Mass Organization Change JPN, Transfer Data Maintenance, Transfer Data Maintenance |
Maintain the Future Update record. |
Listing Ido Candidates
Access the Ido Candidate Listing page (Workforce Administration, Collective Processes, Mass Organization Change JPN, Ido Candidate Listing, Ido Candidate Listing).
Use this page to run a report to determine which employees are subject to a reorganization or tamatsuki placement. The report is in comma delimited file (CSV) format so that you can open the file as a spreadsheet.
Transferring Entries by Department
Access the Transfer Entry by Dept page (Workforce Administration, Collective Processes, Mass Organization Change JPN, Transfer Entry by Dept, Transfer Entry by Dept).
|
Load |
Click the Load button to list the employees for a particular business unit and department who are available for transfer to another department. |
|
Proc (Process) |
The Proc check box is selected by default. When it is selected, employees are transferred to another department or have other job-related information changed. The changes are applied when the page is saved. For example, department 100 is being closed. Half the employees in that department will be assigned to department 110, and the other half will be assigned to department 120. First, open this page and display all employees in department 100. Then enter a transfer to department 110 in the Change the Following Fields group box and deselect the Proc check box for those employees who should be transferred to department 120. After saving the page, enter a transfer for department 120, deselect the employees in department 110, reselect the employees to be transferred to department 120, and save the page again. |
|
Action |
Select the action to use for inserting a new Job row. |
|
Reason |
Select a code to specify why the value is being changed. |
|
Effective Date |
Enter a date to specify when the change becomes effective. |
|
Business Unit, Department, Location Code, Supervisor Level, and Job Code |
Enter values in these fields to specify new information for the employees selected.
Note. These fields should be left blank if a user does not
want to change the data for the employees. For example, if you want to move
employees from department 100 to 110 but want them to keep their old job codes,
you would leave the Jobcode field blank on the
page. |
Transferring Entries by Using Trees
Access the Transfer Entry with Trees page (Workforce Administration, Collective Processes, Mass Organization Change JPN, Transfer Entry with Trees, Transfer Entry with Trees).
Note. Before using this page, consider and decide on each employee's transfer data, including locations, supervisor levels, job codes, and actions and reasons.
Enter values for the Business Unit, Tree Name, Effective Date,and Tree Node fields in both the Selection Criteria to Load Source Structure group box and the Selection Criteria to Load Target Structure group box. Click the respective Load buttons for each section.
To transfer entries by using trees:
Select an employee to be transferred from the Selection Criteria to Load Source Structure tree, and click the Department folder to list all employees in the department.
Click the employee's name to display information on the Details 1 and Details 2 grids.
View information in the Details 1 and Details 2 grids, as necessary.
Enter values in the Action and Reason fields.
The Location, Supervisor Level, and Jobcode fields are optional.
Click a new department for the employee in the Selection Criteria to Load Target Structure tree.
Selecting Tamatsuki Transfer Candidates
Access the Tamatsuki Transfer Candidates page (Workforce Administration, Collective Processes, Mass Organization Change JPN, Tamatsuki Transfer Candidates, Tamatsuki Transfer Candidates).
Enter employees who are potentially candidates for transfer using the Tamatsuki transfer method.
Note. Use this page to begin the Tamatsuki process. Select employee IDs that will appear on other pages that are part of the tamatsuki functionality.
Note. Once employees have been assigned as a tamatsuki transfer candidate, they cannot be transferred using the Transfer Entry by Dept or Transfer Entry by Tree pages.
Entering Tamatsuki Transfers
Access the Tamatsuki Transfer Entry page (Workforce Administration, Collective Processes, Mass Organization Change JPN, Tamatsuki Transfer Entry, Tamatsuki Transfer Entry).
Note. When the user needs to change the middle of the Tamatsuki Chain (Unit), the user should delete the whole unit and enter information from the first row.
Post List
|
Assign |
Use this button to assign the selected employee to the open post. When no one is selected from the unassigned candidate grid, the selected employee's post is entered on the first row. |
|
Business Unit |
This field can only be entered for the first row. The next rows are inserted automatically based on the selected employee's post. |
|
Dept ID |
This field can only be entered for the first row. The next rows are inserted automatically based on the selected employee's post. |
|
Supervisor Level |
This field can only be entered for the first row. The next rows are inserted automatically based on the selected employee's post. |
|
Ido Action |
Open Post is the default value when you insert a new row. When an employee is placed in an open post, the system automatically inserts a new row so that another employee can be assigned to the open (vacated) post. Possible values are:
|
Unassigned Candidates
|
Select |
In the Unassigned Candidates group box, click the Select button next to the row of the employee that will be assigned to a post. The Selected Employee ID field shows the currently selected employee. |
Listing Tamatsuki Placements
Access the Tamatsuki Placement Check List page (Workforce Administration, Collective Processes, Mass Organization Change JPN, Tamatsuki Placement Check List, Tamatsuki Placement Check List).
Use this report to confirm that placements align with the organizational plan and verify that candidates have been placed in the correct posts or that the posts have been assigned the correct candidates.
Transferring Tamatsuki Data to the Job
Record
Access the Tamatsuki to Transfer Record page (Workforce Administration, Collective Processes, Mass Organization Change JPN, Tamatsuki to Transfer Record, Tamatsuki to Transfer Record).
Tamatsuki data is tracked by the IDO_TAMATSU_JPN record. This process moves the data to the IDO_FUT_UPD_JPN record. The Mass Employee Transfer process takes the data from the IDO_FUT_UPD_JPN record and inserts it into the Job record.
Note. If the Tamatsuki to Transfer Record process is never run, the Mass Employee Transfer process will not insert the tamatsuki post changes into the Job record.
Deleting and Maintaining Transfer Data
Access the Transfer Data Maintenance page (Workforce Administration, Collective Processes, Mass Organization Change JPN, Transfer Data Maintenance, Transfer Data Maintenance).
Note. Use caution in modifying information on this page because few validations are made here. The primary purpose of the page is to delete unwanted transfers. It is not intended for data entry that you make on other pages in the Tamatsuki process. If you perform actions beyond deleting rows on this page, be careful to validate your entries.
Finalizing Organization and Employee Placement PlansThis section provides an overview of finalizing organization and employee placement plans and discusses how to:
Create an Organization Plan checklist.
Create a Headcount Plan listing.
Run the Future Employee Assignment List.
Run the Transfers After Organization Change query.
Run the Ido Employee Listing report.
Run the Mass Employee Transfer process.
Clean up temporary data.
Understanding Finalizing Organization and Employee Placement PlansIn order to finalize organization and employee placement plans, a number of checks should be run to ensure that the intended structure is correct and that changes to the organization, employees, and departments are acceptable. HR administrators should also review the Ido Employee Listing and Future Employee Assignment List before the Mass Employee Transfer process.
Pages Used For Finalizing Organization and Employee Placement Plans|
Page Name |
Definition Name |
Navigation |
Usage |
|
Org Plan Checklist |
RC_IDO_AUD1_JPN |
Workforce Administration, Collective Processes, Mass Organization Change JPN, Org Plan Checklist, Org Plan Checklist |
|
|
Headcount Plan Listing |
RC_IDO_HC_RPT_JPN |
Workforce Administration, Collective Processes, Mass Organization Change JPN, Headcount Plan Listing, Headcount Plan Listing |
Use this report to list the head count of the new organization structure. |
|
Future Empl Assignment List |
RC_IDO_FUT_ASN_JPN |
Workforce Administration, Collective Processes, Mass Organization Change JPN, Future Empl Assignment List, Future Empl Assignment List |
Use this report to simulate the way that the organization would look at an employee level if the selected organization plan is processed. |
|
Query Viewer |
QUERY_VIEWER_SRCH |
Reporting Tools, Query, Query Viewer |
Run the HR_ TRANSAFTERORGCHG query to view a list of transferred employees that are affected after the organization change. |
|
Ido Employee Listing |
RC_IDO_AUD2_JPN |
Workforce Administration, Collective Processes, Mass Organization Change JPN, Ido Employee Listing, Ido Employee Listing |
This report summarizes the changes that will be made if the selected organization plan is processed. |
|
Mass Employee Transfer |
RC_IDO_MASS_TR_JPN |
Workforce Administration, Collective Processes, Mass Organization Change JPN, Mass Employee Transfer, Mass Employee Transfer |
Run this process to copy data from the Update Transfer Data table and insert it into the Job record. |
|
Temporary Data Cleanup |
RC_IDO_CLEAN_JPN |
Workforce Administration, Collective Processes, Mass Organization Change JPN, Temporary Data Cleanup, Temporary Data Cleanup |
Run this process to delete data associated with an organization plan. |
Creating an Organization Plan Checklist
Access the Org Plan Checklist (organization plan checklist) page (Workforce Administration, Collective Processes, Mass Organization Change JPN, Org Plan Checklist, Org Plan Checklist).
Use this page to run the Employees in Inactive Department (PER069JP) report and the Open Post Checklist report (PER070JP).
The purpose of the Open Post Checklist report is to list cases where the actual head count in a department (after simulating the insert into the Job record) does not match the head count goals entered in the Headcount Plan by Department page. The Open Post checklist report only lists head count when the goal and actual numbers do not match.
Creating a Headcount Plan Listing
Access the Headcount Plan Listing page (Workforce Administration, Collective Processes, Mass Organization Change JPN, Headcount Plan Listing, Headcount Plan Listing).
Use the Actual Headcount Report to list the actual headcount of an organization plan. This report is the same as the Open Post Checklist report except that it lists both matching and unmatching headcount numbers.
Running the Future Employee Assignment List
Access the Future Empl Assignment List (future employee assignment list) page (Workforce Administration, Collective Processes, Mass Organization Change JPN, Future Empl Assignment List, Future Empl Assignment List).
Use this report to simulate the way that the organization would look at an employee level if the organization plan is processed.
Running the Transfers After Organization Change Query
Access Query Viewer (Reporting Tools, Query, Query Viewer) and run the HR_TRANSAFTERORGCHG query.
The purpose of this query is to list employees with an effective date greater than the Organization Plan effective date. Employees listed on this report will require manual intervention after the Mass Employee Transfer process has been run.
For example, an employee has the following job data:
|
Date |
Action |
DeptID |
|
January 1, 2003 |
HIR |
100 |
|
February 1, 2004 |
PRO |
200 |
You decide to use the Ido functionality to transfer an employee to department 300 effective on January 1, 2004, before the February 1 date that already exists in the employee's record. Effective February 1, this transfer will be canceled due to the future-dated row. In most cases, you will want to update the February 1, 2004 date to reflect the new department, which is 300. This query enables you to detect when this type of situation occurs and manually update employees records after you process the Ido job insert.
Running the Ido Employee Listing Report
Access the Ido Employee Listing page (Workforce Administration, Collective Processes, Mass Organization Change JPN, Ido Employee Listing, Ido Employee Listing).
This report summarizes the changes that will be made if the organization plan is processed. The report is in CSV format so that you can open the file as a spreadsheet.
Running the Mass Employee Transfer Process
Access the Mass Employee Transfer page (Workforce Administration, Collective Processes, Mass Organization Change JPN, Mass Employee Transfer, Mass Employee Transfer).
After you decide which organization plan to use, run the batch Mass Employee Transfer process. This process updates the database with the new the organization plan. It copies data from the Update Transfer Data table and inserts it into the Job record.
If multiple job rows exist with the same effective date, the same effective date is used, however the effective sequence is incremented. For example, if you want to insert a row into the Job table effective January 1, 2004, but a January 1, 2004 row already exists (with an effective sequence of 0), the process will insert the new row with an effective sequence of 1.
Cleaning Up Temporary Data
Access the Temporary Data Cleanup page (Workforce Administration, Collective Processes, Mass Organization Change JPN, Temporary Data Cleanup, Temporary Data Cleanup).
Run this process after the Mass Employee Transfer process completes successfully. After the employees are reorganized and their data inserted into the Job record, there is no longer a need to keep the planning information in the database. For the organization plan selected, this process deletes rows from these tables:
IDO_FUT_UPD_JPN
IDO_TAMATSU_JPN
IDO_CANDIDT_JPN
IDO_HC_DEPT_JPN