In addition to the attribute values and metrics, a Results Table component can contain action columns. An action column contains a link to refine the data, display record details, or display other information.
From the edit view of a Results Table component, to add an action column:
-
Click the
Add Action Column button.
The New action column dialog is displayed.
-
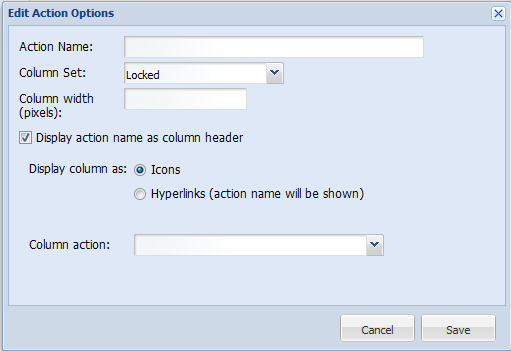
In the
Action name field, type the name of the
action.
The action name may be used as both the column heading and the text of the action hyperlink.
-
From the
Column group drop-down list, select the column
set to add the action to.
By default, the action column is added to the Locked column set, to ensure that the action is always available to end users.
- In the Column width field, type the width in pixels of the action column.
-
To display the action name in the column heading, check the
Display action name as column header checkbox.
If the box is not checked, then the column heading is empty.
By default, the box is not checked.
-
Under
Display column as, click the radio button to
indicate how to display the action.
- To have end users click an icon, click the Icons radio button.
- To have end users click a text link, click the Hyperlinks radio button.
-
Under
Column actions, from the
Action drop-down list, select the action.
When you select an action, the Column actions section is updated to display the fields to use to configure that action type. The available actions are:
Link to record details Indicates that when end users click the icon or link, a Record Details component is populated with the values for that row. For records-based tables, the Record Details component contains the standard list of attribute groups.
For LQL-based tables, the Record Details component contains all of the column sets from the table.
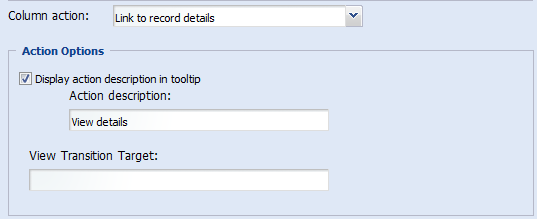 For the Link to record details action, you can configure:
- Whether to display a tooltip when the end user hovers the mouse over the column
- The text to display in the tooltip
- The page on which the Record Details component is located. If you do not specify a page, the end user stays on the current page.
Enable drill down by refinement on this field Indicates that when end users click the icon or link, the value for the selected attribute is used to refine the data. 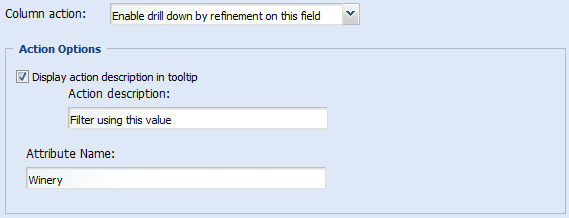 For the Enable drill down by refinement on this field action, you can configure:
- Whether to display a tooltip when the end user hovers the mouse over the value
- The text to display in the tooltip
You also must provide the name of the attribute.
Hyperlink Indicates that the action is a hyperlink to another page or file.  For the Hyperlink action, you can configure:
- Whether to display a tooltip when the end user hovers the mouse over the value
- The text to display in the tooltip
- The target URL for the hyperlink
If you have created different resources for different values of an attribute, then in the URL, use ${<attribute name>} to represent the attribute value, where <attribute name> is the name of the attribute.
For example, if you have created PDF files with summary information about each winery, with the file name being the winery name, then the path would be something like http://company.com/resources/${Winery}.pdf.
-
To save the new action, click
Save.
The action column is added to the selected column set. It is highlighted to indicate that it is an action and not a displayed value. If you have added the action column to the locked columns, then:
- For a records-based table, the column is added to the Other attribute group.
- For an LQL-based table, the column is added to the Default Group.
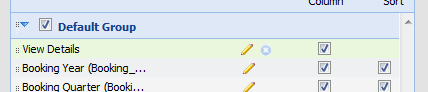
- To remove the action from the table, in the Attribute/Action List, click the delete icon for the action.
- To save the changes, click Save Preferences.
- To exit the edit view, click Return to Full Page.
