| Oracle® Argus Insight Installation Guide Release 7.0.1 E28479-01 |
|
|
PDF · Mobi · ePub |
| Oracle® Argus Insight Installation Guide Release 7.0.1 E28479-01 |
|
|
PDF · Mobi · ePub |
This chapter explains how to use the installation wizard to install Argus Insight, including the application software, the universes and standard reports, and the Schema Creation Tool.
This chapter includes the following topics:
With Argus Insight 7.0.1, you can use Cognos 8 or BusinessObjects XI as your Business Intelligence (BI) tool. Installing Argus Insight is different depending on which BI tool you are using:
If you are using Cognos 8, installing Argus Insight is a two-step process. First, you run the installation wizard to install Argus Insight components onto the Web Server. You then run the installation wizard again to install Argus Insight components onto the Cognos Server.
If you are using BusinessObjects XI, installing Argus Insight is a one-step process. You run the installation wizard to install Argus Insight components onto the Web Server only.
Before you begin to install the Argus Insight application, you must verify or obtain the following information:
Requirements — Read Section 1.2, "Software and Hardware Requirements" and verify that your system meets the minimum requirements.
Database Instance — Verify that the Argus Insight database instance has been created and that it is running. In addition, verify that the database has been created using the character set of your Argus Safety database.
Cryptographic Key — Log in to the Argus Safety Web Server. Copy the cryptographic key from the ArgusSecureKey.ini file. You need to specify this key during the installation of Argus Insight.
Security — Log in to the Argus Insight Web Server.
Make sure that the IUSR user or the user configured in Internet Information Services (IIS) has sufficient privileges for running the Argus Insight application. See the Oracle Argus Insight Minimum Security Configuration Guide for more information.
Ensure that the ASP and ASP.Net extensions are enabled in IIS.
Cognos Requirement — If you are using Cognos 8 with Argus Insight, log in to the Cognos Server and ensure that ASP and ASP.Net extensions are enabled in IIS.
To run the installation wizard and install the Argus Insight components onto the Web Server:
Download the Argus Insight software from Oracle E-delivery and copy the software to the Argus Insight Web Server.
Log in to the Argus Insight Web Server as a user with administrator privileges.
Click setup.exe. The system opens the Welcome screen for the installation wizard, which will guide you through the installation of Argus Insight.
Click Next to continue.
Select the Business Intelligence (BI) tool that you are using. Argus Insight supports the following BI tools:
BusinessObjects
Cognos 8
Click Next to continue.
If you selected Cognos 8, you need to specify whether you are installing Argus Insight components onto the Argus Insight Web Server or the Cognos Server. Select Argus Insight Web Server and then click Next.
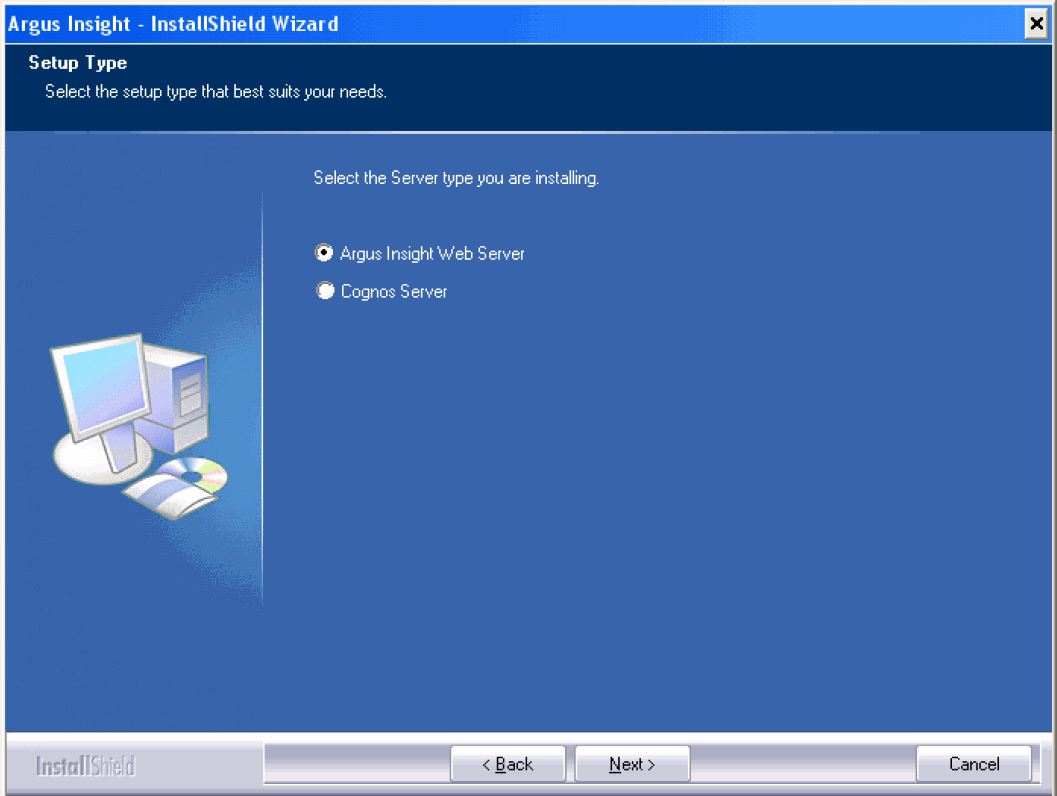
If you selected BusinessObjects, you only install Argus Insight components onto the Argus Insight Web Server. Therefore, the system immediately prompts for your user name and company name.
Enter your user name and company name into the appropriate fields.
Click Next to continue. The Select Features dialog box opens.
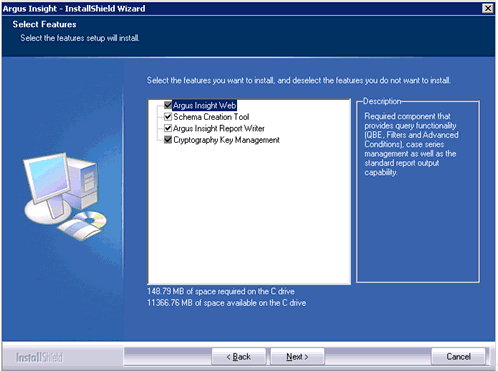
Clear any feature that you do not want to install. By default, the wizard installs all features.
Click Next to continue. The Choose Destination Location dialog box opens.
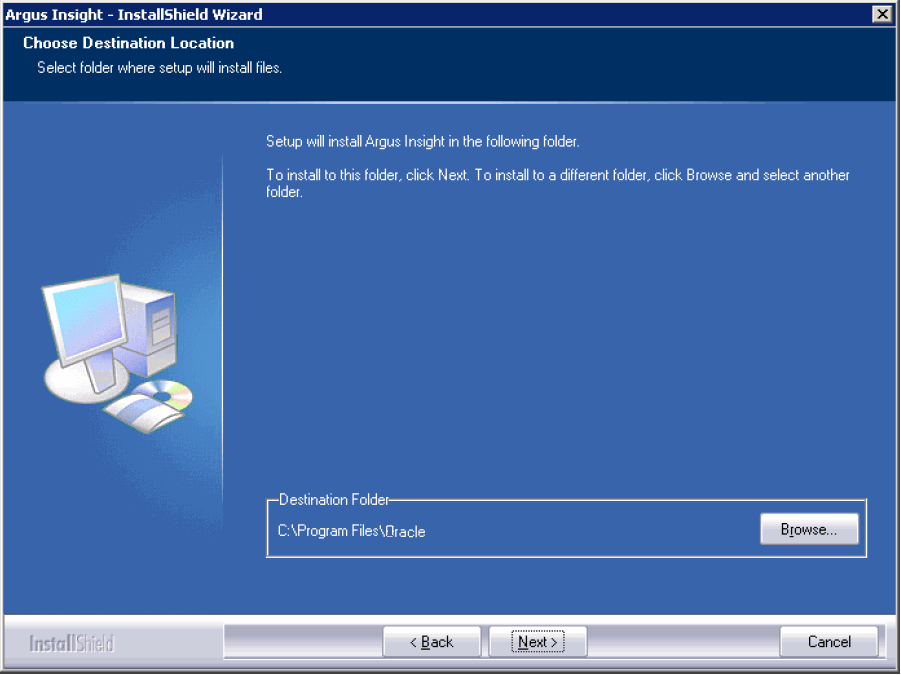
Specify the folder into which the system installs the Argus Insight application:
To install into the default folder (C:\Program Files\Oracle), click Next.
To install into a different folder, click Browse, select another folder, and then click Next.
The system reports that the wizard is ready to install the Argus Insight files.
Click Install to start the installation. The system reports that Argus Insight is configuring your new software and displays a progress bar the reports the status of the installation.
When the installation is done, the following dialog box opens:

Enter the name of the host database server where the Argus Insight data mart is located. Click Next.
Enter the instance name for the Argus Insight data mart. Click Next.
Enter the database port number you want to assign to the Argus Insight database. Click Next.
The system updates the TNSNAME.ORA file with the information you specified about the Argus Insight database.
When the update is done, the Cryptographic Key dialog box opens.
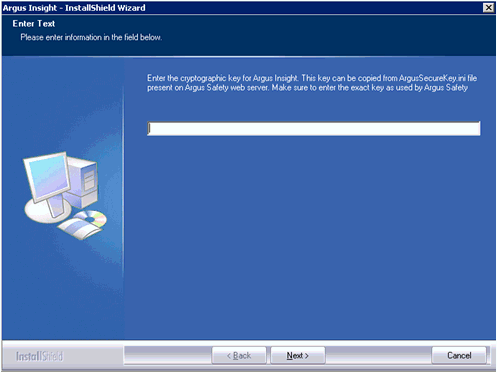
Enter the cryptographic key for Argus Insight, and then click Next to continue.
Note:
The cryptographic key is in the ArgusSecureKey.ini file located on the Argus Safety Web Server. You should have obtained this key during the pre-installation tasks.Enter the password for APR_USER.
Note:
The APR_USER database user provides initial database access to the application user (APR_APP) of Argus Insight. Make sure that this password is the same on all machines where any Argus Insight components are stored.You will be prompted to create/update this user during schema creation. You can modify this password by running the Argus Insight installer and selecting the Modify option. For information about updating the APR_USER password, see Section 2.3.1, "Changing the APR_USER Password."
Click Next to continue. The Confirm Password dialog box opens.

Re-enter the APR_USER password for verification.
Click Next. The Port Number dialog box opens.

Enter the port number you want to assign to the Argus Insight website.
The default value is 8084. If you are unsure of the port number, use the default value.
Click Next. The system reports that the Argus Insight application has been installed successfully.
Click Finish to exit from the installation wizard. The system displays the following message:
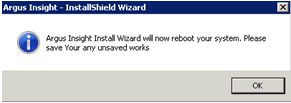
Click OK to restart the Argus Insight Web Server.
You need to update the password on the database level and the Argus Insight Web Server/Cognos Server. The Argus Insight application uses this password to communicate with the database initially.
Before changing the password for the APR_USER on any Argus Insight Web Server/Cognos Server:
Stop the Argus Insight service.
Stop IIS on the Argus Insight Web Server.
Stop the IIS and the Cognos service on the Cognos Server. You only need to complete this task if you are using Cognos 8 as your Business Intelligence tool.
Update the password of APR_USER on database level. You need to update the password at the database level before you can modify the password for the Argus Insight Web Server.
You can modify the password for APR_USER on any Argus Insight Web Server/Cognos Server by running the Argus Insight installer on each server.
To modify the APR_USER password:
Run setup.exe to start the Argus Insight installer. The Argus Insight Setup Maintenance dialog box opens.
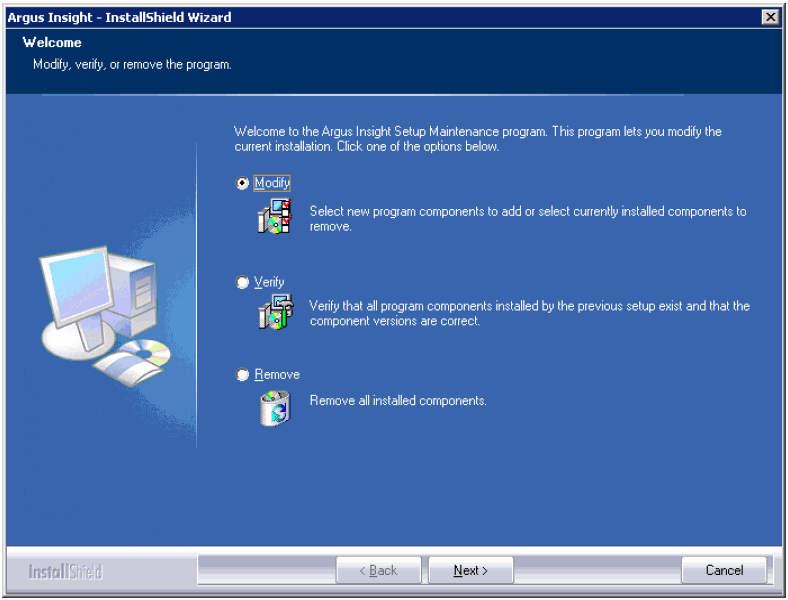
Select Modify and then click Next.
Select Change the password for APR_USER. Click Next.
Enter the APR_USER password.
The password you enter must be the same password for each server being used by Argus Insight and must be configured in the Argus Insight database.
Click Next. The system prompts for confirmation of the new password.
Enter the new APR_USER password a second time for verification.
Click Next.
The system updates the password for APR_USER.
Argus Insight needs the ADODB.DLL file, which is a Microsoft ActiveX Data Object, so report scheduling works properly.
To copy the ADODB.DLL to the correct location:
Locate the adobe.dll file in the following folder:
Argus_Insight_Installation_Directory\Oracle\ArgusInsight\Bin
Drag and drop the adodb.dll from that location into the following folder:
drive:\WINDOWS\assembly
Note:
This installation is required only if you are using Cognos 8 as your Business Intelligence tool with Argus Insight.In the previous section, you installed the Argus Insight components onto the Argus Insight Web Server. If you use Cognos 8 for your Business Intelligence tool and you use different servers for Argus Insight and Cognos 8, you also need to install the Argus Insight components onto the Cognos Server.
To install the Argus Insight components onto the Cognos Server:
Download the Argus Insight software from Oracle E-delivery and copy the software to the Cognos Server.
Log in to the Cognos Server as a user with administrator privileges.
Click setup.exe. The system opens the Welcome screen for the installation wizard, which will guide you through the installation of Argus Insight.
Click Next to continue.
Select Cognos 8 and then click Next.
Select Cognos Server and then click Next.
Enter your user name and company name into the appropriate fields.
Click Next to continue. The Select Features dialog box opens.
Clear any feature that you do not want to install. By default, the wizard installs all features.
Click Next to continue. The Choose Destination Location dialog box opens.
Specify the folder into which the system installs the Argus Insight application:
To install into the default folder (C:\Program Files\Oracle), click Next.
To install into a different folder, click Browse, select another folder, and then click Next.
The system reports that the wizard is ready to install the Argus Insight files.
Click Install to start the installation. The system reports that Argus Insight is configuring your new software and displays a progress bar the reports the status of the installation. Wait until the Database Server dialog box opens.
Enter the name of the host database server where the Argus Insight data mart is located. Click Next.
Enter the instance name for the Argus Insight data mart. Click Next.
Enter the database port number you want to assign to the Argus Insight database. Click Next.
The system updates the TNSNAME.ORA file with the information you specified about the Argus Insight database.
When the update is done, the Cryptographic Key dialog box opens.
Enter the cryptographic key for Argus Insight, and then click Next to continue.
Note:
The cryptographic key is in the ArgusSecureKey.ini file located on the Argus Safety Web Server. You should have obtained this key during the pre-installation tasks.Enter the password for APR_USER.
Note:
The APR_USER database user provides initial database access to the application user (APR_APP) of Argus Insight. Make sure that this password is the same on all machines where any Argus Insight components are stored.You will be prompted to create/update this user during schema creation. You can modify this password by running the Argus Insight installer and selecting the Modify option. For information about updating the APR_USER password, see Section 2.3.1, "Changing the APR_USER Password."
Click Next to continue. The Confirm Password dialog box opens.
Re-enter the APR_USER password for verification.
Click Next. The Port Number dialog box opens.
Click Next. The system reports that the Argus Insight application has been installed successfully.
Click Finish to exit from the installation wizard. A message dialog box informs you that the Argus Insight installation wizard will now restart your system.
Click OK to restart the Cognos 8 Server.
If you are using Cognos 8 for your Business Intelligence tool, you need to configure the Cognos 8 Software Development Kit (SDK) so that Argus Insight can communicate with Cognos.
To configure the Cognos 8 Software Development Kit (SDK):
Change to the following directory on the Cognos Server:
C:\Program Files\Cognos\c8\sdk
Copy the following files from the Cognos Server:
CDK.dll
cognosdotnet_2_0.dll
cognosdotnetassembly_2_0.dll
Paste the three DLL files into the following directory on the Argus Insight Web Server:
Argus_Insight_Installation_Directory\Oracle\ArgusInsight\Bin
Register the CDK.dll file:
Open the command prompt.
Enter the regsvr32 command followed by the complete path to the location of the CDK.dll. For example:
regsvr32 "C:\Program Files\Oracle\ArgusInsight\bin\cdk.dll"
Click Start, select Run, and then type assembly.
Drag and drop the cognosdotnet_2_0.dll and cognosdotnetassembly_2_0.dll files from the Insight_Installation_Directory\Oracle\ArgusInsight\Bin directory into the C:\WINDOWS\assembly directory.
To enable SSL support for the Argus Insight website:
Log in to the Argus Insight Web Server.
Obtain and install the SSL certificate.
Go to IIS Manager.
Select Argus Insight and then select Bindings. The Site Bindings dialog box opens.
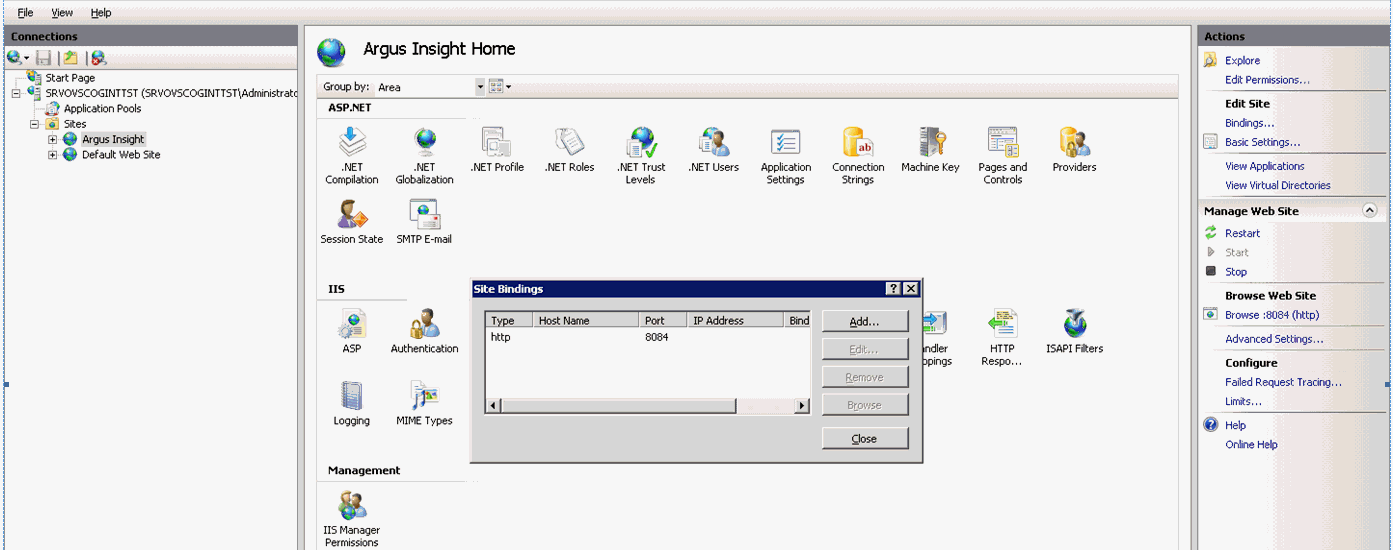
Click Add. The Add Site Binding dialog box opens. 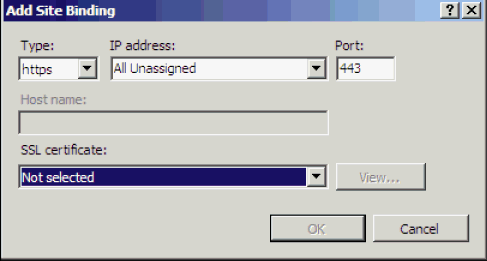
Complete the Add Site Binding dialog box as follows:
In the Type field, select https.
In the SSL certificate field, select your security certificate.
Click OK.
|
Copyright © 2010, 2012, Oracle and/or its affiliates. All rights reserved. Legal Notices |
|