| Oracle® Argus Safety Installation Guide Release 7.0.1 E26221-02 |
|

 Previous |
 Next |
This chapter describes the steps in creating, upgrading, and validating the Argus Safety Database schema. The following topics are contained in the chapter:
Argus Safety installation requires you to create up to three (3) database instances. Of the three database instances, creating the Argus Safety Database instance is required.
Argus Safety Database.
DLP Instance is required if DLP need to setup. The Argus DLP schema cannot reside on the same Oracle instance where Argus Safety and Interchange schemas exists.
Axway Synchrony Database Instance (Optional).
|
Note: The password can only contain any ASCII Character, 0-9, or any of the following special characters _ # $ when creating new users in Oracle. |
The following sections outline the schemas you must create for each database instance.
The Argus Safety instance requires you to create database schemas. The Argus schema and the Interchange Service schema are required for all systems. The other schemas you create are MedDRA or WHO.
Argus Schema:
Use the Argus Safety Schema Creation Tool to create this database schema. This is a required schema.
Interchange Service Schema:
Use the Argus Safety Schema Creation Tool to create this database schema. This is a required schema.
MedDRA Schema:
You must create this schema if MedDRA is to be enabled. This schema is created by the MedDRA Loader Tool when MedDRA is loaded to the new database tables.
WHO Schema:
You must create this schema if WHO is to be enabled. This schema is created by the WHO Loader Tool when WHO is loaded to the new database tables.
This chapter provides the recommended Oracle parameter values for Argus Safety databases. These settings apply to both the Argus Safety and the DLP databases.
The tables in this section list the suggested parameters, configurations, and/or settings for an Oracle 11g database for various sized companies as follows:
Small refers to companies with less than 30,000 cases in the database.
Mid-sized refers to companies with 30,000 to 200,000 cases in the database.
Large refers to companies with 200,000 to 1 million cases in the database.
Very Large refers to companies with more than 1 million cases in the database.
Oracle Database parameters are recommendations only, and may differ based on various factors including company's policy, database server needs, configuration and data load. These recommended values should be evaluated for each specific site based on the intended use of the application, business needs, performance testing and adjusted accordingly.
| # |
Database Parameters | Small | Mid-Sized | Large | Very Large |
|---|---|---|---|---|---|
| 1 | MEMORY_TARGET | 2 GB | 3 GB | 10 GB | 10 GB |
| 2 | PROCESSES | Expected concurrent users + 100 | Expected concurrent users + 100 | Expected concurrent users + 100 | Expected concurrent users + 100 |
| 3 | MEMORY_MAX_TARGET | >= value set
for MEMORY_TARGET |
>= value set
for MEMORY_TARGET |
>= value set
for MEMORY_TARGET |
>= value set
for MEMORY_TARGET |
| 4 | OPTIMIZER_SECURE_VIEW_MERGING | FALSE | FALSE | FALSE | FALSE |
| 5 | CURSOR_SHARING | EXACT | EXACT | EXACT | EXACT |
| 6 | WORKAREA_SIZE_POLICY | AUTO | AUTO | AUTO | AUTO |
| 7 | JOB_QUEUE_PROCESSES | 25 | 25 | 25 | 25 |
| 8 | SHARED_POOL_SIZE | 500 MB | 500 MB | 1 GB | 2 GB |
| 9 | DB_CACHE_SIZE | 500 MB | 500 MB | 1 GB | 2 GB |
| 10 | DB_BLOCK_SIZE (bytes) | 8192 | 8192 | 8192 | 8192 |
| 11 | PGA_AGGREGATE_TARGET | 500 MB | 500 MB | 1 GB | 2 GB |
For column level description, refer to the Oracle Argus DBA Guide. Verify that the value stored in the TABLE is accurate for GMT_DIFF and other columns related to Day Light Saving.
Be aware of the following:
Argus is using function gss_util.gmt_offset to derive the GMT OFFSET which impacts the calculation of GMT date and time.
Use the following SQL queries to verify the GMT offset returned by the database function:
Query to get the current GMT Time offset
Query to get the current Timestamp and GMT Timestamp.
Daylight Savings Time. Assume that Daylight Savings Time starts on First Sunday of April at 2:00 AM and it ends on Last Sunday of October at 2:00 AM.
Query to get GMT Time Difference just before the starting of Day Light Saving.
Query to get GMT Time Difference One Second After Day Light Savings started.
Query to get GMT Time Difference just before the End of Day Light Saving.
Query to get GMT Time Difference just After Day Light Savings ended.
Before creating a new schema, connect to ARGUS Safety database as a SYS user.
|
Note: If other DBA user used instead of SYSTEM then change SYSTEM to the name of DBA user. |
Define user_dba=SYSTEM
GRANT EXECUTE ON SYS.UTL_FILE TO XDB;
GRANT EXECUTE ON SYS.DBMS_SCHEDULER TO &user_dba. WITH GRANT OPTION;
GRANT EXECUTE ON SYS.DBMS_OBFUSCATION_TOOLKIT TO &user_dba. WITH
GRANT OPTION;
GRANT EXECUTE ON SYS.UTL_FILE TO &user_dba. WITH GRANT OPTION;
GRANT EXECUTE ON SYS.DBMS_RANDOM TO &user_dba. WITH GRANT OPTION;
GRANT SELECT ON SYS.ALL_SOURCE TO &user_dba. WITH GRANT OPTION;
GRANT EXECUTE on SYS.DBMS_RLS TO &user_dba. WITH GRANT OPTION;
|
Note: The DBMS_RLS package should be granted to a DBA user, only in case of multi-tenant environments. |
GRANT EXECUTE ON SYS.DBMS_JOB TO &user_dba. WITH GRANT OPTION;
GRANT EXECUTE ON SYS.DBMS_LOB TO &user_dba. WITH GRANT OPTION;
REVOKE EXECUTE ON SYS.DBMS_OBFUSCATION_TOOLKIT FROM PUBLIC;
REVOKE EXECUTE ON SYS.UTL_FILE FROM PUBLIC;
REVOKE EXECUTE ON SYS.DBMS_RANDOM FROM PUBLIC;
REVOKE SELECT ON SYS.ALL_SOURCE FROM PUBLIC;
Two (2) required steps and one (1) optional step are involved in creating Argus Safety database schema as follows:
Installing the Argus Safety schema creation tool
Creating the Tablespace (optional)
Creating the Argus schemas using the schema creation tool
|
Note: The source Argus Safety and DLP Databases must have AL32UTF8 character set. |
|
Note: The Argus Safety and DLP Databases require the Database semantics to be CHAR and not BYTE. Please follow the steps below:
|
Oracle Schema XDB must be present for Interchange packages to load.
If Schema XDB does not exist, use the following procedure to create it:
Click sqlplus.exe
Connect to sys as sysdba.
Execute the ?/rdbms/admin/catqm.sql script.
Provide the following required parameters
user password
user default tablespace
user temporary tablespace
For example: SQL>@?/rdbms/admin/catqm.sql SYSTEM SYSAUX TEMP
|
Note: You must ensure to disable the UAC in order to run the schema creation tool. |
Before installing the Schema Creation Tool on a server, verify that an Oracle client with Administrator option is installed on the server.
When Argus Safety Setup opens the Argus Safety Solution Components dialog box: from the screen and click Next.
Select the Schema Creation Tool.
Click Next.
The system begins the installation procedure and displays the Setup Status screen.
The system displays installation progress.
When the system displays the Setup Completed screen:
Click Finish.
When the system copies the required files to the system and displays the following message:
Click OK to reboot the system.
If you wish to create tablespaces before installing Argus Safety, the following information shows the different table space options available. However, this step is optional. The schema creation tool creates the tablespaces if they do not exist.
|
Note: Refer to the chapter Argus Password Management - Cryptography Tool to create the Cryptographic key before creating the new schema. |
Before creating the schema, verify that:
A blank Oracle database instance is available
A SYSTEM user account is available
The Oracle database is available from the machine where the schema creation tool is installed
Use the following procedure to create the schema.
Open the schema creation tool.
Click Create Schema.
When the system displays the Oracle Database Connect dialog box, enter the Password associated with the system user and the Database.
Enter the password associated with the system user in the Password field and the database name in the Database field.
Click OK.
When the system displays the Argus Safety Schema Creation Options dialog box:
Enter the user name in the VPD Admin Schema Owner field.
Enter the user's password in the VPD Admin Schema Owner Password field.
Reenter the user's password in the Reenter Password field.
When the system displays the New User dialog box:
Enter the user name in the New User Name field.
Enter the user's password in the New User Password field.
Reenter the user's password in the Reenter Password field.
Verify that the Default Tablespace and Temporary Tablespace values are correct.
Click OK.
When the system displays the Argus Safety Schema Creation Options dialog box, repeat Steps 3 and 4 until you have created all the users.
When the system displays the Argus Safety Schema Creation Options dialog box:
Click New Role to create the following roles as appropriate:
Argus Role
Interchange Role
When the system displays the New Role dialog box:
Type the role name in the New Role field.
Click OK.
When the system redisplays the Argus Safety Schema Creation Options dialog box:
Locate the Argus Safety Schema Owner drop-down list and select the Argus Schema Owner you created.
Locate the Schema Options and select the appropriate Database Size and the Time Zone.
Locate the Oracle Licensing Option and select the applicable licensing option.
Select the appropriate Argus Role from the Argus Safety Role drop-down list.
Locate Argus Safety Grantees and select the appropriate Argus Login account.
Locate the Interchange Support section and do the following:
Select the Interchange Schema Owner from the drop-down list.
Select the Interchange Role from the drop-down list.
Select the Interchange Login User from the drop-down list.
Enter password for the ARGUSUSER user.
Select an Application Type from the following two radio buttons:
Single Tenant - Selecting this option allows the database to only support a single tenant. The options to create multiple tenants in the safety system is diabled.
Multi-Tenant - Selecting this option allows the database to support multiple tenants. Users are able to create multiple tenants using the Global Enterprise setup screens.
Select the Default Enterprise from the following:
Enterprise Name
Enterprise Short Name
Click Generate.
If the Tablespace Creation dialog box displays, you may create new tablespaces or use existing tablespaces as follows:
Under Complete Path and Datafile, enter the complete path (including the filename) under which the data file is located on the database server.
If the data file does not exist, the system automatically creates it. It will automatically be created.
If the data file exists, the system prompts you to use the current data file. Select Yes in the dialog.
|
Note: The Tablespace Creation dialog appears if the Database Size was selected as Small, Medium, or Large. It will not appear if the database size was selected as Default.When you have existing tablespaces, you may use them; you are not required to create new ones. The system will not regenerate the tablespaces. If a tablespace already exists the Argus Schema Creation tool will warn you to select Yes to use an existing tablespace. |
When the system opens the Argus Safety Database Installation dialog box:
Select Pause on error.
Select Continue to start the Schema Creation Process. It may take some time to complete the schema creation process.
|
Note: Select Pause on Error to pause the system when an error occurs. This is essential for troubleshooting Schema creation problems. You can also select the Show All box to display the SQL statements the system is executing. However, to create the database schema more quickly, we recommend clearing the Show All check box. The system enters all executed SQL statements in a log file. |
When the schema creation process is complete:
Click Open to open the schema creation log file.
Click Finish.
Before loading factory data verify that:
The schema creation tool is installed
An Oracle database instance is available
A SYSTEM user account has been created
To load Factory Data into the Argus Safety database:
Open the schema creation tool.
Click Factory Data.
When the system opens the Connect to Database dialog box:, enter the Argus Schema Owner Name, Password, and the Database name in the appropriate fields and click OK.
Enter the name of the Argus Schema Owner and the password.
Click OK.
When the system opens the Connect to Database dialog box a second time:
Enter the name of the Interchange Schema Owner and the password.
Click OK.
Enter the default user passwords for the Admin User and the System User.
Verify the passwords for both users in their Password Verify fields.
Click OK.
The system loads the factory data into the database and displays the following message: "Factory Data has been loaded. Please check your factory data folder for "Log" files."
Click OK.
Check the .BAD and .LOG files in the \DB Installer\Factory_Data\ folder to verify that the factory data loaded without errors.
|
Note: If you successfully loaded the factory data and try to load it again, the system will generate errors. |
The system displays the following message: Oracle text is mandatory. Please press the OK button to enable Oracle text.
Click OK.
Oracle Text search is an index-based querying solution that improves Duplicate Case search performance. This section provides information about enabling and disabling Oracle Text.
|
Note: If you do not use the Schema Creation Tool to install Oracle Text and the Common Profile Switch is enabled, running a search from the Argus Book-in screen can cause the system to display the following error message:Oracle Text is not installed correctly. Please install/verify the Oracle Text installation first. |
Once enabled, Oracle Text performs the following functions:
DB Installer checks whether Oracle Text is installed. If not, it displays an error message that "Oracle Text not installed. Please install Oracle Text before adding this feature".
Estimates the Tablespace Size Requirements and adjusts as required.
Populates existing cases in the Oracle Text duplicate Search Table for indexing. This process can take a few hours.
Creates the Oracle Text Index.
Creates the PDP job for Delta updates.
Updates the CMN_PROFILE Key, ORA_TXT_SRCH_ENABLE, to a value of 1.
Before enabling Oracle Text, there must be enough free space available in the tablespace. If there is not enough free space available, the system displays the following dialog box with the amount of space currently available (in megabytes).
Click OK and provide the required free space before enabling Oracle Text.
Use the following procedure to enable Oracle Text:
Open the Schema Creation Tool.
Click Oracle Text.
When the system displays the Enable/Disable Oracle Text dialog box:
Click Yes.
When the system displays the Enable Oracle Text dialog box, enter the connection parameter in the Argus Database Name field and click Proceed.
Enter the database connection parameter.
Enter the Oracle Text Log Directory.
Click Proceed to enable Oracle.
View Oracle Text Log.
Click Close to exit.
Oracle Text is enabled. Click Close to exit.
Run the schema validation tool to validate the schema.
After Oracle Text is disabled, the system performs the following functions:
Updates the CMN_PROFILE Key, ORA_TXT_SRCH_ENABLE, to a value of 0
Deletes the PDP Job
Drops the Oracle Text Index
Truncates the Duplicate Case Search Table
Use the following procedure to disable Oracle Text.
Open the Schema Creation Tool.
Click Oracle Text.
When the system displays the Enable/Disable Oracle Text dialog:
Click No.
When the system displays the Disable Oracle Text dialog box:
Enter the database connection parameter in the Argus Database Name field.
Enter the Oracle Text Log Directory.
Click Proceed to disable Oracle Text. The system disables Oracle Text.
View Oracle Text Log.
Click Close to exit.
Partitioning of CMN_AUDIT_LOG table can significantly improve performance of the system on large Argus Safety databases. Range partitioning can be performed on CMN_AUDIT_LOG table for LOG_DATETIME_STAMP column.
We recommend that you create partitioning on a yearly basis. Partitioning must be performed and maintained by a qualified database administrator.
The minimum space required to install MedDRA and MedDRA J on your system is 50 MB. Verify that you have that amount of space available before loading MedDRA and MedDRA J. You also need to verify that:
The schema creation tool is installed
An Oracle database instance is available
A SYSTEM user account has been created
|
Note: If loading MedDRA V8 or V8.1, the smq_list.asc and smq_content.asc files containing SMQ data must be placed in the same folder as the other dictionary files. |
To load the MedDRA dictionary into the database:
Open the Schema Creation Tool:
Click MedDRA Loader.
When the system displays the Oracle Database Connect dialog box, Click OK.
Enter the Password associated with the SYSTEM user and the Database name.
Click OK.
When the system displays the MedDRA Dictionary Loader dialog box, do the following:
Select Load to New Tables if a MedDRA dictionary has not been loaded before.
Select MedDRA J if you are loading a MedDRA J dictionary.
Locate the Tablespace Information section and select the tablespace and index from the drop-down lists.
Click Create User to create a new MedDRA user.
When the system displays the New MedDRA User dialog box:, enter the appropriate information in the fields and click OK.
Enter the name of the user in the New User Name field.
Enter the password in the New User Password field.
Reenter the password in the Reenter Password field.
Click OK.
When the system redisplays the MedDRA Dictionary Loader dialog box again:
Click Create Role.
When the system displays the New MedDRA Role dialog box:, enter the New Role name and click OK.
Enter the new role name in the New Role field.
Click OK.
When the system redisplays the MedDRA Dictionary Loader dialog box:, locate the Dictionary to Load section an do the following:
Select the MedDRA Version to be loaded from the drop-down list.
Click Browse to go to the directory where the dictionary files reside and select the appropriate dictionary files.
Check the MedDRA Browser checkbox if this dictionary version is being used in the Argus Safety MedDRA Browser.
Click Load.
Select the MedDRA version to be loaded from the MedDRA Version drop-down list.
The system loads the dictionary and displays the following message.
Click OK.
If you find it necessary to overwrite an existing MedDRA dictionary, use the following procedure to do so.
|
Note: If loading MedDRA V8 or V8.1, the smq_list.asc and smq_content.asc files containing SMQ data must be placed in the same folder as the other dictionary files. |
Open the schema creation tool.
Click MedDRA Loader.
When the system displays the Oracle Database Connect dialog box:
Enter the SYSTEM user password in the Password field and the database name in the Database field.
Click OK.
When the system displays the MedDRA Dictionary Loader dialog box: locate the Loading Options section and do the following:
Select Overwrite.
Select MedDRA J if you are loading a MedDRA J dictionary.
Select the tablespace and index from the Tablespace and Index drop-down lists.
Select the user from the User drop-down list.
Enter the user password in the Password field; re-enter it in the Verify Password field.
Select the appropriate role from the Role drop-down list.
Select the version to overwrite from the Current Version to Overwrite drop-down list.
Select the MedDRA version to load from the MedDRA Version drop-down list.
Click Browse to go to the directory where the dictionary files reside and select the appropriate dictionary files.
Click the MedDRA Browser checkbox if the dictionary version is being used in the Argus Safety MedDRA Browser.
Click Load.
When the system displays the Oracle Database Connect dialog box: enter the Password associated with the SYSTEM user and the Database name and click OK.
Enter the SYSTEM user password in the Password field and the database name in the Database field.
Click OK.
When the system finishes overwriting the dictionary, it displays the Dictionary Load dialog box.
Click OK.
The following table lists and describes the options in the dialog box.
Event Recoding Dialog Box Options
| Option | Point E |
|---|---|
| Argus MedDRA Version to Re-code | Select the existing MedDRA version to re-code. |
| Enterprises | Select the enterprises to recode. |
| Data Update/View Options [Currency determined at LLT Level Only] | Check one or both of the following options:
Process Current Terms (Using Primary SOC Path) Process Non-current Terms (Using Primary SOC Path) Select one of the following options: Update Data (Updates will be made to cases and to the audit log.) View Only (Updates will not be made to cases and to the audit log). |
| Output Log File Options | Select an output log file option and directory path for the log files. |
| Status | Displays status. |
If you find it necessary to recode events, use the following procedure to do so:
Open the schema creation tool.
Click MedDRA Loader.
When the system displays the Oracle Database Connect dialog box, enter the Password associated with the SYSTEM user and the Database name.
Enter the password for the SYSTEM user in the Password field and the database name in the Database field.
Click OK.
When the system displays the MedDRA Dictionary Loader dialog box:
Click Re-Code Events.
When the system opens the Event Re-Coding dialog box, do the following:
Select the Enterprise to recode.
|
Note: If Argus is setup in Single Tenant Mode, you will only have one option here. If you are setup as a Multi-Tenant Database, you can choose which Enterprises to recode. Multiple enterprises can be selected. |
Select the existing version of MedDRA that needs to be re-coded.
Select a specific version to only recode data coded with that version.
Select ”All” to recode all existing coded data regardless of the version it is coded with.
Select either or all of the Process Current Terms, Process Non-Current Terms and/or Update dictionary version checkboxes.
Select Update Data if events are to be updated or select View Only if you are interested is just seeing what events will be coded without making the changes.
Select the Output File format.
Delimited Text
Excel Sheet output
Click on the Execute button to start the recoding process.
When the system displays the Connect to Database dialog box, enter the Schema Owner name, Password, and Database. Click OK.
Enter the schema owner name in the Argus Schema Owner field.
Enter the password in the Password field.
Enter the database name in the Database field.
The system recodes the following fields from Case Form and Code List.
| Field Location | Name of Recoded Field |
|---|---|
| Case Form | Death Details
Lab Data Other Relevant History Product Indications Events Case Diagnosis |
| Code List | Product Indication
Lab Test Types |
To load the J Drug dictionary into the database:
Open the Schema Creation Tool:
Click J Drug Loader.
When the system displays the Oracle Database Connect dialog box, Click OK.
Enter the Password associated with the SYSTEM user and the Database name.
Click OK.
When the system displays the J Drug Dictionary Loader dialog box, do the following:
Select Load to New Tables if a J-Drug dictionary is not loaded before.
Locate the Tablespace Information section and select the tablespace and index from the drop-down lists.
Click Create User to create a new J-Drug user
When the system displays the New J-Drug User dialog box:, enter the appropriate information in the fields and click OK.
Enter the name of the user in the New User Name field.
Enter the password in the New User Password field.
Reenter the password in the Reenter Password field.
Click OK.
When the system redisplays the J-Drug Dictionary Loader dialog box again:
Click Create Role.
When the system displays the New J-Drug Role dialog box:, enter the New Role name and click OK.
Enter the new role name in the New Role field.
Click OK.
When the system redisplays the J-Drug Dictionary Loader dialog box:, locate the Dictionary to Load section an do the following:
Select the J-Drug Version to be loaded from the drop-down list.
Click Browse to go to the directory where the dictionary files reside and select the appropriate dictionary files.
Check the J-Drug Browser checkbox if this dictionary version is being used in the Argus Safety MedDRA Browser.
Click Load.
The system loads the dictionary and displays the following message.
Click OK.
This section provides instructions for overwriting an existing MedDRA J dictionary and for recoding events.
If you find it necessary to overwrite an existing MedDRA dictionary, use the following procedure to do so.
|
Note: If loading MedDRA V8 or V8.1, the smq_list.asc and smq_content.asc files containing SMQ data must be placed in the same folder as the other dictionary files. |
Open the schema creation tool.
Click MedDRA Loader.
When the system displays the Oracle Database Connect dialog box:
Enter the SYSTEM user password in the Password field and the database name in the Database field.
Click OK.
When the system displays the MedDRA Dictionary Loader dialog box: locate the Loading Options section and do the following:
Select Overwrite.
Select MedDRA J if you are loading a MedDRA J dictionary.
Select the tablespace and index from the Tablespace and Index drop-down lists.
Select the user from the User drop-down list.
Enter the user password in the Password field; re-enter it in the Verify Password field.
Select the appropriate role from the Role drop-down list.
Select the version to overwrite from the Current Version to Overwrite drop-down list.
Select the MedDRA version to load from the MedDRA Version drop-down list.
Click Browse to go to the directory where the dictionary files reside and select the appropriate dictionary files.
Click the MedDRA Browser checkbox if the dictionary version is being used in the Argus Safety MedDRA Browser.
Click Load.
When the system displays the Oracle Database Connect dialog box: enter the Password associated with the SYSTEM user and the Database name and click OK.
Enter the SYSTEM user password in the Password field and the database name in the Database field.
Click OK.
When the system finishes overwriting the dictionary, it displays the Dictionary Load dialog box.
Click OK.
The following table lists and describes the options in the dialog box.
Event Recoding Dialog Box Options
| Option | Point E |
|---|---|
| Argus MedDRA Version to Re-code | Select the existing MedDRA version to re-code. |
| Enterprises | Select the enterprises to recode. |
| Data Update/View Options [Currency determined at LLT Level Only] | Check one or both of the following options:
Process Current Terms (Using Primary SOC Path) Process Non-current Terms (Using Primary SOC Path) Select one of the following options: Update Data (Updates will be made to cases and to the audit log.) View Only (Updates will not be made to cases and to the audit log). |
| Output Log File Options | Select an output log file option and directory path for the log files. |
| Status | Displays status. |
If you find it necessary to recode events, use the following procedure to do so:
Open the schema creation tool.
Click MedDRA Loader.
When the system displays the Oracle Database Connect dialog box, enter the Password associated with the SYSTEM user and the Database name.
Enter the password for the SYSTEM user in the Password field and the database name in the Database field.
Click OK.
When the system displays the MedDRA Dictionary Loader dialog box:
Click Re-Code Events.
When the system opens the Event Re-Coding dialog box, do the following:
Select the Enterprise to recode.
|
Note: If Argus is setup in Single Tenant Mode, you will only have one option here. If you are setup as a Multi-Tenant Database, you can choose which Enterprises to recode. Multiple enterprises can be selected. |
Select the existing version of MedDRA that needs to be re-coded.
Select a specific version to only recode data coded with that version.
Select ”All” to recode all existing coded data regardless of the version it is coded with.
Select either or all of the Process Current Terms, Process Non-Current Terms and/or Update dictionary version checkboxes.
Select Update Data if events are to be updated or select View Only if you are interested is just seeing what events will be coded without making the changes.
Select the Output File format.
Delimited Text
Excel Sheet output
Click on the Execute button to start the recoding process.
When the system displays the Connect to Database dialog box, enter the Schema Owner name, Password, and Database. Click OK.
Enter the schema owner name in the Argus Schema Owner field.
Enter the password in the Password field.
Enter the database name in the Database field.
The system recodes the following fields from Case Form and Code List.
| Field Location | Name of Recoded Field |
|---|---|
| Case Form | Death Details
Lab Data Other Relevant History Product Indications Events Case Diagnosis |
| Code List | Product Indication
Lab Test Types |
Before loading the WHO-DRUG dictionary, please verify the following:
Windows workstation PC is available to load the WHO-DRUG data on
The PC has Oracle client installed, including the following:
SQLPLUS (Exe=sqlplusw)
SQL*Loader (Exe=sqlldr)
There is an updated TNSNAMES file and Oracle client to connect to the Argus Safety database.
The following WHO-DRUG dictionary data files are available.
| bna.dd | ccode.dd |
| dda.dd | ddsource.dd |
| ing.dd | man.dd |
| dd.dd | ina.dd |
The format of the WHO-DRUG dictionary data files is Text and alternate rows are not blank.
|
Note: WHO-DRUG is loaded using sql*load with DIRECT=TRUE option. Because of sql*loader restrictions, no one should have access to the Argus Safety system while WHO-DRUG is being loaded. |
You can load WHO-Drug dictionary as follows:
Use the Load to New Tables option to load the dictionary to new tables
Use the Overwrite option to overwrite existing and existing dictionary
Use the Format C option to load the dictionary with a different format
Use the following procedure to load WHO-Drug dictionary to new tables:
Launch the schema creation tool:
Click Who Drug Loader.
When the system displays the Oracle Database Connect dialog box:
Enter the SYSTEM password in the Password field. Enter the database name in the Database field.
Click OK.
When the system opens the WHO-Drug Dictionary Loader dialog box do the following:
Click Load New Tables to load the dictionary into a separate schema.
Click Create User to open the New WHO-Drug User dialog box to open the New WHO-Drug User dialog box.
Provide the information required to create a new user and click OK.
The system reopens the WHO-Drug Dictionary Loader dialog box, click Create Role to open the New WHO-Drug Role dialog box.
In the New WHO-Drug Role dialog box, enter the New Role name and click OK.
When the system redisplays the WHO-Drug Dictionary Loader dialog box, locate the Dictionary to Load section and do the following:
In the New WHO-Drug Role dialog box, enter the New Role name and click OK.
When the system displays the WHO-Drug Dictionary Loader dialog box with the appropriate information: click Load.
When the system displays the Dictionary Load dialog box to indicate that the dictionary has loaded successfully: click OK.
Enter the SYSTEM password in the Password field. Enter the database name in the Database field.
Click OK.
Use the following procedure to when using the overwrite option to load the WHO-Drug Dictionary:
Launch the Schema Creation Tool.
Click Who Drug Loader.
When the system opens the Oracle Database connect dialog box:
Enter the SYSTEM password in the Password field. Enter the database name in the Database field.
Click OK.
When the system opens the WHO-Drug Dictionary Loader dialog box, do the following:
Click Overwrite to overwrite existing dictionary files.
Select the dictionary version to load.
Click Browse to display the Select Folder dialog box and select the appropriate path and click Select.
Click Load to load the dictionary.
View WHO-Drug dictionary log.
When the system opens the Oracle Database Connect dialog box, enter the SYSTEM User Password and click OK.
Enter the SYSTEM password in the Password field. Enter the database name in the Database field.
Click OK.
When the system displays to Dictionary Load dialog to indicate that the dictionary has loaded successfully:
Click OK.
Format C is a WHO-Drug dictionary format. For information about this format, go to http://who-umc.org.
To load the WHO-DRUG dictionary using the Format C option:
Launch the Schema Creation Tool.
Click Who Drug Loader.
When the system displays the Oracle Database Connect dialog box, enter the SYSTEM Password and Database name. Click OK.
Enter the SYSTEM password in the Password field. Enter the database name in the Database field.
Click OK.
When the system opens the WHO-Drug Dictionary Loader dialog box do the following:
Click Load New Tables to load the dictionary into a separate schema.
Click Create User to open the New WHO-Drug User dialog box When the system opens the New WHO-Drug User dialog box, provide the information required to create a new user and click OK.
Select Dictionary Format - Format C
When the system reopens the WHO-Drug Dictionary Loader dialog box:
Click Create Role to open the New WHO-Drug Role dialog box. Provide the information required to create the new role. Click OK.
When the system redisplays the WHO-Drug Dictionary Loader dialog box:
Select the Dictionary Version to load from the drop-down list.
Click Browse to display the Select Folder dialog box and select the appropriate path.
When the system displays the WHO-Drug Dictionary Loader dialog box with the appropriate information:
Click Load.
When the system opens the Oracle Database Connect dialog box:
Enter the SYSTEM password in the Password field. Enter the database name in the Database field.
Click OK.
When the system displays the Dictionary Load dialog box to indicate that the dictionary has loaded successfully, click OK.
A necessary step in installing Argus Safety is to validate the database after installation. Use the following procedure to validate the Argus Safety database.
|
Note: If you are creating a fresh Argus Safety database, be sure the factory data is loaded before running the Schema Validation tool. |
To validate the Argus Safety database:
Launch the Schema Creation Tool.
Click Schema Validation.
When the system opens the Connect to Database dialog box:
Enter the user Password.
Enter the name of the database to be validated in the Database field.
Click OK.
When the system displays the Schema Validation dialog box:
Validate the values in the fields.
Locate the Validation CTL File section and click Browse to open the Selection Path for CTL File dialog box.
|
Note: If DLP is enabled, the Schema Validation dialog box DLP information as shown in the following illustration. |
When the system opens the Selection Path for CTL file dialog box:
Click OK.
Locate and select the correct folder and CTL file for the database being validated.
When the system reopens the Schema Validation dialog box:
Locate the Validation Log Files section.
Click Browse to open the Selection Path for Creating Log Files dialog box.
When the system opens the Selection Path for creating Log files dialog box:
Choose the folder where you want the system to create the log files.
Click OK.
When the system displays the Schema Validation dialog box with the required entries:
Click Validate Schema.
Click Validate Schema.The system displays the cmd.exe screen to indicate that processing is taking place.
Press Enter when the system prompts you to do so.
When the system opens the Oracle Sql*Plus window, press Enter.
When the system opens another Oracle Sql*Plus:
Note the path of the log files created during processing.
Exit from the Schema Creation Tool.
Please check the files for errors.
This section provides information about how to enable and disable Data Lock Point (DLP).
Prior to enabling DLP:
Connect to DLP database as SYS user.
|
Note: If other DBA user used instead of SYSTEM then change SYSTEM to the name of DBA user. |
GRANT EXECUTE on SYS.DBMS_RLS TO SYSTEM WITH GRANT OPTION;
|
Note: The DBMS_RLS package should be granted to a DBA user, only in case of multi-tenant environments. |
GRANT EXECUTE on sys.DBMS_OBFUSCATION_TOOLKIT TO PUBLIC;
GRANT EXECUTE on sys.DBMS_JOB TO PUBLIC;
GRANT EXECUTE on sys.UTL_FILE TO PUBLIC;
GRANT EXECUTE on sys.DBMS_LOB TO PUBLIC;
GRANT EXECUTE on sys.DBMS_RANDOM TO PUBLIC;
GRANT SELECT on sys.ALL_SOURCE TO PUBLIC;
GRANT EXECUTE on SYS.DBMS_LOCK TO SYSTEM WITH GRANT OPTION;
Before enabling DLP (Data Lock Point) do the following:
Verify that the Schema Creation Tool is installed
Make sure an Oracle database instance is available
Verify that a SYSTEM user account has been created
Set the job_queue_processes parameter in the DLP database to 10.
Verify that the global_names parameter in the Argus and DLP database is set to FALSE
Verify that both the tnsname parameters in both the Argus and DLP databases are entered in the Argus and DLP database servers
Verify that the database contains extra hard disk space to support DLP
|
Note: Enabling DLP can result in slower system performance. There will be a delay in fetching data for expedited reports and users will not see updated case data immediately. The user should wait for some time before updating the DLP schema. |
Invoke SQL/PLUS and connect to Argus database as SYS user.
GRANT EXECUTE ON DBMS_RLS TO <DLP DBA User> WITH GRANT OPTION;
|
Note: The DBMS_RLS package should be granted to a DBA user, only in case of multi-tenant environments. |
Use the following procedure to enable DLP:
Open the Schema Creation Tool.
Click Argus DLP.
When the system displays the Enable/Disable DLP dialog box:
Click Yes.
When the system displays the Enable DLP window, enter the required connection information and click OK.
When the system displays the expanded Enable DLP window:
Click New User to create the DLP Stage User in the New User Information dialog box. Enter the required details for the new user and click OK.
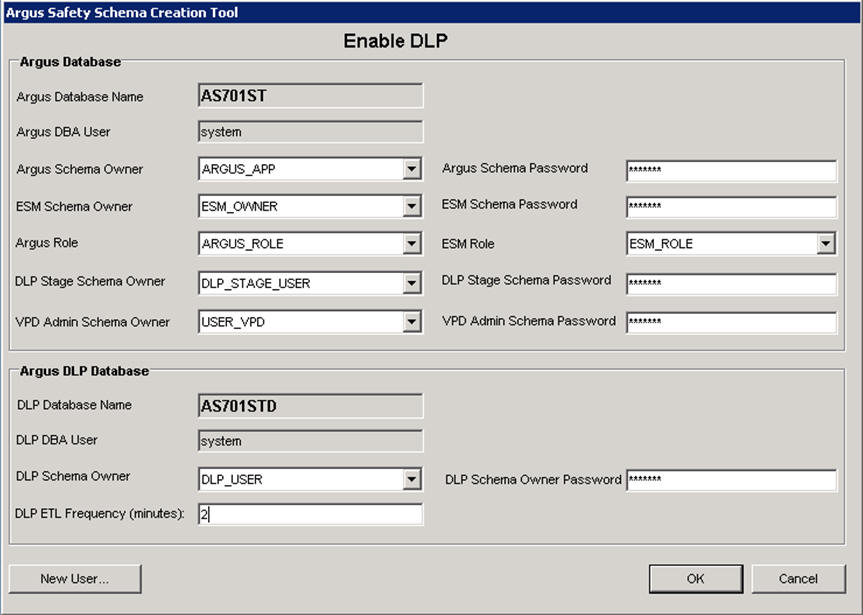
Enter the user name in the VPD Admin Schema Owner field.
Enter the user's password in the VPD Admin Schema Owner Password field.
When the system redisplays the Enable DLP window: click New User again to create the DLP Schema Owner in the New User Information dialog box.
Click New User again to create the DLP Schema Owner.
Enter the required details for the new DLP Schema Owner and click OK.
The system redisplays the Enable DLP window with the data for the DLP Stage User and the DLP Schema Owner.
In the Enable DLP window:
Locate the Local Folder name to create DLP Process Log and DMP files [No Spaces].
Click Browse to select a local folder (without spaces) for the temporary path.
When the system displays the Select temporary Path window:
Select the appropriate path and click OK.
|
Note: If the folder name contains spaces, the system displays the following dialog box. Select a temporary path name without spaces. |
When the system updates and displays the Enable DLP window:
Click OK.
When the system opens the Enable DLP: Create Tablespace window:
|
Note: The Tablespace Creation dialog appears if the Argus Database Size was created as Small, Medium, or Large. It will not appear if the database size was created as Default. |
Enter the tablespace information in the Complete Path and Datafile fields.
Click Create Tablespace.
|
Note: After creation of DLP tablespaces set the AUTOEXTENSIBLE value to "YES" on all DLP tablespaces data files. |
When the system displays the Enable DLP window with a dialog box:
Click OK to close the dialog box.
Click Proceed to start processing.
Before clicking Proceed, verify that the DLP tablespsaces Autoextend property is set to YES.
|
Note: If you are using the Automatic option for extraction method, please skip to Step 16. |
Use the following parameter file to export the case data:
C:\Program Files\Oracle\DBInstaller\DLP\DLP_Export_case_data.par
Use the follows sample command and parameter file to export CASE DATA to the Argus Database:
connect dba_user/dba_user_password@Argus_database;
CREATE DIRECTORY exp_dir AS 'E:\ORADATA\TEST\DLP_DUMP';
GRANT READ, WRITE ON DIRECTORY exp_dir TO Argus_Schema_owner;
EXPDP Argus_Schema_owner/Argus_Schem_owner_password@Argus_database
PARFILE= E:\ORADATA\TEST\DLP_DUMP\DLP_Export_case_data_dp.par;
Thoroughly verify LOG file on Oracle errors.
The parameter files DLP_Export_case_data_dp.par and DLP_Import_case_data_dp.par are
located at C:\Program Files\Oracle\DBInstaller\DLP folder.
where:
Argus_Schem_owner is the Argus Schema Owner in the Argus Database
Argus_Schem_owner_pasword is the Argus Schema Owner password in the Argus Database
Argus_database is the Argus Database Name
DLP_Schem_owner is the owner of the CLP Schema in the DLP database
DLP_Schem_owner_pasword is the password for the DLP Schema Owner in the DLP database
DLP_database is the DLP database name
Thoroughly check the Log file for Oracle errors.
Click OK in the Enable DLP dialog.
The system displays the status of the DLP Enable operation in message section of the Enable DLP window.
The system displays the following message when DLP execution is complete.
Click OK to close the dialog box.
Invoke SQL/PLUS. Connect to DLP database as SYS user and execute the following statements:
Connect to DLP database as SYS user. Define user_dlp=<Replace with DLP Schema owner>
GRANT EXECUTE ON SYS.DBMS_OBFUSCATION_TOOLKIT TO &user_dlp.;GRANT EXECUTE ON SYS.DBMS_JOB TO &user_dlp.;GRANT EXECUTE ON SYS.UTL_FILE TO &user_dlp.;GRANT EXECUTE ON SYS.DBMS_LOB TO &user_dlp.;GRANT EXECUTE ON SYS.DBMS_RANDOM TO &user_dlp.;GRANT SELECT ON SYS.ALL_SOURCE TO &user_dlp.;REVOKE Execute on sys.DBMS_OBFUSCATION_TOOLKIT FROM PUBLIC;REVOKE Execute on sys.DBMS_JOB FROM PUBLIC;REVOKE Execute on sys.UTL_FILE FROM PUBLIC;REVOKE Execute on sys.DBMS_LOB FROM PUBLIC;REVOKE Execute on sys.DBMS_RANDOM FROM PUBLIC;REVOKE SELECT on sys.ALL_SOURCE FROM PUBLIC;
Invoke SQL/PLUS. Connect to DLP database as DLP user and execute the following script:
C:\Program Files\Oracle\DBInstaller\Upgrades\UPGRADE_TO_70\Common\compile_objs.sql
Since disabling DLP requires restarting both the Argus and DLP databases, verify that no one is logged on to either database before beginning the Disable DLP procedure.
Open the Schema Creation Tool.
Click Argus DLP.
When the system displays the Enable/Disable DLP dialog box:
Click No.
When the system displays the Disable DLP dialog box:
Enter the required information and click OK.
When the system displays the expanded Disable DLP dialog box:
Click OK to close the dialog box.
Click Proceed to start processing.
When the system displays the following message, click OK and then click Proceed in the Disable DLP expanded dialog box.
Click OK to close the dialog box.
Click Proceed to start processing.
When the system displays the Disable DLP window:
Click OK to close the dialog box.
The system displays status information regarding the DLP Disable operation in the Disable DLP window.
Click Exit.
When the Disable DLP operation is complete:
Click Exit.
DLP has been disabled.
|
Note: The DBA should manually drop the database data files after disabling DLP. |
The space requirements for the upgrade are determined by the upgrade script. This requirement is mostly for new objects created during the upgrade. It is a fair estimate of space requirements.
Before starting the upgrade procedure:
Verify that the Oracle TNSNAMES have been configured
To avoid errors during upgrade do either of the following:
KEEP DATA FILES AUTOEXTEND ON
Monitor free space and add more space if required
Ensure you have a sort area of approximately 100 MB to avoid disk sort
Create one large rollback segment or size 20 GB for LARGE size model.
Keep all other, except SYSTEM, rollback segments off line.
|
Note: If the source Argus Safety and DLP Databases are not AL32UTF8 character set databases then they must be converted to AL32UTF8 character set before performing the database upgrade to version 7.0.1. |
|
Note: The Argus Safety and DLP Databases require the Database semantics to be CHAR and not BYTE. Following these following steps:
|
After migrating the database from 11.2.0.1 and before starting the 6.0.1 /6.0.1.1/7.0/7.0.0.1 to 7.0.1 upgrade, the following steps need to be followed for Oracle Text:
Run the Schema Creation tool from the 6.0.1 / 6.0.1.1 version of the application (Provided in the zip file for upgrading to 6.0.1/6.0.1.1).
Run the Disable Oracle Text and then Enable Oracle Text from Schema Creation Tool. You can refer to the sections below in this Installation Guide on how to disable and enable Oracle Text:
Disable Oracle Text - see Disabling Oracle Text
Enable Oracle Text - see Enabling Oracle Text
Before upgrading the database from 6.0.1/6.0.1.1/7.0/7.0.0.1 to 7.0.1:
Connect to ARGUS Safety database as SYS user.
GRANT EXECUTE on SYS.DBMS_RLS TO SYSTEM WITH GRANT OPTION;
GRANT EXECUTE on SYS.UTL_FILE TO XDB;
|
Note: The DBMS_RLS package should be granted to a DBA user, only in case of multi-tenant environments. |
GRANT EXECUTE on SYS.DBMS_JOB TO PUBLIC;
GRANT EXECUTE on SYS.DBMS_LOB TO PUBLIC;
Connect to DLP database as SYS user.
GRANT EXECUTE on SYS.DBMS_RLS TO SYSTEM WITH GRANT OPTION;
|
Note: The DBMS_RLS package should be granted to a DBA user, only in case of multi-tenant environments. |
GRANT EXECUTE on SYS.DBMS_LOCK TO SYSTEM WITH GRANT OPTION;
Argus Safety 7.0.1 provides a direct upgrade from existing Argus Safety (AS) 6.0.1 or AS 6.0.1.1 or AS 7.0 or AS 7.0.0.1 databases to AS 7.0.1. This software also provides support of some previous Argus versions. Please refer to following tables for list of valid source versions. Please refer to following flow diagram high level steps database upgrade to AS 7.0.1.
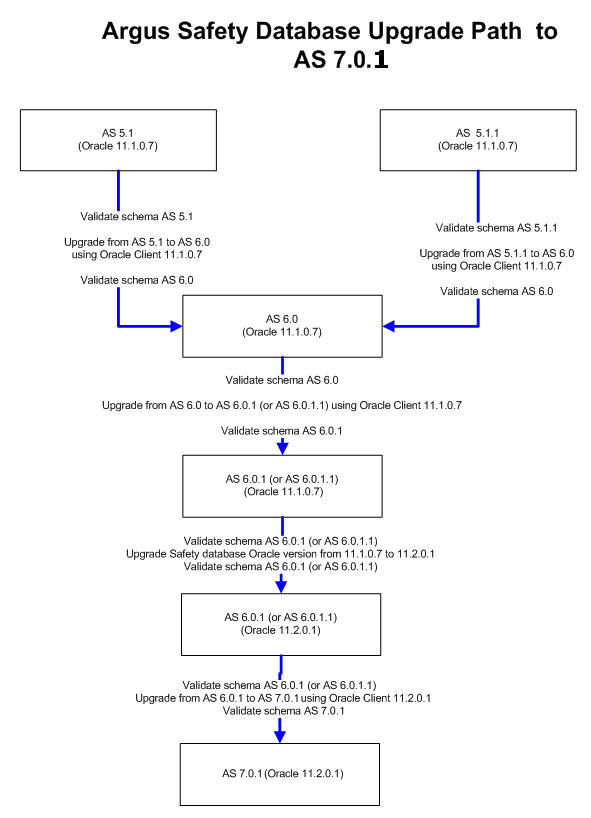
The following Argus source versions are supported to upgrade the Argus database to AS 7.0.1 as follows:
|
Note: Please do Argus schema validation of the database before / after any type of upgrade activities. |
Table 3-1 Upgrade Path
| Source Version | Upgrade path to 7.0.1 | Detail Steps using 7.0.1 released software |
|---|---|---|
|
5.1 |
5.1 > 6.0 > 6.0.1 > 7.0.1 |
Extract the following zip file from Argus Safety (AS) 7.0.1 software to a new folder on a workstation where Oracle Client (Administrator option) 11.1.0.7 is installed Previous Database Upgrades\ Database_released_code_60.zip Double click the exe file "ArgusDBInstall.exe" in DBInstaller folder to start the Safety database upgrade process. Please refer to the AS 6.0 Installation Guide for any details about this upgrade. Once the database upgraded to AS 6.0 refer to section where source version is AS 6.0. |
|
5.1.1 |
5.1.1 > 6.0 > 6.0.1 > 7.0.1 |
Extract the following zip file from AS 7.0.1 software to a new folder on a workstation where Oracle Client (Administrator option) 11.1.0.7 is installed. Previous Database Upgrades\ Database_released_code_60.zip Double click the exe file "ArgusDBInstall.exe" in DBInstaller folder to start the Safety database upgrade process. Please refer to the AS 6.0 Installation Guide for any details about this upgrade. Once the database upgraded to AS 6.0 refer to section where source version is AS 6.0. |
|
6.0 |
6.0 > 6.0.1 > 7.0.1 |
Extract the following zip file from AS 7.0.1 software to a new folder on a workstation where Oracle Client (Administrator option) 11.1.0.7 is installed. Previous Database Upgrades\ Database_released_code_601.zip Double click the exe file "ArgusDBInstall.exe" in DBInstaller folder to start the Safety database upgrade process. Please refer to the AS 6.0.1 Installation Guide for any details about this upgrade. Argus Safety 7.0.1 supports with Oracle version as 11.2.0.1. If the AS 6.0.1 is with old Oracle version then convert the Argus Safety database from current Oracle version to Oracle 11.2.0.1 Please refer to Oracle Documentation to convert the Oracle database version. Refer to main upgrade (Database Upgrade Procedure (with or Without DLP) from AS 6.0.1 to AS 7.0.1) once the Database is upgraded to AS 6.0.1 with Oracle version 11.2.0.1 |
|
6.0.1 |
6.0.1 > 7.0.1 |
Argus Safety 7.0.1 supports with Oracle version as 11.2.0.1. If the AS 6.0.1 is with old Oracle version then convert the Argus Safety database from current Oracle version to Oracle 11.2.0.1 Please refer to Oracle Documentation to convert the Oracle database version. Refer to main upgrade (Database Upgrade Procedure (with or Without DLP) from AS 6.0.1 to AS 7.0) once the Database is upgraded to AS 6.0.1 with Oracle version 11.2.0.1 |
|
6.0.1.1 |
6.0.1.1 > 7.0.1 |
Argus Safety 7.0.1 supports with Oracle version as 11.2.0.1. If the AS 6.0.1.1 is with old Oracle version then convert the Argus Safety database from current Oracle version to Oracle 11.2.0.1 Please refer to Oracle Documentation to convert the Oracle database version. Refer to main upgrade (Database Upgrade Procedure (with or without DLP) from AS 6.0.1.1 to AS 7.0.1) once the Database is upgraded to AS 6.0.1.1 with Oracle version 11.2.0.1 |
|
7.0 |
7.0 > 7.0.1 |
Refer to main upgrade (Database Upgrade Procedure (with or without DLP) from AS 6.0.1 to AS 7.0.1). |
|
7.0.0.1 |
7.0.0.1 > 7.0.1 |
Refer to main upgrade (Database Upgrade Procedure (with or without DLP) from AS 6.0.1 to AS 7.0.1). |
Use the following procedure to upgrade the database. Please note that the Oracle Database Server version should be upgraded to 11.2.0.1 prior to upgrading the database from 6.0.1 to 7.0.1.
You may be prompted to press Enter at screens that are not included in the procedure. This does not hinder the upgrade procedure. Where applicable, press Enter to continue with the upgrade process.
Select Start > Programs > Oracle > Schema Creation Tool.
When the system opens the Schema Creation Tool:
Click DB Upgrade.
When the system opens the Connect to Database dialog box:
Enter the DBA username.
Enter the password.
Enter the Database name.
Click OK.
Select the version-specific upgrade folder and click OK.
|
Note: During the upgrade this validation may appear. This is due to a few tables where the column size has been adjusted and the table currently has more data than the new column size. |
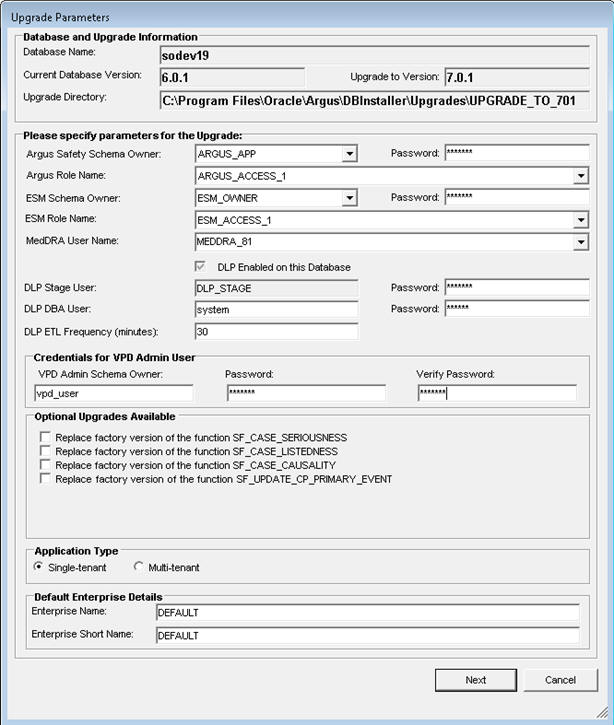
When the system opens the Upgrade Parameters screen loaded with default values:
|
Note: When you get to the screen below, there are a few new options that need to be selected for 7.0.1 as explained below: |
|
Note: The above screen is applicable to upgrades from AS 6.0.1 and 6.0.0.1. Upgrades from AS 7.0 and AS 7.0.0.1 allow selecting the existing VPD User and Application Type, based on the current database type. |
In the Upgrade Parameters screen of the Argus Safety 7.0.1 release, there are some new options for which data has to be entered. They are as follows:
Credentials for VPD Admin User - This includes the VPD Admin Schema Owner, Password, and Verify Password.
Application Type - This includes the following two options:
Single Tenant – Select this option if you are upgrading this database and leaving it as a single tenant model.
Multi Tenant – Select this option if you are upgrading this database and changing to a multi-tenant model.
Default Enterprise Details - This includes the Enterprise Name and Enterprise Short Name.
|
Note: The three optional functions SF_CASE_SERIOUSNESS, SF_CASE_LISTEDNESS, and SF_CASE_CAUSALITY have had their signatures changed. The original functions will be spooled to the log file at .\DBInstaller\Upgrades\UPGRADE_TO_701\UPG_SF_FUNCTIONS_SOURCE.LOG. If custom functions are in use, it will be necessary to re-apply them after the upgrade is complete to conform to the new signatures. |
Enter the Argus Safety Schema Owner password.
Enter the ESM Schema Owner password.
Click Next.
|
Note: If DLP is already enabled, the check box will be checked; otherwise it will be unchecked. |
When the system loads the Tablespace Management window for the Argus database:
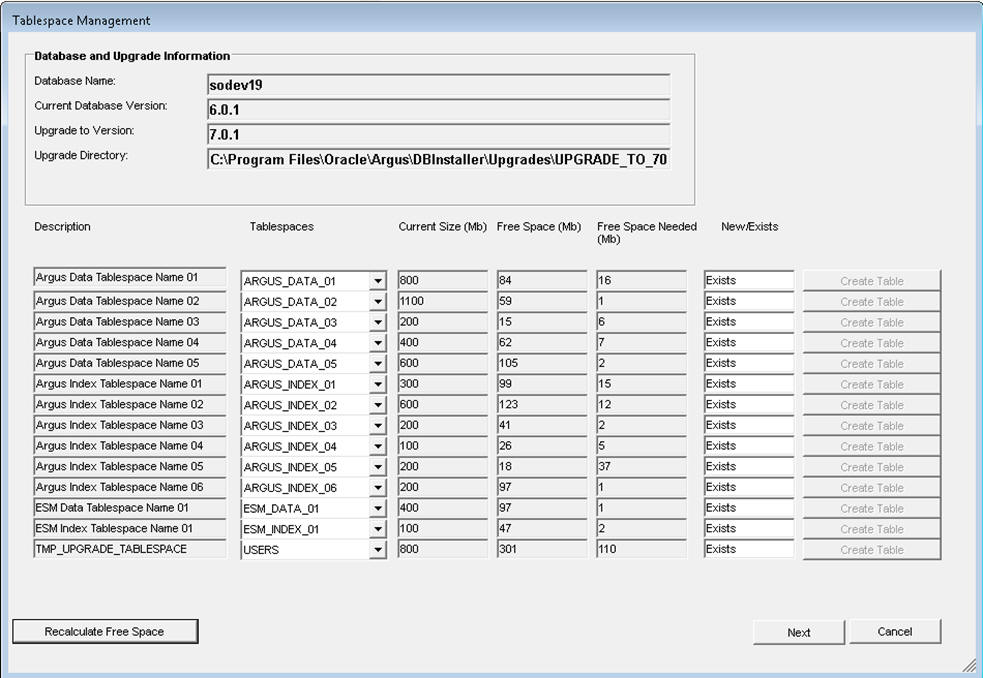
Select the tablespace name from the drop-down list corresponding to the description.
Click Recalculate Free Space. Verify that the available free space is greater than the amount of required space. If you have increased the freespace, click this button to recalculate the amount of available free space.
Click Next.
If DLP is already enabled on the selected Argus DLP database, the system displays the Tablespace Management DLP window. If Argus does not have DLP, this system does not display this screen.

Select the appropriate tablespace from the drop-down list.
Click Recalculate Free Space. Verify that the available free space is greater than the amount of required space.
Click Next.
When the system prompts for confirmation:
Click OK then click Proceed on the main screen.
The upgrade start and the system opens the Command prompt window.
When the upgrade is complete the system opens the following window:
Click OK.
When the system opens the Database Upgrade Execution window:
Click the log icon to verify any upgrade errors.
Click Exit.
When the system opens the Enable Oracle Text window:
See section 3.6 "Enabling and Disabling Oracle Text."
Invoke SQL/PLUS. Connect to DLP database as SYS user and execute the following statements:
define user_dlp=<Replace with DLP Schema owner>
GRANT EXECUTE ON SYS.DBMS_OBFUSCATION_TOOLKIT TO &user_dlp.;
GRANT EXECUTE ON SYS.DBMS_JOB TO &user_dlp.;
GRANT EXECUTE ON SYS.UTL_FILE TO &user_dlp.;
GRANT EXECUTE ON SYS.DBMS_LOB TO &user_dlp.;
GRANT EXECUTE ON SYS.DBMS_RANDOM TO &user_dlp.;
GRANT SELECT ON SYS.ALL_SOURCE TO &user_dlp.;
GRANT EXECUTE ON DBMS_RLS TO <DBA User> WITH GRANT OPTION;
|
Note: The DBMS_RLS package should be granted to a DBA user, only in case of multi-tenant environments. |
GRANT EXECUTE ON DBMS_JOB TO PUBLIC;
GRANT EXECUTE ON DBMS_LOB TO PUBLIC;
REVOKE Execute on sys.DBMS_OBFUSCATION_TOOLKIT FROM PUBLIC;
REVOKE Execute on sys.UTL_FILE FROM PUBLIC;
REVOKE Execute on sys.DBMS_RANDOM FROM PUBLIC;
REVOKE SELECT on sys.ALL_SOURCE FROM PUBLIC;
Upgrade is finished.
Run the schema validation tool to validate the schema.
The end user should not use the Source database during export process.
Install Argus 7.0.1 on a computer where Oracle 11.2.0.1 is installed.
The source databases should be schema validated at Argus 7.0.1.
The source database should only be a single-tenant database.
The source database data must contain only one ENTERPRISE.
Create a cold backup of the target database before starting the MERGE IMPORT step.
The end user should not use the target database during the import process
There is only one at the time MERGE Import process allowed to run on the Target database.
Auto extend should be set on for all Database files in the target database
Sufficient space should be available on the target database server to import the new Enterprise Data. The amount of space depends on the number of cases in source Safety database.
Install the Argus 7.0.1 application. Make sure that Oracle Client version is 11.2.0.1.
The Target databases should be Schema Validated at Argus 7.0.1.
The target database must be a Multi-tenant database
All source database dictionaries should be available in target Database. If the dictionary doesn't exist then please install missing dictionaries on Target database.
All existing AG service users on the Source Database must exist on the target Database
All source database LDAP configured Server name should be available in target database.
Use the following sections to complete the merge process.
Navigate to the following Path from Start Menu:
All Programs --> Oracle --> Merge to Multi-tenant
Click on Export and follow the instructions on the sqlplus screen.
Enter Log File Name to record results.
This is the execution log that is created on the client workstation:
Log file path: <C>:\Program Files\Oracle\Argus\DBInstaller\Merge_to_Multitenant
Enter TNSNAMES Entry to Connect to the Source SAFETY Database.
Enter SYSTEM or DBA user name in source Database.
Enter password for DBA user in source Database.
Enter SAFETY schema owner name in source Database.
Enter password for Safety schema owner in source Database
Enter Interchange schema owner name in Safety Database
Enter password for Interchange schema owner in source Database.
Enter the full directory Path to create the Source Safety database export dump file: This is the Path on the Source Database Server where the Argus Safety Database resides. The Batch file will create an export dump file (SAFETY.DMP) and an export log file (SAFETY_EXPORT.LOG) in the Directory. Make sure that SAFETY.DMP file does not exist prior to the export.
Check the database export process log and export step log file for any errors. This is critical step to make sure no errors during export step. Please check following log files:
Log file name entered as parameter 1 during export step execution.
Following Oracle Import log files are created on database server. The path is the value entered on ”Enter Directory including full Path to create Source safety database export dump file” during export step:
SAFETY_EXPORT.log
Move the export Dmp file created in Merge Export from the source database server to the target database server.
Navigate to the following path from Start Menu:
All Programs --> Oracle --> Merge to Multi-tenant
Click on Import and follow the instructions on the sqlplus screen.
Enter Log File Name to record results. This is the execution log will be created on the client workstation.
Log file path: <C>:\Program Files\Oracle\Argus\DBInstaller\Merge_to_Multitenant
Enter TNSNAMES Entry to Connect to the Target SAFETY Database.
Enter SYSTEM or DBA user name in target Database.
Enter password for DBA user in target Database.
Enter VPD schema owner name in target Database.
Enter VPD schema owner password in target Database.
Enter SAFETY schema owner name in target Database.
Enter password for Safety schema owner in target Database
Enter Interchange schema owner name in target Database
Enter password for Interchange schema owner in target Database.
Enter Directory including full Path on target database server where export dmp file copied for import process. This is the Path on the "Target Database Server" where the Argus Safety Database resides. The Batch file creates an import log files file in the directory mentioned.
Enter the name of new ENTERPRISE.
Enter the abbreviation of new ENTERPRISE.
Enter SAFETY schema owner name in source Database.
Enter Interchange schema owner name in source Database.
This Batch files imports the data from the dump file into the target database.
Check the database import process log and import step log file for any errors. This is critical step to make sure no errors during import step. Please check following log files:
Log file name entered as parameter 1 during Import step execution.
The following Oracle Import log files are created on database server. The path is the value entered on ”Enter Directory including full Path on target database server where export dmp file copied for import process” during import step.
SAFETY_IMPORT_safety.log
SAFETY_IMPORT_interchange.log
SAFETY_IMPORT_SAFETY_DUP_SEARCH_DATA.log
SAFETY_IMPORT_SAFETY_DUP_LAM_SEARCH_DATA.log
Validate the Schema of the Ttget database using Safety Schema Validation tool.
The MERGE process synchronizes the dictionary information based on the dictionary name in the source and target database. If the source Dictionary name is not available in Target Database then manual synchronization is required.
Use the following steps to synchronize the dictionary data manually on the target database:
Log in as Safety schema owner using sqlplus on Target Safety Database.
Locate the new ENTERPRISE_ID value created from import process using the following sql:
SELECT VALUE
FROM cmn_profile_global
WHERE section = 'DATABASE' AND KEY = 'MERGING_TO_MULTITENANT';
Set the context value to new Enterprise_id
Exec pkg_rls.set_context('admin',< Value of New Enterprise ID>,'ARGUS_SAFETY');
Locate the list of Dictionaries ID's where Dictionary synchronization pending due to missing Dictionaries on Target database. If the following sql results in NO ROWS, then no further action required.
Select dict_id
From cfg_dictionaries_enterprise
Where enterprise_id = <Value of New Enterprise ID>
And global_dict_id = -1;
Log in as the Safety schema owner using sqlplus on the source safety database.
Locate the dictionary name of each Dictionary ID where the Dictionary does not exist on the target database using the following sql:
Select name from cfg_dictionaries_global
where dict_id in (<List of Dict ID values (comma separated) from Step 4);
Load the missing dictionaries on the target database.
Set the context to new enterprise_id using following sql on target database.
Exec pkg_rls.set_context('admin',<Value of new ENTERPRISE_ID> ,'ARGUS_SAFETY');
Update GLOBAL_DICT_ID data in the target database using the following SQL:
UPDATE CFG_DICTIONARIES_ENTERPRISE
SET GLOBAL_DICT_ID = <Dictionary Global Dict ID value from target database>
WHERE ENTERPRISE_ID = <New ENTERPRISE_ID created in Target Database>
AND DICT_ID = <Value of Dict ID in New ENTERPRISE with Dictionary name>
AND GLOBAL_DICT_ID =-1;
This tool is intended to provide functionality for copping configuration data from one Argus Safety database to another.
The following steps are required to run the tool:
Validate Schema on the source database using Schema Validation Tool.
Make sure that there are no extra or missing objects exist in Schema Validation log file. Messages for extra custom objects created should be ignored.
Copy the Copy Configuration Tool utility files recursively from C:\Program Files\Oracle\Argus\DBInstaller\Copy_Config to the C:\CONFIG_EXP_IMP_70 folder
Export the Source database by running C:\CONFIG_EXP_IMP_70\Data_ExportConfigOnly_11g.bat and follow the prompts
Copy ArgusSecureKey.ini (working with Source database) from the .\Windows folder and save it with generated source database file.
Create a new database using Argus Safety 7.0.1 Schema Creation tool.
Import into Target database by running C:\CONFIG_EXP_IMP_70\ Data_ImportConfigOnly_11g.bat and follow the prompts
Validate Schema on the target database using Schema Validation Tool.
Copy ArgusSecureKey.ini from the source database folder and paste it in the .\Windows folder of application server(s) which are intended to be used with the target database.
In case you do not have ArgusSecureKey.ini, follow the steps listed in the Resetting the Environment if ArgusSecureKey.ini is Lost section.
|
 Copyright © 2011, 2015, Oracle and/or its affiliates. All rights reserved. Legal Notices |
|