| Oracle® Argus Safety Installation Guide Release 7.0.1 E26221-02 |
|

 Previous |
 Next |
This chapter provides information about the Argus Integrations and includes discussions of the following:
Before installing Argus Safety Web, be aware of the following:
During the installation, the information in this document may be different from what you see on your monitor if additional modules were selected during the Argus Safety Installation.
A domain account with Local Administrator privileges to the Web server is required after the Argus Safety installation is complete.
Use the following procedure to install Argus Safety Integrations:
When the system displays the Argus Safety screen:
Click Argus Safety to start the installation.
When the system displays the Argus Safety Setup screen:
Click Next >.
When the system displays the Customer Information screen:
Enter the user name in the User Name field.
Enter the company name in the Company Name field.
Click Next >.
When the system displays the Default Directory screen, click Browse to select the default installation directory where the Argus Safety Solution Components will be installed.
Click Next to display the Argus Safety Components list and select the default installation directory where the Argus Safety Solution Components will be installed.
When the system displays the component list:
Select the modules to install.
Click Next >.
When the system displays the Argus Safety Solution Components Report Directory screen:
Click Browse, select the folder to store the temporary reports in, and click OK.
Click Next > to continue.
Argus installs and shows the progress of the installation.
When the system prompts you to enter a port number:
Enter the Port for the Argus Web site (default is 8083, and can be changed to port 80 at any time).
Click Next > to continue.
The installer installs the Web site and its related components and shows the progress of the installation.
When the system displays the Setup Completed screen:
Click Finish.
When the system displays the following message:
Click OK to reboot the system.
|
Note: If Integration is hosted under IIS 7.0, the following command line utility needs to be run as an administrator:"%windir%\Microsoft.NET\Framework\v3.0\Windows Communication Foundation\ServiceModelReg.exe" -r -y This command line utility updates the script maps at the IIS metabase roots to ensure the hosted service .svc file is recognized by IIS 7.0. |
|
Note: After installing Argus Integrations, refer to the section The Argus Safety 7.0.1 Application Servers to set up the Argus Cryptography key and also to the section Generating Encrypted String from Clear Text on Configured User Cryptography Key to configure Argus Safety Service user passwords. |
After changes have been made to the areas listed below, IIS needs to be reset to make the latest data / configurations available to the rest of the system:
Changes in config files
Argus.ini, Argus.xml
Changes in following screens through Console:
Common Fields
System Management
Enabled Modules
Loading of MedDRA dictionaries
All web service based interfaces communicate with the standard SOAP 1.2 Protocol and use WS-Addressing and WS-Security. These products leverage Windows Communication Foundation to generate the WS-Addressing and WS-Security header information. It is recommended to test this message before moving too far into business testing. Information on these specifications can be found at the OASIS and W3C websites.
By leveraging WCF, maximum flexibility is provided to the user allowing the selection of which integrations to enable, the transport protocols to use, authentication, etc. by simply updating a standard .config file.
All errors are handled through a SOAP fault. Should an error occur, logical or otherwise, a SOAP fault should be thrown by the host and caught by the client. The client application (web) of Argus displays the details of the SOAP fault to the user when possible. Argus web services throw SOAP faults when an error occurs.
When implementing the customer side of the interface, please follow the structure defined by Oracle in the XSD files located in the following directory:
<Argus Web Install Path>\Integrations\XSD
(e.g. C:\Progam Files\Oracle\ArgusWeb\ASP\Integrations\XSD)
The web.config file located in the root of the ArgusWeb directory contains all the information required for outbound integrations. Two default bindings have been provided, one for basic HTTP traffic and one for SSL communication. For the most basic configuration, simply updating the "address" attribute of the "endpoint" nodes to point to the correct web service address would be sufficient. To use encryption, the "bindingConfiguration" attribute of the "endpoint" node can be set to "WSHttpBinding_IRelsysService_Secure", a binding configuration provided out of the box. As the framework utilizes WCF, additional binding configurations may be created and used as well. Note that the binding configurations between the host and the client must be compatible for successful communication.
Basic user authentication is also supported by the framework. Each endpoint has a counterpart in the ClientCredentials section of the web.config. Simply adding the proper credentials here will instruct WCF to transmit the authentication information.
The framework provides the ability to transform messages using either a custom transformation assembly or an XSLT. Some integrations, like Lot Validation and Drug Dictionary Encoding, currently leverage this feature. Activating the transformer is a simple matter of updating the TransformerConfiguration section to map an endpoint to a transformer. If multiple transformers are specified for a particular endpoint, they will be executed in the order in which they appear in the configuration file. The transformers configured by Oracle should not be modified, but additional ones may be added if necessary.
All inbound integrations are handled by the Argus Safety Windows Service. This service's configuration is located in the RelsysWindowsService.exe.config file located in the .\ArgusWeb\ASP\Argus.NET\Bin directory. This configuration file's primary function is to reference configuration files of configured integrations. The RelsysConfigurationFiles section has several commented "add" nodes. To enable or disable an integration, it is a simple matter of uncommenting or commenting out the node.
This configuration file additionally houses a DatabaseConfiguration section in which the proper database credentials must be specified within the attributes.
The XML message required by each integration varies and is defined by its own schema. However, each schema follows a standard. The root node of every XML Safety Message in an integration is SAFETY_MESSAGE with the following attribute:
Type - An enumeration (currently either "Request" or "Response") to identify the directionality of the message
Every Safety Message may also contain an EXTENSION node with CUSTOM sub nodes. These are for future expandability and currently unused.
The example XML Safety Messages in this document are for illustrative purposes only. Please refer to the latest version of the schema for a definition of the most recent version of the Safety Message.
This section provides information for integrating with an external MedDRA coding system.
The MEDICAL_DICTIONARY node is the first child node identifying a MedDRA integration. It has the following attributes:
Action - An enumeration supporting the following values (currently only one):
Auto - will be passed when a full hierarchy is required to be passed back to auto encode the term without using the MedDRA Browser. With an "Auto" message, the system requires that an LLT Term be passed in the request. If the full Hierarchy is not found / returned, the system will open the MedDRA Browsers and display the LLTs returned for manual encoding by the user using the local MedDRA instance. If multiple paths are returned, the Primary SOC path will be used.
Source - An enumerated value that specifies additional information that may be required for coding based on origination as follows:
Reaction
Case Form | Patient Tab | Patient Tab | Other Relevant History | Reaction
Case Form | Patient Tab | Parent Tab | Other Relevant History | Reaction
Indication
Case Form | Patient Tab | Patient Tab | Other Relevant History | Indication
Case Form | Patient Tab | Parent Tab | Other Relevant History | Indication
Condition should be verbatim
Case Form | Patient Tab | Patient Tab | Other Relevant History | Verbatim
Case Form | Patient Tab | Parent Tab | Other Relevant History | Verbatim
Lab
Console | Code Lists | Lab Test Type
Description
Case Form | Events Tab | Event Tab | Description to be Coded
Case Form | Events Tab | Death Information | Cause of Death and Autopsy Results | Description as Reported
Diagnosis
Argus Case Form | Analysis Tab | Analysis Tab| Company Diagnosis Syndrome
The TERM node specifies the information about a specific term that is either being looked up or populated with data and supports the following attributes:
Primary - The primary attribute will contain "Y" if the term is the Primary SOC path for the selected term. In the event that multiple terms are returned for a MedDRA level, this attribute is only available on the Primary Term.
When Argus makes a call to the web service, it will populate the REPORTED and CODED nodes with data entered by the user. The REPORTED term is essentially a verbatim while the coded term is the term that is expected to be coded by the remote system. The returned message should contain a PATHS node with PATH subnodes that have been encoded by the remote system.
The encoded term is placed on the case form. If multiple matches are returned, the primary path is used. If no matches are returned or an error occurs, the Argus MedDRA browser will appear for the user to encode manually if Argus is configured to allow for manual encoding.
The following example uses "Headache" as the search term for auto encoding.
Request
<?xml version="1.0" encoding="utf-8"?>
<tnsa:SAFETY_MESSAGE xmlns:tns="http://www.oracle.com/Argus/Base/v1.0" xmlns:tnsa="http://www.oracle.com/Argus/MedDRA_Request/v1.0" xmlns:xsi="http://www.w3.org/2001/XMLSchema-instance" tns:Type="Request">
<tnsa:MEDICAL_DICTIONARY Action="Auto" Source="INDICATION">
<tnsa:TERM>
<tnsa:REPORTED>Bad Headache</tnsa:REPORTED>
<tnsa:CODED>Headache</tnsa:CODED>
</tnsa:TERM>
</tnsa:MEDICAL_DICTIONARY>
</tnsa:SAFETY_MESSAGE>
Response
<?xml version="1.0" encoding="utf-8"?>
<tnsa:SAFETY_MESSAGE xmlns:tns="http://www.oracle.com/Argus/Base/v1.0" xmlns:tnsa="http://www.oracle.com/Argus/MedDRA_Response/v1.0" xmlns:xsi="http://www.w3.org/2001/XMLSchema-instance" tns:Type="Response">
<tnsa:MEDICAL_DICTIONARY>
<tnsa:PATHS>
<tnsa:PATH Primary="Y">
<tnsa:LLT>
<tnsa:TEXT>Headache</tnsa:TEXT>
<tnsa:CODE>10001</tnsa:CODE>
<tnsa:SYNS>
<tnsa:SYN>
<tnsa:TEXT>Headache</tnsa:TEXT>
<tnsa:CODE>13221</tnsa:CODE>
</tnsa:SYN>
</tnsa:SYNS>
</tnsa:LLT>
<tnsa:PT>
<tnsa:TEXT>Headache</tnsa:TEXT>
<tnsa:CODE>20001</tnsa:CODE>
</tnsa:PT>
<tnsa:HLT>
<tnsa:TEXT>Headaches NEC</tnsa:TEXT>
<tnsa:CODE>30001</tnsa:CODE>
</tnsa:HLT>
<tnsa:HLGT>
<tnsa:TEXT>Headaches</tnsa:TEXT>
<tnsa:CODE>40001</tnsa:CODE>
</tnsa:HLGT>
<tnsa:SOC>
<tnsa:TEXT>Nervous System Disorders</tnsa:TEXT>
<tnsa:CODE>50001</tnsa:CODE>
</tnsa:SOC>
</tnsa:PATH>
</tnsa:PATHS>
</tnsa:MEDICAL_DICTIONARY>
</tnsa:SAFETY_MESSAGE>
MedDRA integration must be enabled using Argus Console. This can be done by opening Console from Argus Web and selecting "System Configuration=>System Management" from the menu. Expand the "Case Processing" tree branch and select "Dictionary Browser". Select the radio button to use web services under the "Argus Safety MedDRA Coding Method" section. An optional checkbox is also available to determine whether Argus has to use the local MedDRA instance if the web service hosting MedDRA is not available, fails, or does not return a valid match.
Additionally, the web.config file on each web server must have the endpoint with the "name" attribute of "MedDRA" properly configured. At a minimum, the "address" attribute must be changed. Optionally, depending on the bindings employed, the "bindingConfiguration" attribute may also need to be changed. The BindingConfiguration section must have a valid binding for the configured "bindingConfiguration" attribute.
The endpoint configuration might look something like this:
<endpoint address="http://remotewebservice/MedDRAAutoEncode.svc" binding="wsHttpBinding"
bindingConfiguration="WSHttpBinding_IRelsysService_Unsecure"
contract="IRelsysService" name="MedDRA">
This section provides information for integrating with an external Product Study License configuration system.
In the Integrations folder in the following path <Installation Path>\Oracle\ArgusWeb\ASP\Integrations, open the file Service.config. Search for the section called DatabaseConfiguration:
<DatabaseConfiguration DBName="" DBUser="" DBPassword="" />
The DBName, DBUser and DBPassword need to be populated manually.
DBName: This is the TNS of the Argus database
DBUser: This is the user name of a AG Service user. The PSL web service uses this User Context to perform updates in the Argus Safety Database.
DBPassword: Generate new encrypted string, as mentioned in the Generating Encrypted String from Clear Text on Configured User Cryptography Key section.
A sample configuration would be:
<DatabaseConfiguration DBName="ARGOLDDEMO" DBUser="agservice1" DBPassword="BC90A10363A26C147DEF172D61AAEC110296FA9E181E7FFA687D58CE08610C08" />
Security Configuration
If the PSL web service is desired to be run under security, appropriate binding configurations need to be configured in web.config under the Integrations folder. This can be done either manually or through the Service Config Utility.
Logging
PSL Web service performs two kinds of logging. One is file logging using the Relsys Logger. This involves logging information about the errors, warnings, and processing of the PSL web service code. The configuration for this type of logging is present in web.config, under the section <logConfig>. There are four types of logging - Error, Warning, Information, and Verbose. By default, the logger is configured to be of Error level. The logger internally uses log4net component to perform the logging. The RollingLogFileAppender which is by default present in web.config needs to be configured to log information to a specific file on a local folder. Please ensure that read/write permissions are available to the web service for this folder.
Another type of logging is the SOAP message logger, called the RequestLogger. This logger logs all the incoming and outgoing SOAP messages of the PSL web service. The messages are stored internally in the Argus Safety Database and are not available for querying in this release. This logging can be turned off by setting the Enabled attribute to false in Service.config as shown below:
<TransformersConfiguration> <Transformers> <add Transformer="RequestLogger" InterfaceType="Inbound" RequestType="Request,Response" MessageType="SoapMessage" Enabled="False" Metadata="" Assembly="ConsoleInterface" Type="Relsys.ArgusConsole.ConsoleInterface.Common.DBLoggerFactory" /> </Transformers> </TransformersConfiguration>
This section provides information for integrating with an external drug dictionary system.
DRUG_DICTIONARY is the first child node identifying a drug dictionary integration.
When Argus makes a call to the web service, it will populate the DRUG_NAME node. It is then expected that the coding system populate all possible information in the response XML. Argus will display this information in a browser from which the user can select the correct drug.
If the web service does not return any results or is unavailable, Argus will present the user with the WHODrug browser with local dictionary information if the system is configured to allow this.
Note that if an ingredient is returned that is not in the LM_INGREDIENTS table of Argus, the ingredient will not be stored with the case. ATC code is also not stored with the case data. Both of these items are visible in the browser, however.
Request
<?xml version="1.0" encoding="utf-8"?>
<tnsa:SAFETY_MESSAGE xmlns:tns="http://www.oracle.com/Argus/Base/v1.0" xmlns:tnsa="http://www.oracle.com/Argus/WHODrug_Request/v1.0" xmlns:xsi="http://www.w3.org/2001/XMLSchema-instance" tns:Type="Response">
<tnsa:DRUG_DICTIONARY>
<tnsa:DRUG>
<tnsa:DRUG_NAME>Tylenol</tnsa:DRUG_NAME>
</tnsa:DRUG>
</tnsa:DRUG_DICTIONARY>
</tnsa:SAFETY_MESSAGE>
Response
<?xml version="1.0" encoding="utf-8"?>
<tnsa:SAFETY_MESSAGE xmlns:tns="http://www.oracle.com/Argus/Base/v1.0" xmlns:tnsa="http://www.oracle.com/Argus/WHODrug_Response/v1.0" xmlns:xsi="http://www.w3.org/2001/XMLSchema-instance" tns:Type="Response">
<tnsa:DRUG_DICTIONARY>
<tnsa:DRUGS>
<tnsa:DRUG>
<tnsa:DRUG_CODE> 000200.01.005</tnsa:DRUG_CODE>
<tnsa:DRUG_NAME> TYLENOL</tnsa:DRUG_NAME>
<tnsa:GENERIC_NAME>PARACETAMOL</tnsa:GENERIC_NAME>
<tnsa:ATCS>
<tnsa:ATC>
<tnsa:CODE>65GGH</tnsa:CODE>
<tnsa:DESCRIPTION>ATC Desc 1a</tnsa:DESCRIPTION>
</tnsa:ATC>
<tnsa:ATC>
<tnsa:CODE>94534</tnsa:CODE>
<tnsa:DESCRIPTION>ATC Desc 2a</tnsa:DESCRIPTION>
</tnsa:ATC>
</tnsa:ATCS>
<tnsa:INGREDIENTS>
<tnsa:INGREDIENT> PARACETAMOL</tnsa:INGREDIENT>
</tnsa:INGREDIENTS>
<tnsa:MEDICINAL_PRODUCT_ID></tnsa:MEDICINAL_PRODUCT_ID>
<tnsa:DRUG_MANUFACTURER> MCNEIL LABORATORIES, INCORPORATED </tnsa:DRUG_MANUFACTURER>
</tnsa:DRUG>
<tnsa:DRUG>
<tnsa:DRUG_CODE> 004468.01.003</tnsa:DRUG_CODE>
<tnsa:DRUG_NAME> TYLENOL ALLERGY SINUS</tnsa:DRUG_NAME>
<tnsa:GENERIC_NAME></tnsa:GENERIC_NAME>
<tnsa:ATCS>
<tnsa:ATC>
<tnsa:CODE>4UUT1</tnsa:CODE>
<tnsa:DESCRIPTION>ATC Desc 1b</tnsa:DESCRIPTION>
</tnsa:ATC>
<tnsa:ATC>
<tnsa:CODE>13LLP</tnsa:CODE>
<tnsa:DESCRIPTION>ATC Desc 2b</tnsa:DESCRIPTION>
</tnsa:ATC>
</tnsa:ATCS>
<tnsa:INGREDIENTS>
<tnsa:INGREDIENT> PARACETAMOL</tnsa:INGREDIENT>
<tnsa:INGREDIENT> CHLORPHENAMINE MALEATE</tnsa:INGREDIENT>
<tnsa:INGREDIENT> PSEUDOEPHEDRINE HYDROCHLORIDE</tnsa:INGREDIENT>
</tnsa:INGREDIENTS>
<tnsa:MEDICINAL_PRODUCT_ID></tnsa:MEDICINAL_PRODUCT_ID>
<tnsa:DRUG_MANUFACTURER>JOHNSON & JOHNSON</tnsa:DRUG_MANUFACTURER>
</tnsa:DRUG>
</tnsa:DRUGS>
</tnsa:DRUG_DICTIONARY>
</tnsa:SAFETY_MESSAGE>
Drug Dictionary integration must be enabled using Argus Console. This can be done by opening Console from Argus Web and selecting "System Configuration=>System Management" from the menu. Expand the "Case Processing" tree branch and select "Dictionary Browser". Select the radio button to use web services under the "Argus Safety WHO Drug Coding Method" section. An optional checkbox is also available to determine whether Argus has to use the local WHODrug instance if the web service hosting the drug dictionary is not available, fails, or does not return a valid match.
Additionally, the web.config file on each web server must have the endpoint with the "name" attribute of "WHODrug" properly configured. At a minimum, the "address" attribute must be changed. Optionally, depending on the bindings employed, the "bindingConfiguration" attribute may also need to be changed. The BindingConfiguration section must have a valid binding for the configured "bindingConfiguration" attribute.
The endpoint configuration might look something like this:
<endpoint address="http://remotewebservice/WHODrugLookup.svc" binding="wsHttpBinding"
bindingConfiguration="WSHttpBinding_IRelsysService_Unsecure"
contract="IRelsysService" name="WHODrug">
This section provides information for integrating with an external lot validation system.
LOT_LOOKUP is the first child node identifying a lot validation integration.
When Argus makes a call to the web service, it will populate the LOT_NUMBER node with data provided by the user. The external lot validation system can provide zero, one, or many results in multiple LOT nodes.
Argus reaction to various counts of returned lots:
Zero - Argus displays a message that the lot number could not be validated; based on the system configuration, the user may be able to keep the entered lot number, in which case Argus creates a red denotation indicating that the lot number was not validated
One - Argus keeps the user-entered lot number and creates a green denotation indicating a successfully validated lot
Many - Argus displays a dialog from which the user can select the correct lot number; once selected, Argus creates a yellow denotation indicating that the lot number was validated, but the user had to select from multiple matches
The lot validation interface also allows for customized user data to be returned, such as Albumin or Thermisol which is not natively supported by Argus. This data is then stored in the user-defined fields available on the active case form page.
Request
<?xml version="1.0" encoding="utf-8"?>
<tnsb:SAFETY_MESSAGE xmlns:tns="http://www.oracle.com/Argus/Base/v1.0" xmlns:tnsa="http://www.oracle.com/Argus/ProductFamilyEntity/v1.0" xmlns:tnsb="http://www.oracle.com/Argus/Lot_Request/v1.0" xmlns:xsi="http://www.w3.org/2001/XMLSchema-instance" " tns:Type="Request">
<tnsb:LOT_LOOKUP>
<tnsb:LOT>
<tnsa:LOT_NUMBER>5043AX</tnsa:LOT_NUMBER>
</tnsb:LOT>
</tnsb:LOT_LOOKUP>
</tnsb:SAFETY_MESSAGE>
Response
<?xml version="1.0" encoding="utf-8"?>
<tnsb:SAFETY_MESSAGE xmlns:tns="http://www.oracle.com/Argus/Base/v1.0" xmlns:tnsa="http://www.oracle.com/Argus/ProductFamilyEntity/v1.0" xmlns:tnsb="http://www.oracle.com/Argus/Lot_Response/v1.0" xmlns:xsi="http://www.w3.org/2001/XMLSchema-instance" tns:Type="Response">
<tnsb:LOT_LOOKUP>
<tnsb:LOT>
<tnsa:LOT_NUMBER>5043AX1</tnsa:LOT_NUMBER>
<tnsa:EXPIRATION_DATE>2010-06-07</tnsa:EXPIRATION_DATE>
<tns:CUSTOM tns:Name="Thermisol" tns:Metadata="Thermisol Indicator">15</tns:CUSTOM>
<tns:CUSTOM tns:Name="Albumin" tns:Metadata="Albumin Status">11.4 mg/gC </tns:CUSTOM>
</tnsb:LOT>
<tnsb:LOT>
<tnsa:LOT_NUMBER>12GF5</tnsa:LOT_NUMBER>
<tnsa:EXPIRATION_DATE>2014-12-15</tnsa:EXPIRATION_DATE>
<tns:CUSTOM tns:Name="Thermisol" tns:Metadata="Thermisol Indicator">22</tns:CUSTOM>
<tns:CUSTOM tns:Name="Albumin" tns:Metadata="Albumin Status">19.5 mg/gC </tns:CUSTOM>
</tnsb:LOT>
</tnsb:LOT_LOOKUP>
</tnsb:SAFETY_MESSAGE>
Lot Validation integration must be enabled using Argus Console. This can be done by opening Console from Argus Web and selecting "System Configuration=>System Management" from the menu. Expand the "Case Processing" tree branch and select "Lot Number Processing". Select the radio button to use web services under the "Use Centralized Lot Number Validation" section. Additionally, it is necessary to specify whether a user should have the ability to override the lot validation system with the "Allow users to enter non-configured Lot Numbers" switch. This switch is applicable when the lot validation service fails or is unable to provide a match for the lot number.
Additionally, the web.config file on each web server must have the endpoint with the "name" attribute of "LotQuery" properly configured. At a minimum, the "address" attribute must be changed. Optionally, depending on the bindings employed, the "bindingConfiguration" attribute may also need to be changed. The BindingConfiguration section must have a valid binding for the configured "bindingConfiguration" attribute.
The endpoint configuration might look something like this:
<endpoint address="http://remotewebservice/LotValidate.svc" binding="wsHttpBinding"
bindingConfiguration="WSHttpBinding_IRelsysService_Unsecure"
contract="IRelsysService" name=" LotQuery">
If custom data is to be passed back by the lot validation service, then it is also necessary to modify the LotIncomingTransform.xslt file, located in the .\ArgusWeb\ASP\Bin directory. This transformation file reads the CUSTOM tags passed back by the lot validation service and maps them to the Argus user-defined fields.
The CUSTOM tag has a "Name" attribute, which is used by the XSLT to identify to which Argus field to map. The corresponding "Metadata" attribute is used simply to display a label in the lookup dialog if necessary. The XSLT file must be synchronized between all web servers in a web farm scenario.
Specific Argus fields must be placed within the xsl:attribute tags of the XSLT in a comma delimited form. The system will attempt to populate each Argus field specified by the value of the CUSTOM tags. If a field does not exist, no exception is thrown. In this fashion, if different pages in the case form have different definitions for the user-defined fields, the system can still properly populate the values in the fields.
It is inadvisable to modify any piece of the XSLT file with the exception of the piece that is shown in the example below. Consider the web service returns a CUSTOM node like:
<CUSTOM Name="Albumin" Metadata="Albumin Status">19.5 mg/gC</CUSTOM>
And the LotIncomingTransform.xslt contains the snippet:
<xsl:template match="@*" mode="CaseField">
<xsl:choose>
<xsl:when test=".='Thermisol'">
<xsl:attribute name="CaseField">CASE_DOSE_REGIMENS_UD_TEXT_1,CASE_DOSE_REGIMENS_UD_TEXT_2</xsl:attribute>
</xsl:when>
<xsl:when test=".='Albumin'">
<xsl:attribute name="CaseField">CASE_DOSE_REGIMENS_UD_TEXT_3,CASE_DOSE_REGIMENS_UD_TEXT_4</xsl:attribute>
</xsl:when>
</xsl:choose>
</xsl:template>
Then the value of 19.5 will be mapped to both user defined text fields 3 and 4. If only one of the fields is on the active case form page, the other field will be ignored.
This section provides information for integrating with an external system generating potential case data.
CASE_INTAKE is the first child node identifying a worklist intake integration.
When an XML file is dropped in the IN folder of the configured Intake folder, Argus picks up the file and does an initial verification. If there are any attachments specified in the XML, they and the XML are moved to a GUID-created subfolder of the Intermediate folder. All the relevant data is extracted from the XML and stored in the database. During the parsing and extraction, if there are any errors, the unique folder and its associated XML and file attachments are moved to Failures folder. A file called Error.xml will be generated in that folder which contains more information about the failure. If an e-mail address is configured in Intake.config, an e-mail is also generated and processed via AGService.
Worklists for intake are based on user site. They are populated based on either the path in which the initial file was dropped (as per the configuration in Argus Console the path is associated to a specific user site) or by the value of the SITE node contained within the XML itself. If there is a conflict, the SITE node value takes precedence.
The Intake records that are absorbed into Argus are visible to the Argus User in Worklist Intake screen in Argus or in Affiliate. The Argus user can do one of two operations on the Intake record.
Accept - When the user accepts an Intake, the case form book-in screen is shown which will contain information and attachments pre-populated from the Intake record.
If user books in a case, a response is generated which contains the case ID and case number. The attachment details and response XML are placed in the Out folder.
If user adds a follow up to an existing case, a similar response is generated as above and the response XML is placed in the OUT folder.
Reject - When the user rejects an Intake record, a response is generated which contains the Rejection Reason and the attachment details. This response XML is placed in the OUT folder.
Similarly, an Affiliate user can create a local event from an Intake record from within Affiliate. The flow is similar to that mentioned above with the exception that the response XML would contain the Local Event Number instead of the case number.
Request
<?xml version="1.0" encoding="utf-8"?>
<tnsc:SAFETY_MESSAGE xmlns:tns="http://www.oracle.com/Argus/Base/v1.0" xmlns:tnsa="http://www.oracle.com/Argus/CodeListCommon/v1.0" xmlns:tnsb="http://www.oracle.com/Argus/ProductFamilyEntity/v1.0" xmlns:tnsc="http://www.oracle.com/Argus/Case_Intake/v1.0" xmlns:xsi="http://www.w3.org/2001/XMLSchema-instance" tns:Type="Request">
<tnsc:CASE_INTAKE>
<tnsc:CASES>
<tnsc:CASE>
<tnsc:CASE_TYPE>Sponsored Trial</tnsc:CASE_TYPE>
<tnsc:COUNTRY_OF_INCIDENCE>US</tnsc:COUNTRY_OF_INCIDENCE>
<tnsc:EVENT_PT>Pyrexia</tnsc:EVENT_PT>
<tnsc:EVENT_VERBATIM>Fever</tnsc:EVENT_VERBATIM>
<tnsc:FLTH>LT</tnsc:FLTH>
<tnsc:GENERIC_NAME>Cure All</tnsc:GENERIC_NAME>
<tnsc:INITIAL_DATE>2001-06-07</tnsc:INITIAL_DATE>
<tnsc:PRIORITY>1</tnsc:PRIORITY>
<tnsc:PRODUCT_NAME>Cure All</tnsc:PRODUCT_NAME>
<tnsc:REPORTER_TYPE>Health Care Professional</tnsc:REPORTER_TYPE>
<tnsc:SITE>United States</tnsc:SITE>
<tnsc:STUDY_ID>Test Study</tnsc:STUDY_ID>
<tnsc:SUR>Yes</tnsc:SUR>
<tnsc:ATTACHMENTS>
<tnsc:ATTACHMENT>
<tnsc:FILENAME>Case12345.pdf</tnsc:FILENAME>
<tnsc:DOCID>001219988776655</tnsc:DOCID>
<tnsc:CLASSIFICATION></tnsc:CLASSIFICATION>
<tnsc:ATTACHMENT_DESC>Contains case data for 12345</tnsc:ATTACHMENT_DESC>
</tnsc:ATTACHMENT>
</tnsc:ATTACHMENTS >
</tnsc:CASE>
</tnsc:CASES>
</tnsc:CASE_INTAKE>
<tns:EXTENSION>
<tns:CUSTOM tns:Name="ABC" tns:Metadata="DEF">GHI</tns:CUSTOM>
</tns:EXTENSION>
</tnsc:SAFETY_MESSAGE>
Response
<?xml version="1.0" encoding="utf-8"?>
<tnse:SAFETY_MESSAGE xmlns:tns="http://www.oracle.com/Argus/Base/v1.0" xmlns:tnse="http://www.oracle.com/Argus/Case_Intake_Ack/v1.0" xmlns:xsi="http://www.w3.org/2001/XMLSchema-instance" tns:Type="Response">
<tnse:CASE_INTAKE>
<tnse:CASES>
<tnse:CASE>
<tnse:INTAKE_DATE>09-SEP-2009 09:09:09</tnse:INTAKE_DATE>
<tnse:CASE_NUMBER>2009JP000001</tnse:CASE_NUMBER>
<tnse:CASE_ID>10002901</tnse:CASE_ID>
<tnse:CASE_PRODUCT>Cure All</tnse:CASE_PRODUCT>
<tnse:DATE_TIME>18-SEP-2009 18:18:18</tnse:DATE_TIME>
<tnsc:ATTACHMENTS xmlns:tnsc="http://www.oracle.com/Argus/Case_Intake/v1.0">
<tnsc:ATTACHMENT>
<tnsc:FILENAME>Case12345.pdf</tnsc:FILENAME>
<tnsc:DOCID>001219988776655</tnsc:DOCID>
<tnsc:CLASSIFICATION></tnsc:CLASSIFICATION>
<tnsc:ATTACHMENT_DESC>Contains case data for 12345</tnsc:ATTACHMENT_DESC>
</tnsc:ATTACHMENT>
</tnsc:ATTACHMENTS>
</tnse:CASE>
</tnse:CASES>
</tnse:CASE_INTAKE>
<tns:EXTENSION>
<tns:CUSTOM tns:Name="ABC" tns:Metadata="DEF">GHI</tns:CUSTOM>
</tns:EXTENSION>
</tnse:SAFETY_MESSAGE>
Worklist Intake integration currently employs a file drop system. The drop directories should be on a shared path. The directories can be optionally unique to a user site and configured as such in Console. The first step is to set these directory references up in Console under the "User Sites" code list. For each user site, simply specify the UNC for the "Intake File Path" (they can all be the same or different).
Argus Safety Windows Service provides the mechanism by which the files are processed. Since a network resource is being accessed, it is essential that the service run as a domain account and not as the Local System Account (which is the default). To change this, stop the Argus Safety Windows Service by opening the Services control panel and double-clicking the Argus Safety Windows Service and clicking the Stop button. Next click the Log On tab and select the radio button for "This account". Enter valid domain user credentials and click OK.
The service itself contains additional configuration information in the RelsysWindowsService.exe.config file located in the .\ArgusWeb\ASP\Argus.NET\Bin directory. This file references the Intake.config file to obtain configurations specific to Worklist Intake. Simply uncomment the two "add" nodes in the "RelsysConfigFilesSection" that reference the Intake.config file in their "filePath" attributes. Also verify that the DatabaseConfiguration section in this file has a valid database and user credentials with which to connect to the database and access Argus data.
In the same folder the Service.config file also requires some changes to specify information about the assemblies needed to process Worklist Intake messages. Similarly to the RelsysWindowsService.config file, uncomment the two "add" nodes whose "name" attributes refer to "Case Intake" and "Case Intake Ack".
Once configured, use the Services control panel to restart Argus Safety Windows Service. A successful configuration is evident when four new folders are then created in the shared file path (IN, OUT, INTERMEDIATE, and FAILURES).
If the shared folder happens to be on the same physical machine as the server on which ”Argus Windows Service” is running, you can optionally configure the service to access the shared folder directly as a local folder instead of as a network shared path. The following configuration in Intake.config would enable this:
<FolderConfiguration>
<MonitorFolders MonitorAllConfiguredFolders="true" MonitorLiteratureFolder="false">
<add FolderPath="<configured share in console>" Monitor="true" AlternatePath="C:\CaseIntake"/>
</MonitorFolders>
</FolderConfiguration>
In the above configuration, MonitorAllConfiguredFolders can be set to false if you want to configure that server to accept Intake files only for the folders configured in the above section and for which Monitor is set to true.
This section provides information for setting up Literature Intake. Argus accepts files of the following formats for Literature Intake.
WORLD MEDICAL & DRUG INFORMATION SERVICE (WMDIS) (in the form of .xls or .xlsx file format)
JAPIC (in the form of .txt file format)
When a WMDIS or JAPIC file is dropped in the IN folder of the configured Literature Intake folder, Argus picks up the file and does an initial verification. The file is first moved to a GUID-created subfolder of the Intermediate folder. All the relevant data is extracted from the file and stored in the database. During the parsing and extraction, if there are any errors, the unique folder and the file in it are moved to Failures folder. A file called Error.xml will be generated in that folder which contains more information about the failure. If an e-mail address is configured in Intake.config, an e-mail is also generated and processed via AGService. The Literature Intake Worklist shows all the records extracted from the above mentioned files.
The Argus user can do one of the following operations on the Literature Intake record.
Accept
Reject
Assign User
Assign Literature Type
Modify Product Family
Literature Intake integration employs a file drop system. The drop folder should be on a shared path. The folder must be configured in Console under System Configuration => Common Profile Switches => Argus J.
The edit box provided for "Shared Path for Literature Intake" must be configured with the UNC file path of the shared folder. Argus Safety Windows Service provides the mechanism by which the files are processed. Since a network resource is being accessed, it is essential that the service run as a domain account and not as the Local System Account (which is the default).
To change this, stop the Argus Safety Windows Service by opening the Services control panel and double-clicking the Argus Safety Windows Service and clicking the Stop button. Next click the Log On tab and select the radio button for "This account". Enter valid domain user credentials and click OK.
The service itself contains additional configuration information in the RelsysWindowsService.exe.config file located in the .\ArgusWeb\ASP\Argus.NET\Bin directory. This file references the Intake.config file to obtain configurations specific to Worklist Intake. Simply uncomment the two "add" nodes in the "RelsysConfigFilesSection" that reference the Intake.config file in their "filePath" attributes. Also verify that the DatabaseConfiguration section in this file has a valid database and user credentials with which to connect to the database and access Argus data. In the same folder the Service.config file also requires some changes to specify information about the assemblies needed to process Worklist Intake messages.
Go to the Argus Web server machine.
Open the service.config file located at
C:\Program Files\Oracle\Argus\ArgusWeb\ASP\Argus.NET\Bin\
In the service.config file, the metadata configuration is:
<add Name="Case Intake" Assembly="CaseIntakeServiceComponent"
Type="Relsys.CaseIntakeServiceComponent.FSWManager"
Metadata="InvokeDirect=true;PollInterval=1000;CaseIntake=true;LitIntake=true;
UseLocalInterimFolder=true; LocalInterimFolder=C:\Temp\CaseIntake"  />
Similarly to the Service.config file, uncomment the "add" node whose "name" attribute refer to "Case Intake". Ensure that 'LitIntake' is set to true in the Metadata configuration as shown below:
<add Name="Case Intake" Assembly="CaseIntakeServiceComponent" Type="Relsys.CaseIntakeServiceComponent.FSWManager" Metadata="InvokeDirect=true; PollInterval=1000;CaseIntake=true;LitIntake=true" />
In the same folder, the Intake.config file needs some changes. Set the MonitorLiteratureFolder attribute to true in FolderConfiguration/MonitorFolders section as shown below:
<FolderConfiguration>
<MonitorFolders MonitorAllConfiguredFolders="false" MonitorLiteratureFolder="true">
<!-- <add FolderPath="<configured share in console>" Monitor="true" AlternatePath="C:\LiteratureIntake"/> -->
</MonitorFolders>
</FolderConfiguration>
Once configured, use the Services control panel to restart Argus Safety Windows Service. A successful configuration is evident when four new folders are then created in the shared file path (IN, OUT, INTERMEDIATE, and FAILURES).
If the shared folder happens to be on the same physical machine as the server on which ”Argus Windows Service” is running, you can optionally configure the service to access the shared folder directly as a local folder instead of as a network shared path. The following configuration in Intake.config would enable this:
<FolderConfiguration>
<MonitorFolders MonitorAllConfiguredFolders="false"
MonitorLiteratureFolder="true">
<add FolderPath="<configured share in console>" Monitor="true"
AlternatePath="C:\LiteratureIntake"/>
</MonitorFolders>
</FolderConfiguration>
This section provides information about the Extended E2B Interface.
The following steps in this section will create Extension Profile using E2B Mapping.
Log on to ESM Mapping Utility.
Select the Profile from the drop down list as shown below
Click on the Administrator Menu and select the Copy Profile option, Enter the Extension Profile name, Click on Save button and then OK button.
Select the newly created profile from the drop down.
Click on the Receive Tab and select the Checkbox "Extended E2b". Click on the Save button. Now this profile is enabled as extended profile.
Exit from the ESM Mapping Utility.
The following steps in this section will add the Extension element in the DTD file.
Take the DTD file corresponding to the base profile chosen in the above section from the "<Oracle>\ESMService\DTDFiles" folder and make a copy of that profile. In this example, we will make a copy of "EMEA-ICSR-V2.1.dtd" and name it as "EMEA-ICSR-V2.1-Extension.dtd".
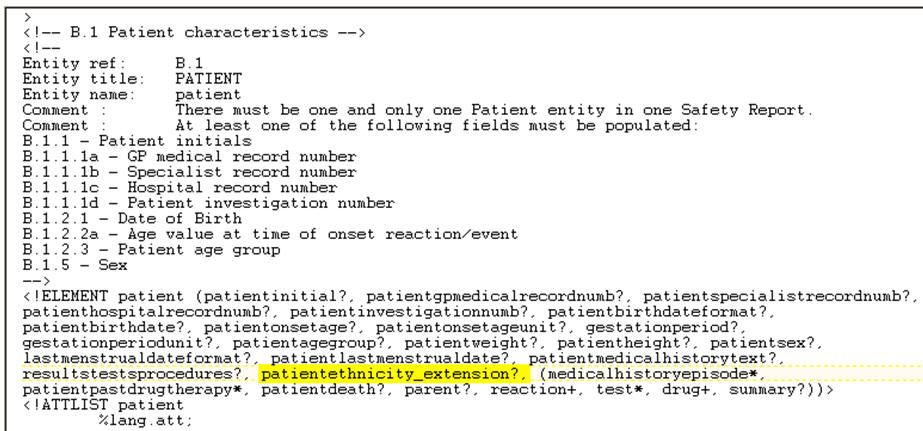
Open the file "EMEA-ICSR-V2.1-Extension.dtd" and include the extension DTD Element "patientethnicity_extension?". To do so, add the element details in the header row, as highlighted in the following image:
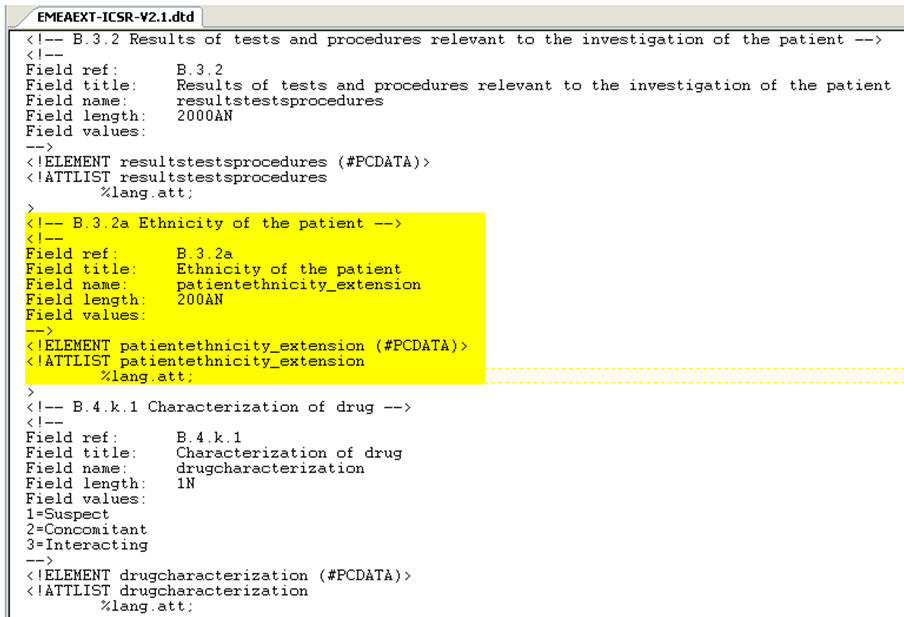
Add the element details as an individual entity, as highlighted in the following image:
Save the updated DTD file in the same folder where all other DTD files exist on the ESM Server.
The following steps in this section will create a factory data for extension elements. Factory data is required to import extension XML.
CFG_E2B: This table keeps the details of all the E2B elements present in all the E2B profiles. The following is a description of all the fields in this table:
Profile (PROFILE): This is an alphanumeric field. It is the name of the profile to which the extension elements will be added.
DTD Element (DTD_ELEMENT): This is an alphanumeric field. It is the name of the extension element. This should always end with text '_EXTENSION'. The name may contain [a-z], [A-Z], [0-9], or an underscore character. This shall be the same as the name of the extension element specified in the DTD file.
Hierarchy Level (HIE_LEVEL): This is a numeric field. This number shall be the same as that of the other DTD elements under the same parent element.
DTD Length (DTD_LENGTH): This is a numeric field. This is the maximum allowed length for the extension element value.
Mandatory (MANDATORY): This is an alphanumeric field. If the extension element is mandatory, then the value of this field shall be 'M'. If the extension is mandatory optional, it shall be 'MO'. If it is none of the above, leave it blank.
Order of Execution (ORDER_OF_EXECUTION): This is a numeric field. It identifies the order of an E2B element while building the E2B report. This number shall be between the ORDER_OF_EXECUTION values of the E2B elements between which the extension element is to be placed. For example, if the new extension element PATIENTETHNICITY_EXTENSION is to be placed between PATIENTHEIGHT and PATIENTSEX which have ORDER_OF_EXECUTION as 116 and 117, then the value of ORDER_OF_EXECUTION for the new extension field can be anything like 116.1, 116.2, etc.
Association Element (AE_SELECT_STMT_ELEMENT_ASSOC): This is an alphanumeric field. It is the name of that element which contains the transmission mapping SQL of this element. Generally, it shall be the same as the parent element.
Column Position (AE_SELECT_STMT_COL_POSITION): This is a numeric field. This is the position of the element in the transmission mapping SQL query, which is specified with the Association element. For example, if the SQL with the association element has 10 fields/columns in the SELECT statement, and the current E2B element maps to the fourth field/column, then the value of this field shall be set to 4.
Parent element (PARENT_ELEMENT): This is an alphanumeric field. It identifies the name of the parent E2B element in the E2B XML hierarchy structure. It shall be the same as the value specified for the other peer E2B elements.
Data Element (DATA_ELEMENT): This is an alphanumeric field. This is the reference number of the element specified by ICH like A.1.2 for OCCURCOUNTRY, B.1.1 for PATIENTINITIAL, etc. This field can be empty for extension elements. However, if preferred, the end-user can specify any value for this field.
AE Case Form GUI (AE_CASE_FORM_GUI): This is an alphanumeric field. This field shall specify the Case Form GUI location of the field to which the E2B element is mapped in the format? <Tab Name> - <Section Name> - <Field Name>". For example, "Patient Tab - Patient Details - Ethnicity".
Title (DTD_ELEMENT_TITLE): This is an alphanumeric field. This field specifies the display title for the extension element e.g. "Ethnicity". This title is displayed in the Decoded View screen in E2B viewer.
Element Type (DTD_ELEMENT_TYPE): This is a numeric field. It contains the type of the E2B element, as described in the CFG_DTD_ELEMENT_TYPE table.
Other
E2B Code
Country
Time Period Unit
Yes/No
Date Format
Date
MedDRA Version
MedDRA Term/Code
Factory Data for CFG_E2B table: Create a .ctl file and use sqlloader utility to load the factory data in CFG_E2B table. This table holds the extension elements definition, import business logic, mandatory, order of execution, etc.
LM_ESM_ARGUS_MAPPING: This table is used to map the E2B elements with the Case Form field during E2B Import. This table is not used during the E2B transmission process.
DTD Element (DTD_ELEMENT): This is an alphanumeric field. It is the name of the extension element, as specified in CFG_E2B table. This should always end with text '_EXTENSION'. The name may contain [a-z], [A-Z], [0-9] or an underscore character. This shall be the same as the name of the extension element specified in the DTD file.
Field ID (FIELD_ID): This is a numeric field. It shall contain the CMN_FIELDS.FIELD_ID value of the Case Form field, which shall be populated or updated for the extension element during E2B Import.
Factory data for LM_ESM_ARGUS_MAPPING table: Create a .ctl file and use the sqlloader utility to load factory data in the LM_ESM_ARGUS_MAPPING table. This table holds the mapping from DTD elements to the Argus Case Form fields.
The following steps in this section will create an import business logic as a PL/SQL block for each extension elements using E2B Mapping.
Log on to the ESM Mapping Utility.
Select the extension profile from the drop down list.
Click on the Receive Tab and select the extension element and write the import business logic as a PL/SQL block and click on the save button to save the PLSQL block.
Exit from the ESM Mapping Utility after completing the business logic.
The following steps in this section will configure the extension profile in Reporting Destination using Argus Console.
Log on to Argus Safety.
Open the Console and click on the Code List | Reporting Destination.
Select the agency name to modify and click on the EDI tab.
Select the extension profile from the message profile drop down Example: "EXTENDED E2B PROFILE"
Enter the extension DTD file with full path into URL of Message DTD field Example: "C:\Program Files\Oracle\ESMService\DTD\EMEA-ICSR-V2.1-Extension.dtd"
|
Note: This field is used only for transmission of E2B extension for import this field is not used, since the DTD path is already embedded in the E2B file. |
Click on the Save button to save the changes. Argus is configured for E2B extension for selected agency.
<patient>
<patientinitial>TMS</patientinitial>
<patientonsetage>66</patientonsetage>
<patientonsetageunit>801</patientonsetageunit>
<patientsex>1</patientsex>
<patientethnicity_extension>Asian</patientethnicity_extension>
<reaction>
<primarysourcereaction>fever</primarysourcereaction>
<reactionmeddraversionllt>10.1</reactionmeddraversionllt>
<reactionmeddrallt>10016558</reactionmeddrallt>
<reactionmeddraversionpt>10.1</reactionmeddraversionpt>
<reactionmeddrapt>Pyrexia</reactionmeddrapt>
<reactionintensity_extension>Mild</reactionintensity_extension>
<reactionhospstartdateformat_extension>102</reactionhospstartdateformat_extension>
<reactionhospstartdate_extension>20090117</reactionhospstartdate_extension>
<reactionhospstopdateformat_extension>102</reactionhospstopdateformat_extension>
<reactionhospstopdate_extension>20090123</reactionhospstopdate_extension>
</reaction>
</patient>
DECLARE
v_xml varchar2(32767);
l_ethnicity_id number;
l_return number := 0;
BEGIN
v_xml := ESM_IMP.F_READ_EXTENSION(:REPORT_ID,:DTD_ELEMENT);
if v_xml is not null then
l_ethnicity_id := ESM_IMP_UTL.f_get_id_from_value('LM_ETHNICITY','ETHNICITY',v_xml,'ETHNICITY_ID');
if l_ethnicity_id > 0 then
l_return := ESM_IMP.F_WRITE(:REPORT_ID,:PARENT_ELEMENT,:DTD_ELEMENT,:PROFILE,'CASE_PAT_INFO','ETHNICITY_ID',l_ethnicity_id);
end if;
end if;
END;
|
 Copyright © 2011, 2015, Oracle and/or its affiliates. All rights reserved. Legal Notices |
|