| Oracle® Argus Safety Unblinding User's Guide Release 7.0.1 E26628-01 |
|
|
PDF · Mobi · ePub |
| Oracle® Argus Safety Unblinding User's Guide Release 7.0.1 E26628-01 |
|
|
PDF · Mobi · ePub |
This chapter provides information about using the EOSU generic software and includes discussions of the following:
You must have specific access rights before you can log in to the EOSU Application. If you have difficulty logging in to the application, consult your System Administrator to verify that you have the following:
Allow Closures of Cases access
Allow Locking of Cases access
Allow Unblinding of Cases access
Membership in the End of Study Unblinding group
Use the following procedure to log in to EOSU:
Select Start => Programs => Oracle => End of Study Unblinding.
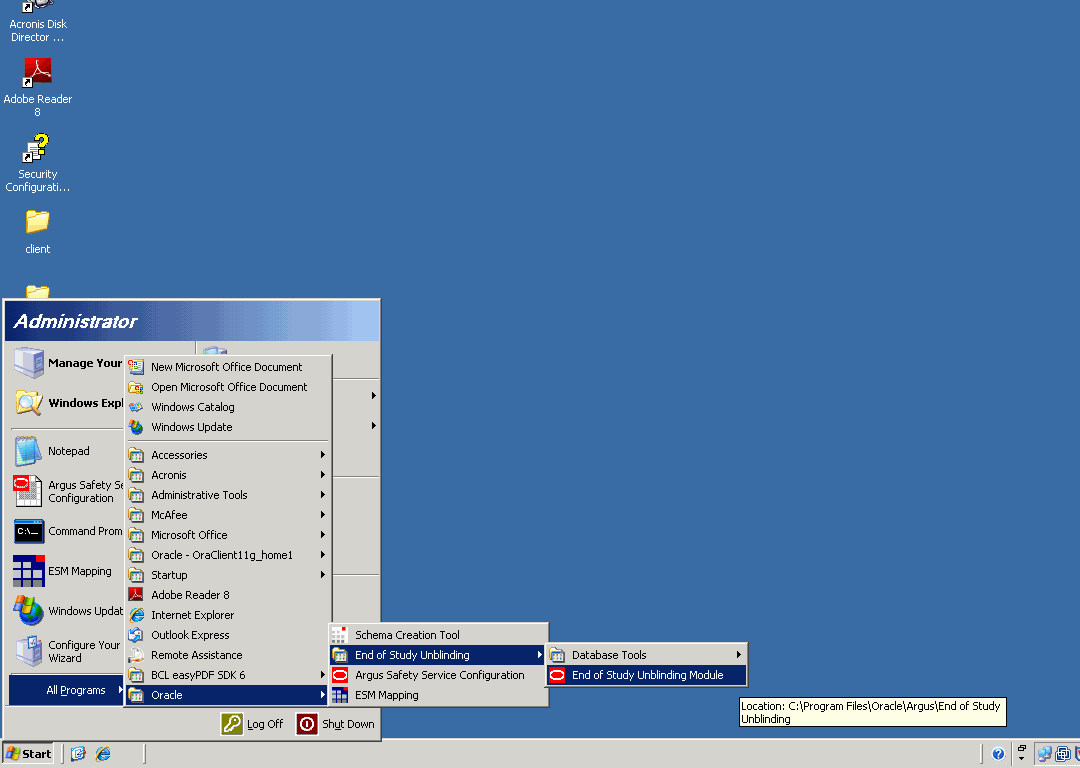
When the log in window opens:

Enter the user name in the User Name field.
Enter the user password in the Password field.
Enter the name of the database where Argus Generic is installed in the Database field.
Click Login.
When the EOSU application opens, choose EOSU=> Configure EOSU.
Note:
In a Multi-tenancy install, select Enterprise after the EOSU login screen. This does not appear in a single-tenancy install.EOSU opens the Configure EOSU: Select EOSU Profile window.
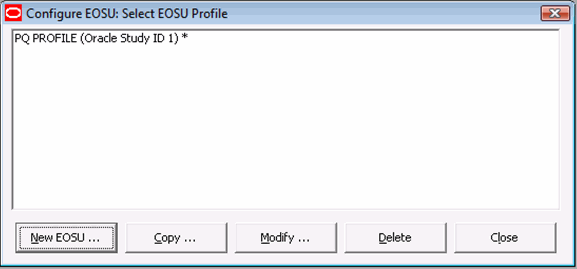
Note:
An asterisk ( * ) next to a profile name indicates that the profile configuration is incomplete and cannot be executed.Click New EOSU to create a new EOSU profile.
Click Copy to copy an existing EOSU profile.
Click Modify to modify an existing EOSU profile.
Click Delete to delete an existing profile.
Click Close to close the current window.
When you log into the EOSU tool in a multi-tenant installation, a pop-up prompts you to choose the Enterprise for which the data is displayed in the EOSU tool.
The drop-down menu in the following pop-up displays an alphabetically-sorted list of Enterprise Short Names for all the active Enterprises that the user has access to as “Enterprise User” in Console => User Management.
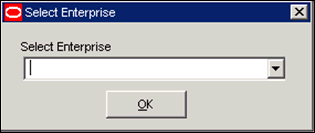
The default value is blank when the pop-up initially displays.
The OK button is only enabled when a non-blank value is selected.
If you only have access to one Enterprise, the pop-up does not display and EOSU tool loads the data for that Enterprise automatically.
If you are configured as an "Enterprise User", there are no active Enterprises, the system displays a message box with the OK button enabled, and the following message: “There are no active Enterprises for the User for the EOSU tool”.
Note:
Enterprise switching without re-login is not provided in the EOSU Tool. If you need to switch to a different Enterprise partition, you must logout and then login again for the other Enterprise.The EOSU window header displasy the Enterprise Short Name based on the Display Enterprise Short Name in Application Header option in common profile switches.If this option is not selected, the EOSU window header will not display the Enterprise Short Name and uses the existing following format:
EOSU [<User Full Name> Log on to <Database Name>]
If this option is selected, the EOSU window header appends the Enterprise Short Name along with the database name using a hyphen, as shown:
EOSU [<User Full Name> Log on to <Database Name> - <Enterprise Short Name>]
Configuring a new EOSU profile requires several procedures as follows:
Configuring a Study Definition
Loading Randomization Data
Mapping Treatment Codes to Products
Configuring Dosage Details for treatments and study projects
You configure a study definition on the Study Definition tab of the Configure EOSU Profile dialog box. Table 4-1lists the fields/controls on the tab and describes the function of each one.
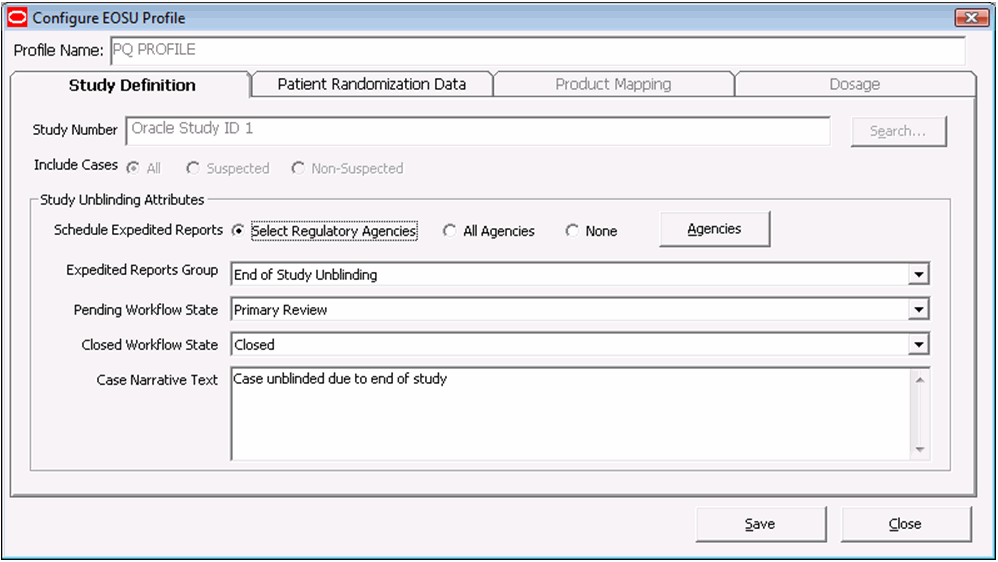
The following table describes Study Definition Tab Fields and Controls:
| Field/Control | Description |
|---|---|
| Study Number | Enables you to select a specific study.
You can select a study only if the Study is eligible for Unblinding option is selected in Argus. |
| Include Cases | Restricts the selection of cases to All, Suspected, or Non-Suspected according to
Case Assessment values for Causality. |
| Schedule Expedited Reports | Enables you to all/partial/no reporting rules for the case being unblinded. |
| Expedited Reports Group | Enables you to replace the group for all reports scheduled for this profile. |
| Pending Workflow State | Replaces the case state for all cases processed by this profile that have an unsubmitted report as part of the case. |
| Closed Workflow State | Defines the workflow state to be used for closed cases. |
| Case Narrative Text | Enables you to enter relevant information about the case. |
| Search… | Enables you to search for a particular study. |
| Agencies | This button is enabled only if the Select Regulatory Agencies option button has been selected. |
| Save | Enables you to save the profile. |
| Close | Enables you to close the profile. |
If you select Select Regulatory Agencies in the Schedule Expedited Reports field when you are configuring a study definition, EOSU also displays the Select Regulatory Agencies dialog box. This dialog displays all the Reporting Rules in the Argus Application, grouped by Rule Country, Agency Country, Agency and the Report Form Name. The column headers can be stretched to make the column wider to display more data. Table 4-2 lists and describes the fields and controls in this dialog box.
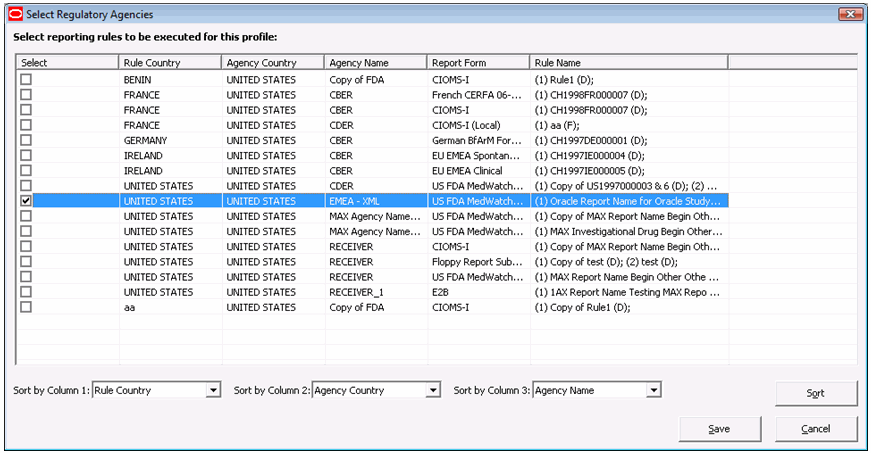
The following table describes Select Regulatory Agency Dialog Box Fields and Controls:
| Field/Control | Description |
|---|---|
| Select | Enables you to select the reporting rules this profile is to execute. |
| Save | Saves the reporting rules and closes the dialog box. |
| Cancel | Closes the dialog box without saving data. |
| Sort | Sorts the data according to the options selected in the Sort by Column 1, Sort by Column 2, and Sort by Column 3. |
To configure a Study Definition:
In the EOSU Unblinding software, choose EOSU > Configure EOSU.
When the Configure EOSU: Select EOSU Profile window opens:

Click New EOSU to create a new EOSU profile.
When the Study Definition tab opens. Enter data as required. Click Save to go to the next tab within the configuration.
Type the study ID in the Study Number field.
Select the cases to include by clicking the appropriate option button in the Include Cases field.
Select the appropriate option button in the Schedule Expedited Reports field.
Select the appropriate group from the Expedited Reports Group drop-down list.
Select the workflow state from the Pending Workflow State drop-down list.
Select the workflow state for all closed cases from the Closed Workflow State drop-down list.
Type any relevant data in the Case Narrative Text field.
Click Save to safe the Study Definition.
If you chose Select Regulatory Agencies in the Schedule Expedited Reports field in the preceding step, the system displays the Select Regulatory Agencies dialog box.
Click in the appropriate checkboxes to select one or more Agency/Rule.
Click Save.
You can load randomization data for the EOSU profile from the Patient Randomization Data tab. Table 4-3lists and describes the fields and controls on the tab.
The following table describes Patient Randomization Data Tab Fields and Controls:
| Field/Control | Description |
|---|---|
| Data File | Enables you to select the data file to load. |
| Load Data | Clicking this button loads data into the Randomization Data Tables. |
| Validate Data | Clicking this button validates the data and generates a report that you can access through the Report Viewer. |
| Save | Enables you to save the data on the tab. |
| Close | Enables you to close the tab without saving the data. |
To load randomization data for the profile
In the Configure EOSU Profile dialog box, click the Patient Randomization Data tab.
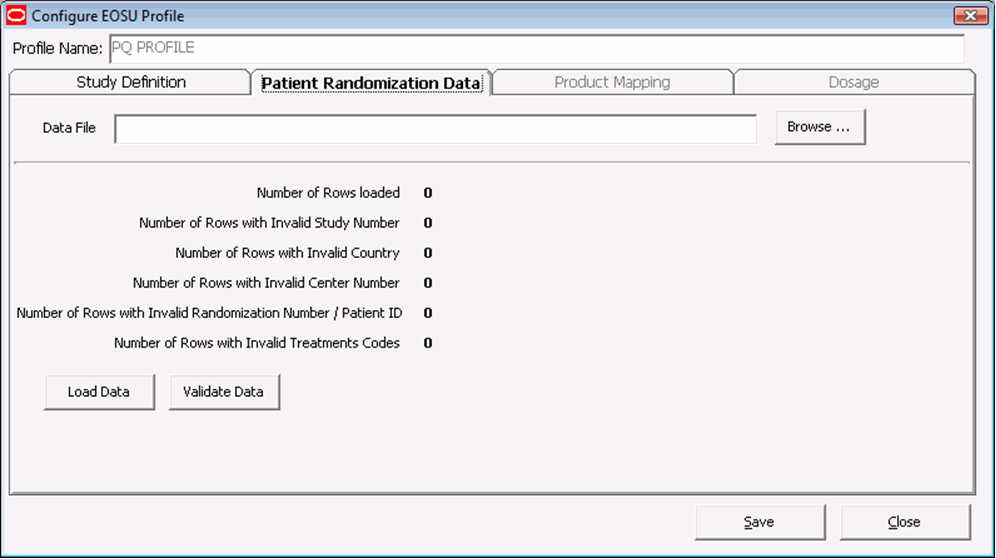
When the Patient Randomization Data tab opens:
Click Browse and select the appropriate Excel data file to load.
Click Save.
On the Product Mapping tab, you can map treatment codes from the Randomization Data to Study Products.
Note:
This release is intended to un-blind only Drug based Studies. Vaccine and Device based studies are not supported. EOSU will not show Products with Device and Vaccine licenses on the Profile configuration (Treatment Code to Study Product Mapping).The following table lists and describes the fields and controls on the Product Mapping tab.
| Field/Control | Description |
|---|---|
| Add | Enables you to:
Add a new treatment code to study product mapping Unblind a treatment code for multiple study products. |
| Delete | Deletes the current row in the table. |
| Saves | Saves the current profile with the new data. |
| Close | Closes the Configure EOSU Profile dialog box. |
To configure product mapping
Click the Product Mapping tab.
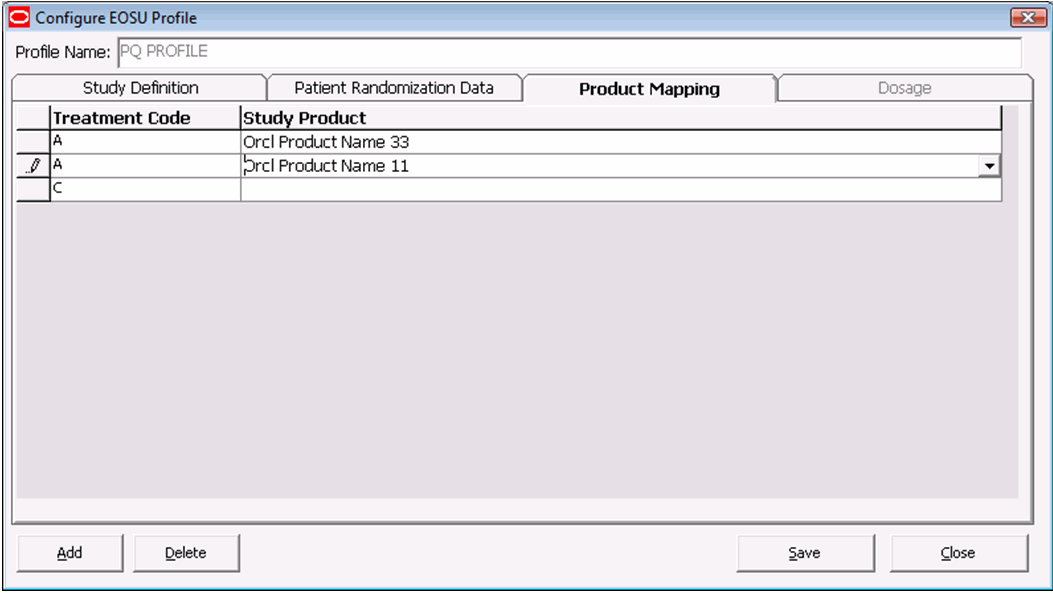
When the Product Mapping tab opens:
Select the appropriate treatment code for each study product from the Treatment Code drop-down.
Click Save to proceed to the Dosage tab.
You can enter dosage details for each treatment and study product on the Dosage tab.
The following table describes the Dosage Tab Fields and Controls:
| Field/Control | Description |
|---|---|
| Available Items | Contains a list of available dosage records for the profile. |
| Dosage Options | Enables you to select how you want to handle the dosage
Add to Existing Dosages - Add a specified dosage amount to the current dosage. Replace All by Following Dosages - Replace the current dosage with a new dosage. Remove All Existing Dosages - Remove all dosages from the selected dosage record. No Changes to Dosages - Do not make any changes. |
| Dosage Details | Enter the details regarding the dosages for the selected dosage record. |
| Add | Enables you to add a dosage record. |
| Modify | Enables you to modify an existing dosage record. |
| Delete | Enables you to delete an existing dosage record. |
| Delete All | Enables you to delete all dosage information |
| Save | Saves the dosage information. |
| Close | Closes the Dosage tab without saving the data. |
To configure dosage:
Click the Dosage tab.
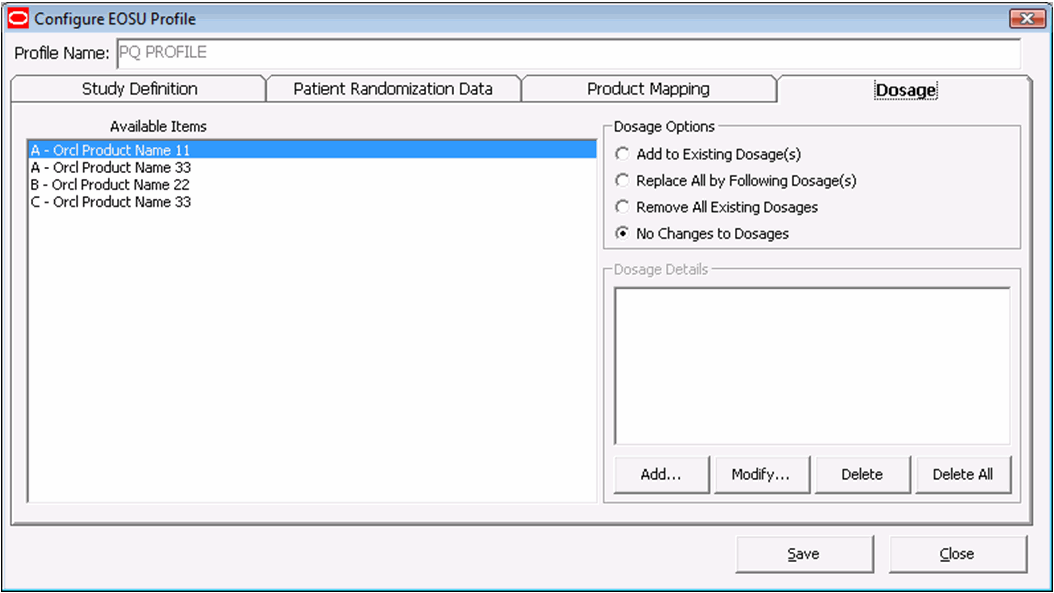
When the Dosage tab opens:
Select the appropriate dosage record from the Available Items list.
Select the appropriate option from the Dosage Options list.
Add. Modify, Delete, or Delete All the dosage as required.
Click Save.
A profile can be copied to another profile from the Profile Configuration Screen. The following restrictions apply when copying the profile:
Only one profile with a specific Study and Include Cases option (Suspected, Non- Suspected or All) can exist in the database.
A profile with ALL as the Include Cases option cannot be copied to any other profile. ALL includes Suspected and Non-Suspected case.
When copying a profile where the Include Cases option is Suspected, the system automatically creates another profile with the Non-Suspected flag is checked (assuming the same study with Non-Suspected option did not exist before).
When the system copies a profiles where the Include Cases option is Non-Suspected, the system automatically creates another profile with the Suspected flag checked (assuming the same study with Suspected option did not exist before)
Use the following procedure to copy an existing profile:
Select Start => Programs => Oracle => End of Study Unblinding => End of Study Unblinding.
When the log in window opens:

Enter the user name in the User Name field.
Enter the user password in the Password field.
Enter the name of the database where Argus Generic is installed in the Database field.
Click Login.
When the EOSU application opens, choose EOSU=> Configure EOSU.
EOSU opens the Configure EOSU: Select EOSU Profile window.
Note:
An asterisk ( * ) next to a profile name indicates that the profile configuration is incomplete and cannot be executed.
Click Copy to copy an existing EOSU profile.
The system copies the profile.
A profile can be modified from the Profile Configuration Screen. You can modify parameters on all tabs except on the Study Definition tab. On that tab, you can modify all parameters except the following:
Study Number
Include Cases
To modify a profile:
Select Start => Programs => Oracle => End of Study Unblinding => End of Study Unblinding.
When the log in window opens:
Enter the user name in the User Name field.
Enter the user password in the Password field.
Enter the name of the database where Argus Generic is installed in the Database field.
Click Login.
When the EOSU application opens, choose EOSU=>=> Configure EOSU.
EOSU opens the Configure EOSU: Select EOSU Profile window.
Note:
An asterisk ( * ) next to a profile name indicates that the profile configuration is incomplete and cannot be executed.Click Modify to make changes to an existing EOSU profile.
When the system opens the Configure EOSU Profile dialog box:
Modify the data on the various tabs as necessary.
You can delete a profile. When deleting a profile, be aware of the following restrictions:
If there is a past attempt to unblind cases with the same profile, the system will not allow you to delete the profile.
Profiles are only deleted logically. An EP_DELETED column in the EOSU_PROFILE table which, when not null, indicates that this profile has been deleted
Use the following procedure to delete a profile:
Select Start => Programs => Oracle => End of Study Unblinding => End of Study Unblinding.
When the log in window opens:
Enter the user name in the User Name field.
Enter the user password in the Password field.
Enter the name of the database where Argus Generic is installed in the Database field.
Click Login.
When the EOSU application opens, choose EOSU=> Configure EOSU.EOSU opens the Configure EOSU: Select EOSU Profile window.
EOSU opens the Configure EOSU: Select EOSU Profile window.
Note:
An asterisk ( * ) next to a profile name indicates that the profile configuration is incomplete and cannot be executed.Click Delete to delete an existing EOSU profile.
The system deletes the profile.
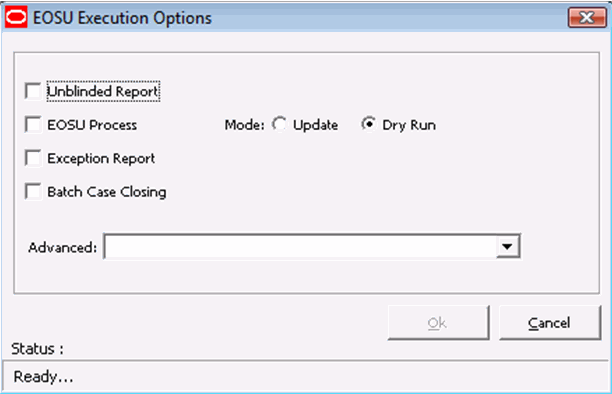
When you run an EOSU profile, you select Execution Options from the EOSU Execution Options dialog box. Table 4-6 lists and describes the function of each execution option.
The following table describes EOSU Execution Options:
| Option | Function |
|---|---|
| Unblinded Report | Generates an Unblinded report. |
| EOSU Process | Executes the profile against the Argus database. |
| Exception Report | Generates an exception for the last execution. |
| Batch Case Closing | Performs batch case closing for cases selected under this profile. |
| Update | Updates the Argus data when you run the profile. |
| Dry Run | Generates and reviews log files before updating the Argus data. |
| Advanced | Enables you to specify an Advanced Condition to restrict the cases processed by each execution. |
To execute a profileSelect Start => Programs => Oracle => End of Study Unblinding => End of Study Unblinding.
When the log in window opens:
Enter the user name in the User Name field.
Enter the user password in the Password field.
Enter the name of the database where Argus Generic is installed in the Database field.
Click Login.
When the EOSU application opens, choose EOSU=> Execute EOSU.
When the Execute EOSU dialog box opens:
Select a profile to execute.
Click Run.
Select the appropriate execution options. Click OK.
Select the appropriate Execution Options.
Click Run.
When executing an EOSU profile you may receive error messages under certain conditions.
Error Message: !! Critical Error Detected !!
Error Display:
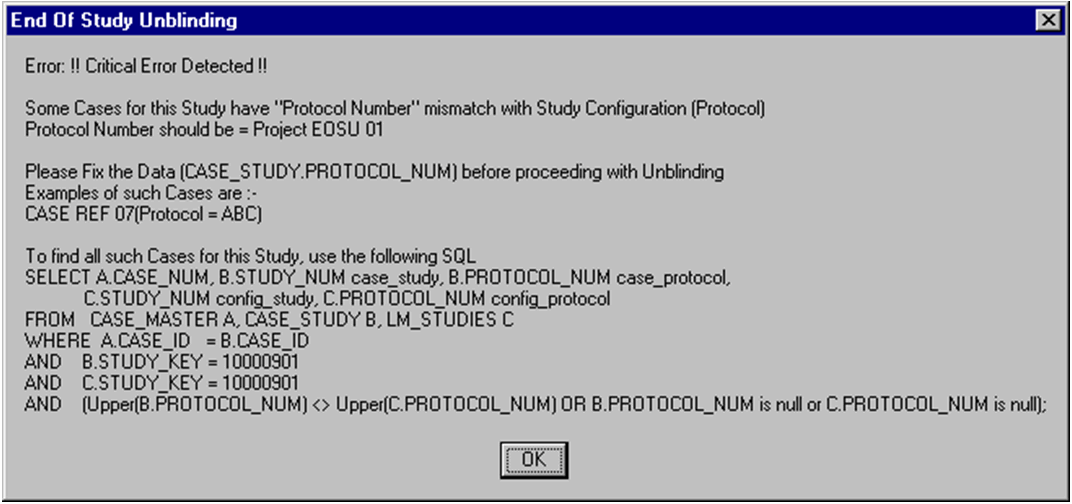
Reason for Error: The Study information (Protocol Number) does not match Study definition under List Maintenance.
As shown in the image above, a Case CASE REF 07 shows protocol number ABC where the protocol number Project EOSU 01 is used in study information. The EOSU software shows a maximum of four (4) cases followed by an SQL statement to help the user to capture all Cases with mismatched data. The User can then update the data in the database and re-execute the profile.
Resolution: Update the protocol number in list maintenance or update the Case Data (CASE_STUDY.PROTOCOL_NUM) with the matching PROTOCOL ID from the Clinical Study information and re-execute the profile
Comment: This message was introduced to prevent the system from hanging indefinitely when there is a data mismatch.
Error Message: Critical Error - Advance Condition…
Error Display:

Reason for Error: The where clause (CFG_ADV_COND.WHERE_CLAUSE) required to execute the EOSU software with an advanced condition (defined on the EOSU Execution Options dialog box to filter the number of cases being processed) is missing.
The software generates an exception report for cases that cannot be Unblinded. The following is a list of possible errors that can be associated with failed cases:
Case is in use by User <XYZ>. To release lock, request the user to login and logout.
Case is unlocked or open.
The Randomization data is missing for the Country, Study, Center, and Randomization Number.
The Patient Exposure drug could not be located in LM_STUDIES.
Case Narrative is larger than 32KB.
There was an Oracle Error during breaking of the Blind. <Oracle Error Message>
Failed in PROCESS_CASE. Oracle Text is <Oracle Error Message>
Duplicate entries in Randomization Data (Country+Study+Center+Rand#) are matching the Case Data.
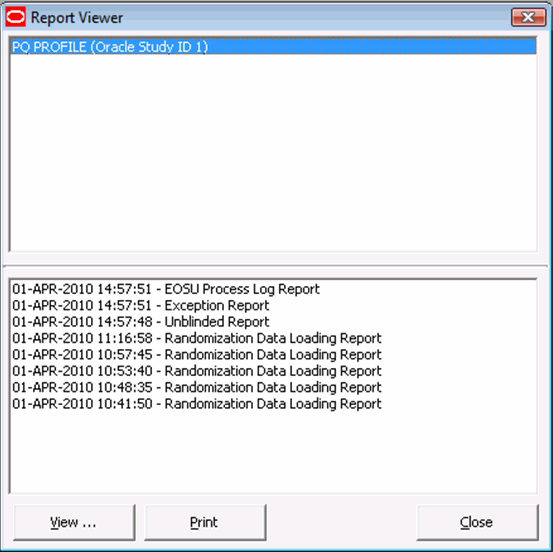
Use the EOSU Report Viewer to select and view unblinded reports. Table 4-7 lists and describes the fields and controls on the Report Viewer dialog box.
The following table describes EOSU Report Viewer Fields and Controls:
| Field/Control | Description |
|---|---|
| View | Opens the report in Microsoft Word. |
| Prints the report to the printer. | |
| Close | Closes the current window. |
Use the following procedure to use the EOSU Report Viewer:
Select Start => Programs => Oracle => End of Study Unblinding => End of Study Unblinding.
When the log in window opens:
Enter the user name in the User Name field.
Enter the user password in the Password field.
Enter the name of the database where Argus Generic is installed in the Database field.
Click Login.
When the EOSU application opens, choose EOSU=> Report Viewer.
When the Report Viewer dialog box opens:
Select a report to view from the list at the bottom of the dialog box.
Click View… to view the report in Microsoft Word.
You can exit from the EOSU application by doing either of the following:
Select File => Exit.
Press ALT+F4.