 Understanding PBI Data Exchange
This chapter provides an overview of PBI data exchange and discusses how to:
Prepare for PBI data exchange.
Create and maintain CAS Details records.
Update multiple CAS records.
Generate an XML file to send to SMS.
Import CAS details from SMS.
Generate PBI communications.
See Also
Understanding PBI Data ExchangeCampus Solutions provides the following processing capabilities to support institutions with the Tier 4 student visa requirements of the United Kingdom Borders Agency (UKBA):
The collection of the data from overseas applicants and continuing students to allow CAS requests to be submitted in bulk to the UKBA via the Sponsor Management System (SMS).
The creation of XML files to transfer to SMS using Bulk Upload to request one or more CAS numbers.
The import of CAS details from XML files created by SMS using Bulk Export after the UKBA has assigned CAS numbers.
The generation of communications to notify an applicant or student of their assigned CAS number.
The creation of XML files to transfer to SMS using Bulk Update in cases where the amount of fees paid by the applicant or student has changed after the CAS number has been assigned.
The generation of communications to notify an applicant or student of the changed fee details.
The creation of XML files to transfer to SMS using Bulk Report to report on applicants or students who have not enrolled or are not in attendance at your institution.
The following is an overview of how CAS requests are processed:
The institution creates CAS Details records in Campus Solutions for overseas applicants that require a student visa or for continuing students that require an extension to an existing visa. The CAS Details record can be created at the point the application is received or the institution may wish to wait until the applicant has accepted an offer of admission before creating the record.
The institution requests the Confirmation of Acceptance of Studies (CAS) number for the applicant or student either by submitting a bulk upload XML file created from Campus Solutions to SMS or by submitting an individual request for an applicant or student directly to the UKBA portal.
SMS processes each record and, if the processing is successful, assigns a CAS number and status (Assigned) to each record. The institution can use Campus Solutions to import these updates, which contain the CAS number, from a bulk export XML file generated from SMS.
The institution is responsible for passing the CAS number on to the applicant or student.
The applicant or student can then use the CAS number to apply for his or her student visa.
The institution can modify existing CAS records in SMS (for example, when students pay the tuition fees and you want to modify the CAS records for these students in SMS). To update the CAS records the institution can use Campus Solutions to create a Bulk Update XML file and submit the file to SMS.
When the applicant or student submits the visa application, UKBA updates the CAS status in SMS to Used. The institution can view the updated CAS record by signing into SMS or by using Campus Solutions to import the updated records from a bulk export XML file generated from SMS.
The institution can use Campus Solutions to fulfill their reporting duties for applicant or student who have failed to enroll or are not in attendance. The institution can use Campus Solutions to create a Bulk Report XML file that contains data of students who have used a CAS number supplied by the institution but have not registered or enrolled.
Note. The academic institution and SMS exchanges the applicant and student data in XML format. Review the Bulk Data Transfer Toolkit available from the UKBA website. This toolkit provides details on the XML files such as the XML schema, examples of export and import XML files, and validation rules.
See The UK Border Agency website
The CAS Maintenance component and the CAS Record Update process are used to create and manage CAS Details records and prepare records for inclusion a Bulk Upload file to request CAS numbers from the UKBA. An optional verification step can be built into the process to allow the request details to be reviewed before the request is sent.
The following diagram illustrates the process for creating and maintaining CAS Details records.
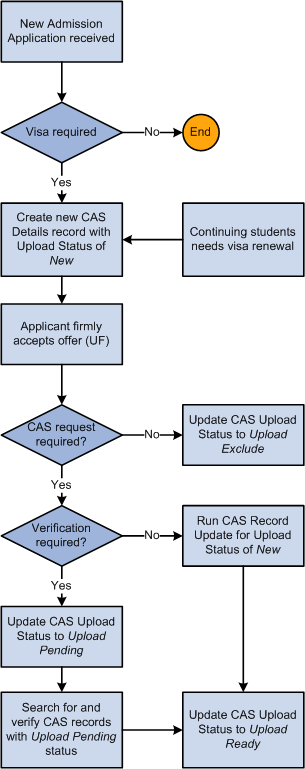
Creating and Maintaining a CAS Details Record
Once records are ready to be sent to the UKBA the Create Extract process, the Upload Extract Data component and the Create and Validate XML processes are used to create and review upload records and to generate the XML file for transfer to SMS.
The following diagram illustrates the process for creating and sending the Bulk Upload XML file to SMS.
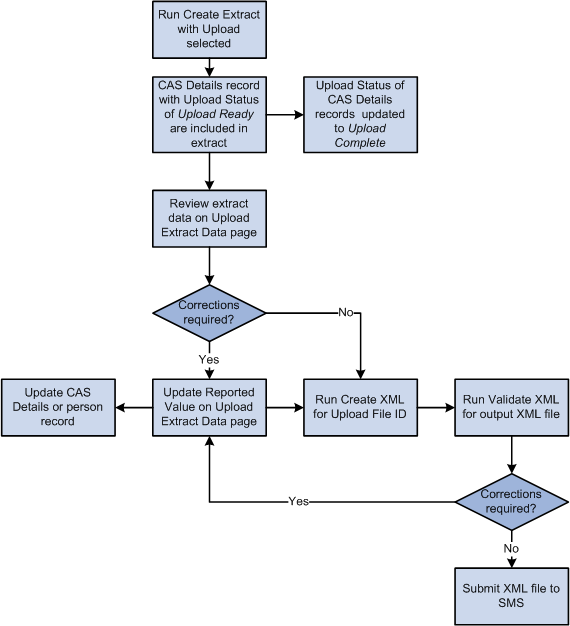
Creating and Sending the Bulk Upload XML file to SMS
After you submit the CAS number requests to SMS the UKBA assigns a CAS number to the applicant or student. You can generate a Bulk Export XML file from SMS and import the details using the Import CAS Details process.
Download the XML file and load the XML data into Campus Solutions using the import process. The process will update the CAS Number and CAS Status details for matched. Unmatched records can be reviewed using the CAS Staging Data component, match details added and the records re-processed.
You can also import subsequent CAS status changes from SMS when the UKBA update the status to one of the post-assigned values: Used (when the applicant has used the CAS number to apply for a visa), Cancelled, Expired, Obsolete and Withdrawn.
The following diagram illustrates the process for importing CAS Details:

Importing CAS Details
Once the CAS number has been assigned any changes to the fees paid fields need to be reported to the UKBA via the Bulk Update file. When any of the fees paid fields is updated for CAS records that have a CAS number, the system automatically sets the Update Status to the status defined for Update Required. The Create Extract process can then be run to select these records for inclusion in the Bulk Update XML file. You can choose to follow an optional verification step before setting the Update Status to Update Ready.
While the CAS status is Assigned a CAS record can be included in multiple Bulk Updates as the fees paid values change over time. Once the CAS Status is updated to one of the post-assigned values then further updates for the fees paid fields are not required.
The following diagram illustrates the process for preparing CAS records for inclusion in the Bulk Update XML file.

Preparing CAS Records for the Bulk Update XML file
The following diagram illustrates the process for creating the Bulk Update XML file.
CAS records need to be submitted to SMS in the Bulk Report file if the applicant or student has used the CAS number in their visa application but is not attending your institution. You can set the Report Status to indicate the applicant or student is not attending. Once you have set this status, the Create Extract Data process can be used to select record for inclusion in the Bulk Report XML file.
The following diagram illustrates the process for preparing records for inclusion in the Bulk Report XML file:

Preparing CAS Records for the Bulk Report XML file
The following diagram illustrates the process for creating the Bulk Report XML file.
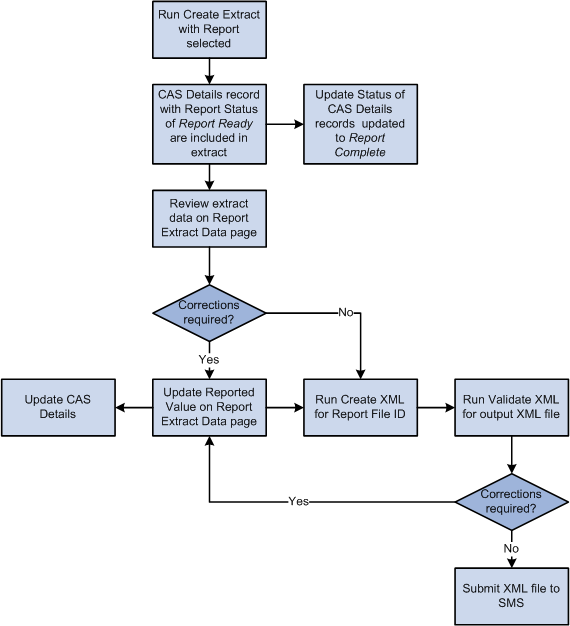
Creating the Bulk Report XML File
Preparing for PBI Data ExchangeBefore you start importing and exporting SMS data, you must set up Campus Solutions as follows:
Enable the PBI functionality for all institutions or for a specific institution.
Set up a PBI configuration record.
Set up CAS statuses.
Define the UKBA Sponsor License Number for partner institutions.
Enter the PBI data for academic programs.
Enter the PBI data for academic plans.
Set up PBI Communications
Defining field values at the configuration level
You can define default values for fields in the Upload extract on the PBI Configuration page if you do not want to specify field values separately at the program and plan levels or at the individual CAS record level.
Defining field values at the academic program and plan levels
For a particular academic program or plan, the value that your institution wants to include in the Upload or Update extract for one or more fields may be the same for all the applicants or students for that academic program or plan. Use the Academic Program and Academic Plan PBI Data pages to define field values at program and plan level respectively, rather than using the CAS Maintenance component to enter field values for each individual applicant or student.
If the same value applies to all academic plans associated with an academic program the value can be defined at academic program level only. The defined values are used to default the values for the corresponding fields when a new CAS Details record is created.
Defining field values at the CAS record level
You can choose to enter or update field values at the applicant or student level using the CAS Maintenance component.
See "Creating and Maintaining CAS Details" section in this chapter.
Note
For most fields the extract process will first look at the CAS Details record to derive a field value. In most cases if a default value has been defined at Academic Plan, Academic Program or Configuration level then the field will be automatically populated in the CAS Details record when it is created. For some fields if a value has not been defined at that CAS Details level, then the process will look at the Academic Plan level. If a value has not been defined at the Academic Plan level, then it looks at the Academic Program level. If a value has not been defined at Academic Program level, finally it derives the field value from the Configuration level. Refer to the "(GBR) PBI Field Derivation" appendix for information about the derivation of individual fields.
 Pages Used to Prepare for PBI Data Exchange
|
Page Name |
Definition Name |
Navigation |
Usage |
|
SA Features |
SCC_INSTALL_SA2 |
Set Up SACR, Install, Student Admin Installation, SA Features |
Enable the PBI pages and links in Campus Solutions. |
|
Academic Institution 6 |
SSR_INST_FEATURES |
Set Up SACR, Foundation Tables, Academic Structure, Academic Institution Table, Academic Institution 6 |
Enable the PBI pages and links in Campus Solutions for a specific institution. |
|
PBI Configuration |
SAD_PB_CONFIG |
Student Admissions, PBI Processing, PBI Configuration |
Create a PBI configuration record. Enter the sponsor license numbers of your institution and campuses. Also, specify field and course date defaults, and applicant and student communication details. |
|
Statuses |
SAD_PB_CONFIG1 |
Student Admissions, PBI Processing, PBI Configuration, Statuses |
Define the various processing statuses for CAS records. |
|
Regional |
SAD_UC_SCHOOL_SBP |
Campus Community, Organization, Create/Maintain Organizations, Organization Table, Regional |
Define the UKBA Sponsor License Number for an external organization being reported to UKBA as a Partner Institution. |
|
Academic Program PBI Data |
SAD_PB_PROG |
Set Up SACR, Foundation Tables, Academic Structure, Academic Program Table, PBI Data |
Specify field values at program level. |
|
Academic Plan PBI Data |
SAD_PB_PLAN |
Set Up SACR, Foundation Tables, Academic Structure, Academic Plan Table, PBI Data |
Specify field values at plan level. |
Enabling the UK Fields for All InstitutionsAccess the SA Features page (Set Up SACR, Install, Student Admin Installation, SA Features).
Select the PBI check box to enable PBI pages, fields, and links fields in Campus Solutions.
Enabling the UK Fields for a Specific InstitutionAccess the Academic Institution 6 page (Set Up SACR, Foundation Tables, Academic Structure, Academic Institution Table, Academic Institution 6).
Select the PBI check box to enable PBI pages, fields, and links in Campus Solutions for a specific institution.
Setting Up a PBI Configuration RecordAccess the PBI Configuration page (Student Admissions, PBI Processing, Configuration).
|
Enable Sub-Plan Reporting |
Select the check box for Sub-Plans to be considered in the derivation of Course Title in the Upload extract. |
|
Sponsor License Number |
Enter your institution's license number. The value is used to derive the corresponding field in the Upload extract. |
Use the Tier ID, Category and Schema ID fields to specify the values that are used to derive the corresponding fields in the Upload extract.
|
Main Site of Study |
Enter the Location if the same Main Site details are reported in the Upload extract for all CAS records for your institution. The value is displayed as the default Main Site on the CAS Details page. The value is used in the derivation of the Main Site address fields in the Upload extract if no Reported Site is defined in the individual CAS Details record. |
Field Defaults
Use this region to specify the field values used to derive the corresponding fields in the Upload and Update extracts. These values are used as default values if no value is defined at program, plan, or individual CAS level.
Admit Term Defaults
For each term, define the values that are used to populate the fees and course date fields in new CAS records if no values are defined at plan or program level. The Latest Acceptance Date should be on or after the Course Start Date.
Communication Details
Campus Community's Communication Generation process uses the event IDs, you set up on this region, to notify the CAS number or fee update details to the applicant or student.
|
Notification Type |
Indicate whether you want to notify CAS Number or Fee Update. |
|
Record Type |
Indicate whether you want to notify the applicant or student. |
|
Event ID |
Select the event ID that you want the system to assign the applicant or student. You can select only event IDs defined for the CASN administrative function in Campus Community. The CASN function captures Academic Career, Career Number and CAS Number as variable data. Refer to the section "Setting Up PBI Communications" for information about the event ID setups. |
The system assigns an event ID for CAS Number notification type to a person when the Import CAS Details process loads the CAS number from the inbound XML file for the first time. Refer to the section "Importing CAS Details" for more information about how the process assigns event IDs for CAS Number notification.
The system assigns an event ID for Fee Update notification type when the Create Extract process creates the update extract data.
You can create one or more communication records using the Communication Generation process to notify the CAS number or fee update details to the applicant or student.
Campus Details
Use this region to specify Sponsor Licence Numbers for individual Campuses if your institution has a different licence number for a particular campus. The value is used to derive the corresponding field in the Upload extract based on the Campus value of the applicant or student in place of the value defined for your institution. If no value is defined the value defined for the institution is used.
Setting up CAS StatusesAccess the Statuses page (Student Admissions, PBI Processing, PBI Configuration, Statuses).
|
Apply Academic Org Security (apply academic organization security) |
Select to have the Create Extract process choose only that CAS record for which the user ID has access to at least one academic organization. Clear this check box if you want the process to choose a CAS record regardless of whether the user ID has access to the related academic organization. Refer to the following "Applying Academic Organization Security to the Create Extract Process" topic in this section for more information about this setup. |
|
New CAS Record |
Choose an Upload status value that the system assigns to new CAS records. If you do not choose a value, the system assigns a blank Upload status. |
|
Upload Ready |
Choose an Upload status value. The Create Extract Data process uses this value to select CAS records for inclusion in the Upload extract. |
|
Upload Complete |
Choose an Upload status value. The Create Extract Data process uses this value to create a new effective dated record to indicate that a CAS record has been included in the Upload extract. |
|
Update Required |
Choose an Update status value that the system assigns to CAS records where the CAS number has been imported and a subsequent change is made to one of the fees paid fields. |
|
Update Ready |
Choose an Update status value. The Create Extract Data process uses this value to select records for inclusion in the Update extract. |
|
Update Complete |
Choose an Update status value. The Create Extract Data process uses this value to create a new effective dated record to indicate that a CAS record has been included in the Update extract. |
|
Report Ready |
Choose a Report status value. The user uses this value to indicate that a record is ready to be included in the Report extract. The Create Extract Data process uses this value to select records for inclusion in the Report extract. |
|
Report Complete |
Choose a Report status value. The Create Extract Data process uses this value to create a new effective dated record to indicate that a CAS record has been included in the Report extract. |
Statuses are delivered as translate values for Upload (SAD_PB_UPLOAD), Update (SAD_PB_UPDATE) and Report (SAD_PB_REPORT). You can amend or add to the translate values as required.
If additional verification steps are required before a CAS record is ready for inclusion in the Upload extract, additional interim statuses can be defined and used to manage individual CAS records. Additional statuses can be defined and used to prevent CAS records from being included in the Upload extract if required.
If a verification step is required between one of the fees paid values being updated and the record being included in the Update extract, different status values can be defined for Update Required and Update Ready. If no verification step is required the same status value for Update Ready can be used for both fields.
Note. To allow records to be retrieved using the single Processing Status search field in the CAS Maintenance component it is recommended that distinct status values are defined for Upload, Update and Extract.
The following is a scenario on how the statuses work where there are verification steps before a CAS record is included in an extract:
Use PeopleTools to create additional status values required. For example: new Upload Statuses of Upload Exclude and Upload Pending and a new Update Status of Update Pending.
Use the Statuses page to define the required values.
Use the CAS Maintenance component to create CAS records. The Upload Status is automatically set to New when you create the records.
Use the CAS Record Update process or CAS Details page to set the Upload Status to Upload Exclude for records that should be excluded from the Upload extract. For example, for a second CAS record for an applicant where the previous CAS record has already been sent and a CAS number requested.
Use the CAS Record Update process or CAS Details page to set the Upload Status to Upload Pending for records where all the details have been entered and the record needs to be verified before it is included in an Upload extract.
Use the CAS Record Update process or CAS Details page to change the Upload Status from Upload Pending to Upload Ready for records that have been verified and are ready to be included in an Upload extract.
Run the Create Extract Data process with the Create Upload option selected. The process picks up only those records that have an Upload Status of Upload Ready.
After including the record data in the extract, the Create Extract Data process sets the Upload Status to Upload Complete and saves the Upload File ID to each CAS record included.
After importing the CAS number, when you update the fees paid details on the CAS Details page, the system automatically sets the Update Status to Update Required.
Use the CAS Record Update process or CAS Details page to set the Update Status to Update Pending for records where the fees paid changes need to be verified before the record is included in an Update extract.
Use the CAS Record Update process or CAS Details page to change the Update Status from Update Pending to Update Ready for records that have been verified and are ready to be included in an Update extract.
Run the Create Extract Data process with the Create Update option selected. The process picks up records that have an Update Status of Update Ready.
After including the record data in the extract, the Create Extract Data process sets the update status to Update Complete.
Use the CAS Record Update process or CAS Details page to set the Report Status to Report Ready for the CAS records where the CAS number has been used and the applicant or student has not enrolled at your institution.
Run the Create Extract Data process with the Create Report option selected. The process picks up only those records that have a Report Status of Report Ready.
After including the record data in the extract, the Create Extract Data process sets the status to Report Complete.
Applying Academic Organization Security to the Create Extract Process
These are the high-level steps to set up academic organization security for the Create Extract process:
Select the Apply Academic Org Security on the Statuses page.
Use the Academic Org Security page to grant or restrict access to academic organizations (Set Up SACR, Security, Secure Student Administration, User ID, Academic Org Security, Academic Org Security). Only those academic organizations defined using the Tree Manager are available for selection on the Academic Org Security page.
See PeopleSoft Campus Solutions 9.0 Application Fundamentals PeopleBook, Designing Your Academic Structure, Defining Academic Organizations
See PeopleSoft Campus Solutions 9.0 Application Fundamentals PeopleBook, Securing Your Academic Institution, Securing Academic Organizations
Use the Taxonomy/Campus page to link academic programs to academic organizations (Set Up SACR, Foundation Tables, Academic Structure, Academic Program Table, Taxonomy/Campus).
If you are not linking programs, link plans as described in the next step.
Use the Owner page to link academic plans to academic organizations (Set Up SACR, Foundation Tables, Academic Structure, Academic Plan Table, Owner).
If you are not linking plans, link programs as described in the previous step.
The Create Extract process performs the following steps if you select the Applying Academic Organization Security check box on the Statuses page:
Step 1: Select the program and plan for the CAS record
For a CAS record with type = applicant:
Select the academic program from the latest effective dated Campus Solutions admission application record (the CAS Details page displays this record).
Select the reported plan from the CAS Details record or if the reported plan does not exist, then select the plan that starts with the lowest alphabet from the latest effective dated Campus Solutions admission application record. For example, suppose if the reported plan does not exist and there are two plans: Biology and Zoology. Then, select Biology.
For a CAS record with type = student:
Select the academic program from the latest effective dated Campus Solutions student program record (the CAS Details page displays this record).
Select the reported plan from the CAS Details record or if the reported plan does not exist, then select the plan that starts with the lowest alphabet from the latest effective dated Campus Solutions student program record.
Step 2: Use the Taxonomy/Campus and Owner pages to find out the academic organizations that are linked with the selected academic program and academic plan.
Step 3: Use the Academic Org Security page to find out whether the user ID that you are using to run the Create Extract process has access to the academic organizations.
Step 4: If the user ID has access to the academic organization, include the CAS record in the extract.
Entering the PBI Data for an Academic ProgramAccess the Academic Program PBI Data page (Set Up SACR, Foundation Tables, Academic Structure, Academic Program Table, PBI Data).
This page appears only if you have selected the PBI check box on the Academic Institution 6 or SA Features page. The values defined are used to populate the corresponding fields in new CAS records if no value is defined for the field at plan level. Values are also used during field derivation.
See the "(GBR) PBI Field Derivation" appendix for information about the derivation of individual fields.
Entering the PBI Data for an Academic PlanAccess the Academic Plan PBI Data page (Set Up SACR, Foundation Tables, Academic Structure, Academic Plan Table, PBI Data).
This page appears only if you have selected the PBI check box on the Academic Institution 6 or SA Features page. The values defined are used to populate the corresponding fields in new CAS records. Values are also used during field derivation.
See the "(GBR) PBI Field Derivation" appendix for information about the derivation of individual fields.
Setting Up PBI CommunicationsYou will need to set up Campus Community communications to notify applicants and students about their assigned CAS numbers or fee update details. This section discusses the steps required to define the Event ID values that are used in the PBI Configuration page, the Import CAS Details process (for CAS Number notification), the Create Extract - update process (for Fee Update notification), the 3C Engine process and the Communications Generation process to create communications to notify applicants and students. You should also refer to the PeopleSoft Campus Community 9.0 PeopleBook for setting up communications.
This section provides communications setup examples for sending CAS number notifications to applicants and students. Similar setups are required for Fee Update notification. The Fee Update notification should contain the relevant update data: First Year Course Fees, Course Fees Paid, Accommodation Fees Paid, and Boarding Fees Paid.
The PeopleSoft system provides a CASN administrative function that captures the variable data required to identify the CAS record that has been updated. The variable data can be used to generate communications, checklists or comments associated with an Event ID. No further setup is required for this function.
The following is the variable data that is automatically populated from the incoming CAS record:
Academic Career
Student Career Number
CAS Number
This example shows the CASN administrative function:
To access the Administrative Function table, select Set Up SACR, Common Definitions, Administrative Function Table.
Creating Queries
Access the Query Manager page (Reporting Tools, Query, Query Manager).
The PeopleSoft system delivers example queries, one for CAS Number notifications to applicants (QA_SAD_PB_CASA) and one for CAS Number notifications to continuing students (QA_SAD_PB_CASB).
Create your own queries to select all the data you require for your communications. Refer to the "Defining Communication Data Sources" section in this chapter for information about data sources.
Each query requires the following:
The core record must be included in the query associated with the administrative function. For the CASN function, the CAS Details record (SAD_PB_CAS) must be included.
A prompt must be created for the applicant/student ID. The Unique Prompt Name must be changed to Person_ID.
Prompts must also be created for the variable data fields relating to the administrative function, ACAD_CAREER, STDNT_CAR_NBR and SAD_PB_CAS_NUMBER.
This example shows the selected fields for the QA_SAD_PB_CASA query:
This example shows the selected records for the QA_SAD_PB_CASA query:
This example shows the selected fields for the QA_SAD_PB_CASB query:
This example shows the selected records for the QA_SAD_PB_CASB query:
Defining Communication Data Sources
Access the Communication Data Source page (Campus Community, Communications, Set up Communications, Communication Data Source).
Define Communication Data Sources for each query. .
This example shows the CASA data source map ID:
This example shows the CASB data source map ID:
Defining Report Definitions
Access the Definition page (Reporting Tools, BI Publisher, Report Definition).
Example templates are delivered that can be used in Report Definitions for CAS Number notifications to applicants (CASA_1) and CAS Number notifications to students (CASB_1). The templates have been created from the XML file downloaded from each Data Source using Oracle BI Publisher.
Create your own template files. There are several possible methods including installing BI Publisher for Word which creates a new menu option in Word. A template can then be created from the XML document downloaded from the Data Source page.
This example shows the Definition page for CASA:
This example shows the Template page for CASA:
This example shows the Definition page for CASB:
This example shows the Template page for CASB:
Defining Standard Letters
Access the Standard Letters page (Campus Community, Communications, Set up Communications, Standard Letter Table).
Create standard letters for applicants and students. Select Report Name to add the details.
This example shows the Standard Letters page for CSA:
This example shows the Standard Letters page for CSB:
Defining Communication Contexts
Access the Communications Context page (Campus Community, Communications, Set up Communications, Communications Context Table).
Create communication contexts for applicants and students.
This example shows Communications Context page for CASA:
This example shows Communications Context page for CASB:
Defining Communication Categories
Access the Communications Category page (Campus Community, Communications, Set up Communications, Communications Category Table).
Create communication categories for applicants and students using the CASN administrative function and the communication contexts created in the previous step.
This example shows the Communications Categories page for CASA:
This example shows the Communications Categories page for CASB:
Defining Communication Speed Keys
Access the Speed Key Table page (Campus Community, Communications, Set up Communications, Speed Key Table).
Create speed keys for applicants and students using the CASN administrative function and the communication contexts and categories created in the previous steps.
This example shows the Communications Speed Keys page for CASA and CASB:
Defining Communication 3C Groups
Access the Communication 3C Groups page (Campus Community, Communications, Set up Communications, Communication 3C Groups).
Define the new categories for the appropriate Communication 3C Groups for the user depending on your institution's group setup (Set Up SACR, User Defaults, User 3C Group Summary).
This example shows the Communication 3C Groups page for CASA:
This example shows the Communication 3C Groups page for CASB:
Creating Event Definitions
Access the Event Definition page (Campus Community, 3C Engine, Set Up 3C Engine, Event Definition).
Define events using the CASN administrative function and communication keys defined in previous steps. Additional communications, comments or checklists can be added to the events if required.
This example shows the Event Definition page for CASA:
This example shows the Event Definition page for CASB:
Defining Event 3C Groups
Access the Event 3C Groups page (Campus Community, 3C Engine, Set Up 3C Engine, Event 3C Groups).
Define the new event IDs for the appropriate Communication 3C Groups for the user depending on your institutions group setup (Set Up SACR, User Defaults, User 3C Group Summary).
This example shows the Event 3C Groups page for CASA:
This example shows the Event 3C Groups page for CASB:
See Also
"Generating PBI Communications" section in this chapter.
PeopleSoft Campus Community Fundamentals 9.0 PeopleBook, "Setting Up Communications"
Creating and Maintaining CAS DetailsYou can use the CAS Maintenance component to create and update CAS records.
The CAS Maintenance component has a CAS Details page and a Report Details page. Use the pages to enter upload, update and report extract field values at the application or student career level.
This section discusses how to:
Create new CAS records.
Review existing CAS records.
Enter or update PBI upload/update data.
Enter or update PBI report data.
Pages Used to Create and Maintain CAS Details|
Page Name |
Definition Name |
Navigation |
Usage |
|
CAS Details |
SAD_PB_CAS |
|
Enter or update upload and update field values for a CAS Details record at the application or student program level |
|
Report Details |
SAD_PB_CASREPDTLS |
|
Enter or update report field values for a CAS Details record at the application or student career level. |
Creating New CAS recordsYou can use the CAS Maintenance component to add new CAS Details records.
Applicants
New CAS records can be added for applicants that require a student visa using the CAS Maintenance component. You can access this component from the Applicant Entry or PBI Processing menus or by clicking the CAS Details link on the Application Program Data page in the Maintain Applications component. Select a record type of Applicant to add a new record.
Continuing Students
New CAS records can be added for continuing students that require an extension to an existing visa. To add new CAS records for continuing students use the CAS Maintenance component from the menus or click the CAS Details link on the Student Program page. Select a record type of Student to add a new record.
Adding CAS Records
Add a CAS record for each CAS request. You can add multiple CAS records for an application or student program record. In such a case, the system defaults the record number to 1 for the first CAS record and increments the record number as you add new records for the application or student program record.
Note that the Import CAS Details and the Import Applicant Data processes can also create new CAS records.
See the "Importing CAS Details" section in this chapter.
See the "Setting Up UCAS and GTTR Options" section in the (GBR) Managing UCAS and GTTR Applications chapter.
Reviewing Existing CAS recordsYou can use the CAS Maintenance component to search for existing CAS Details records.
Search for existing records by entering criteria on the search page. The search values for Academic Institution, Academic Career and Admit Term are defaulted from the values defined on the User Defaults pages.
Records with a particular Upload, Update or Report Status can be selected by adding a value in the Processing Status field. For example, select Update Complete in the Processing Status field of the search page to search for records that the Create Extract process has included in an Update extract.
Note. To allow records to be searched for using the Processing Status field it is recommended that distinct status values are defined for Upload, Update and Extract. Refer to the "Setting up CAS Statuses" section in this chapter for more information.
For users to have access to CAS records for applications of particular application centers using the Application Entry menu, you must grant the users access to these application centers via the Application Center Security page.
See PeopleSoft Campus Solutions 9.0 Application Fundamentals PeopleBook, "Securing Recruiting and Admissions".
Security is not applied when the record type is student or when records are accessed using the PBI Processing menu.
Entering PBI Data for Applicants or StudentsAccess the CAS Details page (Student Admissions, PBI Processing, CAS Maintenance, CAS Details).
You can use the CAS Details page to view a CAS record's history of changes throughout its processing cycle. Each history change record has a unique Effective Date and Sequence Number combination.
|
Personal Information |
Click to navigate to the Biographical Details page of the Add/Update a Person component. |
|
Upload Status |
Identifies whether the record has been identified as:
Once the CAS Number and Status have been imported the system makes this field non-editable. |
|
Upload File ID |
Displays the File ID generated when the record is included in the Upload extract. |
|
CAS Number, Export File ID, CAS Status, and CAS Status Date |
Displays the values imported using the Import CAS Details process. The CAS Number field is used to derive the corresponding field in the Update and Report extracts. |
|
Update Status |
Identifies whether the record has been identified as:
The system enables this field once the CAS Number and Status has been imported and the CAS Status is Assigned. Once the CAS Status is updated to one of the post-assigned values, for example, Used, the field becomes non-editable. Once the CAS Status is Assigned, the system will automatically update the Update Status to Update Required when changes are made to the Course Fees Paid, Accommodation Fees Paid or Boarding Fees paid values. |
|
Update File ID |
Displays the File ID generated when the record is included in the Update extract. If the record is included in multiple Update extracts the most recent Update File ID is displayed in the current effective date/sequence record. |
|
User ID |
Indicates the User ID and name of the user who last updated the record. If the Create Extract Data or Import CAS Details process updated the record, the User ID field indicates the user who ran the process. |
Applicant Details
The following is an example of the Applicant Details region on the CAS Details page.
|
Report Month/Year Only |
Select to include the date of birth in CCYY-MM format in the Upload extract |
|
Report Year Only |
Select to include the date of birth in CCYY format in the Upload extract. |
|
UCAS Personal ID |
Displays the value imported from UCAS. The system selects this value from External System ID records with ID type UC or UP. The most recent effective dated record is displayed. The same value is derived for the corresponding field in the Upload extract when the record type is Applicant. Click the link to navigate to the UCAS Applicant Summary page. Note. The GTTR Personal ID is not included in the CAS Details page. Therefore, the UCAS Personal ID link is not functional for GTTR applicants. To access a GTTR application, select the Maintain Applications link on the header region of the CAS Details page, and then select the Personal ID link on the Application Program Data page. |
|
Nationality |
Displays the country value of the non-EU Citizenship record for the applicant or student. |
|
Select Nationality |
Click if you want to change the default value or select a new value for the Nationality field. If multiple non-EU Citizenship records exist on the Campus Community Citizenship/Passport page, then the record with the lowest country code is displayed by default in the Nationality field and the link is displayed to allow an alternative record to be selected. |
|
Passport Number |
Displays the passport number of the record associated with the Citizenship record displayed in the Nationality field. |
|
Select Passport |
Click if you want to change the default value or select a new value for the Passport field. If multiple Passport records exist on the Campus Community Citizenship/Passport page for the selected Nationality , then the passport record with the most recent Issue Date is displayed by default in the Passport Number field and the link is displayed to allow an alternative record to be selected. Passport records with an Expiration Date in the past are not considered. |
|
Partner Institution and Overseas Institution |
The system automatically populates this field when a new CAS record is created. The value is populated from the Academic Plan PBI data page if a value is defined for the Academic Plan of the application or student career. If a value is not defined for the Academic Plan, the value is populated from the Academic Program PBI data page if a value is defined for the Academic Program of the application or student career. Enter an external ID value if the value has not been set up on the Academic Program or Plan PBI data pages or if you want to enter a different value for the applicant or student. The Overseas Institution prompt is restricted to organizations where the primary location has a country other than GBR. |
Course Details
The following is an example of the Course Details region on the CAS Details page.
|
Academic Plan |
For record type Applicant, if multiple plans exist in the Application Plan Data record, the field displays the plan code which is alphabetically lowest. For record type Student, if multiple plans exist in the Student Program/Plan record, the field displays the plan code which has lowest sequence number |
|
Reported Plan |
Select an alternative plan if the required value is different to the default value displayed in the Academic Plan field. This value will be used in place of the Academic Plan in deriving values in the Upload extract. |
|
Course Title Override |
Enter the course title that the system uses in the Upload extract. The system uses this value in place of the subplan level values or plan level values in the Upload extract. |
|
Main Site of Study |
Displays the value defined for your institution from the PBI Configuration page. If no value is defined in the configuration record the field displays the primary Location of the Campus displayed for the applicant or student. Displays the value defined for your institution from the PBI Configuration page. If no value is defined in the configuration record the field displays the primary Location of the Campus displayed for the applicant or student. |
|
Reported Site |
Select an alternative Location if the required value is different to the default value displayed in the Main Site of Study field. This value will be used in place of the Main Site of Study value in deriving the Main Site address fields in the Upload extract. |
|
Academic Level |
The system automatically populates this field when a new CAS record is created. The value is populated from HESA Plan Data page if a COURSEAIM value is defined for the Academic Plan of the application or student career. If a value is not defined for the Academic Plan, the value is populated from the HESA Program Data page if a COURSEAIM value is defined for the Academic Program of the application or student career. The first letter of the COURSEAIM value is translated to an NQF level as follows: D (doctoral) = 8, M (masters) = 7, H (honours) = 6, I (intermediate) = 5, C (certificate) = 4. Enter a value if a COURSEAIM value has not been set up on the HESA data pages or if you want to enter a different value for the applicant or student. |
|
Secondary Academic Level |
Select a secondary NQF level if required. NQF values for this field and Academic Level are delivered as translate values with the system (SAD_PB_ACAD_LEVEL). You can define additional translate values for qualification types if required. |
|
Course Start Date |
The system automatically populates this field when a new CAS record is created. The value is populated based on the value defined for the Admit Term from (a) Academic Plan PBI Data page, (b) Academic Program PBI Data page, (c) PBI Configuration page or (d) the term begin date of the Admit Term. You can override the default value. |
|
Expected End Date |
The system automatically populates this field when a new CAS record is created. The value is populated based on the value defined for the Admit Term from (a) Academic Plan PBI Data page, (b) Academic Program PBI Data page, (c) PBI Configuration page or (d) the end date of the Expected Graduation Term. You can override the default value. |
|
Latest Acceptance Date |
The system automatically populates this field when a new CAS record is created. The value is populated based on the value defined for the Admit Term from (a) Academic Plan PBI Data page, (b) Academic Program PBI Data page or (c) PBI Configuration page. You can override the default value. The value must be on or after the Course Start Date and on or before the Expected End Date. |
|
Months Duration |
The system automatically populates this field when a new CAS record is created. The value is populated from (a) Academic Plan PBI Data page or (b) Academic Program PBI Data page. You can override the default value by entering a number in the range of 0 and 99. This field is informational only and is not included in the Upload, Update or Report extract. |
|
Full-Time Course |
If the Academic Load field displays Full-Time, the system automatically populates the value Yes when a new CAS record is created. |
|
Course Hours |
The system automatically populates this field when a new CAS record is created. The value is populated from (a) Academic Plan PBI Data page or (b) Academic Program PBI Data page. You can override the default value by entering a decimal value in the range of 0.0 and 168.0. |
|
Work Placement |
The system automatically populates this field when a new CAS record is created. The value is populated from (a) Academic Plan PBI Data page, (b) Academic Program PBI Data page or (c) PBI Configuration page. You can select a different value if required. |
|
Placement Organization |
Enter an external ID value if required. This field is available for edit only if you select Yes in the Work Placement field. |
Financial Details
The following is an example of the Financial Details region on the CAS Details page.
|
Accommodation Provided |
The system automatically populates this field when a new CAS record is created. The value is populated from (a) Academic Plan PBI Data page, (b) Academic Program PBI Data page or (c) PBI Configuration page. You can select a different value if required. |
|
First Year Course Fees |
The system automatically populates this field when a new CAS record is created. The value is populated based on the value defined for the admit term from (a) Academic Plan PBI Data page, (b) Academic Program PBI Data page or (c) PBI Configuration page. If no value is defined for the admit term, then the field value defaults to zero. You can override the value by entering a number in the range of 0.00 to 1,000,000. |
|
Course Fees Paid |
Enter a number in the range of 0.00 to 1,000,000. You cannot enter a value greater than the First Year Course Fees, if the First Year Course Fees field has a value greater than zero. If the CAS Status is Assigned the Update Status value is updated to Update Required when the value for this field is updated. If you leave the field blank, the Create Extract process derives zero for the field in the Upload extract. |
|
Accommodation Fees Included |
The system automatically populates this field when a new CAS record is created. The value is populated from (a) Academic Plan PBI Data page, (b) Academic Program PBI Data page or (c) PBI Configuration page. You can select a different value if required. |
|
Accommodation Fees Paid |
Enter a number in the range of 0.00 to 1,000,000. You cannot enter a value greater than the First Year Course Fees, if the First Year Course Fees field has a value greater than zero. If the CAS Status is Assigned the Update Status value is updated to Update Required when the value for this field is updated. If you leave the field blank, the Create Extract process derives zero for the field in the Upload extract. |
|
First Year Boarding Fees |
The system automatically populates this field when a new CAS record is created. The value is populated based on the value defined for the admit term from (a) Academic Plan PBI Data page, (b) Academic Program PBI Data page or (c) PBI Configuration page. If no value is defined for the admit term, then the field value defaults to zero. You can override the value by entering a number in the range of 0.00 to 1,000,000. |
|
Boarding Fees Paid |
Enter a number in the range of 0.00 to 1,000,000. You cannot enter a value greater than the First Year Boarding Fees, if the First Year Boarding Fees field has a value greater than zero. If the CAS Status is Assigned the Update Status value is updated to Update Required when the value for this field is updated. If you leave the field blank, the Create Extract process derives zero for the field in the Upload extract. |
Documentation
The following is an example of the Documentation region on the CAS Details page.
|
Offer Documents |
Enter a value up to a maximum of 2000 characters. The value is used to derive the DocumentsUsedToObtainOffer field in the Upload extract. |
|
ATAS Certificate Required |
The system automatically populates this field when a new CAS record is created. The value is populated from (a) Academic Plan PBI Data page, (b) Academic Program PBI Data page or (c) PBI Configuration page. You can select a different value if required. |
|
Dean's Certificate Required |
The system automatically populates this field when a new CAS record is created. The value is populated from (a) Academic Plan PBI Data page, (b) Academic Program PBI Data page or (c) PBI Configuration page. You can select a different value if required. |
Sponsor Notes
The following is an example of the Sponsor Notes region on the CAS Details page.
To notify UKBA of corrections to the applicant data, an institution adds Sponsor Notes to a CAS record through SMS. You can use Notes field to enter the same notes to a CAS record in the system. This enables you to maintain the Sponsor Notes locally. The system does not include the Notes field value in the Upload extract data.
Entering PBI Report Data for Applicants or StudentsAccess the Report Details page (Student Admissions, PBI Processing, CAS Maintenance, Report Details).
|
Report Status |
Identifies whether the record has been identified as:
You can set report status to Report Ready, only if the CAS Number is populated and the CAS Status of the record is Used. |
|
Report File ID |
Displays the File ID generated when the record is included in the Report extract. |
|
Expected Enrollment |
The system automatically populates this field when a new CAS record is created. The value is populated based on the value defined for the Admit Term from (a) Academic Plan PBI Data page, (b) Academic Program PBI Data page or (c) PBI Configuration page. You can override the default value. The value must be on or before the Latest Acceptance Date defined on the Course Details region of the CAS Details page. |
|
Notes |
Enter a value up to a maximum of 2000 characters. The value is used to derive the Notes field for the Report extract. |
Updating Multiple CAS RecordsUse the CAS Record Update process if you want to update a group of CAS records in Campus Solutions at the same time. You can select the group of CAS records based on selection criteria, including:
Academic career, program or plan.
Students or applicants.
Admit term.
Upload, Update or Report status.
This section discusses how to update multiple CAS Records.
Note. This process can only be used to update multiple CAS records with a single value per field. Updates that require a different value for each CAS record, for example updates to Course Fees Paid that may vary by applicant or student, should be made using the CAS Details page.
Page Used to Update Multiple CAS Records|
Page Name |
Definition Name |
Navigation |
Usage |
|
CAS Record Update |
SAD_PB_CAS_UPD |
Student Admissions, PBI Processing , CAS Record Update |
Update multiple CAS records. |
Updating Multiple CAS RecordsAccess the CAS Record Update page (Student Admissions, PBI Processing, CAS Maintenance, Report Details).
Use the Selection Criteria region to specify the group of CAS records that you want to update.
Use the Population Selection region to further filter the records that are selected for update by selected a PS Query value.
Use the New Value Details region to specify the values that are updated by the process.
Population Selection
Population selection is a method of selecting the IDs to process a specific transaction. The Population Selection group box appears on the run control pages when the Population Selection process is available or required for the transaction.
The system writes the CAS records returned from any query specified under Population Selection to SAD_PB_CAS_RES. The query must return the following values to uniquely identify the CAS records that need to be updated:
EMPLID
INSTITUTION
SAD_PB_REC_TYPE
ACAD_CAREER
STDNT_CAR_NBR
SAD_PB_REC_NUMBER
ADM_APPL_NBR (blank for record type = student)
APPL_PROG_NBR (blank for record type = student)
For each distinct CAS record, the query automatically selects the most recent effective dated/sequenced row for further filtering before the process creates a new row.
A sample query, SAD_PB_CAS_RECORD_UPDATE, has been delivered. This query selects the most recent effective dated rows for all the CAS records of an institution.
See PeopleSoft Campus Community Fundamentals 9.0 PeopleBook, "Using the Population Selection Process"
After specifying the changes on the New Value Details region, when you run the process:
The process selects the CAS records based on the specified criteria.
In each CAS record, it inserts a new row with an effective date equal to the Effective Date parameter value or, if the most recent row has the same effective date as the Effective Date parameter value, the sequence number is incremented.
In the new row, the process makes the changes based on the parameters you specified on the New Value Details region. The rest of the fields in the new row contain the values from the previous row.
The following table describes how the CAS Record Update process determines whether or not to update a CAS record value:
|
Process Parameter |
Conditions |
|
Effective Date |
If the most recent existing CAS record row has an effective date later than the parameter value, the process logs a message and skips the update for that record. |
|
Upload Status |
Only updated if the Upload Status field is enabled in the CAS record, that is the CAS Number is not populated. |
|
Update Status |
Only updated if the Update Status field is enabled in the CAS record, that is the CAS Number is populated and the CAS Status is blank or Assigned. |
|
Report Status |
No conditions. |
|
Course Start Date |
No conditions. |
|
Expected End Date |
Only updated if the date is after the new/existing Course Start Date. |
|
Latest Acceptance Date |
Only updated if the date is after the new/existing Course Start Date and is before the new/existing Expected End Date. |
|
Expected Enrollment Date |
Only updated if the date is not after the new/existing Latest Acceptance Date. |
|
First Year Course Fees |
Only updated if the value is greater than zero. |
|
First Year Boarding Fees |
Only updated if the value is greater than zero. |
|
Course Fees Paid |
Only updated if the value is greater than zero and is not greater than the new/existing First Year Course Fees value. |
|
Accommodation Fees Paid |
Only updated if the value is greater than zero and is not greater than the new/existing First Year Course Fees value. |
|
Boarding Fees Paid |
Only updated if the value is greater than zero and is not greater than the new/existing First Year Boarding Fees value. |
If any of Course Fees Paid, Accommodation Fees Paid or Boarding Fees Paid is updated and the Update Status field is currently enabled then the Update Status is updated to the value defined for 'Update Required' in the PBI configuration record, unless a new Update Status is specified in the Statuses region in which case that value is used for the update.
There is no validation applied to updates to Course Fees Paid, Accommodation Fees Paid or Boarding Fees Paid to check that the Update Status field is enabled. Values for the fields will be updated even if the Update Status in the CAS Details record is disabled following the update of the CAS Status to one of the post-assigned values. You should ensure that updates to the three Fees Paid fields are only made for records where the Update Status field is enabled.
Generating an XML File to Send to SMSThis section discusses how to:
Generate an extract.
Review an extract.
Create an XML file from an extract.
Validate an XML file.
Pages Used to Generate an XML file to send to SMS|
Page Name |
Definition Name |
Navigation |
Usage |
|
Create Extract Data |
SAD_PB_CRT_EXT |
Student Admissions, PBI Processing , Create Extract Data |
Generate the Upload, Update, or Report extract data. |
|
Upload Extract Data |
SAD_PB_UPL_EXT |
Student Admissions, PBI Processing , Upload Extract Data |
Review and edit the upload extract data. |
|
Update Extract Data |
SAD_PB_UPD_EXT |
Student Admissions, PBI Processing , Update Extract Data |
Review and edit the update extract data. |
|
Report Extract Data |
SAD_PB_REP_EXT |
Student Admissions, PBI Processing , Report Extract Data |
Review and edit the report extract data. |
|
Create XML |
SAD_PB_GXML |
Student Admissions, PBI Processing, Create XML |
Generate the XML file from the extract data. |
|
Validate XML |
SAD_PB_VALX_PRC |
Student Admissions, PBI Processing, Validate XML |
Validate the XML file. |
Generating an ExtractAccess the Create Extract Data page (Student Admissions, PBI Processing, Create Extract).
|
Create Upload |
Select to create Upload extract data. If you select this check box, the process selects CAS Details records with an Upload status of Upload Ready. |
|
Create Update |
Select to create the Update extract data. If you select this check box, the process selects CAS Details records with an Update status of Update Ready. |
|
Create Report |
Select to create the Report extract data. If you select this check box, the process selects CAS Details records with a Report status of Report Ready. |
|
Include Applicants |
Select to create extract data for only applicants. If you select this check box, the process selects CAS Details records with record type Applicant. |
|
Include Students |
Select to create extract data for only students. If you select this check box, the process selects CAS Details records with record type Student. Note. You should not clear both the Include Applicants and the Include Students check boxes. You must select one of the check boxes to run the process. Also, you can select both the check boxes to include both applicant and student records. |
|
Upload File ID Override |
If you do not enter an override value, the process automatically generates a value in the format INST_UPLOAD_YYYY_MM_DD_nn where INST is your institution code and nn is a sequence number that begins 01 and is incremented for new runs of the extract process on that date. For example, a File ID of PSUNV_UPLOAD_2010_06_26_01 will be generated for the first upload extract for institution PSUNV on the 26th June 2010. Enter a File ID value to be used in place of the automatically generated value if required. The value must not have already been used for an Update or Report extract. If an extract for the File ID entered has already been run any existing extract data records will be deleted before the process is re-run. |
|
Update File ID Override |
If you do not enter an override value, the process automatically generates a value in the format INST_UPDATE_YYYY_MM_DD_nn where INST is your institution code and nn is a sequence number that begins 01 and is incremented for new runs of the extract process on that date. Enter a File ID value to be used in place of the automatically generated value if required. The value must not have already been used for an Upload or Report extract. If an extract for the File ID entered has already been run any existing extract data records will be deleted before the process is re-run. |
|
Report File ID Override |
If you do not enter an override value, the process automatically generates a value in the format INST_REPORT_YYYY_MM_DD_nn where INST is your institution code and nn is a sequence number that begins 01 and is incremented for new runs of the extract process on that date. Enter a File ID value to be used in place of the automatically generated value if required. The value must not have already been used for an Upload or Update extract. If an extract for the File ID entered has already been run any existing extract data records will be deleted before the process is re-run. |
Create Upload check box
If the Create Upload check box is selected, CAS Details records with an Upload Status of Upload Ready are selected. The process selects applicant records, if the Include Applicants check box is selected. The process selects student records, if the Include Students check box is selected. If you have selected both the Include Students and Include Applicants check boxes, the process selects both applicant and student records.
If an Upload File ID Override value is selected, any existing extract records are deleted before new records are selected.
If you have selected both Include Applicants and Include Students check boxes, the process includes one record for each applicant or student. If there is more than one CAS Details record with an Upload Status of Upload Ready, the first record selected is included and a message is logged for any subsequent records selected by the process. The additional records can be included in a future extract or the Upload Status can be set to the appropriate status to prevent the record from being included if a second CAS request is not required.
After a CAS Details record is included by the process, a new effective dated record is created to set the Upload Status to Upload Complete and to populate the Upload File ID.
Create Update check box
If the Create Update check box is selected, CAS Details records with an Update Status of Update Ready and the CAS Number populated are selected. The process selects applicant records, if the Include Applicants check box is selected. The process selects student records, if the Include Students check box is selected. If you have selected both the Include Students and Include Applicants check boxes, the process selects both applicant and student records.
If an Update File ID Override value is selected any existing extract records are deleted before new records are selected.
The same value is derived for each record in the Upload extract for the Update File ID field.
After a CAS Details record is included by the process, a new effective dated record is created to set the Update Status to Update Complete and to populate the Update File ID.
If an Event ID is set up on the PBI Configuration page for Record Type = Applicant or Student and Notification Type = Fee Update, the process creates the 3C Engine Trigger result for the Event ID and person. See the "Generating PBI Communications" section for steps that you should perform after the process creates the 3C Engine Trigger result.
Create Report check box
If the Create Report check box is selected, CAS Details records with a Report Status of Report Ready and the CAS Number populated are selected. The process selects applicant records, if the Include Applicants check box is selected. The process selects student records, if the Include Students check box is selected. If you have selected both the Include Students and Include Applicants check boxes, the process selects both applicant and student records.
If a Report File ID Override value is selected any existing extract records are deleted before new records are selected.
The same value is derived for each record in the Upload extract for the Report File ID field.
After a CAS Details record is included by the process, a new effective dated record is created to set the Report Status to Report Complete and to populate the Report File ID.
See the "(GBR) PBI Field Derivation" appendix for information about the derivation of each field in the extract.
Reviewing an ExtractUse the Upload Extract Data, Update Extract Data, and Report Extract Data pages to review the extract data that the Create Extract process has generated prior to creating the XML file.
|
Exclude from XML |
Select to prevent an individual record from being included in the XML file when the Create XML process is run for the File ID. |
|
Reported Value |
Displays the derived value for the field. You can change this value if a different value is required in the XML file to be sent to SMS. If the derived value is overwritten in the extract data you should ensure that the corresponding data in the CAS Details record is also updated. In cases where both General and Child category records are included in the upload extract data the Schema ID and Category values can be overridden for the Child records in the Reported Value field. |
|
Derived Value Overridden |
The system automatically selects the check box if you use the Reported Value field to change the derived value. |
Creating an XML File from an ExtractAccess the Create XML page (Student Admissions, PBI Processing, Create XML).
|
Extract Type |
Select an extract type to filter the prompt values for the File ID field. |
|
Extract Date |
Select an extract date to filter the prompt values for the File ID field. |
|
File ID |
Select the extract that you want to process. |
|
XML Path/File Name |
Enter the file path and file name that you want the system to use to save the XML file. You must enter a valid directory path that maps to a folder with appropriate Read/Write permissions. If you cannot locate such a folder, consult your system administrator. If defined the file name element must include the lower case .xml extension:
If you enter the file path and do not specify the file name, the process uses the File ID value to name the XML file. The format without the file is as follows:
|
Upload Extract XML
For the upload extract the process creates a separate XML file for each combination of the header fields found in the extract data for the File ID:
<BulkUploadFileId>
<SchemaID>
<TierID>
<Category>
<SponsorLicenceNumber>
In cases where there are multiple Sponsor Licence Numbers in the upload extract data multiple XML files are created. If there are both General and Child category records multiple XML files are created. If multiple XML files are required a sequence letter (A, B, C etc) is added to the file name to distinguish between the files.
For cases where the process is being re-run, if there is an existing file for the specified path/file name then that file is overwritten.
Update and Report Extract XML
A single XML file is created for each File ID for update and report extract data.
For cases where the process is being re-run, if there is an existing file for the specified path/file name then that file is overwritten.
Validating a XML FileAccess the Validate XML page (Student Admissions, PBI Processing, Validate XML).
|
XML Path/File Name |
Enter the path and file name of the XML file that you want to validate. |
|
XSD Path/File Name |
Enter the complete path and file name of the primary XSD file. The process uses all of the XSD files to validate your XML file. The XSD files are available from the UKBA website. |
The process validates the XML and checks that it is well formed in the context of the defined schema.
If any errors are reported by the Validate XML process, correct the errors by amending the Reported Value in the Extract Data pages or by amending the CAS Details or related records.
If you have corrected the errors using the Extract Data pages, re-run the Create XML process and validate the file. If you have corrected the errors in the CAS Details or related records, re-run the Create Extract process, re-run the Create XML process and validate the file.
Once the XML file passes schema validation, submit the XML file to SMS via the UKBA portal.
Importing CAS DetailsAfter you send one or more CAS number requests to SMS, use the Import CAS Details process to import the CAS details from the Bulk Export XML file retrieved from SMS.
When you run the process:
Initially it processes the XML file and creates CAS records in the staging tables.
Then it processes the staging table records to either update an existing CAS record with the CAS number and status details or create a new CAS record where you have submitted the CAS request directly via the UKBA portal.
Each CAS record in the staging table has an import status. The following table describes how the process determines which import status to assign to a CAS staging record.
|
Condition |
Status Set By the Import Process |
|
The status is initially set to this value for each new record imported to the staging table from the XML file. |
New (N) |
|
The import process did not find a matching CAS Details record. |
Pending (P) |
|
The import process encountered a problem when identifying a CAS Details record (for example, there is an existing CAS Details record but it is future dated). |
Error (E) |
|
The status is set to this value for each staging record where the corresponding CAS record has been created or updated with the imported CAS details. |
Imported (I) |
Use the CAS Staging Data pages to review the staging records that have Pending or Error status. For records with Pending status, you can use the CAS Staging Data page to match the record with an existing application or student program record and create a new CAS record. For records with Error status, you can use the CAS Details page to correct or update the existing records to allow the staging record to be re-processed.
This section discusses how to:
Import and create CAS records in bulk.
Review and edit the CAS staging data.
Pages Used to Import CAS Records|
Page Name |
Definition Name |
Navigation |
Usage |
|
Import CAS Details |
SAD_PB_IMPC_PRC |
Student Admissions, PBI Processing, Import CAS Details |
Import the CAS details from the Bulk Export XML file provided by SMS. |
|
CAS Staging Data |
SAD_PB_I_CAS |
Student Admissions, PBI Processing, CAS Staging Data |
Review the records that the Import CAS Details has loaded into the staging tables. |
Importing CAS DetailsAccess the Import CAS Details page (Student Admissions, PBI Processing, Import CAS Details).
|
Add Attachment |
Click to browse to the XML file that you want to import, and click Upload. You can browse your local drive and select a file. When you click Upload, the system automatically copies the file to the application server and the XML Path/File Name field automatically displays the server path and file name. Note. The upload process creates a files subdirectory to store and process the XML files. This subdirectory is created in the server directory location that is specified in the PS_SERVDIR system parameter in the Application Server/Process Scheduler configuration file psappsrv.cfg/psprcs.cfg. Ensure that PS_SERVDIR is set up with an appropriate value in the configuration file and that users have the correct permission to access the files subdirectory. |
|
XML Path/File Name |
Enter the path and file name of the XML file that you want to import. You must store this XML file on an application server that the import process can access. If you want to reprocess the staging records, leave the field blank. |
Processing steps
The process performs the following steps to create new staging table records if the XML Path/File Name parameter has been provided:
Deletes any existing staging records with a status of Imported
Opens the XML file. If the XML file cannot be found a message is logged and the re-processing of any existing staging records continues.
Creates staging records with a status of New for each record found in the XML file.
The process then performs the following steps to process staging records that have an import status of Pending from a previous run of the process:
Create: If the application or student program details have been added via the CAS Staging Data page and there is no existing CAS Details record, a new record is created using the application or student program details added and the CAS Number, CAS Status, CAS Status Date and Export File ID from the staging record. The Upload Status is set to Upload Complete and the Nationality value is populated if a country value exists in the staging record.
Update: If the application or student program details have been added via the CAS Staging Data page and there is an existing CAS Details record without the CAS Number populated, a new effective dated record is created for the current date with the CAS Number, CAS Status, CAS Status Date and Export File ID from the staging record.
Pending: If the full application or student program details have not been added via the CAS Staging Data page a message is logged and the record remains with a status of Pending.
Error: If the applicant or student details have been added via the CAS Staging Data page and there is an existing CAS Details record with a different CAS Number already populated then an error message is logged and the status is set to Error.
The process performs the following step to process New staging records and Error records from a previous run of the import process:
Update CAS Status: If the staging record can be matched to an existing CAS Details record using Applicant ID (EMPLID) and CAS Number, a new effective dated record is created with the CAS Status, CAS Status Date and Export File ID from the staging record.
This processing will occur when the CAS Number has already been imported and the CAS Status is being updated from, for example, Assigned to Used.
Note. If the most recent existing effective dated record is in the future or there are multiple matching records, a message is logged and the import status is set to Error.
Update Applicant: If Application ID is populated and the staging record can be matched to an existing applicant CAS Details record using Applicant ID (EMPLID) and Application ID (the combination of Admission Application Number and Application Program Number), a new effective dated record is created with the CAS Status, CAS Status Date and Export File ID from the staging record. This processing will occur when the CAS Number is being imported for the first time and the CAS request has been generated from an existing CAS Details record.
Note. If the most recent existing effective dated record is in the future or there are multiple matching records, a message is logged and the import status is set to Error.
Update Student: If the Application ID is not populated and the staging record can be matched to an existing student CAS Details record using Applicant ID (EMPLID) and Course ID (either Academic Plan or Academic Sub-Plan if sub-plan reporting is enabled on the PBI Configuration page), a new effective dated record is created with the CAS Status, CAS Status Date and Export File ID from the staging record.
Note. If the most recent existing effective dated record is in the future or there are multiple matching records, a message is logged and the import status is set to Error.
No Match: If no match is made to an existing CAS Details record the status is set to Pending. The staging record can be reviewed via CAS Staging Data page and the application or student program details can be added to allow the record to be re-processed.
Assigning Event IDs to the Applicant or Student for CAS Number Notification
If you have defined an event ID for a notification type of CAS Number on the PBI Configuration page, the import process assigns the event ID when it creates a new CAS record or when it creates a new effective dated row for an existing CAS record and the CAS Number is being populated for the first time. If the process is updating an existing CAS record where the CAS number is already populated the Event ID is not created.
To assign the event details to the applicant or student, the process creates a results record in the 3C Engine Trigger Results table for Institution, Event ID and Function (CASN) for the applicant or student EMPLID. The variable data associated with the CASN administrative function (Academic Career, Student Career Number and CAS Number) are also populated.
See "Generating PBI Communications" section in this chapter.
Reviewing and Editing the CAS Staging DataAccess the CAS Staging Data page (Student Admissions, PBI Processing, CAS Staging Data).
Use the search page to retrieve Pending or Error status records for review and update.
Use the Maintain Applications or Student Program/Plan links to search for and review existing application or student program records.
Use the CAS Details link to search for and review any existing CAS Details records.
For records with a status of Error, the existing CAS Details record should be corrected to allow the record to be re-processed when the process is next run (Use the CAS Details page to do this).
The system enables the CAS Details region if the import status is Pending. If you want to match the staging record with an existing application or student program record for re-processing:
Specify whether the new CAS Details record is for an applicant or student by selecting a value in the Record Type field.
Select the Academic Career for the applicant or student from the prompt.
Select the Student Career Number for the applicant from the prompt.
If the record type is applicant, select the Application Number from the prompt.
If the record type is applicant, select the Program Number from the prompt.
Save the record.
Generating PBI CommunicationsAfter the system assigns event IDs, use the following process to notify applicants or students about CAS Number or fee update details:
Use the 3C Engine Trigger Results page to view the result records that have been added (Campus Community, 3C Engine, 3C Engine Trigger Results).
Run the 3C Engine process for each event ID.
Use the Person Communication page to view the assigned communication.
Run the Communication Generation process to create the communication that you can send to applicants and students.
This section describes the steps to assign and generate communications for CAS Number and fee update notifications.
See Also
PeopleSoft Campus Community Fundamentals 9.0 PeopleBook, "Managing Communications"
PeopleSoft Campus Community Fundamentals 9.0 PeopleBook, "Using the 3C Engine"
"Setting Up PBI Communications" section in this chapter
Reviewing 3C Engine Trigger ResultsAccess the 3C Engine Trigger Results page (Campus Community, 3C Engine, 3C Engine Trigger Results).
Use the 3C Engine Trigger Results page to review records that the Import CAS Details process or the Create Extract - update process creates.
Use the page to add any additional records required. Select Variable Data to add the required values for any additional records added.
This example shows the 3C Engine Trigger Results page for CAS Number notification:
Running the 3C Engine ProcessAccess the 3C Engine Parameters page (Campus Community, 3C Engine, Run 3C Engine).
Run the 3C Engine process for each of the Event IDs defined on the PBI Configuration page. The process assigns communications, comments and checklists associated with the Event ID to the ID of the applicant or student.
Assigned communications can be reviewed on the Person Communication page. To navigate to the Person Communication page, select Campus Community, Communications, Person Communications, Communication Management, Person Communication.
Running the Communication Generation ProcessAccess the Selection Parameters page (Campus Community, Communications, Communication Generation).
Run the Communication Generation process for each standard letter code to generate the communications for the assigned communications.
The following example shows that the Communication Method is set to E-Mail. Note that the ID Selection value should be set to All Person IDs rather than All IDs as shown on the example.
Define the Person Communication Usage values on the Process Parameters page.
Define the From and Subject values on the Email Parameters page.
Review the communications generated by the process on the Communications Management page (Campus Community, Communications, Person Communications, Communications Management).