| Oracle® Fusion Middleware Installation and Configuration Guide for Oracle Business Intelligence Applications 11g Release 1 (11.1.1) Part Number E16814-06 |
|
|
PDF · Mobi · ePub |
| Oracle® Fusion Middleware Installation and Configuration Guide for Oracle Business Intelligence Applications 11g Release 1 (11.1.1) Part Number E16814-06 |
|
|
PDF · Mobi · ePub |
This section contains supporting information and tasks for setting up Oracle BI Applications. These tasks are used by the setup steps in Chapter 3, "Setting Up Oracle Business Intelligence Applications".
This section contains the following topics:
Section A.2, "How to Start Oracle BI Applications Configuration Manager"
Section A.3, "Merging Repositories for Oracle BI Applications Projects"
Section A.4, "How to Configure DAC Server in a High Availability Environment"
Section A.5, "How to Verify Duty Roles required for Oracle BI Applications"
Section A.6, "About Warehouse Component Deployment Assistant (WCA)"
Informatica PowerCenter Administrator is hosted from the machine that has installed the gateway node for the PowerCenter domain. For a single machine install of PowerCenter Services as described in this chapter, PowerCenter Administrator is installed along with PowerCenter Services.
To log into PowerCenter Administrator
In a supported Web browser, access the following URL:
http://<gateway host>:<domain port>
Where:
<gateway host> is the name of the machine on which the gateway node has been configured. For a single-machine installation of PowerCenter Services it is the name of the machine on which PowerCenter Services has been installed.
For example, http://myhost.
<domain port> is the port number for the gateway. The default port number is 6008.
In the login page, enter the Administrator user name and password that was specified when you created the domain during installation of PowerCenter Services (for example, Administrator\Administrator), then click Log In to display the main page.
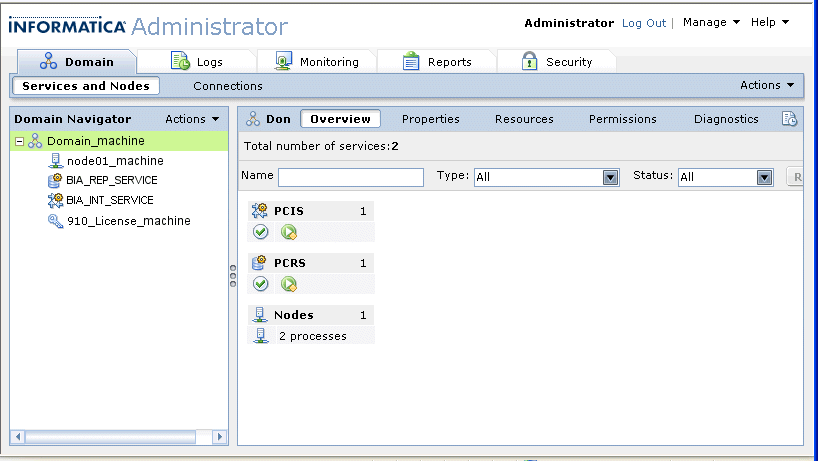
In the following example screenshot, the Domain Navigator displays a list of components, including a Repository Service named BIA_REP_SERVICE, and an Integration Service named BIA_INT_SERVICE. The Overview page displays the status of the components.
You use Oracle BI Applications Configuration Manager to set up and manage several aspects of the Oracle BI Applications environment, and to manage and monitor Functional Configurations for Oracle BI Applications Offerings.
To start Oracle BI Applications Configuration Manager:
In a Web browser, enter the Oracle BI Applications Configuration Manager URL which your System Administrator provides you.
For example:
http://myexample.com:7001/biacm/
The Oracle BI Applications Configuration Manager Login dialog is displayed.
In the Login screen, log in with your user credentials.
Note: Your User Login must be associated to the appropriate Duty Role. For more information see Section 4.4, "About Users and Roles in Oracle BI Applications Configuration Manager". If you do not have access to Oracle BI Applications Configuration Manager or have incorrect access, then contact your Security Administrator.
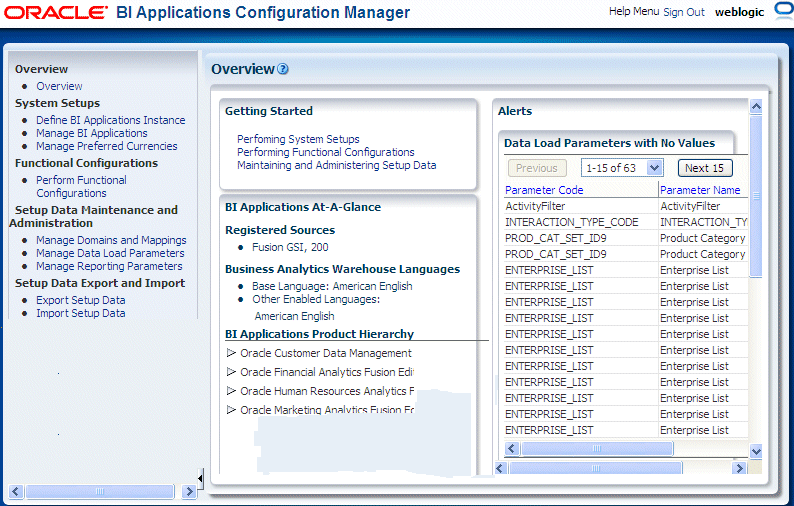
The main Oracle BI Applications Configuration Manager page is displayed.
Notes
Use the Tasks bar on the left-hand side of the Welcome page to navigate the application.
The options that are displayed in the Tasks bar are dependent on the privileges of the user name that you log in with.
To display Help for the Overview page, click Help, then Configuration Manager Help. You can also display context-sensitive Help for a dialog by clicking the question mark icon displayed next to the dialog name or a field name.
To log out of Oracle BI Applications Configuration Manager, select the Sign out link in the top right hand corner.
This section explains how to merge two BI repositories (that is, RPD files) for Oracle BI Applications.
To merge repositories for Oracle BI Applications projects:
In the Administration Tool, open in offline mode the Oracle BI repository.
On the Administration Tool menu bar, click File and then Merge.
In the Select Original Repository dialog box, select the repository (for example, OracleBIApps.rpd).
Type the password for the original repository, and then click OK.
Click Select for the Modified Repository field. The Select Modified Repository dialog box opens.
In the Select Modified Repository dialog box, select the repository that contains the customizations you made to the previous RPD file (for example, OracleBIAppsOTBIonly.rpd).
Click Open, type the password for the previously customized RPD file, and then click OK.
In the Decision drop-down list, select the action you want to take regarding the repository change, or accept the default action.
To locate subsequent rows with empty Decision fields, click the Decision header cell. After all rows have a value in the Decision field, the Merge button becomes enabled.
Click Merge. A message appears after the merge concludes successfully.
On the File menu, click Save As, and save the current repository using a new name (for example, OracleBIAppsFinal.rpd).
The section describes how to configure DAC Server in a high-availability environment.
In Oracle BI Applications 11g Release 1 (11.1.1), the DAC Server is an enterprise application deployed into the Managed Server of the BI Domain. DAC Client is used to configure the URL of the DAC Server in the DAC Repository.
In a simple deployment (that is, Oracle BI Applications deployed into a single BI domain with the WebLogic Administration Server and Managed Server in the same domain home), the DAC Server URL is configured automatically. In a high-availability deployment, the DAC Server URL must be changed manually to the Oracle HTTP Server URL by following the steps below:
To configure the DAC Server URL:
Start DAC Client by navigating to the \dac directory and double-clicking the startclient.bat file. The Login dialog window opens.
In the Login dialog window, select the Configure.
In the Configuring dialog, select Create Connection, and then click Next.
Enter the appropriate connection information:
Name: Enter a unique name for the connection to the DAC repository.
Connection type: Choose Oracle (Thin).
Service Name: Enter the service name for the DAC Repository (prefix_DAC).
Database Host: Enter the name of the computer that hosts the DAC Repository database.
Database Port: Enter the port number for the database.
Click in the Authentication File field, and then do the following:
In the Authentication File dialog window, click Choose existing authentication file, and then click OK.
Navigate to the appropriate directory, select the cwallet.sso file that you copied from the DAC Server computer, and click OK.
If you installed DAC Client on a different machine to the Fusion Applications installed DAC Server, then you first need to copy cwallet.sso file across from server machine to dac client machine.
In the Configuring dialog window, click Test Connection to confirm the connection works.
Click Apply.
Click Finish.
In the drop-down list of the Login dialog window, select the Connection that you created.
Enter any values in the User Name and Password fields, as the DAC repository does not contain any user names or passwords. A user account will be created with the user name and password you enter. This user account is automatically assigned the Administrator role.
Select DAC as the Authentication Type.
Click Login.
In DAC Client, navigate to Tools menu, click DAC Server Management, and then click Repository Configuration.
In the Repository Configuration dialog window, enter the following information:
Mode: Web
URL: The URL for the DAC Server enterprise application deployed in WebLogic Server. For example, http://WLS_host:9704/DACServer.
Click Save.
Note:
For all subsequent logins to DAC Client, select the Connection and choose the FMW Authentication Type. Users will be authenticated against the LDAP system and must be granted the appropriate Oracle BI Applications duty role.
This section explains how to verify that Duty Roles for Oracle BI Applications are correctly mapped to Fusion Applications Enterprise Roles.
A list of required Enterprise Roles and Duty Roles for Oracle BI Applications is published on My Oracle Support (ID 1333454.1.) as a spreadsheet named 'Oracle Business Intelligence Applications Duty Role Assignments for Fusion Applications'.
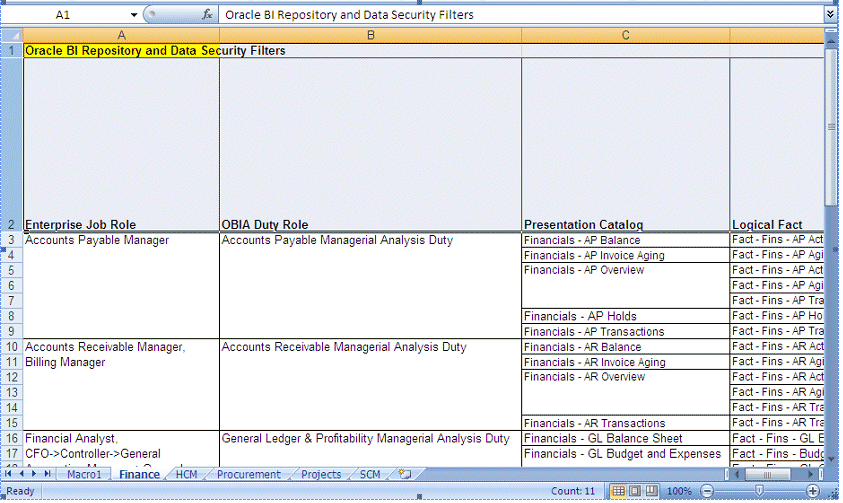
The spreadsheet contains a sheet for each Oracle BI Applications Offering; for example, Oracle Financial Analytics, Oracle HR Analytics, and so on. Each sheet contains the following information:
The Fusion Applications Enterprise Job Roles in column A.
The associated Duty Roles in column B.
The Presentation Catalog areas mapped to the Duty Role in Column C.
The other columns show information, such as the modules to which the roles apply.
The following screenshot shows a section from the Finance sheet, which contains Duty Roles for Oracle Financial Analytics.
To verify that Duty Roles are mapped to appropriate Fusion Applications Enterprise Roles, do the following:
Download the spreadsheet named 'Oracle Business Intelligence Applications Duty Role Assignments for Fusion Applications', which is available on My Oracle Review as ID 1333454.1.
Use Oracle APM to verify that Duty Roles are mapped to the appropriate Enterprise Roles, as follows:
In Oracle APM, navigate to the 'obi' Application and use the Search options to locate Duty Roles prefixed with 'OBIA_'.
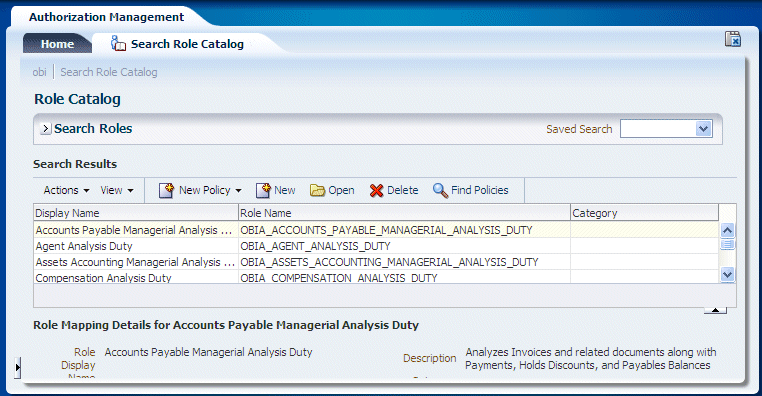
Select each Duty Role, then click Open to display the <Application> | Application Role dialog.
Display the External Role Mapping tab, and check that the role list contains the appropriate Enterprise Roles.
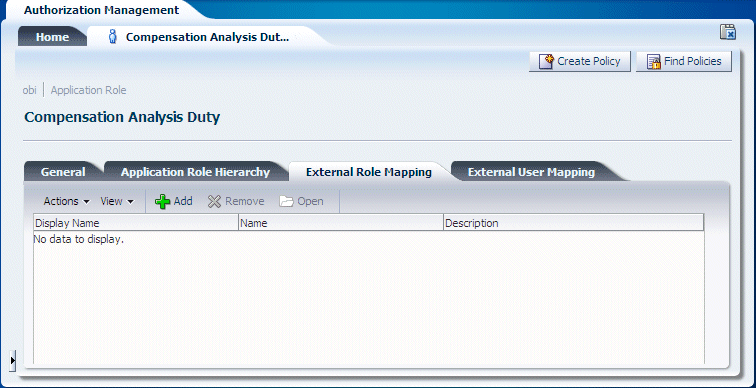
Use the spreadsheet 'Oracle Business Intelligence Applications Duty Role Assignments for Fusion Applications' to determine which Enterprise Roles should be displayed in the role list.
If you need to re-map Fusion Applications Enterprise Roles to Duty Roles, do the following:
In Oracle APM, navigate to the 'obi' Application and use the Search options to locate and select the Duty Role in the role list.
Click Open to display the <Application> | Application Role dialog.
Display the External Role Mapping tab.

Use the External Role Mapping tab to search for and select the Fusion Applications Enterprise Roles that must be mapped to that Duty Role.
Click Add to display the External Role Search dialog, which enables you to locate Enterprise Roles in the LDAP directory.
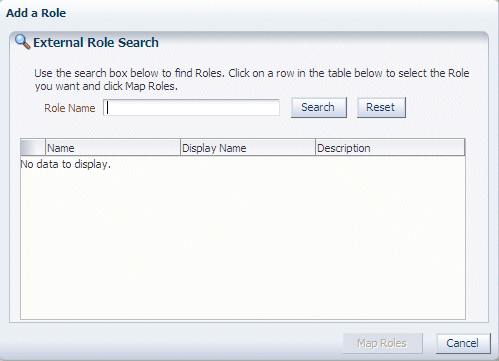
For example, the OBIA_WORKFORCE_DEPLOYMENT_ANALYSIS_DUTY Duty Role must be mapped to the PER_LINE_MANAGER_ABSTRACT Job Role and the PER_HUMAN_RESOURCES_VP_JOB Job Role.
Click Map Roles to map selected Enterprise Roles to the Duty Role, and return to the External Role Mapping tab.
For more information about using Oracle APM to manage Duty Roles and Enterprise Roles, refer to Oracle Fusion Middleware Oracle Authorization Policy Manager Administrator's Guide (Oracle Fusion Applications Edition).
Warehouse Component Deployment Assistant (WCA) is a configuration script that you use in UNIX environments to set up a new Oracle BI Applications Release 11.1.1.6 environment after Oracle BI Applications has been installed using the Oracle Fusion Applications installer. WCA is not supported on Windows platforms.
WCA is used as part of the setup process for Oracle BI Applications. For information about how to use WCA to configure an Oracle BI Applications environment, see Section 3.4.8.1, "Setup Step: Configure Oracle BI Applications components using Warehouse Component Deployment Assistant (WCA) in a UNIX Environment.", (which is performed as part of Section 3.1.1, "High-level Tasks for Setting Up Oracle BI Applications.").
Warehouse Component Deployment Assistant does the following:
(Optional) Installs Informatica PowerCenter Services V9.1 HotFix 2.
(Optional) Configures Informatica PowerCenter Services related components.
Configures DAC Properties, registers Informatica, and sets physical connections.
Registers Sources in Oracle BI Applications Configuration Manager.
Extends and configures the BI Domain.
Configures RPD Connection Pools.
Enables User Currencies.
Creates physical connections for Fusion Applications pillars, DW, and Oracle BI Applications Configuration Manager.
Creates an Integration Service for Informatica PowerCenter.
Note: This configuration step requires Informatica PowerCenter Services and DAC Server to be installed on the machine that hosts the BI Domain, and the CONFIGURE_INFA value set to 'y' in the wca_params.properties configuration file. If not, you must manually configure this component as described in Section 3.4.9.2, "Setup Step: Creating the Informatica Repository Service".
Restores the Informatica repository into the Repository Service.
Note: This configuration step requires Informatica PowerCenter Services and DAC Server to be installed on the machine that hosts the BI Domain, and the CONFIGURE_INFA value set to 'y' in the wca_params.properties configuration file. If not, you must manually configure this component as described in Section 3.4.9.4, "Setup Step: Load the Prebuilt Informatica Repository".
Creates a Repository Service for Informatica PowerCenter.
Note: This configuration step requires Informatica PowerCenter Services and DAC Server to be installed on the machine that hosts the BI Domain, and the CONFIGURE_INFA value set to 'y' in the wca_params.properties configuration file. If not, you must manually configure this component as described in Section 3.4.9.3, "Setup Step: Creating the Informatica Integration Service".
Copy source files and sets custom properties.
Note: This configuration step requires Informatica PowerCenter Services and DAC Server to be installed on the machine that hosts the BI Domain, and the CONFIGURE_INFA value set to 'y' in the wca_params.properties configuration file. If not, you must manually configure this component as described in Section 3.4.9.5, "Setup Step: Copying Source Files to the Informatica PowerCenter Services machine".
Creates an Administrator user for the Informatica repository.
Note: This configuration step requires Informatica PowerCenter Services and DAC Server to be installed on the machine that hosts the BI Domain, and the CONFIGURE_INFA value set to 'y' in the wca_params.properties configuration file. If not, you must manually configure this component as described in Section 3.4.12.3, "Setup Step: Creating the Repository Administrator User in the Native Security Domain".
Sets Informatica PowerCenter properties, and creates relational connections in Informatica.
Note: This configuration step requires Informatica PowerCenter Services and DAC Server to be installed on the machine that hosts the BI Domain, and the CONFIGURE_INFA value set to 'y' in the wca_params.properties configuration file. If not, you must manually configure this component as described in Section 3.4.15.3, and Section 3.4.15.4, "Setup Step: Setting the SiebelUnicodeDB Property in Informatica Integration Services".
If you have Informatica PowerCenter Services and DAC Server installed on the machine that hosts the BI Domain, then WCA can configure all components. If you do not have Informatica PowerCenter Services and DAC Server installed on the machine that hosts the BI Domain, then WCA cannot configure Informatica related components, and you must manually configure them, as described in Appendix A, "Overview of WCA".
Specify the value of the INFA_INSTALL_UNZIP_LOC parameter as the directory where you extracted the Informatica PowerCenter Services JAR file. For example, INFA_INSTALL_UNZIP_LOC=/scratch/myfiles/infa9. This directory should contain the extracted install.sh file and associated files.
To install Informatica PowerCenter Services, set INSTALL_INFA to y, and specify values for the following parameters:
INFA_DB_HOST
INFA_DB_PORT
INFA_DB_SERVICE
INFA_DOM_DB_PASSWRD
INFA_DOM_DB_USER
INFA_DOM_NAME
INFA_DOM_PASSWRD
INFA_DOM_PORT
INFA_DOM_USER
INFA_HOME
INFA_INSTALL_UNZIP_LOC
INFA_LICENSE_KEY
INFA_NODENAME
INSTALL_INFA
If INSTALL_INFA is set to n, then the parameters listed above and any default values are ignored.
If you are deploying Informatica PowerCenter Services on the same machine as the BI Server, set CONFIGURE_INFA to y, and specify values for the following parameters:
CONFIGURE_INFA
INFA_DB_HOST
INFA_DB_PORT
INFA_DB_SERVICE
INFA_DB_TNS_ENTRY
INFA_DB_TYPE
INFA_DOM_DB_PASSWRD
INFA_DOM_DB_USER
INFA_DOM_HTTPS_PORT
INFA_DOM_NAME
INFA_DOM_PASSWRD
INFA_DOM_PORT
INFA_DOM_USER
INFA_DOMAIN_FILE
INFA_HOME
INFA_IS_NAME
INFA_NODENAME
INFA_PCS_HOST
INFA_REP_DB_PASSWRD
INFA_REP_DB_USER
INFA_REP_PASSWRD
INFA_REP_USER
INFA_RS_NAME
If CONFIGURE_INFA is set to n, then the parameters listed above and any default values are ignored.
To restart DAC Server:
Navigate to the DAC domain home, for example, /instance/domains/<Domain Host>/BIDomain/dac.
Execute the automationUtils.sh cmdCredentials command with the cwallet.sso file and the administrator username for WebLogic Server Administrator Console. For example:
/instance/domains/<Domain Host>/BIDomain/dac/conf/security/repository/cwallet.sso FAadmin
Note: When prompted for a password, specify the administrator password for WebLogic Server Administrator Console.
Execute the following command:
sh dacCmdLine.sh StartServer