11g Release 1 (11.1.4)
Part Number E20372-04
Contents
Previous
Next
|
Oracle® Fusion
Applications Marketing Implementation Guide 11g Release 1 (11.1.4) Part Number E20372-04 |
Contents |
Previous |
Next |
This chapter contains the following:
Manage Public Unique Identifier Profile Options
Define Resource Organization Information
Define Resource Role Information
Define Resource Team Information
Define Products: Define Basic Items
Define Products: Define Advanced Items
Manage Calendar Profile Option
Define Sales Prediction Configuration
Source systems are used to import data into Oracle Fusion Applications, and are used within the application to identify source data information. You can specify whether the source system is a Spoke system, such as a legacy system, or a Purchased system, such as data from a third party provider. You can also specify what type of data will be imported using the source system, for example, you can specify that a source system will import trading community members.
You can configure the following for a source system:
Source system code, name, and description
Source system type
Enable for Items, Trading Community Members, Order Orchestration and Planning, and Assets
You can create a source system code to uniquely identify the source system. Source system codes are used by the application when creating references between source IDs and the Oracle Fusion Applications database IDs. You can create a source system name and description to provide information that is more descriptive than the source system code.
Note
You cannot update the source system code once you have created the source system.
You must set up a source system as either a Spoke system, such as a legacy system, or a Purchased system, such as data from Dun & Bradstreet.
You should select which types of entities will be imported from the source system into the Oracle Fusion Applications database from the following:
Items
Trading Community Members
Order Orchestration and Planning
Assets
You can select one or more of these entity types as required for the source system. It is important to enable the correct entity types because each import UI filters source systems based on their entity type. For example, if a source system is enabled for Trading Community Members, Items, and Assets, then the source system can be selected as a data source in the Trading Community Members, Items, and Asset import UIs, but the source system cannot be selected in the Orchestration and Planning import UI.
Source System Entities are the entities, such as addresses and parties, which can be imported using a specified source system.
When you import data from a source system, all of the entities in the source system data will be imported. Within the Source System Entities UI, you can chose to allow multiple source references, which allows multiple records from a source system to map to a single trading community record.
Allowing multiple source system references means that when you import data from a source system you can merge multiple, or duplicate, source system records and create one record in the Oracle Fusion Applications database.
If you do not allow multiple source system references then an Oracle Fusion Applications database record will be created for every source system record. This means that you could potentially create duplicate records in the Oracle Fusion Applications database.
Oracle Fusion applications generate thousands of rows of data that require unique identifiers (UIDs). These automatically generated, 18-digit numbers are not easily read or used by humans. A cogent example is an electronic airline ticket whose numbers can be 13 digits long, such as, 0162128736572. There are also confirmation or itinerary numbers that relate directly to that ticket that are only six digits long, such as QDLG9S; these can be used interchangeably with the ticket number. These shorter confirmation numbers are much easier to read and process by passengers and employees alike. A separate Public Unique ID (PUID) is also generated by the document sequencing feature and is available for encoding into a more user-friendly, alphanumeric ID.
The Oracle Fusion default setup shows the automatically generated numeric private UIDs and PUIDs for data rows. To use an alphanumeric PUID instead of the delivered numeric, navigate to the Setup and Maintenance task Manage Public Unique Identifier Profile Options to enable the encoding process. There are two profile options to configure the PUID:
CRM Public Unique ID String Encoding controls the characters used in the encoding of the PUID based on a radix, or base number.
CRM Public Unique ID Prefix defines the optional prefix value for the PUID.
Document sequencing typically begins with the number one. You may choose to start the sequences of your PUIDs at a specific value. See the related links below to determine the document sequencing.
This profile option determines the set of numbers and letters to be used in encoding the PUID generated by the document sequencing feature. The PUID is delivered with the encoding set to none. To enable the encoding of the PUID, choose a radix, or base conversion algorithm. The available values are stored in the lookup type ZCA_PUID_ENCODING. These encoding methods convert the PUID into user readable IDs using alphanumeric characters rather than just numeric digits. For example, if BASE_26 is chosen, only the upper case letters of the alphabet will be used.
There are seven delivered base values. These are not extensible.
|
RADIX |
Values |
|---|---|
|
BASE_16 |
Numbers 0-9, letters A-F |
|
BASE_26 |
Letters A-Z, Upper Case |
|
BASE_29 |
Numbers 2-9, letters BCDFGHJKLMNPQRSTVWXYZ |
|
BASE_31 |
Numbers 0-9, letters ABCDEFGHJKLMNPQRTUWXY |
|
BASE_36 |
Numbers 0-9, letters A-Z upper case |
|
BASE_62 |
Numbers 0-9, letters A-Z, letters a-z |
|
NONE (default) |
No Encoding |
A prefix may be defined as a site-level profile option. This profile option is delivered with no prefix defined. When defined, the inserted text is prepended to the PUID base encoded document sequence value. For example, if the PUID was CLE123 and the Prefix was ORA, the new PUID would be ORACLE123. Any delimiters or separation characters desired must be defined in the prefix itself. Ensure that the prefix length is short enough so that the concatenated PUID and prefix do not exceed the defined field length, usually no more than 30 characters. For example, you may want the records for the pharmaceutical divisions of your company to be denoted with PUIDs and the prefix Pharma- or Pharma1, Pharma2, and so on.
Party usages describe how a party is used in the context of the implementing organization. For example, a person in the business community may be a consumer or contact. Rules can be associated to a party, and these rules determine when a party usage can and cannot be used.
These are the following rules that can be defined for a party usage:
Assignment rules
Exclusivity rules
Incompatibility rules
Transition rules
Assignment rules are used to define how the party usage can and cannot be assigned to parties. You can choose to allow unconditional party usage assignment, enabling the assignment to be manually created, or updated, by an administrator.
Alternatively, you can restrict the manual assignment and update of a party usage, which will mean that the party usage can only be created, or updated, by a business event. For example, creating an account for a party record can automatically assign the Customer party usage to that record.
You can also specify whether the party usage assignment can also be created or updated by the assignment of a party relationship. For example, the party relationship Contact Of can assign a party usage of Organization Contact.
Exclusivity rules enable you to restrict party usage assignment, so that between a specified date range the party usage can be the only usage allowed to be assigned to a party. For example, you can set up an exclusivity rule that between January 1 2011 and February 1 2011 parties that have the Manufacturer party usage cannot have any other party usage assigned to them.
You can specify which party usages cannot be assigned concurrently to a party between a defined date range. For example, you can specify that you cannot assign a Sales Account usage to a party with a Sales Prospect usage, during January 1 2011 and December 31 2030.
You are able to define which party usages can transition to the party usage you are creating or editing. Once a party has transitioned to the current party usage, the previous party usage is set with an end date. For example, when a party with the Prospective Partner party usage is assigned the Partner party usage, the Prospective Partner usage is set with an end date.
Define additional name types to capture alternative names for parties.
For example, create an additional name type NICK_NAME to capture the nick names of parties of type Person.
While creating an additional name type, specify the party type to which it applies. From then on, the additional name type will be available as a naming option for all parties of that party type within the deploying company. You can use additional name types to capture language-specific names as well.
Create additional identifier types to provide extensions to party attributes. For example, you can create an additional identifier type to record a person's passport number.
You can choose which party types can use the additional identifier type. These party types can be Person or Organization, or both. You can also specify whether the value of an identifier type must be unique. For example, the passport number listed under each person's profile must be unique.
Additional identifier types do not automatically appear in the user interface. If you want to use identifier types in the application you will need to call the Trading Community Member Name and Identifier Setup web service.
A relationship type categorizes relationship phrases and roles that determine the nature and purpose of a relationship. A relationship type defines the aspects of a relationship such as the roles of the subject and object, business rules, and phrases that describe the relationship. A relationship, uses the relationship type, to define how a party is related to another party.
The components of a relationship type are:
Relationship phrase pair and role pair
Relationship characteristics
A relationship type contains a relationship phrase pair and a role pair. Relationship phrase pair and role pair define the mutual roles that the two parties play in a relationship. For example, for relationship type Employment the phrase pair contains Employee of and Employer of; and, the role pair contains Employee and Employer.
The role pair describes the roles of the entities immaterial of the direction of the relationship. For example, in an Employment relationship Bill has the role of an employee and Oracle Corporation has the role of an employer.
The phrase pair describes the roles of the entities in the relationship. For example, in an Employment relationship if Bill is the subject and Oracle is the object, then the phrase would be Employee of. Similarly, if Oracle is the subject and Bill is the object, then the phrase would be Employer of.
Relationship types include characteristics or rules that define how the relationship type can be used.
While defining a relationship type, you can define if the relationship can be:
Circular
Related to self
Circular relationships have two parties related in a circle of relationships. For example, you can create a Competitor relationship type to link two organization parties. In this scenario, ABC Corp is a competitor to XYZ Corp, and XYZ Corp is also a competitor to ABC Corp.
You can create a self-relating relationship type, where the subject and the object of the relationship are the same. For example, you can create a Subsidiary relationship type, where a subsidiary organization ABC is linked to a parent organization XYZ. The parent organization XYZ, in turn, could be linked to itself as a subsidiary using the same relationship type.
This example demonstrates how to create a relationship type, and add relationship roles and phrases to the relationship type.
The following table summarizes key decisions while relationship types.
|
Decisions to Consider |
In This Example |
|---|---|
|
What are the subject and object party types for the relationship? |
The subject type and object type is organization. |
|
Is the relationship circular? |
Yes |
|
Can the subject related to self in this relationship? |
No |
You must search for the relationship type to make sure it does not already exist, before you create a relationship type.
|
Field |
Operator |
Value |
|---|---|---|
|
Relationship Type |
Equals |
Vendor |
|
Subject Type |
Equals |
Organization |
|
Object Type |
Equals |
Organization |
Review the search results. Ensure that there is no existing Relationship Type for the criteria.
|
Field |
Value |
|---|---|
|
Subject Type |
Organization |
|
Subject Phrase |
Vendor of |
|
Subject Role Singular |
Vendor |
|
Subject Role Plural |
Vendors |
|
Object Type |
Organization |
|
Object Phrase |
Vendee of |
|
Object Role Singular |
Vendee |
|
Object Role Plural |
Vendees |
This example demonstrates how to create a relationship group. Relationship groups are used to categorize relationship roles and phrases, based on the user interfaces they appear in.
In this scenario, you will create group for relationship types that link an organization to an external organization.
|
Field |
Value |
|---|---|
|
Name |
Related External Organizations |
|
Code |
REL_EXT_ORGS |
|
Description |
Indicates a group of relationships that link the organization to external entities. |
|
Subject Type |
Subject Role |
|---|---|
|
Organization |
Supplier |
|
Organization |
Vendor |
|
Organization |
Competitor |
Relationship groups categorize relationship phrase and role pairs for functional purpose. For example, you can assign the relationship phrase Subsidiary Of to a group, and assign the phrase Headquarters Of to a different group.
Relationship groups are used to determine which relationship roles and phrases are displayed in specific user interfaces of the Oracle applications. A relationship group can correspond to one or more Oracle Applications user interfaces. For example, you can configure an Oracle application to display only the relationship types that pertain to the Party Contacts information.
This example demonstrates how to create a relationship group. Relationship groups are used to categorize relationship roles and phrases, based on the user interfaces they appear in.
In this scenario, you will create group for relationship types that link an organization to an external organization.
|
Field |
Value |
|---|---|
|
Name |
Related External Organizations |
|
Code |
REL_EXT_ORGS |
|
Description |
Indicates a group of relationships that link the organization to external entities. |
|
Subject Type |
Subject Role |
|---|---|
|
Organization |
Supplier |
|
Organization |
Vendor |
|
Organization |
Competitor |
The classifications model provides you with a flexible tool to categorize entities such as parties, projects, tasks, and orders. Classifications enable you to classify an entity, such as a party, in a way that the rest of the world sees it, in addition to the way that it is referenced within your organization.
The major components of classifications are:
Classification categories
Classification rules
Classification codes
Classification code hierarchy
Entity assignment
Classification categories give you the ability to classify entities under a broad subject area. For example, you can classify organizations based on the industries they operate in. Classification categories are a logical grouping of one or more classification codes and allow classification code rules to be defined.
Classification categories can have rules that define how classifications can be assigned to entities. When you set up classification categories specific rules can be created, such as allowing the parent classification code to be assigned to a party, and allowing multiple classification codes to be assigned to an entity.
The individual values within the classification category are called classification codes. For example, in the 1987 SIC classification category there is a classification code of software that can be assigned to a party in the software industry. You can organize classification codes into a hierarchical tree, with a parent classification code at the top of the tree and child classification codes branching off from the parent code or other classification codes.
You can create hierarchies of classification codes within a classification category. For example, you can set up a classification category of IT containing the classification codes hardware, keyboards, and printers. You can then set up the classification code of hardware as the parent code at the top of the tree, with the classification codes of keyboards and printers as child codes underneath. You can create further child classification codes, such as dot matrix, ink-jet, and laser below the printer classification code.
Define which entities can be assigned to a classification category by entering the entity table name and creating a Where clause in SQL. Only entities that satisfy the Where clause are assigned the classification category. For example, a classification category called industries with the Where clause of where "party_type = ORGANIZATION" would have the result that only organizations can be classified with the industries classification category.
You can assign the parent classification code to an object, as well as the child classification codes. The parent classification code is the code at the top of the classification code tree.
If you don't allow parent classification codes to be assigned to an object, then you can assign only child classification codes, or codes that are below another classification code in the tree, to an object.
You can assign more than one classification code from this classification category to an object.
If you don't allow multiple classification codes to be assigned to an object, then you can assign only one classification code from this classification category to an object.
No. You can delete the entity assignment rule and create a new one.
Telephone Numbering Plans allow you to define the telephone number format for a country. You can have multiple formats for a country, depending on the requirements.
Phone number format, along with the other country-specific location information such as address and name formats, defines geographic-specific data formats. The Manage Telephone Numbering Plans page allows you to create and manage telephone number plans. Oracle Fusion uses the telephone number formats to display phone number in the appropriate style, and to validate phone numbers. You can define country-specific components of phone numbers, display format styles, and area codes. Oracle Fusion uses the phone formats to correctly parse phone numbers and determine the correct format style for displaying phone numbers in user interfaces.
Oracle Fusion validates phone numbers for a country, based on the format defined for the country. The phone numbers are also validated against a common set of rules that apply to all countries. You can also enter time zone information for a country, at the country code and area code level. The time zone information entered with phone number is validated against the time information defined for the country.
A telephone numbering plan defines the expected number and pattern of digits for a country phone number. It defines the country-specific components of phone numbers, display format styles, and codes. This includes country codes, international prefixes, area codes within a country, and mobile prefixes. You can specify country-specific mobile prefixes to determine if a phone number is mobile or not.
You can also create multiple telephone number display formats for a country. For example, for the US phone format, you define the phone country code as 01, fixed area code as three numbers in length, and subscriber number as seven digits in length. You can then create a telephone format for domestic display, such as (999) 999-9999. You can also create a telephone format for international display, such as 999-999-9999.
You can update telephone number plans from the Edit Telephone Number Plan page. You cannot edit the country information if the country has area codes, mobile prefixes, or phone formats defined.
In the Edit Telephone Number Plan page, you can:
Edit Scheme
Edit Regional Information
You can edit the country-specific phone information in the Scheme section. You can edit the following fields in the section:
Trunk Prefix: The code to dial before long distance numbers within the country, for example 1 for the US
International Prefix: The code to dial before international numbers when calling from the country that you are setting up, for example 011 for the US
Subscriber Number Length: The length of the subscriber number for countries where the subscriber length is fixed.
Area Code Length: The length of the area code for countries where the area code length is fixed.
You can edit the regional phone number information for the country in the Regional Information section.
The Regional Information section contains the following tabs:
Area Codes: Allows you to define area codes that you want to use for the country.
Mobile Prefixes: Allows you to define mobile prefixes that you want to use for this country. Mobile prefixes contain the area code and possible prefixes of the subscriber number. For example, the mobile prefix of 650506 consists of the 650 area code and the 506 subscriber number prefix.
Telephone Number Formats: Allows you to define multiple telephone number display formats for a country.
You cannot update the country information for a country if the regional information such as area codes, mobile prefixes, and phone formats are defined for the country. For example, if area codes, mobile prefixes, and phone formats are defined for the United States, then you cannot edit the country information.
Data Formats help you define address formats and name formats within your organization, and assign them to specific geographies. These data formats can be used to capture and validate party name and address information. In order to use geography-based validations for addresses, you must set up geography data in addition to the address formats.
You can define new styles for name and address, which would categorize a name and address style format. A Data Style, such as Mailing Address or Concatenated Name, categorizes name and address style formats. Oracle Fusion uses Data Styles to identify a particular manner or situation for which an entity, such as name or address, is formatted. The application can be customized so that, for example, only certain name and address styles are displayed in the user interface.
Use Data Formats to ensure party address and party name data quality. The format is used to present the address elements in the country specific formatting, and help users during address entry. This also provides the flexibility to specify the scope of address validation. Address formats are linked to the geographic data in order to provide address verification, at the data-import level. For example, when creating or editing an address for a party, selecting a country displays the address format for that country.
The use of Name formats ensures that name components are stored in a decomposed manner. This allows you to construct name representations from components in a variety of different styles. Name formats also allow you to store phonetic names that are required for certain geographies.
Data Formats simplify the storage of party address and party name, by storing them as components. Once you setup the address and name format for a geography, you can use the format to validate address and name data.
Data Formats determine how names and addresses are displayed in the Oracle Fusion application. Name and address formats vary depending on usage, country, and language. You can create name formats and address formats, customize them to display the address and name components, and assign them to specific locales. This allows you to create data formats for various countries, languages, and usages. Additionally, you can create variations of the formats, with each variation having its own layout. For example, an address format may have variations of a general address, rural address, and military address.
There are two types of data formats.
Address format
Name format
Address formats specify the layout of an address, including the address components and their position in the layout. For example, an address format for US postal address can include address, city, state, and zip code. Similarly, the address format for UK would include address, city, county, and post code.
Name formats, such as Informal or Mailing, allow you to specify how a name is displayed in the application, based on the usage, language, and country. A name format includes name elements, their position, and formatting. You can create a name style format for either an organization name or a person name.
This example shows how to create an address style format for a specified address style.
Specify the address style format name and address style, create the format variation layout, and assign a locale.
Create the address style format code and name, choose which address style you want to use to define this address style format, and specify if you want this address style format to be the default format for the selected address style.
|
Field |
Value |
|---|---|
|
Code |
CA_POSTAL_ADDR |
|
Name |
Canadian Postal Address Format |
|
Address Style |
Postal Address |
|
Default |
No |
Specify the address lines you want in the address and the position of the lines in the address layout. You also want to specify if the address lines will be mandatory, whether the address lines will render in uppercase, and whether there will be blank lines after the address line.
|
Field |
Value |
|---|---|
|
Line |
1 |
|
Position |
1 |
|
Prompt |
Address line 1 |
|
Address Element |
Address line 1 |
|
Required |
Yes |
|
Uppercase |
No |
|
Field |
Value |
|---|---|
|
Line |
2 |
|
Position |
2 |
|
Prompt |
City |
|
Address Element |
City |
|
Required |
Yes |
|
Uppercase |
Yes |
Specify the relevant countries for this address style format.
This example shows how to create a name style format for a specified name style.
Specify the name of the name style format and name style, create the format variation layout, and assign a locale.
You create the name style format code and name, and choose which name style you want to use to define this name style format. You also specify if you want this name style format to be the default format for the selected name style.
|
Field |
Value |
|---|---|
|
Code |
CONCAT_NAME_US |
|
Name |
United States Concatenated Name Format |
|
Name Style |
Concatenated Name |
|
Default |
No |
Specify the name parts you want in the name, and the position of the name parts in the name layout. You also want to specify if the name parts will be mandatory, define whether the name parts will render in uppercase, and whether there will be blank lines after the name part.
|
Field |
Value |
|---|---|
|
Line |
1 |
|
Position |
1 |
|
Prompt |
Person First Name |
|
Name Element |
First Name |
|
Required |
No |
|
Uppercase |
No |
|
Field |
Value |
|---|---|
|
Line |
2 |
|
Position |
2 |
|
Prompt |
Person Last Name |
|
Name Element |
Last Name |
|
Required |
No |
|
Uppercase |
No |
Specify the relevant countries for this name style format.
Click New in the Manage Address Formats page and add address lines in the Format Variation Layout section. If you require more than one address style format layout, then you can create a format variation and add a different address format layout.
You can create different variations of an address style format, with each variation having its own layout. For example, a country's postal address may have variations such as general postal address, rural address, and military address. When you create an address style format, the layout defined for the format is assigned as the default variation. Click Add in the Format Variation region of the Edit Address Style Format page, for the address style format, to add a variation of the Address style. For each address style format variation, you can enter a variation rank to define the priority of the variation.
Click New in the Manage Name Formats page and add line entries for each part of the full name in the Format Variation Layout section, within the Create Name Style Format page. If you require more than one name style format layout, then you can create a format variation and add a different name format layout.
You can create different variations of a name style format, with each variation having its own layout. For example, different regions in a country may have different name style formats. Click Add in the Format Variation region in the Edit Name Style Format page, for the name style format, to add a variation of the name style. For each name style format variation, you can enter a variation rank to define the priority of the variation.
A note is a record attached to a business object that is used to capture nonstandard information received while conducting business. When setting up notes for your application, you should consider the following points:
Note Types
Note Type Mappings
Note types are assigned to notes at creation to categorize them for future reference. During setup you can add new note types, and you can restrict them by business object type through the process of note type mapping.
After note types are added, you must map them to the business objects applicable to your product area. Select a business object other than Default Note Types. You will see the note types only applicable to that object. If the list is empty, note type mapping doesn't exist for that object, and default note types will be used. Select Default Note Types to view the default note types in the system. Modifying default note types will affect all business objects without a note type mapping. For example, you have decided to add a new note type of Analysis for your product area of Sales-Opportunity Management. Use the note type mapping functionality to map Analysis to the Opportunity business object. This will result in the Analysis note type being an available option when you are creating or editing a note for an opportunity. When deciding which note types to map to the business objects in your area, consider the same issues you considered when deciding to add new note types. Decide how you would like users to be able to search for, filter, and report on those notes.
Note
Extensibility features are available on the Note object. For more information refer to the article Extending CRM Applications: how it works.
The Resource Directory offers detailed information about all the resources within the deploying organization. The Resource Directory also enables you to find and communicate with other resources, and to network and collaborate with them.
Use the Resource Directory to perform the following tasks:
View and modify your profile
View your organization and team membership information
View information related to other organizations and teams
View the profiles of other resources
Communicate with other resources
Setting up resources involves identifying a person as a resource and specifying optional profile details as needed. This is an important step because until you identify users as resources, you cannot assign work objects to them.
While identifying a resource is the only mandatory task in resource setup, you may also need to perform some of the following tasks while setting up resources.
Specify the end date for a resource's engagement with the deploying company
Assign roles to resources
Assign resources to organizations
Assign resources to teams
The Identify Resources step in the Manage Resources task is only needed to identify an existing employee, contingent worker, or partner member as a resource. Usually they are identified as resource in the Manage Users task, or in the Partner Center. If you have created partner members or internal users in the system without making them resources, you can identify them as resources in the Identify Resources step. Until you identify employees, contingent workers, and partner members as resources, you cannot assign them work objects.
Note
Resources need not necessarily belong to an organization, nor do they need to have specific roles assigned. However, it is best to always associate resources with an organization either as managers or as members. Similarly resources should also have at least one role as part of their organization membership. When you identify users as resources, all you indicate is that these new resources can now be assigned work within the deploying company.
Resource skills help you assign resources to organizations and teams which can best utilize a specific set of skills. For example, if a resource is skilled in a specific technology, product, or business domain, you can assign the resource to teams and organizations that need resources possessing such skills. Use skill-based resource assignment to get the best out of the resources available to the deploying company.
You can include resources from different resource organizations to work together on a work object as members of the same resource team. You can also include entire resource organizations into a resource team. Generally what resources can do is controlled by their resource organization membership and their hierarchy. Resource teams provide a flexible way of bringing resources together without any organizational or hierarchy-based restrictions.
You can assign identified resources to teams and assign them roles within the team. Each resource can have a specific role within a team. Thus, a resource may play different roles in different teams.
When you add a resource to an organization, the resource becomes a member of the organization. This positions the resource within the organization hierarchy.
Organization membership information is part of the publicly visible details of a resource profile. This means that a resource's organization membership and reporting structure are visible to all active resources within the organization.
If you assign the entire organization to a resource team, all member resources are automatically assigned to the team. This information also becomes part of the resource's publicly visible profile.
When you delete a resource, the resource is deleted from the Resource Directory and from the organizations and teams with which the resource was associated. It is always best, though, to check a resource's usage and remove the resource from all teams and organizations before deletion from the resource directory.
The main difference between an internal resource and a partner resource is the company for whom each works. While the internal resource is an employee or contingent worker of the deploying company, the partner resource is an employee of the partner company.
The methodology used to create resources of these two types is also different. While the partner administrator or channel manager creates a new partner resource through the Oracle Fusion Partner Management applications, internal resources are added using the Manage Users, Hire Employee, or Import Person and Organization task.
Another difference between partner resources and internal resources is that partner resources cannot access the Resource Directory while internal resources can.
No. You can only identify existing employees and contingent workers as resources in the Manage Resources task, but you cannot create a new employee or contingent worker in the Manage Resources task.
You can create an employee or contingent worker using Manage Users task, Hire Employee task, or Import Person and Organization task.
When resources quit, their status is set to inactive. This automatically removes these resources from all organizations and teams in the deploying company, and no new work objects can be assigned to them.
To identify specific employees, contingent workers, or partner contacts as resources, you need to search for them and enable them as resources. Once these new resources have been identified, you can assign them to organizations and teams as needed.
Oracle Fusion CRM or MDM Application Administrators can use the Manage Users setup task to create new employees or contingent worker users. New employees or contingent workers can also be identified as resources similarly.
You can assign organization usage information to resource organizations to classify them based on how they can be used. For instance, resource organizations engaged in sales activities can be assigned the Sales Organization usage. This enables you to sort organizations based on their usage, simplifying your task of working with them.
A resource can belong to multiple organizations, and can be assigned different resource roles for each organization. However, a resource can be assigned to one resource organization that becomes the primary organization for the resource as far as a specific usage is concerned.
A resource organization can be said to be a primary resource organization by usage for a resource if the following criteria are met.
The resource must be a member of the concerned organization.
The resource organization must be classified as an organization with the specific usage.
For example, a resource organization can be listed as a primary resource organization for marketing for a particular resource if the resource organization is classified as a marketing organization by usage, and has the concerned resource as a member.
As organizations evolve, you may need to make changes to the existing organization hierarchy. Create organization hierarchies to capture these changes without impacting active hierarchies.
Depending on the urgency and nature of the changes within the deploying company, organization hierarchy changes can either be immediate or planned.
In case of immediate changes in the organization hierarchy, either make changes directly to the hierarchy or create a new version of the existing hierarchy and set it to become active when the new organization structure needs takes effect.
Note
Changes made to existing hierarchies are saved automatically and updated immediately.
Create a new version of the active hierarchy and specify the date on which the new version needs to become active. Once the new version is saved, you can make and save the changes needed. Ensure that you have made all the changes needed to the new version before the date on which the new version needs to become active.
When you assign a resource to an organization, you should also specify the role the resource needs to play in the organization. This ensures clarity on the kind of tasks that can be assigned to a resource, apart from defining where the resource is situated within the organization's hierarchy.
Note
There can be only one manager in an organization. However, a resource can be a member of multiple organizations if needed.
This example demonstrates how to create a resource organization with sales usage.
you have two choices while creating resource organizations with sales usage:
Create an organization from an existing department
Create a new organization
These tasks can be accomplished using the Manage Sales and Marketing Organizations screen in the Setup and Maintenance section. To navigate to this screen, perform the following tasks.
Click the Navigator link at the top-left section of the Oracle Fusion screen.
Click the Setup and Maintenance link in the Navigator. This displays the Setup and Maintenance screen.
If the Manage Sales and Marketing Organization task is listed in the Assigned Implementation tasks, click the Go To Task button against it to access the Manage Sales and Marketing Organizations screen. You can also choose to search for the task in the All Tasks tab.
You need to create an organization with sales usage from an existing department if the concerned department needs to be reused as a sales organization.
This example describes how you can add a sales organization to a sales organization hierarchy.
As new sales organizations are created within your company, you need to add these organizations to your company's sales organization hierarchy. To do so, perform the tasks detailed below.
Once you have identified a resource, you can assign the resource to organizations within the deploying company. This example explains how you can assign resources to organizations.
You need to assign a resource to an organization. It is important to state here that a resource can belong to multiple organizations at the same time. This means that even if chosen resources already belong to organizations, you can assign them to other organizations as needed.
To assign a resource to an organization, perform the following tasks.
Search for the resource using the Search controls in the Resource Directory.
Display the concerned resource's profile by clicking on the resource's name in the search results.
Click the Organizations tab in the Resource Profile Details screen. This displays the list of organizations to which the resource belongs.
Click the Create button to display the Create Organization Membership popup screen. Use this screen to search and assign organizations to the concerned resource's profile.
Click the Organization field and select the organization you need from the drop-down list displayed. You can also enter part of the name of the organization you need and search for it. You can also search for organizations using a range of search options available in the search screen. Click the OK button to add the organization you need to the Create Organization Membership screen.
Click the Add Row button in the Create Organization Membershipscreen. This adds a row to the screen, enabling you to specify the role the resource needs to play in the organization.
Click the Role field and, from the drop-down list displayed, select the role the resource needs to play in the organization. Depending on the role settings created for the selected role, the role type is automatically indicated by a tick mark under the appropriate column.
The From Date field is automatically set to the current date. You can change this date to reflect the actual assignment date as required.
The To Date is empty by default. This means that the resource is assigned to the organization you chose infinitely. You can set the date to the actual end date by entering the required value in the mm/dd/yy format.
Click the OK button to save your changes. This assigns the resource to the organization you chose. You can add the resource to as many other organizations as needed.
You can also assign resources to organizations by searching for organizations and adding members to the concerned organization. To assign resources to organizations by searching for organizations, perform the following operations.
Click the Search field and, from the drop-down list displayed, select Organizations.
Search for the organization you need and click on the name of the required organization from the search results. This displays the Organization screen, where all the details of the selected organization are displayed.
Click the Members tab to edit the list of members assigned to the organization.
Click the Create button to assign a new resource to the organization. This displays the Add Resource Member popup screen.
Search for the resource by entering the resource's name in the Resource field. From the search results displayed, select the resource you wish to assign to the organization and click OK. This displays the Add Resource Member popup screen with the resource's name added.
Click the Add Row button to add a role to the newly-added resource.
Click the Role field and, from the drop-down list displayed, select the role the resource needs to play in the organization. Depending on the role settings created for the selected role, the role type is automatically indicated by a tick mark under the appropriate column.
The From Date field is automatically set to the current date. You can change this date to reflect the actual assignment date as required.
The To Date is empty by default. This means that the resource is assigned to the organization you chose infinitely. You can set the date to the actual end date by entering the required value in the mm/dd/yy format.
Click the OK button to save your changes. This assigns the resource to the organization you chose. You can add as many resources to the organization similarly.
Note
The date from which a resource is a member of an organization must be on or after the date on which the resource was hired.
If a resource was previously a member of the selected resource organization with an end date later than the current date, and if the resource was removed from the organization before the end date, you cannot reassign the resource to the same organization.
Yes. You can create new organizations using the Manage Sales and Marketing Organizations option in the Functional Setup Manager or the Oracle Fusion Partner Management user interface. You can also create new resource organizations from the User Management interface. You can also use the interface to manage user accounts and roles, and to create employee and partner-member users.
To delete a resource from an organization, you need to delete the concerned resource's membership from the organization.
To manage the membership of an organization, navigate to the Manage Resource Organization and select the organization concerned. Once the organization's membership details are listed, you can add, delete or edit them as required.
When you delete a resource from an organization, you effectively delete the concerned resource's membership with the organization. This also removes the resource from the organization hierarchy.
A resource organization hierarchy is a hierarchically structured representation of the way resources are grouped within a resource organization. Resource organization hierarchies can contain other organizations within them. Thus, you can include any resource organization within the deploying company to create a single global hierarchy that depicts the operational structure of your company.
Simply put, a resource organization hierarchy describes how organizations are structured. Organization hierarchies also capture the relations between organizations across the deploying company. Thus, resources can view the reporting structures within their organizations and how their organization reports into higher-level organizations.
No. All organizations within your deploying company are part of a large overarching global hierarchy. Therefore, new organization hierarchies cannot be created. You can, however, move existing organizations or attach new organizations to the existing hierarchy and create a new version of the hierarchy. Once you have created a new version, specify the date from which the new version needs to become active and, on the specified date, your new hierarchy version replaces the older hierarchy.
No. You can only have one resource organization hierarchy active at a time within a deploying company. If you need to create a hierarchy for an organization, you will need to specify the reporting structure within the concerned organization and then make the organization a part of the existing hierarchy.
Yes. To create a new hierarchy version, navigate to the hierarchy whose new version you wish to create and click on the Actions button. From the drop-down list displayed, select Create Hierarchy Version. make the changes to the hierarchy as required, specify the dates between which the organization hierarchy needs to be active, and click Save and Close to save your changes and exit the screen.
There is always one resource organization hierarchy for internal resource organizations and also one partner organization hierarchy for each partner company. You can have one active version and multiple inactive versions of resource organization hierarchies. Resource organizations can be included into any of the active or inactive organization hierarchies.
No. An organization can have only one manager.
Defining resource roles involves defining and configuring the roles that a resource plays as an individual or within a resource organization or resource team in the deploying company. This requires you to specify who a resource is within the enterprise and what specific role the resource performs within the context of an organization or team.
You can assign defined roles to resources directly or to resources within an organization or team context. This action simplifies the task of individually assigning complex roles to resources within the organization.
You can also set several flags while defining roles. Use these flags along with the organization hierarchy information to define the reporting hierarchy of resources. Use the Manager flag to tag a role as a supervisor role. Similarly, attach a Member tag to a role to make it a subordinate role in the hierarchy. Tag roles as Administrator or Lead to indicate the roles that the resource roles have within the hierarchy. Additionally, you can use these flags along with the organization hierarchy information to maintain manager-to-manager relationships within the organization.
Resource role types organize roles into logical groups. This simplifies role assignment and assignment tracking. For example, the Partner resource role type defines a set of partner-specific roles such as partner sales representative and partner sales manager. Use the Partner resource role type to determine the roles that are appropriate for partner members. Similarly, use the Sales resource role type and the Marketing resource role type to categorize the appropriate sales and marketing roles for internal employees or contingent worker resources.
Security role provisioning is the process of automating the provisioning and de-provisioning of security roles based on resource role assignment to resources. Once security roles are provisioned to resources, they can access the tasks and data enabled for the security role.
Resource roles indicate who a person is to the deploying company. As such, resource roles are used for filtering resources and for generating reporting hierarchies in addition to being used to define security policies. A key difference between a security role and resource role is that a resource role may be assigned to a resource without a user account, while a security role can only be provisioned to a resource who has a user account. So while in some cases the resource role may be defined at the same granularity as the security role and used to automate security role provisioning, the resource role concept remains separate from security roles.
In the Manage Resource Roles task, you can establish job mapping for a resource role. Job-to-resource-role mapping enables you to associate HCM jobs with specific resource roles. This mapping simplifies the task of assigning resource roles to new employees or contingent workers, resulting in time and costs efficiency.
For example, suppose a new employee joins the IT department as a data quality manager. If the new employee's job is already mapped to a resource role like Data Steward Manager, the resource role is automatically assigned when the employee is identified as a resource in the system. This enables you to place new employees faster in organizational and reporting hierarchies. If security roles are also associated with the resource role, then the new employee's access privileges are also granted automatically.
Resource role assignment is the task of assigning roles to active resources within the deploying company. These roles are previously set up, and have associated security privileges. Thus, when you assign a specific role to resources, they automatically receive access to specific business functions within the company.
You can assign different roles to the same resource in different organizations. Thus, the same resource can have access to different business functions depending on the security roles associated with the resource roles assigned to them.
Resources who are team members can be assigned different roles within the team. These roles do not necessarily need to reflect the roles these resources may play in resource organizations. Depending on the requirements of the tasks assigned to the team, resources may be assigned resource roles, and can accordingly access data related to the tasks in which the team is engaged.
A resource can belong to multiple teams depending on the needs of these teams and the skills that the resource offers. This does not affect the resource's membership with organizations within the deploying company.
Resources have specific roles to play in every team to which they are assigned. Each of these roles can be different. Also, these roles can be different from the roles assigned to the same resources in resource organizations. Thus, a resource can be a manager in one team, and a member in another simultaneously.
Yes. While a resource can have only one resource role within a resource organization, a resource can have multiple roles in different organizations across the deploying company.
No. One resource can only have one role within an organization. However, a resource can belong to more than one team, and can have multiple roles in each.
Setting up resource roles helps you define the various roles within your organization so that they can be assigned to resources.
Use the Resource Role Setup tasks to define specific roles that best reflect the way responsibilities are distributed within the deploying company. If your resource roles are created before you start setting up your resources, you can easily assign roles to resources, simplifying task assignment. Resource roles that are tagged as manager or member roles also determine how eventually the reporting hierarchy gets built.
Later, when you need to assign resources to organizations, resource roles can help you specify the precise roles that resources need to play within the organizations to which you assign them.
Resource roles also simplify security provisioning for resources. You can define security roles corresponding to resource roles using the role mapping interface. Once such mapping rules are setup, you can provision security roles by assigning the corresponding resource roles to resources.
A resource team is a group of resources formed to work on work objects. A resource team may comprise resource organizations, resources, or both. A resource team cannot be hierarchically structured and is not intended to implement an organization structure. You can also use resource teams as a quick reference to groups of related resources that you can quickly assign work objects to.
Note
Members of teams can either be reassigned separately, or entire teams can be assigned to other tasks as required.
A duty role is a set of privileges associated with an aspect of a resource role, and one or more duty roles roll up into a resource role. Basically, resource roles can be said to comprise a set of duties, and each duty has its own set of privileges. Thus, privileges roll up into duty roles, and duty roles roll up into resource roles.
Value sets are specific to the application in which they will be used. In the Oracle Product Information Management application, value sets are used primarily for defining attributes where the values that an attribute can have is limited to a specific set of values.
Value sets can be edited or new value sets can be created from the Manage Product Value Sets page. The Edit icon launches the Edit Value Sets page, which redraws in the same region of the local area. The Create icon launches the Create Value Sets page, which redraws in the same region of the local area.
A value set is defined by the value set code and is specific to the module of an application in which the value set is to be used, such as Item Class.
The validation type determines how the value of field is validated for the assigned value set. The following are the seeded values:
Format Only
Independent
Dependent
Subset
Table
The value data type determines the data type for the value set. The following are the seeded values:
Character
Number
Date
Date/Time
The Manage Product Child Value Sets task uses the same page as the Manage Product Value Set task.
A child value set is used to define variants for stock-keeping units or SKUs. A SKU contains the common properties for an item. For example, a shirt can be produced with colors; white, red, yellow, and blue. The variant is used to represent the colors of the shirt.
You define child value sets as follows:
Create a value set with validation type of independent, for example All Colors.
Select the new value set in the Manage Product Value Sets results table, for example All Colors.
Click Manage Values, create several values, for example Blue, Red, Green, Yellow, and Black.
Create a value set with validation type of Subset and enter the first value set you created for the independent value set, for example: Summer Colors.
Select the value set Summer Colors in the Manage Product Value Set result table.
Click Manage Values and then click the Add icon. The dialog will show a list of values based on the value set named Summer colors. Select two of them.
The value set Summer Colors is a child of All Colors.
The Root Item Class is seeded and all item classes are created as children of the Root Item Class. For Oracle Fusion Product Model customers, only the Root Item Class is available. The Manage Default Item Class task enables Product Model customers to manage item class templates, descriptive flexfields, attachment categories and lifecycle phases. The Manage Default Item Class task launches an edit page for the Root Item Class.
The functionality for the Root Item Class is defined using three tabs:
The Basic tab enables descriptive flexfields and attachment categories to be viewed and managed for the Root Item Class.
The Lifecycle Phases tab enables one or more lifecycle phases of a lifecycle to be associated with an item class.
The Templates tab is where you define and manage item templates for the item class.
In the Item Status table, select a status code to display the associated attribute groups and attributes as well as control information.
You can create or edit or delete item statuses on the Manage Item Statuses page. Inactive dates are used to specify the date after which the item status will no longer be active. Operational attribute groups and attributes corresponding to the selected item status are displayed in the Details section. Select a value for the status from choice list for the attribute. Whenever the status is applied to the item, the value of the attribute may change. If the status will have no value, select No.
Select the Usage value of None or Defaulted or Inherited in the choice list for the Usage field that corresponds to how the attribute value will change based on the item status value:
Defaulted-Sets the values of the item status attributes when the status value changes, but allows the overriding of the value during import and update of item.
Inherited-Sets the values of the item status attributes when the status value changes, but overrides cannot occur.
None-The item status attribute values will not be changed.
Any change made to an item status is not applied automatically to existing items, but will be applied during the editing of an item when the item status value is changed.
Item types are managed on the Manage Item Types page.
There are 32 seeded item types and you can edit them or create additional item types.
Item types are date-enabled and are made active or inactive by adjusting the Start Date and End Date.
To benefit from the use of item types, you must enable them by selecting the Enable checkbox.
Cross-References provide the functionality to map additional information about an item in the form of a value and cross-reference type. For example, the cross-reference can map between an item and an old part number, where the value is the value for the old part number and the type is Old Part Number. Cross-Reference Types are part of item relationships where the item relationship type is Cross-Reference. There are no values seeded for cross-reference types. You define the values using the Manage Cross Reference Types task. Cross-reference types are date-enabled and can be made active or inactive by adjusting the values of the Start Date and End Date. To benefit from using item relationship for cross-reference, you must enable cross-reference types by checking the Enable checkbox.
You can import items and item-related information using interface tables. This import data is loaded into the production tables using the Import Item task.
The Import Item task creates an Enterprise Storage Server (ESS) process that takes the data that is loaded in the interface tables and uses the import process to move the data to the production tables. The import processes will perform all of the validations necessary to ensure the data imported is correct prior to moving the data into the production tables.
Access the Enterprise Storage Server and provide a process name (job definition) such as Item Import Process.
Select Setup and Maintenance from the Navigator.
Access the All Tasks tab on the Overview page, and search for the Import Item task with the name of your ESS process definition.
Click the Go to Task icon in the search results for that Import Item task.
The parameters for the item import process are
Batch ID: Associate the interface table to an item batch definition.
Organization: Select an organization to be used for the import.
Process Only: Determines how the data is processed. The choices are:
Create
Sync
Update
Process All Organizations: Select Yes if the import contains items that will be imported to multiple organizations.
Delete Processed Rows: Select Yes to delete rows that are imported without errors
Click Submit and the Request Number will be displayed.
Select Setup and Maintenance from the Navigator, then access Monitor Item Imports to search for specific Enterprise Storage Server processes and monitor their status in the search results table.
A related item is an item relationship between two existing items. How the two items are related is defined by a subtype. Multiple subtypes for related items are seeded, and you define additional subtypes on the Manage Related Item Subtypes page.
You can use descriptive flexfields to capture additional information about items beyond what is provided by the predefined set of operational attributes in Oracle Fusion Product Model.
If you are not using Oracle Fusion Product and Catalog Management, then you cannot create user-defined attribute groups and attributes. However you can use descriptive flexfields associated at Item level to create fields to capture information about items. Like other descriptive flexfields, item descriptive flexfields have context segments and context-sensitive segments whose values are validated on entry by value sets. You can define the value sets to control what values users can enter in a descriptive flexfield segment. Examples of information that you might capture are size and volumetric weight.
Manage this flexfield type by using the Manage Item Descriptive Flexfields task, which you can access by searching for flexfield tasks on the Setup and Maintenance Overview page.
Use descriptive flexfields associated at Item Revision level to capture item revision information whose values may differ between revisions of the same item.
Manage this flexfield type by using the Manage Item Revision Descriptive Flexfields task, which you can access by searching for flexfield tasks on the Setup and Maintenance Overview page.
When defining descriptive flexfields associated with item relationships, you must use certain prefixes when naming the context segments, in order for the segments to be displayed for the respective relationships.
The prefixes required for naming the context segments
are listed in the following table, with their corresponding item relationship
types. For example, if you define an item relationship descriptive
flexfield with a context segment named RELATED_RELATIONSHIP_ATTRIBUTES, then the value segments of this context will be displayed for Related
Item Relationships when users conduct transactions in that context.
For another example, when users navigate to a UI of a particular object,
such as a Competitor Item, they see the contexts whose internal name
has the prefix COMP.
|
Relationship Type |
Prefix for Context Segment |
|---|---|
|
Competitor Item Relationship |
COMP |
|
Customer Item Relationship |
CUST |
|
Item Cross-reference Relationship |
XREF |
|
GTIN Relationship |
GTIN |
|
Manufacturer Part Number Relationship |
MFG |
|
Related Item Relationship |
RELATED |
|
Source System Item Relationship |
SYS |
Manage this flexfield type by using the Manage Item Relationship Descriptive Flexfields task, which you can access by searching for flexfield tasks on the Setup and Maintenance Overview page.
When defining descriptive flexfields associated with trading partner items, you must use certain prefixes when naming the context segments, in order for the segments to be displayed for the respective trading partner type.
The prefixes required for naming the context segments
are listed in the following table, with their corresponding trading
partner types. For example, if you define a trading partner item descriptive
flexfield with a context segment named COMP_TPI_ATTRIBUTES, then the value segments of this context will be displayed for Competitor
Item when users conduct transactions in that context..
|
Trading Partner Type |
Prefix for Context Segment |
|---|---|
|
Competitor Item |
COMP |
|
Customer Item |
CUST |
|
Manufacturer Item |
MFG |
Manage this flexfield type by using the Manage Trading Partner Item Descriptive Flexfields task, which you can access by searching for flexfield tasks on the Setup and Maintenance Overview page.
Lifecycle phase types are seeded and describe the type of lifecycle phase. They are Design, Obsolete, Preproduction or Prototype, and Production.
Lifecycle phases must be created by the user by selecting one of the seeded lifecycle phase types.
Define units of measure, unit of measure classes, and base units of measure for tracking, moving, storing, and counting items.
The Quantity unit of measure class contains the units of measure Box of 8, Box of 4, and Each. The unit of measure Each is assigned as the base unit of measure.
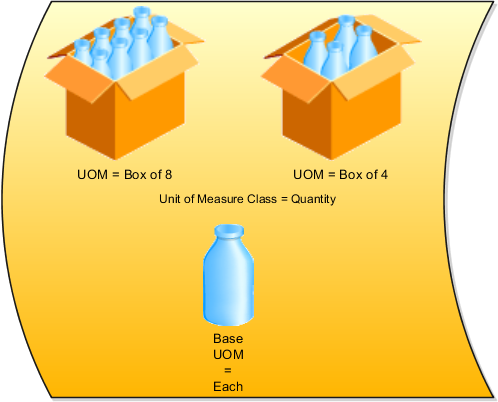
Unit of measure classes represent groups of units of measure with similar characteristics such as area, weight, or volume.
Units of measure are used by a variety of functions and transactions to express the quantity of items. Each unit of measure you define must belong to a unit of measure class.
Each unit of measure class has a base unit of measure. The base unit of measure is used to perform conversions between units of measure in the class. For this reason, the base unit of measure should be representative of the other units of measure in the class, and should generally be one of the smaller units. For example, you could use CU (cubic feet) as the base unit of measure for a unit of measure class called Volume.
Each unit of measure class must have a base unit of measure.
This table lists examples of unit of measure classes, the units of measure in each unit of measure class, and the unit of measure assigned as the base unit of measure for each unit of measure class. Note that each base unit of measure is the smallest unit of measure in its unit of measure class.
|
Unit of Measure Class |
Units of Measure |
Base Unit of Measure |
|---|---|---|
|
Quantity |
dozen box each |
each |
|
Weight |
pound kilogram gram |
gram |
|
Time |
hour minute second |
second |
|
Volume |
cubic feet cubic centimeters cubic inches |
cubic inches |
A unit of measure standard conversion specifies the conversion factor by which the unit of measure is equivalent to the base unit of measure.
This table lists examples of unit of measure classes, one unit of measure included in each class, the base unit of measure for the unit of measure class, and the conversion factor defined for the unit of measure.
|
Unit of Measure Class |
Unit of Measure |
Base Unit of Measure |
Conversion Factor |
|---|---|---|---|
|
Quantity |
dozen |
each |
12 (1 dozen = 12 each) |
|
Weight |
pound |
gram |
454 (1 pound = 454 grams) |
|
Time |
minute |
second |
60 (1 minute = 60 seconds) |
A unit of measure standard conversion defines the conversion factor by which the unit of measure is equivalent to the base unit of measure that you defined for the unit of measure class. Defining a unit of measure standard conversion allows you to perform transactions in units other than the primary unit of measure of the item being transacted. The standard unit of measure conversion is used for an item if an item-specific unit of measure conversion has not been defined.
A UOM interclass conversion defines the conversion between the source base unit of measure ("From Base UOM") in one unit of measure class ("From Class") and the destination base unit of measure ("To Base UOM") in a different unit of measure class ("To Class").
For example, the item is gasoline. The From Base UOM (of the From Class called "volume") is liters. The To Base UOM (of the To Class called "quantity") is Barrels. The conversion is 158.76 liters (volume) to 1 barrel of oil (quantity).
A UOM intraclass conversion specifies the conversion between a unit of measure (the "From UOM") and the base unit of measure of the same class.
For example, the item is soda pop. The unit of measure class is Quantity. The From UOM is Case (CS). The base unit of measure is Each (EA). The conversion is 24, to specify that 1 CS = 24 EA.
Attributes that exist for each instance of an item and the values for the attributes can be different.
For example:
The number of megabytes (MB) or gigabytes (GB) of e-mail storage on a digital subscriber line (DSL) account.
The monogram text on a shirt pocket.
The color of a music player.
These attributes are defined at the item class and their attribute value is captured at the time of a transaction by downstream applications. The metadata values of these attributes are maintained at the item class. Order orchestration and order capture systems are two examples of downstream use. All transactional attributes must be associated with a value set.
The following metadata values can be defined for an attribute.
Required: Indicates whether the attribute value is required at the transaction.
Default Value: Indicates the default value of the attribute.
Value Set: Indicates the value set associated with the attribute.
Read Only: Indicates whether the attribute value is read only.
Hidden: Indicates whether the attribute is not shown.
Active: Indicates whether the attribute is active or inactive.
Transactional attributes are inherited across the item class hierarchy. The metadata is data-effective. Changes in the metadata will be reflected immediately at the item level. For example:
Any of the metadata of a transactional item attribute belonging to a specific domain, if modified in the child item class would break the inheritance. Any changes done at the parent item class for this transactional item attribute would not get inherited. Multiple records with same date range can exist if they belong to different domains. For example, the transactional item attribute Memory is associated with aDomain and order capture. Each of the domains may use a different set of metadata for its own purpose. Hence, for the same date range, two different records can exist. Only Start Dates for a transactional item attribute would be entered by a user. End date would be calculated automatically based on the next Date Effective record.
Users can modify (either Start Date and metadata) of a future effective record. Records with Starting date as Past cannot be modify or edited.
Only start dates can be set to permit updating by a user, and the end date of a record will automatically be pulled from the next record.
Any changes performed in the parent item class would be inherited by the child item class. If the corresponding record is modified in the child, then these changes will not be inherited.
Item pages provide a mechanism with which to customize the user interface.
Pages and attribute groups enable you to structure your data.
Benefits include:
You can combine and sequence attribute groups into pages.
There is no limit on the number of attribute groups associated with a page
Pages can be created at item class and are inherited down the item class hierarchy.
Attribute groups can be added to pages sequentially and based on this sequence, these attribute groups are shown in items
Attributes groups can be added for an inherited page at the child item class.
Functional Item pages are another type of special pages which are used to associate pages already created for use in the application. Application scope indicates the application which uses these pages and the usage indicates the specific use of the configured pages.
You can associate attributes for the purpose of standardization and matching, to be performed when items are created. You restrict the attributes to be processed for standardization or matching or both. Selecting Standardization allows the data quality engine to return the standardized values for these attributes. Matching allows the data quality engine to return any existing items which matches the value of these attributes and are potential duplicates.
Sequential lifecycles phases enable you to track and control the lifecycle phases of items. Each phase represents a set of tasks and deliverables that are required before promoting the item to the next phase. You can associate lifecycle phases to an item class which are created elsewhere. Lifecycle phases are inherited down the item class hierarchy and new lifecycle phases can be added to child item classes. For example, the lifecycle phases for a computer component item class might be: Concept, Prototype, Production, and Retirement.
Template is a defined set of attribute values used during item creation. When you apply a template to an item, you overlay or default-in the set of attribute values to the item definition. For example, every time users in a particular organization create new items, the attributes, as defined and approved by the organization appear in the appropriate fields. No user guesswork is required, and time is saved during the creation of items with a similar form, fit and function. Templates are created for each item class. Templates are specific to organization. Templates are inherited down the item class hierarchy. You can define both operational attributes and user defined attributes for each template.
Search formats provide a convenient way to save frequently used search criteria. Search formats created at item class will be available to all users. Search formats are always created in the context of item class. Display formats enable you to predefine search display views. You can use these views to look at different sets of item attributes that are returned by the search. Display formats created at item class will be available to all users. Display formats are always created in the context of item class.
An import format identifies the base and user-defined attributes in an item class that are imported into the application using a spreadsheet. Consequently, when you import item business entities from a spreadsheet, the items are all imported into the particular item class defined in the import format. These imported item business entities inherit all the attribute groups defined for the specific item class. You cannot edit the layout of an import format once it is created.
When you are ready to create or edit an item class, you must decide whether to allow items to be created under the item class.
To create an item class, perform the following steps:
Create a list of all items.
Classify or categorize these items (Item classes).
Define any parent child relationships (Item Class Hierarchy).
Gather the unique types of specifications required for each type of classification at a high level (user-defined attribute groups).
Gather the unique specifications required within the group (user-defined attributes).
If there are specified values that must be used, define them (value sets and values).
Item classes can be used for classification purposes and in some case, item creation may not be allowed. By optionally setting the item creation allowed attribute to No, item creation under an item class can be prevented. However, a child item class of such a item class may be allowed for item creation. For example:

This will prevent items from being created in Computers and Desktop and allow items to be created for Green Desktops and Gaming Desktops. Optionally, specify a date on which the item class will become inactive. You cannot specify an inactive date that is later than the inactive date of an item class parent, nor can you specify an inactive date that has already passed. Also, all children of a parent item class with an inactive date should be made inactive at the same time or earlier.
Attachment categories enable you to categorize and classify attachments to an item. To classify item attachments, associate attachment categories with item catalog categories. Associated attachment categories are inherited down through the item class hierarchy.
Item classes can be set up for item numbers and descriptions so that they are automatically generated when net items are created. This ensures that new items created in item classes have a consistent numbering scheme. Versioning control allows new versions to be created for all items of item class. An integrated workflow definition allows creation of custom new item request definition for new items created. This definition workflow enables you to route the definition and approval of an item using various steps. When creating a new item, various aspects of an item like base operational attributes, user-defined attributes, structures, attachments, categories associated, organization assignments, are defined by various people in the organization using a workflow process.
You can control item creation, viewing and update access by assigning a role on the item class to a principal or group of users. Security allows a person or a group to have privileges on an item of item class in each organization. This is inherited and hence a person who has a privilege in a parent item class will automatically have the same privilege in the child item classes.
The item class hierarchy provides a logical classification and grouping of similar products, and also acts as a template for product definition by enabling the association and inheritance of data elements and policies that are shared by products.
To create an item class, select a parent item class on the Item Class Search Results page and select Create. Provide the required information, and optionally include additional details, such as attribute groups, pages, templates, and search and display formats.
You can set various options to customize the runtime instance of your product catalog.
The Functions and Miscellaneous tabs have several built-in features and options for you to choose from.
Select certain functions and specify how they should run depending on your processes.
|
Name |
Description |
Value |
Description |
|---|---|---|---|
|
Availability Engine |
Determines the availability of a product in stock. |
Do not run |
Do not call the availability service. |
|
|
Quick availability |
Show whether the product is available or out of stock |
|
|
Detail availability |
Show the number of quantity available. Example 25 in stock. |
|
Eligibility Engine |
Determines the eligibility of a product or product group for a customer or a geographical area. |
Do not run |
Do not call the eligibility service. |
|
|
Run and hide |
Call the eligibility service but hide the ineligible products, product groups and promotions. |
|
|
Run and sShow |
Call the eligibility service and show the ineligible products, product groups and promotions with the appropriate message. |
|
Pricing Engine |
Determines the price for a product. |
Do not run |
Do not call the pricing service. |
|
|
Complex |
Show the List Price, Your Price, Discount, and so on. |
|
|
Simple |
Show the List Price only. |
|
Territory Engine |
Determines the products in a territory. |
Do not run |
Do not check for territory information. |
|
|
Enforce territory |
Always show the products and product groups that are part of the territory. |
|
|
Display user choices |
Provides the user with the choice to toggle between all product or product groups and the ones that belongs to the territory only. |
Set preferences such as button label, sort by text, number of products per page, and so on.
|
Name |
Description |
|---|---|
|
Add item button label |
The selected value is shown next to the product in the runtime interface. |
|
Add category button label |
The selected value is shown next to the catalog or category in the runtime interface. |
|
Add category enabled flag |
Allows buttons to be shown next to the catalog or categories. |
|
Records per page |
Number of records to be displayed per page. |
|
Sort by format text |
Sort format of the entire label that you want displayed in the runtime interface. The default pattern is {ATTR}: {SORT_ORDER}. Example: Name: A to Z. |
|
Sort by product label prefix |
Sort format of the prefix label that you want displayed. Example: If the default is Name: A to Z, you can select an alternate label for Name. It could be Item: A to Z. |
|
Sort by sequence product ascending label |
Sort format of the ascending suffix label that you want displayed. Example: If the default is Name: A to Z, you can select an alternate for A to Z. It could be Name: Ascending. |
|
Sort by sequence product descending label |
Sort format of the descending suffix label that you want displayed. Example: If the default is Name: Z to A, you can select an alternate for Z to A. It could be Name: Descending. |
|
Sort by sequence ascending first flag |
Select Yes to display ascending labels first in the Sort By LOV. |
|
Show immediate child products only |
Shows immediate products of a given category disregarding the standard behavior of showing all products (including child categories) if narrow by is defined on the category. |
|
Image server |
Identifies the source of images for products and product groups. |
|
Image server alternate path |
Identifies an alternate image source location (URL) |
|
Enable transactional attribute |
Allows transactional attributes to show up in product detail page. Transactional attributes are attributes that can be selected such as color and size of shirt. |
|
Hidden category optional attribute list |
You can specify the attributes you would like to hide from the category UI here. This could be a comma separated list of attributes that needs to be hidden from the category list page. |
|
Hidden product optional attribute list |
You can specify the attributes you would like to hide from the product UI here. This could be a comma separated list of attributes that needs to be hidden from the product pages. |
|
Hide quantity |
Set this to Yes, to hide the quantity field shown in the product page. |
|
Hide unit of measure |
Set this to Yes, to hide the unit of measure field shown in the product detail page. |
Megan and the marketing team notice that when they browse the ComfyGooseCatalog, availability information is shown against each product. Since they have no visibility around the Loveseats product, the marketing team suggests to hide the availability information for the Loveseats category alone. Megan remembers from the training that Fusion Sales Catalog provides the ability to override the default behavior.
Megan recalls that she has to make this change from the Display Options for the Loveseats catalog.
Megan chooses the Loveseats catalog.
Megan creates a record and names it Hide Availability.
Megan selects the Base usage.
Megan validates the effect of this change at runtime.
Use the display options to control various aspects of the published product group.
You can make small but significant changes to a product group from these tabs. The changes here override default settings.
Applies To
Select the usage that this product group is applicable to. Usage defines the department or function within your organization for which this catalog is created.
Apart from usage, you can also select the mode within the usage. Mode defines the department or function within your organization that uses the same catalog but with minor changes from other consumers.
Narrow By
Select Narrow By attributes and their appearance. These attributes appear as filters to narrow searches at runtime.
Template
Select templates for category, product list, and so on.
Functions
Define the changes to specific settings in certain functions such as pricing and eligibility.
Miscellaneous
Change basic settings for the product group such as button label, number of items per page, invocation of the configurator, and so on.
This example demonstrates how to create a sales catalog. In this example, ComfyGoose Inc is a state of the art outfit in the business of selling chairs and sofas. As part of their expansion plans, they recently bought Oracle Fusion CRM and are uptaking the best business practices and all the functionality it brings.
Megan works in the product marketing department and is excited about the sales catalog and the ease with which she can create products and catalogs. She gathers information about the categories to be created and the products that need to be associated to each category. She is familiar with the layouts and the navigation paradigm in the application.
As a first step, Megan decides to create a sales catalog.
Megan enters the following details for her catalog.
|
Field |
Sample Data |
|---|---|
|
Name |
ComfyGooseCatalog |
|
Display |
Comfy Goose Catalog |
|
Description |
Contains ergonomic chairs for your home or office needs, chairs for businesses such as call centers and offices; at attractive prices. |
|
Root Catalog |
Select to make this a root catalog.Only root catalogs can be added to a usage in Product Group Usage Administration. |
Megan creates the following subgroups for the ComfyGoose Catalog product group.
|
Field |
Sample Data |
|---|---|
|
Subgroup Name |
|
Megan creates further categories within some of the subgroups.
|
Parent Subgroup |
Sample Data |
|---|---|
|
Chairs |
|
|
Sofas |
Sofas and Loveseats |
|
Sofas and Loveseats |
|
A published catalog is available for use by different departments which is done via Usage Administration
Megan selects the Base usage and adds ComfyGooseCatalog to this usage.
This example demonstrates how you can reuse a sales catalog. In the scenario used in this example, ComfyGoose Inc is a state of the art outfit in the business of selling chairs and sofas. As part of their expansion plans, they recently bought Oracle Fusion CRM and are uptaking the best business practices and all the functionality it brings. Megan works in the product marketing department.
Megan gets a call from another division of the company, after a few months of deploying the ComfyGooseCatalog. They have heard of the new catalog that she helped build for the marketing team and enquire if they can have a similar subset for their division. They want to leverage as much as possible having a consistent look-and-feel.
An application developer must create an application and should be able to consume the sales catalog task flows to achieve this example. This task is similar to what the Sales module has done to consume the task flows provided by the sales catalog team.
Megan gathers the necessary information and identifies that this division primarily needs what is in the Chair category of the ComfyGooseCatalog. She is very excited because she knows that she can simply reuse the Chairs category. In the past, she would have had to create another catalog repeating the same data, a maintenance overhead.
Megan creates the Call Center Division usage
You can choose only product groups that are catalogs by themselves here. In other words, the catalog must be a root catalog.
Megan realizes that the Chairs catalog that she wants to reuse is a subgroup of the ComfyGooseCatalog. To make it a root catalog, she follows these steps:
Navigate to the Product Group Administration page
Select the product group Chairs from the Product Group pane
From the Details tab, select Root Catalog
Save and publish the catalog.
The Chairs catalog is now available for the Call Center Division.
This example demonstrates how to enable filtering by attributes. In the scenario used in this example, ComfyGoose Inc is a state of the art outfit in the business of selling chairs and sofas. As part of their expansion plans, they recently bought Oracel Fusion CRM and are uptaking the best business practices and all the functionality it brings. Megan works in the product marketing department. She has created the ComfyGooseCatalog and tried changing some usage attributes.
Megan now reviews the ComfyGooseCatalog with the team and decides that it will be nice to provide the user with few narrow by filters. After reviewing the definition of products associated to the Chairs category and its subcategories, it is decided that attributes Color and Material can be used for filtering.
The attributes must already be registered in the Product Group Attribute Administration page. These attributes must be present and associated in the Item Master.
Megan selects the Chairs category.
Note
The attribute is already registered in the Product Group Attribute Administration page.
Megan selects the Color and Material attributes.
Megan creates Blue, Pink and Black as the values for the chair color. She also creates values for the chair material.
Megan validated the changes in the graphical catalog. She can see the attributes that she created and their values in the Advanced Search, Narrow By and Sort options of the catalog.
This example demonstrates how to use a new template in a catalog. Megan informs the marketing team that the IT department has created a new template that gives a cool web 2.0 feeling and asks their permission to try it out. She informs them that it gives a carousel effect which is quite common while browsing songs, DVDs, and so on. The marketing team agrees to give it a try.
Using Fusion JDeveloper, application developers have to create a task flow using the Fusion ADF component and all necessary VOs to support the task flow. The task flow must be registered in the template administration.
Megan decides to use the template ComfyGoose Carousel template in the ComfyGoose Catalog's browsing categories.
Megan creates a record and names it Carousel.
Megan selects the Base usage.
Megan selects the Category List Template as the type and the ComfyGoose Carousel template as the template.
Megan verifies the change in the catalog at runtime. The marketing team loves this cool effect and agrees to adopt it for the final catalog roll out.
This example demonstrates how you can modify attributes for an application's usage. In this scenario, the Call Center division only deals with call centers across the world, they have not seen if any product they have sold is not applicable to call center companies. Therefore, they decide to switch off the eligibility and availability messages that show up in their side of the catalog.
Megan knows that this is a fairly simple task because she can do these settings from the Product Group Usage Administration page.
Megan selects the Call Center usage.
|
Name |
Value |
|---|---|
|
Availability Engine |
Do not run |
|
Eligibility Engine |
Do not run |
Megan accesses the catalog and finds that the availability and eligibility messages do not appear anymore for the Call Center division's catalog.
An eligibility rule can be a physical eligibility rule or a marketing eligibility rule
Some points to remember when you create an eligibility rule:
An eligibility rule can determine one of the two kinds of eligibility for a product group, physical or marketing. They cannot be combined.
A rule can be of two types: Available and Not Available. If contradictory rules are defined for the same product group, the Not Available rule will prevail.
All children of a product group inherit rules from the parent product group.
Eligibility rules set at the product level have precedence over the rules set at the product group level.
When you create a physical eligibility rule, select attributes from these: Country, State or Province, City and Postal Code.
When you create a marketing eligibility rule, select a value for Customer Type.
You can add custom labels for your catalog by specifying them in the Miscellaneous tab of Display Options. For example, you can change the default Add to Cart label and can select a different label such as Add to Shopping Cart. You can add an additional value for the button label from the Manage Product Group Lookups page from the Setup and Maintenance Overview page. You can enter a new value using the lookup Add Item Label Values. Once done, you can navigate to the product group administration to either override the button label for the entire catalog via the usage functions or to a specific product group from the display options tab.
Apart from customizing button labels, you can also set the number of items to display per page from the Miscellaneous tab.
A rollup catalog does not have the same product appearing multiple times within its hierarchy. The primary purpose of a rollup catalog is to create a hierarchy more tailored to forecasting purposes where a particular product appears only once in the entire hierarchy.
A sales catalog can have the same product appearing multiple times within its hierarchy. For example, the product Toys can be part of the Children category as well as the Electronics category within the same catalog.
Note
The Allow Duplicate flag distinguishes between a rollup catalog and a sales catalog. By default, the flag is selected making it a sales catalog. The Allow Duplicate flag is in the Details tab of the Product Group Administration page.
Products in your catalog are active for a specified period. Once the period expires, the product becomes inactive and does not appear as part of the published catalog. Activate the products from the Products tab of the Product Group Administration page.
Related groups shows the relationship between two different product groups. For example, a group that contains extended warranty products is related to a group that contains laptops. There are various relations types supported such as revenue, service and so on. This relationship is used in the other applications.
Eligibility is the condition of being qualified or being entitled for a purchase or enrollment.
There are two types of eligibility.
Physical eligibility: Determines whether a service is available in a given area.
Marketing eligibility: Determines whether a company is willing to sell a product, service, or promotion to a customer.
Some examples of eligibility are:
Video Conferencing is available in California.
Liquor is not available to minors.
ESPN pay-per-view Requires HD Package
In the Filter Attributes tab of the Product Group page, change the value for the Display of the attribute. The attribute can have an internal name but the name displayed at runtime can be more meaningful and customer friendly.
For example, if the attribute name is Laptop Color, you can change the display to Available Colors. This will display in the narrow by or advanced search options at runtime.
To modify a product group, you must first lock it. Click Lock in the Product Group page. If the product group is locked by another user, the Lock button is not visible and the Locked flag is enabled in the Details tab.
There may be several promotions running at any given time. You can associate active promotions to a product group from the Promotions tab. Coupons are a part of promotions and are added to the product group along with the promotion. You can also view the promotion's effective period.
A product group can have two versions, Administration and Published. The Published version is visible to the end user in the graphical sales catalog. The administrator must make any changes to the product group in the administration version.
After publishing the administration version, the changes are made available to the published version and to the consuming applications
Use product group mapping in the following situations:
If a product group is reused, find it in the target hierarchy.
Identify the right product group in the target hierarchy when the source product group is not recognized.
Do a reverse mapping by passing the target product group to get the source product group.
You can set exceptions for a usage from the Modes tab of the Product Group Usage Administration page. Exceptions can be made when you need minor modifications for different departments in your organizations, for the same usage. The following modes are available: Lead Management, Campaign Management, Opportunity Management, Territory Management, Opportunity Landscape and Sales Prediction.
You can get this information from the Product Groups Shared With region in the Product Groups pane. By default, all product groups are shared.
File-based import supports the import of data from an external text or xml file to interface tables and then from interface tables to target application tables.
File-based import includes the following:
Source files with import data
Import objects with available import attributes
Mappings between source files and interface table columns
Import Activities to define import options, a processing schedule, and monitor progress
External data can be obtained in various ways and formatted in a text or xml file. The source file data is mapped to interface table columns using a Mapping. The source file is identified on an Import Activity, along with other import processing details. The file processing component of the file-based data import consists of reading the source file, parsing the data, and inserting the data into the appropriate interface tables.
Import objects are defined where interface tables exist and external files can be used to import data into the interface tables. Import Object definitions for Oracle objects that support file-based import are predefined and can be accessed with the appropriate security privilege. Individual object attributes represent the interface table columns and are used to map source file data or constant values in Mappings and Import Activity definitions. Use the Import Object definition to manage the display of attributes that can be mapped, to indicate required mappings, and to set site level default values as required.
Import mapping enables you to predefine a mapping between the columns provided in a source file and the attributes pertaining to the objects being imported. Once you create a mapping, it can be reused in the Import Activity definition.
An Import Activity definition provides the instructions for the import processing. It includes the source file or file location and mapping, plus import processing options and schedule. You can monitor the progress of the Import Activity processing and view completion reports for both successful records and errors.
The file-based data import process includes processing the source file data and inserting it into the interface tables, moving the interface table data into the destination application tables, and then processing the attachments for the imported objects. Processing factors are subject to the settings defined for the Import Activity, Mapping, and Import Object. You can monitor the processing steps and view process reports for each Import Activity.
This topic describes the following:
Inserting Data in the Interface Tables
Interface Table Data Validation and Error Counts
Interface Table to Destination Application Table Processing
Importing Attachments
Viewing Import Results
Data exists in various sources and in various formats. The file import processing starts with reading the source data, parsing the data, and inserting into the appropriate interface tables. The source of the data comes from the following:
Source file values mapped to target object attributes in the Import Activity.
Constant values defined for target object attributes in the Import Activity.
Default values defined for target object attributes in the Import Object.
The data is initially validated against the predefined Import Mapping and the Import Object settings as the interface tables are being populated by the initial file import process. The interface table data is validated again before importing into the destination application tables.
Validation includes:
Missing required values
Values that exceed the attribute length
Invalid values
Duplicates to existing records in the destination application tables based on the combination of attributes selected for duplicate validation in the predefined Import Mapping.
Note
For the Lead import object, the duplicate checking is only done for existing leads created within the look back days setting of the Import Activity.
Duplicates to existing records in the destination application tables for Customer Data Management objects based on Matching Configurations.
Errors
Most validation issues are recorded as errors, with the exception of Customer Data Management duplicates found during the Matching Configuration process. In this case, matched records are only considered as errors if:
Customer Management Duplicates option is set to Do Not Import for the Import Activity and
The main object of the Import Activity is a consumer, customer, or legal entity object
Allowable Error Count Threshold
The validation of the interface table occurs before any records are imported into the destination application tables. Once the validation process has completed, the count of records with errors is compared to the Allowable Error Count Threshold value specified for the Import Activity. A count above the threshold will stop the import process for all records. If the count is below the threshold, records without errors will import. In either case, records with errors will be reported in the Error and Exception files.
The import process orchestrates the import for each of the component objects that make up the overall main objects of the Import Activity.
Once the objects have imported successfully, the attachments are processed. The import process matches the source file attachment name to the file name included in the compressed file entered on the Import Activity. The attachment file is imported into Universal Content Manager and then associated as an attachment to the imported object.
You can monitor all file-based Import Activities that are currently scheduled to run, have completed successfully, or failed with errors. For each Import Activity, you can view the details pertaining to each underlying process. Once an Import Activity process has completed, the following processing reports are added as attachments to the process:
Log file. Includes the records that were successfully imported plus the unique destination application table identifiers for the objects.
Exception file. Includes the records that were not imported plus a reference to an error for each record that failed validation.
Error file. Includes all the errors for each record that failed validation.
Import objects represent the application and attribute information for business objects that can be imported using external source files.
This topic describes the following:
Import object management options
Custom objects
A single import object can have multiple associated components that are considered objects by themselves. An object and associated objects that can be imported within the same source file are grouped together within the application module class.
Note
Each object includes the Import Activity object (MktImpJobs1). The Import Activity object is a required component of the application module but is not mapped to a source file. All values for this object are derived from the Import Activity definition. Consequently, do not update the Map, Required, and Default Value settings for the Import Activity object.
The following table includes information about the import object:
|
Option |
Description |
|---|---|
|
Attributes |
A view-only listing of object attributes that represent each column in the interface table for the object. |
|
Length |
A view-only listing of widths for the columns in the interface tables. If the source file values for the attribute have more characters than the attribute length, the source file row will not be imported. |
|
Default Value |
Optionally, specify an attribute value to use if a value is not available from the source file or Import Activity constant value. |
|
Map |
Enable the list of attributes that can be mapped to a source file or constant value in the Import Mapping and Import Activity Map Fields step. |
|
Required |
Specify the list of attributes that must be mapped to source file columns. Consequently, if you have selected an attribute as required, you must also enable the Map option for that attribute. When mapping the external source file, the required target attribute defined for the object are displayed with an asterisk. |
To use the file-based import feature for custom objects, you must first generate the artifacts required for import. You generate these required artifacts within Oracle Fusion CRM Application Composer, after making your object model extensions.
Import mapping enables you to predefine a mapping between the columns provided in a source file and the attributes pertaining to the objects being imported. Once you create a mapping, it can be reused in the Import Activity definition.
This topic contains the following sections:
Import options
Source file options
Target options
The following attributes pertain to the import mapping.
|
Attribute |
Description |
|---|---|
|
Object |
The business object to be imported. |
|
Name |
The name that identifies the mapping in the Import Mapping and Import Activity UIs. If the mapping was initially created while mapping fields directly in the Import Activity user interface and automatically saved without providing a user-defined mapping name, the mapping name is derived from the Import Activity name and date. |
|
Decimal Separator |
The format of the fractional portion of numerical values in columns mapped to attributes with a decimal attribute type. |
|
Date Format |
The format of values in columns mapped to attributes with a date attribute type. |
|
Timestamp Format |
The format of values in columns mapped to attributes with a time stamp attribute type. |
|
Lock |
If selected, prevents any user, other than the creator of the mapping, from editing the mapping. |
Map each column that the source file is expected to contain with a specific attribute.
The following table describes the details pertaining to columns provided in the source file:
|
Source Column |
Description |
|---|---|
|
Sequence |
The sequence number in which the columns are expected to be provided in the source file. Two rows cannot have the same sequence number. |
|
Column Name |
The column name expected in the source file if a header row is included, or more generic values such as Column A, Column B, and so on, if the header row is not included for Text file types. The tagging structure is represented for XML file types. |
|
Column Width |
Use when the delimiter value is fixed width for Text file types only. |
|
Ignore |
Ignore the source file column to exclude the data from being imported. |
|
Required |
If selected, a value must exist in the source file or the row will not be imported. |
The following table describes the details pertaining to corresponding attributes in the target application table:
|
Target Attributes |
Description |
|---|---|
|
Object |
The group of import objects that represent the components of the business object being imported. |
|
Attribute |
The attribute name that represents the corresponding interface table column for the object. |
|
Duplicate Validation |
If selected, the attribute, along with other selected attributes, determines what constitutes a duplicate object when comparing objects in the interface tables and existing objects in the target application tables. For example, to validate the uniqueness of an object in the target application tables by the combination of an object's name and date, select Duplicate Validation for both attributes in the mapping. |
The Import Activity consists of a step by step guided process to assist you with creating an import activity for a given object.
This topic describes the source file options defined in the Import Activity that are used by the import process to locate and parse the source file data.
Enter attribute details pertaining to the source file as follows:
|
Option |
Description |
|---|---|
|
File Type |
Source file must be either Text or XML. |
|
Data Type, Delimiter, and Header Row Included |
A Text file type can further be defined based on how the data is delimited and if the source file is expected to include a row of headings for each column. |
|
Import Mapping |
Displays a list of predefined mappings for the object selected for this import activity. The selected mapping will be used as the basis for mapping your source file in the next Import Activity step. |
The following outlines the options that are available to you when locating your source file for import.
|
Option |
Description |
|---|---|
|
File Selection |
Select from the following file selections:
|
|
Upload From |
You can upload the source file from three locations:
If you select Desktop, a File Name field with an associated Update button is displayed. Click Update and browse to search for and select the file you want to upload. If you select URL, enter the address location as in
the following example format: If you select Network, enter the file name path as
in the following example format: Note If you selected the Specific File as your file selection option, then you will have to include the file name for both URL and Network file path locations. |
Once the objects have imported successfully, the attachments are processed. The import process matches the source file attachment name to the file name included in the compressed file entered on the Import Activity. The attachment file is imported into Universal Content Manager and then associated as an attachment to the imported object.
This topic includes the following:
Provide attachment information in the source file columns for the corresponding object record row
Select all the attachment files referenced in the source file in the Import Activity definition
Attachments are processed after the associated objects have imported successfully. Attachment related source file columns are not mapped to target attributes but used to directly associate the attachments to the corresponding import objects by the import process. Consequently, the source file column names must have specific values for the import process to identify the attachment information. If an object has multiple attachments, the set of columns must be repeated for each attachment. For example, if the imported objects have a maximum possibility of two attachment files, at a minimum, you must have two columns labeled ATTACHMENT_FILE_NAME.
The following table describes the source file column names:
|
Column Name |
Description |
|---|---|
|
ATTACHMENT_FILE_NAME |
The only required column for each attachment file. This column is for the attachment file name and must match exactly to the file name that will be added to the Import Activity. |
|
ATTACHMENT_FILE_TITLE |
An optional column to provide a file title. |
|
ATTACHMENT_FILE_DESC |
An optional column to provide a file description. |
|
ATTACHMENT_CATEGORY_NAME |
An optional column for the Category Name. If one is not provided, the Oracle defined category for the object is used. |
The Import Activity requires a single compressed file that includes all the attachment files referenced in the source file. The selection method can occur in two ways:
Select a compressed file in zip or jar format that contains all the individual attachment documents. A compressed file that contains a hierarchy of folders that organizes the individual documents is acceptable.
Alternatively, if the Universal Content Management Applet Enabled profile is set to Yes, you can select individual attachment documents and the applet will compress the selection into a single compressed file. Select Multiple Files and then click Browse to display the file selector. Browse through the file system and select multiples files from across various folders.
Note
You must select all attachments in one operation. For example, you cannot select few files now and then return later to select more attachments files. If more than one row in the source file references the same file, you only need to select it once.
The File Import Activity consists of a step by step guided process to assist you with creating an import activity for a given object.
This topic describes the import options defined in the Import Activity that are used by the import process to interpret source file data and import interface table data into the target application tables.
The following options are used to identify the formatting of source file data so the data can be correctly interpreted and transformed by the import process:
|
Option |
Description |
|---|---|
|
Decimal Separator |
The format of the fractional portion of numerical values in columns mapped to attributes with a decimal attribute type. |
|
Date Format |
The format for values in columns mapped to attributes with a date attribute type. |
|
Time Stamp Format |
The format for values in columns mapped to attributes with a time stamp attribute type. |
|
File Encoding |
The overall encoding of the characters within the file. |
The following options are used when importing the interface table information to the target application tables:
|
Option |
Description |
|---|---|
|
Import Mode |
Determines if the Import Activity process should create new records or update existing records. If updating existing records, the record IDs must be provided in the source file. If an existing record is not found, a new record is created. Update mode is not supported for all import objects. Consequently, the Import Mode is set to Create and is not updatable for those objects. If creating new records, the import process evaluates the data in the interface tables with existing objects in the target application tables for possible duplicates. Customer Data Management objects are evaluated using the rules defined in the set of Matching Configurations. All other objects are evaluated using the combination of attributes selected for duplicate validation in the predefined Import Mapping. |
|
Allowable Error Count |
An error count above the threshold will stop the import process for all records. If the error count is below the threshold, records without errors are imported. In either case, records with errors will be reported in the Error and Exception files. Validation errors include:
Duplicates found using matching configurations for Customer Data Management objects do not contribute to the error count. |
|
Notification E-Mail |
The e-mail of the intended recipient of import processing notifications. |
|
Customer Data Management Duplicates |
Consumer, customer, and legal entity objects imported by themselves or as components of another object are subject to duplicate verification. The duplicates are determined using the following matching configurations:
You can select from one of the following:
|
|
Duplicate Look Back Days |
This option applies only to the Lead import object. Only existing leads created within the period determined by the look back days value are evaluated for duplicates based on the attributes selected for duplicate validation in the predefined import mapping. If a duplicate is found, the lead will not be imported and the duplicate record will be reported on the Exception report. Duplicate leads are included in the calculation of the allowable error count threshold. |
After entering your import options, the second step of the import activity process is to map fields in the source file to the corresponding target attributes.
This topic explains:
Map Fields
Saving the Import Mapping
Constant Values
The Map Fields section can be subdivided into source file columns and target attribute columns.
The source column header value is derived from one of the following:
Predefined mapping, if one is selected
The source file, if the Header Row Included option is selected in the first step of the Import Activity definition (for Text file type only)
Generic values of Column A, Column B, and so on, if the Header Row Included option is not selected (for Text file type only)
XML tagging structure (for XML file type only)
The following table outlines the source columns:
|
Source Column |
Description |
|---|---|
|
Column Header |
Represents the column header for Text file types and the tagging structure for XML file types. |
|
Example Value |
Values are derived from the first source file saved with the predefined mapping. If you did not select a predefined mapping, the example values are taken from the first data row in the source file selected in the first step of the Import Activity definition. |
|
Ignore |
Select this option if you do not want to import the source file data in that column. |
The following table outlines the target columns:
|
Target Column |
Description |
|---|---|
|
Object |
The group of import objects that represent the components of the business object being imported. |
|
Attribute |
The attribute name that represents the corresponding interface table column for the object. |
The mapping between source file information and target attributes is saved as a reusable mapping when the Import Activity is saved, using the import activity name and date to derive a mapping name. If you selected a predefined mapping, modifications made in the Import Activity to an unlocked mapping will update and save to the predefined mapping. If the predefined mapping is locked, a modified mapping will be saved as a new mapping. To specify a mapping name for new mappings, select the Save As option from the Map Fields Actions menu.
Constant values provide a way to specify a value for a target attribute that all imported objects will inherit. For example, if a source file does not contain a column for business unit and all of the objects in the file belong to the same business unit, enter a constant value for the object and business unit attribute.
You can monitor all file import activities that are currently scheduled to run, have completed successfully, or failed with errors. For each import activity, you can view the details pertaining to each underlying process and make necessary updates for any failed records to import again.
You can view the list of import activities from the Manage Import Activities page. Select the import activity that you want to monitor by clicking on the hyperlink in the corresponding Status column. The View Import Status results page is displayed which contains the following sections:
Files Processed
Import Processes
The Files Processed section displays a row for each source file that is processed.
The import processing details are summarized and displayed for each source file and include the following:
|
File Processing Summary Information |
Description |
|---|---|
|
Records Read From File |
The number of records read from the source file. |
|
Format Errors |
The number of errors found when processing data to insert into the interface tables from the source file, Import Activity constants, and Import Object value default values. View the error details in the Exception and Error files attached to the process. |
|
Load Errors |
The number of errors found when importing data from the interface tables to the destination application tables. View the error details in the Exception and Error files attached to the process. |
|
Successfully Loaded |
The number of import objects imported to the application destination tables. If the import object is made up of multiple components, each component is counted as successfully loaded. Consequently the Successfully Loaded count may be larger than the Records Read From File count. View the successful record details in the Log file attached to the process. |
|
Attachments |
Once an Import Activity process has completed, processing reports are included in the Attachments column. The Log file includes the records that were successfully imported plus the unique destination application table identifiers for the objects. The Exception file includes the records that were not imported plus a reference to one of the errors for each record that failed. The Error file includes all the errors for each record that failed validation. |
From the Import Processes section, you can view details pertaining to each process involved in importing the objects in the source file. A listing of brief messages provides information on processing steps within each underlying process.
A single import object can have multiple associated components that are considered objects by themselves. Whether or not an associated object can be grouped as a component of another object for the purpose of file import is determined by the complexity of the object structure and how it is stored in the data model. Oracle Fusion provides import objects predefined to meet the file processing import requirements. Consequently, in some cases, more than one source file may be required to capture all associated components of an object.
The Import Activity will not stop the currently running process. However, it will stop the next process that has not started plus any future repeating file import activities. You can always activate the process at a later stage.
File-based data import enables you to record consumers and organization contacts in a marketing list when importing consumer, lead, and response import objects. Select an existing list or create a new one. A marketing list is assigned the list type value of Imported if created while defining an import activity. After the objects are imported successfully, the consumers and contacts are added as members of the marketing list.
The Bulk Export application provides a mechanism to extract large volumes of data from Fusion CRM objects. These extracts can be the full set of records for an object or incremental extracts. For example, data extracted for a specific period of time, from the hosted CRM system to an on-premise database that resides behind a user's fire-wall. The system will create comma separated variable or tab delimited files with the extracted data, which will be available to users as attachments to the batch records that have been executed.
The following figure depicts the process of selecting data for export, scheduling and finally delivering the exported data file.
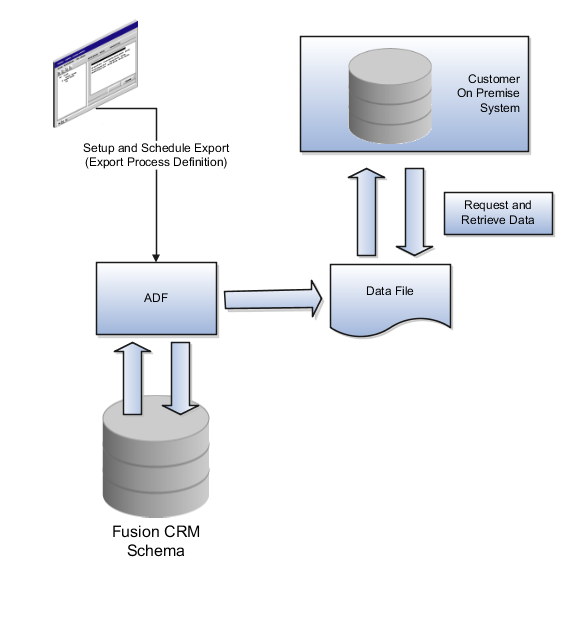
This solution provides a mechanism to extract large volumes of data from Fusion CRM objects, both as extracts of a full set of records for an object as well as incremental extracts. The system will create comma or tab delimited files with the extracted data which will be available to users as attachments to the batch records that have been executed.
In order to create the extracts, two steps must be completed. First, mapping files for the full and incremental extract processes must be defined in the Fusion CRM system. These maps will specify which columns and filters will be applied to each export process for each export object. For the incremental extracts, filters can be created that leverage time stamps to determine which rows will be queried out of the system. All mapping files will be saved in the system and reused for each extract.
Next, the hourly and weekly data export processes
are scheduled in the Fusion export tool. For any required incremental
and scheduled export, the export task should either exist or created
through the UI. Oracle Web Services would only be used to schedule
the export and start it. After each export process executes and completes,
a comma or tab delimited data file will be created and stored in the
Fusion system as an attachment. The formatted file can be downloaded
by using the getAttachment() web service
or by using the interactive UI in the export tool.
There are no transactional steps for this process in the Fusion CRM application, there are only prerequisite setup steps. Once these steps are complete the process should run automatically. The prerequisite steps in Fusion are to create an export map and export job schedule for each object to be extracted (this only needs to be done once).
The Bulk Export Process Definition is made up of the Export Map and the processing schedule. See the steps below.
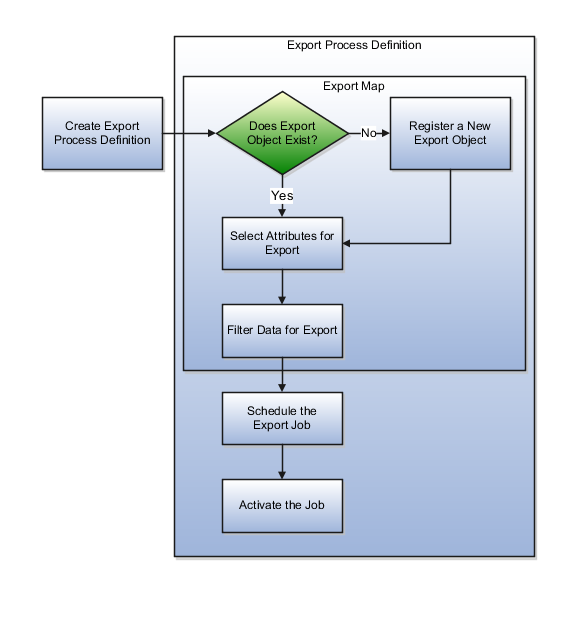
The export object is the Fusion data base object where the data resides. It is made up of attributes. If you need to export data from a custom table, you must register the object as an export object. This is accomplished from the Manage Export Process UI, Manage Export Objects action. All the delivered tables and their attributes are available for export.
The export object is made up of attributes. These attribute may be selected for export or not included. You can edit the header text of the attribute to make its meaning more clear to other users of this process.
Each attribute may have limits or conditions enforced. Various operators are available for selecting the data to precisely select the data required for the export. You can save the filter criteria and then modify the criteria and save it under a new name. You can then change the filter by coming here to select an alternate filter name. Because the filters are related to the export object, if you reuse a map and change the filter, you are changing it for any Export Process Definition that uses that map. The attributes you use for the map have no bearing on what is available in the filter. All fields from the VO are available for use in the filter. For example, you can filter by TYPE but not show TYPE in the output.
Once defined, the export process is scheduled. You can run the process immediately or at the time and date of your choosing. If you decide to schedule the job at a later date you can also choose to set up a recurring schedule of extracts.
By clicking on the Activate button, you make the job available to be run. It does not start an export process.
In the two step process used by Oracle Fusion Bulk Export, the first is the mapping of files for the full and incremental extract processes. The second step is the scheduling of the export. You create a process definition that includes both of these steps.
The process definition has three components that together make exporting data easier by leveraging the export maps that you have already built. The process name, the export process ID and the export map ID all serve to identify the specific process definition as well as leverage your work with reusable export maps
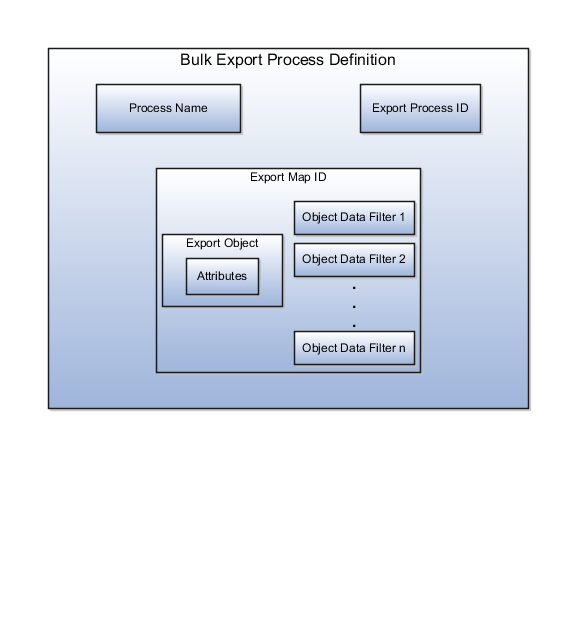
A user-supplied, natural language way to refer to the Export Process Definition. This enables you to refer to the export process definition easily rather than using the machine generated ID. For example, use Customer or some other meaningful name as the export process name instead of the export process ID 100000019897192.
A unique, system generated identifier for the export process definition that ties together the export map, with its export objects and filters, and the defined export schedule.
A unique identifier for the export map itself. You can name the export map or leave the field blank for a system generated map name to be entered. You can reuse the export map in different process definitions. For example, you could create a process definition to export all the data from the Customer export object. You could then reuse that export map and apply a new filter on the data to create an incremental export, such as data accrued since the last export date.
Review the requirements for the data to be exported and determine the source view object that holds the attributes you want.
Full sets of data are not always required for export. To create a subset of data, use filter criteria to determine the time frame or scope of data, based on values of the attributes. For example, to find activities for a certain period, use a project start date from 1/1/11 through 3/31/11, navigate to the Export Objects Detail Sub Page and click the filter icon. Fill in the filter criteria dialog for the project start dates to select the data to be exported.You run the export by navigating to the Setup and Maintenance menu, selecting Manage Task Lists and Tasks. Then, search for Schedule Export Processes and click the Go to Task icon on the line for this task.
You can look on the Schedule Export Processes, Overview page to see the History subpage. The column Exported Data File shows a hyperlink to your output file This file will be a comma separated variable or a tab delimited file. Click that link to open the file and see the exported data.
You can use your own defined view objects as a source for Bulk Export. To register your view objects for export, select Setup and Maintenance from the Tools menu and search for the Manage Export Objects task. Click the Go to Task icon and on the Manage Export Objects page click the Create icon to add your View Object, making it available for use.
Changing the sequence number changes the order of the attributes in the exported data file. Changing the header text enables you to give a more intuitive meaning to the attribute and the associated data.
Select as many view objects as required to be export objects for the export process. Choose the individual attributes required from each export object.
The Oracle Fusion Customer Relationship Management (CRM) common calendar is used across CRM applications. The calendar utilizes the Accounting Calendar Default profile option that is not set when the delivered product is installed. First, create an accounting calendar with calendar periods appropriate for your CRM needs, and give it a unique name, CRM Calendar, for example. Then, you must specify that calendar in the Accounting Calendar Default profile option. Use the tasks noted below in the Set and Maintenance area to accomplish these tasks.
Note
When creating the calendar, the first calendar date should be the first date of the period of the oldest historical data on which you will be reporting. For example, if you were to select January 1, 2010 as your first calendar date, you would only be able to enter or import historical data associated with this date and beyond.
The CRM calendar profile option needs to be associated with the new accounting calendar. Follow these steps:
Note
While the Common Financial Calendar feature of Oracle Fusion Applications supports creation of more than one calendar, Fusion CRM may only be associated with one calendar. Many features of Fusion CRM utilize this common calendar profile option and changing it could result in the loss of data for one or more applications. Oracle strongly recommends that you do not change the selected Accounting Calendar Default (ZCA_COMMON_CALENDAR) profile option calendar value once it is set.
Predictive models analyze sales data to evaluate buying patterns and selling win or loss rates. The model can be used to identify customer profiles with a greater likelihood to buy certain target products. After evaluation of model results, lead generation can be scheduled in order to disseminate lead recommendations to users who can benefit from the insight gathered. Each lead recommendation includes win likelihood in addition to the average expected revenue and sales cycle duration from past similar deals for the same product to similar customers.
Oracle Fusion Sales Prediction Engine leverages the power of predictive analytical models to identify patterns and correlation of data for the purpose of identifying what products to consider positioning next to your customers. The application leverages multiple mathematical models in order to formulate the likelihood a given customer will purchase a specific product, the estimated revenue which can be expected, and the duration of the estimated sales effort.
After the statistical model generates against the historical sales data based on the selected entities and attributes, summary and detail reports show critical insights as to what customers buy and can be used to predict the right products for the right customers. You can then use these insights to refine the process of generating leads based on what the customers are more likely to buy. Moreover, the same model can be used to predict the win likelihood of current opportunity revenue based on analysis of similar opportunities in the past. Also, product domain or market experts can write prediction rules to recommend products based on a set of rules conditions, utilizing all available customer profile attributes as well as other metrics.
The statistical analysis will identify which data has an influence in determining a likelihood to buy. After the statistical model generates against the historical sales data based on the selected entities and attributes, summary and detail reports show critical insights as to what customers buy and can be used to predict the right products for the right customers. As such, the decision regarding the selection of entities and attributes is critical. While the selection of certain entities and attributes may seem logical based on the awareness of sales behavior (customers in certain industries have a stronger affinity for certain products, for example), where there is uncertainty, the statistical model analysis will provide the necessary insight into whether patterns and correlation emerge. As such, as much available data as possible should be leveraged for the purpose of evaluation. Some factors which weight into the decision include the availability and accuracy of the data.
Additionally, the application allows for the inclusion of expert insight from product management and sales and marketing operations. These expert insights can be captured via prediction rules. The same data made available to and leveraged by the predictive model, is also available for rule authoring.
Your company sells a service that appeals mostly to larger companies, and another service that targets smaller customers. If a customer purchased one of your product packages, then the customer already has all service needs covered by the package. You want to know, given a product recommendation, if credit score, asset, and customer size are important predictors when it comes to recommending this particular product.
You select the following entities and attributes:
Customer Profile
Annual Revenue
Credit Score
Customer Size Code
Past Purchased Products or Services
Assets and Service Contracts
These entities and associated attributes entail the data available to the enterprise which the predictive models can evaluate for identifying correlation, and which you can use to create prediction rules. Over time, you can further refine the selections based on availability of data and the cost to integrate that data for evaluation.
Before using the Oracle Fusion CRM for Microsoft Outlook application, several setup tasks must be performed. Some of these are Fusion-specific tasks that are done by the environment hosting team or the customer implementation team. Other tasks are related to setting up the users' computers to use the application, including the install and initialization of the extensions to Microsoft Outlook (Outlook). These tasks are described in more detail in the sections that follow.
For information on supported software versions, see the related topic, Supported Software for Oracle Fusion CRM for Microsoft Outlook: Explained.
At a high level, the following are the Oracle Fusion-specific setup tasks involved in implementing CRM for Microsoft Outlook:
Required: Install Fusion CRM, including the CRM for Microsoft Outlook application.
Required: Perform Fusion setup tasks for Oracle Fusion Common Components, Oracle Fusion Customer Center, Oracle Fusion Sales, and Oracle Fusion Marketing.
Optional: Perform customization and security changes for CRM for Microsoft Outlook, after initial setup.
At a high level, the following are the setup tasks required for each computer that will run CRM for Microsoft Outlook:
Required: If not already present, install Microsoft .NET framework version 3.5 SP1 (or later).
Required: Download and install the Fusion CRM server certificate.
Required: Download and run the CRM for Microsoft Outlook installer.
Required: Complete First Run Assistant to set up application options and perform initial synchronization to get Outlook configuration and user data from the Fusion CRM application.
The overall process flow for implementing CRM for Microsoft Outlook is shown in this section.

Following are the CRM for Microsoft Outlook implementation tasks specific to Oracle Fusion.
Install Oracle Fusion CRM Applications suite
As a prerequisite setup task, provision the server environment and install the Fusion CRM Applications suite. This task is typically completed by the hosting operations team or customer implementing the Oracle Fusion CRM Applications suite and is the basis for the rest of the setup steps described in this section.
Perform CRM setup tasks for functionality used by CRM for Microsoft Outlook
Because CRM for Microsoft Outlook allows users to access and manage their CRM data in Microsoft Outlook, it is necessary to complete the required setup tasks for the relevant CRM functionality. For example, the following setup tasks must be completed before using CRM for Microsoft Outlook:
Set up reference data, such as: address and phone formats, currencies, geographies, and resources.
Set up CRM functional areas exposed in CRM for Microsoft Outlook, such as: calendar and task management, customer and contact management, lead management, and opportunity and revenue management, including the sales product catalog.
Optionally, CRM for Microsoft Outlook can be configured by completing these Outlook-specific setup tasks:
Configure CRM for Microsoft Outlook client configuration files: Configure only if Outlook client customizations are needed
Configure CRM for Microsoft Outlook client deployment packages: Configure only if Outlook client customizations are needed
Configure CRM for Microsoft Outlook server configuration file: Configure only if Outlook configuration includes references to new services
Other, security-related tasks, performed in Oracle Fusion Authorization Policy Manager (APM), may be necessary depending upon your applications configuration. Perform these tasks after initial setup, as needed. If new job roles are created, you will need to associate these new roles with the predefined data privileges and Outlook configuration packages. If you create custom Outlook deployment packages, there are additional steps required. See the "Related Topics" section at the end of this topic for more information.
Following are the non-Fusion implementation tasks for CRM for Microsoft Outlook.
Verify Microsoft .NET Framework 3.5 SP1 or higher is installed on all computers that run CRM for Microsoft Outlook.
Verify each user has a Microsoft Exchange mail profile configured with Cached Exchange Mode (which supports offline storage in an .OST file format) or has a separate personal folders storage (in .PST file format) to store CRM data.
Deploy the Fusion public certificate into users' Personal and Trusted Root Certificate Authorities directories on users' computers. The certificate is provided by the environment hosting team or the group implementing Fusion CRM. See the related topic, Options for Deploying the Public Certificate: Explained, for steps describing how users can import the certificate themselves or how to automate the process.
Verify that each user can access the CRM for Microsoft Outlook installer from the download page in the Sales application. The download page is accessible from the application preferences menu.
Each user must run the CRM for Microsoft Outlook installer on his/her computer. See the related topic, Deploying and Installing Oracle Fusion CRM for Microsoft Outlook: Explained, for more information.
In Oracle Fusion CRM for Microsoft Outlook, deployment packages contain metadata files that describe the CRM application extensions deployed to users' computers. To provide users access to a new client configuration, you can either create a new deployment package or create a new instance of an existing package, as discussed in the following sections.
When you create a new package, in addition to activating it, you must configure a data security policy that allows users to access the package. This secondary task is done in Oracle Fusion Authorization Policy Manager (APM) and involves the following steps:
In the top left section of the APM
application window, use global search to search for Database Resources
using search criteria equal to Outlook. This should return the result, Outlook Edition Metadata Package.
Select the Edit button on the Search Results pane to edit the Outlook Edition Metadata Package database resource.
In the Edit Database Resource tab,
select the Condition tab and create a new condition on the database
resource. Specify any unique name/display name, and set the SQL predicate
to package_name = '<name_of_deployment_package>' (for example, package name = 'NewOutlookPackage').
Select the Submit button to commit the change.
Repeat step 2. In the search results pane, select Edit to reopen the Edit Database Resource page to edit the Outlook Edition Metadata Package database resource.
In the Edit Database Resource tab, select the Policy tab, and select the policy that should have access to the new package (for example, ZOE_SALES_MGR_OUTLOOK_DUTY), and then select Edit.
In the lower section of the page, select the Rule tab.
Select the lookup control next to the condition field and select the new condition created in step 3.
Select Submit to commit the changes.
When you use an existing package, you create a new instance of the package with different configuration files. When using this method, you must inactivate the previous instance and activate the new instance. There is no need to configure a data policy when creating a new instance of an existing deployment package.
Before using the Oracle Fusion CRM for Microsoft Outlook application, several setup tasks must be performed. One of these tasks is to deploy the Fusion Public Certificate to each user's machine in order to support secure exchange of data between Outlook and Oracle Fusion CRM during synchronization. The Fusion CRM application public certificate is available from the CRM for Microsoft Outlook preference page in the Oracle Fusion Sales application.
If users have sufficient privileges and knowledge to import the certificate themselves, they need to make sure the certificate is imported to both the Personal and Trusted Root Authority certificate stores. This can be done by following these steps:
In the Windows Start menu select Run, and type mmc to open the Microsoft Machine Console application.
In the console window, select File, then Add/Remove Snap-in.
In the Add/Remove Snap-in window, select Add, and then select the Certificates snap-in. Select the Add button to add it.
Select the option to manage certificates for My user account and select Finish.
Select Close and OK to complete adding the Certificate snap-in.
Expand the Certificates - Current User group to review all the certificate stores.
Expand the Personal store, right-select the Certificates child folder and select All Tasks - Import.
In the next several windows, find the certificate file and complete the import into the Personal certificate store.
Repeat step 7 using the Trusted Root Certification Authorities store, and repeat step 8 to import the certificate file.
Alternatively, to automate the installation of the public certificate into the appropriate certificate stores on the users' computers, deploy the CertMgr.exe program available from Microsoft in the Windows SDK to users' computers, along with the certificate file, and a batch script that implements the following commands:
certmgr.exe -add -c <cert_name> -s root -r localMachine
certmgr.exe -add -c <cert_name> -r CurrentUser -s My
In the script above, the placeholder for the certificate name would be replaced with the name of the certificate file (for example, oracle.cer).
Oracle Fusion CRM for Microsoft Outlook includes a Microsoft Outlook add-in that must be deployed and installed on each user's computer. The installer file is available from the CRM for Microsoft Outlook preference page in the Oracle Fusion Sales application.
Users can complete the installation by running the Oracle Fusion CRM for Microsoft Outlook.msi file on their computers. The Outlook application must be closed during this process. During the install, the user will specify:
The install directory
The Outlook mail profile to use
An alternative to users installing CRM for Microsoft Outlook themselves is for the installer to be deployed to user computers by the administrator using Windows Group policies, Microsoft System Center Configuration Manager (SCCM), or other desktop software deployment mechanisms. In this case, the administrator will access the installer file from the appropriate preference page in the Oracle Fusion Sales application and write a batch script to run the installer with several default parameters, such as the install directory, the mail profile to install to, and all of the elements of the connect string.
The following sample batch script shows how the installer installation can be automated:
msiexec /i "Oracle Fusion CRM for Microsoft Outlook.3.00.50.msi" OL_PROFILE=$DEFAULT FUSION_SERVER_HOST="hostedappserver.com" FUSION_SERVER_PORT="443" FUSION_SERVER_SUFFIX="outlookEditionConnector/OutlookRequestHandlerService" FUSION_SERVER_PROTOCOL="https" /QR
The parameters in the script include the following:
The name and relative path to the installer file. In the example, the script assumes that the .msi file is in the same directory as the batch script.
OL_PROFILE: This is the name of the user's Outlook mail profile. Besides the mail profile name itself, predefined values can be provided (for example, $DEFAULT and $PREFERRED). When using $DEFAULT, the default mail profile will be selected. When using $PREFERRED, the installer will try to use the default profile first, but if it doesn't satisfy the mail profile configuration requirements (if it doesn't use Cached Exchange Mode or use Personal Folders storage) then the installer will try to use another profile.
FUSION_SERVER_HOST: This is the server name or IP address.
FUSION_SERVER_PORT: This is the port that CRM for Microsoft Outlook is configured to use.
FUSION_SERVER_SUFFIX: This is the URL suffix for accessing the CRM for Microsoft Outlook Web services. The one provided in the example above is the default deployment path for the CRM for Microsoft Outlook application, and it will typically be used.
FUSION_SERVER_PROTOCOL: This is either "http" or "https", depending on whether the application is deployed with SSL enabled or not.
Note that the script is using the standard switches provided by the Microsoft Installer executable, msiexec.exe. Documentation of the switches can be reviewed by typing msiexec.exe /?at the command prompt.
Once the installer finishes, the first time the user opens Outlook there will be additional dialogs that prompt the selection of various application options. This process is called the First Run Assistant, and each user will specify:
The Fusion CRM username and password.
The CRM for Microsoft Outlook connect string. Note that if the installation was completed with the various FUSION_SERVER_* variables, the connect string will be pre-filled and the user will not need to specify those details.
Once the user credentials and connect string are provided, the application will connect to Fusion to download and apply the Outlook configuration available to the user. Once the configuration is applied the user is presented with additional First Run Assistant dialogs to complete the personalization process and perform an initial synchronization. In this second phase of the First Run Assistant, the user will specify:
Synchronization settings, including the default synchronization frequency and synchronization filters. The application synchronizes data based on synchronization filters, and will automatically initiate a syncronization on the specified frequency.
Whether to share new Appointments, Contacts, and Tasks in CRM for Microsoft Outlook by default.
Whether to convert his contact list to Fusion contacts.
Once the user completes the First Run Assistant, the application will begin the first synchronization.
Before using the Oracle Fusion CRM for Microsoft Outlook application, several setup tasks must be performed. One of these tasks is to verify each user's computer has the necessary supported software prior to installing CRM for Microsoft Outlook.
The following are the supported client computer operating systems:
Microsoft Windows XP SP3 (32 bit) and higher
Microsoft Vista SP1 (32 and 64 bit) and higher
Microsoft Windows 7 and higher
The following are the supported Microsoft Office versions:
2007 SP2 and higher
2010 and higher
The following are the supported Outlook profiles:
Profile with a Microsoft Exchange e-mail account configured in cached mode with single mailbox. Outlook needs to be run with this profile at least once.
Profile with an Internet e-mail account. Outlook needs to be run with this profile at least once.
Note
CRM for Outlook can only be installed into one of the Outlook profiles.
Depending on what data file is set as the default mail delivery location in the Outlook profile selected for CRM for Outlook installation, it can be either:
.ost file
.pst file
Only POP protocol is supported. IMAP is not supported for the following reasons:
The IMAP protocol has a unique structure. Whether or not a custom folder can be created in this protocol depends on the mail server. The CRM for Outlook platform requires the ability to add custom folders, and needs to be able to syncronize custom CRM objects (for example, accounts or opportunities) with Outlook.
The IMAP protocol cannot be made the default mail delivery location in Outlook, and the CRM for Outlook platform installs to the default mail delivery location in the profile. Either Exchange mailbox or POP .pest can be made the default mail delivery location. A default mail delivery location is required for the platform, as all Outlook activity processing happens there (for example, meeting participants receive notification from the organizer only in this location).
Note
Changing the default mail delivery location in the Outlook profile where CRM for Outlook is installed is not supported because doing so will cause the CRM for Outlook add-in to fail.
The following are the supported versions of Microsoft Exchange Server:
Microsoft Exchange Server 2003
Microsoft Exchange Server 2007
Microsoft .NET Framework 3.5 SP1 or higher is required to support the client application.
Oracle Fusion CRM for Microsoft Outlook is a composite application that allows users to work with Oracle Fusion CRM data inside Microsoft Outlook. The application is deployed to Outlook using the add-in framework and extends the Outlook data model and UI framework in order to store and render CRM data to the user.
Oracle Fusion CRM data is synchronized to users' computers and maintained in native Microsoft Outlook storage. While working in Outlook, users access CRM data that is stored locally, even when connected to the corporate network. The changes made to the CRM data are periodically synchronized with the Oracle Fusion CRM application. There are two options for storing the CRM data:
A Microsoft Outlook mail profile configured to use a Microsoft Exchange service with the Use Cached Exchange Mode enabled to allow data to be stored in an offline storage file (.ost file format)
A Microsoft Outlook mail profile configured to use the Internet E-Mail service with personal folder storage (.pst file format)
Because CRM data is maintained in Outlook storage, it can be displayed and accessed like any other Outlook item. For instance, CRM data types will appear in the folders for the user's mailbox alongside other native Outlook types, and users can select the CRM folder and view the CRM records there as they would work with other Outlook information. Within a given folder, the user can select and open a single record to view the data. In this case, the user will have access to CRM data that appears within an Outlook form or inspector window.
In addition to accessing CRM data in Outlook explorer views and inspector windows where the CRM data is the primary focus, users will also be able to access CRM context when viewing standard Outlook items like appointments, e-mails, and tasks. For these Outlook types, the user will be able to specify the CRM customer, related sales item, contacts, and resources associated with the Outlook item, and will be able navigate to the related CRM item to review additional details.
Data that is stored in either cached Exchange mode in .ost file format, or in personal folders in .pst format, is accessible to the CRM for Microsoft Outlook user while disconnected. The user interacts with the CRM data that is stored locally on his computer and periodically synchronizes data between Outlook and the Fusion CRM server. Synchronization happens when the user is connected to the corporate network and can access the CRM application server. Because the user always works with the local set of CRM data, he will have access to the data from the server immediately following the synchronization process, but doesn't directly access or update the data on the server. Changes are made to the local data set, and then the synchronization process takes care of making changes to the local or server data sets to align the two.
After CRM for Microsoft Outlook is installed, the user must perform an initial synchronization to retrieve his accessible CRM data. Several synchronization settings are configured as part of the First Run Assistant process that influence the initial synchronization. These include the frequency of automatic synchronization, the synchronization filters to use, and which objects are enabled or disabled from synchronization. These settings can be changed by the user after the initial synchronization. Once the user completes the First Run Assistant process, the initial synchronization will begin. The duration of the synchronization process will depend on the number of records that will be synchronized, network bandwidth, load on the server, as well as processing speed and memory available on the user's computer. A rule of thumb is to try to configure synchronization filters so that no more than five to ten thousand records are synchronized.
During the synchronization process, the application performs the following steps:
Connects to the Fusion CRM server CRM for Microsoft Outlook synchronization services using SOAP over HTTP and authenticates the user.
Performs a check to determine the configuration for which the user possesses access. Access to an Outlook configuration is established based on a privilege associated with a user's job role that allows access to an Outlook client deployment package.
If a user has access to a deployment package, it is downloaded, and the configuration is applied to the Outlook mailbox.
The final step is to synchronize data. The records that are retrieved depend on the internal filters configured on the server, data security applied to the objects that are synchronized, and the user filters.
Subsequent synchronization cycles follow a process that includes these steps:
CRM for Microsoft Outlook sends a request to the Fusion CRM server with a list of objects and the current user filters and requests a snapshot of IDs and timestamps for all records that are within the scope of the object list and specified filters.
The server sends a response with the requested information.
CRM for Microsoft Outlook makes a local snapshot of IDs and timestamps and compares that to the server snapshot.
The differences between the local snapshot of IDs and timestamps and the server snapshot result in a few possible actions:
Inserts, updates, or deletes data on the Fusion server based on changes that occurred in CRM for Microsoft Outlook since the prior synchronization.
Inserts, updates, or deletes data in CRM for Microsoft Outlook based on changes that occurred on the Fusion server since the prior synchronization.
In all cases, changes that are made to data locally in the CRM for Microsoft Outlook client are only sent to the Fusion server during the subsequent synchronization session; however, users who want to synchronize a change or set of changes immediately can start the synchronization cycle manually to avoid waiting for the next scheduled synchronization.
The synchronization process on the Fusion server is supported by CRM for Microsoft Outlook accessing Web services. CRM for Microsoft Outlook accesses two Web services directly -- one that provides access to data during synchronization processing, and one that provides access to metadata. The synchronization process is initiated by CRM for Microsoft Outlook within the Outlook application, and the Fusion server accepts synchronization requests, routes them to the appropriate services within the service, and returns the appropriate responses. The work that each part of the synchronization architecture performs is summarized as:
CRM for Microsoft Outlook synchronization engine and connector that are deployed to Microsoft Outlook perform the following:
Initiates a new synchronization request based on a preconfigured automatic synchronization interval or by an ad hoc user request to start a new synchronization cycle.
Uses the stored details about username, password, server connection information, and CRM public security certificate stored on the user's computer to format and send requests to the CRM application server.
Based on the configuration deployed to a user's computer (including object types deployed), fields defined as part of those objects, synchronization filters and the like, the application generates the appropriate SOAP message content and expects the corresponding response when using the HTTP or HTTPS transport to communicate with the CRM applicaiton server.
The Fusion server hosts an application that listens for CRM for Microsoft Outlook synchronization requests, and the synchronization services perform the following:
The OutlookRequestHandlerService Web service processes all incoming requests for data synchronization, and the OutlookMetadataService Web service handles requests to retrieve metadata.
Incoming SOAP messages are routed to the appropriate service. These messages include one or more requests to invoke a method on the target service.
Requests sent to the OutlookRequestHandlerService in particular are routed to other services to perform the action expected from the synchronization process. For instance, a request to get appointment data sent to the OutlookRequestHandlerService will be routed to the appointment Web service that will process the request and return the requested data, and the OutlookRequestHandlerService will send this back to the CRM for Microsoft Outlook client that sent the request.
A synchronization cycle will include requests to get a server snapshot, and can then include many additional requests to query, insert, update, and delete data based on the changes detected when CRM for Microsoft Outlook compares the local and server snapshots.
Each of these requests is processed based on the type of request, and is either managed within the OutlookRequestHandlerService processing directly or is routed to the appropriate target service to be fulfilled.
In addition to standard Outlook data storage mechanisms and the synchronization engine, several extensions to the standard Outlook user interface provide a way to access and manage CRM data inside of Outlook. Examples of extensions to the standard Outlook user interface include custom toolbar buttons, menu items, inspectors that display Fusion CRM data, controls that are embedded on standard Outlook item inspectors, the personalization options dialog box, and so forth. The CRM for Microsoft Outlook client can use these extensions to perform a variety of tasks.
The following are some examples of tasks that the user can perform:
Create, view, and edit CRM data in Outlook.
Mark an Outlook item to be shared with CRM Desktop and associated sales data.
Initiate a standard Outlook action, such as sending an e-mail or scheduling a meeting in the context of a sales item.
The behavior of the extended Outlook user interface is influenced by custom CRM business logic that performs a variety of validations during data entry. The following are some examples of validation that are performed:
Confirm that the data type is valid for a given field.
Make sure fields that are required are populated.
Prevent changes to fields or records that are configured to be read-only.
Validate field values based on comparisons with other fields or static values.
Apply conditional validation so that a field may be required or read-only based on other criteria.
Following are the major physical components that CRM for Microsoft Outlook uses:
CRM Database
This is the database accessed by the CRM application that stores data about customers, contacts, business opportunities, and so on.
CRM Application Server
This is the server that hosts the CRM for Microsoft Outlook application and the related Outlook Web services, and therefore is the main entry point for synchronization requests coming from the CRM for Microsoft Outlook add-in running on users' computers.
Laptop or Desktop
This is the computer where the CRM for Microsoft Outlook add-in is installed, and where users are working with CRM data in Outlook. The Outlook add-in will install binary files that support synchronization of CRM data and integration with Outlook, including support to extend the Outlook data model and user interface, and resource files containing images and strings to initialize the application. The CRM for Microsoft Outlook add-in will connect to the CRM application server and download the appropriate configuration and CRM data for the user which are also stored on this computer.
Corporate Messaging Infrastructure
The corporate messaging infrastructure encompasses all of the server computers and other network topology that support the transmission of e-mail messages, and other personal information management capabilities such as the corporate calendar, contact and task lists.
Following are the CRM for Microsoft Outlook functional components:
CRM Extensions in Outlook
Extensions integrate with Outlook data storage and deliver additional business logic and extensions to the Outlook user interface to allow users to access and modify CRM data. CRM data is viewed with extensions to the Outlook user interface. Changes to CRM data are controlled by business logic and custom controls and then finally stored in Outlook data storage (for example, in a user's mailbox storage file). The user works with a version of the CRM application, as defined in the configuration deployed to the user's computer. Changes to CRM data since the last synchronization cycle are calculated by the synchronization engine during data synchronization with the CRM application server.
Synchronization Engine
The synchronization engine handles requests to initiate a synchronization cycle and is responsible for structuring the requests that are sent to the server. For the initial and incremental synchronization cycles, the synchronization engine manages requests to count records available to the user; sends a request to generate a server snapshot; initiates the process to generate a local snapshot; compares the results; and calculates the necessary requests to be sent to the CRM application server to complete the synchronization of local and server data sets. The synchronization engine works in tandem with the connector to correctly format and transmit messages with the CRM application server.
CRM Connector
This part of the CRM for Microsoft Outlook add-in is responsible for knowing how to connect and communicate with the CRM application server. The connector uses details such as the username, password, connect string, public security certificate, and client metadata to interpret requests from the synchronization engine to correctly format and send requests to the CRM application server. All details of the requests to send to the server are orchestrated by the synchronization engine, but the transmission of the requests and retrieval of the responses is done by the connector. The connector uses the details in the connect string to know where to send requests to the CRM application Web services.
CRM Application Web Service
CRM Web Service provides functionality to handle the user session, and to add, delete, modify, count, and list data objects that are required by the Web service connector.
You can customize the product name displayed by the Oracle Fusion CRM for Microsoft Outlook client, by modifying the package_res.xml client configuration file.
Use an XML editor to open the package_res.xml client configuration file. Create or modify any of the following attributes, as required:
<str key="app_name">CRM for Microsoft Outlook</str>
<str key="pim_name">Outlook</str>
<str key="remote_app_name">Oracle Fusion</str>
For example, in the remote_app_name attribute, change Oracle Fusion to the name of your company.
When a user clicks Send Feedback on the Feedback tab within Oracle Fusion CRM for Microsoft Outlook, a new e-mail message is created, and the e-mail is automatically addressed to the support team. You can customize the support team's e-mail address by modifying the package_res.xml client configuration file.
Use an XML editor to open the package_res.xml client configuration file. In the following code, change email_address to the required e-mail address.
<!-- Feedback page -->
<str key="support_email">email_address</str>
For example:
<str key="support_email">support@your_company.com</str>
You can make Oracle Fusion CRM for Microsoft Outlook fields and forms read-only, by modifying the forms.js client configuration file.
Use a JavaScript editor to open the forms.js client configuration file. Find the following code in the configuration file:
// LEAD FORM SCRIPTS //
function lead_form(ctx)
{
The example above shows how to make the Lead field read-only.
To make a field read-only, add the following code below the section of code you have just located:
ctx.form[control_id].enabled = false;
The control_id should be the identifier of the field that you want to make read-only.
To make a form read-only, add the following code below the section of the client configuration file you have just located:
ctx.form.enabled = false;
You can customize the text that appears in the Oracle Fusion CRM for Microsoft Outlook application, by modifying the text strings in the package_res.xml client configuration file.
Use an XML editor to open the package_res.xml client configuration file, and find the text string you want to change. For example, in the following code you want to change the text string "Customer name is required":
<str key="msg_customer_required">Customer name is required.</str>
You change the text string to "Enter a customer name for this organization", and so the code now appears as follows:
<str key="msg_customer_required">Enter a customer name for this organization.</str>
This example demonstrates how to display a custom Oracle Fusion field in a Oracle Fusion CRM for Microsoft Outlook form. This example specifically shows you how to display the Opportunity Number field on the Opportunity form.
Firstly, you need to make the field Opportunity Number available through the Oracle Fusion API, and then customize CRM desktop to synchronize and display the field.
<Type Key="OptyId" Label="#obj_opportunity"...>
<Field FieldName="OptyNumber" FieldType="xsd:string"></Field>
<type id="opportunity" display_name="#obj_opportunity_plural" folder_type="10">
<field id="OptyNumber">
 <reader>
  <mapi_user>
   <user_field id="fsn Opportunity Number" ol_field_type="1"></user_field>
   <convertor>
    <string/>
   </convertor>
  </mapi_user>
 </reader>
 <writer>
  <outlook_user>
   <user_field id="fsn Opportunity Number" ol_field_type="1"></user_field>
   <convertor>
    <string/>
   </convertor>
  </outlook_user>
 </writer>
<str key="lbl_opty_number">Opportunity Number:</str>
<!--end opportunity reason win
los-->
on the Opportunity form.
<!-- opportunity number -->
<cell size="20">
 <stack layout="horz" spacing="3">
  <cell size="4"/>
  <cell size="100">
   <stack layout="vert" padding="2">
    <cell>
     <static id="lbl_opty_number" tab_order="150">
       <text>#lbl_opty_number</text>
     </static>
    </cell>
   </stack>
  </cell>
  <cell>
   <edit id="opty_number" tab_order="151">
    <field value="string">OptyNumber</field>
   </edit>
  </cell>
 </stack>
</cell>
<!--end opportunity number-->
<!-- opportunity details -->
<cell size="197">
In Oracle Fusion CRM for Microsoft Outlook, a client configuration file describes a part of the application configuration that resides on the user computer, and it extends the desktop application. Client configuration files can either describe a portion of the application logic implemented as Java script, or can be a declarative configuration of items, such as UI components or synchronization mappings implemented as XML. Each configuration file has a particular type. There can be more than one version of any file type at one time as long as the names differ, and only one file of any given type can be included in a deployment package.
In Oracle Fusion CRM for Microsoft Outlook, a client deployment package is a collection of metadata files that describe the CRM application extensions deployed to users' computers. Access to a given deployment package is given to CRM application users through a privilege associated with their job role. When a user connects to the CRM application server to synchronize data from a desktop application like Microsoft Outlook, the application determines if any changes to the package have occurred, and if so, downloads any changes.
In Oracle Fusion CRM for Microsoft Outlook, the client configuration validation file (.xsd) describes the structure of a valid client configuration file (.xml). The application uses the client configuration validation file to check that any client configuration file imported to the server is structured correctly and complies with the requirements of the validation file. The validation process happens automatically during the import of any client configuration file, and helps catch misconfigured files.
The Oracle Fusion CRM for Microsoft Outlook application uses a file to identify and map services and view objects that are used when processing synchronization requests, and to correctly query, insert, update, and delete data on the server. There is only ever one of these files used at a given time, and changes made to it are recognized by the application and loaded immediately.
Oracle Fusion Customer Center enables the comprehensive management of customer information. Customer Center collects data from various systems and presents them for management in one location.
Following are some of the capabilities of Customer Center:
Create customers and contacts
Update customers and contacts
Maintain customer hierarchies
Maintain competitor information
When working with Customer Center, be aware of the following terminology used through out the application:
Sales prospect
Sales account
Customer
Consumer
Legal entity
Billing account
A sales prospect is a prospective sell-to entity, or person, at an existing or potential customer used to define Leads. A prospect is the lowest level representation of a business entity that your company's marketing processes will track and act upon. The sales prospect does not have a sell-to address. You can create a sales prospect from a party that does not have a sell-to address when you create the first lead for that party. You can also create sales prospects in Customer Center and by importing them in bulk.
You can create leads against sales prospects, but a sales prospect must be qualified and converted to a sales account before you can create opportunities for it. To qualify and convert a sales prospect, a set of business criteria or rules must be satisfied. For example, the prospect may be required to meet the criteria for account assignment.
A sales account is a specific sell-to entity within a given customer. You can create leads and opportunities against sales accounts. A single customer might have a collection of sales accounts. To avoid confusion when assigning territories to the account, each sales account has only one sell-to address. Typically, a sales team manages a sales account. The sales team is comprised of resources assigned to the territories associated with the sales account. Additionally, a profile option determines whether a sales account is a named sales account, an existing sales account, and the account owner. Named sales accounts are typically strategic accounts assigned to dedicated territories. An existing sales account is one where there is an existing financial relationship or had previous installs. You can create sales accounts in Customer Center and by importing them in bulk.
Within Customer Relations Management (CRM), sales accounts and sales prospects are collectively referred to as Customers. Additionally, a Customer also can have representations as a legal entity and a billing account that are expressed as root nodes in a hierarchy to the respective sales accounts for that customer.
View the Customer Hierarchy: A customer's hierarchy represents a holistic view of the customer's structure, showing you the customer type, the parent for the customer, the subsidiaries of the customer, as well as rolled up revenue analysis data.
A consumer is a person who is a qualified paying individual. A consumer can have one or more sales accounts or sales prospects. A consumer is not an organization sales account or sales prospect. A consumer is by definition also a legal entity.
A legal entity is a party that can enter into legal contracts or a business relationship, and be sued if it fails to meet contractual obligations. There are two types of legal entities: internal and external. A customer with a party usage of Legal Entity is considered an internal legal entity and is used for interdivisional selling within your own company. A customer with a party usage of External Legal Entity is any external customer who fits the definition of legal entity. Legal entities may also be used to group multiple sales accounts, sales prospects and other classes of entities or parties.
A billing account is a party that represents the financial account transactional entity for a given Customer.
There are five types of Oracle Fusion Customer Center trees. Each tree displays slightly different nodes, and the information that you are able to view and edit on each node depends upon your security privileges and your membership status on the sales account team
The five types of Customer Center trees are:
Customer
Consumer
Contact
Legal Entity
Account Plan
The customer tree displays nodes for business-to-business entities such as sales account and sales prospect. If you are a member of the sales account team with at least Edit level access or you have the Sales Party Administration duty, you can update information on the following nodes: contacts, organization chart, classifications, assessments, discussion forums, classifications, assessments, notes and, account assessments. Only those users with Sales Party Administration duty or Full level access on the sales account team and profile nodes can update the members of the sales account team
The consumer tree displays nodes for business-to-consumer entities such as sales accounts and sales prospects. All nodes on the consumer tree are visible to all users. Since consumers are individuals rather than organizations, there are fewer nodes displayed in the consumer tree than in the customer tree. For example, you will not see nodes for organization chart, contacts, assessments, or others that are pertinent to organizations.
The contact tree displays nodes for contacts with the contact profile and other related information such as the customer (the organization) to whom the contact belongs, interactions with the contact, notes, and so on. All nodes on the contract tree are visible to all users.
The legal entity tree displays nodes for business-to-business entities that are marked with a party usage of Legal Entity. Because legal entities are typically a parent or root node in a customer hierarchy, legal entity tree has a subsidiaries node. All nodes on the legal entity tree are visible to all users.
An account plan is a plan to sell to a certain set of accounts in a coordinated way. There is a specific set of assigned resources. This tree shows associated contacts, assets, Opportunities and member accounts of the plan.
Customer center tree is a navigation paradigm which enables quick and easy access to various related information in one central place. Seen on the regional area of the page, the tree is made up of object nodes such as Profile or Contacts. These object nodes can be categorized into logical categories. Categories enable you to organize those object nodes to fit your needs, for example, the Sales category or Service category. Each implementation can customize the Customer Center tree by showing or hiding the various nodes as required, and configuring node names and other parameters. When saved, the personalizations for this view of the tree are kept for all users of the application. Individual users will have capability to further personalize the tree as desired.
Set these attributes for each node in the Customer Center Tree:
Name - the name shown in the customer center tree UI.
Visible - indicates whether the node will be visible in the customer center tree.
Important
All tree nodes that render portlets are delivered with the Visible check box unselected. To show the portlet, select the Visible check box.
Default - the node shown when a user drills down into the customer center tree.
Portlet - indicates whether the node is a portlet or a local task flow. A portlet is a non-local task flow residing in another business process. For example, when accessing the Opportunities node in the Lead Management application, the Opportunities node is a portlet because the Opportunities task flow resides in the Sales applications, outside of the local Lead Management application. Each Fusion application using Customer Center is delivered with the appropriate portal information already configured and should not be changed. All tree nodes that render portlets have the 'Visible' flag turned off. If the portlet is required to be visible, the 'Visible' flag needs to be changed to show the node.
Parameters - specify input variables and values for the node. There are only three nodes that require parameters. These nodes are specifically for third-party integration: OneSource Profile, Service Requests, and Snapshot:
OneSource
Profile parameters: token=#{'{OneSource
token}'}
Replace {OneSource token} with your OneSource access token. For
example, if your OneSource token is 'token', set the OneSource Profile parameter as: token=#{'token'}. Or, if you do not require a token to access OneSource, simply replace {OneSource token} with NULL; set the OneSource Profile parameter as: Token=#{''}
Service Requests
parameters: HostName=#{'{Siebel server
path}'};SSLEnabled=#{'[true|false]'};UserName=#{'{username}'};Password=#{'{password}'};System
Name=#{'{reference system name''}
Set host name to be your Siebel server
path, for example, HostName=#{'hostname.siebel.com/
CALLCENTER_enu/start.swe'}
Set SSLEnabled to true or false,
for example, SSLEnabled=#{'false'}.
Set UserName to be your Siebel system
login, for example, UserName=#{'USER'}.
Set Password to be your Siebel system
password, for example, Password=#{'PWD'}.
Set System Name to be your source
system name as defined in the Original System References mapping table,
for example, System Name=#{'SIEBEL'}. The default value is 'SIEBEL' if this parameter is not specified.
Example Service Requests parameter: HostName=#{'hostname.siebel.com/CALLCENTER_enu/start.swe'};SSLEnabled=#{'false'};UserName=#{'USER'};Password=#{'PWD'};System
Name=#{'SIEBEL'}
Snapshot
node parameter: HostName=#{'{Siebel
server path}'};SSLEnabled=#{'[true|false]'};UserName=#{'{username}'};Password=#{'{password}'};System
Name=#{'{reference system name''}
The Snapshot node parameter is the same as the Service Requests node and thus needs the same parameters as those for the Service Requests node.
Oracle Fusion Customer Center is a central location to access a comprehensive and multifaceted view of customer information. It unifies Fusion applications data as well as relevant third-party content.
OneSource and Siebel Service are two third-party integrations readily configured in Customer Center. This topic explains how third-party customer content is mapped to Fusion customer.
OneSource to Fusion Mapping
OneSource, an online source of business and company data, can be accessed directly from the OneSource node in Customer Center.
Customer Center conducts searches for OneSource company data in the following order:
Look up based on mappings defined
in HZ_ORIG_SYS_REFERENCES table where orig_system is ONESOURCE.
Look up based on Fusion customer
stock symbol. This is checked if mapping is not found in HZ_ORG_SYS_REFERENCES.
Look up based on Fusion customer name. This is checked if mapping is not found by stock symbol lookup. If there are multiple OneSource companies match the Fusion customer name, user can choose from the list of matching OneSource companies.
Siebel Service to Fusion Mapping
Mappings for Siebel
accounts to Fusion customers are maintained in the HZ_ORIG_SYS_REFERENCES table, where orig_system is SIEBEL.
Note
Customer Center does not include licenses for OneSource and Siebel applications. Third-party application licenses may be acquired separately. If you want to enable OneSource and you have a web proxy for external HTTP(S) traffic, you must select Enable Web Proxy on the Web Proxy Configuration screen and specify your web proxy configuration.
See Also: "Web Proxy Configuration" in the chapter "Creating a New Provisioning Plan" of the Oracle Fusion Applications Installation Guide
Personalizing the Oracle Fusion Customer Center tree enables you to have a more intuitive navigation experience. The tree, located in the regional area of the page, is made up of object nodes such as Profile or Contacts. To personalize the tree, use the Action menu located directly above the tree or right click on any tree node, and click Manage Customer Tree in the menu popup. The Manage Customer Tree window will pop up. Select the node you wish to modify. You can change the name, whether the node is visible or not and if it should the default node that will display upon opening the tree. When you save, the customization will be associated to your user name.
Assessment templates let you analyze the health of a business object, such as a lead or an opportunity, and suggest appropriate next steps based on its diagnosis. To best plan and create assessment templates, you should consider the following points:
Ratings
Questions, Question Groups, and Question Weights
Responses and Scores
Associated Task Templates
A rating is a textual qualification such as Excellent. There are three delivered ratings in the assessment template: Excellent, Average, and Poor. Ratings provide a metric other than a numerical score for qualifying the outcome of an assessment. Ratings are created at the beginning of the assessment template creation process. They are later applied to possible responses to questions in the template, which associates each rating with a score. An appropriate feedback will be displayed to you based on the completed assessment score once you submit an assessment. When setting up ratings and applying them to possible responses, it is important to remember that they and their associated feedback text will eventually display as part of the overall assessed health of a business object.
Questions are the main components of an assessment template. They are written such that they aid in systematically determining the health of a business object, and they are grouped into logical collections called Question Groups. Each question in the template is assigned a question weight, expressed as a percentage, which is the relative importance of the question within the template. When an assessment template is used to perform an assessment, a question's weight is multiplied by the normalized response score given for the question to produce a weighted score for that question. When setting up questions, question groups, and question weights, it is important to carefully analyze which factors determine the health of a particular business object (like a lead or an opportunity) in your organization. Use those factors to create your question groups; and then, for example, write three to five questions per group that are weighted according to your analysis. There is no limit to the number of questions that can be in a question group, but each question group must have at least one question.
Responses are attached to questions in the template. Each question should have at least two responses, unless it's a free-form only question. More than one response can be tied to the same rating but, between all of its responses, each question should accommodate at least two ratings, unless it's a free-form only question. For example, if your ratings are Excellent, Average, or Poor you may, for each question, include two responses that correspond to at least one of those ratings, such as average. There must be enough responses to cover at least two of the ratings such as Excellent and Average. You assign a score to each response for a question, and the application normalizes the score based on a standard scoring scale. When an assessment template is used to perform an assessment, a question's weight is multiplied by the normalized score of the response given for the question to produce a weighted score for that response. When adding responses to questions, ensure that the scores and ratings you assign to each response correlate. In other words, the higher the score you assign to the response, the higher the rating should be so that you have a strong quantitative relationship between the two. Also note that you can allow free-form responses for one or more questions in the template, but free-form responses are never scored.
A task template is an instruction to generate a group of related activities. You can associate task templates with an assessment template in order to recommend tasks that should be performed after an assessment has been done for a business object. When you associate task templates with an assessment template, you can indicate a score range for each task template, and based on the total score of any assessment that uses your template, one or more task templates will be recommended as follow-up activities. In order for a task template to be available to associate with an assessment template, it must be assigned to the same business object type as that assigned to the assessment template, and it must have a subtype of Assessment. Ensure that you have set up task templates correctly before attempting to associate them to assessment templates.
Throughout the life of an assessment template, it can be assigned several different status codes.
These status codes control the actions you are allowed to make against an assessment template.
In Progress
Active
Retired
This is the initial status of an assessment template. When an assessment template is at this status, you can edit any part of it. This is the only status at which you can delete a template. If the template is not deleted, it moves to the Active status next.
This is the status assigned when the assessment template has been deployed for general usage. When an assessment template is at this status, you can make only minor textual edits to it, including, but not limited to, template description, question text correction, question sequencing change, response description, and score range feedback. From this status, you can move the template to Retired; you cannot delete it.
When an assessment template is at this status, it is no longer available for general usage. You cannot edit any part of it, and you cannot move it to any other status; however, it can still be copied. Active templates that are deleted revert to this status.
The application calculates the score range for an assessment template using the question weights and the ratings and scores assigned to the possible responses for all the questions in the template. This topic explains when the score range is calculated and the components that are used in the calculation, so that you can make the best decision regarding the feedback text to apply to each score range. In addition to the automatic score range calculation, a manual method for adjusting score range is also available on the administration UI.
In order for the application to calculate the assessment template score range, you must:
Apply weights to all template questions.
Configure ratings and apply them to possible responses for all template questions.
Apply a score to each of the possible responses for all template questions.
The score ranges for each rating in an assessment template are determined using the lowest and the highest weighted response scores for each question. So for each rating score range, the lower end of the range starts where the previous rating range ended, and the higher end of the range is the sum of the highest weighted scores that can be attained for that rating.
This table displays a simple example of the components used in the score range calculation.
|
Question (Weight) |
Response (Normalized Score) |
Weighted Score |
Rating |
|---|---|---|---|
|
What is the customer win? (20%) |
Lower Operating Cost (100) |
20 |
Excellent |
|
Higher Revenues (80) |
16 |
Average |
|
Other (53) |
11 |
Average |
|
Don't Know (27) |
5 |
Poor |
|
What is our win? (80%) |
Reference (60) |
48 |
Average |
|
Resale (50) |
40 |
Poor |
|
Partnership (100) |
80 |
Excellent |
This table displays the score range calculation based on the components from the first table.
|
Rating |
Score Range |
|
|---|---|---|
|
Excellent |
65 - 100 |
|
|
Average |
46 - 64 |
|
|
Poor |
0 - 45 |
|
Note
If a template administrator does not use a particular rating while assigning ratings to possible responses, this could result in improper score range calculations. To counteract this problem, the score range calculation uses a built-in correction algorithm to ensure proper score ranges. The correction algorithm works like this: For a question where a particular rating is skipped, the low score for the skipped rating is calculated to be equal to the high score of the next lower ranked rating. The high score for the skipped rating is calculated to be equal to the low score of the next higher ranked rating.
Using the ratings displayed in the tables above, if the rating Average is not used for a question's possible responses, the score range calculation assigns a low score to Average for that question that is equal to the high score of Poor for that question. It also assigns a high score to Average for that question that is equal to the low score of Excellent for that question. This ensures that the overall template score range for Average is calculated to fall between the score ranges for Poor and Excellent.
A task is a unit of work to be completed by one or more people by a specific completion date. When using tasks in your application, you should consider the following points:
Tasks
Task Templates
A task is defined with a description, due date and category. Each task has an owner, who oversees or is responsible for the task, and one or more assignees who perform the work. The task can be related to a business object, such as an Opportunity, a customer or, one or more external contacts. Tasks may also have Notes for general information, Attachments for tracking e-mail or project documents and Interactions which record customer communications.
Often a set of Tasks are performed repeatedly for a particular process and to support this administrators can define Task Templates, which represent a group of tasks. These task templates can be invoked by users working on a particular business object, for example a lead, campaign, or an opportunity. The user selects the appropriate task template for the goal they want to achieve and this creates the tasks and associates them with the business object being worked on. This saves the user from creating multiple tasks when an Opportunity reaches a particular sales stage, or the same set of tasks each time a marketing campaign is created.
Note
Extensibility features are available on the Task object. For more details refer to the article Extending CRM Applications : How It Works
One of the steps for creating an assessment template is associating task templates. You would take this step if you want to recommend sets of tasks to be done after an assessment is performed using your template. You associate task templates to ranges of scores in the assessment template, and where the overall assessment score falls within those ranges determines the tasks that are suggested to be performed after the assessment.
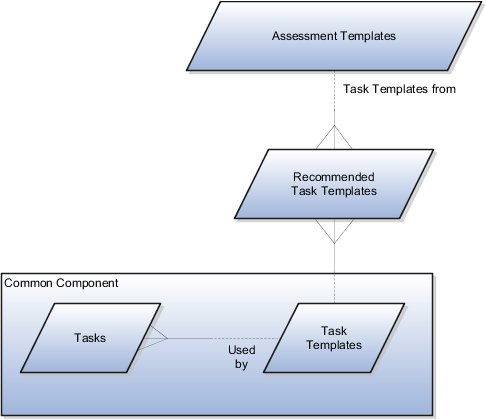
An assessment template is a set of weighted questions and possible responses used to evaluate the health of a business object such as an opportunity or a lead. An assessment template can be associated with one or more task templates that are recommended based on the outcome of an assessment.
A task template is an instruction to generate a group of related activities. By marking a task template with a subtype of Assessment, you make that task template available for association with assessment templates. The task template's business object type should be the same as that assigned to the assessment template. When an assessment is performed using an assessment template that has associated task templates, one or more task templates are recommended based on the total score of that assessment and can be used to generate a list of activities to perform.
For example, you can associate a task template called Engage Business Development Manager with your assessment template called Potential for Win-Win. Associate the task template with the score range of 86 to 100, so if an assessment using the assessment template Potential for Win-Win scores within that range, the application recommends the Engage Business Development Manager task template and a list of follow-up activities based on that template can be generated.
A score of 0 is assigned for free-form responses.
A free-form response option will have no effect on the overall assessment score. The free-form response offers the opportunity to enter a textual response to a question that does not conform to any of the pre-populated responses provided by the assessment template.
A question group is a logical grouping of questions within an assessment template, and it is used strictly as a category header for those questions. Through careful naming of a question group, you can achieve the benefit of providing the user of the template with an approximate idea of the type of questions to expect in each group.
This step lists all of the assessment template questions in one place, and provides you with the opportunity to edit weights as necessary to ensure that the sum of all weights totals 100.
There are three types of sales account team memberships known as access levels.
These access levels control the team member's privileges for the sales account:
View Only
Edit
Full
When a resource is initially added to the sales account team, a profile option setting determines the member's default access level. If that member is removed from the sales account resource team, she no longer has access to the sales account, unless she is still a member of a territory that is assigned to the sales account. Resources in the management hierarchy of a newly added team member inherit the same access level of the subordinates.
View Only is the minimum level assigned to a sales account team member. This access level enables the team member to view the contents of the sales account child attributes such as sales account team, snapshot, assessments, discussion forums, notes, interactions, appointments, and tasks. This assumes, however, that the team member also has functional access to view that child attribute. If the team member's resource role does not provide functional access to view a particular child attribute of a sales account, that member cannot view the attribute, regardless of her sales account team access level. A team member with View Only access level for a sales account can view only the opportunities, leads, and revenue lines to which she has relevant data privileges.
Sales account team members with the Edit access level can view and edit all customer-related objects. They can view and edit only the opportunities, leads, and revenue lines to which they have the relevant data privileges. The Edit access level provides a sales account team member with the ability to run the territory reassignment process, but she cannot change the composition of the sales account resource team.
The Full access level allows team members to do everything that the Edit access level allows, with the addition of being able to change the composition of the sales account resource team. A team member with Full access can manually add and remove team members, change a member's access level, and mark the lock assignment setting for team members. When a sales account is created, only the sales account owner and sales administrators are granted the Full access level, but they can grant Full access to other team members.
Access for the Territory owners and members parallels that of the Sales Team members.
These access levels control the internal and partner territories privileges for the sales account:
Internal territory owner: Full access
Internal territory members (non-owner): Edit access
Partner territory owner and members: View-only access
Note
Territory Management must be implemented to utilize this feature.
The work object, candidate object, and attributes are components that fit together to create assignment objects that are used in rule-based and territory-based assignment. Work objects are business objects that require assignment, such as leads and opportunities. Candidate objects are business objects, such as resources and territories, that are assigned to work objects.
When you create candidate objects, you can select attributes for them that are later used in rules or mappings. These candidate objects also become candidates that are available for association when you create work objects. When you create work objects, you can select attributes for them also, as well as associating one or more candidates.
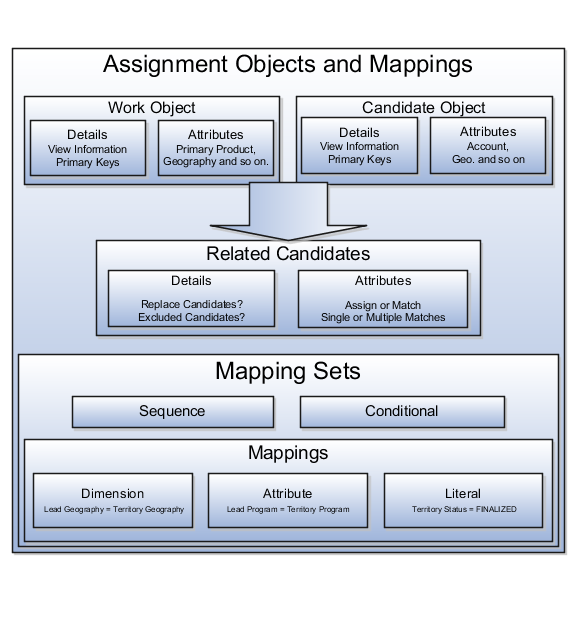
A work object is a business object that requires assignment such as a lead or an opportunity. Creating a work object involves entering its application information, selecting its attributes to use during assignment, and associating one or more candidates.
A candidate object is a business object, such as a resource or a territory, that is associated with one or more work objects for eventual assignment. Creating a candidate object involves entering its application information and selecting its attributes to use in rules or mappings. A special type of candidate object is a classification object. This type of candidate object does not represent a business object that gets assigned to a work object. It is used only with classification rules and is used primarily to rank or qualify leads.
Note
As candidate objects are created, they become available as candidates that can be associated with one or more work objects as part of the work object creation process.
The administrator needs to define the association between the work object and candidate object. For example, the Lead work object may have an association with both the Territory candidate object and the Resource candidate object. This implies that Assignment Manager can be used to assign Territories and Resources to a lead.
In the related Candidates tab for the Revenue work object an administrator can define the association between the work object and candidate object. For example, the revenue work object may have an association with both the territory candidate object and the credit allocation template candidate object. This association indicates that Assignment Manager can be used to assign both territories and credit allocation templates to revenue lines.
To relate a candidate object to a work object, use the following fields:
Assign Candidates: Indicates that Assignment Manager performs the assignment. If not set, then Assignment Manager is used to find the matching candidates, which are then passed to the calling application to update the work object.
Custom Logic: Indicates that Assignment Manager passes the result of the assignment matching to the callback function of the work object. For example, Opportunity Management uses custom logic that updates the sales team with the territory members. It stamps the territories onto the revenue line and adds the territory team members (resources) to the opportunity sales team.
Merge Assignment Candidates: Controls whether the matching assignment candidates identified from processing each set of mappings should be merged. This is used to drive the merging of matching candidates when multiple mapping sets are used in assignment processing. If the check box is checked, then the candidates are merged. The default is unchecked.
Keep Manual Candidates: Indicates that manually assigned candidates are retained during assignment processing. This option can be used to prevent the removal of manually added candidates during reassignment. Sales Account and Opportunity Management have implemented their own lock assignment features.
Replace Candidates: Determines whether unqualified candidates are removed from a team when an assignment runs. For example, the first time that Assignment Manager runs, a territory is assigned to a sales lead. When the reassignment process runs following a territory proposal activation, the territory is no longer valid. If Replace Candidates is set, then the territory is removed from the sales lead.
Candidate Exclusion: Sales leads have a related object, which stores the excluded candidates for each sales lead. Assignment Manager accesses this information, which prevents assignment of the work object to an excluded candidate.
Parent Attribute: Used by territory based assignment to determine the hierarchy of matching territories, eliminate all parent territories, and only return and assign the matching leaf node Territories. If this attribute is not used, then all matching territories (parent or leaf ) are returned and assigned.
Candidate Differentiation Attribute: Stores the attribute on the candidate object that is used for discriminating matching candidates. For example, in Revenue line assignment, this attribute enables matching leaf territories of many territory types (such as Prime, Channel Sales Manager, and so on) to be assigned. The Candidate Discriminator Attribute is only relevant for territory-based assignment and can only be selected if a parent attribute has been selected.
Coverage Attribute: The territory attribute used to denote whether the candidate in the matching candidate list has a regular, included, or excluded coverage.
Maximum Number of Candidates: The maximum number of candidates returned for the work object and candidate object combination. The default value is 100.
Manual Attributes: The attribute that identifies a candidate was manually assigned, rather than by the system. This attribute is used with the Keep Manual Candidates attribute.
Keep Manual Candidates: A flag to retain manually assigned candidates when assigning or re-assigning a work object. This option is only relevant if the manual attribute is defined and the Assigned Candidates option is checked.
Replace Candidates: Indicates whether non matching candidates will be removed when re-assigning a work object. In an example scenario, in the first time assignment runs, territory A is assigned to a sales lead and there is a change within the territory definition. When the sales lead is reassigned, territory A is no longer valid. If this option was selected, then territory A is removed from the sales lead.
Score Attribute: The score attribute in which the calculated score is stored.
System Attribute: The attribute that identifies a candidate was assigned by the system, rather than manually.
Attributes are elements in the view object defined for an assignment object. For each assignment object, you can select one or more attributes that you want to use when configuring assignment rules or mappings. For example, for a work object like sales account, you might choose the attributes of Named Account Flag, Customer Size, and Organization Type. When you configure assignment mappings for the sales account work object, your chosen attributes are available. You could create a mapping for Sales Account using the Named Account Flag attribute.
When selecting attributes for a candidate object, you will not only select the attributes you want to use when configuring assignment rules and mappings that involve that candidate object, but you also want to select the attributes for that candidate object that you want to appear in the screen that displays recommended candidates after assignment manager is run. For example, if a candidate object is resource (sales representative), and you want to show sales representatives' first names, last names, and phone numbers when they are recommended during assignment processing, you need to select the attributes for the resource candidate object that correspond to first name, last name, and phone number, and specify the order in which these attributes appear in the recommended candidates screen.
Note
This feature is not used by any CRM applications at this time.
The Manage Assignment Objects pages enable you to define and edit the Work and Candidate objects as well as define any territory-based mappings. The figure above shows the relationship between the work and candidate objects and the mapping of the matching candidates to work objects.
When you add or edit a work or candidate object there are several key pieces of information that are required in the definition:
Name: a unique name for the object with an optional description.
Code: a unique code used in processing the object.
Work/Candidate Object check boxes: indicates if the object is a work object, candidate object or both.
Application Module: an Oracle Application Development Framework (ADF) business component that encapsulates the business service methods and UI-aware data model for a logical unit of work related to an end-user task. Enter the fully qualified definition name of the consumer application, Application Module. Valid for top level Work and Candidate objects. Child objects automatically inherit this value from its parent.
Application Module configuration: Valid for Top Level Work and Candidate objects except Classification Candidate objects. Child objects will automatically inherit this value from its parent.
View Object Instance: used to define the data model of a view object component when designing an application module, for example, Opportunity. Valid for all levels of Work and Candidate objects except Classification Candidate objects.
View Criteria may be defined to filter the information for the rows of a view object collection. Valid for top level Work and Candidate objects except Classification Candidate objects.
Primary Key Attribute 1: First or only attribute that makes up the object primary key. Valid for top level Work and Candidate objects except Classification Candidate objects.
Refresh Interval: the number of minutes between refreshes of candidate object data. The default setting is 0 minutes. Valid for top level Candidate objects except Classification Candidate objects.
Initial Caches: The initial size of the cache when processing an object. This value will be used the first time the engine processes objects or following a server bounce. The default value is 2, and the maximum value is 20. Only valid for top level Candidate objects except Classification Candidate objects. All Work Objects that are used for scoring, Lead, for example, use the Product Level (MOW_SCORING_INITIAL_CACHES) Initial caches for scoring rules profile option value.
Maximum Caches: The maximum size of the pool/cache when processing the object. The default value is 5, and the maximum value is 25. Only valid for top level Candidate objects.
Note
All Work Objects that are used for scoring, Lead for example, use the Product Level (MOW_SCORING_MAX_CACHES) Maximum caches for scoring rules profile option value.
Score Attribute: The attribute on the object that stores the total calculated score after an assignment request has been processed. Valid for top level Work objects only.
Assignment Date Attribute: The attribute on the object that stores the assignment date after an assignment request has been processed. Valid for top level Work objects.
Exclude Assignment Attribute: The attribute on the object that stores the setting for excluding a work object from assignment. Valid for top level Work objects.
Assignment Manager allows users to specify a set of attributes from the assignment object VO to be used during the assignment evaluation. The assignment engine will load these Assignment Object Attributes for each assignment object VO row, in addition to any primary key or assignment attributes. This is designed to improve performance by not loading those attributes not used for the assignment evaluation.
Assignment Object Attributes should be defined for each work object and any child objects as well as each candidate object to be used by the Assignment Engine.
View Object Attribute: Name of each attribute in the view object defined for the assignment object. Assignment Rules or Mappings can be configured using these attributes. For Candidates Objects, the attributes that appear in the interactive assignment UI should also be selected.
Candidate Information Sequence: The sequence that this attribute is displayed in the Interactive Assignment UI.
Assignment mappings drive territory-based assignments. These mappings identify the dimensions, attributes, and territory filtering used in territory-based assignment processing. A default set of mappings is seeded. This seeding assumes that opportunities, leads, and sales accounts use the same territory hierarchy.
Assignment Manager has an indicator in the related Candidates region to control whether to merge the matching assignment candidates identified from processing each set of mappings. This indicator is used to drive the merging of matching candidates when multiple mapping sets are used in assignment processing. If the box is checked, then the candidates are merged. The default is unchecked.
You can use the following assignment mappings:
Attribute Mapping: An example is assigning territories to a sales lead where the territory program ID is the same as the sales lead program ID. In this case, the territory is matched when the territory program ID is equal to the sales lead attribute program ID.
Dimension Mapping: An example is assigning territories to opportunity revenue lines based on the product associated with the revenue line. In this case, the product dimension is selected as the mapping type. The candidate object low attribute and high attribute correspond to the names of the low sequence and high sequence attributes for product on the territory. The work object low attribute and high attribute correspond to the names of the low sequence and high sequence attributes for product on the revenue line.
Mapping using alternative attributes: Using the same scenario, if a revenue line does not have a product assigned to it, but has a product group assigned, add the low sequence and high sequence attributes for product group are entered for the work object alternate low and high attributes.
Mapping using default values: Using the same scenario, if the low sequence and high sequence attributes for product on a specific revenue line do not contain values, then the low and high default values for the product attribute for all revenue lines are used.
Literal Mapping: A way of filtering the matched territories based on specific values of a territory attribute. For example, by only matching with territories that are finalized, territory status equals FINALIZED.
Assignment is the process for selecting a candidate as an object and executing the association to a work object. Assignment consists of two phases. The first phase is the matching phase, where matching rules or mappings are evaluated to find the right assignees from a list of possible candidates. The second phase is the disposition phase, where the disposition, or assignment, of matching candidates is handled. Assignment Manager is the tool used to establish the business objects that require assignment, and to create the rules and mappings that dictate the selection and assignment of resources and territories. Candidates are potential assignees for a work object. A work object is a representation of an application business object inside Assignment Manager. A work object captures the attributes of a business object and associated child objects to be used for matching purpose. To best plan the configuration of Assignment Manager, you should consider the following points:
Business objects
Attributes
Resources and territories
Assignment disposition
Mappings sets and mappings
Rules
A business object is a data entity or a collection of data treated as a unit, such as a sales account, an opportunity, or a lead. Any business object that requires the assignment to act upon it is considered a work object by Assignment Manager. The work object is a representation of the business object, and mappings and rules are developed to ensure timely and accurate assignment of candidates (for example, territories or resources) to those work objects. When configuring Assignment Manager, carefully consider which of your business objects require assignment, and create work objects only for those that do.
A set of business or assignment objects is seeded for the assignment of territories or resources to sales accounts, opportunities, and leads.
After you determine the business objects (work objects) that require assignment and the candidate objects that you will assign to them, you must decide how the matching candidate assignment disposition will be carried out. Consider these questions:
Do you want to assign a single resource or multiple resources?
Do you want to automatically assign matching candidates or run custom logic against matching candidates?
Do you want to record the matching candidate score on the work object?
Do you want to retain manually assigned candidates when assignments are processed?
Do you want to replace disqualified candidates when assignments are processed?
To ensure that candidates are properly assigned to work objects, create mappings and rules. These mappings and rules employ attributes to determine the best assignments. As you set up work objects and candidate objects in Assignment Manager, also select the attributes of those objects that you want to use in your mappings and rules. For example, you might want to assign a resource such as a specific sales representative to a business object, such as opportunity, based on the risk level of the opportunity. In this case, when you create the opportunity work object and the sales representative candidate object, you will select the attribute of opportunity that corresponds with risk level, and the attribute of the sales representative that corresponds with skill name or e-mail address. Selecting these attributes makes them available for mappings and for conditions on your rules, so ensure that you select the attributes that reflect the criteria that you want to use for matching candidate objects to work objects.
Assignment mapping sets and their related mappings drive territory-based assignment. The mapping sets determine the sequence of mappings and which mappings are used in territory-based assignment. The mappings identify the dimensions, attributes, and territory filtering used in the assignment processing. Default mapping sets and their related mappings are seeded. This seeding assumes that opportunities, leads, and sales accounts use the same territory hierarchy.
Create the mappings using the work objects, candidate objects, and attributes that you already established. When designing your mappings, carefully consider the dimensions and attributes you use in your territory structure and how you want to match these territory candidates to work objects.
Rules are defined for the execution of rule-based assignment. Rules are designed to return candidates based on whether these candidates match a set of criteria, are within a defined scoring range, or are of a specific classification.
Create the rules using the work objects, candidate objects, and attributes that you already established. When designing your rules, carefully consider how you want to match candidates to work objects. For example, would you want resources assigned based on their geographic location, their product knowledge, on the status or score of an object, or a combination of any of these attributes? Do you want to match candidates only, or would you like to match candidates and score them? In a multiple-candidate scenario, do you want to assign all matching candidates or only those who achieve higher than a specific score? Consider these questions before creating rules.
Territory-based assignment is based on intelligent mapping of sales account assignment object attributes and sales territory dimensions. The Sales Account Assignment object is used by Assignment Manager to identify the sales accounts and then determine which territories to assign. The table below lists sales account assignment object attributes and corresponding customer attributes as shown in Customer Center Profile and Classification nodes. See Configuring Assignment Manager: Critical Choices for more information about the assignment process.
|
Sales Account Assignment Object Attribute |
Corresponding Customer Center Attribute |
|---|---|
|
Geography ID |
Sell-to Address |
|
Industry |
Primary Industry: the primary classification code for the classification category defined in profile option Industry Classification Category. |
|
Organization Type |
Primary Organization Type: the primary classification code for the classification category Organization Type defined in profile option Industry Classification Category. |
|
Customer Size |
Customer Size |
|
Named Account Type |
Named Sales Account Indicator |
|
Party ID |
Party ID |
|
Auxiliary Dimension 1 |
the primary classification code for the classification category defined in profile option Industry Classification Category for Auxiliary Dimension 1. |
|
Auxiliary Dimension 2 |
the primary classification code for the classification category defined in profile option Industry Classification Category for Auxiliary Dimension 2. |
|
Auxiliary Dimension 3 |
the primary classification code for the classification category defined in profile option Industry Classification Category for Auxiliary Dimension 3. |
For territory-based assignment, you create work-object-to-candidate-object mappings during assignment object creation. These mappings are used to make candidate assignments. You can create multiple types of mappings for assignments. The following scenarios illustrate these different mappings:
Creating an attribute mapping
Creating a dimension mapping
Creating a literal mapping
You want to assign territories to a sales lead when the territory program ID is the same as the sales lead program ID. Create a mapping where the work object is sales lead and the candidate object is sales lead territory. Select the territory when the attribute territory program ID is equal to the sales lead attribute program ID.
Another example would be if you want to assign territories to a sales lead based when the territory manual account inclusion or exclusion is the same as the account on the sales lead. Create a mapping where the work object is sales lead and the candidate object is sales lead territory. Match the territory when the territory attribute account node integration (AccoutnNodeIntgId) ID is equal to the sales lead attribute party ID.
You want to assign territories to opportunity revenue
lines based on the product associated with the revenue line. Create
a mapping where the work object is opportunity revenue line, and the
candidate object is territory. Select the product dimension as the
mapping type. The candidate object low and high attributes correspond
to the names of the low sequence and high sequence attributes for
product on the territory. The work object low and high attributes
correspond to the names of the low sequence and high sequence attributes
for product on the revenue line. For example, the low sequence attribute
for product on the revenue line might be called ProdSeqLow.
Mapping using alternative attributes:
Using the same scenario of assigning territories to opportunity revenue
lines based on the product associated with the revenue line, you might
encounter a situation where a revenue line does not have a product
assigned to it, but it does have a product group assigned to it. Create
the same mapping that you created for the dimension mapping scenario,
and add the names of the low sequence and high sequence attributes
for product group for the work object alternate low and high attributes.
For example, the alternate low sequence attribute for product group
on the revenue line might be called ProdGrpSeqLow.
Mapping using default values: Using the same scenario of assigning territories to opportunity revenue lines based on the product associated with the revenue line, you might encounter a situation where the low sequence and high sequence attributes for product on a revenue line do not contain values when assignments are processed. Create the same mapping that you created for the dimension mapping scenario, and add low and high default values for the product attribute for revenue lines.
Literal mappings are a way of filtering the matched territories based on specific values of a territory attribute. You want to find only territories that are finalized (for example, territory status equals FINALIZED).
A task is a unit of work to be completed by one or more people by a specific completion date. When using tasks in your application, you should consider the following points:
Tasks
Task Templates
A task is defined with a description, due date and category. Each task has an owner, who oversees or is responsible for the task, and one or more assignees who perform the work. The task can be related to a business object, such as an Opportunity, a customer or, one or more external contacts. Tasks may also have Notes for general information, Attachments for tracking e-mail or project documents and Interactions which record customer communications.
Often a set of Tasks are performed repeatedly for a particular process and to support this administrators can define Task Templates, which represent a group of tasks. These task templates can be invoked by users working on a particular business object, for example a lead, campaign, or an opportunity. The user selects the appropriate task template for the goal they want to achieve and this creates the tasks and associates them with the business object being worked on. This saves the user from creating multiple tasks when an Opportunity reaches a particular sales stage, or the same set of tasks each time a marketing campaign is created.
Note
Extensibility features are available on the Task object. For more details refer to the article Extending CRM Applications : How It Works
The Sales Account assignments process can be scheduled and run on the Scheduled Process page. You need to have the 'Run Sales Party Batch Assignment' privilege to be able to define and run sales account batch assignment.
To access the Scheduled Process page, start on the Fusion Home page and click Navigator. Under the Tools heading, click Scheduled Processes.
Click Schedule New Process then click type Job. Choose the process named SalesAccountBatchAssignRequest. If needed, use the Search link at the bottom of the Search window.
Enter your process details. The following table shows the view criteria and its description, as well as any bind values that are required.
Work Object code: Sales_Account_Work_Object
Candidate Object Code: SalesAccountTerritory_Candidate_Object
Assignment Mode: Territory
View Criteria Name: (see table below)
View Criteria Bind Values: (see table below)
|
View Criteria Name |
View Criteria Description |
View Criteria Bind Values |
|---|---|---|
|
SalesAccountsUpdatedSinceVC |
Use this view criteria to assign sales accounts which
have not been previously assigned and have |
BindLastUpdateDate=[YYYY-MM-DD HH:MM:SS] |
|
SalesAccountsAssignedBeforeVC |
Use this view criteria to reassign sales accounts
which have been previously assigned and have |
BindLastAssignedDate=[YYYY-MM-DD] |
|
SalesAccountTerritoryBatchReassignmentVC |
Use this view criteria to reassign sales accounts impacted by the specified territory and territory dimensional realignment batch. This view criteria is also used internally to invoke immediate/automatic assignments after territory proposal activation and territory dimension updates. |
BindReassignmentBatchId=[Territory Reassignment Batch ID] |
|
SalesAccountBulkImportVC |
Use this view criteria to assign sales accounts created in a given customer import batch. This view criteria is also used internally to invoke immediate/automatic assignments after customer import. |
BindReassignmentBatchId=[Import Activity ID] |
|
SalesAccountDimsForPartyVC |
Use this view criteria to assign the sales account with the specified sales account ID. |
BindPartyId=[Sales Account ID] |
Define a schedule as needed using the Advanced button on the Process Details page. You can schedule the process to run as soon as possible, or to run at a given frequency and start date.
Submit your job and monitor it using the Scheduled Processes list, refreshing it to view the latest status updates.
When the assignment object inactive box is checked the selected work or candidate assignment object is not available for assignment processing. When the assignment attribute inactive box is checked the selected work or candidate object attribute is not available for assignment processing.
Note
The object or attribute cannot be set to inactive if there is a mapping set, mapping, or rule defined using the object or attribute.
Dimension Mapping: Dimension mapping should be used when the work object and candidate object attributes in the comparison are dimension attributes, such as Geography, Product, or Account. When creating the mapping, use the Function Code field to specify a unique identifier for the dimension. This identifier is passed to the translation function, in case the same function is used for multiple dimensions.
Attribute Mapping: This mapping enables you to compare and match attribute
values between a work object attribute and a candidate object attribute.
When the value of the candidate object attribute matches the work
object attribute the candidate is selected. Attribute mappings should
be used when the work object and candidate object attributes in the
comparison are non-dimensional attributes.For example,
consider a lead work object with a program ID attribute and the territory
object with program ID attribute. The selection criterion is: select Sales Lead Territories where Sales Lead
Territory.ProgramID equals Sales Lead.LeadProgramIDThe assignment
engine will use this mapping data to construct a query on the candidate
object that is equivalent to the selection criteria. When creating
the mapping, the Function Service and Function Code are only needed
if a translations function is used. The function code field is used
to specify a unique identifier for the attribute, and this identifier
is passed to the translation function.
Literal Mapping: Literal Mapping is used almost exclusively to filter the candidate
objects. This form of mapping enables the comparison of candidate
attributes against a specific value chosen by the user. The assignment
engine will compare the mapped candidate object attribute against
the specified literal value. For example, select the Territory Candidate
object that has the attribute TerrStatusCode that equals the value FINALIZED.
Note
For Literal Mappings ensure that the value entered corresponds to the Lookup Type Value code, not the meaning.
An internal, or deploying company, territory is defined, created, and assigned internal resources.
Examples of two internal territories are:
Sales Representative Territory (SRT) is the jurisdiction of responsibility of a sales representative over a set of sales accounts, leads and opportunities.
Lead Triage Territory (LTT) is the jurisdiction of responsibility of channel manager to triage partner Leads, that is approve leads and route to the right Partner.
A Partner territory is the jurisdiction of the reselling partner and contains partner resources. Specific Partner territories can be assigned to a sales account as needed.
Note
Territory Management must be implemented to utilize this feature.
Assignment Manager (part of Oracle Fusion Work Management) is used to determine matching territories for a given sales account. A sales account can also be assigned to one or more internal and partner territories.
All internal territories, such as Prime, Overlay and Sales Channel Manager territories, which match a given sales account's assignment attributes are assigned to the sales account. Internal territory assignment can be run immediately and automatically whenever sales account assignment or reassignment is required. For example, you can run assignment manager when a sales account is created or updated, or when territories are realigned. Internal territory assignment can also be scheduled to run in a batch, or it can be run on-demand via the Assign Territories action in the sales account team page.
Partner territories are applicable to Partner Relationship Management implementations. When a partner lead is approved, any partner territories associated to the lead are automatically assigned to the lead's sales account. Channel sales manager can also select specific partner territories to assign to a sales account via the Add Partner Territories action in the sales account team page.
Note
Territory Management must be implemented to utilize this feature.
Internal territories get assigned to sales accounts in the following scenarios.
When sales accounts are created.
When a sell-to address is added to an existing sales party.
When sales accounts are imported in bulk.
When certain attributes on sales accounts that correspond with territory assignment dimensions are updated.
When batch assignment is run.
When you select the Assign Territories menu action on the Sales Account Team node for the sales account
When territories are realigned or when personnel leave the territory or the company.
Note
The following profile options determine whether territory assignment and reassignment is automatic for sales accounts. The default setting for both is YES.
Sales Account Automatic Assignment on Create Enabled
Sales Account Automatic Assignment on Update Enabled
Automatic assignments are always enabled following an import, party merge and territory realignment.
During initial implementation and migration, it is
possible to create sales accounts before territories have been set
up in the system. These sales accounts will not receive any territory
assignment because there are no territories. These accounts need to
be explicitly assigned when territories are configured and activated
in the system. This is one exception which does not have immediate/automatic
assignment. The recommendation is to run a batch assignment to assign
these sales accounts created at the beginning of the implementation
using the view criteria SalesAccountsUpdatedSinceVC.
Partner territories get assigned to sales accounts in the following scenarios.
When a partner-generated lead is approved, all partner territories associated to the partner-generated lead are automatically assigned to the sales account.
Users with the privilege Manage Sales Party Partner Territory can assign partner territories from the sales account team UI.
Note
Territory Management must be implemented to utilize this feature.
This example illustrates how to create a task template that represents a business process.
A sales manager wants to create a task template for her department's client product demonstration process.
The client product demonstration process occurs regularly. The sales manager does not want to manually create tasks for this process every time it occurs, so she decides to create a task template that includes the business process activities. Each time she repeats the business process, she can use the task template to automatically generate the appropriate tasks that need to be performed.
The business process consists of the following activities:
Book a conference room.
Create an agenda.
Confirm the date and time with the client.
Make arrangements with presenters.
Deliver product demonstration.
Follow up with client.
Based on the analysis of the business process, the following task template is created:
Task Template Name: Client Product Demonstration
|
Task |
Category |
Lead Days |
Duration Days |
|---|---|---|---|
|
Book conference room |
Preparation |
1 |
1 |
|
Create agenda |
Preparation |
1 |
1 |
|
Confirm date and time with client |
Call |
5 |
1 |
|
Schedule presenters |
Preparation |
5 |
2 |
|
Deliver demonstration |
Demonstration |
7 |
1 |
|
Follow up with client |
Call |
10 |
1 |
A note is a record attached to a business object that is used to capture nonstandard information received while conducting business. When setting up notes for your application, you should consider the following points:
Note Types
Note Type Mappings
Note types are assigned to notes at creation to categorize them for future reference. During setup you can add new note types, and you can restrict them by business object type through the process of note type mapping.
After note types are added, you must map them to the business objects applicable to your product area. Select a business object other than Default Note Types. You will see the note types only applicable to that object. If the list is empty, note type mapping doesn't exist for that object, and default note types will be used. Select Default Note Types to view the default note types in the system. Modifying default note types will affect all business objects without a note type mapping. For example, you have decided to add a new note type of Analysis for your product area of Sales-Opportunity Management. Use the note type mapping functionality to map Analysis to the Opportunity business object. This will result in the Analysis note type being an available option when you are creating or editing a note for an opportunity. When deciding which note types to map to the business objects in your area, consider the same issues you considered when deciding to add new note types. Decide how you would like users to be able to search for, filter, and report on those notes.
Note
Extensibility features are available on the Note object. For more information refer to the article Extending CRM Applications: how it works.
Create the task template with a subtype of Assessment.
A score of 0 is assigned for free-form responses.
A free-form response option will have no effect on the overall assessment score. The free-form response offers the opportunity to enter a textual response to a question that does not conform to any of the pre-populated responses provided by the assessment template.
A question group is a logical grouping of questions within an assessment template, and it is used strictly as a category header for those questions. Through careful naming of a question group, you can achieve the benefit of providing the user of the template with an approximate idea of the type of questions to expect in each group.
This step lists all of the assessment template questions in one place, and provides you with the opportunity to edit weights as necessary to ensure that the sum of all weights totals 100.
|
Copyright © 2011-2012, Oracle and/or its affiliates. All rights reserved. Legal Notices |
|