11g Release 5 (11.1.5)
Part Number E20374-05
Contents
Contact
Us
|
Oracle® Fusion
Accounting Hub Implementation Guide 11g Release 5 (11.1.5) Part Number E20374-05 |
Contents |
Contact Us |
|
Previous |
Next |
This chapter contains the following:
Financial Reporting Center Configuration: How It Works
Setting Up Your Financial Reporting Center: Critical Choices
Oracle Fusion General Ledger Report Listing
The Oracle Fusion Financial Reporting Center provides functionality for reporting on Oracle Fusion General Ledger balances. It provides secure, self-service access to reports that use real time account information.
You can design traditional financial report formats such as balance sheets, profit and loss statements, and cash flow reports. You can also design nontraditional formats for financial or analytic data that include text and graphics.
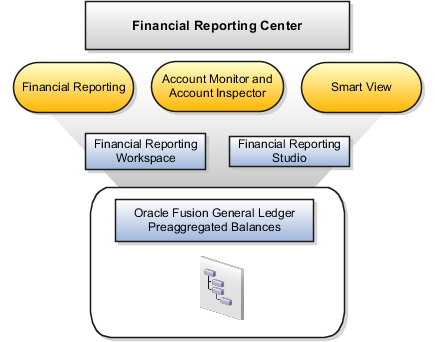
Financial Reporting Center is comprised of numerous components:
Financial Reporting: Financial users and analysts access live reports and books or published snapshot reports and books from previously scheduled batches in a variety of formats. Other functionality includes:
Refreshing report data using runtime points of view or parameters
Drill through capability from parents to other parents
Drill down to detail balances, journal lines, and subledger transactions.
Smart View: Financial analysts view, import, manipulate, distribute, and share data from your Oracle Fusion General Ledger balances in Microsoft Excel.
Account Monitor and Account Inspector: Financial analysts monitor and track key account balances in real time at every level of your dimensions and hierarchies. These tools provide multidimensional account analysis and drill down capability.
Workspace: Reporting administrators create, open, save, and delete folders and store report objects, reports, and snapshot reports.
Financial Reporting Studio: Report authors use an object-oriented graphical report layout with report objects, such as text boxes, grids, images, and charts, to design reports.
Oracle Fusion Financial Reporting Center is a powerful tool for accessing, designing, and presenting financial reports and analytic data. The steps needed to configure and install the components in Financial Reporting Center consist of:
Configuring Financial Reporting Center
Installing and Configuring Financial Reporting Studio (Performed by the end user.)
Installing Smart View (Performed by the end user.)
Configuring Workspace Database Connection (Performed by the administrator.)
Installing and Configuring Financial Reporting Print Server (Performed by the administrator.)
Users access reports through the folder structure in Workspace. Enter the user name, password, server, and report structure. Administrators define the folder structure in Workspace considering security requirements for both folder and reports, as well as report distribution requirements for financial reporting batches. Security should be set up on folders and reports from Workspace so users can only view the folders and the reports that they can access.
Financial Reporting Studio is client-based software. If you access Oracle Fusion Applications from Oracle Public Cloud, you will connect to the Financial Reporting Studio through a window remote desktop. Otherwise, report authors need to download the installation files from Navigator > Tools > Download Desktop Integrator Installer to install Financial Reporting Studio. After completing the installation, you can obtain financial reporting server information to connect to by following the steps below:
Open Navigator > Financial Reporting Center > Workspace.
Edit the Workspace URL and remove workspace/index.jsp.
For example, if the Workspace URL is https://fusionsystemtest-p-external-bi.us.oracle.com/workspace/index.jsp, it should now appear as https://fusionsystemtest-p-external-bi.us.oracle.com/ for the Financial Reporting Studio.
Launch Financial Reporting Studio.
Copy the modified URL to the Server URL field.
Smart View is an Excel add-in that must be loaded to each client. To download the installation files from the Navigator > Tools > Download Desktop Integrator Installer to install.
Note
Since Smart View is an add-in to Microsoft Office products, you can install Smart View only on a Windows operating system.
Once Smart View is installed, it must be configured to connect to Oracle Fusion Applications. This is done using the Smart View Shared Connections URL. You can derive the Smart View Shared Connections URL by following the steps below:
Launch Workspace from the Financial Reporting Center.
Edit the Workspace URL, for example, https://fusionsystemtest-p-external-bi.us.oracle.com/workspace/index.jsp. Remove index.jsp and add SmartViewProviders at the end of the URL to launch Smart View.
Note
For example, the URL now appears as https://fusionsystemtest-p-external-bi.us.oracle.com/workspace/SmartViewProviders.
Copy the URL.
Launch Excel.
Navigate to the Smart View menu > Options > Advanced.
Paste the URL in the Shared Connections URL field.
Go to the Smart View menu > Open -> Shared Connections.
Note
The login window is displayed.
Enter your user name and password.
Click Shared Connections > Select Server to Proceed.
In the Add New Server field, add the Essbase server.
Note
The Essbase server URL is the BI Managed Server host (internal) and port 10215. For example: slcac.us.oracle.com:10215. If you are unsure of the host name for the internal BI host, contact your system administrator. You must enter the internal BI host in this URL or drill through functionality won't work.
For more information on configuring Smart View client for users, see Oracle Hyperion Smart View for Office, Fusion Edition User's Guide for Oracle Hyperion Smart View.
Administrators need to create database connections from Workspace so users can access the cubes from either Workspace or Financial Reporting Studio.
Note
Ledger setup has to be completed before the database connection can be created. Oracle Fusion General Ledger balances cubes are created as part of ledger setup. There is a separate cube for each combination of chart of accounts and accounting calendar. A database connection is needed for each cube.
Steps to define a database connection are:
Start at the Navigator by selecting Financial Reporting Center > Launch Workspace
From within Workspace > Navigator > BI Catalog > (main tab), select Tools > Database Connection Manager
Select New button
Enter a user friendly name for the connection
Enter the Essbase server, user and password, and select Application (i.e. cube) and database
For more information on configuring Essbase database connections in Workspace see: Oracle Essbase Database Administrator's Guide for Oracle Essbase
Note
The database connection is available in both Workspace and Financial Reporting Studio. Optionally, it can be setup in Financial Reporting Studio when putting grids on a report. This should only be done by an administrator.
To enable users view and print the reports, administrators need to install and configure the Financial Reporting Print Server available with Oracle Business Intelligence. However, check for the following prerequisites before the installation:
Install the Financial Reporting Studio.
If you have an earlier release of the Financial Reporting Print Server, stop and disable the Financial Reporting Print Server Windows service, and delete HRPrinter1-5 from Windows printers.
Ensure that a supported 32-bit version of Ghostscript is installed.
Perform the following steps to complete the installation.
Obtain a Windows machine (either 32-bit or 64-bit) to install and configure the Financial Reporting Print Server.
Sign in to Oracle Business Intelligence Enterprise Edition.
Open Navigator > Financial Reporting Center > Workspace.
If you have not already installed Financial Reporting Studio, you can download and install the Financial Reporting Studio from Navigator > Tools > Download Desktop Integrator Installer.
Follow the instructions to complete the installation. By default, the Financial Reporting Studio is installed in the Program Files/Oracle/FinancialReportingStudio directory.
In the Program Files\Oracle\FinancialReportingStudio\products\financialreporting\install\bin\ directory, search for the FRSetupPrintServer.properties file and open it with a text editor.
For the following attributes, specify the Financial Reporting Server URL and administrator credentials used to register the Financial Reporting Print Server:
FRWebServer=http://<name of the server>:<port number>
AdminUser= <Administrator user name>
AdminPassword=<password>
Note
The server URL specified here is the same one used when connecting from the Financial Reporting Studio.
To configure and register the Financial Reporting Print Server, in the Windows command prompt, navigate to FinancialReportingStudioInstallationLocation/products/financialreporting/install/bin/ and run the following command:
FRSetupPrintServer.cmd
The Financial Reporting Print Server is now installed and configured for use. You should be able to view the reports in PDF. However, to ensure that everything is running as required, verify the following:
Financial Reporting Print Server service has been created and has started automatically.
The FRPrintLogging.log file is created in the directory Program Files\Oracle\FinancialReportingStudio\diagnostics\logs\FinancialReporting.
The PrintServers property in the Financial Reporting MBeans in JConsole displays
the Financial Reporting Print Server machine and port (the default
port is 8297). This property may show multiple Financial Reporting
Print Servers if more than one have been configured.
The server name and port of the Financial Reporting Print Server can be reached from the Financial Reporting Web Application server machine(s).
Oracle Fusion General Ledger provides predefined reports that are used in the close process and to verify setup of the accounting configuration.
The following tables are the lists of predefined reports by type.
Account Analysis Reports
|
Process Name |
Display Name |
Description |
Classification |
|---|---|---|---|
|
GLACTANL2 |
Account Analysis |
Prints balances by account segment and a secondary segment for each journal entry, and lists the subledger document number for transactions imported from subledgers. |
Oracle Fusion Transactional Business Intelligence (OTBI) |
|
GLRFCLD |
General Ledger Report |
Provides journal information to trace each transaction back to its original source. Prints a separate page for each balancing segment value. For each journal line, prints the account affected, the concatenated description, the journal line amount, and the beginning and ending account balance. Additionally, for each journal line, prints journal details including source, category, journal name, and effective date. Lists accounts in ascending order by account segment value, and prints a CR next to credit amounts. |
BI Publisher |
|
GLWACCTR |
Account Analysis for Contra Account Report |
Prints balances by account segment and a secondary segment, lists the contra account for each journal entry, and lists the subledger document number for transactions imported from subledgers. Print this report by date range, accounting flexfield range, contra account, and amount range. |
BI Publisher |
|
GLXAVADT |
Average Balance Audit Account Analysis Report |
Displays the detail account activity which created the aggregate balances and related average balances. Used to research how average balances are calculated for an account. Displays daily average balance information for the selected accounts for the specified range of dates. Contains parameters such as the as-of reporting date, average balance type (period, quarter, or year average-to-date), and account ranges. |
Oracle Business Intelligence Publisher (BI Publisher) |
Journal Reports
|
Process Name |
Display Name |
Description |
Classification |
|---|---|---|---|
|
GLJRNL |
Journals Report |
Provides journal activity for a given period or range of periods, balancing segment value, currency, and range of account segment values. Prints the accounting date, category, journal name, reference, journal batch name, entered debit or credit amounts, net balance, and account total for each journal. In addition, a total is provided for each balancing segment and a grand total is provided for all the activity included. |
BI Publisher |
|
GLRXVCJ |
General Journals Report |
Provides journal activity for a given period or range of periods, balancing segment value, currency, and range of account segment values. |
OTBI |
|
GLYRLJRE |
Journals Batch Summary Report |
Lists posted journal batches for a particular ledger, balancing segment value, currency, and date range. Provides information on actual balances for your journal batches, source, batch, and posting dates, total entered debits and credits, and sorts the information by journal batch within each journal entry category. In addition, totals are provided for each journal category and a grand total for each ledger and balancing segment value combination included in your report. Does not report on budget or encumbrance balances. |
BI Publisher |
|
GLRXCKJ |
Journals Check Report |
Provides information on manually entered journals prior to posting, including field by field, all data entered into the system or data imported from external sources. |
BI Publisher |
|
GLRXDBJ |
Journals Day Book Report |
Provides posted journal entries and journal details chronologically by accounting date for a specified range of dates, journal source, and journal category. For each accounting date, journal entries are sorted by document number. Prints the accounting date, document number, journal entry name, journal source and category, subledger document name and number, currency, and conversion rate. For each journal line, it also prints the line number, account segment value and description, functional debit and credit amounts, description, and cost center segment value. |
BI Publisher |
Trial Balance Reports
|
Process Name |
Display Name |
Description |
Classification |
|---|---|---|---|
|
GLTRBAL |
Trial Balance Report |
Provides summarized actual account balances and activity by ledger, balancing segment, and account segment value. |
BI Publisher and OTBI |
|
GLXAVTRB |
Trial Balance - Average Balances |
Provides a listing of ending balances and average balances for selected accounts based on an as of date specified. Print the ledger currency or foreign-entered balances. In addition, displays period, quarter, and year average-to-date balances. Request additional information by specifying balancing segments and account ranges. |
BI Publisher |
Reconciliation Reports
|
Process Name |
Display Name |
Description |
Classification |
|---|---|---|---|
|
GLReconciliationReport |
Cash to General Ledger Reconciliation Report |
Extracts cash management and general ledger accounting and transactional data for reconciling cash management to the general ledger. |
BI Publisher |
|
Payables to Ledger Reconciliation Report |
Payables to Ledger Reconciliation Report |
Provides both summarized and detailed reconciling data for review. Shows payables and accounting beginning and ending balances, as well as summarized activity for the period and how this activity was accounted. |
OTBI |
|
Receivables to Ledger Reconciliation Report |
Receivables to Ledger Reconciliation Report |
Provides reconciliation of receivables data to the general ledger. Shows receivables and accounting beginning and ending balances, as well as summarized activity for the period and how the activity was accounted. |
OTBI |
Chart of Accounts Reports
|
GLXBSVA |
Balancing Segment Value Assignments Report |
Reports on the assignment of primary balancing segment values to legal entities and ledgers across accounting setups. Allows quick identification of overlapping balancing segment value errors and reviews of any unassigned values. The application does not check for overlapping balancing segment values online. |
BI Publisher |
|
GLXCOCRR |
Chart of Accounts Mapping Rules Report |
Provides both the segment and account rules defined for a specific chart of accounts mapping. If the mapping has account rules, prints each subsidiary account range and the parent account into which it maps. If the mapping has segment rules, prints the rule name and the parent and subsidiary segments. If the mapping has a rollup range rule, prints each subsidiary segment value range and its corresponding parent segment value. |
BI Publisher |
The reports classified as Oracle Business Intelligence Publisher (BI Publisher) are scheduled and run from the Scheduled Processes work area on the Navigator menu.
Click the Schedule New Process button
Search on the Process Name.
Enter the desired parameters.
Enter the desired process options and schedule.
Click Submit.
All the reports including those classified as Oracle Fusion Transactional Business Intelligence (OTBI) are accessed from the Reports and Analytics pane on the Navigator menu or from dashboards, where the reports are saved. The report links in the Reports and Analytics pane open in the Oracle Business Intelligence Catalog where reports can be edited, printed, and reviewed.
|
Previous |
Next |
Copyright © 2011-2012, Oracle and/or its affiliates. All rights reserved. Legal Notices |
Contents |
Contact Us |